How to configure PVS-Studio in Travis CI using the PSP game console emulator as an example

Travis CI is a distributed web service for building and testing software that uses GitHub as a source code hosting. In addition to the above scenarios, you can add your own, thanks to the extensive configuration options. In this article, we will configure Travis CI to work with PVS-Studio using the example PPSSPP code.
Introduction
Travis CI is a web service for building and testing software. Usually it is used in conjunction with the practice of continuous integration.
PPSSPP - PSP game console emulator. The program is able to emulate the launch of any games from disk images designed for Sony PSP. The program was released on November 1, 2012. PPSSPP is licensed under the GPL v2. Anyone can make improvements to the source code of the project .
PVS-Studio is a static code analyzer for searching for errors and potential vulnerabilities in program code. In this article, for a change, we will launch PVS-Studio not locally on the developer's machine, but in the cloud, and look for errors in PPSSPP.
Configure Travis CI
We will need a repository on GitHub, where the project we need lies, as well as a key for PVS-Studio (you can get a trial key or free for Open Source projects ).
Let's go to the Travis CI website. After authorization using the GitHub account, we will have a list of repositories:
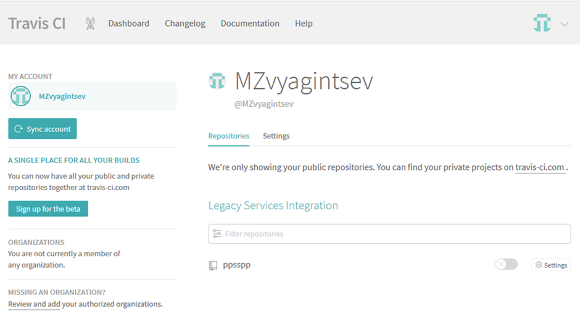
For the test, I forked PPSSPP.
We activate the repository that we want to collect:
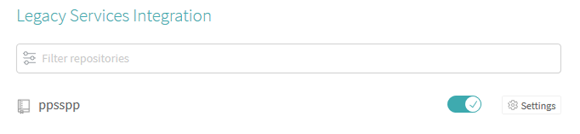
At the moment, Travis CI cannot assemble our project, since there are no instructions for the assembly. Therefore, it is time for configuration.
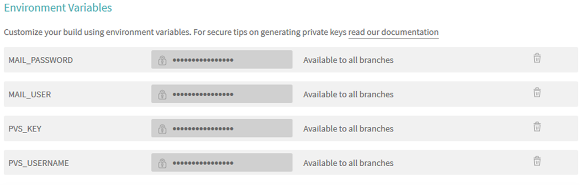
During the analysis, some variables will be useful to us, for example, the key for PVS-Studio, which would be undesirable to specify in the configuration file. So add environment variables using build settings in Travis CI:

We will need:
- PVS_USERNAME - username
- PVS_KEY - key
- MAIL_USER - email that will be used to send the report
- MAIL_PASSWORD - email password
The last two are optional. They will be used to send the results by mail. If you want to send the report in another way, then you do not need to specify them.
So, we added the environment variables we need:
Now create a .travis.yml file and put it in the root of the project. The configuration file for Travis CI already existed in PPSSPP, however, it was too large and completely unsuitable for the example, so I had to significantly simplify it and leave only the basic elements.
First, we indicate the language, the version of Ubuntu Linux that we want to use in the virtual machine, and the necessary packages for the assembly:
language: cpp dist: xenial addons: apt: update: true packages: - ant - aria2 - build-essential - cmake - libgl1-mesa-dev - libglu1-mesa-dev - libsdl2-dev - pv - sendemail - software-properties-common sources: - sourceline: 'ppa:ubuntu-toolchain-r/test' - sourceline: 'ppa:ubuntu-sdk-team/ppa'
All packages that are listed are for PPSSPP only.
Now specify the assembly matrix:
matrix: include: - os: linux compiler: "gcc" env: PPSSPP_BUILD_TYPE=Linux PVS_ANALYZE=Yes - os: linux compiler: "clang" env: PPSSPP_BUILD_TYPE=Linux
A bit more about the matrix section. In Travis CI, there are two ways to create build options: the first is to list the compilers, types of operating systems, environment variables, etc., after which a matrix of all possible combinations is generated; the second is an explicit indication of the matrix. Of course, you can combine these two approaches and add a unique case, or, alternatively, exclude using the exclude section. Read more about this in the Travis CI documentation .
It remains to specify project-specific assembly instructions:
before_install: - travis_retry bash .travis.sh travis_before_install install: - travis_retry bash .travis.sh travis_install script: - bash .travis.sh travis_script after_success: - bash .travis.sh travis_after_success
Travis CI allows you to add your own teams for various stages of the life of a virtual machine. The before_install section is performed before installing the packages. Then install , which follows the installation of packages from the addons.apt list, which we indicated above. The assembly itself takes place in a script . If everything went well, then we get into after_success (it is in this section that we will run static analysis). These are not all the steps that can be modified; if you need more, then you should look in the Travis CI documentation .
For ease of reading, the commands were moved to a separate script .travis.sh , which is placed in the root of the project.
So we have the following .travis.yml file:
language: cpp dist: xenial addons: apt: update: true packages: - ant - aria2 - build-essential - cmake - libgl1-mesa-dev - libglu1-mesa-dev - libsdl2-dev - pv - sendemail - software-properties-common sources: - sourceline: 'ppa:ubuntu-toolchain-r/test' - sourceline: 'ppa:ubuntu-sdk-team/ppa' matrix: include: - os: linux compiler: "gcc" env: PVS_ANALYZE=Yes - os: linux compiler: "clang" before_install: - travis_retry bash .travis.sh travis_before_install install: - travis_retry bash .travis.sh travis_install script: - bash .travis.sh travis_script after_success: - bash .travis.sh travis_after_success
Before installing the packages, update the submodules. This is needed to build PPSSPP. Add the first function to .travis.sh (pay attention to the extension):
travis_before_install() { git submodule update --init --recursive }
Now we have come directly to setting up PVS-Studio to start automatically in Travis CI. First, we need to install the PVS-Studio package on the system:
travis_install() { if [ "$CXX" = "g++" ]; then sudo apt-get install -qq g++-4.8 fi if [ "$PVS_ANALYZE" = "Yes" ]; then wget -q -O - https://files.viva64.com/etc/pubkey.txt \ | sudo apt-key add - sudo wget -O /etc/apt/sources.list.d/viva64.list \ https://files.viva64.com/etc/viva64.list sudo apt-get update -qq sudo apt-get install -qq pvs-studio \ libio-socket-ssl-perl \ libnet-ssleay-perl fi download_extract \ "https://cmake.org/files/v3.6/cmake-3.6.2-Linux-x86_64.tar.gz" \ cmake-3.6.2-Linux-x86_64.tar.gz }
At the beginning of the travis_install function , we install the compilers we need using environment variables. Then, if the variable $ PVS_ANALYZE stores the value Yes (we specified it in the env section during the configuration of the assembly matrix), we install the pvs-studio package. In addition to it, the packages libio-socket-ssl-perl and libnet-ssleay-perl are also indicated, however, they are needed to send the results by mail, so they are not necessary if you chose a different method of report delivery.
The download_extract function downloads and unpacks the specified archive:
download_extract() { aria2c -x 16 $1 -o $2 tar -xf $2 }
It is time to put together a project. This happens in the script section:
travis_script() { if [ -d cmake-3.6.2-Linux-x86_64 ]; then export PATH=$(pwd)/cmake-3.6.2-Linux-x86_64/bin:$PATH fi CMAKE_ARGS="-DHEADLESS=ON ${CMAKE_ARGS}" if [ "$PVS_ANALYZE" = "Yes" ]; then CMAKE_ARGS="-DCMAKE_EXPORT_COMPILE_COMMANDS=On ${CMAKE_ARGS}" fi cmake $CMAKE_ARGS CMakeLists.txt make }
In fact, this is a simplified original configuration, with the exception of these lines:
if [ "$PVS_ANALYZE" = "Yes" ]; then CMAKE_ARGS="-DCMAKE_EXPORT_COMPILE_COMMANDS=On ${CMAKE_ARGS}" fi
In this section of code, we set the export flag of compilation commands for cmake . This is necessary for a static code analyzer. You can read more about this in the article " How to run PVS-Studio on Linux and macOS ".
If the assembly was successful, then we end up in after_success , where we perform a static analysis:
travis_after_success() { if [ "$PVS_ANALYZE" = "Yes" ]; then pvs-studio-analyzer credentials $PVS_USERNAME $PVS_KEY -o PVS-Studio.lic pvs-studio-analyzer analyze -j2 -l PVS-Studio.lic \ -o PVS-Studio-${CC}.log \ --disableLicenseExpirationCheck plog-converter -t html PVS-Studio-${CC}.log -o PVS-Studio-${CC}.html sendemail -t mail@domain.com \ -u "PVS-Studio $CC report, commit:$TRAVIS_COMMIT" \ -m "PVS-Studio $CC report, commit:$TRAVIS_COMMIT" \ -s smtp.gmail.com:587 \ -xu $MAIL_USER \ -xp $MAIL_PASSWORD \ -o tls=yes \ -f $MAIL_USER \ -a PVS-Studio-${CC}.log PVS-Studio-${CC}.html fi }
Let us consider the following lines in more detail:
pvs-studio-analyzer credentials $PVS_USERNAME $PVS_KEY -o PVS-Studio.lic pvs-studio-analyzer analyze -j2 -l PVS-Studio.lic \ -o PVS-Studio-${CC}.log \ --disableLicenseExpirationCheck plog-converter -t html PVS-Studio-${CC}.log -o PVS-Studio-${CC}.html
The first line generates a license file from the username and key that we specified at the very beginning when setting up the Travis CI environment variables.
The second line starts the analysis directly. The -j <N> flag sets the number of streams for analysis, the -l <file> flag indicates the license, the -o <file> flag defines the file for log output, and the -disableLicenseExpirationCheck flag is necessary for trial versions, since by default pvs- studio-analyzer will warn the user about the expiration of the license. To prevent this, you can specify this flag.
The log file contains raw output that cannot be read without conversion, so you must first make the file readable. We skip the logs through the plog-converter , and the output is an html file.
In this example, I decided to send reports by mail using the sendemail command.
As a result, we got the following .travis.sh file:
#/bin/bash travis_before_install() { git submodule update --init --recursive } download_extract() { aria2c -x 16 $1 -o $2 tar -xf $2 } travis_install() { if [ "$CXX" = "g++" ]; then sudo apt-get install -qq g++-4.8 fi if [ "$PVS_ANALYZE" = "Yes" ]; then wget -q -O - https://files.viva64.com/etc/pubkey.txt \ | sudo apt-key add - sudo wget -O /etc/apt/sources.list.d/viva64.list \ https://files.viva64.com/etc/viva64.list sudo apt-get update -qq sudo apt-get install -qq pvs-studio \ libio-socket-ssl-perl \ libnet-ssleay-perl fi download_extract \ "https://cmake.org/files/v3.6/cmake-3.6.2-Linux-x86_64.tar.gz" \ cmake-3.6.2-Linux-x86_64.tar.gz } travis_script() { if [ -d cmake-3.6.2-Linux-x86_64 ]; then export PATH=$(pwd)/cmake-3.6.2-Linux-x86_64/bin:$PATH fi CMAKE_ARGS="-DHEADLESS=ON ${CMAKE_ARGS}" if [ "$PVS_ANALYZE" = "Yes" ]; then CMAKE_ARGS="-DCMAKE_EXPORT_COMPILE_COMMANDS=On ${CMAKE_ARGS}" fi cmake $CMAKE_ARGS CMakeLists.txt make } travis_after_success() { if [ "$PVS_ANALYZE" = "Yes" ]; then pvs-studio-analyzer credentials $PVS_USERNAME $PVS_KEY -o PVS-Studio.lic pvs-studio-analyzer analyze -j2 -l PVS-Studio.lic \ -o PVS-Studio-${CC}.log \ --disableLicenseExpirationCheck plog-converter -t html PVS-Studio-${CC}.log -o PVS-Studio-${CC}.html sendemail -t mail@domain.com \ -u "PVS-Studio $CC report, commit:$TRAVIS_COMMIT" \ -m "PVS-Studio $CC report, commit:$TRAVIS_COMMIT" \ -s smtp.gmail.com:587 \ -xu $MAIL_USER \ -xp $MAIL_PASSWORD \ -o tls=yes \ -f $MAIL_USER \ -a PVS-Studio-${CC}.log PVS-Studio-${CC}.html fi } set -e set -x $1;
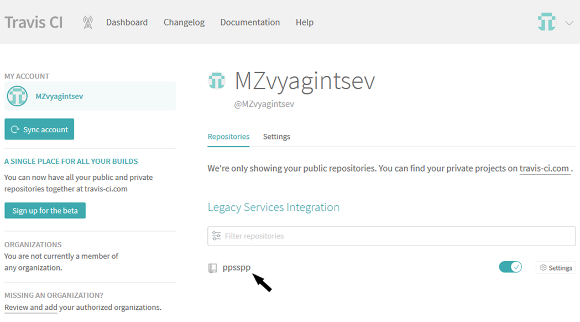
It is time to add the changes to the git repository, after which Travis CI will automatically start the build. Click on “ppsspp” to go to build reports:
We will see an overview of the current assembly:

If the assembly is successfully completed, we will receive an email with the results of the static analysis. Of course, mailing is not the only way to get a report. You can choose any implementation method. But it is important to remember that after the assembly is completed it will be impossible to access the files of the virtual machine.
Summary of errors
We have successfully completed the most difficult part. Now let's make sure that all our efforts are justified. Consider some interesting points from the report on static analysis, which came to me by mail (not for nothing I pointed it out).
Dangerous optimization
void sha1( unsigned char *input, int ilen, unsigned char output[20] ) { sha1_context ctx; sha1_starts( &ctx ); sha1_update( &ctx, input, ilen ); sha1_finish( &ctx, output ); memset( &ctx, 0, sizeof( sha1_context ) ); }
PVS-Studio Warning: V597 The compiler could delete the 'memset' function call, which is used to flush 'sum' buffer. The RtlSecureZeroMemory () function should be used to erase the private data. sha1.cpp 325
This code fragment is located in the secure hashing module, however, it contains a serious security flaw ( CWE-14 ). Consider the assembler listing that is generated when compiling the Debug version:
; Line 355 mov r8d, 20 xor edx, edx lea rcx, QWORD PTR sum$[rsp] call memset ; Line 356
Everything is in perfect order, and the memset function is executed, thereby overwriting important data in RAM, however, do not rejoice so far. Consider the assembler listing of the Release version with optimization:
; 354 : ; 355 : memset( sum, 0, sizeof( sum ) ); ; 356 :}
As can be seen from the listing, the compiler ignored the memset call. This is because the sha1 function no longer calls the ctx structure after calling memset . Therefore, the compiler does not see the point of wasting processor time overwriting unused memory in the future. You can fix this by using the RtlSecureZeroMemory function or similar .
Right:
void sha1( unsigned char *input, int ilen, unsigned char output[20] ) { sha1_context ctx; sha1_starts( &ctx ); sha1_update( &ctx, input, ilen ); sha1_finish( &ctx, output ); RtlSecureZeroMemory(&ctx, sizeof( sha1_context ) ); }
Extra comparison
static u32 sceAudioOutputPannedBlocking (u32 chan, int leftvol, int rightvol, u32 samplePtr) { int result = 0; // For some reason, this is the only one that checks for negative. if (leftvol > 0xFFFF || rightvol > 0xFFFF || leftvol < 0 || rightvol < 0) { .... } else { if (leftvol >= 0) { chans[chan].leftVolume = leftvol; } if (rightvol >= 0) { chans[chan].rightVolume = rightvol; } chans[chan].sampleAddress = samplePtr; result = __AudioEnqueue(chans[chan], chan, true); } }
PVS-Studio warning : V547 Expression 'leftvol> = 0' is always true. sceAudio.cpp 120
Pay attention to the else branch for the first if . The code will be executed only if all conditions are leftvol> 0xFFFF || rightvol> 0xFFFF || leftvol <0 || rightvol <0 will turn out to be false. Therefore, we get the following statements that will be true for the else branch: leftvol <= 0xFFFF , rightvol <= 0xFFFF , leftvol> = 0 and rightvol> = 0 . Pay attention to the last two statements. Does it make sense to check what is a necessary condition for the execution of this piece of code?
So we can calmly remove these conditional statements:
static u32 sceAudioOutputPannedBlocking (u32 chan, int leftvol, int rightvol, u32 samplePtr) { int result = 0; // For some reason, this is the only one that checks for negative. if (leftvol > 0xFFFF || rightvol > 0xFFFF || leftvol < 0 || rightvol < 0) { .... } else { chans[chan].leftVolume = leftvol; chans[chan].rightVolume = rightvol; chans[chan].sampleAddress = samplePtr; result = __AudioEnqueue(chans[chan], chan, true); } }
Another scenario. Behind these redundant conditions is some kind of error. Perhaps they checked not what is required.
Ctrl + C Ctrl + V Strikes Back
static u32 scePsmfSetPsmf(u32 psmfStruct, u32 psmfData) { if (!Memory::IsValidAddress(psmfData) || !Memory::IsValidAddress(psmfData)) { return hleReportError(ME, SCE_KERNEL_ERROR_ILLEGAL_ADDRESS, "bad address"); } .... }
V501 There are identical sub-expressions '! Memory :: IsValidAddress (psmfData)' to the left and to the right of the '||' operator. scePsmf.cpp 703
Pay attention to the check inside if . Doesn’t it seem strange to you that we check if the address psmfData is valid twice as much? So it seems strange to me ... In fact, we have, of course, a typo, and the idea was to check both input parameters.
The correct option:
static u32 scePsmfSetPsmf(u32 psmfStruct, u32 psmfData) { if (!Memory::IsValidAddress(psmfStruct) || !Memory::IsValidAddress(psmfData)) { return hleReportError(ME, SCE_KERNEL_ERROR_ILLEGAL_ADDRESS, "bad address"); } .... }
Forgotten variable
extern void ud_translate_att( int size = 0; .... if (size == 8) { ud_asmprintf(u, "b"); } else if (size == 16) { ud_asmprintf(u, "w"); } else if (size == 64) { ud_asmprintf(u, "q"); } .... }
PVS-Studio warning : V547 Expression 'size == 8' is always false. syn-att.c 195
This error is located in the ext folder, so it doesn’t quite apply to the project, but the error was found before I noticed this, so I decided to leave it. Still, this article is not about a review of errors, but about integration with Travis CI, and no configuration of the analyzer was carried out.
The variable size is initialized with a constant, however, it is not used at all in the code, up to the if statement , which, of course, returns false when checking the condition, because, as we recall, size is zero. Subsequent checks do not make sense either.
Apparently, the author of the code fragment forgot about overwriting the size variable before this.
Stop
On this, perhaps, we end up with errors. The purpose of this article is to demonstrate the work of PVS-Studio in conjunction with Travis CI, and not to analyze the project as thoroughly as possible. If you want more and more beautiful mistakes, then you can always admire them here :).
Conclusion
Using web services to build projects in conjunction with the practice of incremental analysis can detect many problems immediately after code merging. True, a single assembly may not be enough, so setting up testing in conjunction with static analysis will significantly improve the quality of the code.
useful links

If you want to share this article with an English-speaking audience, then please use the link to the translation: Maxim Zvyagintsev. How to set up PVS-Studio in Travis CI using the example of PSP game console emulator .
All Articles