How to run a java project on a shell runner when pushing to a GitLab repository
My name is Ivan Sidorenko, I am a testing engineer at Digital Design. My task was to implement the launch of self-tests written in Java Selenium.
I am new to CI / CD, so I ran into a lot of problems. I did not find detailed instructions on the Internet for this task, therefore, after I figured it out with the help of our developers, I decided to write a manual for the same newcomers as I did.
I described in detail all the necessary steps in order to configure CI / CD using GitLab, for example, running a simple HelloWorld program written using Java.

Auto tests should be run every time a developer pushes changes to the GitLab repository. This task corresponds to one of the principles of CI / CD - the launch of autotests at each stage of product development. I will not describe the complete CI / CD concept in this manual - this information is easy to find on the Internet.
But what not to find is how to configure CI / CD using GitLab for beginners, with a description of all the necessary steps. This will be discussed below.
I deployed everything necessary to start the project on a remote machine, but since the purpose of this manual is to familiarize myself with the basics of deploying CI / CD, we will work on the local machine.
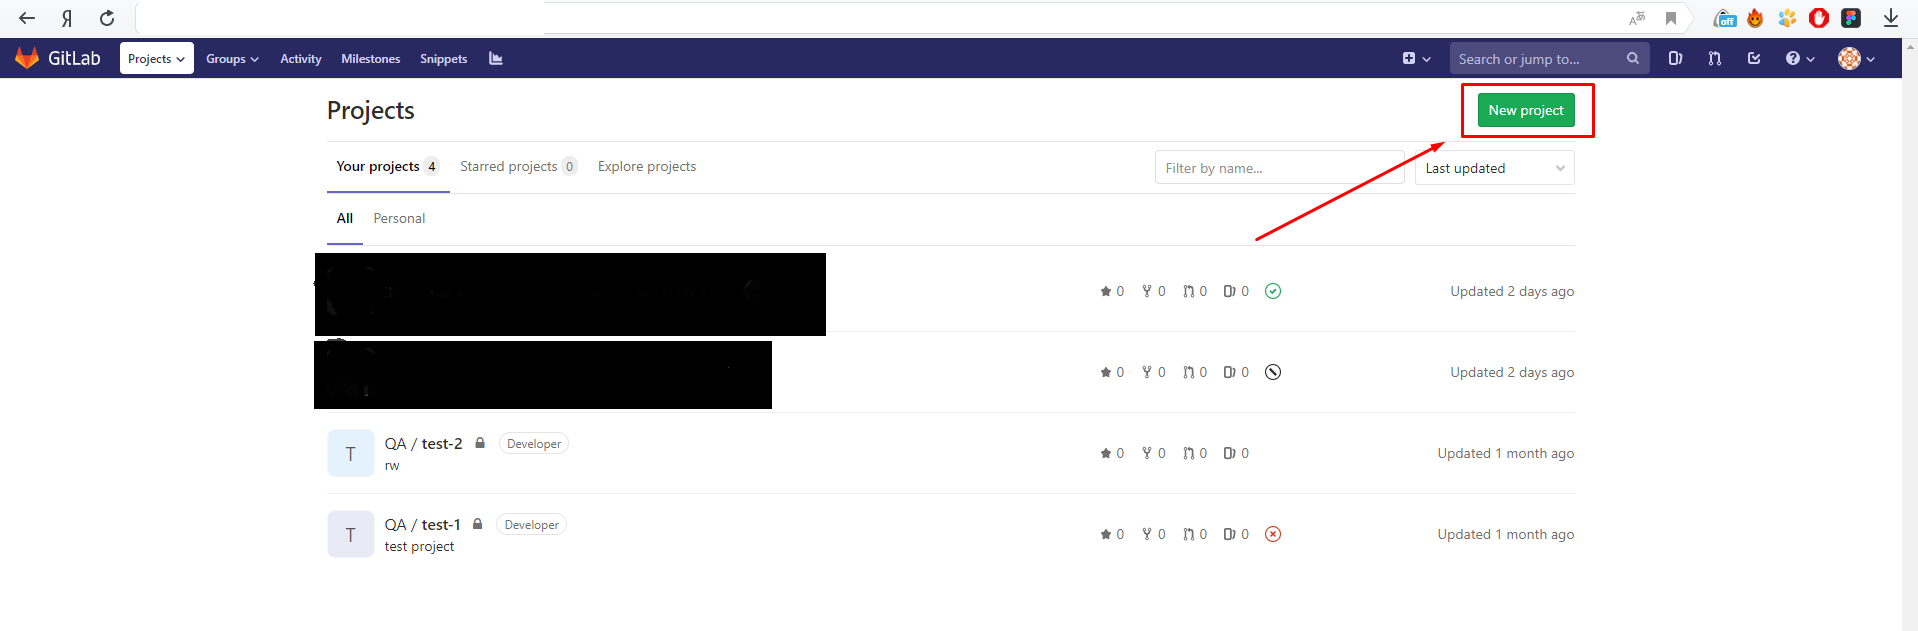
Go to GitLab on the Projects page, in the window that appears, click the New project button
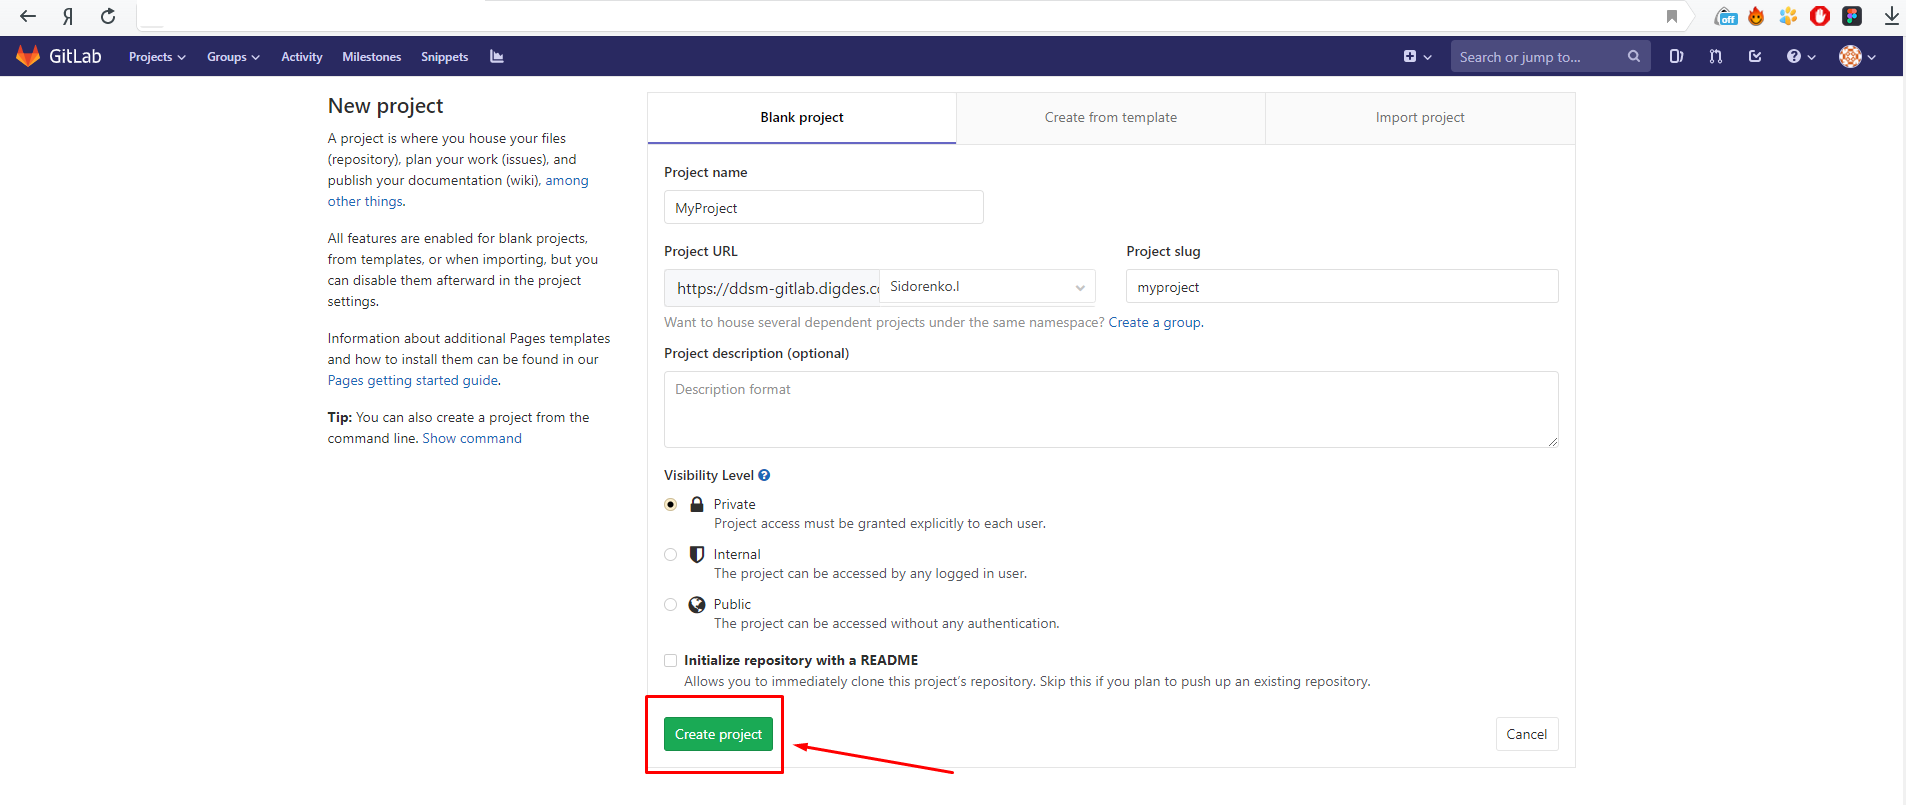
Set the project name, set the Private value in the Visibility Project field and click the green Create project button.
Congratulations, the project in GitLab has been created.

Now we need to deploy the local repository from which we will push the changes to GitLab. To do this, you must first install Git, during installation, you can select all the default values. If there was no experience with the git and its installation, I recommend that you familiarize yourself with this course on www.youtube.com .
Now you need to configure the Git environment variables user.name and user.email. We take the values from the GitLab -> Project / Details page (we get this page as soon as we create the project).
Open Git Bash, to do this, click anywhere on the desktop and select Git Bash Here. Now we enter these two commands sequentially.
After that, you need to create a local repository, from where we will push all the changes in GitLab. To do this, create a folder on the local machine, go to it, open Git Bash and execute these commands sequentially (they are also available on the GitLab -> Project / Details page).
here specify the path to your project
Now our remote repository has been added. But before you start pushing changes to the GitLab repository, you need to configure SSH keys.
SSH keys are required for secure data transfer from remote repositories to the main git repository, via the SSH protocol. Create a key pair.
Open Git Bash and enter:
Instead of email@example.com we substitute your email.
Next we get a message where the keys will be stored. Here, just press Enter. Keys will be saved in a folder of the form:
After choosing a folder, we will be asked to enter a password for the keys, you can skip this step by pressing Enter twice.
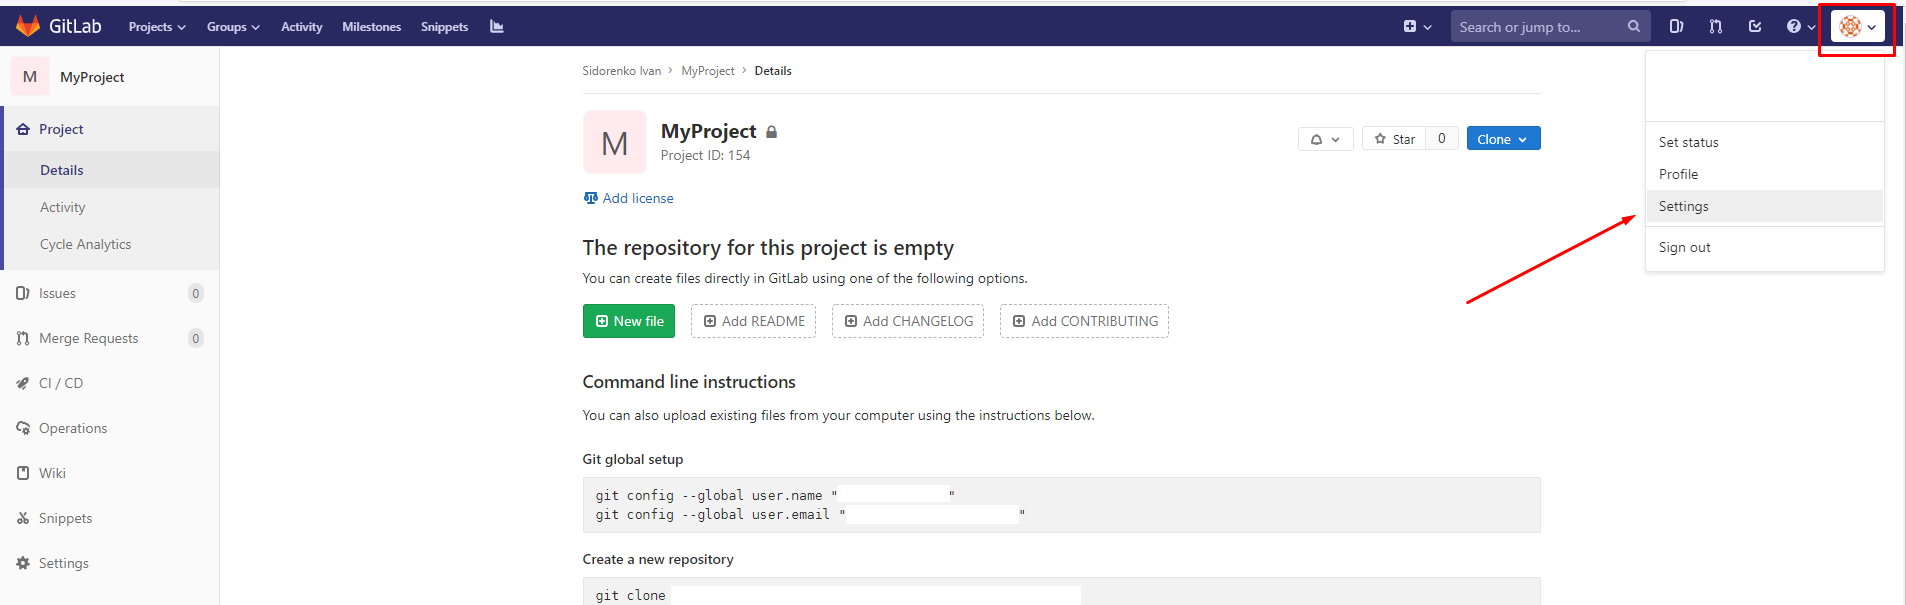
Now you need to add the public key to your GitLab account. Go to the .ssh folder and open the id _rsa.pub id file with notepad. Copy the contents of the file and go to GitLab. Here you need to go to the user settings (click the button in the upper right and select Settings).
Go to the SSH Keys section.
Insert the public key in the Key field and click the Add key button.

Now you need to save the private key on the remote machine. To do this, execute the commands:
where key is the generated private key (file named "id_rsa")
ssh-agent is a program for storing private keys used for authentication with public keys (in our case, this is an RSA key).
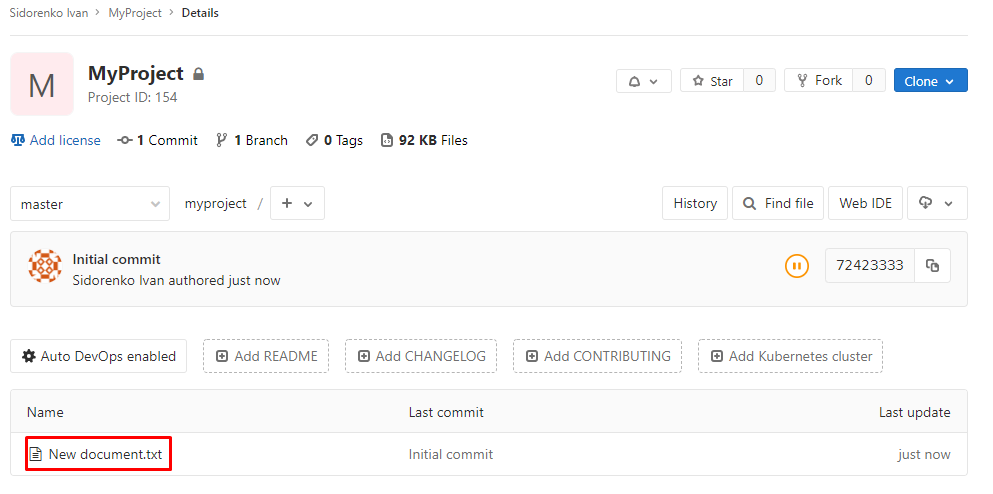
Now you are ready to push files in GitLab. Check if everything works. Go to the repository that was initialized earlier. Add the empty txt file to it. After that, we execute these commands sequentially in Git Bash.
Go to GitLab on the Project / Details page and verify that everything is working fine.
To start projects when pushing to gitlab, we need to deploy a runner. GitLab Runner is an agent for running instructions from a special .gitlab-ci.yml file. There are several types of runners. Consider the installation and launch of one of the simplest - shell runner.
Shell-runner allows you to run projects on the machine where this runner is installed. Consider installing this runner on our local machine:
1. Create a folder for the runner, for example C: \ GitLab-Runner
2. Download the runner from the link:
https://gitlab-runner-downloads.s3.amazonaws.com/latest/binaries/gitlab-runner-windows-386.exe
Rename it to gitlab-runner.exe.
3. Run PowerShell as administrator.
4. Go to our folder:
5. Enter the link to GitLab. In GitLab go to Settings-> CI / CD-> Runners.
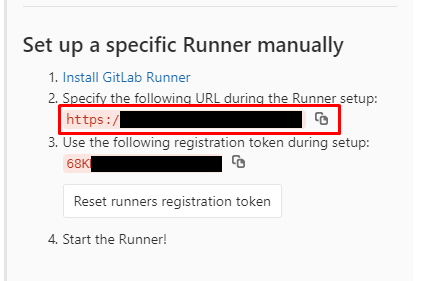
6. Enter the token:

7. Enter a description of the runner.
8. Enter the tags for the runner.
9. Choose the type of runner - shell.
10. Install the runner:
11. And run:
In order to verify that the runner has started, go to GitLab -> Settings -> CI / CD -> Runners. A green circle means that the runner is running.

To run our java program, we need:
1. Install java:
https://java.com/en/download/
2. Install jdk: https://www.oracle.com/technetwork/java/javase/downloads/index.html
3. Set environment variables.
To configure environment variables, go to:
My computer -> Properties -> Advanced environment settings -> Environment variables
Here, in the "System Variables" section, create the JAVA_HOME variable, in the line "Variable Value" write the path to jdk.
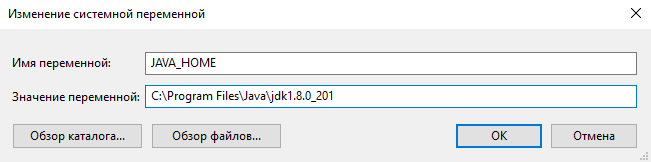
Add this value to the Path variable. You also need to verify that there is a path for Java.

Let's create a simple java project that will display “Hello World!” In the console. Put it in our local repository. It will look something like this:
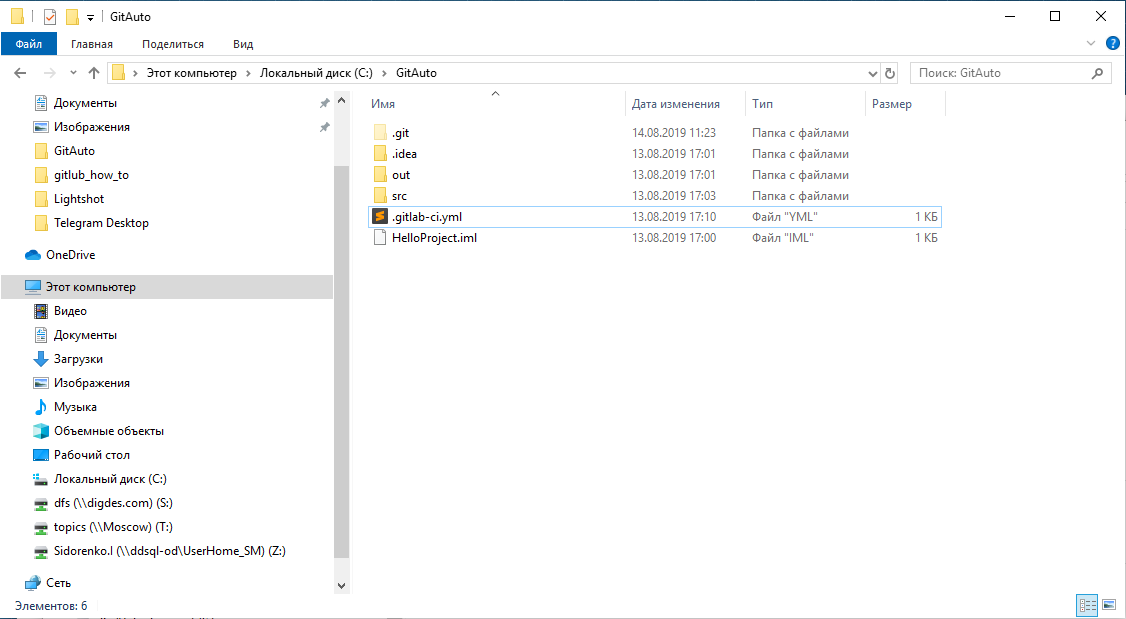
Here I created a .gitlab-ci file with the yml extension.
There are two stages - Build and Execute. Using the javac command, we compile the source code, and using the java command, we run it. At each step, we must explicitly indicate which runner we will use. The runner is determined by the value of its tag (can be found in the runner settings in GitLab).
After setting the contents of the file, go to the local repository and open Git Bash. We begin to sequentially execute the commands:
The changes are started, now we will verify that our program has successfully completed. Go to GitLab -> CI / CD -> Jobs, open the last job:

The program is complete, you are great!
I am new to CI / CD, so I ran into a lot of problems. I did not find detailed instructions on the Internet for this task, therefore, after I figured it out with the help of our developers, I decided to write a manual for the same newcomers as I did.
I described in detail all the necessary steps in order to configure CI / CD using GitLab, for example, running a simple HelloWorld program written using Java.
Auto tests should be run every time a developer pushes changes to the GitLab repository. This task corresponds to one of the principles of CI / CD - the launch of autotests at each stage of product development. I will not describe the complete CI / CD concept in this manual - this information is easy to find on the Internet.
But what not to find is how to configure CI / CD using GitLab for beginners, with a description of all the necessary steps. This will be discussed below.
1. Install Git and gain access to the GitLab repository
I deployed everything necessary to start the project on a remote machine, but since the purpose of this manual is to familiarize myself with the basics of deploying CI / CD, we will work on the local machine.
Go to GitLab on the Projects page, in the window that appears, click the New project button
Set the project name, set the Private value in the Visibility Project field and click the green Create project button.
Congratulations, the project in GitLab has been created.
Now we need to deploy the local repository from which we will push the changes to GitLab. To do this, you must first install Git, during installation, you can select all the default values. If there was no experience with the git and its installation, I recommend that you familiarize yourself with this course on www.youtube.com .
Now you need to configure the Git environment variables user.name and user.email. We take the values from the GitLab -> Project / Details page (we get this page as soon as we create the project).
git config --global user.name "user name" git config --global user.email "email@examle.com"
Open Git Bash, to do this, click anywhere on the desktop and select Git Bash Here. Now we enter these two commands sequentially.
After that, you need to create a local repository, from where we will push all the changes in GitLab. To do this, create a folder on the local machine, go to it, open Git Bash and execute these commands sequentially (they are also available on the GitLab -> Project / Details page).
git init
git remote add origin
git init
git remote add origin
here specify the path to your project
Now our remote repository has been added. But before you start pushing changes to the GitLab repository, you need to configure SSH keys.
2. Configuring SSH keys
SSH keys are required for secure data transfer from remote repositories to the main git repository, via the SSH protocol. Create a key pair.
Open Git Bash and enter:
ssh-keygen -o -t rsa -b 4096 -C email@example.com
Instead of email@example.com we substitute your email.
Next we get a message where the keys will be stored. Here, just press Enter. Keys will be saved in a folder of the form:
C:\Users\User_name\.ssh
After choosing a folder, we will be asked to enter a password for the keys, you can skip this step by pressing Enter twice.
Now you need to add the public key to your GitLab account. Go to the .ssh folder and open the id _rsa.pub id file with notepad. Copy the contents of the file and go to GitLab. Here you need to go to the user settings (click the button in the upper right and select Settings).
Go to the SSH Keys section.
Insert the public key in the Key field and click the Add key button.
Now you need to save the private key on the remote machine. To do this, execute the commands:
ssh-agent bash ssh-add ~/.ssh/key
where key is the generated private key (file named "id_rsa")
ssh-agent is a program for storing private keys used for authentication with public keys (in our case, this is an RSA key).
Now you are ready to push files in GitLab. Check if everything works. Go to the repository that was initialized earlier. Add the empty txt file to it. After that, we execute these commands sequentially in Git Bash.
git add . git commit -m "Initial commit" git push -u origin master
Go to GitLab on the Project / Details page and verify that everything is working fine.
3. Creating a GitLab Runner (Shell)
To start projects when pushing to gitlab, we need to deploy a runner. GitLab Runner is an agent for running instructions from a special .gitlab-ci.yml file. There are several types of runners. Consider the installation and launch of one of the simplest - shell runner.
Shell-runner allows you to run projects on the machine where this runner is installed. Consider installing this runner on our local machine:
1. Create a folder for the runner, for example C: \ GitLab-Runner
2. Download the runner from the link:
https://gitlab-runner-downloads.s3.amazonaws.com/latest/binaries/gitlab-runner-windows-386.exe
Rename it to gitlab-runner.exe.
3. Run PowerShell as administrator.
4. Go to our folder:
cd C:\GitLab-Runner
5. Enter the link to GitLab. In GitLab go to Settings-> CI / CD-> Runners.
6. Enter the token:
7. Enter a description of the runner.
8. Enter the tags for the runner.
9. Choose the type of runner - shell.
10. Install the runner:
gitlab-runner install
11. And run:
gitlab-runner start
In order to verify that the runner has started, go to GitLab -> Settings -> CI / CD -> Runners. A green circle means that the runner is running.
4. Setting the environment variable
To run our java program, we need:
1. Install java:
https://java.com/en/download/
2. Install jdk: https://www.oracle.com/technetwork/java/javase/downloads/index.html
3. Set environment variables.
To configure environment variables, go to:
My computer -> Properties -> Advanced environment settings -> Environment variables
Here, in the "System Variables" section, create the JAVA_HOME variable, in the line "Variable Value" write the path to jdk.
Add this value to the Path variable. You also need to verify that there is a path for Java.
5. Creation of the project and its launch
Let's create a simple java project that will display “Hello World!” In the console. Put it in our local repository. It will look something like this:
Here I created a .gitlab-ci file with the yml extension.
Content .gitlab-ci.yml
image: java:latest stages: - build - execute build: stage: build script: - cd C:\GitAuto\src - javac Main.java artifacts: tags: - first-runner execute: stage: execute script: - cd C:\GitAuto\src - java Main artifacts: tags: - first-runner
There are two stages - Build and Execute. Using the javac command, we compile the source code, and using the java command, we run it. At each step, we must explicitly indicate which runner we will use. The runner is determined by the value of its tag (can be found in the runner settings in GitLab).
After setting the contents of the file, go to the local repository and open Git Bash. We begin to sequentially execute the commands:
git add . git commit -m "Initial commit" git push -u origin master
The changes are started, now we will verify that our program has successfully completed. Go to GitLab -> CI / CD -> Jobs, open the last job:
The program is complete, you are great!
All Articles