DIY call button. Raspberry Pi, MajorDoMo, Freeswitch and Linphonec
Some time ago, I had a need to communicate with a person after an illness who could not physically use the phone. A simple calling device was needed, a voice call was made at the touch of a button. The need disappeared, however, having been in the hospital himself, looking at the patients, it was thought that such a solution might come in handy.
Now I see the personal use of this device as a SIP doorbell.
Perhaps with small alterations, the combination of VoIP telephony with a home automation system. As options for use - SIP doorbell, intercom, voice communication system (client-personnel, director-secretary), etc.

The whole decision is made on free and open source software: operating system - Raspbian Stretch (Debian 9), Home automation system - MajorDoMo, VoIP server - Freeswitch, IP-telephony software client with the ability to work in terminal mode Linphonec.
In this part, under the cut, we will mainly talk about installing the Linphonec console SIP client.
We will need:
1. First step - Installing the MajorDoMo image for RPI
Currently, the current version of the image for the Raspberry Pi is v. 3.40. Here is a short description of MajorDoMo images and changes:
MajorDoMo Basic Images for Raspberry Pi
After installation and when the system boots, connecting the speakers to the 3.5 connector - we will hear system messages and the IP address of Raspberry.
The default username is: pi password: raspberry.
2. Install FREESWITCH,
Installing FRESWITCH VoIP Server for Raspberry
After that, we proceed to the installation of the necessary components. An optional, but possibly later useful step.
Install a small but useful RPI monitor utility that shows the resources of our Raspberry PI.
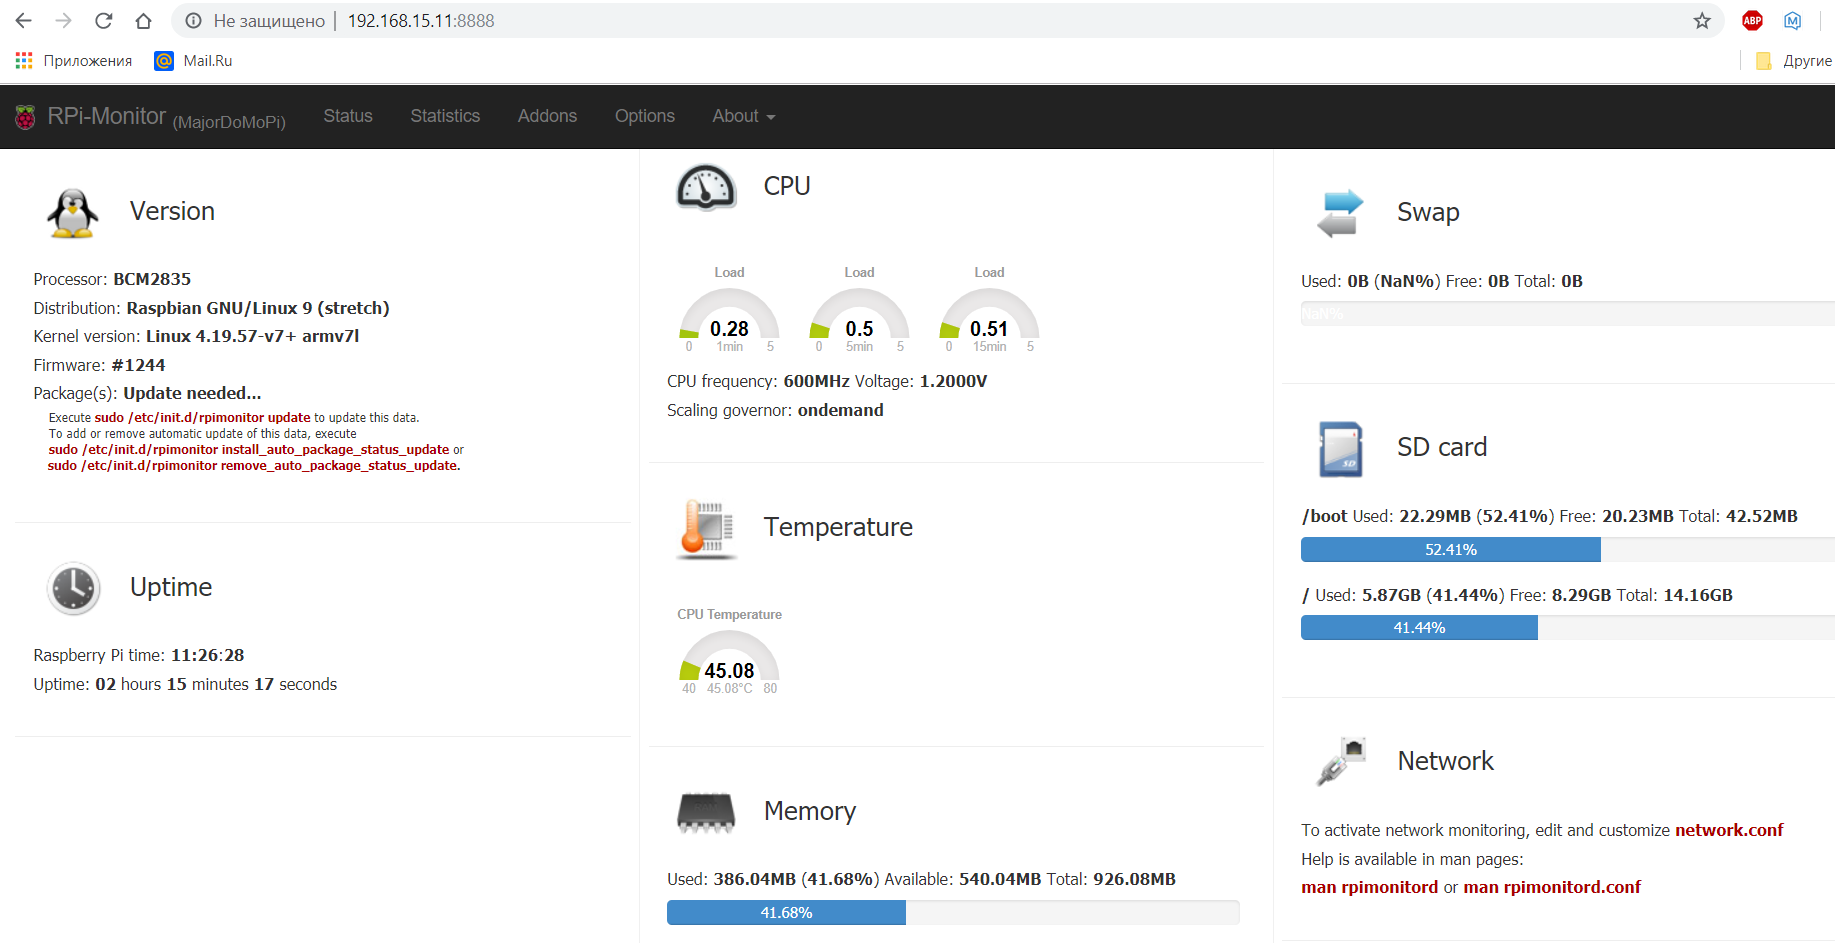
RPi-Monitor is a web-based Raspberry Pi board control software. This tool can be useful to control the use of disk space, CPU load, memory and network traffic, temperature. RPI-Monitor is quite simple to install, and visually displays information about the system.
First of all, I will provide a link to the source:
RPi-Monitor .
We install the public key RPi-Monitor and add it to the trusted repositories:
Next, update the system and install the RPI monitor itself:
Open the IP of your computer in the browser with the port: 8888, on which the monitor is running, and see the RPI status.
Unfortunately, our Raspberry mini computer does not have its own built-in microphone and input for it. Therefore, to connect a microphone, you will have to use an external USB sound card. We connect the card to the Raspberry USB port, and execute the command (which shows the sound devices in the system):
We see the answer with two cards, bcm2835 - built-in, external defined as USB Audio Device:
0 [ALSA]: bcm2835_alsa - bcm2835 ALSA
bcm2835 ALSA
1 [Device]: USB-Audio - USB Audio Device
GeneralPlus USB Audio Device at usb-3f980000.usb-1.4, full speed
The OS sees our sound card, but it is not yet registered in the system.
Create a file:
We write (paste) the following line:
options snd-usb-audio index = 1
Save (in the editor Ctrl + X).
Create another file:
Add content:
We edit the following configuration file:
Change the default sound card from 0 to 1 (USB card), Obviously, the default 0 is the built-in sound output of the minicomputer, set the following parameters in 2 lines:
The changes will take effect, after rebooting, we overload by typing in the console:
We connect a microphone and speakers (headphones) to an external audio card. After rebooting, run the Alsamixer sound configuration utility.
We see our devices that we defined in the system by default:
Use the cursor keys left and right, select the desired device, up and down, adjust, pay attention to the symbols under the selected device:
xOOx - device is turned on, xMMx - device is turned off. As you can see in the screenshot, my microphone was turned off by default in the system.
To turn on / off the device, you need to press M on the keyboard.
Exit alsamixer (exit ctr + C).
Checking the sound in the system. Speakers and a microphone are connected to the corresponding USB outputs of the sound card.
We give the command:
With this command, a sound file is recorded through the microphone into the corresponding directory (in our case, the user's home pi). Stop recording Ctrl + c .
Check the recorded file:
We will carry out a better check later.
There are not so many programs that can work in the OS without a graphical interface; I settled on the Linphone package.
The package is quite large, has many potential features, but so far we only need a small utility Linphonec that can work in the terminal and has the function of auto answer (automatic pick-up).
For her sake, the following actions will be performed.
I note that when installing from the Raspbian repository, a rather old version 3.6.1 is installed, which does not work correctly with the ALSA sound system, I had a sound loss, the program itself crashed several times.
Therefore, I will use a more current version.
For self-assembly of the package from the sources, we install additional dependencies:
Go to the home directory:
Download the Linphone package itself, the download took about 20 minutes.
I couldn’t compile and compile the Linphone package from the first or even the second time. Therefore, I will give my algorithm of action.
We stop almost all currently running, but currently unused services, using the systemctl service management system.
There were errors during the assembly, our mini PC just does not have enough resources. Free them for installation.
Just in case, we can make a temporary (before restarting) swap file (hard disk space), which the operating system uses in case of insufficient RAM.
To check if the swap file is included in our Raspbian (Debian) installation by typing:
The output is empty, which means that the system does not have a swap file.
Add 1G swap and create a file:
Only the root user can read and write to the page file, so we set the correct permissions:
We use the mkswap tool to configure the Linux swap area in the file and activate it by typing the following commands:
Go to the created directory when downloading the package:
We prepare for installation a version without a graphical interface:
Build using the –j4 attribute (i.e., build in 4 threads at the same time.
When installing, we can look at the status of our computer in RPI-Monitor:

The build time for me was about 30-40 minutes.
The compiled program files appeared in the OUTPUT / no-ui / bin directory. To run the program, let's go into it:
Check the version of the program:
We get the result: version: 3.12.0
Overloading our Raspberry
When restarting, the swap file disappears, all running services registered in startup are restored.
The FREESWITCH server is installed by default in the / usr / local / freeswitch / directory. The conf folder contains configuration files. By default, the vanilla test configuration is installed, which for the most part serves to familiarize yourself with the capabilities of the VoIP server and contains a large number of examples that are clearly redundant for home use. First, let us see the out of the box configuration of the VoIP server.
Edit the configuration file vars.xml
First of all, change the default password 1234 to another value, say 1111. If you do not do this, then before each call a pause is set before dialing 10 seconds.
By default, as I wrote in a previous article, we have 20 subscriber numbers 1001-1020. Dialplan is also installed by default.
For some reason, these times, compared to six months ago, when the mod_xml_rpc module was turned on, the server constantly crashed.
Dialplan FreeSWITCH makes extensive use of regular expressions. The default dialplan is responsible for processing calls, the next section of the Local_Extension file is responsible for sending to our local numbers. Comment out a few lines:
Dialog editing, insert a comment symbol in this section:
A small digression, in my opinion, despite the FS's working ability, after our several changes, it’s better to redo the FS configuration files for yourself, including subscription, dialplan, etc., but you can’t fit everything in one article, so we turn to our terminal client.
Run Linphonec in auto answer mode from the current pi user:
At first launch, Linphonec tries to create a database file and settings file. However, the launch is in error.
Initially, we will deal with the last error, opening the database file.
The database file is created in the home directory along the following path: /home/pi/.local/share/linphone
A Linux file (or directory) is considered hidden if its name begins with a period “.”. For example, ".myfile". Typically, such files are used by applications to store settings, configurations and other information that needs to be hidden from the user.
Check the rights to the directory and change them.
This command will give all rights to the folder for each type of user (owner, group, and others).
Create a directory for the database of our softphone:
We start the program, the program started, but it gives an error:
We figured out the first problem of creating a database; at initial launch, the program generated a database file.
The error associated with the Pulseaudio sound system - does not interfere with the functioning of the program, I plan to use ALSA, if necessary, a sound server can always be installed before.
The second - ports 5060 are busy. These ports are commonly used by SIP applications. We can exit the program and give the command:
We will see that port 5060 uses our VoIP FREESWITCH server. Well, we will use free ports.
We go back to the linphonec program. And do a little setup.
First of all, we change the port for Linfon, then indicate the registration to the VoIP server, check the registration status and look at the list of sound cards, the card used and configure it on an external USB (with an index in the Linphone program - 2):
In the registration team, we use the following format: Sip user ID - by default, we have 20 subscribers with numbers 1001-1019. These numbers are the usernames of subscribers. Subscriber login @ [Domain name] - domain name - IP address of our Raspberry. Sip proxy - matches the RPI IP address, and at the end - the password of the user we recently set up 1111.
Exit the program (Ctrl + x), the settings are not always applied on the fly. After exiting in the home directory / home / pi, the console client configuration file appeared: .linphonerc.
We can already make changes by editing the configuration file of the SIP client.
On a new launch console SIP client.
In parallel with the current SSH session, open a new one, log in using your username and password.
We start alsamixer. In one session, we have Linphonec, in the second, a sound tuning utility.
We make the call setup from the SIP client on a smartphone or PC (as described in the article about installing FREESWITCH), changing the default password to your own and dialing a number, in our case 1001. We can go to the freswitch portal at IP_Raspberry: 8080, view the registration of subscribers, status call, etc.
Using alsamixer, customize the sound. Sound changes are applied on the fly, without exiting programs.
Unfortunately, due to the use of a cheap audio card, I didn’t achieve an acceptable sound, an echo was heard in the speakers. It can be minimized somewhat, but completely removed - I did not succeed.
Therefore, since it was not possible to remove it in one way, we eliminate it in another.
Close Linphonec, edit the configuration file:
In the sound section, we bring the last three lines to this form:
In this way, we forced the ringer and sound output device to work on the built-in 3.5 raspberry jack, and the recording device - microphone to work through an external sound card - the echo disappeared.
Switch the speakers to the raspberry’s own connector.
We take into account the following moment: when loading and in some cases, the smart home system plays its system messages through this audio output.
Turn them off. We pass on IP_Rasberry to the main page, opening the MajorDoMo home automation system.
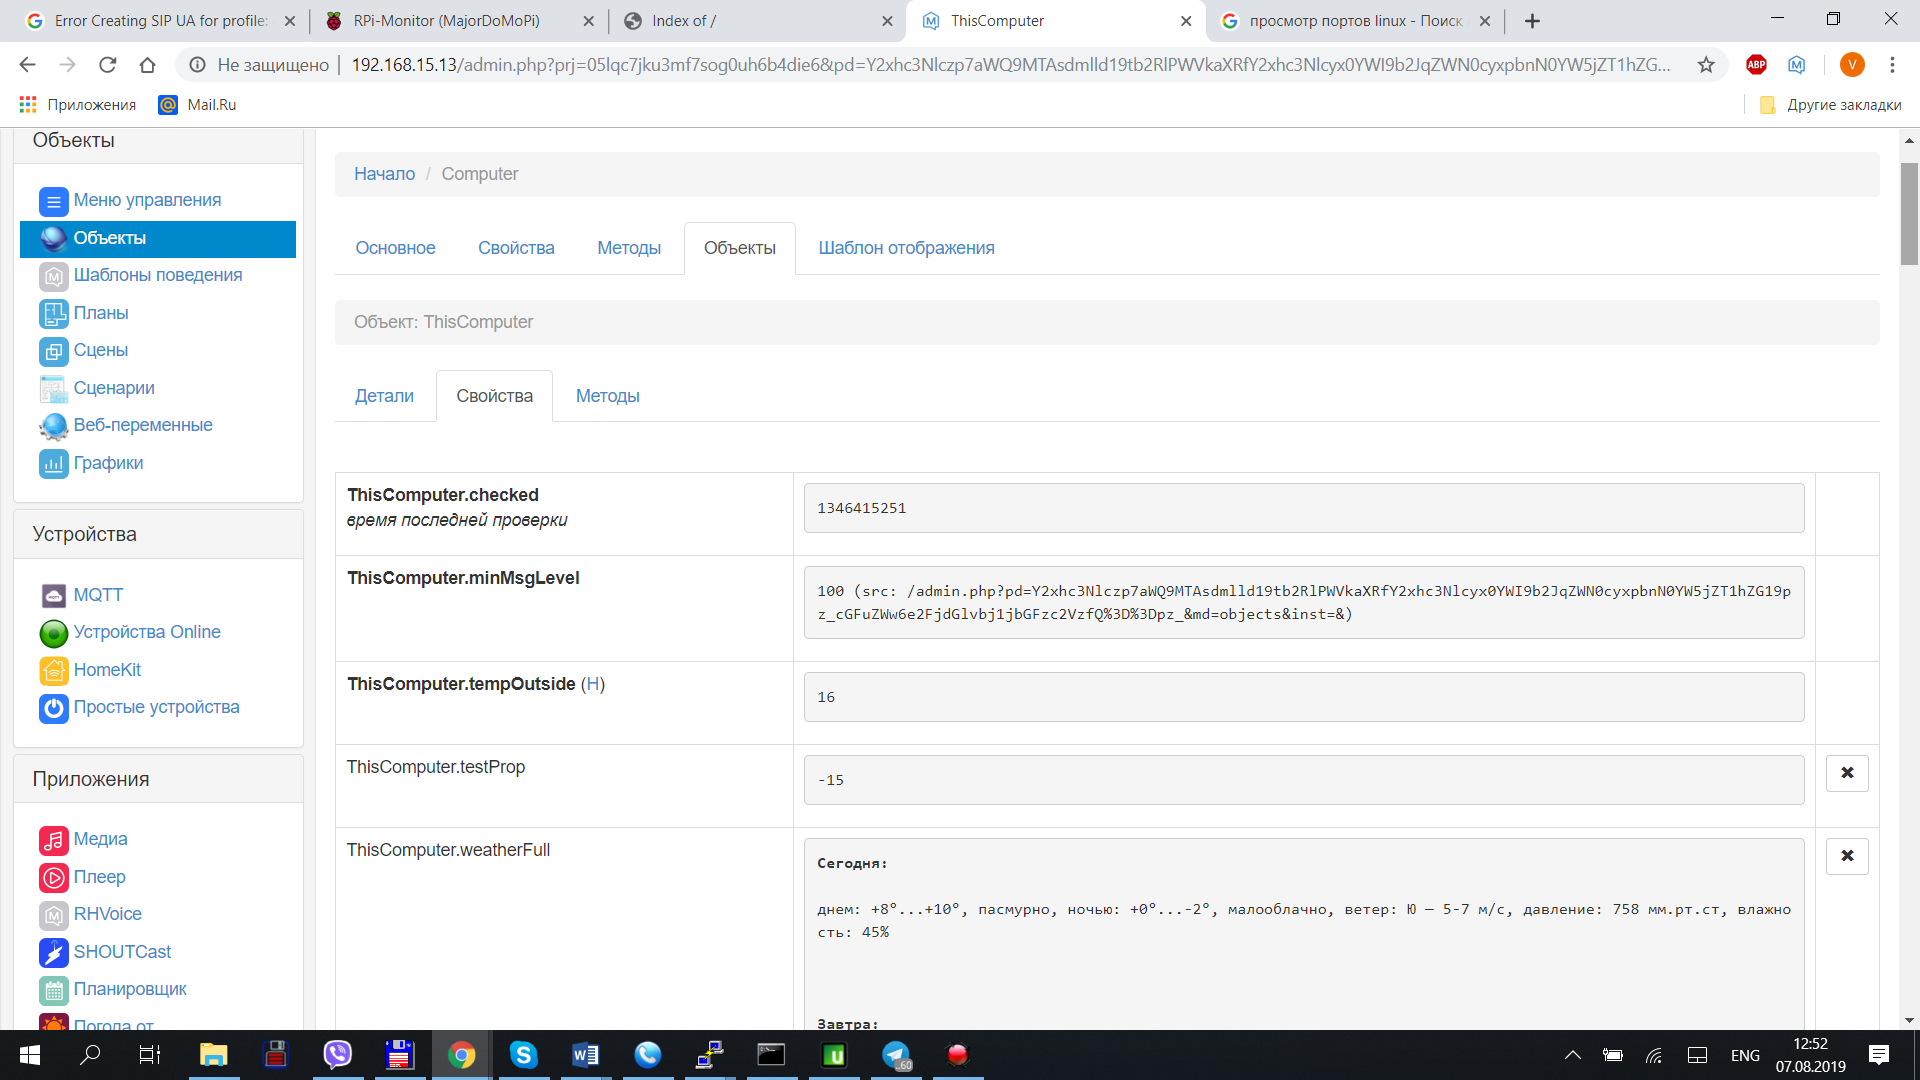
We enter the control panel - the Computer object (expand the device) - ThisComputer on the Properties tab and set the values:
Add an entry to cron (a daemon program designed to perform tasks at a specific time, or at certain intervals. The crontab utility is used to edit tasks):
I note we are doing this from under the user pi.
Insert the line at the very end:
This line starts when restarting, turning on the computer, the Linphonec program in auto answer mode.
Back to MajorDoMo:
Let's go to the main page, in the service section:
In the menu of this section, buttons are created for rebooting (turning off) the computer.
The fact is that in order to save the resources of the SD memory card, the changes are recorded in the “smart home” system after a certain time (15 minutes). Therefore, if you need to overload raspberries, then it is better to do it right. We reboot the system.
After rebooting, we go to the main page of MajorDoMo, go to the control panel, and as in the last article we make a call from the console using the following format:
Following the command, Linphonec automatically picks up the phone. In the RPI speaker, a sound file is being played, a call is being sent to the second softphone (PC / smartphone). Having picked up the handset (by pressing the answer button in the program), the connection is established.
On this, I finish this part. I’ll try to describe a little later about the button itself using GPIO and setting up calls outside my local network.
Now I see the personal use of this device as a SIP doorbell.
Perhaps with small alterations, the combination of VoIP telephony with a home automation system. As options for use - SIP doorbell, intercom, voice communication system (client-personnel, director-secretary), etc.
The whole decision is made on free and open source software: operating system - Raspbian Stretch (Debian 9), Home automation system - MajorDoMo, VoIP server - Freeswitch, IP-telephony software client with the ability to work in terminal mode Linphonec.
In this part, under the cut, we will mainly talk about installing the Linphonec console SIP client.
We will need:
- Raspberry Pi - single board computer (I have a Raspberry Pi 3B model)
- Micro SD memory card at least 16 GB, USB charger, housing.
- USB sound card (used one of the cheapest, Gembird), microphone, speaker (headphones).
- Button and a pair of BBJ jumpers for GPIO pins.
1. First step - Installing the MajorDoMo image for RPI
Currently, the current version of the image for the Raspberry Pi is v. 3.40. Here is a short description of MajorDoMo images and changes:
MajorDoMo Basic Images for Raspberry Pi
After installation and when the system boots, connecting the speakers to the 3.5 connector - we will hear system messages and the IP address of Raspberry.
The default username is: pi password: raspberry.
2. Install FREESWITCH,
Installing FRESWITCH VoIP Server for Raspberry
After that, we proceed to the installation of the necessary components. An optional, but possibly later useful step.
Install RPi-Monitor
Install a small but useful RPI monitor utility that shows the resources of our Raspberry PI.
RPi-Monitor is a web-based Raspberry Pi board control software. This tool can be useful to control the use of disk space, CPU load, memory and network traffic, temperature. RPI-Monitor is quite simple to install, and visually displays information about the system.
First of all, I will provide a link to the source:
RPi-Monitor .
We install the public key RPi-Monitor and add it to the trusted repositories:
sudo apt-get install dirmngr sudo apt-key adv --recv-keys --keyserver keyserver.ubuntu.com 2C0D3C0F sudo wget http://goo.gl/vewCLL -O /etc/apt/sources.list.d/rpimonitor.list
Next, update the system and install the RPI monitor itself:
sudo apt-get update sudo apt-get install rpimonitor
Open the IP of your computer in the browser with the port: 8888, on which the monitor is running, and see the RPI status.
Installing a USB audio card and setting up sound in the Raspberry Pi OS
Unfortunately, our Raspberry mini computer does not have its own built-in microphone and input for it. Therefore, to connect a microphone, you will have to use an external USB sound card. We connect the card to the Raspberry USB port, and execute the command (which shows the sound devices in the system):
cat /proc/asound/cards
We see the answer with two cards, bcm2835 - built-in, external defined as USB Audio Device:
0 [ALSA]: bcm2835_alsa - bcm2835 ALSA
bcm2835 ALSA
1 [Device]: USB-Audio - USB Audio Device
GeneralPlus USB Audio Device at usb-3f980000.usb-1.4, full speed
The OS sees our sound card, but it is not yet registered in the system.
Create a file:
sudo nano /etc/modprobe.d/alsa-base.conf
We write (paste) the following line:
options snd-usb-audio index = 1
Save (in the editor Ctrl + X).
Create another file:
sudo nano /etc/asound.conf
Add content:
file contents
pcm.!default { type plug slave { pcm "hw:1,0" } } ctl.!default { type hw card 1 }
We edit the following configuration file:
sudo nano /usr/share/alsa/alsa.conf
Change the default sound card from 0 to 1 (USB card), Obviously, the default 0 is the built-in sound output of the minicomputer, set the following parameters in 2 lines:
defaults.ctl.card 1 defaults.pcm.card 1
The changes will take effect, after rebooting, we overload by typing in the console:
sudo reboot
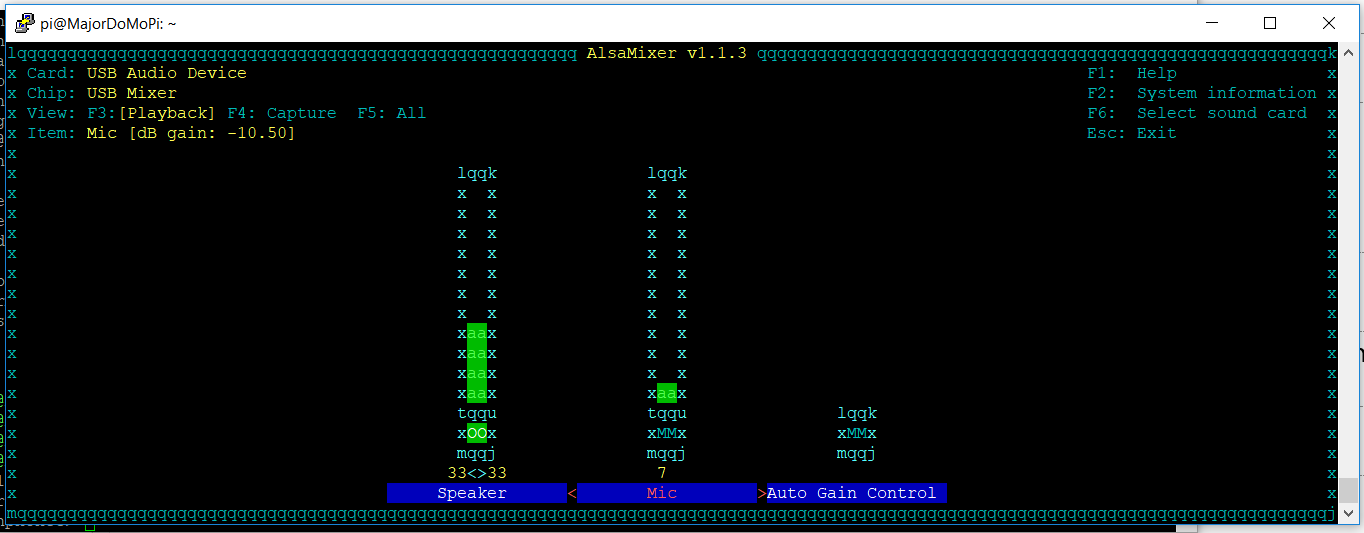
We connect a microphone and speakers (headphones) to an external audio card. After rebooting, run the Alsamixer sound configuration utility.
alsamixer
We see our devices that we defined in the system by default:
Use the cursor keys left and right, select the desired device, up and down, adjust, pay attention to the symbols under the selected device:
xOOx - device is turned on, xMMx - device is turned off. As you can see in the screenshot, my microphone was turned off by default in the system.
To turn on / off the device, you need to press M on the keyboard.
Exit alsamixer (exit ctr + C).
Checking the sound in the system. Speakers and a microphone are connected to the corresponding USB outputs of the sound card.
We give the command:
arecord -D plughw:1,0 -f cd /home/pi/test_record.wav
With this command, a sound file is recorded through the microphone into the corresponding directory (in our case, the user's home pi). Stop recording Ctrl + c .
Check the recorded file:
aplay /home/pi/test_record.wav
We will carry out a better check later.
Installing the Linphonec Console VoIP Client
There are not so many programs that can work in the OS without a graphical interface; I settled on the Linphone package.
The package is quite large, has many potential features, but so far we only need a small utility Linphonec that can work in the terminal and has the function of auto answer (automatic pick-up).
For her sake, the following actions will be performed.
I note that when installing from the Raspbian repository, a rather old version 3.6.1 is installed, which does not work correctly with the ALSA sound system, I had a sound loss, the program itself crashed several times.
Therefore, I will use a more current version.
For self-assembly of the package from the sources, we install additional dependencies:
sudo apt-get install cmake automake autoconf libtool intltool yasm libasound2-dev libpulse-dev libv4l-dev nasm git libglew-dev
Go to the home directory:
cd /home/pi/
Download the Linphone package itself, the download took about 20 minutes.
git clone git://git.linphone.org/linphone-desktop.git –recursive
I couldn’t compile and compile the Linphone package from the first or even the second time. Therefore, I will give my algorithm of action.
We stop almost all currently running, but currently unused services, using the systemctl service management system.
There were errors during the assembly, our mini PC just does not have enough resources. Free them for installation.
Stopping services
sudo systemctl stop freeswitch.service sudo systemctl stop majordomo.service sudo systemctl stop avahi-daemon.socket sudo systemctl stop avahi-daemon.service sudo systemctl stop mosquitto.service sudo systemctl stop mysql sudo systemctl stop mpd.service sudo systemctl stop mpd.socket sudo systemctl stop homebridge.service sudo systemctl stop nginx.service sudo systemctl stop bluetooth.target sudo systemctl stop bluetooth.service
Just in case, we can make a temporary (before restarting) swap file (hard disk space), which the operating system uses in case of insufficient RAM.
To check if the swap file is included in our Raspbian (Debian) installation by typing:
sudo swapon --show
The output is empty, which means that the system does not have a swap file.
Add 1G swap and create a file:
sudo fallocate -l 1G /swapfile
Only the root user can read and write to the page file, so we set the correct permissions:
sudo chmod 600 /swapfile
We use the mkswap tool to configure the Linux swap area in the file and activate it by typing the following commands:
sudo mkswap /swapfile sudo swapon /swapfile
Go to the created directory when downloading the package:
cd linphone-desktop
We prepare for installation a version without a graphical interface:
sudo ./prepare.py no-ui -DENABLE_OPENH264=ON -DENABLE_WEBRTC_AEC=OFF -DENABLE_UNIT_TESTS=OFF -DENABLE_MKV=OFF -DENABLE_FFMPEG=ON -DENABLE_CXX_WRAPPER=OFF -DENABLE_NON_FREE_CODECS=ON -DENABLE_VCARD=OFF -DENABLE_BV16=OFF -DENABLE_V4L=OFF
Build using the –j4 attribute (i.e., build in 4 threads at the same time.
sudo make -j4
When installing, we can look at the status of our computer in RPI-Monitor:
The build time for me was about 30-40 minutes.
The compiled program files appeared in the OUTPUT / no-ui / bin directory. To run the program, let's go into it:
cd OUTPUT/no-ui/bin
Check the version of the program:
./linphonec -v
We get the result: version: 3.12.0
Overloading our Raspberry
When restarting, the swap file disappears, all running services registered in startup are restored.
A small initial Freeswitch setup.
The FREESWITCH server is installed by default in the / usr / local / freeswitch / directory. The conf folder contains configuration files. By default, the vanilla test configuration is installed, which for the most part serves to familiarize yourself with the capabilities of the VoIP server and contains a large number of examples that are clearly redundant for home use. First, let us see the out of the box configuration of the VoIP server.
Edit the configuration file vars.xml
sudo nano /usr/local/freeswitch/conf/vars.xml
First of all, change the default password 1234 to another value, say 1111. If you do not do this, then before each call a pause is set before dialing 10 seconds.
By default, as I wrote in a previous article, we have 20 subscriber numbers 1001-1020. Dialplan is also installed by default.
For some reason, these times, compared to six months ago, when the mod_xml_rpc module was turned on, the server constantly crashed.
Dialplan FreeSWITCH makes extensive use of regular expressions. The default dialplan is responsible for processing calls, the next section of the Local_Extension file is responsible for sending to our local numbers. Comment out a few lines:
sudo nano /usr/local/freeswitch/conf/dialplan/defaults.xml
Dialog editing, insert a comment symbol in this section:
Dialog editing of numbers 1001-1019
<extension name="Local_Extension"> <condition field="destination_number" expression="^(10[01][0-9])$"> <action application="export" data="dialed_extension=$1"/> <!-- <action application="bind_meta_app" data="1 bs execute_extension::dx XML features"/> <action application="bind_meta_app" data="2 bs record_session::$${recordings_dir}/${caller_id_number}.${strftime(%Y-%m-%d-%H-%M-%S)}.wav"/> <action application="bind_meta_app" data="3 bs execute_extension::cf XML features"/> <action application="bind_meta_app" data="4 bs execute_extension::att_xfer XML features"/> -->
A small digression, in my opinion, despite the FS's working ability, after our several changes, it’s better to redo the FS configuration files for yourself, including subscription, dialplan, etc., but you can’t fit everything in one article, so we turn to our terminal client.
Configure and launch the Linphonec terminal client
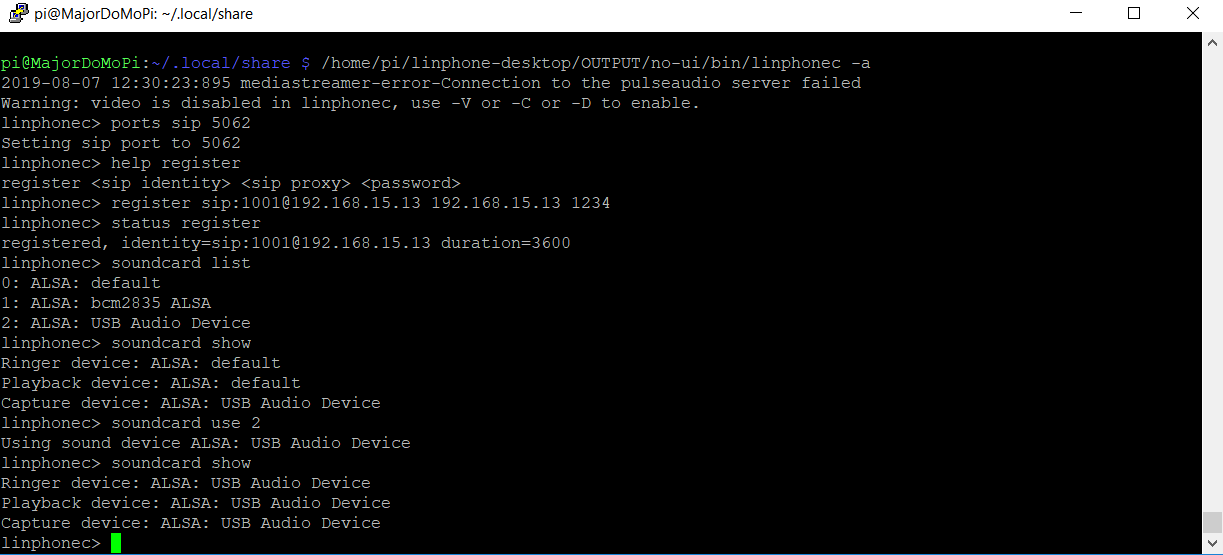
Run Linphonec in auto answer mode from the current pi user:
/home/pi/linphone-desktop/OUTPUT/no-ui/bin/linphonec -a
At first launch, Linphonec tries to create a database file and settings file. However, the launch is in error.
Linphonec startup errors
2019-08-02 18:02:58:715 mediastreamer-error-Connection to the pulseaudio server failed 2019-08-02 18:02:58:946 belle-sip-error-udp bind() failed for ::0 port 5060: Address already in use 2019-08-02 18:02:58:947 belle-sip-error-TCP bind() failed for ::0 port 5060: Address already in use 2019-08-02 18:02:59:126 liblinphone-fatal-Unable to open linphone database. Aborted
Initially, we will deal with the last error, opening the database file.
The database file is created in the home directory along the following path: /home/pi/.local/share/linphone
A Linux file (or directory) is considered hidden if its name begins with a period “.”. For example, ".myfile". Typically, such files are used by applications to store settings, configurations and other information that needs to be hidden from the user.
Check the rights to the directory and change them.
sudo ls -al /home/pi/ sudo chmod -R 777 /home/pi/.local/share/
This command will give all rights to the folder for each type of user (owner, group, and others).
Create a directory for the database of our softphone:
mkdir /home/pi/.local/share/linphone
We start the program, the program started, but it gives an error:
Port Opening Error
2019-08-07 11:29:32:780 mediastreamer-error-Connection to the pulseaudio server failed 2019-08-07 11:29:32:866 belle-sip-error-udp bind() failed for ::0 port 5060: Address already in use 2019-08-07 11:29:32:866 belle-sip-error-TCP bind() failed for ::0 port 5060: Address already in use
We figured out the first problem of creating a database; at initial launch, the program generated a database file.
The error associated with the Pulseaudio sound system - does not interfere with the functioning of the program, I plan to use ALSA, if necessary, a sound server can always be installed before.
The second - ports 5060 are busy. These ports are commonly used by SIP applications. We can exit the program and give the command:
sudo netstat -tulpn | grep LISTEN
We will see that port 5060 uses our VoIP FREESWITCH server. Well, we will use free ports.
We go back to the linphonec program. And do a little setup.
First of all, we change the port for Linfon, then indicate the registration to the VoIP server, check the registration status and look at the list of sound cards, the card used and configure it on an external USB (with an index in the Linphone program - 2):
ports sip 5062 register sip:1001@192.168.15.13 192.168.15.13 1111 linphonec> help register status register soundcard list soundcard show soundcard use 2 soundcard show
In the registration team, we use the following format: Sip user ID - by default, we have 20 subscribers with numbers 1001-1019. These numbers are the usernames of subscribers. Subscriber login @ [Domain name] - domain name - IP address of our Raspberry. Sip proxy - matches the RPI IP address, and at the end - the password of the user we recently set up 1111.
Exit the program (Ctrl + x), the settings are not always applied on the fly. After exiting in the home directory / home / pi, the console client configuration file appeared: .linphonerc.
We can already make changes by editing the configuration file of the SIP client.
On a new launch console SIP client.
In parallel with the current SSH session, open a new one, log in using your username and password.
We start alsamixer. In one session, we have Linphonec, in the second, a sound tuning utility.
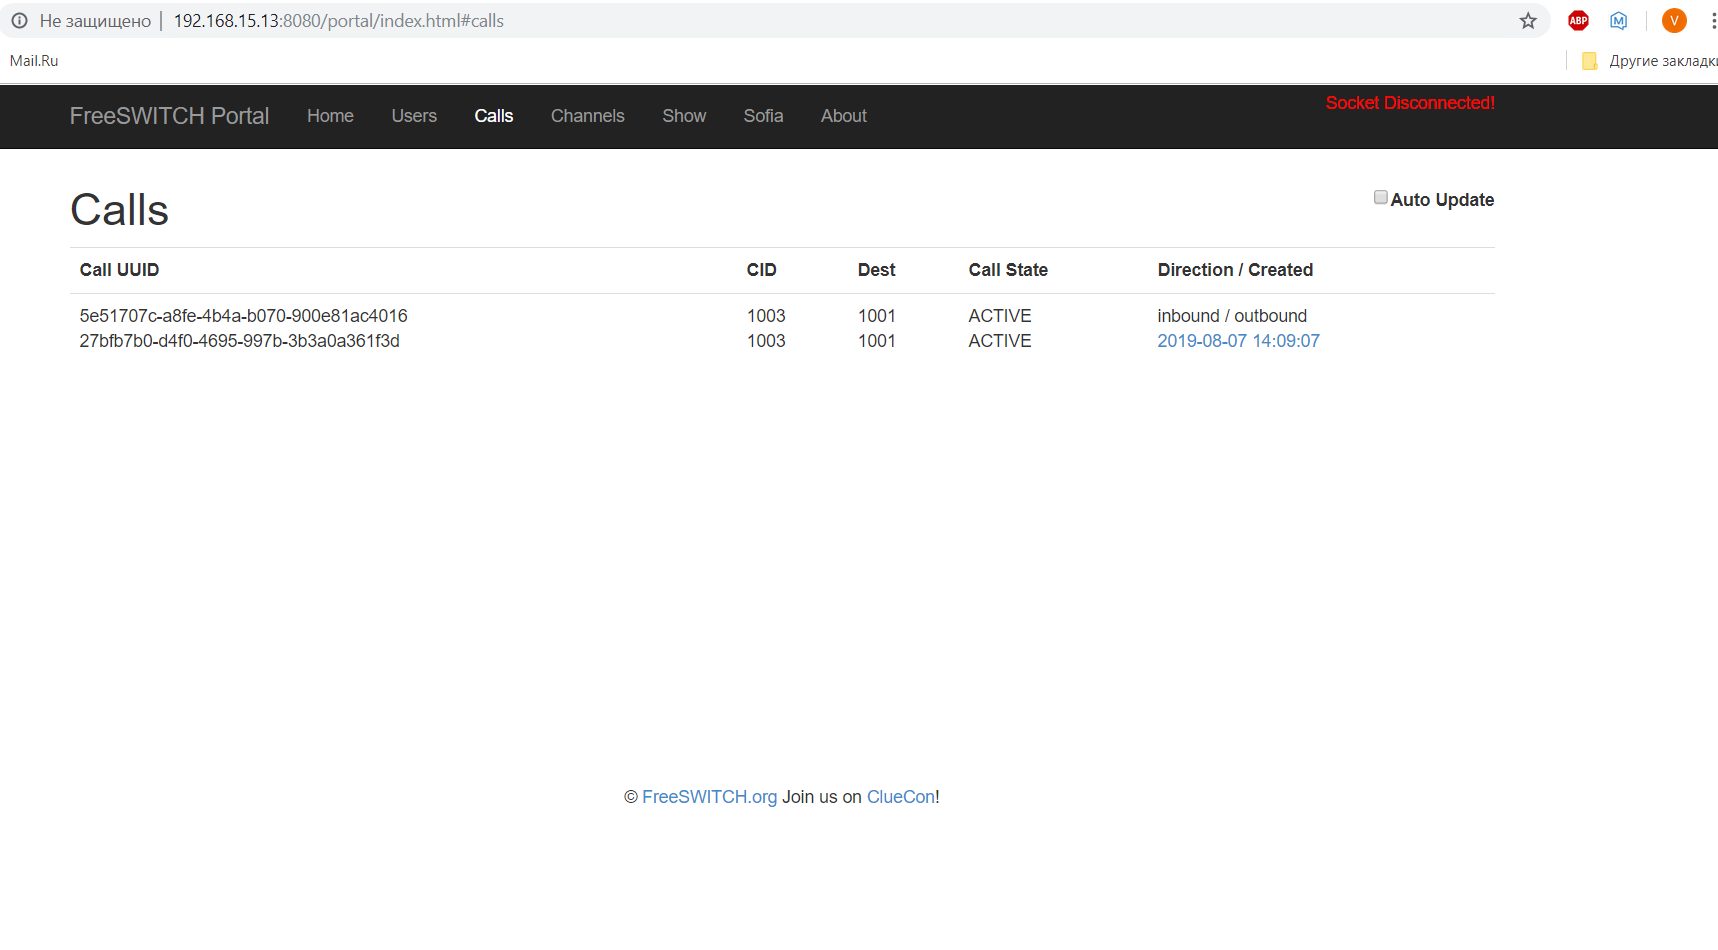
We make the call setup from the SIP client on a smartphone or PC (as described in the article about installing FREESWITCH), changing the default password to your own and dialing a number, in our case 1001. We can go to the freswitch portal at IP_Raspberry: 8080, view the registration of subscribers, status call, etc.
Using alsamixer, customize the sound. Sound changes are applied on the fly, without exiting programs.
Unfortunately, due to the use of a cheap audio card, I didn’t achieve an acceptable sound, an echo was heard in the speakers. It can be minimized somewhat, but completely removed - I did not succeed.
Therefore, since it was not possible to remove it in one way, we eliminate it in another.
Close Linphonec, edit the configuration file:
sudo nano /home/pi/.linphonerc
In the sound section, we bring the last three lines to this form:
Linphonerc Sound Section
[sound] remote_ring=/home/pi/linphone-desktop/OUTPUT/no-ui/share/sounds/linphone/ringback.wav playback_gain_db=0.000000 mic_gain_db=0.000000 ringer_dev_id=ALSA: bcm2835 ALSA playback_dev_id=ALSA: bcm2835 ALSA capture_dev_id=ALSA: USB Audio Device
In this way, we forced the ringer and sound output device to work on the built-in 3.5 raspberry jack, and the recording device - microphone to work through an external sound card - the echo disappeared.
Switch the speakers to the raspberry’s own connector.
We take into account the following moment: when loading and in some cases, the smart home system plays its system messages through this audio output.
Turn them off. We pass on IP_Rasberry to the main page, opening the MajorDoMo home automation system.
We enter the control panel - the Computer object (expand the device) - ThisComputer on the Properties tab and set the values:
ThisComputer.minMsgLevel 100 ThisComputer.volumeLevel 0
Add an entry to cron (a daemon program designed to perform tasks at a specific time, or at certain intervals. The crontab utility is used to edit tasks):
crontab –e
I note we are doing this from under the user pi.
Insert the line at the very end:
@reboot /home/pi/linphone-desktop/OUTPUT/no-ui/bin/linphonec –a
This line starts when restarting, turning on the computer, the Linphonec program in auto answer mode.
Back to MajorDoMo:
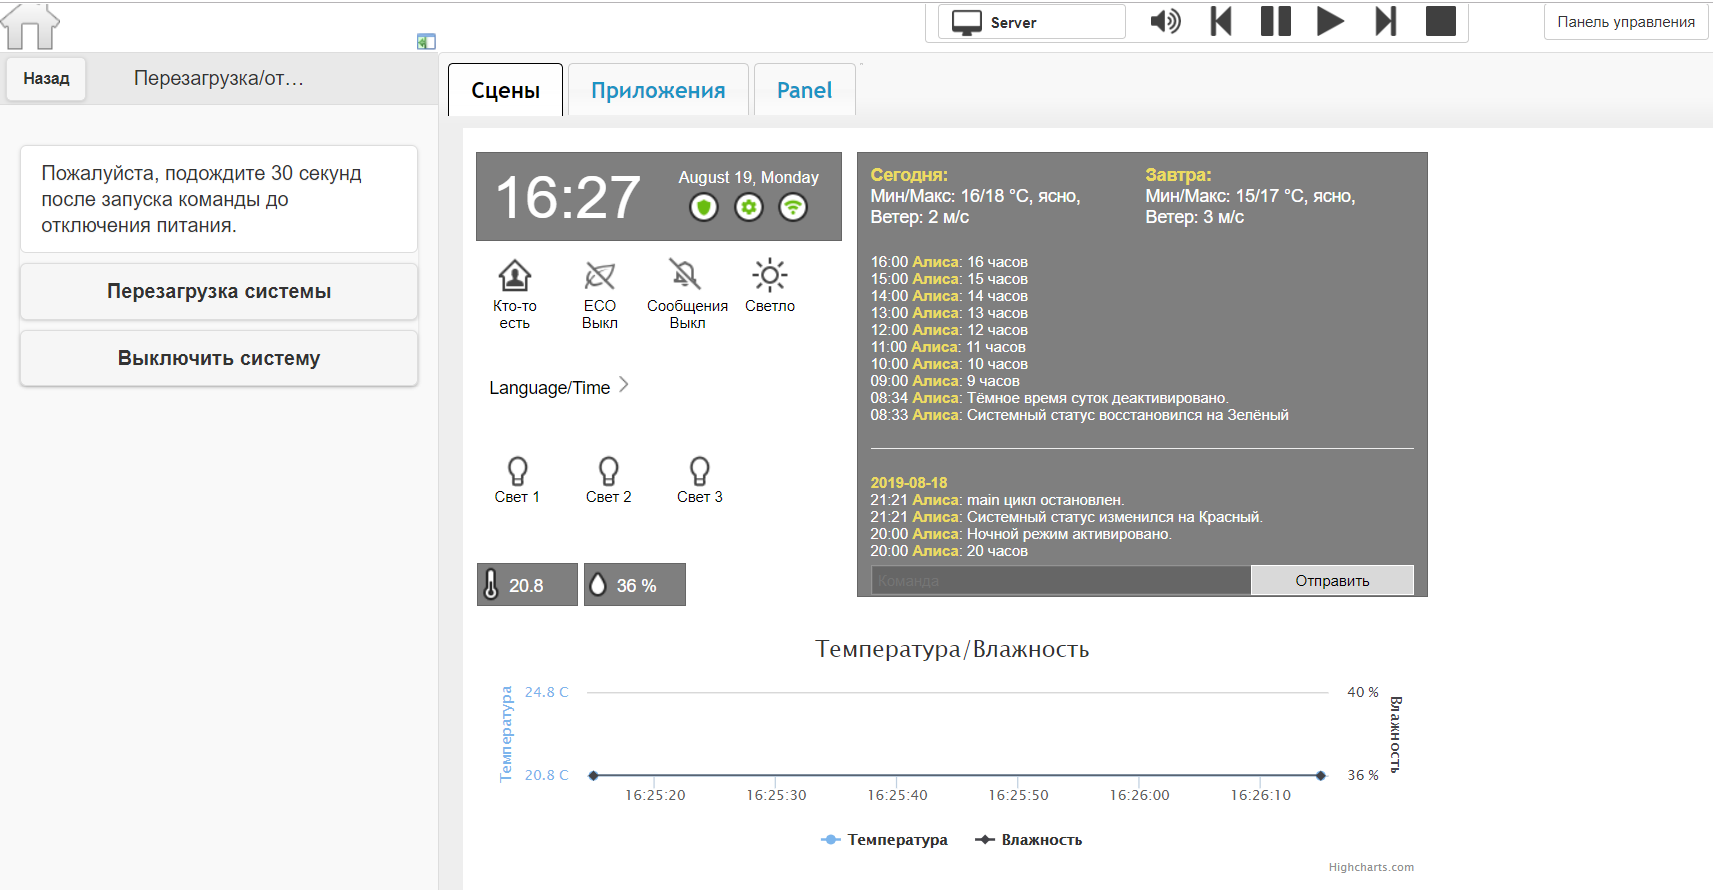
Let's go to the main page, in the service section:
In the menu of this section, buttons are created for rebooting (turning off) the computer.
The fact is that in order to save the resources of the SD memory card, the changes are recorded in the “smart home” system after a certain time (15 minutes). Therefore, if you need to overload raspberries, then it is better to do it right. We reboot the system.
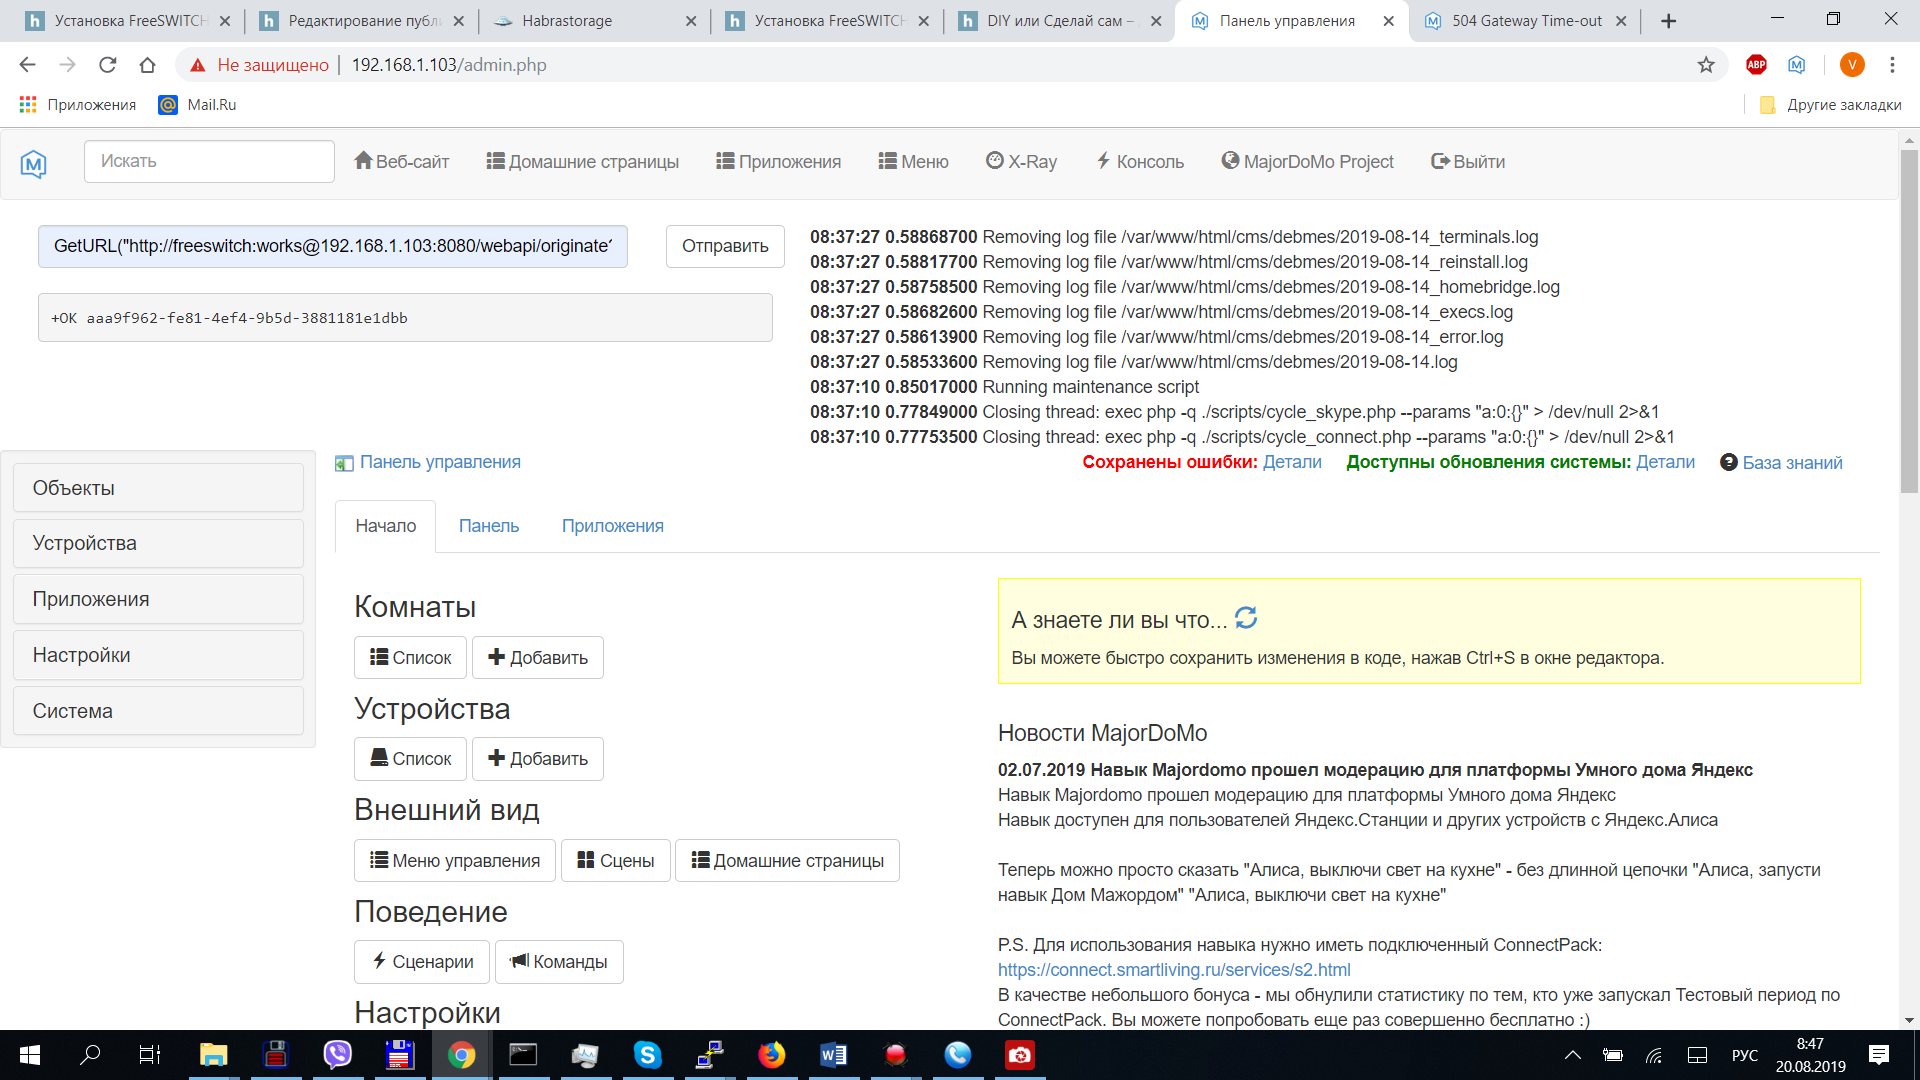
After rebooting, we go to the main page of MajorDoMo, go to the control panel, and as in the last article we make a call from the console using the following format:
GetURL("http://freeswitch:works@192.168.1.103:8080/webapi/originate?user/1001%201003%20XML%20default")
Following the command, Linphonec automatically picks up the phone. In the RPI speaker, a sound file is being played, a call is being sent to the second softphone (PC / smartphone). Having picked up the handset (by pressing the answer button in the program), the connection is established.
On this, I finish this part. I’ll try to describe a little later about the button itself using GPIO and setting up calls outside my local network.
All Articles