AirTest IDE and Image Recognition - Automation of testing mobile games based on image recognition
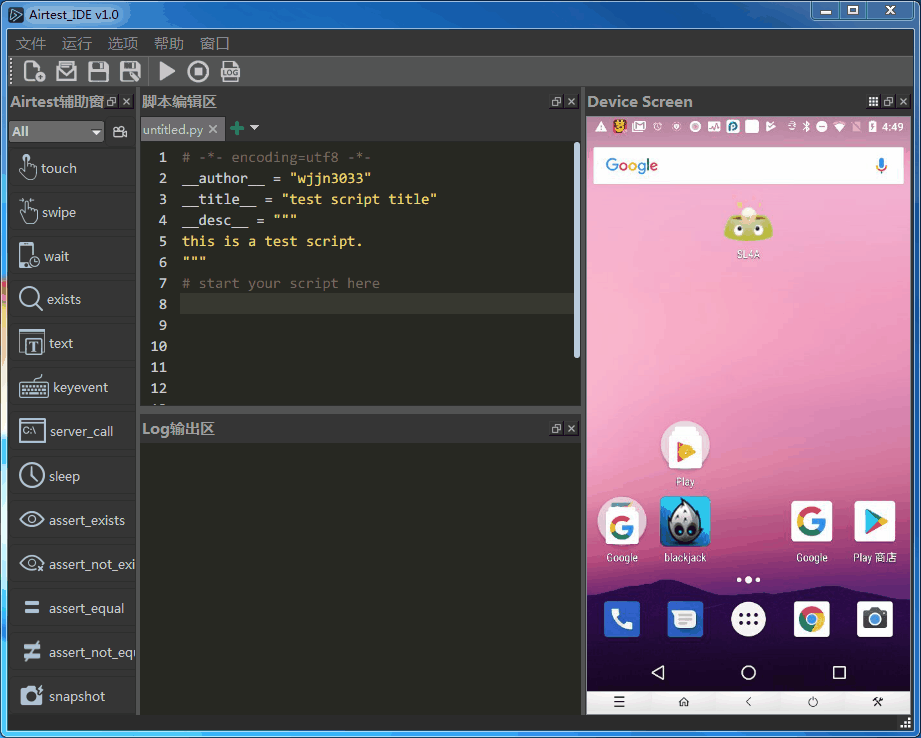
In the previous article, we met with AirTest IDE , but just in case, let's repeat: AirTest IDE was developed by NetEase and is designed for "hard-to-automate" applications, such as games. Actually they are the main focus of the developers, although this does not stop using AirTest for any other applications.
Today I will tell you about one of the 2 main frameworks - AirTest. AirTest is a cross-platform framework for automating UI, based on the principles of image recognition (Image Recognition), which, according to developers, is suitable for games and applications. The AirTest Project on GitHub contains 4 projects: Airtest , Poco , iOS-Tangent , multi-device-runner .
Now let's move on to the fun part!
How AirTest Works
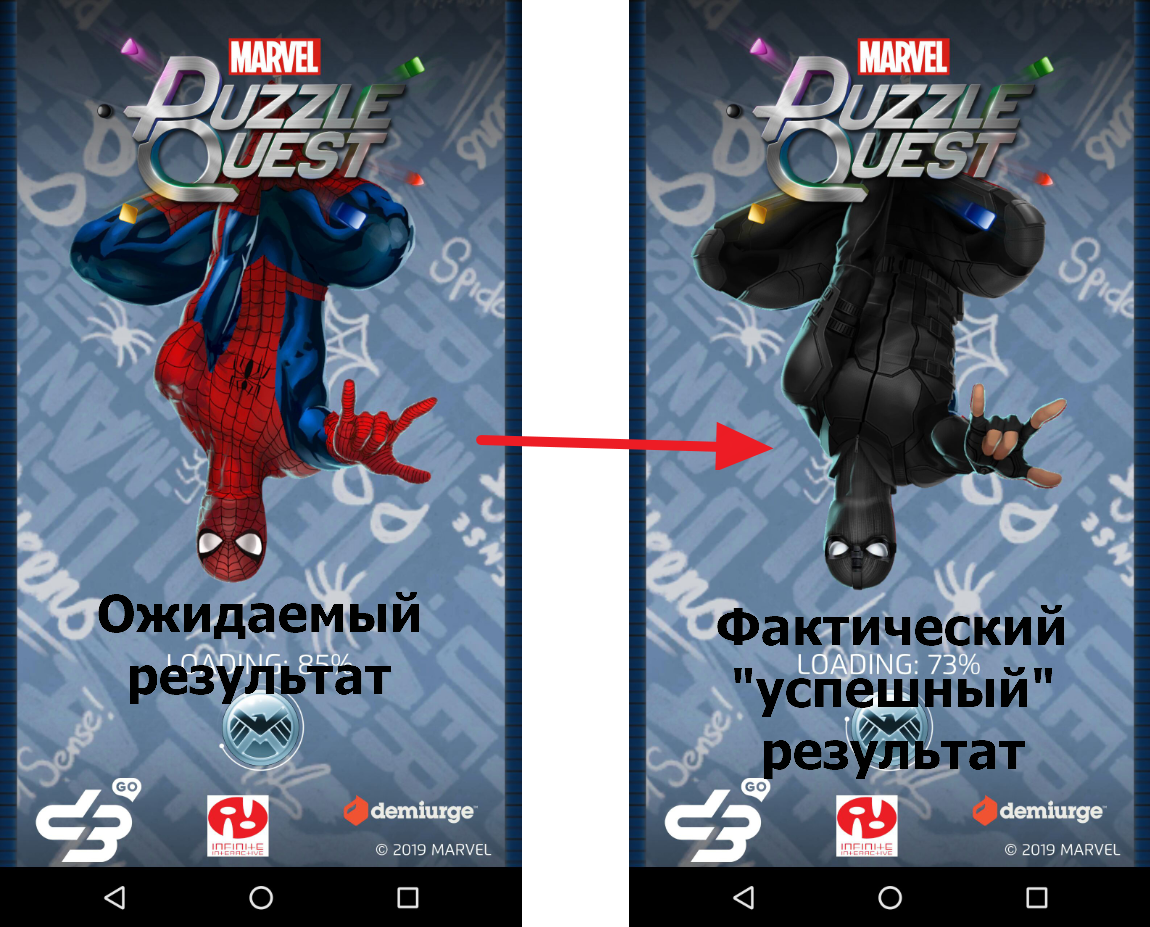
AirTest processes the resulting screenshots based on the thresholding process. The bottom line is to compare the intensity of the pixels in the image with a certain number ( threshold value ) and, if the pixel value is greater, then assign a color to it (white is most often used). Otherwise, a different color is assigned - black. As a result, the output is a black and white image. A natural limitation follows from this - AirTest does not take color into account during recognition. For example, if you use an object with the same silhouette, but different, for example, coloring and you need to check for the presence of an element with a particular color palette, then this will be extremely difficult, and may not work at all.
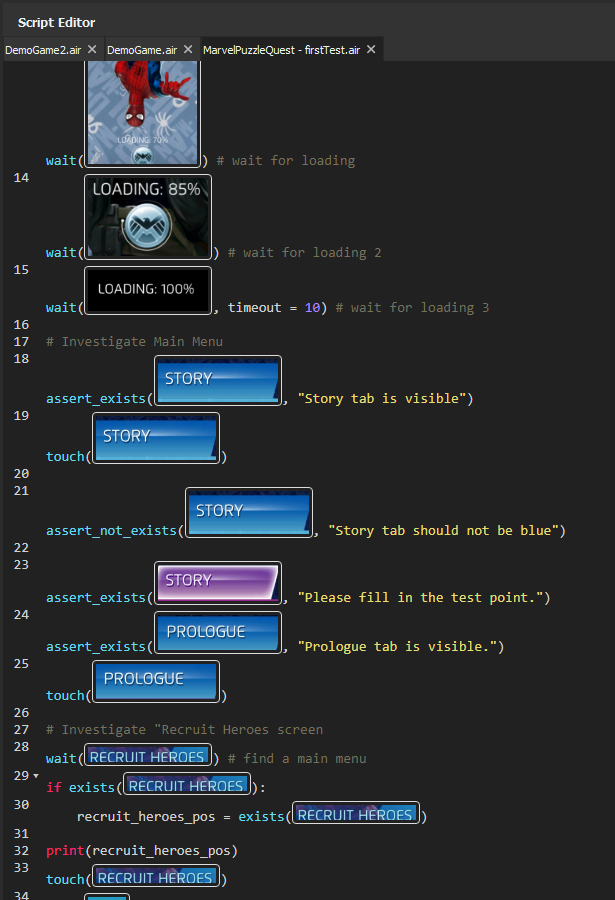
For example, as part of the AirTest IDE test, it was decided to work with the game Marvel Puzzle Quest . When loading, characters from this comic book universe flash on the screen in a certain order. From time to time, their costumes change and this is the first time I have been alerted. In the example below, I expected, as part of the test, Spider-Man in a classic, and received in a stealth suit. The test, in fact, was successful, but this happened because of the above - the use of a black and white image during recognition. An example of what was expected and what ultimately happened:
Improving the likelihood of successful completion of tests
As you already understood, Image Recognition is far from a panacea, although it works well here. To write quality tests, you can’t avoid writing code and, accordingly, knowing the basics of Python. For example, before looking for a specific element, it would be nice to make sure that it really is on the screen. There are times when AirTest “misses” and may take the wrong item for the one you need. From time to time there are problems with the recognition of the text that you want to find using Image Recognition. AirTest may confuse the results and assume that the text you need is on the screen, but, in fact, the text there is completely different. The results analysis process is designed to simplify the reporting system that is already integrated into the AirTest IDE. You can create and open a report after completing the test / script using the keyboard shortcut Ctrl / Cmd + L.
According to general recommendations, I would also highlight the following.
- Take screenshots of exactly those elements that you need. I mean, if you need a button that, for example, is on a complex texture backdrop, then try to make a screen of only the button so that you do not waste time processing the backdrop, which, in fact, you do not need. In this case, the search will not depend on what is shown on the backdrop and you will get a more accurate result in less time.
- Try to avoid recognition of images in which only text is present, as successful recognition ("success rate") in this case will be greatly reduced.
- Although creating screenshots during automatic code recording (script auto recording) is a fairly convenient function, but in some places screenshots are not very informative. It’s better to create them manually in order to store more useful search information in your pictures.
And if you want to ask “Is it possible to change the settings of the image search process?”, Then I will answer you - yes, it is possible.
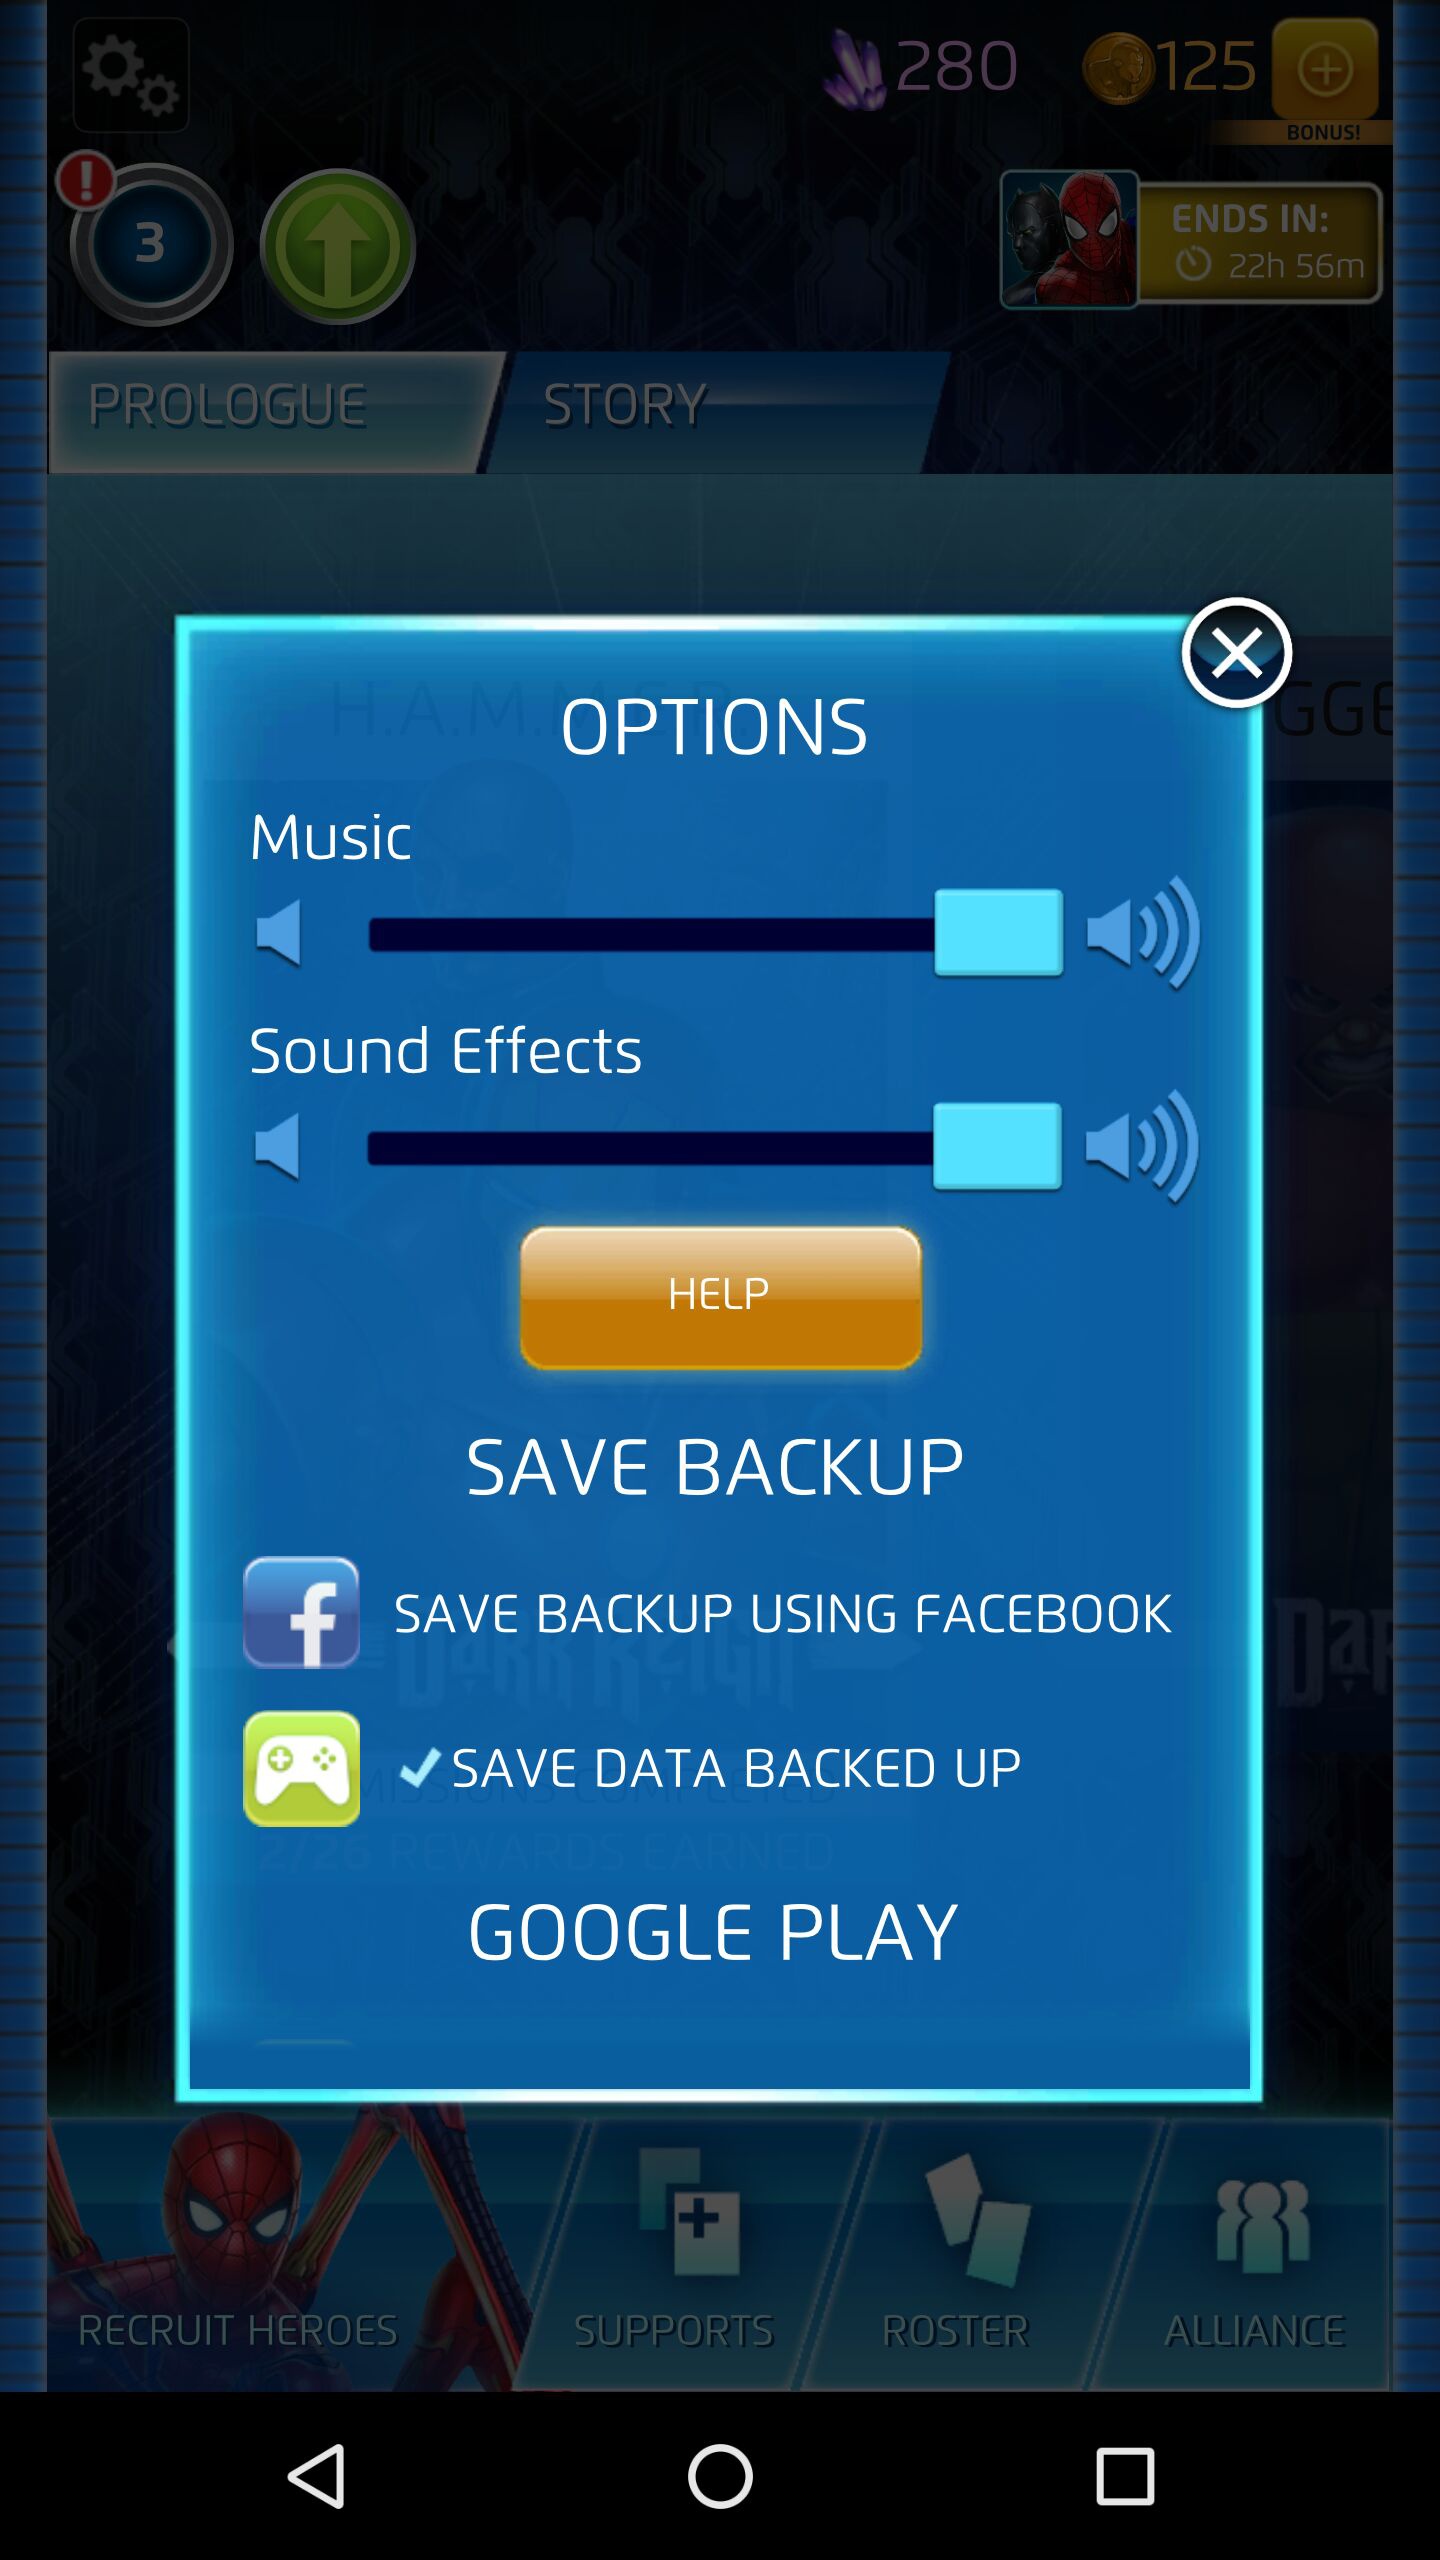
Image Recognition Settings
The user is allowed and encouraged to work with the Image Recognition settings to achieve the desired results, to optimize the time and probability of successful recognition of elements (success rate) on the screen. These settings are stored in the Image Editor window and to open it, you need to double-click on the desired image in the Script Editor. Recognition settings for each image need to be changed separately or global variables should be used if, for example, you want to increase the accuracy requirements for threshold operations for your project.
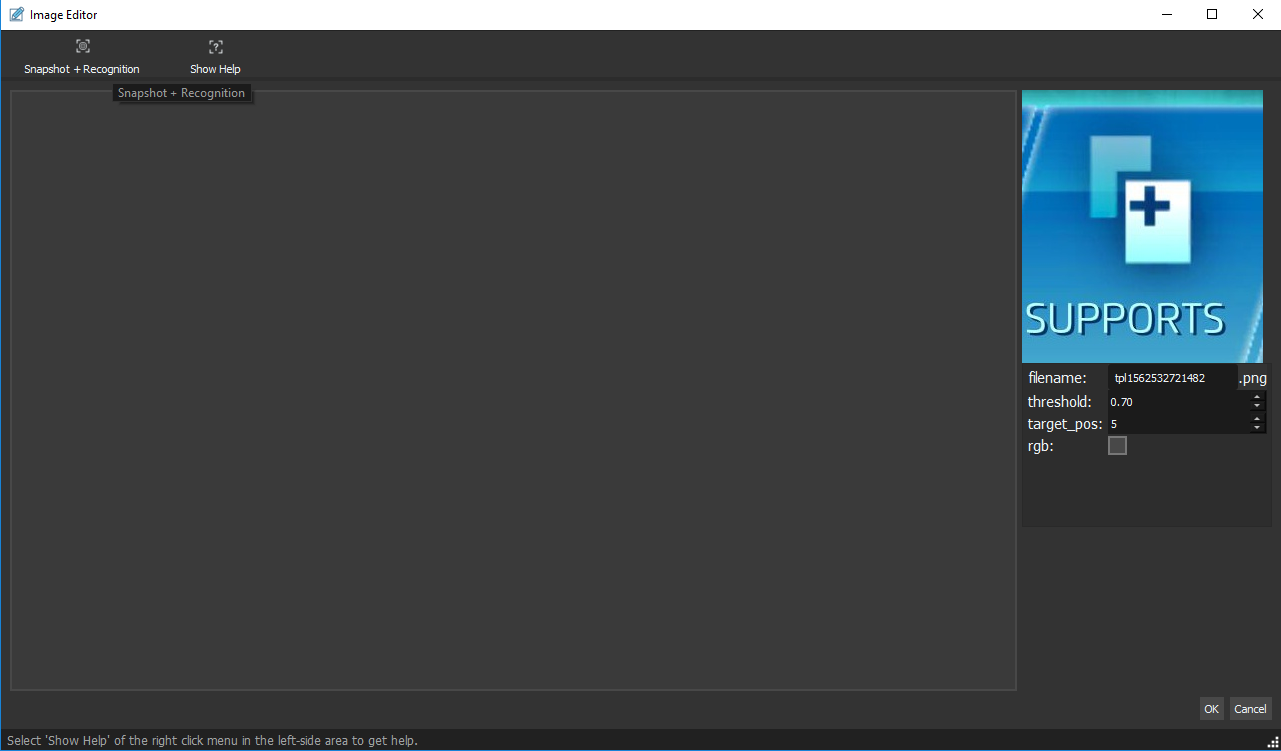
Image Editor contains a working area, as well as "Snapshot + Recognition" and "Show Help" buttons. The first is responsible for comparing your current picture with the snapshot version. Snapshot picture is captured from the current window on your device. The second button opens the Image Editor functional manual. In the right part of the window, the current image for search is displayed, as well as settings such as filename, threshold, target_pos and rgb.
- The filename field is responsible for the name of the currently saved image (all pictures are saved in the project folder).
- threshold stores the value of the percentage of coincidence (from 0 to 1) of images after recognition. The higher the value, the higher the requirement for image matching accuracy. As mentioned above, AirTest converts images to black and white (depending on the implementation of the threshold) and, therefore, the color is not taken into account during recognition.
- The rgb checkbox is designed to “enable and add” color during image recognition and thereby begin to take it into account. However, keep in mind that the inclusion of this functionality still does not guarantee 100% of the result. For example, if you have 2 identical buttons that differ only in the background color, the probability of incorrect recognition (for example, within assert_exists / assert_not_exists) will be quite high.
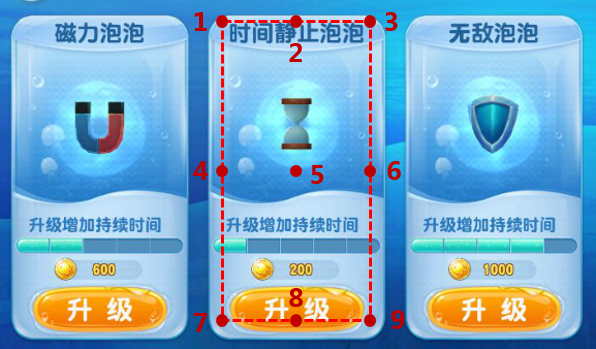
- target_pos is responsible for the point in the picture that AirTest clicks after recognition. The default value is 5, but you can change it from 1 to 9, where 1 is the upper left corner of your working image, and 9 is the lower right corner. The location of all nine points is clearly shown in the screenshot below. You can also read about it in the official documentation.
In this example, the middle button is selected for recognition. The outline shows the borders of the selection.
Writing Automated Tests with AirTest
All working commands of the AirTest framework can be found in the AirTestAssistant window in the upper left corner of the Airtest IDE. If it is not there, then you can set the default window layout using Window -> Default layout .
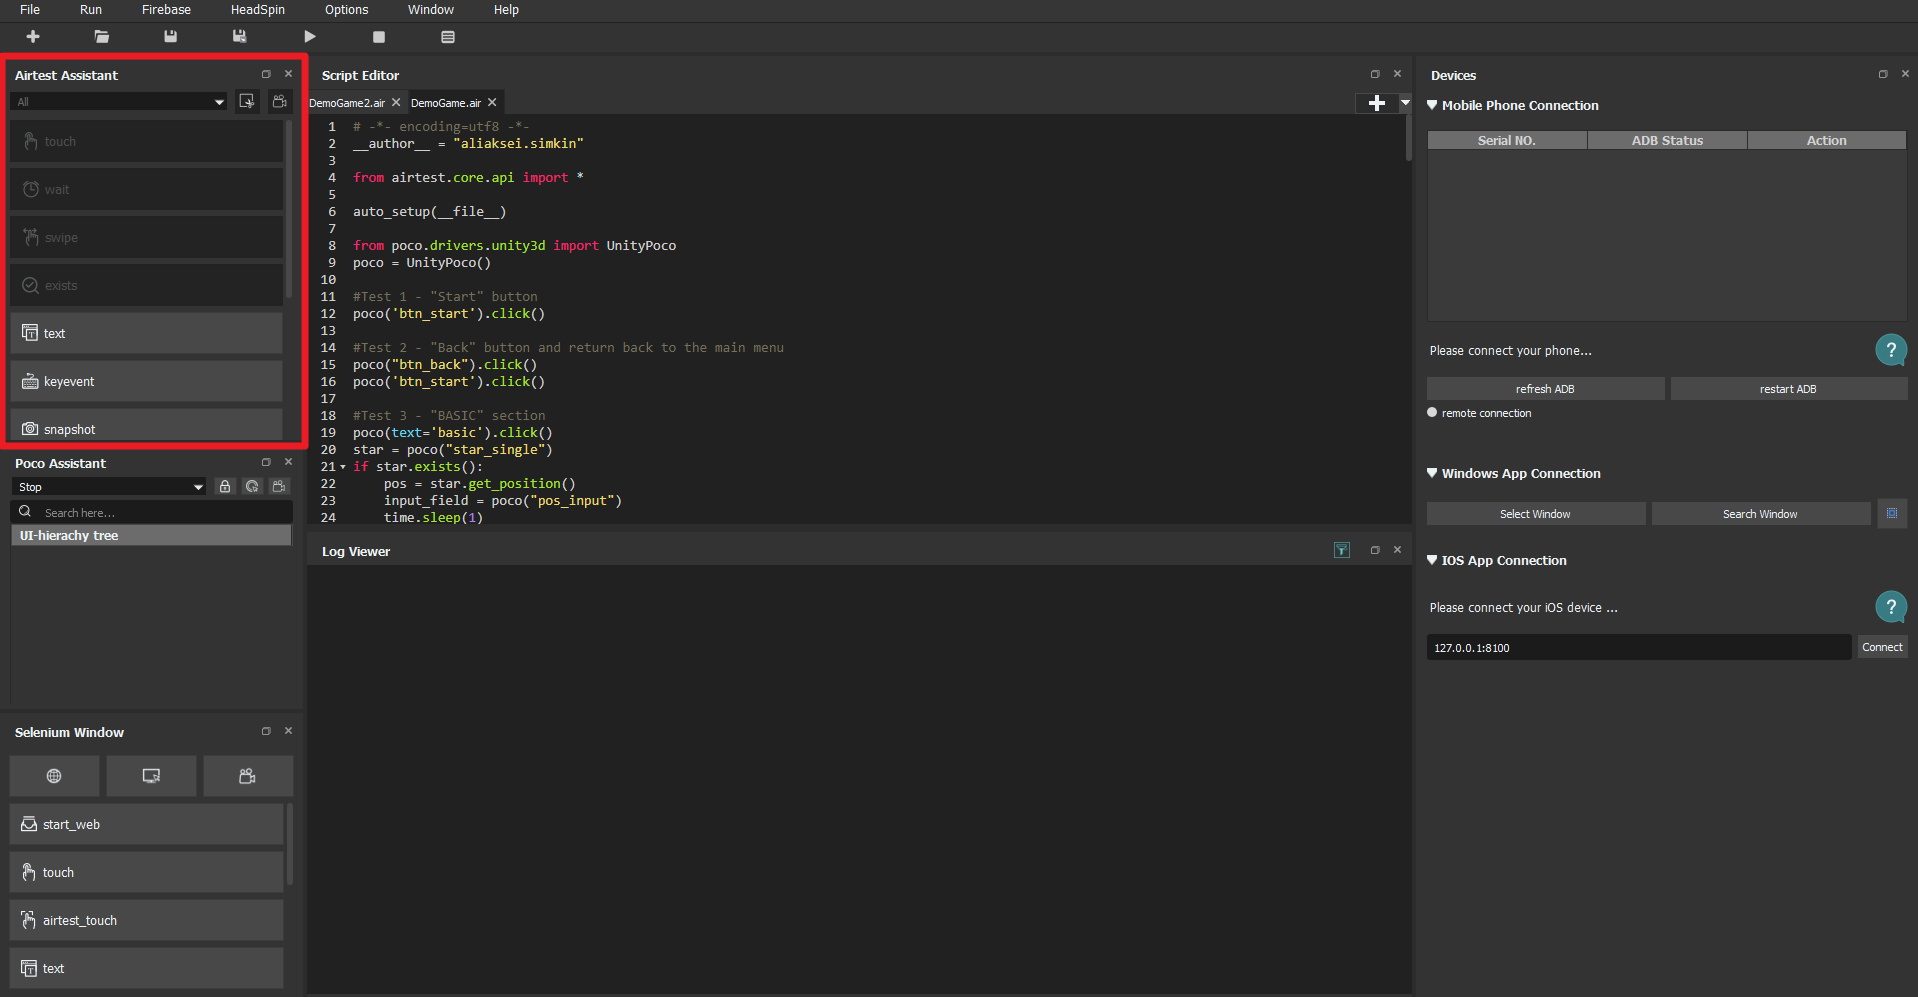
In the current version of the program, you can use the following commands that are available in the AirTest Assistant window:
- touch - this command simulates a touch gesture on a mobile device. Touch has the following parameters - touch (v, times = 1, duration = 0.01, right_click = False).
- v - picture or coordinate (x, y)
- times - the number of clicks. The default value is 1
- duration - the duration of the hold after touching the screen. With this parameter you can simulate a "long press" (long_touch). The default value is 0.01 seconds.
- right_click - click the "right mouse button". Can only be used in Windows programs.
- wait - waiting for the UI element. The command has the following parameters - wait (v, timeout = TIMEOUT, interval = 5, intervalfunc = None).
- v - the image that the program expects
- timeout - timeout. The default value is 20.
- intervalfunc is a user (custom) function. If the image is not found, this function will be executed.
- interval - interval between image comparison
The function returns the following: if an image is found, then the center coordinates of the given image are returned, otherwise TargetNotFoundError is thrown
- swipe - this command simulates a swipe gesture on a mobile device ("swiping the screen"). Swipe has the following parameters: swipe (v1, v2 = None, vector = None, duration = 0.01).
- v1 - the value from which svayp begins. It can be either an image or a given coordinate (x, y)
- v2: swipe end value (command is executed from v1 to v2). This parameter has higher priority than the "vector" parameter
- vector [x, y] - is created while AirTest is running, or you can set it yourself. Indicates which way to swipe. To swipe to the right, X must be positive, in turn, Y must be positive for swipe down.
- steps - did not use this parameter and did not find how it is applied in practice. The tooltip gives the following: "the node in the swipe path, default 5". I suppose that the swipe direction vector will be divided into “sections” and instead of swapping instantly from point A to point B, the swipe will be simulated with small pauses in the nodes specified in this parameter, as if simulating a phased movement. For example, if the value is 5, then the vector will be divided into 5 segments.
- duration - the duration of the swipe. The default value is 0.5 seconds.
- exists - a check exists for the element you expect on the device’s monitor screen. exists has the following parameters: exists (v)
- v - image
The function returns the following: if an image is found, then the center coordinates of the given image are returned, otherwise False.
- v - image
- text - text input command. text has the following parameters: text (text, enter = True, search = False)
- text - text string to enter
- enter - this parameter is responsible for whether to use "Enter" after entering text. The default value is True.
- search - did not use this parameter and did not find how it is applied in practice. The tooltip gives the following: "force" Search "or not after input". The default value is False.
- keyevent - emulation of pressing physical buttons on the device, such as HOME, BACK, MENU, POWER, etc. Parameters for this command: keyevent (keyname)
- keyname - button name (POWER, HOME, etc.)
- snapshot - create a screenshot of the screen in the current state. Default options: snapshot (filename = None, msg = "test-point")
- filename - save the current screenshot as a separate file. You can ignore this option.
- msg - description of this test point. This text will be displayed in the HTML report, which can be created after the test.
This function returns the following: file name (filename).
- sleep - the running test "falls asleep" for a while. Default Values: sleep (secs = 1.0)
- secs - timeout. The default value is 1 second.
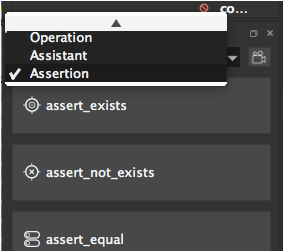
- assert_exists - check if an element exists. Parameters for this command: assert_exists (v, msg = "test-point")
- v - image with the element, the presence of which is checked
- msg - description of this test point. This text will be displayed in the HTML report, which can be created after the test.
This function returns the following: if an image is found, then the coordinates of the center point of this image are returned, otherwise an AssertionError is thrown
- assert_not_exists - check that the item is not present on the device screen. Parameters for this command: assert_not_exists (v, msg = "test-point")
- v - image with the element, the presence of which is checked
- msg - description of this test point. This text will be displayed in the HTML report, which can be created after the test.
- assert_equal - check that the attribute is equal to the specified value. Parameters for this command: assert_equal (first, second, msg = "test-point")
- first - the first item to compare
- second - the second element to compare
- msg - description of this test point. This text will be displayed in the HTML report, which can be created after the test.
- assert_not_equal - check that the attribute is not equal to the specified value. Parameters for this command: assert_not_equal (first, second, msg = "test-point")
- first - the first item to compare
- second - the second element to compare
- msg - description of this test point. This text will be displayed in the HTML report, which can be created after the test.
These commands are divided into 3 main groups: Operations, Auxiliary functions, and Assertions . You can select the group you need using the appropriate filter (drop-down menu immediately below the window name).
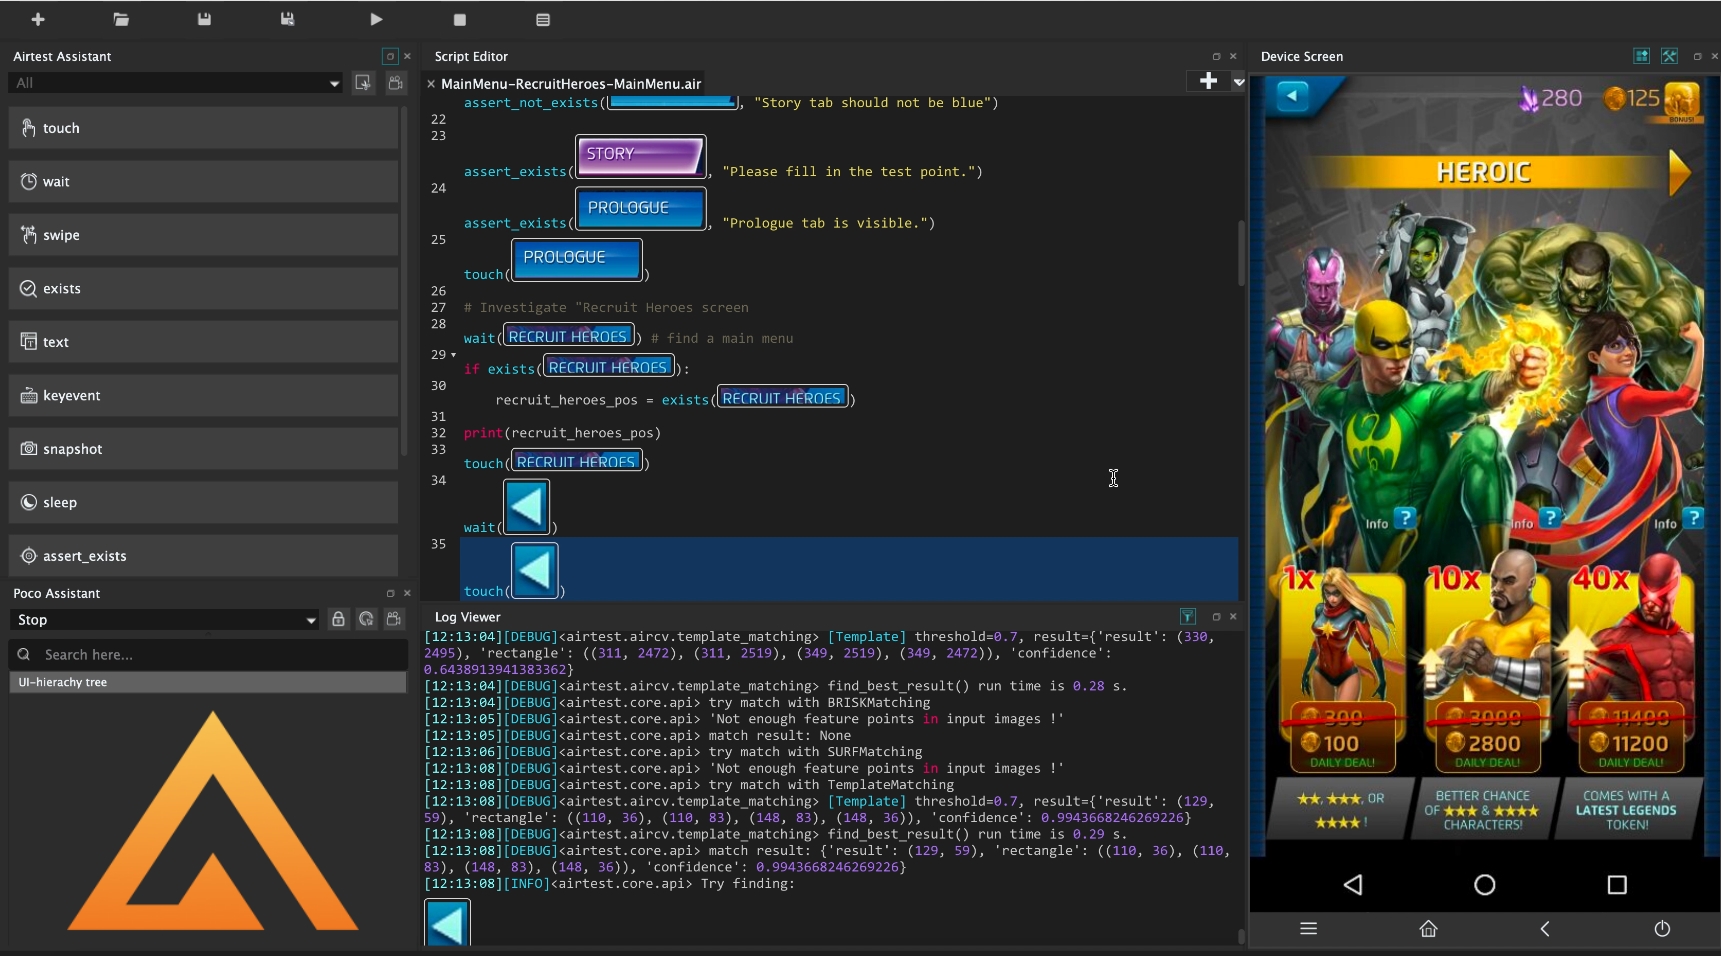
Teams that need an image activate the screenshot recording functions immediately after clicking on the corresponding button. For example, to select which item to click on the screen, select the touch command in AirTest Assistant and in the Device Screen window, on the active device, circle the item you want to click. After that, the corresponding command will appear in the main window (Script Editor), in our case touch, with the image as a parameter. As a result, the automation process is as follows (the gif was recorded from an obsolete version of AirTest IDE):

If for some reason you do not want to manually create screenshots and / or write code in general, you can use the automatic recording function. You can activate it by pressing the "camera" button opposite the drop-down menu with groups of commands in the Airtest Assistant window. Autorecording is a pretty accurate and convenient thing, but, of course, is not a panacea and will not replace manual code dialing.
It is worth mentioning 3 more hot keys - F5 (start the script), F10 (stop the running script), Ctrl + L / Cmd + L (create a report based on the finished test).
You can run ready-made tests without a UI using the terminal (command line). More information about this in general and about running tests in particular can be found here .
An example of an excerpt from a test written using the AirTest framework can be found under the spoiler!
The UI in your application / game does not consist entirely of unique icons, buttons, backs, etc. In addition, periodically visually identical elements can be found on one screen, for example buttons, sliders, etc. Most often in such cases, AirTest will not be able to recognize the element you need and either the test will fail with error or the wrong interface element will be selected for further manipulations.
Especially for such cases, another framework was developed that is already built into the AirTest IDE. He is Poco and was briefly described in an article with an overview of the Airtest IDE . I’ll tell you more about this framework in the next article.
Tell us if you have already used the AirTest IDE and what you think about this tool. I will be glad to discuss in the comments!
All Articles