Deploy Symfony + React applications on AWS through CI
Good afternoon, in this article I will show how to deploy Symfony 4 application on AWS. There is an example of such a process in the official documentation, however, my version is not as trivial as downloading a zip archive with an application. In the yard of 2019, in docker mode, microservice architecture and CI / CD practices are finally starting to be included in the tools of not only DevOps engineers, but also ordinary mortal developers. To make the article more interesting, I added a front to React.JS, to cover the needs of a larger mass of people, if your application does not use Encore - it does not matter, I will indicate how to change the Docker file for you, support for React.JS only affects it . Who will be interested in this tutorial? First of all, it is aimed at PHP developers who want to change their deployment practice - to move away from the usual canons and use docker to pack their application and lay out the image. But you can go a little deeper, and the further narration will be aimed at automatically deploying the application from Git via the CI / CD platform (CircleCI will be used, but if you are interested in the Gitlab config, write in the comments, I will attach it). In fact, it’s absolutely not important for React / PHP whether you have an application or, say, .NET Core, this part will be interesting for developers to gain deployment automation skills in general. The source code is available in the github repository, link at the end of the article. Well, let's go!
I assume that you have your own Symfony application, but for the demonstration purposes I sketched “hello, world!” Containing the following packages:
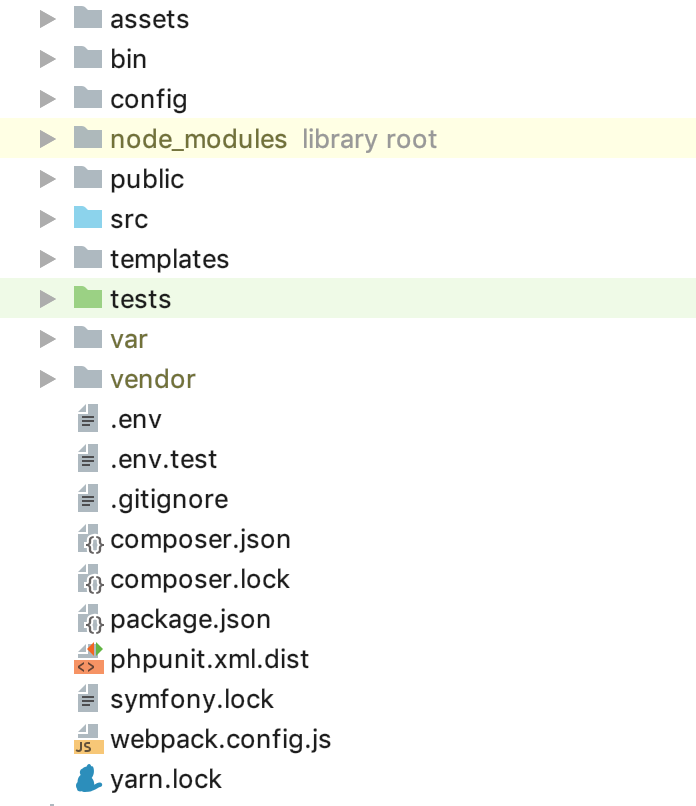
is a minimal gentleman's set. At the moment, the folder structure should be as follows:
Now you need to configure your cloud infrastructure. I will not focus on registering and activating the trial period of AWS, at this stage we need to create 2 database instances - I will use 2 types of environment: STG (staging) to test the implementation of new “features” and PROD (production) as directly “combat” server. A lot of articles have been written about the advantages of the managed service database, moreover, we mainly pursue the convenience for the developer in this guide, therefore we use RDS, and do not raise our own separate database server. As a DBMS for this example, I used PostgreSQL, you are free to choose any one that suits you, go to the RDS service and create 2 instances of the capacity and volume you need. Since the
file is available for us “out of the box” in Symfony, we will use it, for example, for PROD, and for STG we will create a copy of
and change
to
in
and
on
in
, and also enter the
connection parameters for each of the created instances.
Great, a start has been made! As you know, symfony dependencies are installed through composer, to install it, use the composer.sh file, which we put in the root of the project:
This is a software installation guide from composer .
Now, for each of the environments, create your own Dockerfile in the root of the project:
and
Files can be used “as is”, no macros are used for changes. Let's walk through the contents of the Dockerfile to dispel a touch of magic. As the “foundation” we use the official PHP 7.2.19 image with the integrated Apache web server (you are free to use any of your choice, configure a bundle with Nginx, and so on, in this example I use the above as the most, in my opinion, convenient). The expose line is not important to us at the moment, it does nothing by itself, however in the future it will be used by ElasticBeanstalk, which needs it to deploy correctly. The following constructions use PHP-optimized production settings recommended by the manufacturer, activate mod_rewrite for Apache and increase the maximum amount of memory for a PHP script from 128 to 256 MB, which is necessary for composer to work correctly. Next, we install the necessary applications, PHP dependencies and extensions, and immediately configure them. We assign the folder / var / www to the working directory of our application - the source code of our application will be copied there. Since apache, by default, uses / var / www as an entry point for its host, and the symfony index file is located in / var / www / public, we change the apache document root as the next construct. Then we sequentially install composer, nodejs and yarn (if you do not use encore / react.js in your application, then you do not need the last two points). Finally, we copy our source code and start the installation of dependencies through composer for symfony and yarn for react.js. The meaning of a separate Dockerfile for STG lies in the penultimate instruction for docker - copying .env.stg to .env, so the .env file in the STG image will contain the parameters relevant for this environment. You can locally (of course with docker installed) collect the image, run it and make sure that the application is working and does not need anything else for this work:
for STG and
for PROD.
We can use EC2, configure ELB / ASG, etc., or use ElasticBeanstalk, which is just a gift for us in terms of convenience. Go to the ElasticBeanstalk section and create a new application with its name and description. Then create the 2 environments that were mentioned earlier: STG and PROD, create both environments as the Web server environment, specify “Docker” as the platform, and leave the Sample application as the application code. Deployment to ElasticBeanstalk is done by uploading project files or instructions, usually in a zip archive. In our case, the flow will be like this: we collect the docker image of our application, upload it to the repository and load the instructions instead of the source archive or the docker image, which tells ElasticBeanstalk to take the image from the remote server and deploy it. And all this is automatic.
Let's start by creating a repository for storing docker images. There are 2 options:
1 - your project is private, its code is closed and the repository, respectively, must also be closed. In this case, you either keep your own register of images somewhere or use a private cloud. AWS has ECR for these purposes, you can create a repository there, but no one forces you to do this.
2 - you have an open source project and you can use dockerhub.
In our example, the code is open, but I will show how to use closed repositories, after understanding this process, connecting an image from dockerhub will not be difficult. The first thing we need is to create the repository itself, after that you will get its unique URI. Further narration will go for third-party (not AWS ECR repositories and their integration), I will write for ECR after that.
After creating the repository, we need to log in to this service and there is a little trick ... Go to the settings of your locally installed docker and check that you have the option to save passwords in external storage removed (for macOS users: “Securely store docker logins in macOS Keychain ”), otherwise the configuration file we need will be empty. And so, we authorize in the selected service for storing the registers of your images:
after successful authentication, the following construction will appear in the ~ / .docker / config.json configuration file:
If it does not appear, double-check the docker configuration described above.
Now everything is ready to prepare the instruction file for ElasticBeanstalk - Dockerrun.aws.json, its code will be like this:
In general, the instruction looks like this: logging in using the key located by KEY_PATH in the S3 storage BUCKET_ID, load the image by IMAGE_URL overwriting the saved one, start it by forwarding port 80 to the same port on the container. Now about the constants used:
BUCKET_ID is the “backpack” automatically created for you in the S3 service, having the form of elasticbeanstalk-REGION-HASH, this is where the system locates service files for your ElasticBeanstalk, including the application files that you download using the “Upload and deploy” button.
KEY_PATH - path to the authorization file to the image repository, I use the APP_NAME / cr.json format, that is, in the folder inside BUCKET_ID under the name of my application (I create, if not yet) I put the cr.json file containing the code received after authorization in the register Images locally:
IMAGE_URL is the unique URI of your image register + tag of the image itself, everything should be clear here.
That's it, now we can download this file as a version of our application in ElasticBeanstalk, and he will pull up the specified image and deploy it.
It remains to automate this process. And to be absolutely interesting, I will implement the sequence of steps for the next flow: for all commits NOT in the master branch, the image will be collected and deployed in the STG environment, and if we push into the master, or better, close it and fill it with merge request 's, then the code will be deployed on PROD. Thus, we get in PROD an up-to-date wizard in which everything should be fine, and branches for developing and testing new code in STG. For this implementation, we need instructions for uploading non-latest images, copy Dockerrun.aws.json to Dockerrun.aws.stg.json, and rename Dockerrun.aws.json to Dockerrun.aws.prod.json (just for convenience).
The only thing that sets Dockerrun.aws.stg.json apart from Dockerrun.aws.prod.json is IMAGE_URL:
As I said at the beginning of the article, I will use CircleCI as a CI / CD, which, according to my personal feelings, is faster than GitlabCI, if I use the free SaaS version. Free Travis would do, but since it doesn’t work with private git repositories, I didn’t specifically conduct a demonstration on it so that there would be no disappointment when such an opportunity was needed. I will leave the settings for the project in CircleCI to readers to study for themselves, I will give the instructions necessary for the deployment myself - in the root of our project we will create the .circleci folder, in it config.yml with the following contents:
I painted the flow itself a little earlier, here it is translated into yaml-instructions for CircleCI, let's go through the implementation of specific steps. It is important to note the presence of environment variables defined for CI that will be used by him during the work:
CI_REGISTRY, CI_REGISTRY_USER, CI_REGISTRY_PASSWORD are needed to access the docker image storage - the same thing that we put in cr.json, only without base64
CI_REGISTRY / CI_REGISTRY_ID make up a unique image URL, without a tag
AWS_ACCESS_KEY_ID and AWS_SECRET_ACCESS_KEY - the names speak for themselves, these are AWS credits for the user on behalf of whom CircleCI will deploy. Go to AWS IAM and create a user, add him to the administrators group and provide only programmatic access. Remember that AWS_SECRET_ACCESS_KEY is available for viewing / copying only once, after you click the show link, you will not see it again.
Back to the CircleCI configuration steps. What is the magic? Checkout loads the source code from the git branch into the current working directory, this process is repeated in every job. In the build process, we sequentially log into the repository, collect the code based on Dockerfile.stg under the tag XXX: dev and send it to the repository. build-master does the same, only for the build it uses the “normal” Dockerfile under the tag XXX: latest.
deploy-stg installs AWS EB CLI and creates an authorization profile in the ~ / .aws / config file, which is necessary for the CLI to work correctly, then initializes the variables for the CLI — you will need to specify the region you choose, the platform — always Docker and the name of your application. Next, we copy the contents of Dockerrun.aws.stg.json to the new Dockerrun.aws.json file and, using the specific environment and region, give the command to deploy our application using the created authorization profile. By default, as a result of this command, all the code of the monitored branch will end up in a zip archive, which will be downloaded to ElasticBeanstalk and unpacked there, but this operation is relatively expensive, that's why we created a new Dockerrun.aws.json file, which is enough to deploy the created by us remote image, and we only need to upload it, in fact. To do this, create a .ebignore file in the project root:
This file uses the syntax .gitignore and it is .gitignore, but not for the Git CLI, but for AWS EB CLI. In this file, I tell the CLI to skip all files except Dockerrun.aws.json. That's it, now when you run the deploy-stg job in ElasticBeanstalk, only the file we created will be sent. deploy-prod does the same thing, it only copies the contents of the Dockerrun.aws.prod.json file to Dockerrun.aws.json, and the last one is an indication of the sequence of work in the CircleCI format (deploy-stg after build and deploy-prod after build -master), and on which branches the data is looking for (ignore: - master and only: - master).
The case is a bit different with AWS ECR, as I promised, let's get back to it. You do not need to log in remotely to the ECR and create a cr.json file, as ElasticBeanstalk “knows a brother in person”. Accordingly, Dockerrun.aws.json will look different - there will simply be no authentication block:
But how then will authentication happen? The fact is that the service that accesses the ECR has a certain set of rights, which in turn are based on certain security policies. In our case, when the deployment is launched via the AWS CLI from a third-party server (from CI), the aws-elasticbeanstalk-ec2-role role is used, find it in AWS IAM in the roles section and attach the additional AmazonEC2ContainerRegistryReadOnly policy to it. Now downloading from a private repository to its “neighbor” will succeed without errors.
But this is exactly loading from the same VPC, through the CLI the docker login command is also not "without tricks": you should receive (for sure) dockers login via the AWS CLI, for this there is a command
This command will return you a line of the form docker login ..., simply put, in the console you need to execute
The command will first receive a string for authentication, and then start the corresponding process. In view of these rules for AWS ECR, the instruction file for CircleCI will look like this:
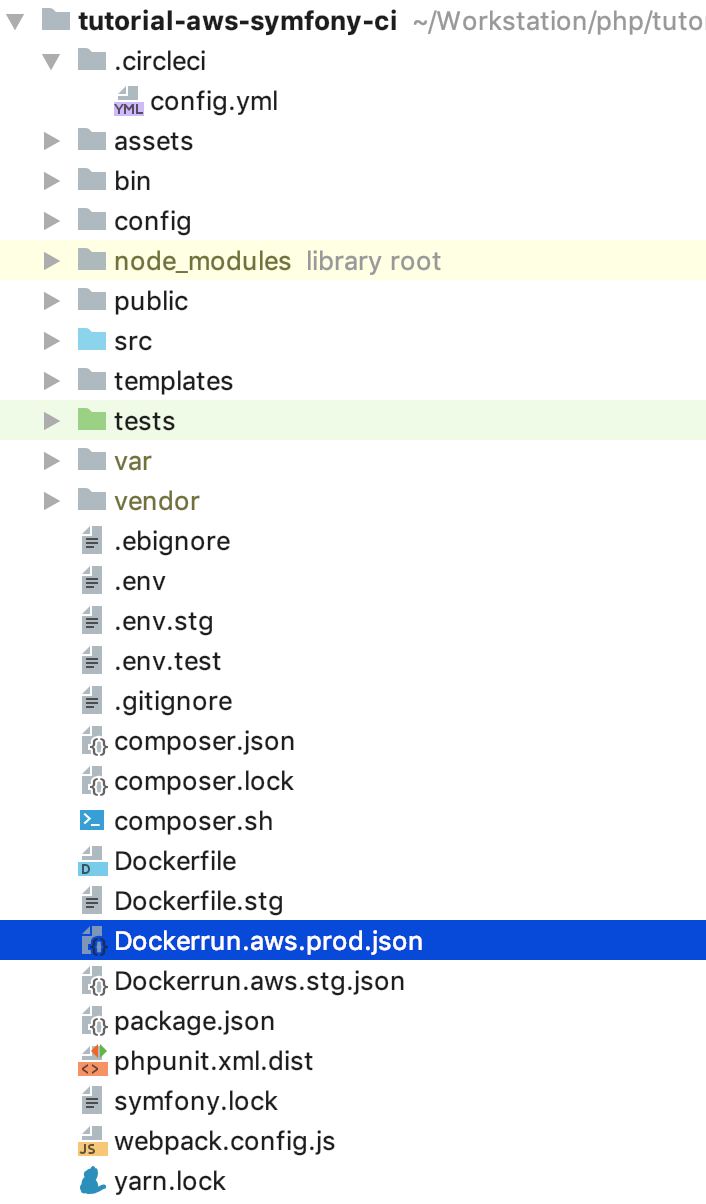
To support docker-in-docker, we added setup_remote_docker at the assembly stages, you should already know the rest from the contents of this article. That's all, now the structure of our project is as follows:
Try to change the code, push it into the task branch, and then make a merge (pull) request to the master and accept it. No more “moves” to post updates. It’s possible (and someone needs) to go further, write your own job desks for rolling migrations, take an intermediate mandatory step for passing automatic tests, and so on, I hope this article will lay the foundation for such experiments and subsequent implementations of high-quality and proper content delivery.
GitHub source code: tutorial-aws-symfony-ci
I assume that you have your own Symfony application, but for the demonstration purposes I sketched “hello, world!” Containing the following packages:
`symfony/webpack-encore-bundle symfony/form symfony/orm-pack symfony/profiler-pack symfony/security-bundle symfony/twig-bundle symfony/validator symfony/phpunit-bridge`
is a minimal gentleman's set. At the moment, the folder structure should be as follows:
Now you need to configure your cloud infrastructure. I will not focus on registering and activating the trial period of AWS, at this stage we need to create 2 database instances - I will use 2 types of environment: STG (staging) to test the implementation of new “features” and PROD (production) as directly “combat” server. A lot of articles have been written about the advantages of the managed service database, moreover, we mainly pursue the convenience for the developer in this guide, therefore we use RDS, and do not raise our own separate database server. As a DBMS for this example, I used PostgreSQL, you are free to choose any one that suits you, go to the RDS service and create 2 instances of the capacity and volume you need. Since the
.env
file is available for us “out of the box” in Symfony, we will use it, for example, for PROD, and for STG we will create a copy of
.env.stg
and change
APP_ENV=dev
to
APP_ENV=stg
in
.env.stg
and
APP_ENV=dev
on
APP_ENV=prod
in
.env
, and also enter the
.env
connection parameters for each of the created instances.
Great, a start has been made! As you know, symfony dependencies are installed through composer, to install it, use the composer.sh file, which we put in the root of the project:
composer.sh
#!/bin/sh EXPECTED_SIGNATURE="$(wget -q -O - https://composer.github.io/installer.sig)" php -r "copy('https://getcomposer.org/installer', 'composer-setup.php');" ACTUAL_SIGNATURE="$(php -r "echo hash_file('sha384', 'composer-setup.php');")" if [ "$EXPECTED_SIGNATURE" != "$ACTUAL_SIGNATURE" ] then >&2 echo 'ERROR: Invalid installer signature' rm composer-setup.php exit 1 fi php composer-setup.php --quiet RESULT=$? rm composer-setup.php exit $RESULT
This is a software installation guide from composer .
Now, for each of the environments, create your own Dockerfile in the root of the project:
Dockerfile.stg (staging)
FROM php:7.2.19-apache EXPOSE 80 RUN mv "$PHP_INI_DIR/php.ini-production" "$PHP_INI_DIR/php.ini" && a2enmod rewrite RUN sed -ri -e 's!memory_limit = 128M!memory_limit = 256M!g' "$PHP_INI_DIR/php.ini" RUN apt-get update && apt-get install -y \ wget \ curl \ libfreetype6-dev \ libjpeg62-turbo-dev \ libpng-dev \ libzip-dev \ zip \ libpq-dev \ && docker-php-ext-configure gd --with-freetype-dir=/usr/include/ --with-jpeg-dir=/usr/include/ \ && docker-php-ext-configure zip --with-libzip \ && docker-php-ext-configure pgsql -with-pgsql=/usr/local/pgsql \ && docker-php-ext-install -j$(nproc) gd \ && docker-php-ext-install zip \ && docker-php-ext-install pdo pdo_pgsql pgsql WORKDIR /var/www ENV APACHE_DOCUMENT_ROOT /var/www/public RUN sed -ri -e 's!/var/www/html!${APACHE_DOCUMENT_ROOT}!g' /etc/apache2/sites-available/*.conf RUN sed -ri -e 's!/var/www/!${APACHE_DOCUMENT_ROOT}!g' /etc/apache2/apache2.conf /etc/apache2/conf-available/*.conf RUN echo "ServerName localhost" >> /etc/apache2/apache2.conf COPY ./composer.sh ./ RUN chmod +x ./composer.sh && ./composer.sh && mv composer.phar /usr/local/bin/composer RUN curl -sL https://deb.nodesource.com/setup_10.x | bash - \ && apt-get install -y nodejs RUN curl -sS https://dl.yarnpkg.com/debian/pubkey.gpg | apt-key add - \ && echo "deb https://dl.yarnpkg.com/debian/ stable main" | tee /etc/apt/sources.list.d/yarn.list \ && apt-get update -qq \ && apt-get install -y yarn COPY ./ ./ COPY ./.env.stg ./.env RUN composer install && yarn && yarn run build
and
Dockerfile (production)
FROM php:7.2.19-apache EXPOSE 80 RUN mv "$PHP_INI_DIR/php.ini-production" "$PHP_INI_DIR/php.ini" && a2enmod rewrite RUN sed -ri -e 's!memory_limit = 128M!memory_limit = 256M!g' "$PHP_INI_DIR/php.ini" RUN apt-get update && apt-get install -y \ wget \ curl \ libfreetype6-dev \ libjpeg62-turbo-dev \ libpng-dev \ libzip-dev \ zip \ libpq-dev \ && docker-php-ext-configure gd --with-freetype-dir=/usr/include/ --with-jpeg-dir=/usr/include/ \ && docker-php-ext-configure zip --with-libzip \ && docker-php-ext-configure pgsql -with-pgsql=/usr/local/pgsql \ && docker-php-ext-install -j$(nproc) gd \ && docker-php-ext-install zip \ && docker-php-ext-install pdo pdo_pgsql pgsql WORKDIR /var/www ENV APACHE_DOCUMENT_ROOT /var/www/public RUN sed -ri -e 's!/var/www/html!${APACHE_DOCUMENT_ROOT}!g' /etc/apache2/sites-available/*.conf RUN sed -ri -e 's!/var/www/!${APACHE_DOCUMENT_ROOT}!g' /etc/apache2/apache2.conf /etc/apache2/conf-available/*.conf RUN echo "ServerName localhost" >> /etc/apache2/apache2.conf COPY ./composer.sh ./ RUN chmod +x ./composer.sh && ./composer.sh && mv composer.phar /usr/local/bin/composer RUN curl -sL https://deb.nodesource.com/setup_10.x | bash - \ && apt-get install -y nodejs RUN curl -sS https://dl.yarnpkg.com/debian/pubkey.gpg | apt-key add - \ && echo "deb https://dl.yarnpkg.com/debian/ stable main" | tee /etc/apt/sources.list.d/yarn.list \ && apt-get update -qq \ && apt-get install -y yarn COPY ./ ./ RUN composer install && yarn && yarn run build
Files can be used “as is”, no macros are used for changes. Let's walk through the contents of the Dockerfile to dispel a touch of magic. As the “foundation” we use the official PHP 7.2.19 image with the integrated Apache web server (you are free to use any of your choice, configure a bundle with Nginx, and so on, in this example I use the above as the most, in my opinion, convenient). The expose line is not important to us at the moment, it does nothing by itself, however in the future it will be used by ElasticBeanstalk, which needs it to deploy correctly. The following constructions use PHP-optimized production settings recommended by the manufacturer, activate mod_rewrite for Apache and increase the maximum amount of memory for a PHP script from 128 to 256 MB, which is necessary for composer to work correctly. Next, we install the necessary applications, PHP dependencies and extensions, and immediately configure them. We assign the folder / var / www to the working directory of our application - the source code of our application will be copied there. Since apache, by default, uses / var / www as an entry point for its host, and the symfony index file is located in / var / www / public, we change the apache document root as the next construct. Then we sequentially install composer, nodejs and yarn (if you do not use encore / react.js in your application, then you do not need the last two points). Finally, we copy our source code and start the installation of dependencies through composer for symfony and yarn for react.js. The meaning of a separate Dockerfile for STG lies in the penultimate instruction for docker - copying .env.stg to .env, so the .env file in the STG image will contain the parameters relevant for this environment. You can locally (of course with docker installed) collect the image, run it and make sure that the application is working and does not need anything else for this work:
docker build -t tmp:stg -f Dockerfile.stg . docker run -p 80:80 tmp:stg
for STG and
docker build -t tmp:prod . docker run -p 80:80 tmp:prod
for PROD.
We can use EC2, configure ELB / ASG, etc., or use ElasticBeanstalk, which is just a gift for us in terms of convenience. Go to the ElasticBeanstalk section and create a new application with its name and description. Then create the 2 environments that were mentioned earlier: STG and PROD, create both environments as the Web server environment, specify “Docker” as the platform, and leave the Sample application as the application code. Deployment to ElasticBeanstalk is done by uploading project files or instructions, usually in a zip archive. In our case, the flow will be like this: we collect the docker image of our application, upload it to the repository and load the instructions instead of the source archive or the docker image, which tells ElasticBeanstalk to take the image from the remote server and deploy it. And all this is automatic.
Let's start by creating a repository for storing docker images. There are 2 options:
1 - your project is private, its code is closed and the repository, respectively, must also be closed. In this case, you either keep your own register of images somewhere or use a private cloud. AWS has ECR for these purposes, you can create a repository there, but no one forces you to do this.
2 - you have an open source project and you can use dockerhub.
In our example, the code is open, but I will show how to use closed repositories, after understanding this process, connecting an image from dockerhub will not be difficult. The first thing we need is to create the repository itself, after that you will get its unique URI. Further narration will go for third-party (not AWS ECR repositories and their integration), I will write for ECR after that.
After creating the repository, we need to log in to this service and there is a little trick ... Go to the settings of your locally installed docker and check that you have the option to save passwords in external storage removed (for macOS users: “Securely store docker logins in macOS Keychain ”), otherwise the configuration file we need will be empty. And so, we authorize in the selected service for storing the registers of your images:
docker login -u LOGIN -p PASSWORD REGISTRY
after successful authentication, the following construction will appear in the ~ / .docker / config.json configuration file:
"REGISTRY" : { "auth" : "BASE64_ENCODED_TOKEN" }
If it does not appear, double-check the docker configuration described above.
Now everything is ready to prepare the instruction file for ElasticBeanstalk - Dockerrun.aws.json, its code will be like this:
Dockerrun.aws.json
{ "AWSEBDockerrunVersion": "1", "Authentication": { "Bucket": "BUCKET_ID", "Key": "KEY_PATH" }, "Image": { "Name": "IMAGE_URL", "Update": "true" }, "Ports": [ { "ContainerPort": "80" } ] }
In general, the instruction looks like this: logging in using the key located by KEY_PATH in the S3 storage BUCKET_ID, load the image by IMAGE_URL overwriting the saved one, start it by forwarding port 80 to the same port on the container. Now about the constants used:
BUCKET_ID is the “backpack” automatically created for you in the S3 service, having the form of elasticbeanstalk-REGION-HASH, this is where the system locates service files for your ElasticBeanstalk, including the application files that you download using the “Upload and deploy” button.
KEY_PATH - path to the authorization file to the image repository, I use the APP_NAME / cr.json format, that is, in the folder inside BUCKET_ID under the name of my application (I create, if not yet) I put the cr.json file containing the code received after authorization in the register Images locally:
BUCKET_ID / APP_NAME / cr.json
{ "REGISTRY" : { "auth" : "BASE64_ENCODED_TOKEN" } }
IMAGE_URL is the unique URI of your image register + tag of the image itself, everything should be clear here.
That's it, now we can download this file as a version of our application in ElasticBeanstalk, and he will pull up the specified image and deploy it.
It remains to automate this process. And to be absolutely interesting, I will implement the sequence of steps for the next flow: for all commits NOT in the master branch, the image will be collected and deployed in the STG environment, and if we push into the master, or better, close it and fill it with merge request 's, then the code will be deployed on PROD. Thus, we get in PROD an up-to-date wizard in which everything should be fine, and branches for developing and testing new code in STG. For this implementation, we need instructions for uploading non-latest images, copy Dockerrun.aws.json to Dockerrun.aws.stg.json, and rename Dockerrun.aws.json to Dockerrun.aws.prod.json (just for convenience).
The only thing that sets Dockerrun.aws.stg.json apart from Dockerrun.aws.prod.json is IMAGE_URL:
Dockerrun.aws.stg.json
{ "AWSEBDockerrunVersion": "1", "Authentication": { "Bucket": "BUCKET_ID", "Key": "KEY_PATH" }, "Image": { "Name": "IMAGE_URL:dev", "Update": "true" }, "Ports": [ { "ContainerPort": "80" } ] }
As I said at the beginning of the article, I will use CircleCI as a CI / CD, which, according to my personal feelings, is faster than GitlabCI, if I use the free SaaS version. Free Travis would do, but since it doesn’t work with private git repositories, I didn’t specifically conduct a demonstration on it so that there would be no disappointment when such an opportunity was needed. I will leave the settings for the project in CircleCI to readers to study for themselves, I will give the instructions necessary for the deployment myself - in the root of our project we will create the .circleci folder, in it config.yml with the following contents:
.circleci / config.yml
version: 2 jobs: build: machine: true steps: - checkout - run: echo "$CI_REGISTRY_PASSWORD" | docker login -u $CI_REGISTRY_USER --password-stdin $CI_REGISTRY - run: docker build -t $CI_REGISTRY/$CI_REGISTRY_ID:dev -f Dockerfile.stg . - run: docker push $CI_REGISTRY/$CI_REGISTRY_ID:dev build-master: machine: true steps: - checkout - run: echo "$CI_REGISTRY_PASSWORD" | docker login -u $CI_REGISTRY_USER --password-stdin $CI_REGISTRY - run: docker build -t $CI_REGISTRY/$CI_REGISTRY_ID:latest . - run: docker push $CI_REGISTRY/$CI_REGISTRY_ID:latest deploy-stg: docker: - image: circleci/python:latest steps: - checkout - run: sudo pip install awsebcli --upgrade - run: | mkdir ~/.aws touch ~/.aws/config chmod 600 ~/.aws/config echo "[profile eb-cli]" > ~/.aws/config echo "aws_access_key_id=$AWS_ACCESS_KEY_ID" >> ~/.aws/config echo "aws_secret_access_key=$AWS_SECRET_ACCESS_KEY" >> ~/.aws/config - run: eb init --region EB_REGION --platform Docker EB_APP - run: cp Dockerrun.aws.stg.json Dockerrun.aws.json - run: eb use EB_ENV_STG --region EB_REGION - run: eb deploy -v --staged --profile eb-cli deploy-prod: docker: - image: circleci/python:latest steps: - checkout - run: sudo pip install awsebcli --upgrade - run: | mkdir ~/.aws touch ~/.aws/config chmod 600 ~/.aws/config echo "[profile eb-cli]" > ~/.aws/config echo "aws_access_key_id=$AWS_ACCESS_KEY_ID" >> ~/.aws/config echo "aws_secret_access_key=$AWS_SECRET_ACCESS_KEY" >> ~/.aws/config - run: eb init --region EB_REGION --platform Docker EB_APP - run: cp Dockerrun.aws.prod.json Dockerrun.aws.json - run: eb use EB_ENV_STG --region EB_REGION - run: eb deploy -v --staged --profile eb-cli workflows: version: 2 build: jobs: - build: filters: branches: ignore: - master - deploy-stg: requires: - build filters: branches: ignore: - master build-deploy: jobs: - build-master: filters: branches: only: - master - deploy-prod: requires: - build-master filters: branches: only: - master
I painted the flow itself a little earlier, here it is translated into yaml-instructions for CircleCI, let's go through the implementation of specific steps. It is important to note the presence of environment variables defined for CI that will be used by him during the work:
CI_REGISTRY, CI_REGISTRY_USER, CI_REGISTRY_PASSWORD are needed to access the docker image storage - the same thing that we put in cr.json, only without base64
CI_REGISTRY / CI_REGISTRY_ID make up a unique image URL, without a tag
AWS_ACCESS_KEY_ID and AWS_SECRET_ACCESS_KEY - the names speak for themselves, these are AWS credits for the user on behalf of whom CircleCI will deploy. Go to AWS IAM and create a user, add him to the administrators group and provide only programmatic access. Remember that AWS_SECRET_ACCESS_KEY is available for viewing / copying only once, after you click the show link, you will not see it again.
Back to the CircleCI configuration steps. What is the magic? Checkout loads the source code from the git branch into the current working directory, this process is repeated in every job. In the build process, we sequentially log into the repository, collect the code based on Dockerfile.stg under the tag XXX: dev and send it to the repository. build-master does the same, only for the build it uses the “normal” Dockerfile under the tag XXX: latest.
deploy-stg installs AWS EB CLI and creates an authorization profile in the ~ / .aws / config file, which is necessary for the CLI to work correctly, then initializes the variables for the CLI — you will need to specify the region you choose, the platform — always Docker and the name of your application. Next, we copy the contents of Dockerrun.aws.stg.json to the new Dockerrun.aws.json file and, using the specific environment and region, give the command to deploy our application using the created authorization profile. By default, as a result of this command, all the code of the monitored branch will end up in a zip archive, which will be downloaded to ElasticBeanstalk and unpacked there, but this operation is relatively expensive, that's why we created a new Dockerrun.aws.json file, which is enough to deploy the created by us remote image, and we only need to upload it, in fact. To do this, create a .ebignore file in the project root:
.ebignore
* !Dockerrun.aws.json
This file uses the syntax .gitignore and it is .gitignore, but not for the Git CLI, but for AWS EB CLI. In this file, I tell the CLI to skip all files except Dockerrun.aws.json. That's it, now when you run the deploy-stg job in ElasticBeanstalk, only the file we created will be sent. deploy-prod does the same thing, it only copies the contents of the Dockerrun.aws.prod.json file to Dockerrun.aws.json, and the last one is an indication of the sequence of work in the CircleCI format (deploy-stg after build and deploy-prod after build -master), and on which branches the data is looking for (ignore: - master and only: - master).
The case is a bit different with AWS ECR, as I promised, let's get back to it. You do not need to log in remotely to the ECR and create a cr.json file, as ElasticBeanstalk “knows a brother in person”. Accordingly, Dockerrun.aws.json will look different - there will simply be no authentication block:
Dockerrun.aws.json (AWS ECR)
{ "AWSEBDockerrunVersion": "1", "Image": { "Name": "IMAGE_URL", "Update": "true" }, "Ports": [ { "ContainerPort": "80" } ] }
But how then will authentication happen? The fact is that the service that accesses the ECR has a certain set of rights, which in turn are based on certain security policies. In our case, when the deployment is launched via the AWS CLI from a third-party server (from CI), the aws-elasticbeanstalk-ec2-role role is used, find it in AWS IAM in the roles section and attach the additional AmazonEC2ContainerRegistryReadOnly policy to it. Now downloading from a private repository to its “neighbor” will succeed without errors.
But this is exactly loading from the same VPC, through the CLI the docker login command is also not "without tricks": you should receive (for sure) dockers login via the AWS CLI, for this there is a command
aws ecr get-login --region REGION --no-include-email
This command will return you a line of the form docker login ..., simply put, in the console you need to execute
eval $(aws ecr get-login --region EB_REGION --no-include-email)
The command will first receive a string for authentication, and then start the corresponding process. In view of these rules for AWS ECR, the instruction file for CircleCI will look like this:
.circleci / config.yml (for AWS ECR)
version: 2 jobs: build: docker: - image: circleci/python:latest steps: - checkout - run: sudo pip install awscli --upgrade - run: | mkdir ~/.aws touch ~/.aws/config chmod 600 ~/.aws/config echo "[profile eb-cli]" > ~/.aws/config echo "aws_access_key_id=$AWS_ACCESS_KEY_ID" >> ~/.aws/config echo "aws_secret_access_key=$AWS_SECRET_ACCESS_KEY" >> ~/.aws/config - setup_remote_docker - run: eval $(aws ecr get-login --region EB_REGION --no-include-email) - run: docker build -t $CI_REGISTRY/$CI_REGISTRY_ID:dev -f Dockerfile.stg . - run: docker push $CI_REGISTRY/$CI_REGISTRY_ID:dev build-master: docker: - image: circleci/python:latest steps: - checkout - run: sudo pip install awscli --upgrade - run: | mkdir ~/.aws touch ~/.aws/config chmod 600 ~/.aws/config echo "[profile eb-cli]" > ~/.aws/config echo "aws_access_key_id=$AWS_ACCESS_KEY_ID" >> ~/.aws/config echo "aws_secret_access_key=$AWS_SECRET_ACCESS_KEY" >> ~/.aws/config - setup_remote_docker - run: eval $(aws ecr get-login --region EB_REGION --no-include-email) - run: docker build -t $CI_REGISTRY/$CI_REGISTRY_ID:latest . - run: docker push $CI_REGISTRY/$CI_REGISTRY_ID:latest deploy-stg: docker: - image: circleci/python:latest steps: - checkout - run: sudo pip install awsebcli --upgrade - run: | mkdir ~/.aws touch ~/.aws/config chmod 600 ~/.aws/config echo "[profile eb-cli]" > ~/.aws/config echo "aws_access_key_id=$AWS_ACCESS_KEY_ID" >> ~/.aws/config echo "aws_secret_access_key=$AWS_SECRET_ACCESS_KEY" >> ~/.aws/config - run: eb init --region EB_REGION --platform Docker EB_APP - run: cp Dockerrun.aws.stg.json Dockerrun.aws.json - run: eb use EB_ENV_STG --region EB_REGION - run: eb deploy -v --staged --profile eb-cli deploy-prod: docker: - image: circleci/python:latest steps: - checkout - run: sudo pip install awsebcli --upgrade - run: | mkdir ~/.aws touch ~/.aws/config chmod 600 ~/.aws/config echo "[profile eb-cli]" > ~/.aws/config echo "aws_access_key_id=$AWS_ACCESS_KEY_ID" >> ~/.aws/config echo "aws_secret_access_key=$AWS_SECRET_ACCESS_KEY" >> ~/.aws/config - run: eb init --region EB_REGION --platform Docker EB_APP - run: cp Dockerrun.aws.prod.json Dockerrun.aws.json - run: eb use EB_ENV_STG --region EB_REGION - run: eb deploy -v --staged --profile eb-cli workflows: version: 2 build: jobs: - build: filters: branches: ignore: - master - deploy-stg: requires: - build filters: branches: ignore: - master build-deploy: jobs: - build-master: filters: branches: only: - master - deploy-prod: requires: - build-master filters: branches: only: - master
To support docker-in-docker, we added setup_remote_docker at the assembly stages, you should already know the rest from the contents of this article. That's all, now the structure of our project is as follows:
Try to change the code, push it into the task branch, and then make a merge (pull) request to the master and accept it. No more “moves” to post updates. It’s possible (and someone needs) to go further, write your own job desks for rolling migrations, take an intermediate mandatory step for passing automatic tests, and so on, I hope this article will lay the foundation for such experiments and subsequent implementations of high-quality and proper content delivery.
GitHub source code: tutorial-aws-symfony-ci
All Articles