Smart "Apartment"
Hello! Finally, an overhaul in the apartment came to an end, and in this connection I want to share with you the implemented project of the Smart Apartment with basic lighting control, heated underfloor heating, temperature and humidity control of the rooms, and other goodies. The descriptive part will be made in the form of a manual (so it is easier to express something).
In view of the fact that, in principle, I wanted to collect all the automation on ready-made, but budgetary decisions of executive and control devices, a unanimous decision was made (in one person) to use this list of equipment:
Management Server - Raspberry Pi 3 + OpenHAB 2 - 1pc (3000r.)
Multifunction controller - MegaD-2561 - 1pc (3480r.)
Executive unit for 14 relay outputs - MegaD-14-R - 1pc (4480r.)
Temperature and humidity sensors DHT22 (AM2303) - 4pcs (1960r.)
Temperature sensors 1-Wire DS18B20 waterproof - 2pcs (180r.)
The power supply unit 12V DR-60-12 - 1 piece (1420 rubles)
Dsen-Box Sensor Housings - 4pcs (1000r.)
A tablet for controlling and displaying parameters - already exists (3000-10000r.)
Most of the list can be purchased at ALI.
One of the basic principles of automation systems is uninterrupted and redundant functions. That is, even if all low-current automatics burn out to hell, we should not lose the function of controlling lighting and other important actuators. Thus, the lighting control solution will be implemented on the so-called “pass-through system” i.e. the switches (switches) in the rooms will be pass-through, and the roles of the second switches (switches) will play relyushki in the MegaD-14-R executive unit. Provided, of course, that the relyushki themselves do not burn out, we will not lose functionality if the automation blocks fail. Therefore, in all the rooms, passable 2 and 1-key Legrand Etika switches are installed (they look nice compared to the Valenoy).
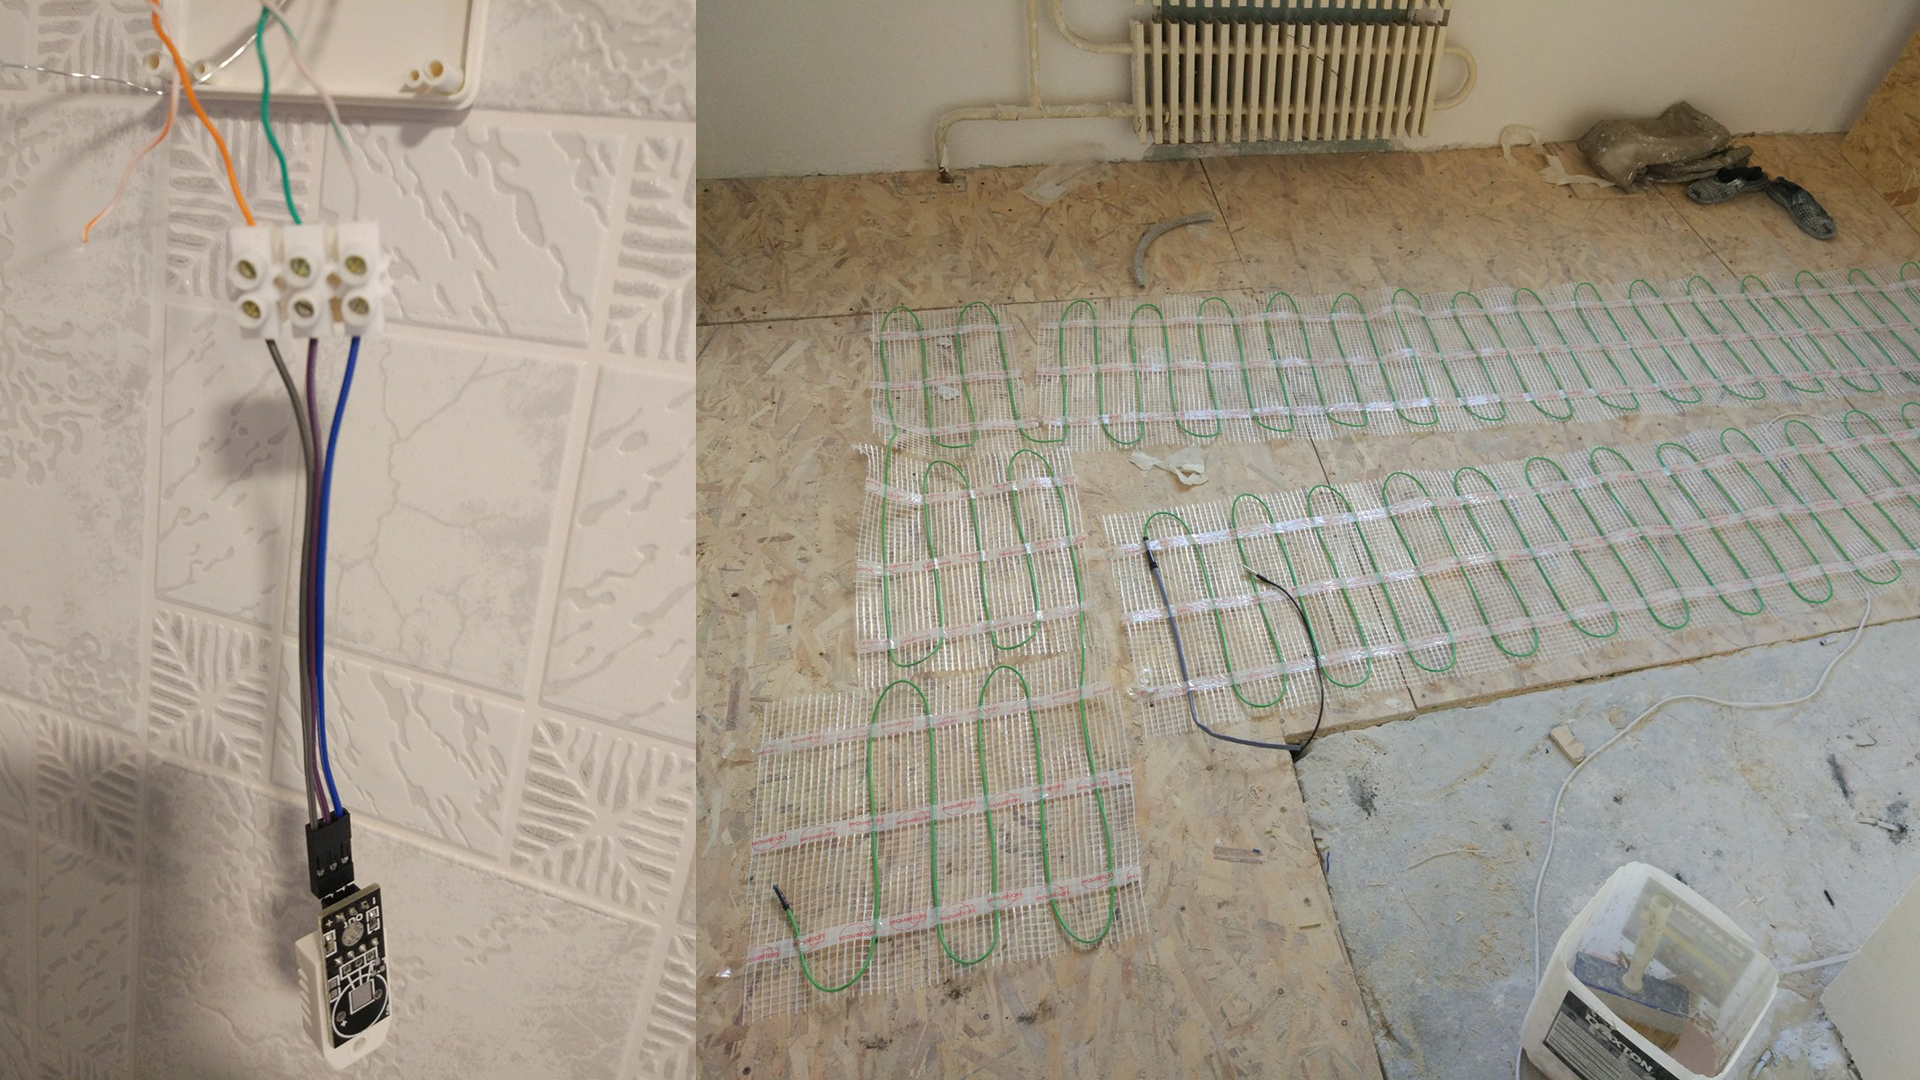
Temperature and humidity sensors DHT22 are installed in Dsen-Box cases at a level of about 2 meters from the floor in each room. Do not forget about the fact that the apartment overhaul and all the wires carefully laid from the panel to the location of sensors and devices.
The cable is almost everywhere laid SFTP 4x2x0.5 shielded. Temperature sensors DS18B20 installed at the time of laying underfloor heating.
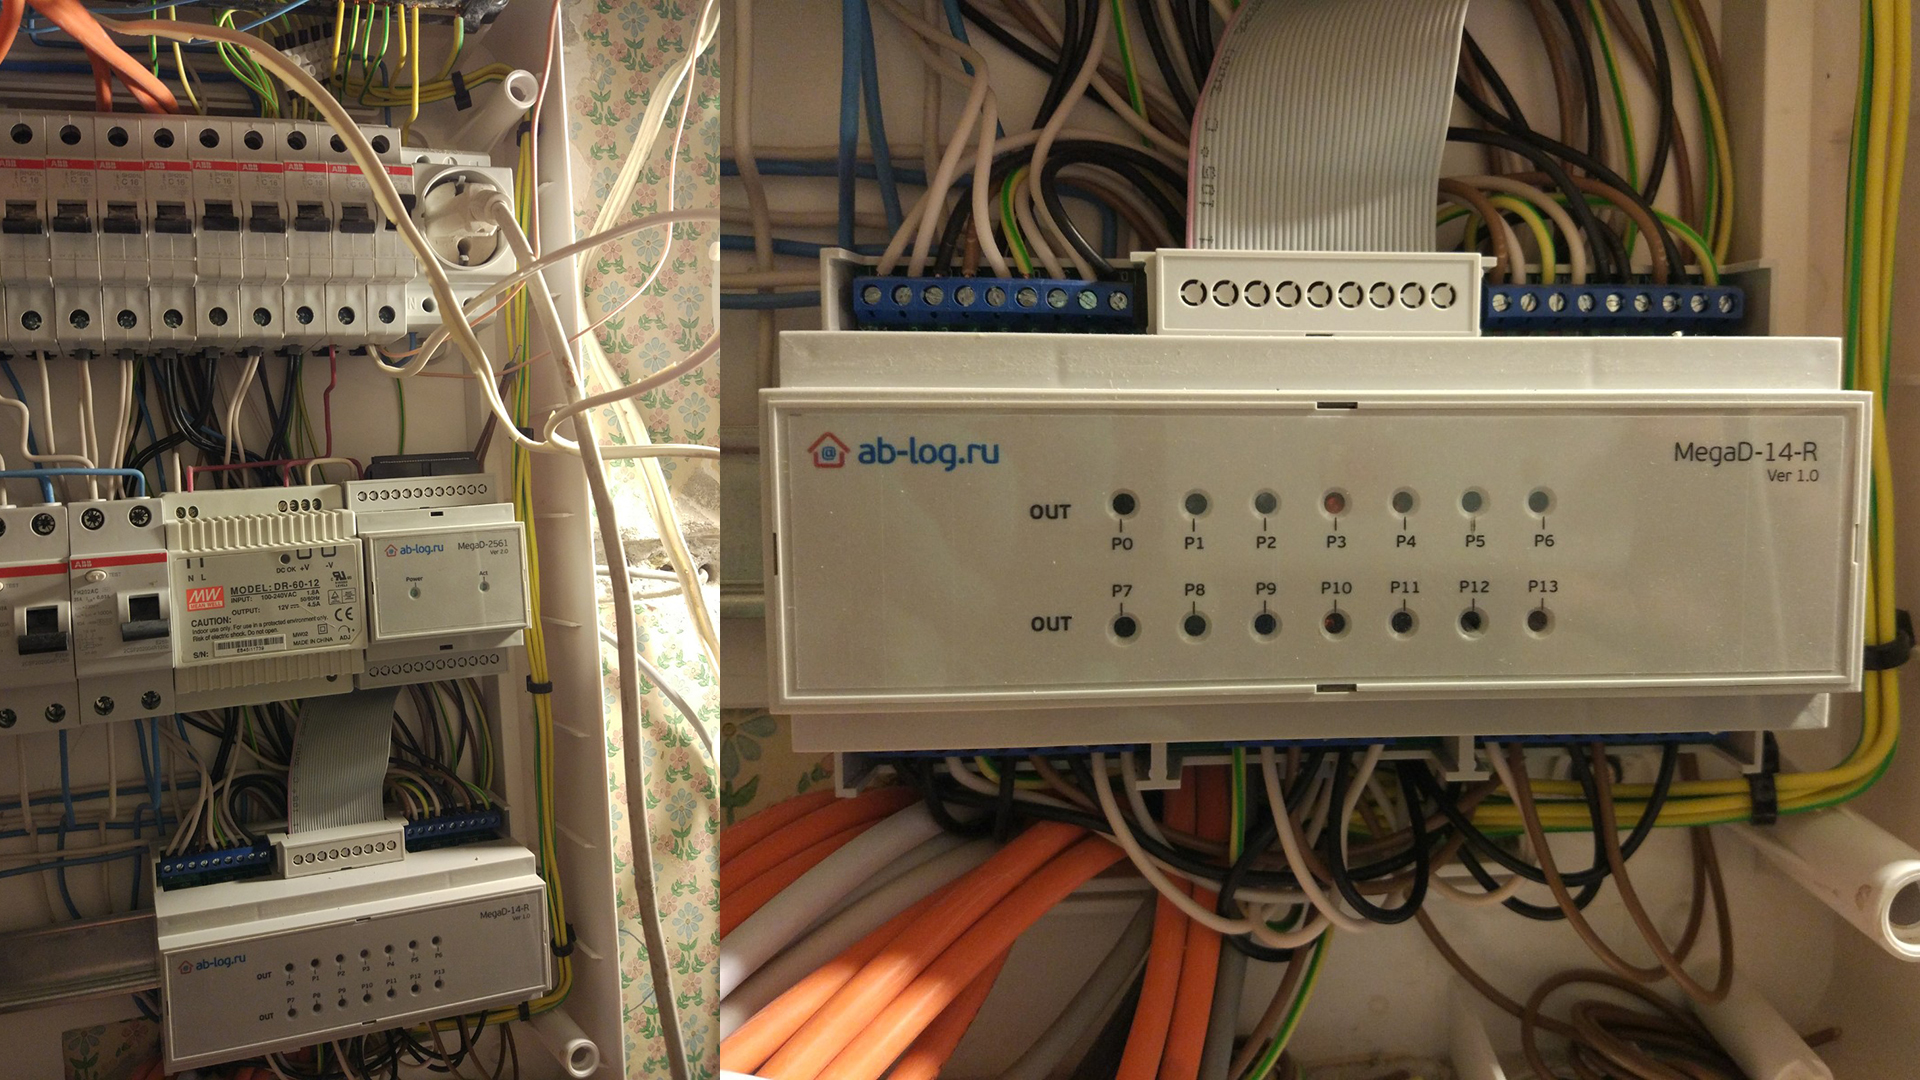
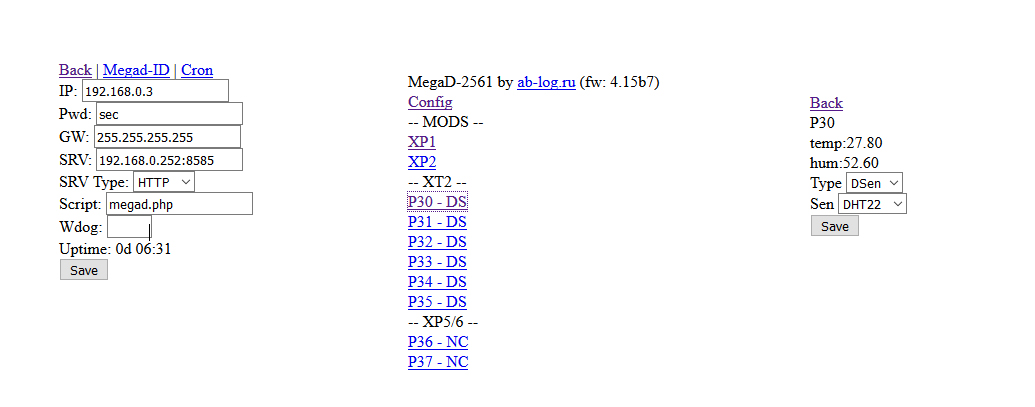
Install MegaD devices into a dashboard, match them with a 34pin native cable and connect to the Ethernet network. Go to the web interface at 192.168.0.14/sec. In the “config” section, set the desired address or leave it by default, be sure to prescribe the server’s Openhab address (we will find out later when we deploy the Openhab image on the raspberry or write it right away, and on the raspberry we change it). We connect all the sensors and wires from the switches according to one line.
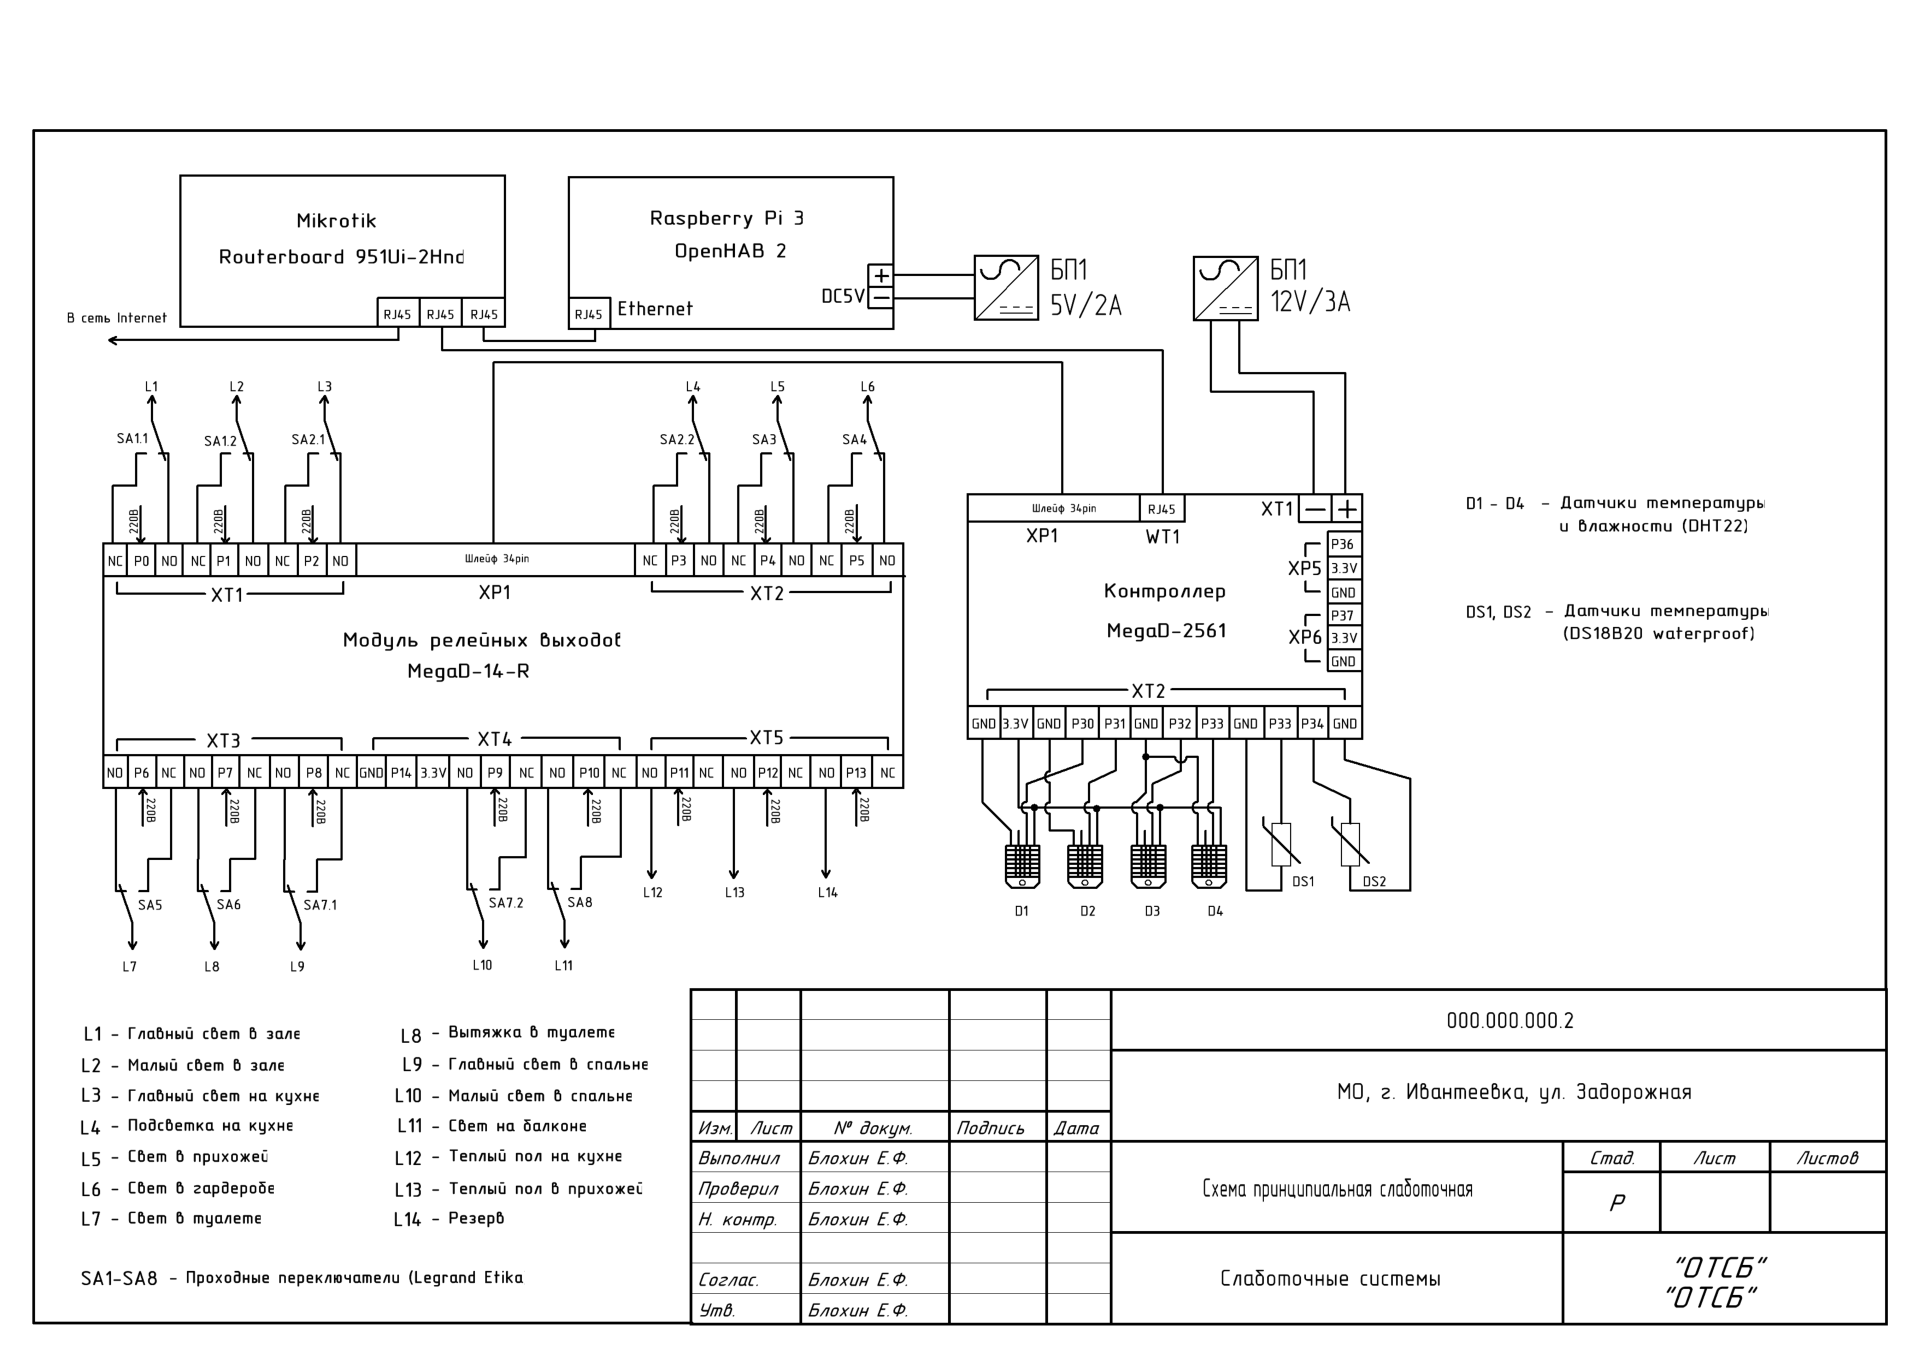
In the port settings of the MegaD device, set the types (OUT - if it is a relay, IN or Dsen - if the sensor input). If the ports of the connected sensors indicate the correct type, we will immediately see the actual readings.
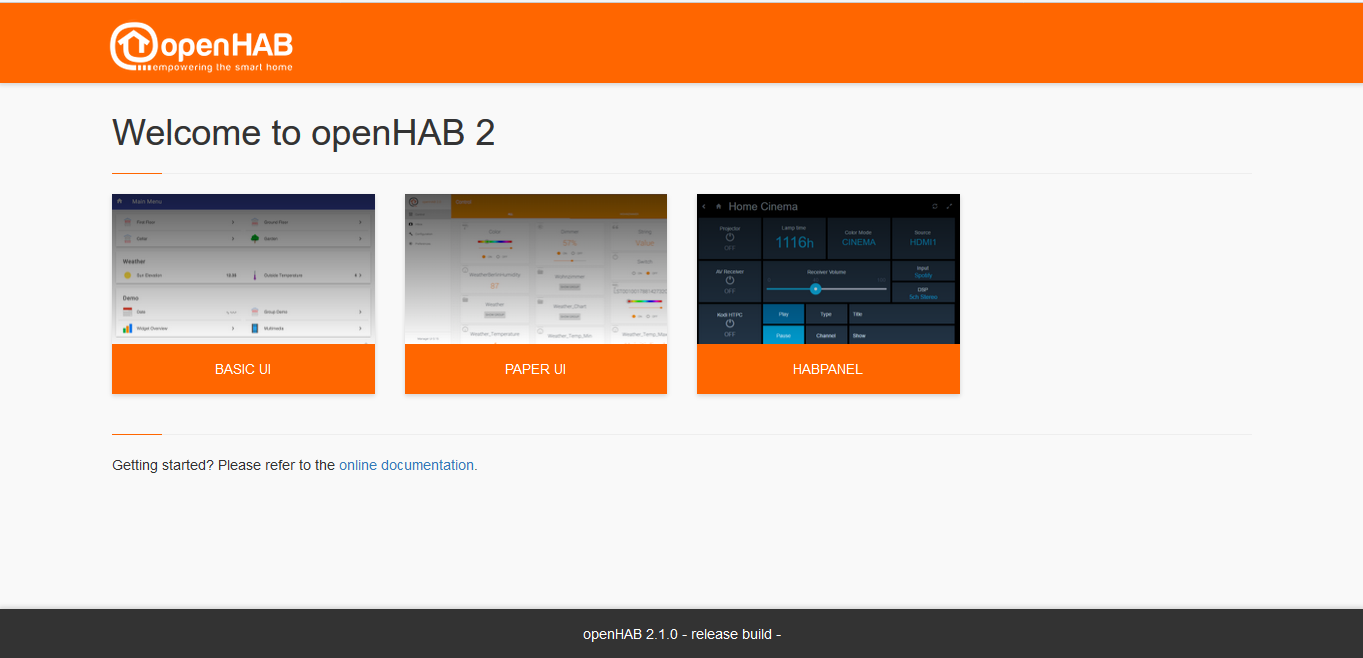
We collect the server. The case for the raspberry is made of a failed power supply unit for convenient mounting on a din-rail (there is of course a special case for this, but this is not about us))). Do not forget, of course, plug the USB flash drive and cable. In order not to suffer with the installation, I decided to download the finished OpenHabian image - the entire process of installing and configuring the server is described in detail here and comes down to deploying the image to a flash drive, running the raspberry and waiting for 15-45 minutes. (yes long) at the first configuration. OpenHab is ready to go!
If we do not want to change anything in the server configuration (how to open the settings section described in detail on openhab.org), then connect to Openhab openhabianpi : 8080, select the Paper UI graphical interface and start sculpt everything you need.
First you need to establish a connection server OH (openhab) and MegaD. The integration of equipment on the server, using protocols and rules defined by the equipment, is performed using ready-made files, so-called “Binding”. Download current binding for equipment MegaD . We drop it (you can use WinSCP) in the / srv / openhab2-addons folder on the server, so we will see this binding in “Bindings” Paper UI.
Next in “Inbox” we create a Bridge MegaD Incoming server adapter, this is something like a virtual bridge between the server and the hardware. We assign the required port to it (the server address and port must be entered in the “Config” of the MegaD device itself).

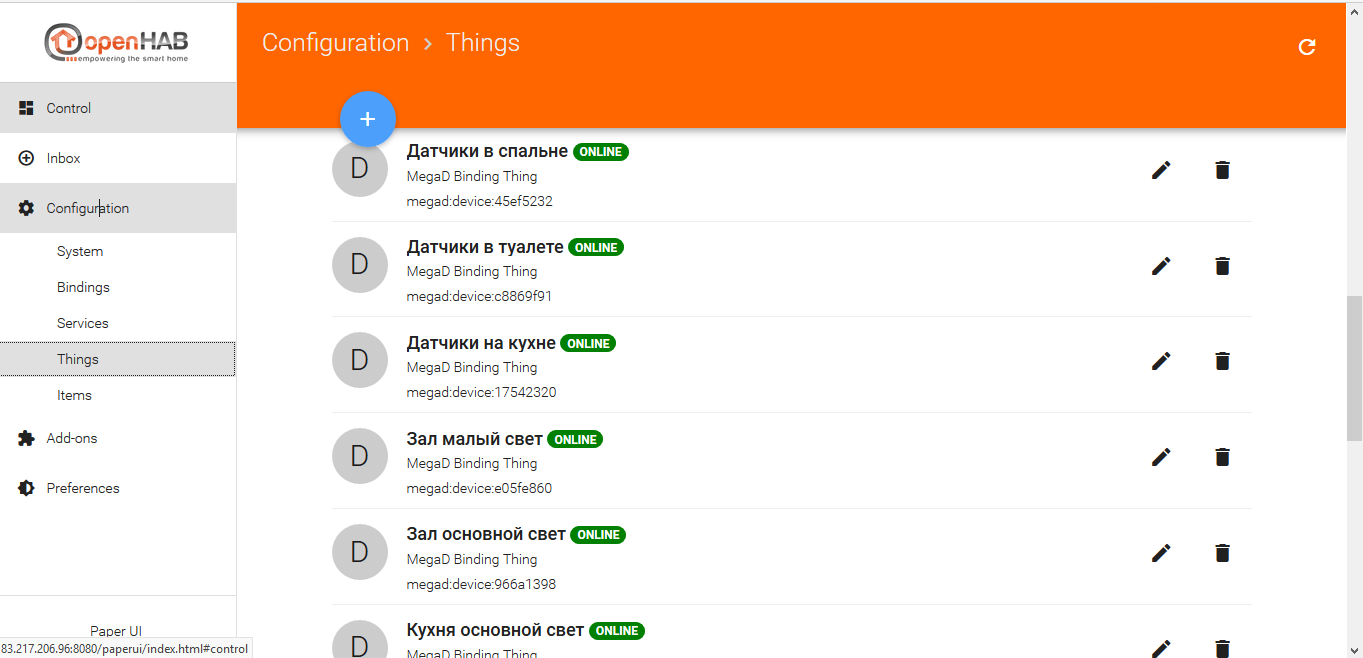
After creating the bridge, we also create “MegaD Binding Things” in the “Inbox” section. A single “Thing” is the way a particular physical device is defined on the server, be it a sensor or a relay, with which we will interact using the created bridge. In them, we specifically register the ip address of the Megad device, the password for access and the port of the device (this is the input port where the sensor or the output port for controlling devices is connected).
For convenient distribution by location, in the “Location” field we indicate where what is - the hall, kitchen ... After creating these “Things” they will appear in “Configuration / Things”. Go to the created “Thing” and click on the desired type (we had to specify it in the settings of the MegaD device port) and assign it to the “Item” by creating a new “Create new Item”.
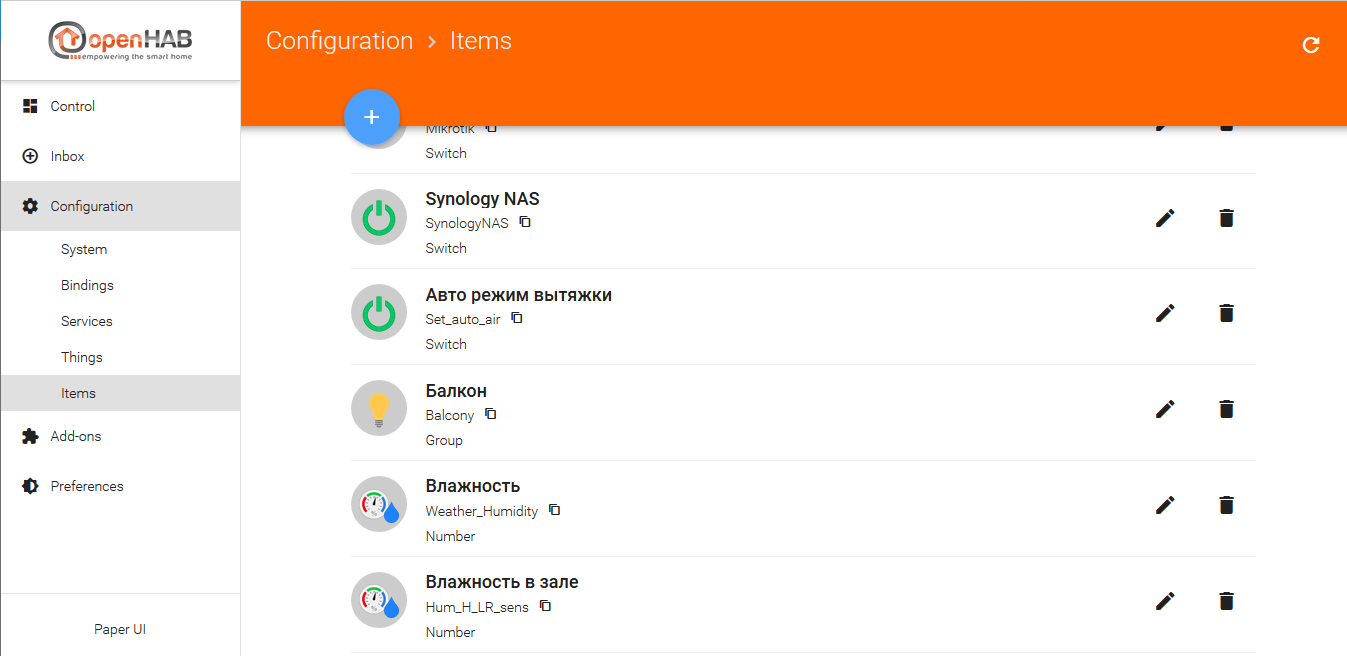
Separately taken “Item” - on the server and in the graphical interface, this is the element that acts as a control button or data output from the sensor and other features.
The field “Name” must be continuous Latin, but we call “Label” as we want. In the “Item” settings you need to specify the type (if it is a relay, then - SWITCH, if the sensor, then - NUMBER, etc.
If we want to combine certain Items into groups (this is mostly necessary for convenient distribution and viewing in a mobile application or using the Basic UI interface), then in the “Group” field we indicate the necessary group that we need to create in the “Items” section specifying the type of “Group”. After these manipulations, we will see the same “Item” created in the “Control” section of the Paper UI, and if everything is done correctly, then when you click on the created “Item” of the “Switch” type, the connected device (MegaD relay) will click.
We perform similar actions for all switches and sensors, correctly naming them and setting them up.
Now all this is nice and works, but not beautiful and uncomfortable.
We take the tablet go through the browser openhabianpi : 8080, select the graphical interface Habpanel and begin to customize to fit your needs.
Click on the settings gear in the upper right corner, click on “Advanced settings” and make the necessary settings (theme, name ...) on the left side of the settings, later after creating the ready interface, you need to save it “Save the current configuration to a new panel configuration” .
Returning from the settings back, use the slider to select the required number of columns of tiles in the interface and click “Add a new dashboard”. In the settings of the tile, we specify the color scale and display icons. These tiles, we will determine the location or group of our devices (for example, in my case it is the room).
Then, after creating the location, go to it by clicking on the tile and on top, next to the name of the tile, click on the pencil, we will place the tiles created in the “Items” system. In the upper right corner we add “Add a new widget”. Select the desired tile type (when you move the cursor, prompts pop up) “Switch” if it is a switch, “Dummy” if it is a sensor ... etc. In the settings of the created tile, we tie it to the existing “Item” system and set up the display - icon, color, size ... After creating all the necessary “items” tiles, click “Run” in the left corner, thereby saving the settings and launching the display mode. This is how we create the interface Habpanel. It is very convenient after configuration, if this was done in Chrome, to add the Habpanel page to the tablet's desktop from the browser settings.


Rules (rules) - those rules (scripts) for the implementation of the logic of the functioning of a single device or interactions between several.
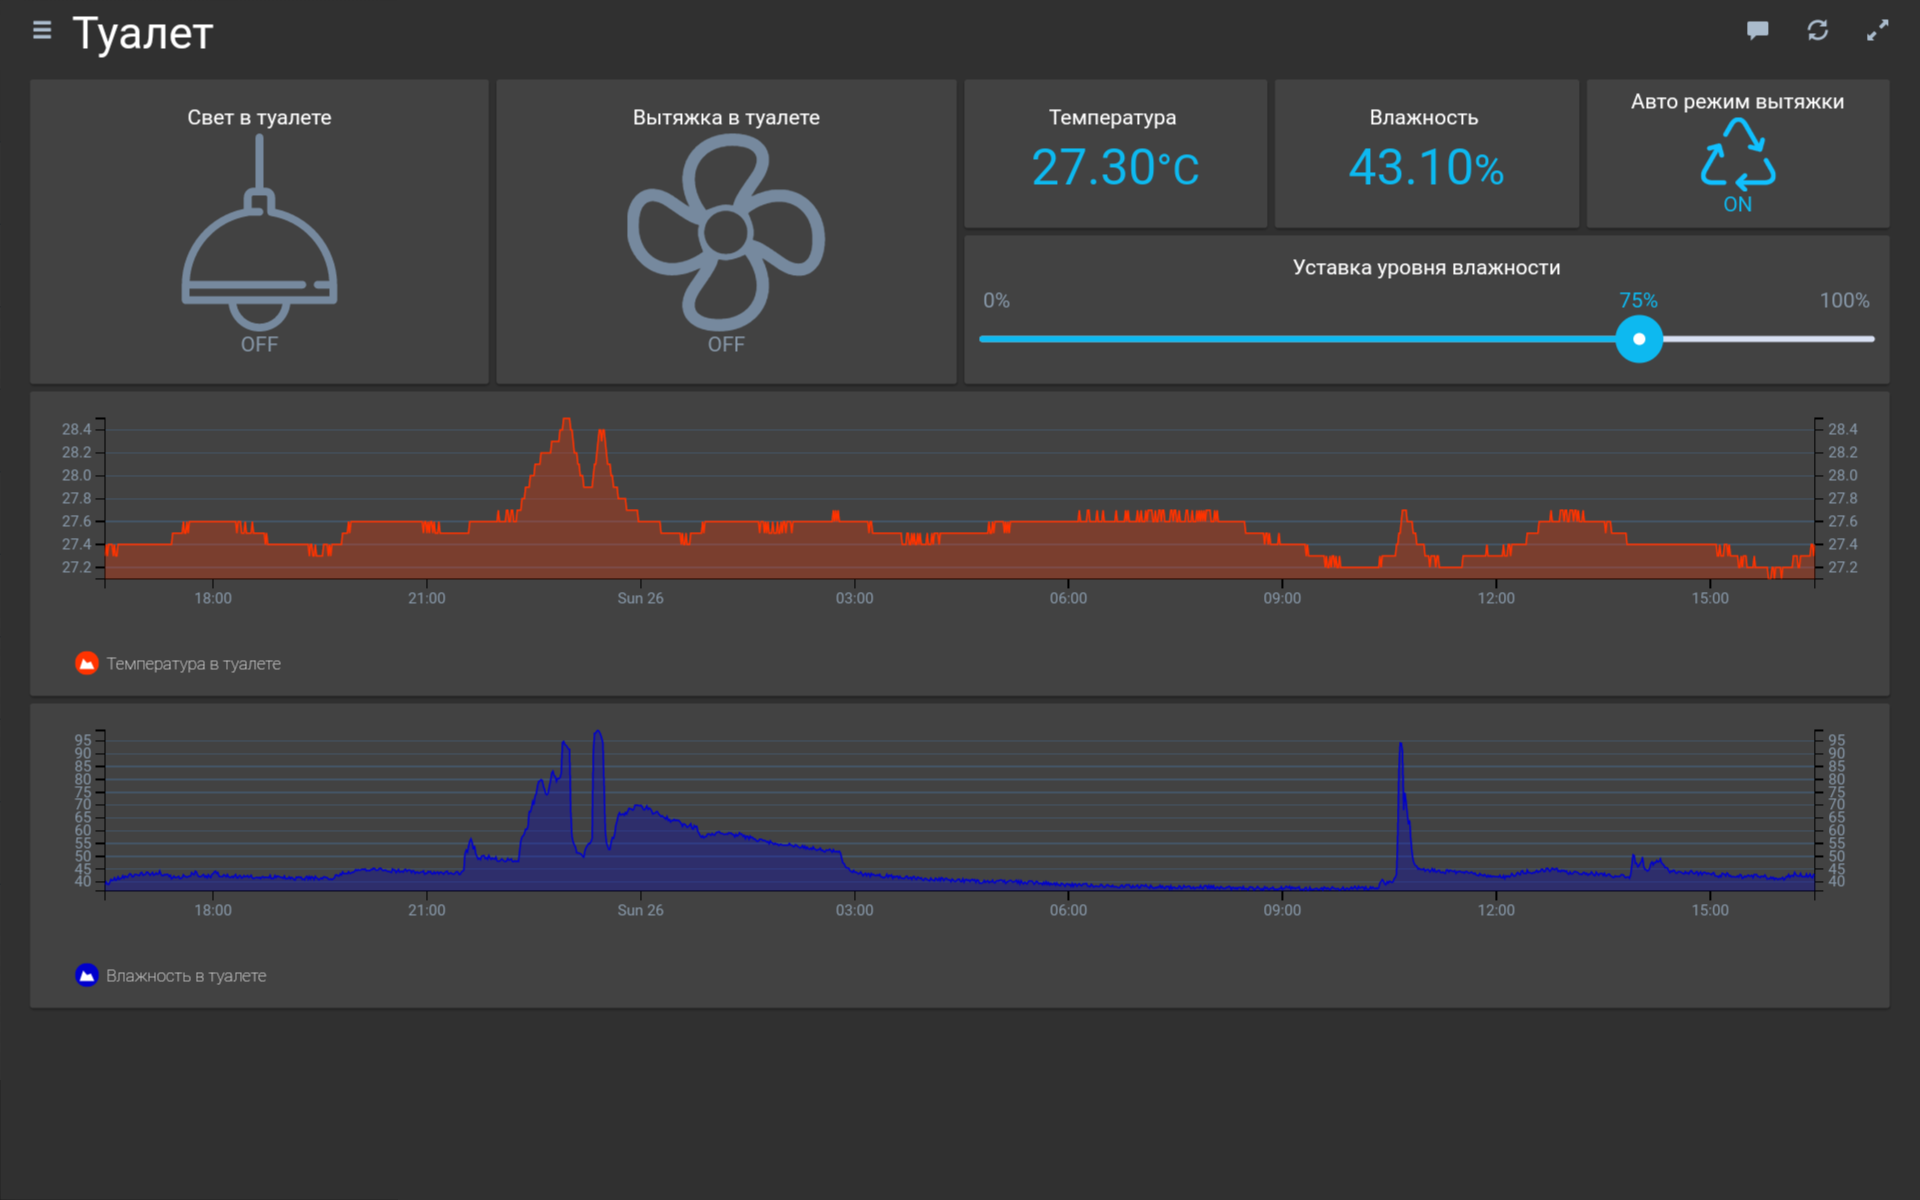
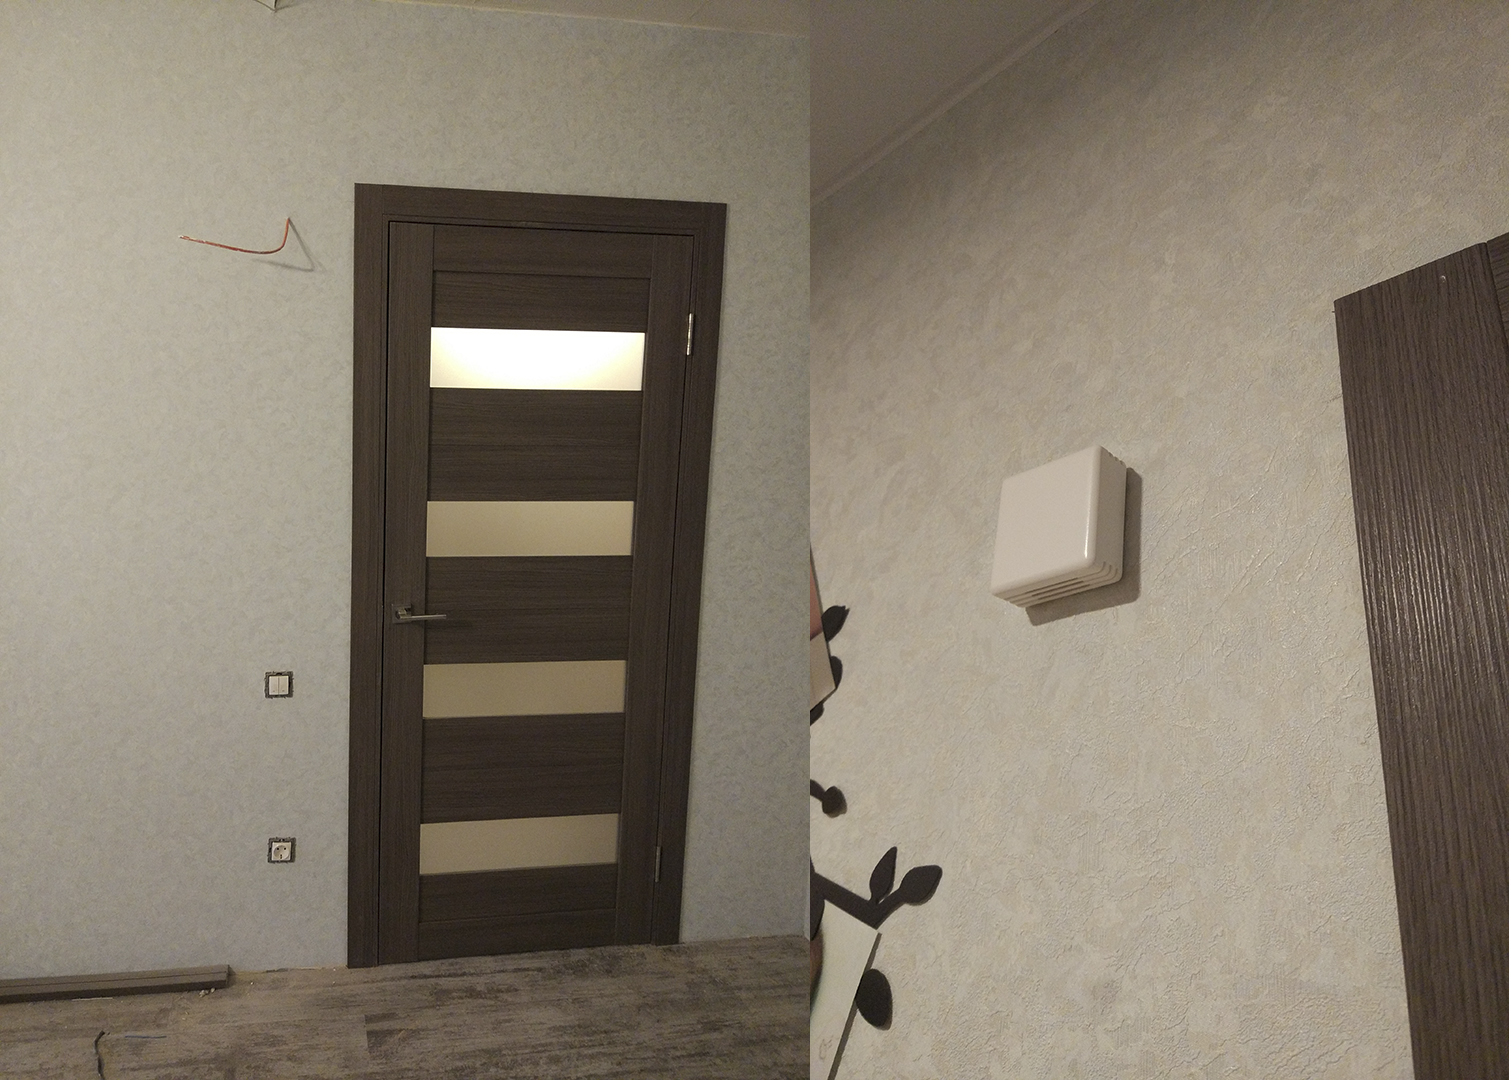
We implement automatic control of the hood in the bathroom.
To do this, we need to create a virtual “Item” of the “Number” type in which we will record the values of the humidity level we need. Another “Item” of “Switch” type to start automatic control of the humidity level. Well, actually the rule itself, which will process the obtained humidity value from the sensor in the bathroom, compare it with the set value of our setpoint and control the exhaust.
To create a rule, we need to create a file with the .rules extension with javascript content in the folder on the / etc / openhab2 / rules server. Here is an example of the content:
Well, actually you need to display the created “Items” on the dashboard screen in Habpanel. For the “Item” humidity setting, apply the “Slider” type.
Another nice feature of the system is statistical data collection in the database and display in the form of graphs.
Create graphics! First you need to configure the database.
By default, OpenHab offers work with the Rrd4j database, but I could not properly configure it. Therefore, it began to use MySQL (somehow familiar).
To work with the database, you must install an add-on in the system. In the “Addons” tab, select the Paper UI in the “Persistence” section, MySQL Persistence (install).
The base we have created is now set up.
To do this, we need to create a file (if it is missing) in the folder on the server: /etc/openhab2/persistence/mysql.persist, in which we must specify the data collection strategy (such as hourly, daily, weekly ...) and specify which “Item ”With reference to which strategy will be stored. For example, here are the contents:
After creating the file, the system will start collecting data. We also need to set up Habpanel dashboards to display charts.
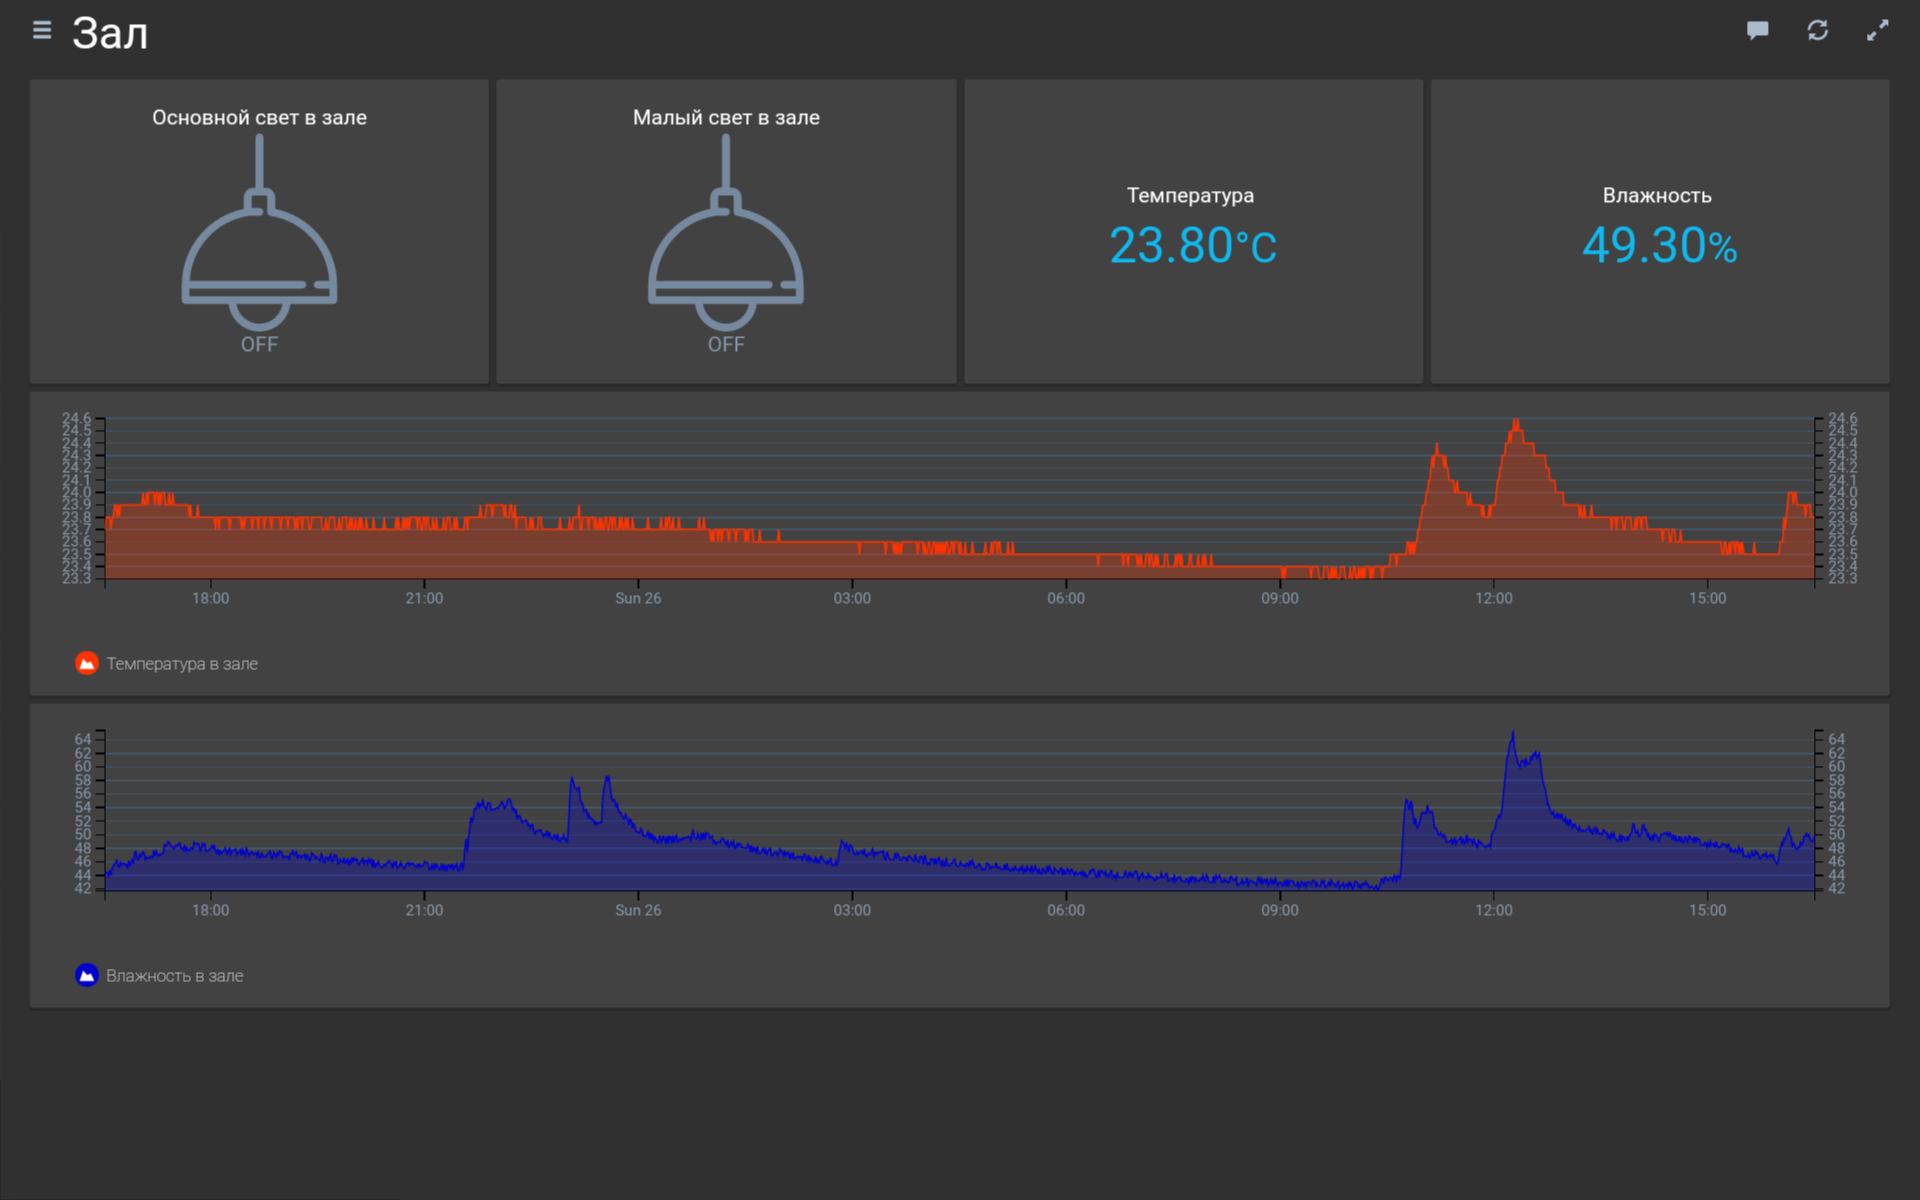
We return to the graphical user interface Habpanel, go to the desired location and add a new widget by selecting the type “Charts”. Call as we want, “Type” select “n3-line-chart (interactive)”, “Service provider” - mysql, “Period” - the display period is day (D). In the “Series” tab - we bind the “Item” we need. And voila! get a beautiful schedule!
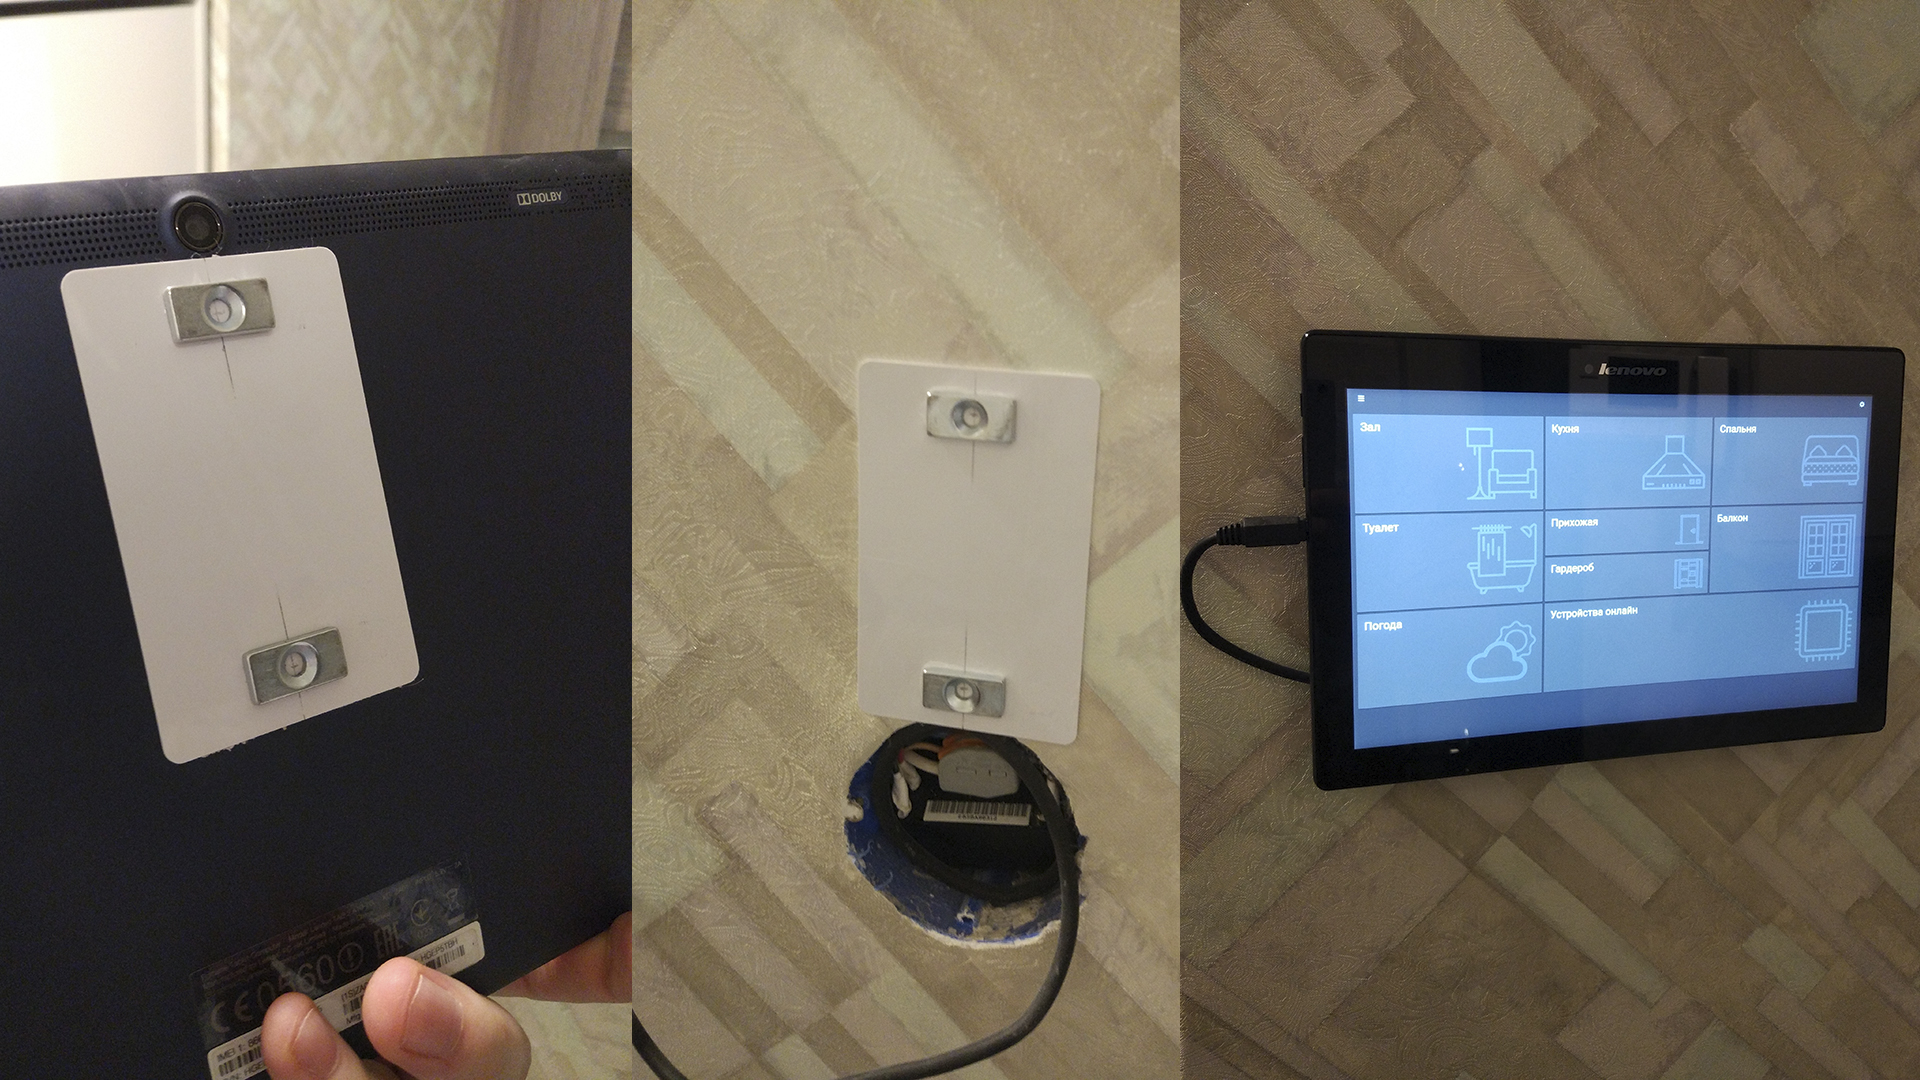
Well, after pure water amateur - we fix the tablet on the wall! O_o for this, I took two em-marin magnetic cards (those that are very thin) and glue on the glue (Uhu) along the edges of the card two neodymium magnets. Such platforms with magnets are mounted on a double sided tape (good thin) on the back of the tablet and on the wall. By the way, in advance, in a plug-in, a MeanWell 5V power supply unit is installed, with a microUSB cable. Tablet on the wall!
I apologize for the peculiarity of the presentation of the material (I have never written anything like this before). If the post will be at least as popular, next, I will describe the feature of setting up a mobile application. I hope it will come in handy. All smart home)))
Equipment
In view of the fact that, in principle, I wanted to collect all the automation on ready-made, but budgetary decisions of executive and control devices, a unanimous decision was made (in one person) to use this list of equipment:
Management Server - Raspberry Pi 3 + OpenHAB 2 - 1pc (3000r.)
Multifunction controller - MegaD-2561 - 1pc (3480r.)
Executive unit for 14 relay outputs - MegaD-14-R - 1pc (4480r.)
Temperature and humidity sensors DHT22 (AM2303) - 4pcs (1960r.)
Temperature sensors 1-Wire DS18B20 waterproof - 2pcs (180r.)
The power supply unit 12V DR-60-12 - 1 piece (1420 rubles)
Dsen-Box Sensor Housings - 4pcs (1000r.)
A tablet for controlling and displaying parameters - already exists (3000-10000r.)
Most of the list can be purchased at ALI.
Introductory
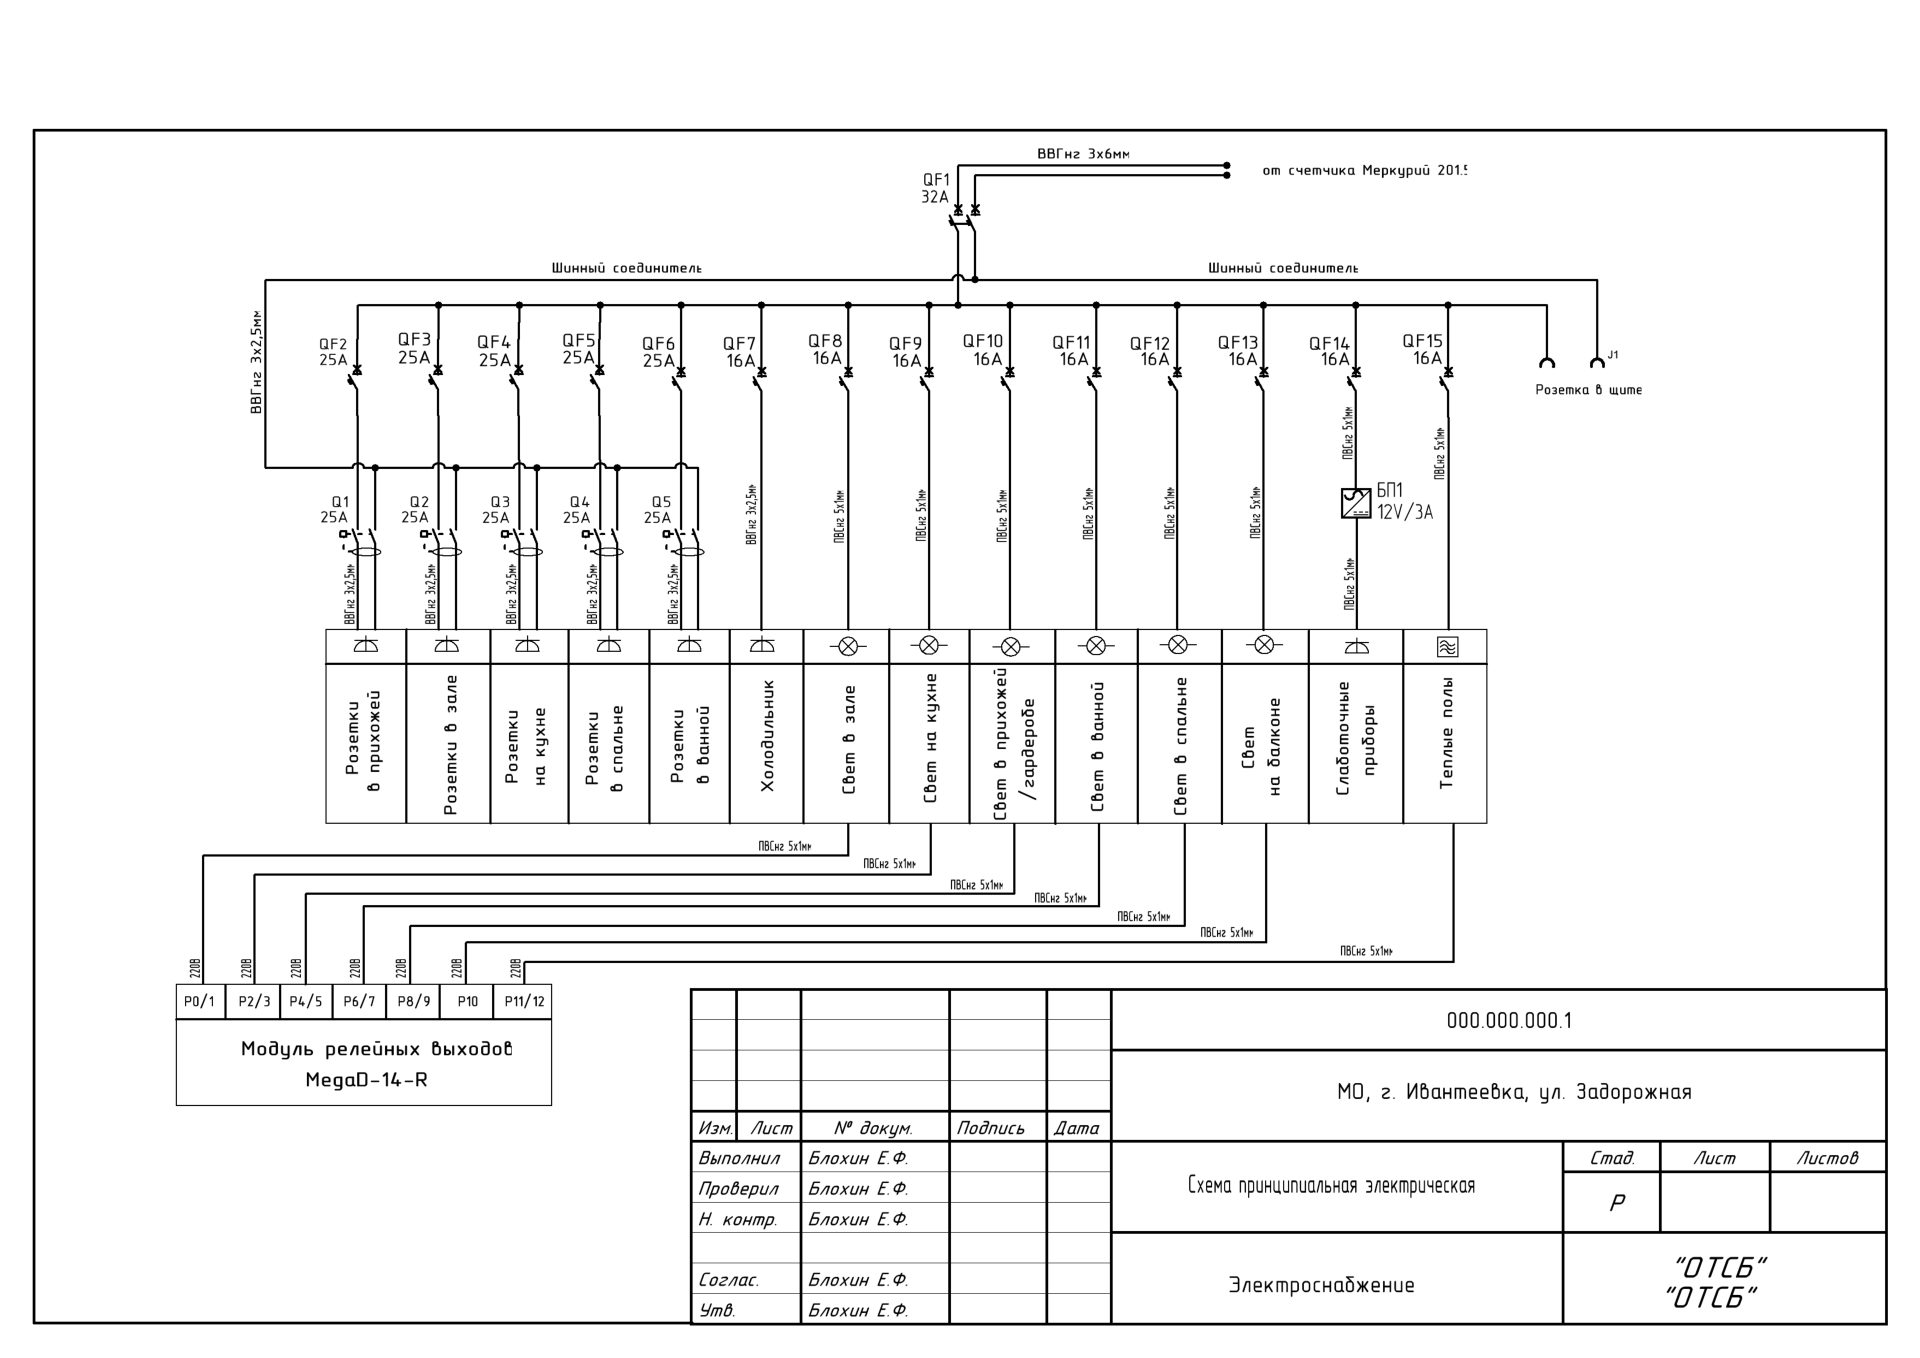
One of the basic principles of automation systems is uninterrupted and redundant functions. That is, even if all low-current automatics burn out to hell, we should not lose the function of controlling lighting and other important actuators. Thus, the lighting control solution will be implemented on the so-called “pass-through system” i.e. the switches (switches) in the rooms will be pass-through, and the roles of the second switches (switches) will play relyushki in the MegaD-14-R executive unit. Provided, of course, that the relyushki themselves do not burn out, we will not lose functionality if the automation blocks fail. Therefore, in all the rooms, passable 2 and 1-key Legrand Etika switches are installed (they look nice compared to the Valenoy).
Connection
Temperature and humidity sensors DHT22 are installed in Dsen-Box cases at a level of about 2 meters from the floor in each room. Do not forget about the fact that the apartment overhaul and all the wires carefully laid from the panel to the location of sensors and devices.
The cable is almost everywhere laid SFTP 4x2x0.5 shielded. Temperature sensors DS18B20 installed at the time of laying underfloor heating.
Install MegaD devices into a dashboard, match them with a 34pin native cable and connect to the Ethernet network. Go to the web interface at 192.168.0.14/sec. In the “config” section, set the desired address or leave it by default, be sure to prescribe the server’s Openhab address (we will find out later when we deploy the Openhab image on the raspberry or write it right away, and on the raspberry we change it). We connect all the sensors and wires from the switches according to one line.
In the port settings of the MegaD device, set the types (OUT - if it is a relay, IN or Dsen - if the sensor input). If the ports of the connected sensors indicate the correct type, we will immediately see the actual readings.
Server
We collect the server. The case for the raspberry is made of a failed power supply unit for convenient mounting on a din-rail (there is of course a special case for this, but this is not about us))). Do not forget, of course, plug the USB flash drive and cable. In order not to suffer with the installation, I decided to download the finished OpenHabian image - the entire process of installing and configuring the server is described in detail here and comes down to deploying the image to a flash drive, running the raspberry and waiting for 15-45 minutes. (yes long) at the first configuration. OpenHab is ready to go!
If we do not want to change anything in the server configuration (how to open the settings section described in detail on openhab.org), then connect to Openhab openhabianpi : 8080, select the Paper UI graphical interface and start sculpt everything you need.
Customization
Bindings
First you need to establish a connection server OH (openhab) and MegaD. The integration of equipment on the server, using protocols and rules defined by the equipment, is performed using ready-made files, so-called “Binding”. Download current binding for equipment MegaD . We drop it (you can use WinSCP) in the / srv / openhab2-addons folder on the server, so we will see this binding in “Bindings” Paper UI.
Next in “Inbox” we create a Bridge MegaD Incoming server adapter, this is something like a virtual bridge between the server and the hardware. We assign the required port to it (the server address and port must be entered in the “Config” of the MegaD device itself).
Things
After creating the bridge, we also create “MegaD Binding Things” in the “Inbox” section. A single “Thing” is the way a particular physical device is defined on the server, be it a sensor or a relay, with which we will interact using the created bridge. In them, we specifically register the ip address of the Megad device, the password for access and the port of the device (this is the input port where the sensor or the output port for controlling devices is connected).
For convenient distribution by location, in the “Location” field we indicate where what is - the hall, kitchen ... After creating these “Things” they will appear in “Configuration / Things”. Go to the created “Thing” and click on the desired type (we had to specify it in the settings of the MegaD device port) and assign it to the “Item” by creating a new “Create new Item”.
Items
Separately taken “Item” - on the server and in the graphical interface, this is the element that acts as a control button or data output from the sensor and other features.
The field “Name” must be continuous Latin, but we call “Label” as we want. In the “Item” settings you need to specify the type (if it is a relay, then - SWITCH, if the sensor, then - NUMBER, etc.
If we want to combine certain Items into groups (this is mostly necessary for convenient distribution and viewing in a mobile application or using the Basic UI interface), then in the “Group” field we indicate the necessary group that we need to create in the “Items” section specifying the type of “Group”. After these manipulations, we will see the same “Item” created in the “Control” section of the Paper UI, and if everything is done correctly, then when you click on the created “Item” of the “Switch” type, the connected device (MegaD relay) will click.
We perform similar actions for all switches and sensors, correctly naming them and setting them up.
Ui
Now all this is nice and works, but not beautiful and uncomfortable.
We take the tablet go through the browser openhabianpi : 8080, select the graphical interface Habpanel and begin to customize to fit your needs.
Click on the settings gear in the upper right corner, click on “Advanced settings” and make the necessary settings (theme, name ...) on the left side of the settings, later after creating the ready interface, you need to save it “Save the current configuration to a new panel configuration” .
Returning from the settings back, use the slider to select the required number of columns of tiles in the interface and click “Add a new dashboard”. In the settings of the tile, we specify the color scale and display icons. These tiles, we will determine the location or group of our devices (for example, in my case it is the room).
Then, after creating the location, go to it by clicking on the tile and on top, next to the name of the tile, click on the pencil, we will place the tiles created in the “Items” system. In the upper right corner we add “Add a new widget”. Select the desired tile type (when you move the cursor, prompts pop up) “Switch” if it is a switch, “Dummy” if it is a sensor ... etc. In the settings of the created tile, we tie it to the existing “Item” system and set up the display - icon, color, size ... After creating all the necessary “items” tiles, click “Run” in the left corner, thereby saving the settings and launching the display mode. This is how we create the interface Habpanel. It is very convenient after configuration, if this was done in Chrome, to add the Habpanel page to the tablet's desktop from the browser settings.
Rules
Rules (rules) - those rules (scripts) for the implementation of the logic of the functioning of a single device or interactions between several.
We implement automatic control of the hood in the bathroom.
To do this, we need to create a virtual “Item” of the “Number” type in which we will record the values of the humidity level we need. Another “Item” of “Switch” type to start automatic control of the humidity level. Well, actually the rule itself, which will process the obtained humidity value from the sensor in the bathroom, compare it with the set value of our setpoint and control the exhaust.
To create a rule, we need to create a file with the .rules extension with javascript content in the folder on the / etc / openhab2 / rules server. Here is an example of the content:
Auto_air.rules
rule "Auto_air"
when
Item Hum_H_T_sens received update
then
if
(Hum_H_T_sens.state> Set_hum.state && Air_H_T_switch.state == OFF && Set_auto_air.state == ON) {
Air_H_T_switch.sendCommand (ON)
}
else
if
(Hum_H_T_sens.state <Set_hum.state && Air_H_T_switch.state == ON && Set_auto_air.state == ON) {
Air_H_T_switch.sendCommand (OFF)
}
end
Well, actually you need to display the created “Items” on the dashboard screen in Habpanel. For the “Item” humidity setting, apply the “Slider” type.
Charts
Another nice feature of the system is statistical data collection in the database and display in the form of graphs.
Create graphics! First you need to configure the database.
By default, OpenHab offers work with the Rrd4j database, but I could not properly configure it. Therefore, it began to use MySQL (somehow familiar).
To work with the database, you must install an add-on in the system. In the “Addons” tab, select the Paper UI in the “Persistence” section, MySQL Persistence (install).
The base we have created is now set up.
To do this, we need to create a file (if it is missing) in the folder on the server: /etc/openhab2/persistence/mysql.persist, in which we must specify the data collection strategy (such as hourly, daily, weekly ...) and specify which “Item ”With reference to which strategy will be stored. For example, here are the contents:
mysql.persist
// in the "Items" section
Strategies {
// if the element below does not specify a strategy, the default list will be used
everyMinute: "0 * * * *?"
every5Minutes: "0 * / 5 * * *?"
everyHour: "0 0 * * *?"
everyDay: "0 0 0 * *?"
default = everyChange
}
/ *
* Each line in this section is determined for which product (s), in which the strategy (ies) should be applied.
* You can list single items, use "*" for all items or "groupitem *" for all members of a group
* item (excl. the group item itself).
* /
Items {
// save all items once a day and with each change restore them from the database at startup
// *: strategy = everyChange, everyDay, restoreOnStartup
// besides, all values of temperature and weather are saved every hour
Weather_Temperature Temp_H_LR_sens Temp_H_BR_sens Temp_H_T_sens
}
After creating the file, the system will start collecting data. We also need to set up Habpanel dashboards to display charts.
We return to the graphical user interface Habpanel, go to the desired location and add a new widget by selecting the type “Charts”. Call as we want, “Type” select “n3-line-chart (interactive)”, “Service provider” - mysql, “Period” - the display period is day (D). In the “Series” tab - we bind the “Item” we need. And voila! get a beautiful schedule!
Well, after pure water amateur - we fix the tablet on the wall! O_o for this, I took two em-marin magnetic cards (those that are very thin) and glue on the glue (Uhu) along the edges of the card two neodymium magnets. Such platforms with magnets are mounted on a double sided tape (good thin) on the back of the tablet and on the wall. By the way, in advance, in a plug-in, a MeanWell 5V power supply unit is installed, with a microUSB cable. Tablet on the wall!
I apologize for the peculiarity of the presentation of the material (I have never written anything like this before). If the post will be at least as popular, next, I will describe the feature of setting up a mobile application. I hope it will come in handy. All smart home)))
All Articles