Smart Fitolamp on Arduino
Creating a prototype of adaptive fitolampa on Arduino
This article will be devoted to the creation of a prototype of an LED lamp for plant illumination. Of course, this is not just a lamp, otherwise why write about it on geektimes? The phytolamp is controlled by the Arduino controller and has an on-board light sensor (for adaptive dimming), a LED driver for controlling the brightness using PWM, a 433 Mhz radio module and of course bluetooth (because everything gets cooler ...) to control from the phone from the developed application for Android. I will also touch on the question of the use of suitable LEDs, power sources and how they showed themselves during 6 months of operation. Since the inception of the idea, I was interested in the issue of creating small-scale production, but more on that below.
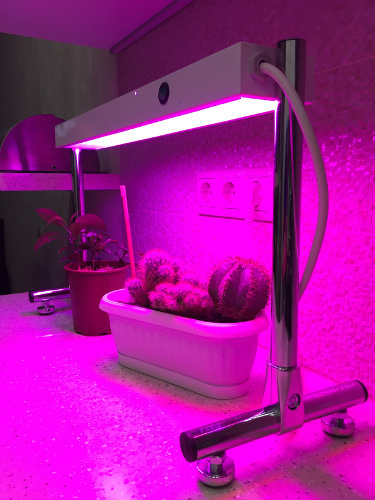
Now quite often in the evening Moscow windows one can see a violet shine, which can mean 2 things, either the owner of the apartment is an avid gardener or a dragon dealer growing hemp. Such a violet glow is provided by special LEDs used for additional illumination of plants (when there is not enough natural light).
Came, saw, automated
The absorption spectrum of light in higher plants is in the range from 350 to 900 nm. The growth process of plants needs a different spectral composition of light, but there are two most used by the plant range. 440 -470 nm light perceived by the eye as blue. Affects the vegetative system responsible for the growth of green mass, leaves and shoots. And 630-670 nm red light affecting the generative system of plants. Flowering, ripening of fruits and seeds. At this point we end the excursion on biology and proceed to the most interesting part.
The purpose of the creation of fitolamps is the most effective effect on the plant with light in the ranges of 440 - 470 nm and 630 - 670 nm. It is this combination of blue and red that give violet light. For this purpose, 1W and 3W full-spectrum LEDs were chosen. spectral composition of which is shown in the figure below. (diagram from the manufacturer of the LED).

Also, LEDs 5050, 5630, 5730 can be used for additional illumination, but their light efficiency is lower due to the use of a limiting resistor in the circuit. Also similar lines warm much more. 1 W phyto-LEDs with Aliexpress (in terms of heating and illumination Lm) showed themselves best, although 3W are used in the prototype.
So, what can a man with an engineering degree and enough free time have to offer gardeners?

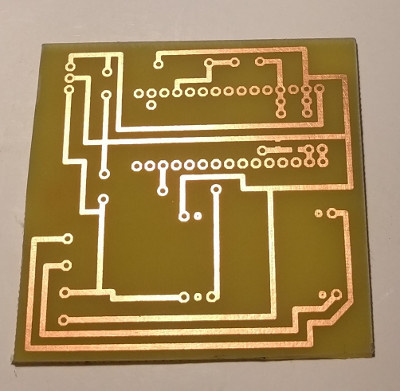
Inside the case, an Arduino nano controller is installed on the etched board.
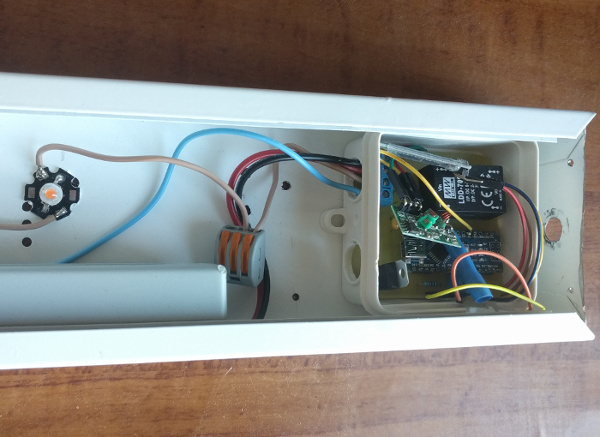
If the controller briefly controls the brightness of the LEDs, receiving information about the illumination from the photoresistor installed on the lamp body.

This achieves the adaptive brightness of the lamp. Demonstration is on video.
/ * A paragraph of technical subtleties can be skipped.
The entire circuit is powered by a 24V power supply. A 220 A fuse is installed on the 220V side. Power to the LEDs is supplied via the LDD-700H driver with an output current of 700 mA and a dimming input that supports PWM. Lamp power 18 W, phytolamp provides illumination 3000lk at a distance of 20 cm. It is worth noting that the power to the controller is supplied through the voltage regulator L7809C, which lowers the voltage from 24V from the power supply to acceptable 9V to the input Vin of the controller. In the voltage stabilizer piping, there are 2 capacitors with nominal values of 0.33 microfarads at the input and 0.1 microfarads at the output; this is done to filter out voltage surges and allows reducing the stabilizer heating. Resistors R3 = 1 kOhm, R4 = 2 kΩ at the input of the Rx Bluetooth module are designed to reduce the voltage to 3.3 volts. The resistor R1 = 10 kOhm together with the photoresistor represent a voltage divider and allow you to measure the change in voltage (or rather resistance) on the photoresistor depending on the external lighting. Finally, resistor R2 = 100 ohms at the output of 10 arduino, is installed to protect it. Output 10 controls the brightness of the lamp, and also turns it off when applying a zero potential. * /
To build the prototype was etched board.
The 433 MHz receiver is installed in the case to control the lamp from the remote (if there is no phone at hand) And of course the most interesting thing is the Bluetooth hc-05 module is installed in the lamp, which allows you to control it using an Android phone from a written application.

At the moment, you can set 3 lamp operation modes:
- Turning on
- Power off
- Adaptive brightness by photoresistor
To verify the results of the extra-light, several experiments with seedlings were carried out.

In one pot, seedlings were illuminated in the evening for 3 hours.
Summing up the intermediate result, I can see that 1W LEDs showed themselves best of all (the desired luminescence spectrum is obtained by using a phosphor applied on the lens). From a 12W lamp, I received an illumination of 4000 Lx at a distance of 15 cm. For 5630 LEDs (an assembly on the line of red and blue LEDs) with a power of 16W, only 2000 Lx at a distance of 15 cm were achieved, 3W phyto-LEDs showed similar characteristics. Of course, much depends on the quality of the LEDs.

In the future, I wanted to make a change in the spectrum of light according to predetermined programs for different plants at different periods of their life, there was also an idea to add automatic irrigation.
As I mentioned there was the idea of creating small-scale production, from a technical point of view, suppliers of LEDs and lamp housings were found, but for assembling electrical appliances (including lamps), a certificate of conformity is needed. And obtaining a certificate implies the presence of production that can be inspected by a state employee. It turns out that bureaucracy is more complicated than circuit design and programming. For these reasons, I decided to make the idea public, although I do not pretend to originality.
And at the end of the promised video demonstration work Fitolampy. You can look at the code for the application controller on my website, the link is in the profile.
Added 07/17/17
In the comments I noticed a question about the heating of the LEDs and their cooling. The question is really interesting and deserves a mention. I use passive cooling, the LEDs are glued to the metal body of the lamp with heat-conducting glue. It turned out to be very difficult to strike a balance between the power of the lamp and its heating. For LEDs 5630, the limiting temperature of normal operation is 40 C. (according to the manufacturers). For high-power LEDs, this is about 60 ° C. For power supplies no more than 40 ° C. The 5630 LED lines are heated more due to losses on the resistor (one resistor per 3 LEDs). With empirical methods, I have come to the optimal combination of the number of LEDs, lamp size (scattering surface) and the method of placing LEDs in the lamp. Temperature tested pyrometer.

All Articles