このライブラリを使用してPDFドキュメントを作成する方法は多数あります。 何よりも、 XMLドキュメントを使用して説明する方法が気に入りました。 そのようなxmlをxslt変換によって作成し、xmlドキュメントでデータを掌握することにしました。
データは次のようになります。
次に、pdf用のxmlを作成する必要があります(チュートリアルドキュメントのiText.dtdスキームへのリンクが破損していると言います。正しいリンクを以下に示します)。<? xml version ="1.0" encoding ="utf-8" ? >
< Profile >
< FirstName > </ FirstName >
< SecondName > </ SecondName >
< LastName > </ LastName >
< Subtexts >
< Text > . . . . . . . . </ Text >
</ Subtexts >
< Subtexts >
< Text > . . . . . . . . . </ Text >
</ Subtexts >
</ Profile >
* This source code was highlighted with Source Code Highlighter .
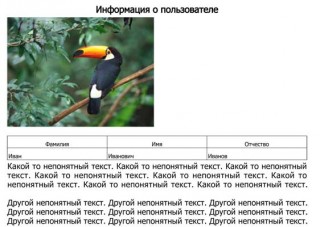
私にとっては、彼らは最適な記述スキームを選択しませんでした。小さなPDFドキュメントには面倒なコードです。 したがって、赤、緑、青の色を別々に記述することはあまり一般的ではないため、HEXレコードで作成することは可能です。 xsltダイアグラムでわかるように、ドキュメントには、pdfドキュメントに挿入される画像のパスを示すパラメーターがあります。また、ダイアグラムを使用して3列といくつかの段落で構成されるテーブルについても説明しています。<? xml version ="1.0" encoding ="utf-8" ? >
< xsl:stylesheet version ="1.0" xmlns:xsl ="http://www.w3.org/1999/XSL/Transform"
xmlns:msxsl ="urn:schemas-microsoft-com:xslt" exclude-result-prefixes ="msxsl" >
< xsl:param name ="picturePath" />
< xsl:output method ="xml" indent ="yes" />
< xsl:template match ="/Profile" >
< itext >
< paragraph align ="Center" >
< phrase fontstyle ="bold" size ="16.0" > </ phrase >
</ paragraph >
< image >
< xsl:attribute name ="url" >
< xsl:value-of select ="$picturePath" />
</ xsl:attribute >
</ image >
< table width ="100%" columns ="3" cellpadding ="1" cellspacing ="1" borderwidth ="0.5" red ="0"
green ="0" blue ="0" left ="true" right ="true" top ="true" bottom ="true" widths ="33;33;33" >
< row >
< cell borderwidth ="0.5" red ="0" green ="0" blue ="0" left ="false"
right ="true" top ="false" bottom ="true" header ="true" horizontalalign ="Center" >
< phrase size ="10.0" > </ phrase >
</ cell >
< cell borderwidth ="0.5" red ="0" green ="0" blue ="0" left ="false"
right ="true" top ="false" bottom ="true" header ="true" horizontalalign ="Center" >
< phrase size ="10.0" > </ phrase >
</ cell >
< cell borderwidth ="0.5" red ="0" green ="0" blue ="0" left ="false"
right ="false" top ="false" bottom ="true" header ="true" horizontalalign ="Center" >
< phrase size ="10.0" > </ phrase >
</ cell >
</ row >
< row >
< cell borderwidth ="0.5" red ="0" green ="0" blue ="0" left ="false"
right ="true" top ="false" bottom ="false" header ="false" horizontalalign ="Left" >
< phrase size ="10.0" >
< xsl:value-of select ="FirstName" />
</ phrase >
</ cell >
< cell borderwidth ="0.5" red ="0" green ="0" blue ="0" left ="false"
right ="true" top ="false" bottom ="false" header ="false" horizontalalign ="Left" >
< phrase size ="10.0" >
< xsl:value-of select ="SecondName" />
</ phrase >
</ cell >
< cell borderwidth ="0.5" red ="0" green ="0" blue ="0" left ="false"
right ="false" top ="false" bottom ="false" header ="false" horizontalalign ="Left" >
< phrase size ="10.0" >
< xsl:value-of select ="LastName" />
</ phrase >
</ cell >
</ row >
</ table >
< xsl:apply-templates select ="Subtexts" />
</ itext >
</ xsl:template >
< xsl:template match ="Subtexts" >
< paragraph align ="Justify" >
< phrase size ="14.0" >
< xsl:value-of select ="Text" />
</ phrase >
</ paragraph >
< newline />
</ xsl:template >
</ xsl:stylesheet >
* This source code was highlighted with Source Code Highlighter .
次のステップ:バイトの配列をpdfドキュメントに返すすべてのコードを説明し、アクションのシーケンス全体を説明しようとしたコメントを付けます。
baseFontの定義に注意を払い、それをITextHandlerのデフォルトフォントとして設定します。 この手順を実行しないと、キリル文字は表示されません。 このアプローチにより、キリル文字を表示できますが、1つのドキュメントで複数のフォントを使用することはできません。 1つのドキュメントで複数のフォントを使用する必要がある場合は、コードを修正してライブラリを自分でコンパイルするか、ソースとしてxmlを使用しないためデータ(ただし、問題がITextHandlerのみにあるという事実ではありません)。public byte [] GetPdfRaw()
{
XmlDocument doc = new XmlDocument ();
// xml
doc.Load(MapPath( @"~\Resources\UserProfile.xml" ));
XslCompiledTransform xslTransform = new XslCompiledTransform();
// XSLT
xslTransform.Load(MapPath( @"~\Resources\ReportProcessor.xslt" ));
XsltArgumentList list = new XsltArgumentList();
//
list.AddParam( "picturePath" , string .Empty, MapPath( @"~\Resources\Toco.jpg" ));
// , xml pdf
using (MemoryStream stream = new MemoryStream())
{
// xml pdf
xslTransform.Transform(doc, list, stream);
// Font pdf
BaseFont baseFont = BaseFont.CreateFont(Environment.ExpandEnvironmentVariables( @"%systemroot%\fonts\Tahoma.TTF" ),
"CP1251" , BaseFont.EMBEDDED);
Document document = new Document();
using (MemoryStream pdfStream = new MemoryStream())
{
PdfWriter.GetInstance(document, pdfStream);
XmlDocument d = new XmlDocument ();
string str = Encoding .UTF8.GetString(stream.ToArray()).Substring(1);
d.LoadXml(str);
// xml pdf
ITextHandler h = new ITextHandler(document) {DefaultFont = baseFont};
h.Parse(d);
// pdf byte[]
return pdfStream.ToArray();
}
}
}
* This source code was highlighted with Source Code Highlighter .
彼女はいまだにIという文字でクラスを呼び出す理由に非常に興味を持っています。c#ではインターフェイスと呼ばれています。 もちろん、私はライブラリがJavaから移植されていることを理解していますが、それでも私は最初にst迷に陥りました...
最後は、Responceページでのpdfドキュメントの出力です(私のようなASP.NETアプリケーションがある場合)
サンプルのダウンロード... (サンプルを機能させるには、itextsharpライブラリもダウンロードする必要があります。サンプルではバージョン4.1.2.0を使用しています)protected override void OnLoad( EventArgs e)
{
// Response pdf , MIME
HttpContext .Current.Response.Clear();
HttpContext .Current.Response.ContentType = "application/pdf" ;
HttpContext .Current.Response.AddHeader( "Content-Disposition" , string .Format( "attachment;filename=\"{0}\"" , "report.pdf" ));
byte [] pdfRaw = GetPdfRaw();
HttpContext .Current.Response.OutputStream.Write(pdfRaw, 0, pdfRaw.Length);
}
* This source code was highlighted with Source Code Highlighter
関連リンク:
- SourceForgeのiTextSharp
- iTextSharpチュートリアル
- iText.dtd (xmlスキーム)