TL; DR:これらのエピソードでは、ReactとReduxでSVG要素を制御してゲームを作成する方法を学びます。 このシリーズで得られた知識により、ゲームだけでなくアニメーションを作成できます。 このパートで開発されたソースコードの最終バージョンは、 GitHubにあります。
( 3番目の部分は最終です。ゲーム自体の開発を完了することに加えて、Auth0と単純なリアルタイムサーバーを使用した承認について説明します-翻訳者のコメント )
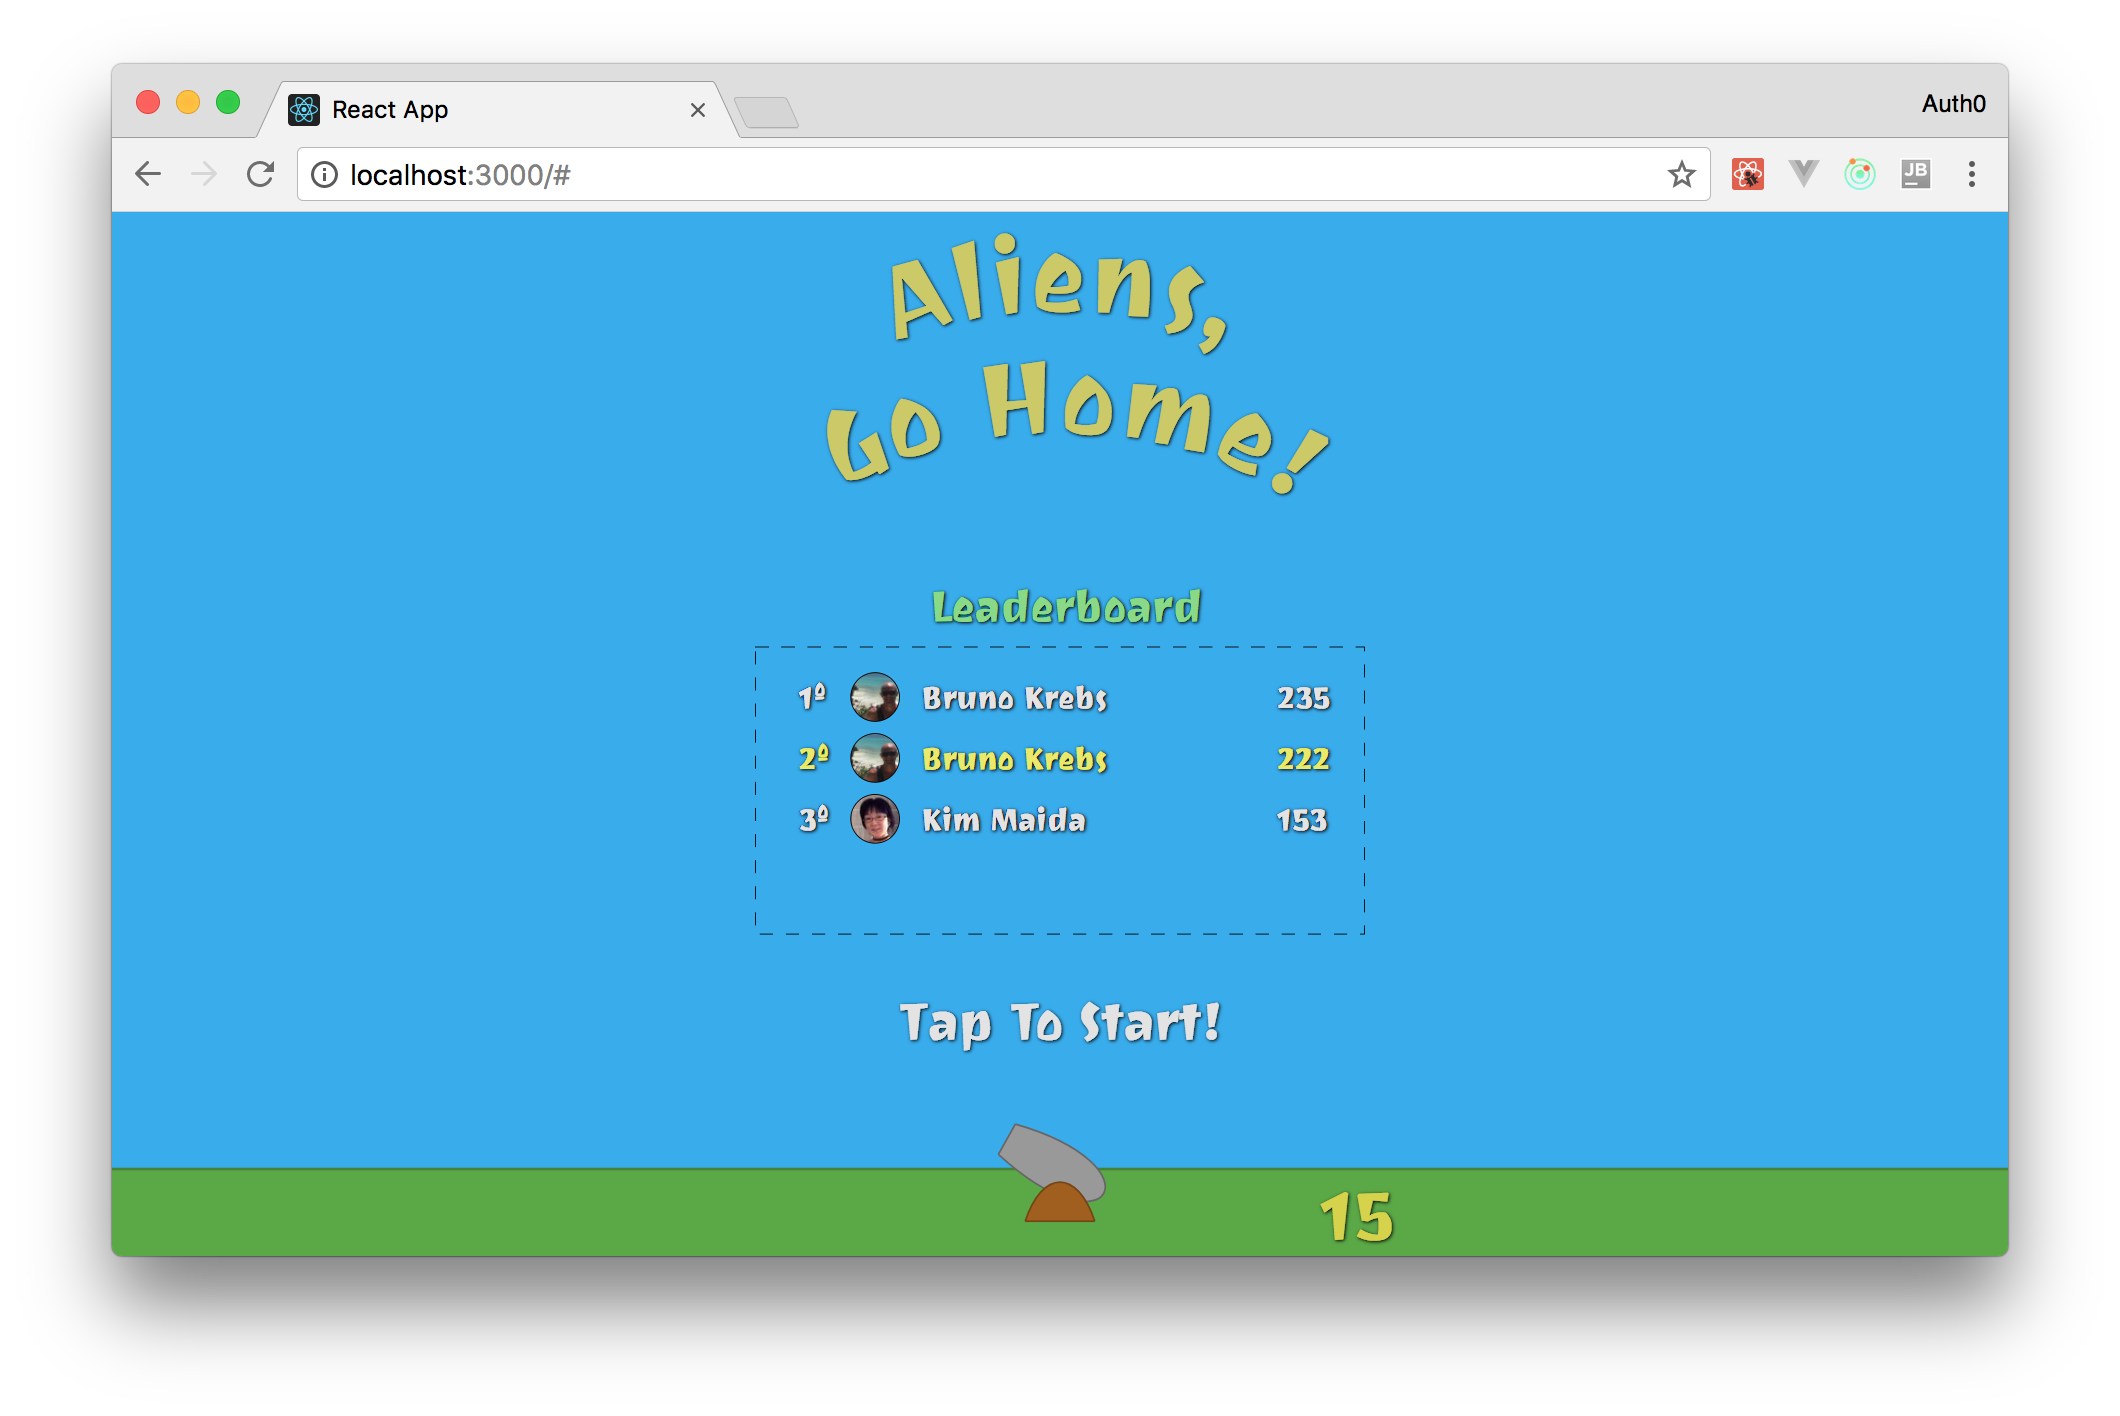
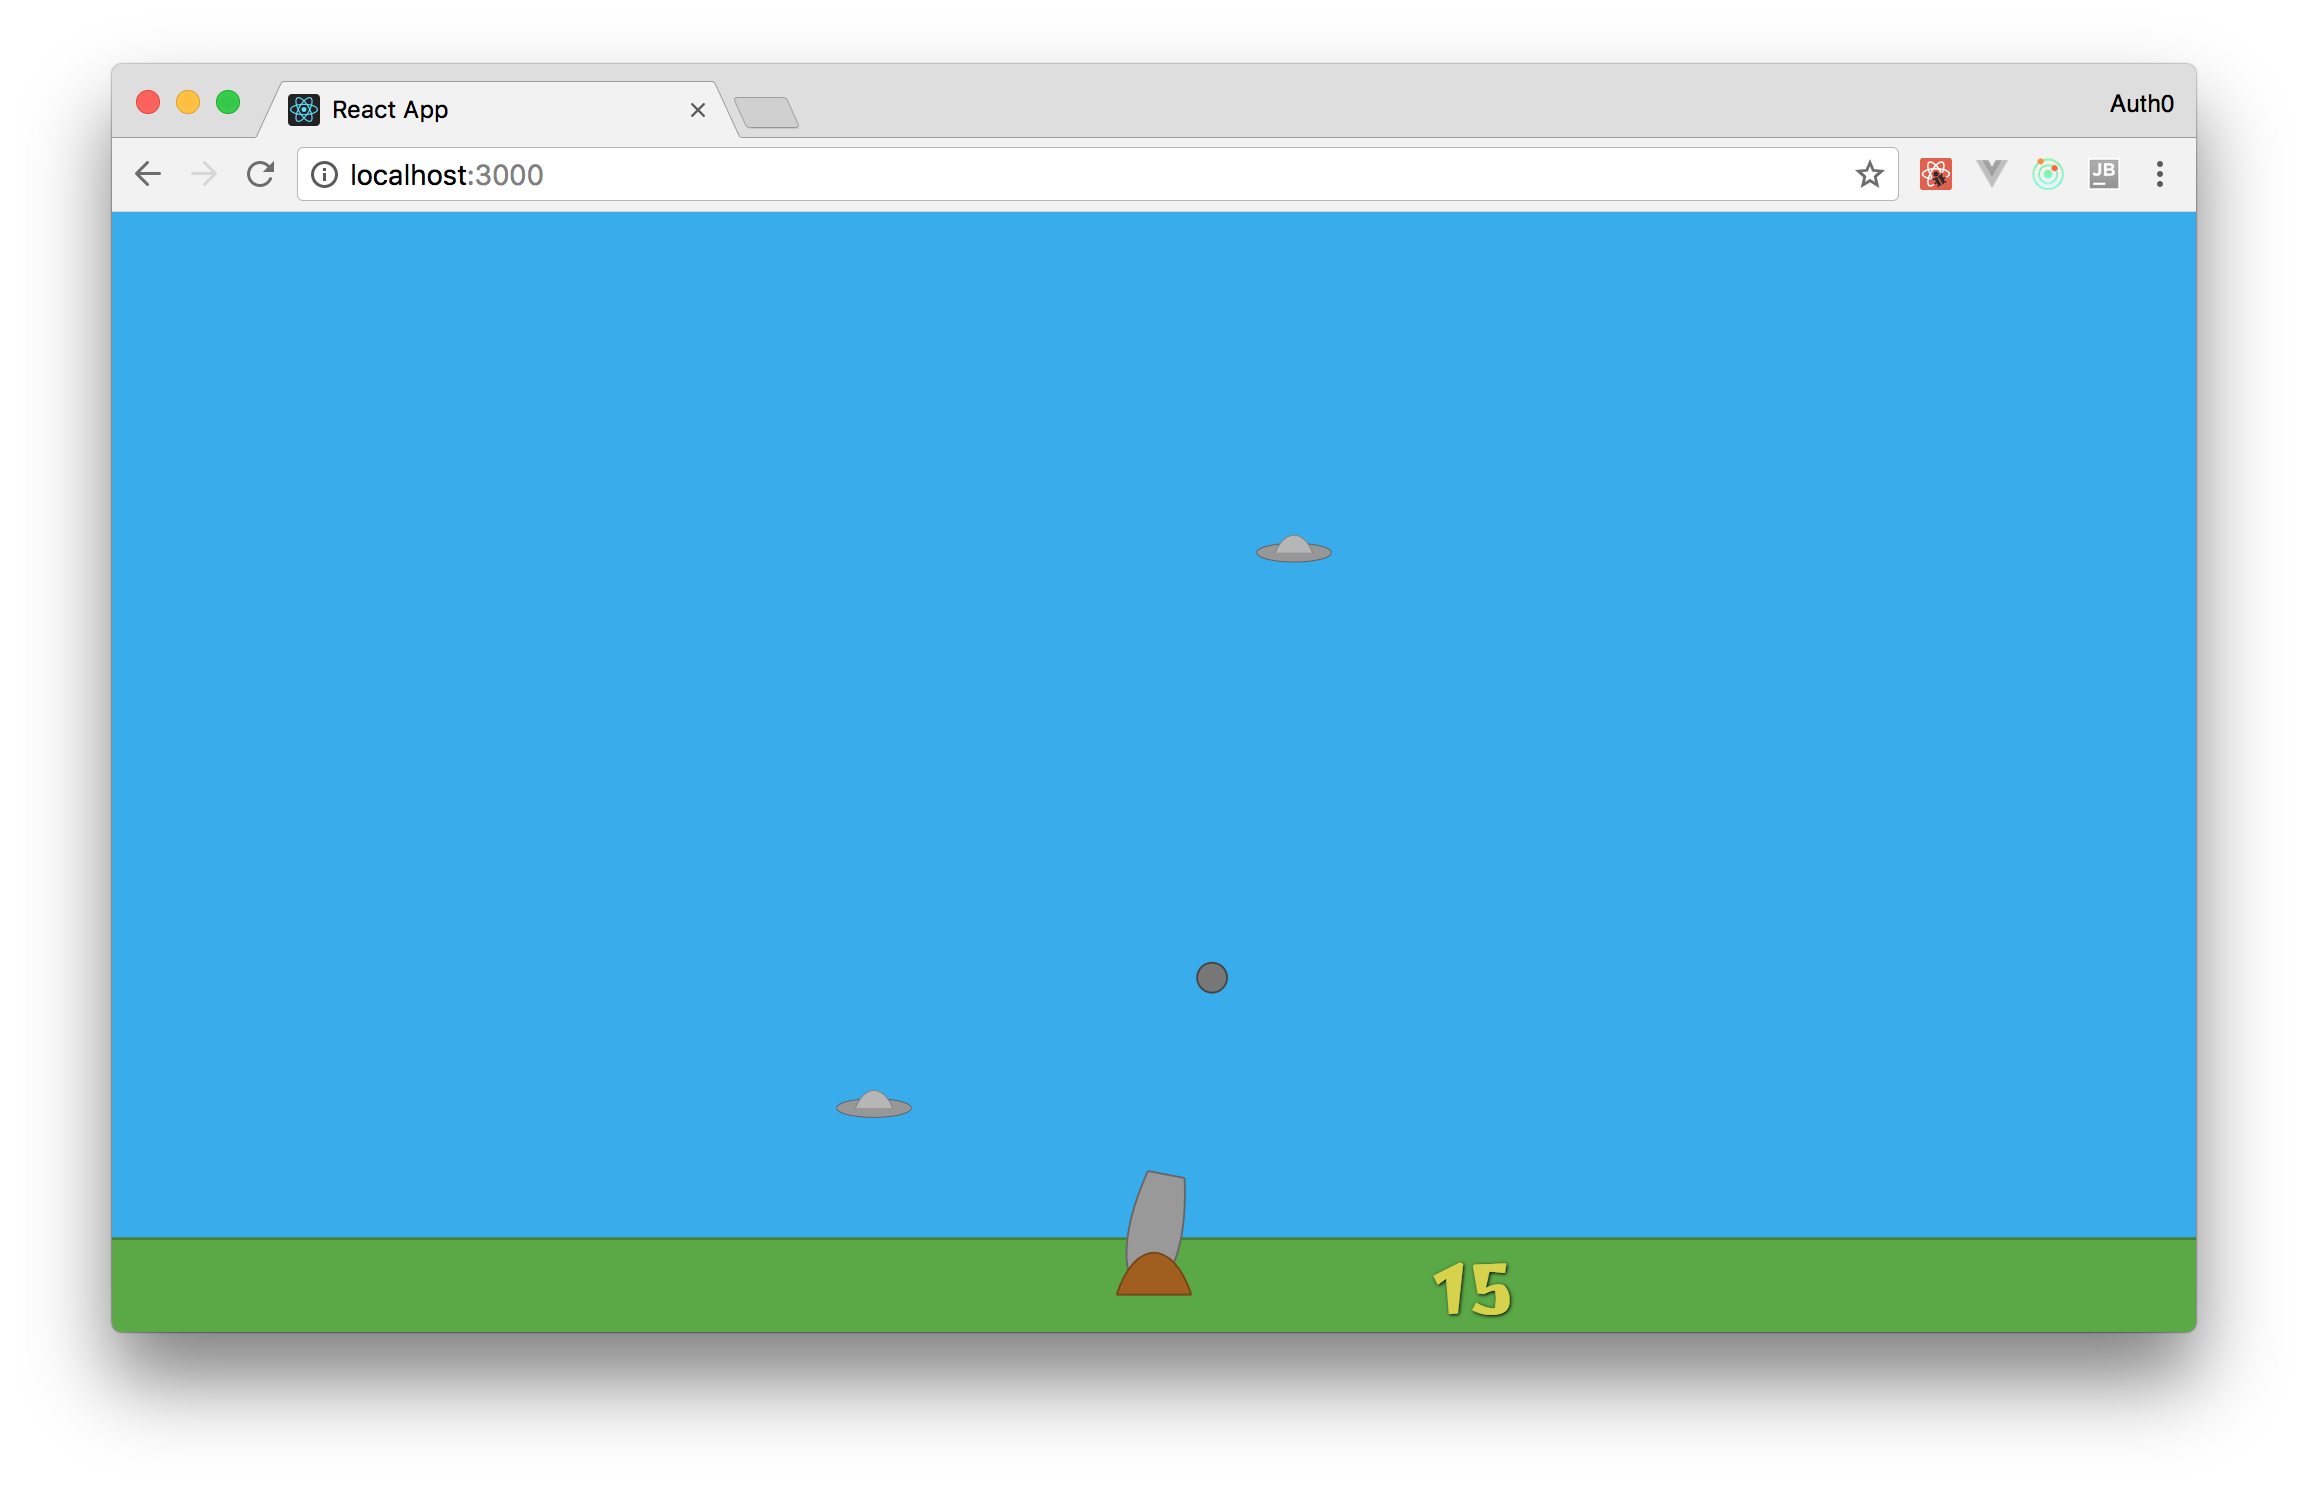
このシリーズで開発するゲームは、エイリアン、ゲットアウェイホーム! ゲームのアイデアはシンプルです。地球に侵入しようとしている「フライングディスク」を撃ち落とす銃があります。 これらのUFOを破壊するには、マウスにカーソルを合わせてクリックして大砲を発射する必要があります。
興味がある場合は、 ここでゲームの最終バージョンを見つけて実行できます( リンクが常に機能するとは限りません-翻訳者のメモ )。 しかし、ゲームに参加しないでください、あなたは仕事をしています!
前のシリーズ
最初のシリーズでは、 create-react-app
を使用create-react-app
てReactアプリケーションをすばやく起動し、ゲームの状態を制御するためにReduxをインストールおよび構成しました。 次に、ReactコンポーネントでSVGの使用をマスターし、 Sky
、 Ground
、 CannonBase
、およびCannonPipe
ゲーム要素を作成しました。 最後に、イベントハンドラーと間隔を使用してガンのスコープをマウントし、Reduxアクションをトリガーします。これにより、 CannonPipe
角度が変更されます。
これらの演習では、React、Redux、およびSVGを使用して、ゲームを作成するスキル(だけでなく)を「ポンプ」しました。
2番目のシリーズでは、ゲームに必要な他の要素( Heart
、 FlyingObject
およびCannonBall
)を作成し、プレイヤーにゲームを開始する機会を与え、エイリアンを飛ばしました(最終的には何をしましたか?)。
これらの「機能」はすべて非常にクールであるという事実にもかかわらず、ゲームの開発はまだ完了していませんでした。 大砲はまだコアにヒットしません。また、コアがターゲットにヒットしたと判断するアルゴリズムはありません。 さらに、プレイヤーが別のエイリアンを倒すたびにCurrentScore
コンポーネントの値が増加するはずです。
もちろん、エイリアンを殺して、あなたのポイントがどのように蓄積するかを見るのはクールですが、ゲームをさらに面白くすることができます。 これを行うには、 リーダーボード機能-リーダー評価を追加する必要があります。 プレイヤーはより多くの時間を費やして、評価をリーダーシップに高めます。
これらの条件をすべて満たすことで、開発が完了したと安全に言うことができます。 この場合、時間を無駄にせずに開始します。
注:何らかの理由で前のセクションで記述したコードがない場合は、GitHubリポジトリから単純にコピーできます 。 コピー後、以下の手順に従ってください。
LeaderBoard関数の実装(評価)
ゲームを本当にゲームにするために最初に行う必要があるのは、評価機能を実装することです。 これにより、プレイヤーはシステムに参加でき、ゲームは最大ポイントを読み取り、ランクを表示します。
ReactとAuth0を統合する
Auth0でプレーヤーを識別するには、まずAuth0のアカウントが必要です。 まだお持ちでない場合は、 こちらから無料のアカウントを作成できます 。
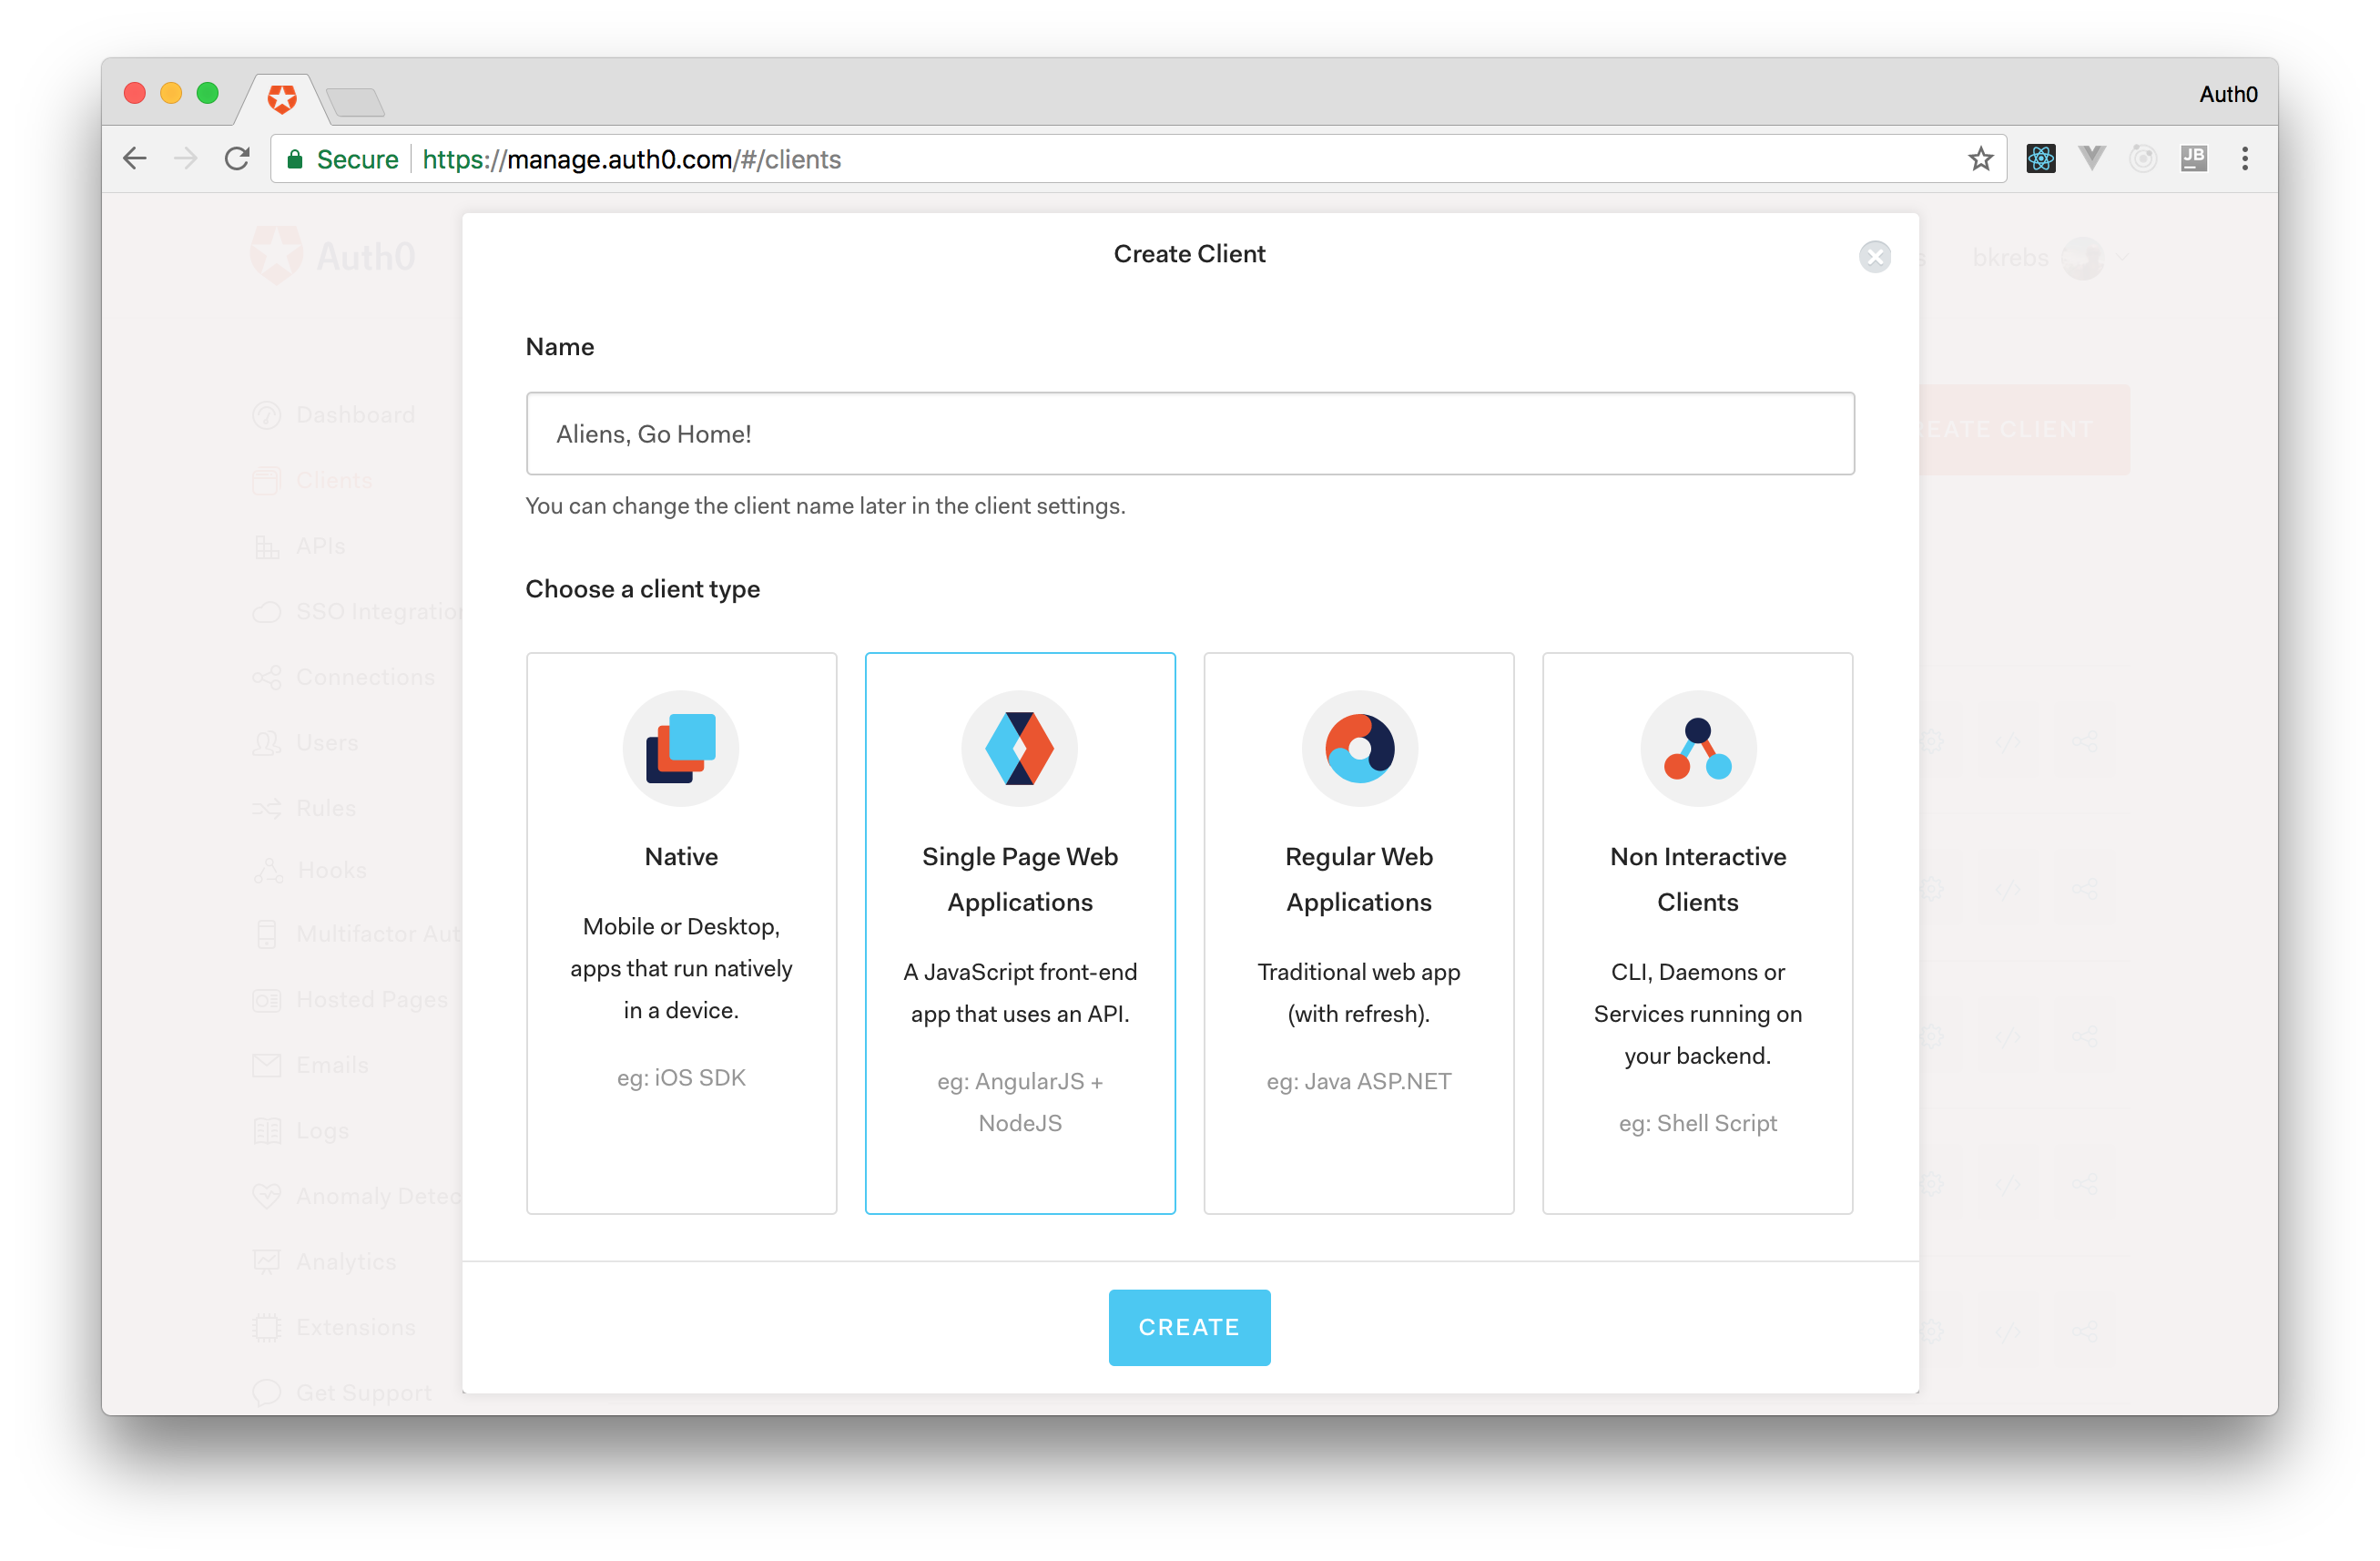
アカウントを開いたら、ゲームを表すAuth0クライアントを作成するだけです。 これを行うには、Auth0コントロールパネルの[クライアント]ページに移動し、[クライアントの作成]ボタンをクリックします。 情報パネルには、クライアントの名前とタイプを指定する必要があるフォームがあります。 Aliens, Go Home!
頼んでAliens, Go Home!
名前として、 Single Page Web Application
タイプを選択しSingle Page Web Application
(ゲームはReactのSPAです)。 次に、「作成」をクリックします。
その後、クライアントの[クイックスタート]タブにリダイレクトされます。 この記事ではReactとAuth0を統合する方法を学習するため、このタブは無視できます。 代わりに、「設定」タブが必要なので、それを開きます。
[設定]ページで行う必要がある3つのことがあります。 最初:値http://localhost:3000
をAllowed Callback URLsというフィールドに追加します 。 ダッシュボード( ダッシュボード )で説明されているように、Auth0での認証後、プレーヤーはこのフィールドで指定されたURLにリダイレクトされます。 したがって、インターネットでゲームを公開する場合は、必ず公開URL( http://aliens-go-home.digituz.com.br
)を追加してhttp://aliens-go-home.digituz.com.br
。
このフィールドにすべてのURLを入力した後、「保存」ボタンをクリックするか、 ctrl + s
押します(MacBookがある場合は、 command+s
押します)。 2つのことは残ります。「ドメイン」フィールドと「クライアントID」フィールドから値をコピーします。 しかし、それらを使用する前に、少しプログラミングする必要があります。
まず、ゲームのルートで次のコマンドを入力して、 auth0-web
パッケージをインストールする必要があります
npm i auth0-web
ご覧のとおり、このパッケージはAuth0とSPAの統合を容易にします。
次のステップは、ユーザーがAuth0を介して認証できるように、ゲームにログインボタンを追加することです。 これを行うには、次のコードを使用して./src/components
ディレクトリ内に新しいLogin.jsx
ファイルを作成します。
import React from 'react'; import PropTypes from 'prop-types'; const Login = (props) => { const button = { x: -300, y: -600, width: 600, height: 300, style: { fill: 'transparent', cursor: 'pointer', }, onClick: props.authenticate, }; const text = { textAnchor: 'middle', // x: 0, // X y: -440, // 440 style: { fontFamily: '"Joti One", cursive', fontSize: 45, fill: '#e3e3e3', cursor: 'pointer', }, onClick: props.authenticate, }; return ( <g filter="url(#shadow)"> <rect {...button} /> <text {...text}> Login to participate! </text> </g> ); }; Login.propTypes = { authenticate: PropTypes.func.isRequired, }; export default Login;
作成されたコンポーネントは、クリックされたときに何をするかという点では不可知論的です。 このアクションを定義するには、 Canvas
コンポーネントに追加します。 したがって、 Canvas.jsx
を開いて更新します。
// ... import Login from './Login'; import { signIn } from 'auth0-web'; const Canvas = (props) => { // ... const definitions return ( <svg ...> // ... { ! props.gameState.started && <g> // ... StartGame Title <Login authenticate={signIn} /> </g> } // ... flyingObjects.map </svg> ); }; // ... propTypes
ご覧のとおり、新しいバージョンでは、 auth0-web
パッケージからLogin
コンポーネントとsignIn
関数をインポートしました。 コードには別のコンポーネントが表示され、ユーザーがゲームを開始するまで表示されます。 承認ボタンをクリックすると、 signIn
関数の開始も登録しました。
これをすべて行った後、Auth0クライアントプロパティでauth0-web
を構成します。 これを行うには、 App.js
ファイルを開きます。
// ... import import * as Auth0 from 'auth0-web'; Auth0.configure({ domain: 'YOUR_AUTH0_DOMAIN', // clientID: 'YOUR_AUTH0_CLIENT_ID', // id redirectUri: 'http://localhost:3000/', responseType: 'token id_token', scope: 'openid profile manage:points', }); class App extends Component { // ... componentDidMount() { const self = this; Auth0.handleAuthCallback(); Auth0.subscribe((auth) => { console.log(auth); }); // ... setInterval onresize } // ... trackMouse render } // ... propTypes export
注:YOUR_AUTH0_DOMAIN
およびYOUR_AUTH0_CLIENT_ID
クライアントの [ ドメイン]および[ クライアントID]フィールドからコピーYOUR_AUTH0_CLIENT_ID
値に置き換える必要があります。 これに加えて、ゲームを公開するときに、redirectUri
の値も置き換える必要があります。
このコードの改善は非常に簡単です。 リストは次のとおりです。
-
configure
:この関数を使用して、Auth0 Clientプロパティでauth0-web
パッケージを構成しauth0-web
。 -
handleAuthCallback
:"" componentDidMount
でこの関数を呼び出して、認証後にプレーヤーがAuth0を返すかどうかを判断します。 この関数は、URLからトークンを抽出しようとするだけで、成功した場合、プレーヤーのプロファイルを選択し、すべてをlocalstorage
保存します。 -
subscribe
:この関数は、プレーヤーが認証されているかどうかを判断するために使用されます(true-アクセスの場合、false-認証されていない場合)。
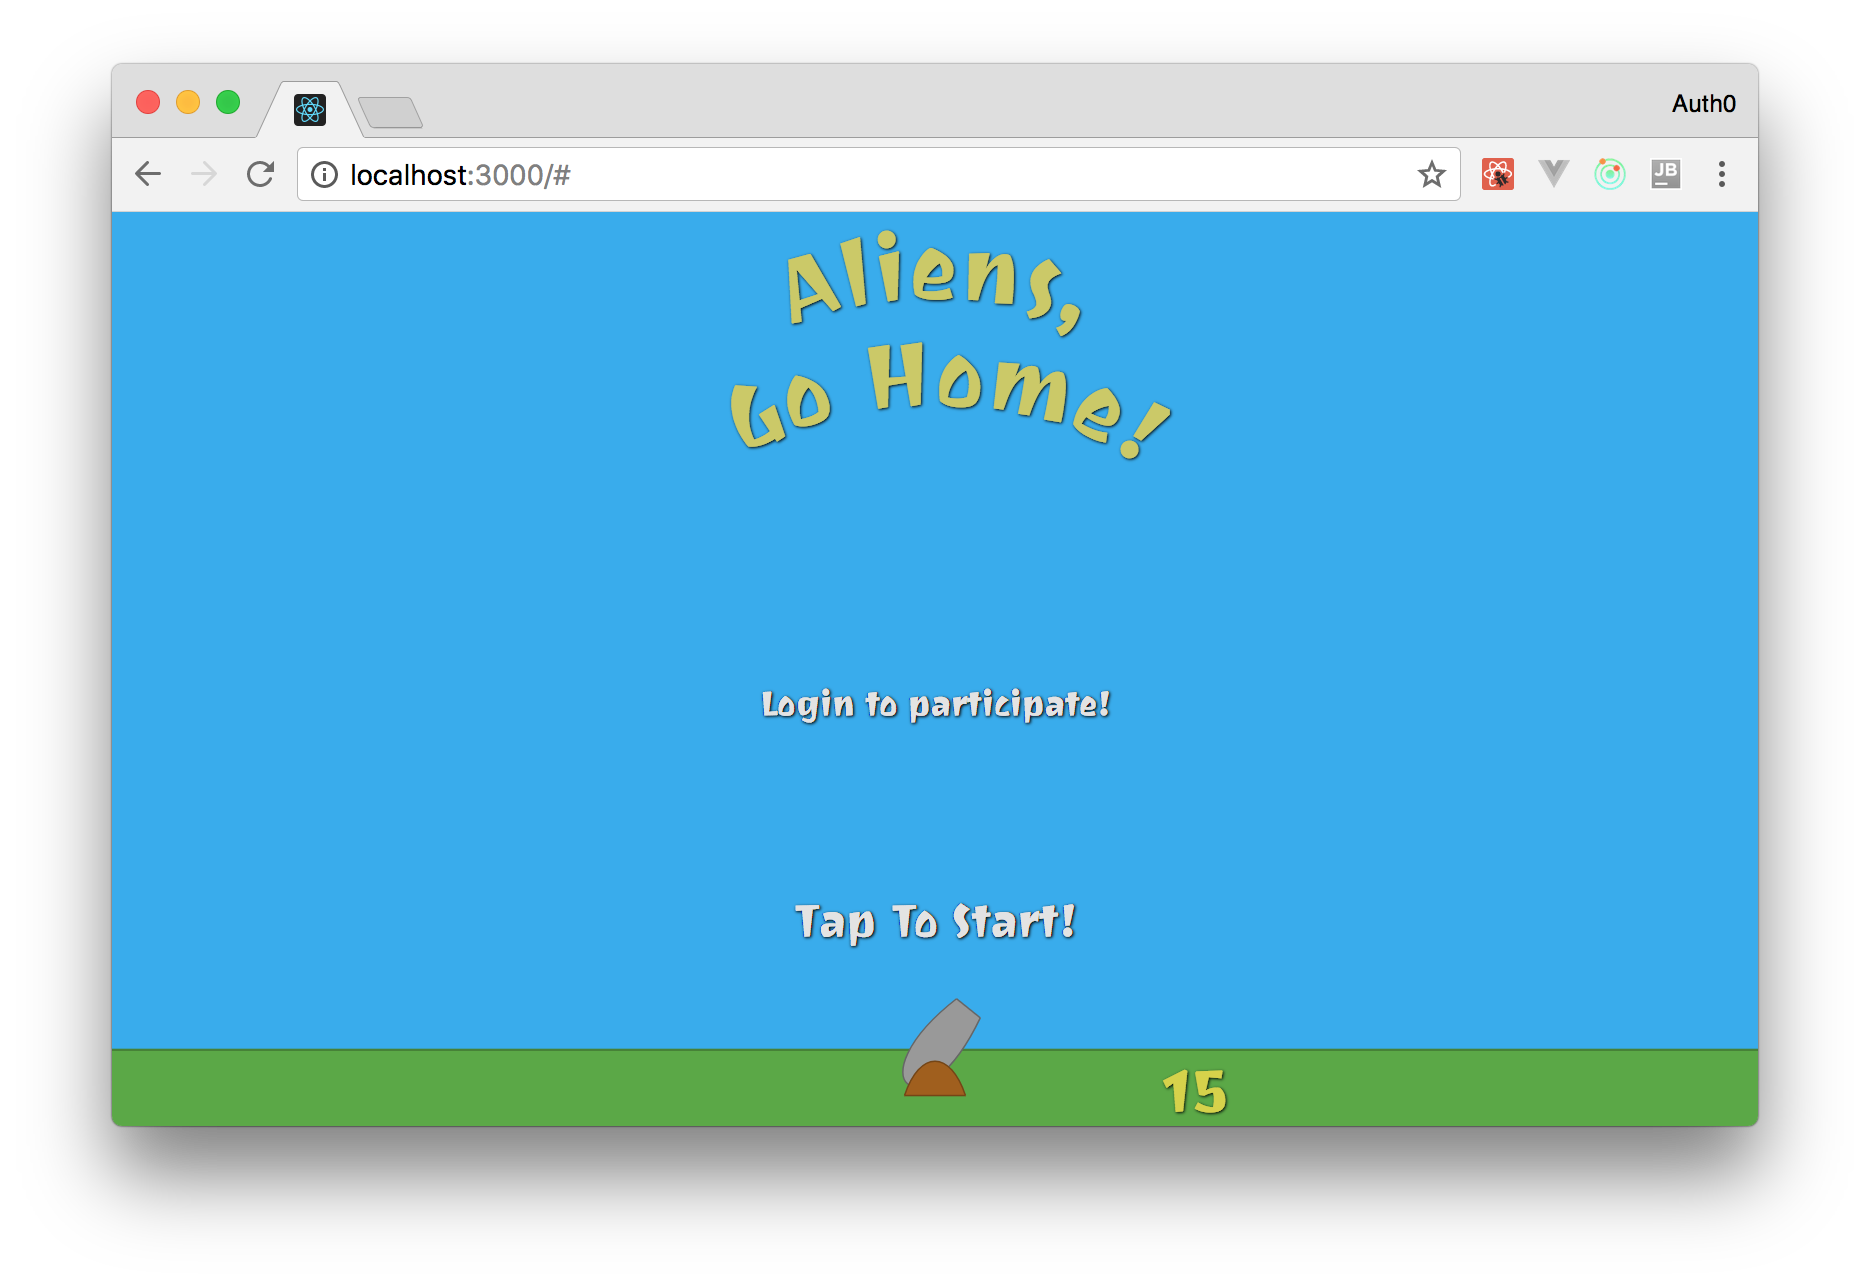
これで、ゲームではAuth0がID管理サービスとして使用されます 。 アプリケーションを実行し( npm start
)、ブラウザーで開くと( http://localhost:3000
)、ログインボタンが表示されます。 クリックすると、 Auth0ログインページにリダイレクトされ、 ログインできます。
認証後、Auth0は再びゲームにリダイレクトし、 handleAuthCallback
関数handleAuthCallback
トークンhandleAuthCallback
引き出します。 その後、アプリケーションにconsole.log
を実行するように指示すると、ブラウザコンソールで値true
を確認できます。
LeaderBoard(評価)を作成する
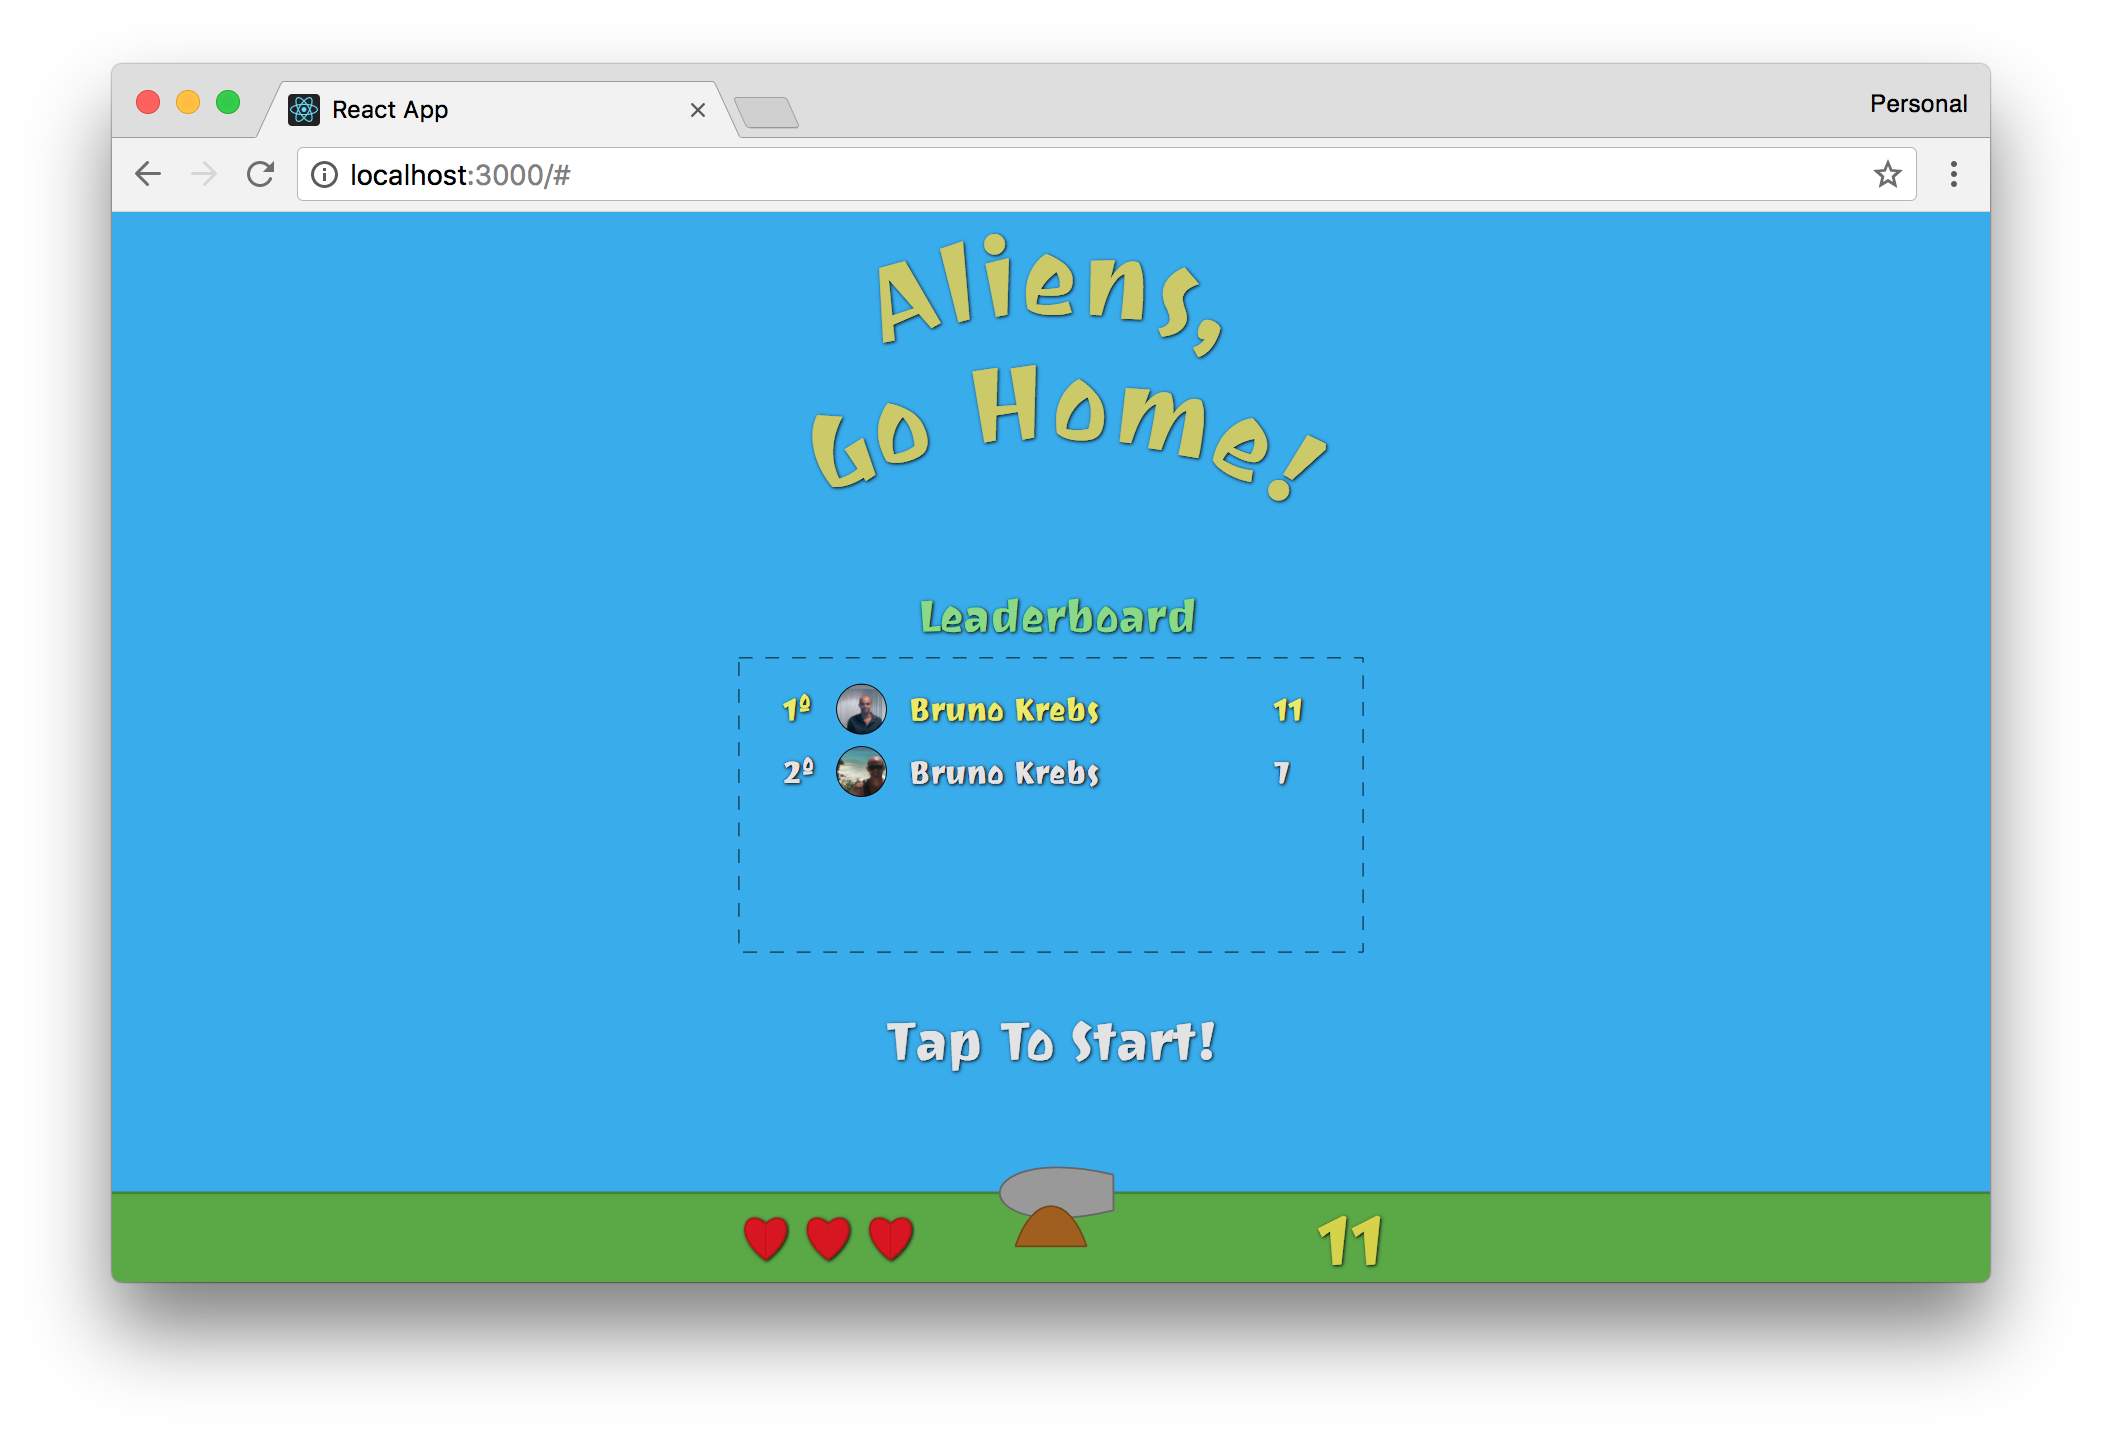
Auth0をID管理システムとして構成したので、プレーヤーのレーティングと最大ポイントを表示するコンポーネントを作成する必要があります。 これらは、 leaderboard
とrank
ように呼ばれます。 プレーヤーのデータを美しく表示するのはそれほど簡単ではないため(たとえば、得点、名前、位置、アバターなど)、2つのコンポーネントが必要になります。 これは難しくありませんが、このためにはいくつかの良いコードを書く必要があります。 一般に、これから1つのコンポーネントを彫刻することは、最も巧妙な手法ではありません。
プレーヤーがいないため、最初に行う必要があるのは、リーダーボードに記入するための 「レイアウトデータ」( いわゆる「魚」-翻訳者コメント )を定義することです。 これはCanvas
コンポーネントで行うのが最適です。 また、キャンバスを更新するため、 Login
コンポーネントをLeaderboard
コンポーネントに置き換えることもできます(同時にLogin
をLeaderboard
追加します)。
// ... import // Login import Leaderboard from './Leaderboard'; const Canvas = (props) => { // ... () const leaderboard = [ { id: 'd4', maxScore: 82, name: 'Ado Kukic', picture: 'https://twitter.com/KukicAdo/profile_image', }, { id: 'a1', maxScore: 235, name: 'Bruno Krebs', picture: 'https://twitter.com/brunoskrebs/profile_image', }, { id: 'c3', maxScore: 99, name: 'Diego Poza', picture: 'https://twitter.com/diegopoza/profile_image', }, { id: 'b2', maxScore: 129, name: 'Jeana Tahnk', picture: 'https://twitter.com/jeanatahnk/profile_image', }, { id: 'e5', maxScore: 34, name: 'Jenny Obrien', picture: 'https://twitter.com/jenny_obrien/profile_image', }, { id: 'f6', maxScore: 153, name: 'Kim Maida', picture: 'https://twitter.com/KimMaida/profile_image', }, { id: 'g7', maxScore: 55, name: 'Luke Oliff', picture: 'https://twitter.com/mroliff/profile_image', }, { id: 'h8', maxScore: 146, name: 'Sebastián Peyrott', picture: 'https://twitter.com/speyrott/profile_image', }, ]; return ( <svg ...> // ... { ! props.gameState.started && <g> // ... StartGame Title <Leaderboard currentPlayer={leaderboard[6]} authenticate={signIn} leaderboard={leaderboard} /> </g> } // ... flyingObjects.map </svg> ); }; // ... propTypes export
新しいバージョンでは、架空のプレーヤーの配列を含むleaderboard
定数について説明しました。 これらのプレーヤーには、 id
、 maxScore
、 name
およびpicture
プロパティがあります。 次に、 svg
要素内に、次のパラメーターを使用してleaderboard
コンポーネントを追加しました。
-
currentPlayer
:現在誰がプレイしているかを決定します。 架空のプレイヤーがいるので、すべてがどのように機能するかを見てみましょう。 このパラメーターを渡す目的は、プレーヤーをテーブルで強調表示することです。 -
authenticate
:以前にLogin
コンポーネントに追加したパラメーターと同じパラメーター。 -
leaderboard
:偽のプレーヤーの配列。 現在の評価を表示するために使用されます。
次に、 Leaderboard
コンポーネントについて説明する必要があります。 これを行うには、。 ./src/components
ディレクトリに新しい./src/components
ファイルを作成し、次を追加します。
import React from 'react'; import PropTypes from 'prop-types'; import Login from './Login'; import Rank from "./Rank"; const Leaderboard = (props) => { const style = { fill: 'transparent', stroke: 'black', strokeDasharray: '15', }; const leaderboardTitle = { fontFamily: '"Joti One", cursive', fontSize: 50, fill: '#88da85', cursor: 'default', }; let leaderboard = props.leaderboard || []; leaderboard = leaderboard.sort((prev, next) => { if (prev.maxScore === next.maxScore) { return prev.name <= next.name ? 1 : -1; } return prev.maxScore < next.maxScore ? 1 : -1; }).map((member, index) => ({ ...member, rank: index + 1, currentPlayer: member.id === props.currentPlayer.id, })).filter((member, index) => { if (index < 3 || member.id === props.currentPlayer.id) return member; return null; }); return ( <g> <text filter="url(#shadow)" style={leaderboardTitle} x="-150" y="-630">Leaderboard</text> <rect style={style} x="-350" y="-600" width="700" height="330" /> { props.currentPlayer && leaderboard.map((player, idx) => { const position = { x: -100, y: -530 + (70 * idx) }; return <Rank key={player.id} player={player} position={position}/> }) } { ! props.currentPlayer && <Login authenticate={props.authenticate} /> } </g> ); }; Leaderboard.propTypes = { currentPlayer: PropTypes.shape({ id: PropTypes.string.isRequired, maxScore: PropTypes.number.isRequired, name: PropTypes.string.isRequired, picture: PropTypes.string.isRequired, }), authenticate: PropTypes.func.isRequired, leaderboard: PropTypes.arrayOf(PropTypes.shape({ id: PropTypes.string.isRequired, maxScore: PropTypes.number.isRequired, name: PropTypes.string.isRequired, picture: PropTypes.string.isRequired, ranking: PropTypes.number, })), }; Leaderboard.defaultProps = { currentPlayer: null, leaderboard: null, }; export default Leaderboard;
心配しないでください! 実際、コードは非常に単純です。
- 評価表のタイトルの外観を設定するには、
leaderboardTitle
定数を定義します。 -
dashedRectangle
定数を定義して、テーブルの「コンテナ」として機能するdashedRectangle
要素を作成します。 -
props.leaderboard
変数のsort
関数を呼び出して、ランクを調整します。 その後、テーブルの一番上の行は最も多くのポイントを持つプレイヤーによって占有され、一番下のポイントは最も小さいプレイヤーによって占有されます。 プレーヤーのポイントが等しい場合、名前順に並べられます。 - 前のアクションの結果に応じて、
map
関数が呼び出され、各プレーヤーにランクを追加し、currentPlayer
フラグを追加します。 このフラグは、現在のプレーヤーが配置されている行を強調表示します。 - 前の手順(
map
機能)の結果として、filter
機能を使用して、TOP-3にいないプレーヤーをfilter
します。 実際、現在のプレーヤーがトップ3に含まれていなくても、最終的な配列に残ることを許可します。 - 最後に、プレーヤーがログインしている場合(
props.currentPlayer
&&props.currentPlayer
)、またはLogin
ボタンが表示されていない場合、フィルターされた配列を反復処理してRank
要素を表示します。
最終段階にRank
ます- Rank
コンポーネントを作成します。 これを行うには、 Rank.jsx
ファイルの隣に、次のコードを含む新しいRank.jsx
ファイルを作成します。
import React from 'react'; import PropTypes from 'prop-types'; const Rank = (props) => { const { x, y } = props.position; const rectId = 'rect' + props.player.rank; const clipId = 'clip' + props.player.rank; const pictureStyle = { height: 60, width: 60, }; const textStyle = { fontFamily: '"Joti One", cursive', fontSize: 35, fill: '#e3e3e3', cursor: 'default', }; if (props.player.currentPlayer) textStyle.fill = '#e9ea64'; const pictureProperties = { style: pictureStyle, x: x - 140, y: y - 40, href: props.player.picture, clipPath: `url(#${clipId})`, }; const frameProperties = { width: 55, height: 55, rx: 30, x: pictureProperties.x, y: pictureProperties.y, }; return ( <g> <defs> <rect id={rectId} {...frameProperties} /> <clipPath id={clipId}> <use xlinkHref={'#' + rectId} /> </clipPath> </defs> <use xlinkHref={'#' + rectId} strokeWidth="2" stroke="black" /> <text filter="url(#shadow)" style={textStyle} x={x - 200} y={y}>{props.player.rank}º</text> <image {...pictureProperties} /> <text filter="url(#shadow)" style={textStyle} x={x - 60} y={y}>{props.player.name}</text> <text filter="url(#shadow)" style={textStyle} x={x + 350} y={y}>{props.player.maxScore}</text> </g> ); }; Rank.propTypes = { player: PropTypes.shape({ id: PropTypes.string.isRequired, maxScore: PropTypes.number.isRequired, name: PropTypes.string.isRequired, picture: PropTypes.string.isRequired, rank: PropTypes.number.isRequired, currentPlayer: PropTypes.bool.isRequired, }).isRequired, position: PropTypes.shape({ x: PropTypes.number.isRequired, y: PropTypes.number.isRequired }).isRequired, }; export default Rank;
このコードを恐れないでください。 珍しいことは1つだけですclipPath
要素とrect
要素をdefs
要素内のこのコンポーネントに追加して、丸みを帯びたポートレートを作成します。
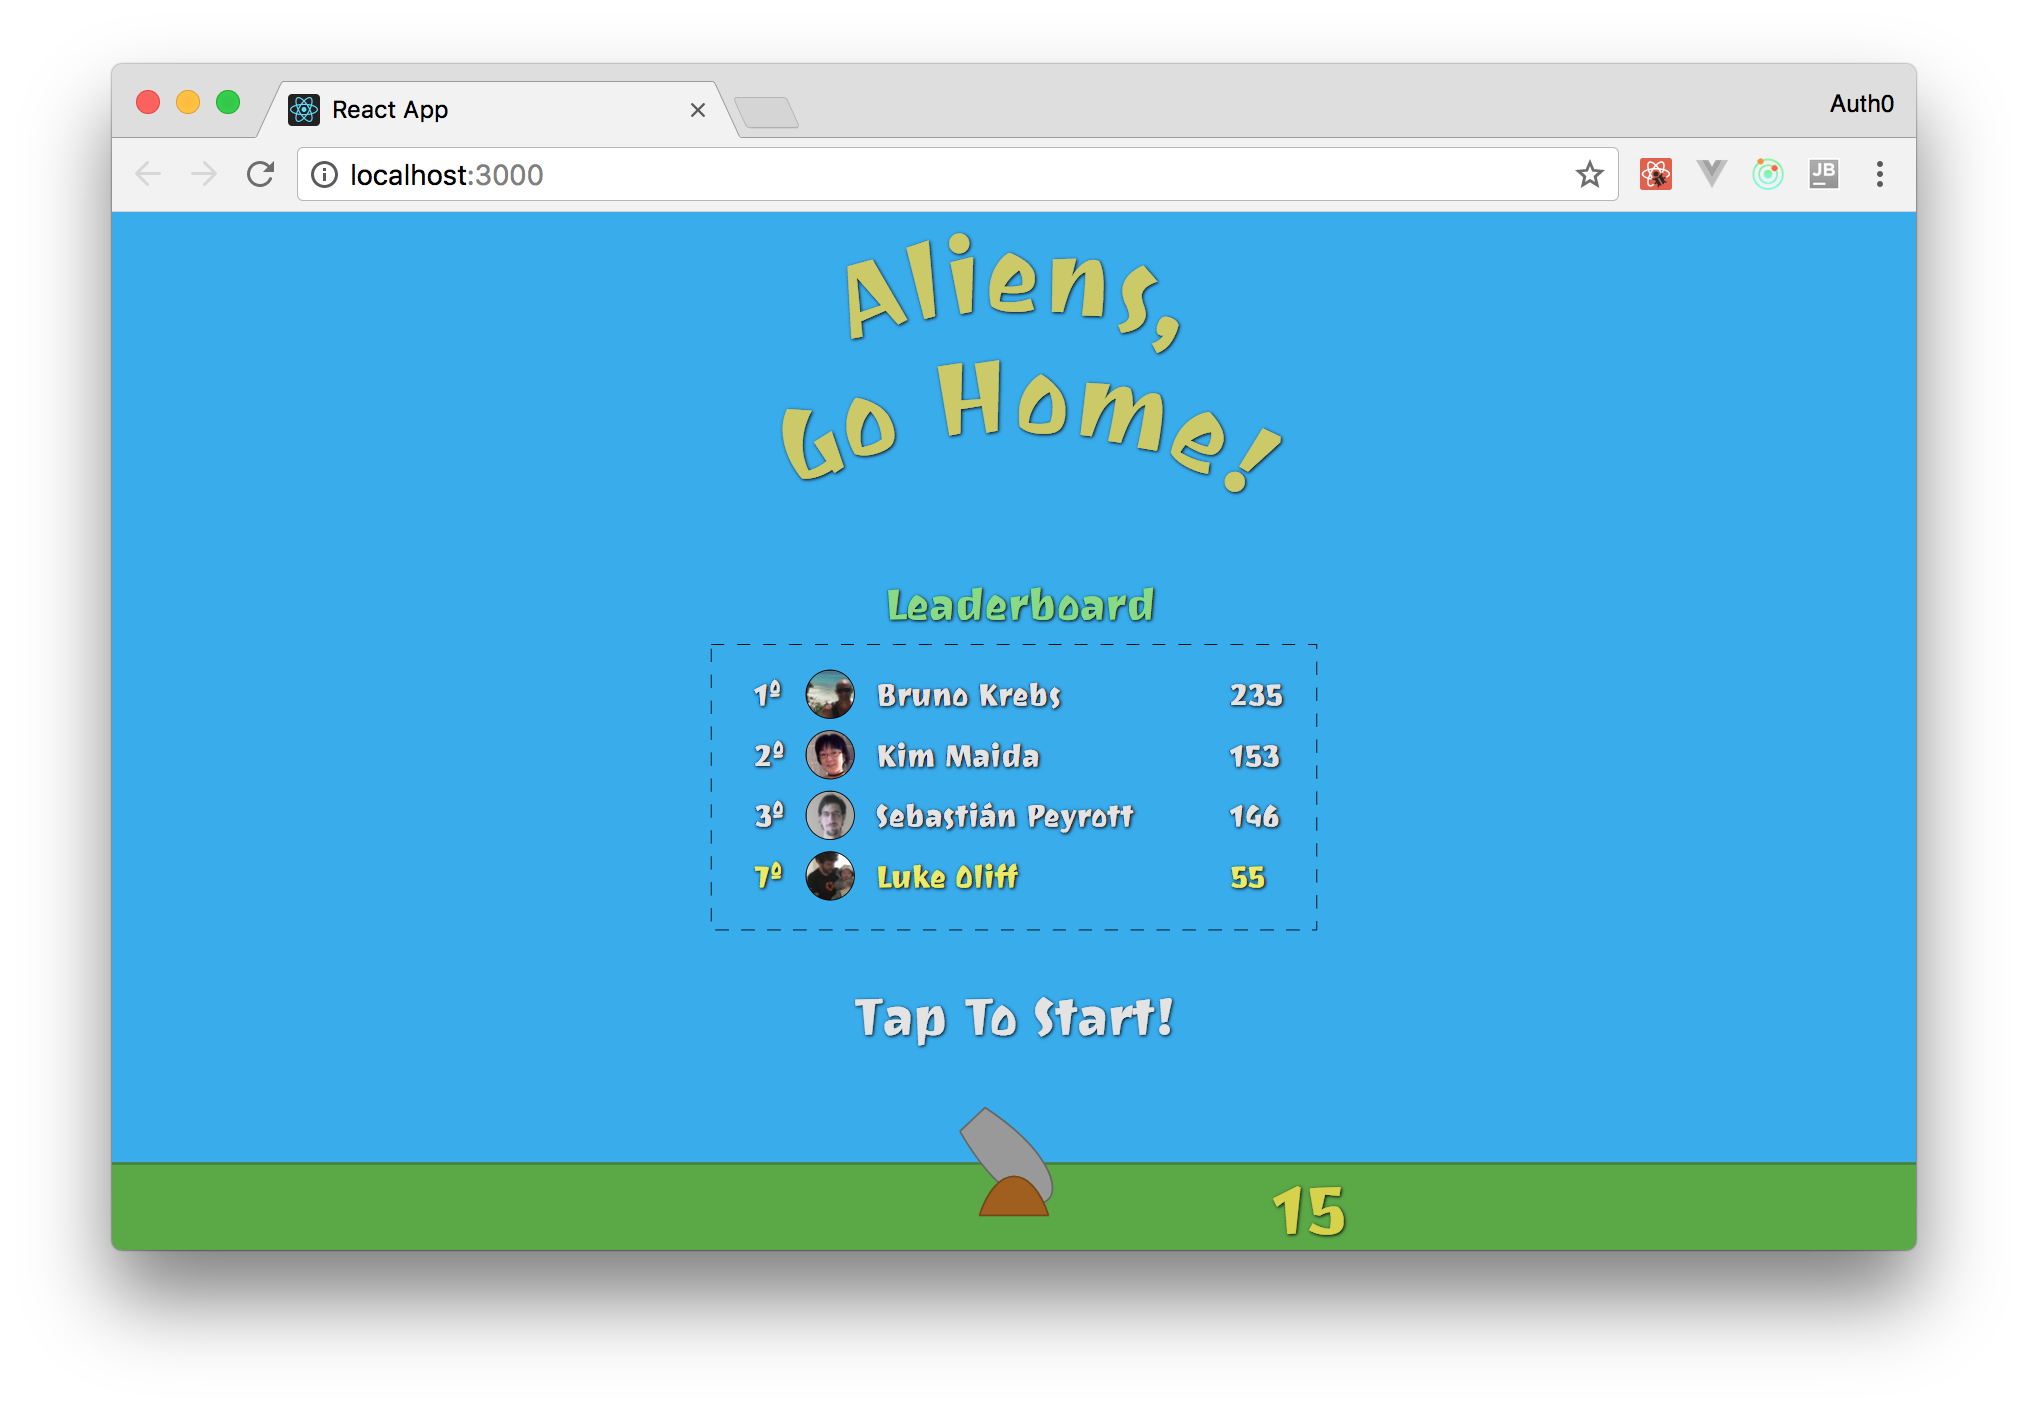
このすべての後、アプリケーション( http://localhost:3000/
)に移動して、新しい評価テーブルを表示できます。
Socket.IOを使用して、保持のリアルタイムテーブルを作成する
さて、Auth0をID管理サービスとして使用し、評価テーブルを表示するためのすべてのコンポーネントを用意しました。 次は? そうです、リアルタイムでイベントを送信して評価テーブルを更新できるバックエンドが必要です。
おそらく、そのようなサーバー( バックエンド )を作成するのは難しいと思ったのでしょうか? いいえ、まったくありません。 Socket.IOを使用すると、この機能を簡単に開発できます。 とにかく、このサービスを保護したいですか? これを行うには、サービスを表すAuth0 APIを作成します。
これはそれほど難しくありません。 Auth0コントロールパネルのAPIページに移動し、[APIの作成]ボタンをクリックするだけです。 その後、3つのフィールドを含むフォームに入力する必要があります。
- API 名 ( name ):このAPIが何を表すかを覚えておくには、わかりやすい名前を設定する必要があります。 「エイリアン、帰って!」と呼びましょう。
2. API 識別子 ( identifier ):ゲームの最終URLを指定することをお勧めしますが、実際には何でも挿入できます。 ただし、https://aliens-go-home.digituz.com.br
と入力しhttps://aliens-go-home.digituz.com.br
。 - 署名アルゴリズムには、RS256とHS256の2つのオプションがあります。 このフィールドは空白のままにしておくとよいでしょう(デフォルトではRS256)。 違いが何かに興味がある場合は、 こちらをチェックしてください 。

すべてのフィールドに入力したら、「作成」をクリックします。 新しいAPI内の[ クイックスタート ]タブにリダイレクトされます。 そこから、 「スコープ」タブをクリックし、 「 manage:points
と呼ばれる新しい領域を追加します。「最大ポイントの読み取りと書き込み」という説明があります。 これは、Auth0 APIアプリケーションで領域を定義するのに適した方法です。
エリアを追加したら、少しプログラミングする必要があります。 リアルタイムの評価表を実装するには、次の手順を実行します。
# mkdir server # ( ) cd server # NPM npm init -y # npm i express jsonwebtoken jwks-rsa socket.io socketio-jwt # touch index.js
新しいファイルで、コードを追加します。
const app = require('express')(); const http = require('http').Server(app); const io = require('socket.io')(http); const jwt = require('jsonwebtoken'); const jwksClient = require('jwks-rsa'); const client = jwksClient({ jwksUri: 'https://YOUR_AUTH0_DOMAIN/.well-known/jwks.json' // }); const players = [ { id: 'a1', maxScore: 235, name: 'Bruno Krebs', picture: 'https://twitter.com/brunoskrebs/profile_image', }, { id: 'c3', maxScore: 99, name: 'Diego Poza', picture: 'https://twitter.com/diegopoza/profile_image', }, { id: 'b2', maxScore: 129, name: 'Jeana Tahnk', picture: 'https://twitter.com/jeanatahnk/profile_image', }, { id: 'f6', maxScore: 153, name: 'Kim Maida', picture: 'https://twitter.com/KimMaida/profile_image', }, { id: 'e5', maxScore: 55, name: 'Luke Oliff', picture: 'https://twitter.com/mroliff/profile_image', }, { id: 'd4', maxScore: 146, name: 'Sebastián Peyrott', picture: 'https://twitter.com/speyrott/profile_image', }, ]; const verifyPlayer = (token, cb) => { const uncheckedToken = jwt.decode(token, {complete: true}); const kid = uncheckedToken.header.kid; client.getSigningKey(kid, (err, key) => { const signingKey = key.publicKey || key.rsaPublicKey; jwt.verify(token, signingKey, cb); }); }; const newMaxScoreHandler = (payload) => { let foundPlayer = false; players.forEach((player) => { if (player.id === payload.id) { foundPlayer = true; player.maxScore = Math.max(player.maxScore, payload.maxScore); } }); if (!foundPlayer) { players.push(payload); } io.emit('players', players); }; io.on('connection', (socket) => { const { token } = socket.handshake.query; verifyPlayer(token, (err) => { if (err) socket.disconnect(); io.emit('players', players); }); socket.on('new-max-score', newMaxScoreHandler); }); http.listen(3001, () => { console.log('listening on port 3001'); });
このコードの機能を理解する前に、 YOUR_AUTH0_DOMAIN
Auth0ドメイン( App.js
ファイルに追加したドメイン)に置き換えYOUR_AUTH0_DOMAIN
ください。 この値はjwksUri
プロパティにあります。
次に、これがどのように機能するかを理解するために、次のリストを確認してください。
-
express
とsocket.io
:これは、socket.io
拡張されたエクスプレスサーバーであり、リアルタイムでの作業方法を教えています。 以前にSocket.IOを使用したことがない場合は、 Get Startedチュートリアルをご覧ください。 とても簡単です。 -
jwt
およびjwksClient
:jwt
を介して認証する場合、プレーヤーは(特に)JWT(JSON Web Token)の形式でaccess_tokenを受け取ります。 RS256アルゴリズムを使用しているため、jwksClient
パッケージを使用して、JWT検証用の正しい公開キーを取得する必要があります。 -
jwt.verify
:正しいキーを取得する方法、この関数を使用してJWTをデコードおよび評価します。 すべてが正常である場合、要求に応じてプレーヤーのリストを送信するだけです。 そうでない場合は、(socket
)クライアントをdisconnect
ます。 -
on('new-max-score', ...)
:最後に、newMaxScoreHandler
関数をnew-max-score
イベントにアタッチします。 したがって、ユーザーの最大ポイントを更新する必要がある場合は常に、Reactからこのイベントをトリガーします。
残りのコードは直感的です。 このサービスをゲームに統合することに集中できます。
Socket.IOとReact
「リアルタイムバックエンドサービス」を作成したら、それをReactに統合します。 ReactとSocket.IOを使用する最良の方法は socket.io-client
をインストールする socket.io-client
。 これを行うには、Reactアプリケーションのルートに次のコードを入力します。
npm i socket.io-client
次に、プレーヤーを認証するたびにゲームをサービスに接続します(テーブルには許可されていないユーザーはいません)。 Reduxを使用してゲームの状態を保存しているため、ストレージを更新するには2つの手順が必要です。 ./src/actions/index.js
ファイルを開いて更新します。
export const LEADERBOARD_LOADED = 'LEADERBOARD_LOADED'; export const LOGGED_IN = 'LOGGED_IN'; // ... MOVE_OBJECTS START_GAME ... export const leaderboardLoaded = players => ({ type: LEADERBOARD_LOADED, players, }); export const loggedIn = player => ({ type: LOGGED_IN, player, }); // ... moveObjects startGame ...
新しいバージョンでは、2つのステップで起動するアクションを定義しています。
-
LOGGED_IN
:このアクションにより、プレイヤーがログインしたときにゲームをバックエンドに接続します。 -
LEADERBOARD_LOADED
:このアクションを使用すると、バックエンドがプレーヤーのリストを送信するときに「プレーヤー」でReduxストアを更新します。
Reduxがこれらのアクションに応答するには、。 ./src/reducers/index.js
ファイルを開いて更新します。
import { LEADERBOARD_LOADED, LOGGED_IN, MOVE_OBJECTS, START_GAME } from '../actions'; // ... import const initialGameState = { // ... currentPlayer: null, players: null, }; // ... initialState function reducer(state = initialState, action) { switch (action.type) { case LEADERBOARD_LOADED: return { ...state, players: action.players, }; case LOGGED_IN: return { ...state, currentPlayer: action.player, }; // ... MOVE_OBJECTS, START_GAME, default case } } export default reducer;
LEADERBOARD_LOADED
がゲームで呼び出されたので、新しいプレーヤーの配列でReduxを更新します。 , , , currentPlayer
.
, , ./src/containers/Game.js
:
// ... import import { leaderboardLoaded, loggedIn, moveObjects, startGame } from '../actions/index'; const mapStateToProps = state => ({ // ... angle gameState currentPlayer: state.currentPlayer, players: state.players, }); const mapDispatchToProps = dispatch => ({ leaderboardLoaded: (players) => { dispatch(leaderboardLoaded(players)); }, loggedIn: (player) => { dispatch(loggedIn(player)); }, // ... moveObjects startGame }); // ... connect export
, realtime- ( ), . ./src/App.js
:
// ... import import io from 'socket.io-client'; Auth0.configure({ // ... audience: 'https://aliens-go-home.digituz.com.br', }); class App extends Component { // ... componentDidMount() { const self = this; Auth0.handleAuthCallback(); Auth0.subscribe((auth) => { if (!auth) return; const playerProfile = Auth0.getProfile(); const currentPlayer = { id: playerProfile.sub, maxScore: 0, name: playerProfile.name, picture: playerProfile.picture, }; this.props.loggedIn(currentPlayer); const socket = io('http://localhost:3001', { query: `token=${Auth0.getAccessToken()}`, }); let emitted = false; socket.on('players', (players) => { this.props.leaderboardLoaded(players); if (emitted) return; socket.emit('new-max-score', { id: playerProfile.sub, maxScore: 120, name: playerProfile.name, picture: playerProfile.picture, }); emitted = true; setTimeout(() => { socket.emit('new-max-score', { id: playerProfile.sub, maxScore: 222, name: playerProfile.name, picture: playerProfile.picture, }); }, 5000); }); }); // ... setInterval onresize } // ... trackMouse render() { return ( <Canvas angle={this.props.angle} currentPlayer={this.props.currentPlayer} gameState={this.props.gameState} players={this.props.players} startGame={this.props.startGame} trackMouse={event => (this.trackMouse(event))} /> ); } } App.propTypes = { // ... propTypes currentPlayer: PropTypes.shape({ id: PropTypes.string.isRequired, maxScore: PropTypes.number.isRequired, name: PropTypes.string.isRequired, picture: PropTypes.string.isRequired, }), leaderboardLoaded: PropTypes.func.isRequired, loggedIn: PropTypes.func.isRequired, players: PropTypes.arrayOf(PropTypes.shape({ id: PropTypes.string.isRequired, maxScore: PropTypes.number.isRequired, name: PropTypes.string.isRequired, picture: PropTypes.string.isRequired, })), }; App.defaultProps = { currentPlayer: null, players: null, }; export default App;
, :
-
audience
Auth0
. - (
Auth0.getProfile()
)currentPlayer
(Redux store) (this.props.loggedIn(...)
). - (
io('http://localhost:3001', ...)
)access_token
(Auth0.getAccessToken()
). -
players
, , Redux store (this.props.leaderboardLoaded(...)
).
, , (events) new-max-score
( ). -, maxScore
120
, 5 . , 5 ( (setTimeout(..., 5000)
), c maxScore
, 222
, .
Canvas
: currentPlayer
players
. , ./src/components/Canvas.jsx
:
// ... import const Canvas = (props) => { // ... gameHeight viewBox // leaderboard !!!! return ( <svg ...> // ... { ! props.gameState.started && <g> // ... StartGame Title <Leaderboard currentPlayer={props.currentPlayer} authenticate={signIn} leaderboard={props.players} /> </g> } // ... flyingObjects.map </svg> ); }; Canvas.propTypes = { // ... propTypes currentPlayer: PropTypes.shape({ id: PropTypes.string.isRequired, maxScore: PropTypes.number.isRequired, name: PropTypes.string.isRequired, picture: PropTypes.string.isRequired, }), players: PropTypes.arrayOf(PropTypes.shape({ id: PropTypes.string.isRequired, maxScore: PropTypes.number.isRequired, name: PropTypes.string.isRequired, picture: PropTypes.string.isRequired, })), }; Canvas.defaultProps = { currentPlayer: null, players: null, }; export default Canvas;
:
-
leaderboard
. . -
<Leaderboard />
. :props.currentPlayer
props.players
. -
propTypes
, ,Canvas
currentPlayer
players
.
できた! Socket.IO. ( — — ., ) :
# cd server # node index.js & # (cd .. = ) cd .. # npm start
: ( http://localhost:3000
). , , :
. , , . :
- : , "" .
- "": , , .
- "" : , , ( score ) . , "".
- : .
.
, onClick
Canvas
. Redux-, ( ). moveObjects
.
"" . ./src/actions/index.js
:
// ... export const SHOOT = 'SHOOT'; // ... export const shoot = (mousePosition) => ({ type: SHOOT, mousePosition, });
( ./src/reducers/index.js
):
import { LEADERBOARD_LOADED, LOGGED_IN, MOVE_OBJECTS, SHOOT, START_GAME } from '../actions'; // ... import import shoot from './shoot'; const initialGameState = { // ... cannonBalls: [], }; // ... initialState function reducer(state = initialState, action) { switch (action.type) { // case- case SHOOT: return shoot(state, action); // ... } }
, shoot
, SHOOT
. . shoot.js
:
import { calculateAngle } from '../utils/formulas'; function shoot(state, action) { if (!state.gameState.started) return state; const { cannonBalls } = state.gameState; if (cannonBalls.length === 2) return state; const { x, y } = action.mousePosition; const angle = calculateAngle(0, 0, x, y); const id = (new Date()).getTime(); const cannonBall = { position: { x: 0, y: 0 }, angle, id, }; return { ...state, gameState: { ...state.gameState, cannonBalls: [...cannonBalls, cannonBall], } }; } export default shoot;
, . , . , . , . , calculateAngle
. , , (Redux store) .
, , Game
, App
. , ./src/containers/Game.js
:
// ... import import { leaderboardLoaded, loggedIn, moveObjects, startGame, shoot } from '../actions/index'; // ... mapStateToProps const mapDispatchToProps = dispatch => ({ // ... shoot: (mousePosition) => { dispatch(shoot(mousePosition)) }, }); // ... connect export
./src/App.js
:
// ... import statements and Auth0.configure class App extends Component { constructor(props) { super(props); this.shoot = this.shoot.bind(this); } // ... componentDidMount and trackMouse definition shoot() { this.props.shoot(this.canvasMousePosition); } render() { return ( <Canvas // other props shoot={this.shoot} /> ); } } App.propTypes = { // ... other propTypes shoot: PropTypes.func.isRequired, }; // ... defaultProps and export statements
, App
shoot
props ( , "" shoot — . ) canvasMousePosition
. Canvas
. "" , onClick
svg
, "".
// ... import import CannonBall from './CannonBall'; const Canvas = (props) => { // ... gameHeight viewBox return ( <svg // ... onClick={props.shoot} > // ... defs, Sky Ground {props.gameState.cannonBalls.map(cannonBall => ( <CannonBall key={cannonBall.id} position={cannonBall.position} /> ))} // ... CannonPipe, CannonBase, CurrentScore </svg> ); }; Canvas.propTypes = { // ... shoot: PropTypes.func.isRequired, }; // ... defaultProps export
: cannonBalls.map
CannonPipe
, "" .
, ( x: 0, y: 0
) , ( angle
) . , "" ( ).
, ./src/utils/formulas.js
:
// ... const degreesToRadian = degrees => ((degrees * Math.PI) / 180); export const calculateNextPosition = (x, y, angle, divisor = 300) => { const realAngle = (angle * -1) + 90; const stepsX = radiansToDegrees(Math.cos(degreesToRadian(realAngle))) / divisor; const stepsY = radiansToDegrees(Math.sin(degreesToRadian(realAngle))) / divisor; return { x: x +stepsX, y: y - stepsY, } };
moveCannonBalls.js
calculateNextPosition
. ./src/reducers/
:
import { calculateNextPosition } from '../utils/formulas'; const moveBalls = cannonBalls => ( cannonBalls .filter(cannonBall => ( cannonBall.position.y > -800 && cannonBall.position.x > -500 && cannonBall.position.x < 500 )) .map((cannonBall) => { const { x, y } = cannonBall.position; const { angle } = cannonBall; return { ...cannonBall, position: calculateNextPosition(x, y, angle, 5), }; }) ); export default moveBalls;
. -, filter
, cannonBalls
(), . , -800 Y , ( -500) ( 500).
, ./src/reducers/moveObjects.js
:
// ... import import moveBalls from './moveCannonBalls'; function moveObjects(state, action) { if (!state.gameState.started) return state; let cannonBalls = moveBalls(state.gameState.cannonBalls); // ... mousePosition, createFlyingObjects, filter return { ...newState, gameState: { ...newState.gameState, flyingObjects, cannonBalls, }, angle, }; } export default moveObjects;
moveObjects
, moveBalls
. cannonBalls
gameState
.
, , . -:
, , , , , . "" , . "": .
: , . , , , . , , .
, ./src/utils/formulas.js
:
// ... export const checkCollision = (rectA, rectB) => ( rectA.x1 < rectB.x2 && rectA.x2 > rectB.x1 && rectA.y1 < rectB.y2 && rectA.y2 > rectB.y1 );
, "" . checkCollisions.js
./src/reducers
:
import { checkCollision } from '../utils/formulas'; import { gameHeight } from '../utils/constants'; const checkCollisions = (cannonBalls, flyingDiscs) => { const objectsDestroyed = []; flyingDiscs.forEach((flyingDisc) => { const currentLifeTime = (new Date()).getTime() - flyingDisc.createdAt; const calculatedPosition = { x: flyingDisc.position.x, y: flyingDisc.position.y + ((currentLifeTime / 4000) * gameHeight), }; const rectA = { x1: calculatedPosition.x - 40, y1: calculatedPosition.y - 10, x2: calculatedPosition.x + 40, y2: calculatedPosition.y + 10, }; cannonBalls.forEach((cannonBall) => { const rectB = { x1: cannonBall.position.x - 8, y1: cannonBall.position.y - 8, x2: cannonBall.position.x + 8, y2: cannonBall.position.y + 8, }; if (checkCollision(rectA, rectB)) { objectsDestroyed.push({ cannonBallId: cannonBall.id, flyingDiscId: flyingDisc.id, }); } }); }); return objectsDestroyed; }; export default checkCollisions;
, :
-
objectsDestroyed
. -
flyingDiscs
(forEach
) . , CSS, YcurrentLifeTime
. -
cannonBalls
(forEach
) . -
checkCollision
( ), , (). ,objectsDestroyed
, .
moveObjects.js
, :
// ... import import checkCollisions from './checkCollisions'; function moveObjects(state, action) { // ... // - // , let let flyingObjects = newState.gameState.flyingObjects.filter(object => ( (now - object.createdAt) < 4000 )); // ... { x, y } angle const objectsDestroyed = checkCollisions(cannonBalls, flyingObjects); const cannonBallsDestroyed = objectsDestroyed.map(object => (object.cannonBallId)); const flyingDiscsDestroyed = objectsDestroyed.map(object => (object.flyingDiscId)); cannonBalls = cannonBalls.filter(cannonBall => (cannonBallsDestroyed.indexOf(cannonBall.id))); flyingObjects = flyingObjects.filter(flyingDisc => (flyingDiscsDestroyed.indexOf(flyingDisc.id))); return { ...newState, gameState: { ...newState.gameState, flyingObjects, cannonBalls, }, angle, }; } export default moveObjects;
checkCollisions
, cannonBalls
flyingObjects
.
, "" , moveObjects
gameState
. -.
""
, - , "". "" , . "" . — ./src/reducers/moveObject.js
. :
import { calculateAngle } from '../utils/formulas'; import createFlyingObjects from './createFlyingObjects'; import moveBalls from './moveCannonBalls'; import checkCollisions from './checkCollisions'; function moveObjects(state, action) { // ... newState.gameState.flyingObjects.filter const lostLife = state.gameState.flyingObjects.length > flyingObjects.length; let lives = state.gameState.lives; if (lostLife) { lives--; } const started = lives > 0; if (!started) { flyingObjects = []; cannonBalls = []; lives = 3; } // ... x, y, angle, objectsDestroyed return { ...newState, gameState: { ...newState.gameState, flyingObjects, cannonBalls: [...cannonBalls], lives, started, }, angle, }; } export default moveObjects;
flyingObjects
, , "" . , , 4 ( (now - object.createdAt) < 4000
), , .
, "", Canvas
. ./src/components/Canvas.jsx
:
// ... import import Heart from './Heart'; const Canvas = (props) => { // ... gameHeight viewBox const lives = []; for (let i = 0; i < props.gameState.lives; i++) { const heartPosition = { x: -180 - (i * 70), y: 35 }; lives.push(<Heart key={i} position={heartPosition}/>); } return ( <svg ...> // ... {lives} </svg> ); }; // ... propTypes, defaultProps, export
. ; , . , , , .
. ./src/reducers/moveObjects.js
:
// ... import statements function moveObjects(state, action) { // ... const kills = state.gameState.kills + flyingDiscsDestroyed.length; return { // ...newState, gameState: { // ... props- kills, }, // ... angle, }; } export default moveObjects;
./src/components.Canvas.jsx
CurrentScore
( 15) :
<CurrentScore score={props.gameState.kills} />
! , , React, Redux, SVG CSS . , .
./server/index.js
players
. "" ( ) "" . . , :
const players = [];
App
. ./src/App.js
:
// ... import // ... Auth0.configure class App extends Component { constructor(props) { // ... super this.shoot.bind(this) this.socket = null; this.currentPlayer = null; } // componentDidMount componentDidMount() { const self = this; Auth0.handleAuthCallback(); Auth0.subscribe((auth) => { if (!auth) return; self.playerProfile = Auth0.getProfile(); self.currentPlayer = { id: self.playerProfile.sub, maxScore: 0, name: self.playerProfile.name, picture: self.playerProfile.picture, }; self.props.loggedIn(self.currentPlayer); self.socket = io('http://localhost:3001', { query: `token=${Auth0.getAccessToken()}`, }); self.socket.on('players', (players) => { self.props.leaderboardLoaded(players); players.forEach((player) => { if (player.id === self.currentPlayer.id) { self.currentPlayer.maxScore = player.maxScore; } }); }); }); setInterval(() => { self.props.moveObjects(self.canvasMousePosition); }, 10); window.onresize = () => { const cnv = document.getElementById('aliens-go-home-canvas'); cnv.style.width = `${window.innerWidth}px`; cnv.style.height = `${window.innerHeight}px`; }; window.onresize(); } componentWillReceiveProps(nextProps) { if (!nextProps.gameState.started && this.props.gameState.started) { if (this.currentPlayer.maxScore < this.props.gameState.kills) { this.socket.emit('new-max-score', { ...this.currentPlayer, maxScore: this.props.gameState.kills, }); } } } // ... trackMouse, shoot, render } // ... propTypes, defaultProps export
, :
- (
socket
currentPlayer
), . - ,
new-max-score
. -
players
( ),maxScore
. , ,maxScore
. -
componentWillReceiveProps
, (maxScore
).new-max-score
.
! -. , Socket.IO React :
# node ./server/index & # React- npm start
, . , .
おわりに
これらのエピソードでは、シンプルで楽しいゲームを作成するために多くの素晴らしい技術を適用しました。Reactを使用してゲーム要素を定義および制御し、SVG(HTMLではなく)を使用してこれらの要素をレンダリングし、Reduxを使用してゲームの状態を制御し、最後にCSSアニメーションを使用してエイリアンを画面上で移動しました。さらに、Socket.IOは、リアルタイムの評価テーブル、およびID管理システムとしてのAuth0を作成するのに役立ちました。
ああ!あなたは長い道のりを歩み、多くを学びました。少しリラックスして撮影する時間です!