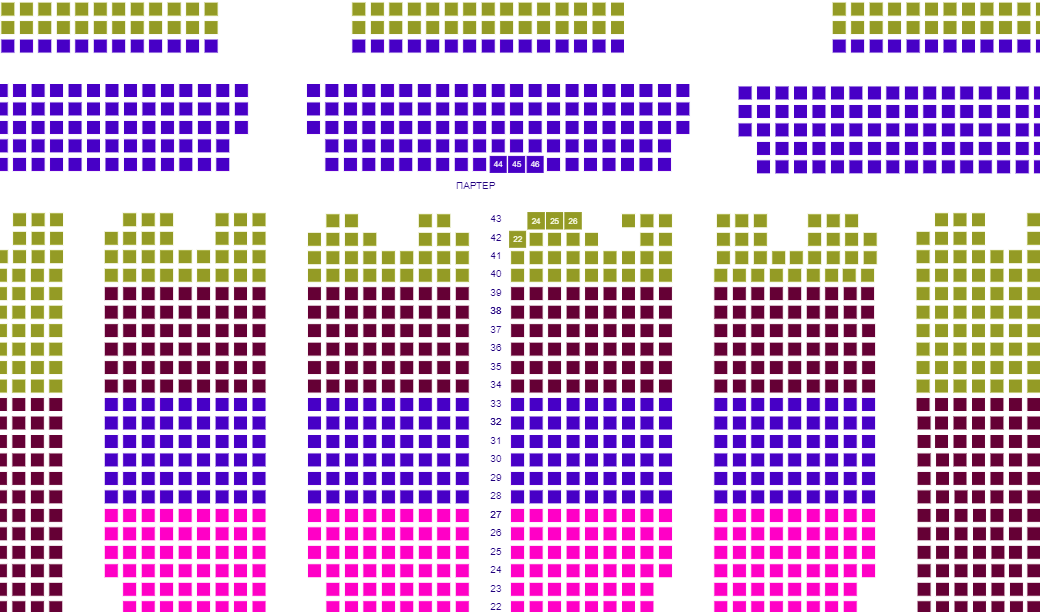
フレームワークなしでキャンバス上に大規模なインタラクティブホールスキームを表示し、IEやモバイルデバイスでうまく機能させるためのライブラリを開発しています。 途中で、キャンバスの機能を扱います。
はい、そして厳密なタイピングは、私の意見では、バグの数を減らすことができます。 一般に、私はPHPでプログラムするので、コードに関するコメントを歓迎します。
問題の声明
まず、要件を策定します。
- パフォーマンス:5〜1万のオブジェクトは、たとえ
- 各オブジェクトをホバー/クリックすることができ、オブジェクトはこれを処理できる必要があります
- 回路はスケーリングおよび移動する必要があります。
- コンテナ寸法への適応性
- タッチデバイスのサポート
はじめに
デモをプルしてすぐに表示することはありませんので、 デモの内容が明確になります。
記事では、コードの小さなセクションのみを挿入します。残りの部分は、
Github
キャンバスは本質的にAPIを含む画像であるため、ホバーとクリックの処理は良心にかかっていることを思い出してください。スケールとスクロールを考慮して、座標を考慮し、座標でオブジェクトを探す必要があります。 しかし同時に、パフォーマンスを完全に制御し、必要なものだけを引き出します。
ダイアグラム内のすべてのオブジェクトを常に並べ替えて、それらの座標を確認することは最適ではありません。 これはかなり迅速に行われますが、それでも改善されます。マップをセクターに分割して検索ツリーを構築します。
検索の最適化に加えて、キャンバスを操作するために次のルールに従うようにします。
requestAnimationFrame
ブラウザーには独自のレンダリングタイマーがあり、 requestAnimationFrameメソッドを使用して、ブラウザーにフレームと残りのアニメーションを描画するように依頼できます。これにより、ブラウザーが2回動作することを回避できます。 アニメーションをキャンセルするには、 cancelAnimationFrameがあります 。 ポリフィル 。
複雑なオブジェクトのキャッシュ
複雑なオブジェクトが変更されない場合、絶えず再描画する必要はありません。 事前に非表示のキャンバスにそれらを描画してから、そこから取得することができます。
可視オブジェクトのみを描く
エレメントがキャンバスの境界を越えて広がっている場合でも、レンダリングには時間がかかります。
これは特に顕著です。つまり、彼は正直にすべてを描画しますが、クロムでは最適化され、それに費やす時間ははるかに少なくなります。
変更されたオブジェクトのみを再描画する
1つの要素が変更された場合、シーン全体を再描画しても意味がありません。
少ないテキスト
キャンバスにテキストを描画するのは難しい作業なので、多くのことは避けてください
テキスト付きのオブジェクト。 各場所に数字を配置したい場合でも、この数字の表示を縮尺に制限することをお勧めします。たとえば、この情報が役立つときに特定の近似値でのみ数字を表示します。
建築
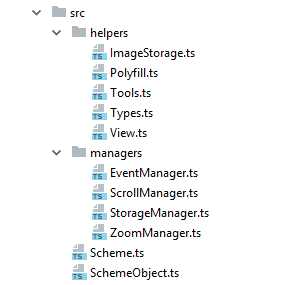
Schemeがメインクラスです。
ビュー -クラスは、描画するキャンバスとそのパラメーターを認識します(そのうちの2つがあります)。
SchemeObject-スキーマオブジェクトのクラスは、その場所、自身の描画方法、およびイベントの処理方法を知っています。 価格などの追加パラメーターが含まれる場合があります。
EventManager-イベントを処理および作成するためのクラス。 イベントが受信されると、それを目的のクラスに渡します。
ScrollManager-スキームのスクロールを担当するクラス。
ZoomManager-ズームスキームを担当するクラス。
StorageManager-スケマティックオブジェクトの保存、検索ツリーの作成、および座標によるオブジェクトの検索を担当するクラス。
ポリフィル -クロスブラウザ互換性のためのポリフィルのセットを持つクラス。
ツール -正方形の交差を決定するなど、さまざまな機能を持つクラス。
ImageStorage-画像を保存するためのキャンバス作成クラス
構成
スキームに柔軟な設定が必要です。 これを行うには、次のような単純なオブジェクト構成メソッドを作成します。
/** * Object configurator * @param obj * @param params */ public static configure(obj: any, params: any) { for (let paramName in params) { let value = params[paramName]; let setter = 'set' + Tools.capitalizeFirstLetter(paramName); if (typeof obj[setter] === 'function') { obj[setter].apply(obj, [value]); } } }
これで、次のようにオブジェクトを構成できます。
Tools.configure(this, params.options); Tools.configure(this.scrollManager, params.scroll); Tools.configure(this.zoomManager, params.zoom);
これは便利です。プロパティの値を設定できるだけでなく、必要に応じて値を検証または変更できるオブジェクトのセッターを作成するだけで済みます。
オブジェクトの保管と表示
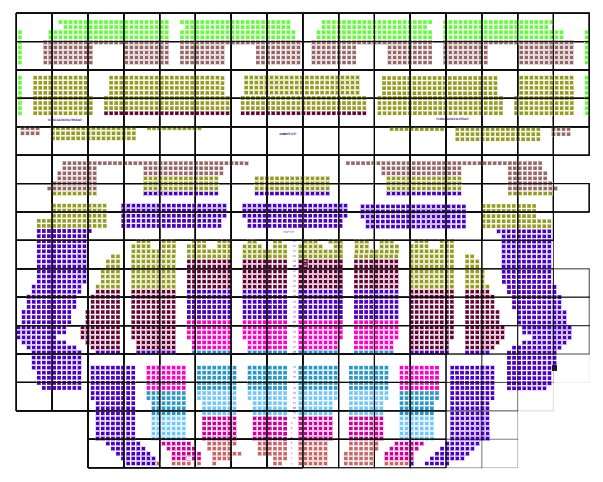
まず、ダイアグラム上にオブジェクトを配置する方法を学ぶ必要があります。 ただし、このためには、現在どのオブジェクトが見えているかを理解する必要があります。 すべてのオブジェクトを常にソートするのではなく、検索ツリーを構築することに同意しました。
ツリーを構築するには、ホールスキームを部分に分割し、一方の部分をツリーの左側のノードに、もう一方の部分を右側に書き込む必要があります。 ノードのキーは、回路の領域を囲む長方形になります。 なぜなら オブジェクトは点ではなく平面を表し、木の複数のノードに一度に現れることができます-それはひどいものではありません。 質問:回路を破壊する方法は? 最大の利益を達成するには、ツリーのバランスが取れていなければなりません。 ノード内の要素の数はほぼ同じである必要があります。 私たちの場合、特に気にすることはできません。 通常、ダイアグラム内のオブジェクトはほぼ均一に配置されます。 幅と高さを交互に半分に分割するだけです。 深さが8のツリーのパーティションは次のとおりです。
コード
TreeNode-ツリーノードクラスは、その親、その子、およびそれに含まれるオブジェクトの正方形の座標を知っています。
/** * Tree node */ export class TreeNode { /** * Parent node */ protected parent: TreeNode; /** * Children nodes */ protected children: TreeNode[] = []; /** * Bounding rect of node */ protected boundingRect: BoundingRect; /** * Objects in node */ protected objects: SchemeObject[] = []; /** * Depth */ protected depth: number; /** * Constructor * @param parent * @param boundingRect * @param objects * @param depth */ constructor(parent: null | TreeNode, boundingRect: BoundingRect, objects: SchemeObject[], depth: number) { this.parent = parent; this.boundingRect = boundingRect; this.objects = objects; this.depth = depth; } /** * Add child * @param child */ public addChild(child: TreeNode): void { this.children.push(child); } /** * Get objects * @returns {SchemeObject[]} */ public getObjects(): SchemeObject[] { return this.objects; } /** * Get children * @returns {TreeNode[]} */ public getChildren(): TreeNode[] { return this.children; } /** * Is last node * @returns {boolean} */ public isLastNode(): boolean { return this.objects.length > 0; } /** * Get last children * @returns {TreeNode[]} */ public getLastChildren(): TreeNode[] { let result: TreeNode[] = []; for (let childNode of this.children) { if (childNode.isLastNode()) { result.push(childNode); } else { let lastChildNodeChildren = childNode.getLastChildren(); for (let lastChildNodeChild of lastChildNodeChildren) { result.push(lastChildNodeChild); } } } return result; } /** * Get child by coordinates * @param coordinates * @returns {TreeNode|null} */ public getChildByCoordinates(coordinates: Coordinates): TreeNode | null { for (let childNode of this.children) { if (Tools.pointInRect(coordinates, childNode.getBoundingRect())) { return childNode; } } return null; } /** * Get child by bounding rect * @param boundingRect * @returns {TreeNode[]} */ public getChildrenByBoundingRect(boundingRect: BoundingRect): TreeNode[] { let result: TreeNode[] = []; for (let childNode of this.children) { if (Tools.rectIntersectRect(childNode.getBoundingRect(), boundingRect)) { result.push(childNode); } } return result; } /** * Remove objects */ public removeObjects(): void { this.objects = []; } /** * Get bounding rect * @returns {BoundingRect} */ public getBoundingRect(): BoundingRect { return this.boundingRect; } /** * Get depth * @returns {number} */ public getDepth(): number { return this.depth; }
今、あなたは再帰的にツリーを作成し、それをオブジェクトで満たす必要があります。 次のようになります。深さが設定で設定されている深さよりも小さい場合、次のノードを取得します。このノードのオブジェクトを分割線に沿って分割し、2つの子ノードを作成し、オブジェクトを配置します。
/** * Recursive explode node * @param node * @param depth */ protected explodeTreeNodes(node: TreeNode, depth: number): void { this.explodeTreeNode(node); depth--; if (depth > 0) { for (let childNode of node.getChildren()) { this.explodeTreeNodes(childNode, depth); } } } /** * Explode node to children * @param node */ protected explodeTreeNode(node: TreeNode): void { let nodeBoundingRect = node.getBoundingRect(); let newDepth = node.getDepth() + 1; let leftBoundingRect = Tools.clone(nodeBoundingRect) as BoundingRect; let rightBoundingRect = Tools.clone(nodeBoundingRect) as BoundingRect; /** * Width or height explode */ if (newDepth % 2 == 1) { let width = nodeBoundingRect.right - nodeBoundingRect.left; let delta = width / 2; leftBoundingRect.right = leftBoundingRect.right - delta; rightBoundingRect.left = rightBoundingRect.left + delta; } else { let height = nodeBoundingRect.bottom - nodeBoundingRect.top; let delta = height / 2; leftBoundingRect.bottom = leftBoundingRect.bottom - delta; rightBoundingRect.top = rightBoundingRect.top + delta; } let leftNodeObjects = Tools.filterObjectsByBoundingRect(leftBoundingRect, node.getObjects()); let rightNodeObjects = Tools.filterObjectsByBoundingRect(rightBoundingRect, node.getObjects()); let leftNode = new TreeNode(node, leftBoundingRect, leftNodeObjects, newDepth); let rightNode = new TreeNode(node, rightBoundingRect, rightNodeObjects, newDepth); node.addChild(leftNode); node.addChild(rightNode); node.removeObjects(); }
これで、正方形と座標の両方で目的のオブジェクトを見つけるのが非常に簡単になりました。 スクロールとズームの修正は既に行われていますが、それらについてはもう少し詳しく説明します。
/** * Find node by coordinates * @param node * @param coordinates * @returns {TreeNode|null} */ public findNodeByCoordinates(node: TreeNode, coordinates: Coordinates): TreeNode | null { let childNode = node.getChildByCoordinates(coordinates); if (!childNode) { return null; } if (childNode.isLastNode()) { return childNode; } else { return this.findNodeByCoordinates(childNode, coordinates); } } /** * find objects by coordinates in tree * @param coordinates Coordinates * @returns {SchemeObject[]} */ public findObjectsByCoordinates(coordinates: Coordinates): SchemeObject[] { let result: SchemeObject[] = []; // scale let x = coordinates.x; let y = coordinates.y; x = x / this.scheme.getZoomManager().getScale(); y = y / this.scheme.getZoomManager().getScale(); // scroll x = x - this.scheme.getScrollManager().getScrollLeft(); y = y - this.scheme.getScrollManager().getScrollTop(); // search node let rootNode = this.getTree(); let node = this.findNodeByCoordinates(rootNode, {x: x, y: y}); let nodeObjects: SchemeObject[] = []; if (node) { nodeObjects = node.getObjects(); } // search object in node for (let schemeObject of nodeObjects) { let boundingRect = schemeObject.getBoundingRect(); if (Tools.pointInRect({x: x, y: y}, boundingRect)) { result.push(schemeObject) } } return result; }
また、すべてのオブジェクトを列挙せずに、どのオブジェクトが可視領域にあり、レンダリングが必要かを簡単に判断できます。
/** * Render visible objects */ protected renderAll(): void { if (this.renderingRequestId) { this.cancelAnimationFrameApply(this.renderingRequestId); this.renderingRequestId = 0; } this.eventManager.sendEvent('beforeRenderAll'); this.clearContext(); let scrollLeft = this.scrollManager.getScrollLeft(); let scrollTop = this.scrollManager.getScrollTop(); this.view.setScrollLeft(scrollLeft); this.view.setScrollTop(scrollTop); let width = this.getWidth() / this.zoomManager.getScale(); let height = this.getHeight() / this.zoomManager.getScale(); let leftOffset = -scrollLeft; let topOffset = -scrollTop; let nodes = this.storageManager.findNodesByBoundingRect(null, { left: leftOffset, top: topOffset, right: leftOffset + width, bottom: topOffset + height }); for (let node of nodes) { for (let schemeObject of node.getObjects()) { schemeObject.render(this, this.view); } } this.eventManager.sendEvent('afterRenderAll'); }
オブジェクトストレージおよび検索クラス: src / managers / StorageManager.ts
スケーリング
ズームは簡単です。 Canvasには、座標のグリッドを変換するスケールメソッドがあります。 ただし、ズームだけでなく、カーソルまたは中心が位置するポイントまでズームする必要があります。
ポイントにズームするには、ズームの古い中心(古いスケールで)と新しいポイントの2つのポイントを知るだけで、それらの違いをスキームのオフセットに追加できます。
/** * Zoom to point * @param point * @param delta */ public zoomToPoint(point: Coordinates, delta: number): void { let prevScale = this.scheme.getZoomManager().getScale(); let zoomed = this.scheme.getZoomManager().zoom(delta); if (zoomed) { let newScale = this.scheme.getZoomManager().getScale(); let prevCenter: Coordinates = { x: point.x / prevScale, y: point.y / prevScale, }; let newCenter: Coordinates = { x: point.x / newScale, y: point.y / newScale, }; let leftOffsetDelta = newCenter.x - prevCenter.x; let topOffsetDelta = newCenter.y - prevCenter.y; this.scheme.getScrollManager().scroll( this.scheme.getScrollManager().getScrollLeft() + leftOffsetDelta, this.scheme.getScrollManager().getScrollTop() + topOffsetDelta ); } }
ただし、デバイスのタッチをサポートするため、2本の指の動きを処理し、ネイティブズームを禁止する必要があります。
this.scheme.getCanvas().addEventListener('touchstart', (e: TouchEvent) => { this.touchDistance = 0; this.onMouseDown(e); }); this.scheme.getCanvas().addEventListener('touchmove', (e: TouchEvent) => { if (e.targetTouches.length == 1) { // one finger - dragging this.onMouseMove(e); } else if (e.targetTouches.length == 2) { // two finger - zoom const p1 = e.targetTouches[0]; const p2 = e.targetTouches[1]; let distance = Math.sqrt(Math.pow(p2.pageX - p1.pageX, 2) + Math.pow(p2.pageY - p1.pageY, 2)); let delta = 0; if(this.touchDistance) { delta = distance - this.touchDistance; } this.touchDistance = distance; if (delta) { this.scheme.getZoomManager().zoomToPointer(e, delta / 5); } } e.preventDefault(); });
iPhone 6以前では、不快な機能が見つかりました。クイックダブルタップで、キャンバスに焦点を合わせたネイティブズームが表示され、このモードでは、キャンバスの速度が著しく低下し始めました。 ビューポートへの反応はありません。 次のように扱われます。
this.scheme.getCanvas().addEventListener('touchend', (e: TouchEvent) => { // prevent double tap zoom let now = (new Date()).getTime(); if (this.lastTouchEndTime && now - this.lastTouchEndTime <= 300) { e.preventDefault(); } else { this.onMouseUp(e); } this.lastTouchEndTime = now; });
スケーリングを担当するクラス: src / managers / ZoomManager.ts
スキーマの動き
座標の左と上にオフセットを追加することにしました。
確かに、座標グリッドをシフトする変換メソッドがあります。 開発の時点では、あまり便利ではないように見えましたが、おそらくまだ使用するでしょう。 しかし、これはささいなことであり、イベント処理の問題に最も関心があります。
一部の人々は、クリックするとカーソルがわずかに移動する場合があるため、これを考慮する必要があります。
/** * Mouse down * @param e */ protected onMouseDown(e: MouseEvent | TouchEvent): void { this.leftButtonDown = true; this.setLastClientPositionFromEvent(e); } /** * Mouse up * @param e */ protected onMouseUp(e: MouseEvent | TouchEvent): void { this.leftButtonDown = false; this.setLastClientPositionFromEvent(e); if (this.isDragging) { this.scheme.setCursorStyle(this.scheme.getDefaultCursorStyle()); this.scheme.requestRenderAll(); } // defer for prevent trigger click on mouseUp setTimeout(() => {this.isDragging = false; }, 10); } /** * On mouse move * @param e */ protected onMouseMove(e: MouseEvent | TouchEvent): void { if (this.leftButtonDown) { let newCoordinates = this.getCoordinatesFromEvent(e); let deltaX = Math.abs(newCoordinates.x - this.getLastClientX()); let deltaY = Math.abs(newCoordinates.y - this.getLastClientY()); // 1 - is click with offset if (deltaX > 1 || deltaY > 1) { this.isDragging = true; this.scheme.setCursorStyle('move'); } } if (!this.isDragging) { this.handleHover(e); } else { this.scheme.getScrollManager().handleDragging(e); } } /** * Handle dragging * @param e */ public handleDragging(e: MouseEvent | TouchEvent): void { let lastClientX = this.scheme.getEventManager().getLastClientX(); let lastClientY = this.scheme.getEventManager().getLastClientY(); this.scheme.getEventManager().setLastClientPositionFromEvent(e); let leftCenterOffset = this.scheme.getEventManager().getLastClientX() - lastClientX; let topCenterOffset = this.scheme.getEventManager().getLastClientY() - lastClientY; // scale leftCenterOffset = leftCenterOffset / this.scheme.getZoomManager().getScale(); topCenterOffset = topCenterOffset / this.scheme.getZoomManager().getScale(); let scrollLeft = leftCenterOffset + this.getScrollLeft(); let scrollTop = topCenterOffset + this.getScrollTop(); this.scroll(scrollLeft, scrollTop); }
スクロールクラス: src / managers / ScrollManager.ts
最適化
このスキームにはすでに機能するバージョンがあるようですが、不愉快な驚きを待っています:
回路はクロムでのみ高速に動作します。 問題は、スキームをフルサイズで移動し、このフルサイズからズームアウトすると、すべてのオブジェクトが再描画されることです。 そして、オブジェクトの一部のみが既にスケール上に配置されている場合、正常に機能します。
最初は、クラスター内の最も近い場所を組み合わせて、何百ものオブジェクトの場所が小さなスケールで1つ描画されるようにしました。 しかし、合理的な時間内にこれを行い、安定するアルゴリズムを見つけることができませんでした。 マップ上のオブジェクトは、必要に応じて配置できます。
次に、キャンバスを操作するときに各フェンスに(そしてこの記事の冒頭に)書かれているルールを思い出しました。不変のパーツを再描画しないでください。 実際、移動およびズームする場合、スキーム自体は変更されないため、スキームの「スナップショット」を初期スケールのn倍にする必要があり、移動/ズームする場合、オブジェクトをレンダリングせず、マップの解像度が画像の解像度を超えるまで画像を単純に置き換えます。 そして、残りの実際のオブジェクトは、その量を考慮してすばやく描画されます。
しかし、この状況も時々変わるはずです。 たとえば、場所を選択すると、外観が変更され、選択した場所がスキームの移動中に消えないようにする必要があります。 クリックしたときに画像全体(初期マップサイズのn倍)を再描画するとコストが高くなりますが、
ただし、同時に、画像内のオブジェクトの交差をあまり気にせず、変更されたオブジェクトが配置されている正方形のみを更新する余裕があります。
/** * Update scheme cache * @param onlyChanged */ public updateCache(onlyChanged: boolean): void { if (!this.cacheView) { let storage = this.storageManager.getImageStorage('scheme-cache'); this.cacheView = new View(storage.getCanvas()); } if (onlyChanged) { for (let schemeObject of this.changedObjects) { schemeObject.clear(this, this.cacheView); schemeObject.render(this, this.cacheView); } } else { let boundingRect = this.storageManager.getObjectsBoundingRect(); let scale = (1 / this.zoomManager.getScaleWithAllObjects()) * this.cacheSchemeRatio; let rectWidth = boundingRect.right * scale; let rectHeight = boundingRect.bottom * scale; this.cacheView.setDimensions({ width: rectWidth, height: rectHeight }); this.cacheView.getContext().scale(scale, scale); for (let schemeObject of this.getObjects()) { schemeObject.render(this, this.cacheView); } } this.changedObjects = []; } /** * Draw from cache */ public drawFromCache() { if (!this.cacheView) { return false; } if (this.renderingRequestId) { this.cancelAnimationFrameApply(this.renderingRequestId); this.renderingRequestId = 0; } this.clearContext(); let boundingRect = this.storageManager.getObjectsBoundingRect(); let rectWidth = boundingRect.right; let rectHeight = boundingRect.bottom; this.view.getContext().drawImage( this.cacheView.getCanvas(), this.getScrollManager().getScrollLeft(), this.getScrollManager().getScrollTop(), rectWidth, rectHeight ); } /** * Request draw from cache * @returns {Scheme} */ public requestDrawFromCache(): this { if (!this.renderingRequestId) { this.renderingRequestId = this.requestFrameAnimationApply(() => { this.drawFromCache(); }); } return this; }
一見単純な方法で、回路の速度を大幅に上げました。
最後まで読んでくれてありがとう。 サーキットで作業する過程で、 fabricjsとchartjsのソースを覗いてサイクルを減らしました。