私は、これまでにCheck Pointで作業したことがあるすべての人が、コマンドラインから構成を編集できないことについて不満を持っていると確信しています 。 これは、以前にCisco ASAで働いていた人にとって特にワイルドです。CLIですべてを完全に設定できます。 Check Pointには逆があります。すべてのセキュリティ設定は、グラフィカルインターフェイスからのみ実行されました。 ただし、GUIを介して行うには完全に不便なものもあります(チェックポイントと同じくらい便利です)。 たとえば、100個の新しいホストまたはネットワークを追加するタスクは、長くて退屈な手順になります。 オブジェクトごとに、マウスを数回クリックして、IPアドレスを入力する必要があります。 同じことは、サイトのグループを作成したり、IPS署名を大幅に有効化/無効化する場合にも当てはまります。 また、間違いを犯す可能性があります。
比較的最近、「奇跡」が起こりました。 Gaia R80の新しいバージョンのリリースにより、 APIを使用する可能性が発表され、設定、管理、監視などの自動化の幅広い可能性が開かれました。 次のことができます。
- オブジェクトを作成します。
- アクセスリストを追加または編集します。
- ブレードの有効化/無効化。
- ネットワークインターフェイスを構成する
- ポリシーをインストールします。
- などなど。
正直に言うと、このニュースがどのようにHabrを通過したのかわかりません。 この記事では、APIの使用方法を簡単に説明し、スクリプトを使用してCheckPointを構成する実用的な例を紹介します 。
すぐに予約したいのですが、APIは管理サーバーにのみ使用されます。 すなわち 管理サーバーなしでゲートウェイを管理することは依然として不可能です。
誰が原則としてこのAPIを使用できますか?
- Check Pointのセットアップのルーチンタスクを単純化または自動化するシステム管理者。
- Check Pointを他のソリューション(仮想化システム、チケットシステム、構成管理システムなど)と統合したい企業。
- チェックポイントに関連する設定を標準化するか、追加の製品を作成するシステムインテグレーター。
典型的な回路
したがって、Check Pointを使用したサンプルダイアグラムを想像してください。
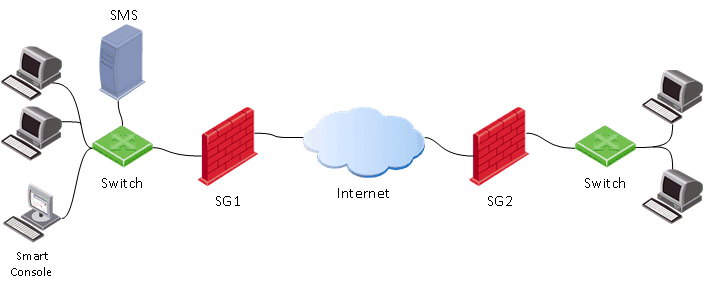
いつものように、ゲートウェイ( SG )、管理サーバー( SMS )、および管理コンソール( SmartConsole )があります。 この場合、ゲートウェイを構成する通常のプロセスは次のとおりです。

すなわち まず、管理サーバー( SMS )に接続する管理者のコンピューターでSmartConsoleを実行する必要があります。 SMSでは、セキュリティ設定が行われ、その設定のみがゲートウェイ( SG )に適用( インストールポリシー )されます。
Management APIを使用する場合、原則として最初の項目をスキップし(SmartConsoleを起動)、 APIコマンドを管理サーバー(SMS)に直接適用できます 。
APIの使用方法
APIを使用して構成を編集するには、主に4つの方法があります。
1)mgmt_cliユーティリティの使用
例- #mgmt_cli add host name host1 ip-address 192.168.2.100
このコマンドは、管理サーバー(SMS)のコマンドラインから起動します。 コマンド構文は明確だと思います-host1はアドレス192.168.2.100で作成されます。
2)clishを使用してコマンドAPIを入力します(エキスパートモード)
実際、必要なのは、SmartConsole経由で接続するときに使用されるアカウント(またはrootアカウント)でコマンドライン( mgmt login )にログインすることだけです。 その後、 APIコマンドを入力できます (この場合、各コマンドの前にmgmt_cliユーティリティを使用する必要はありません)。 本格的なBASHスクリプトを作成できます。 ホストを作成するサンプルスクリプト:
Bashスクリプト
#!/bin/bash main() { clear #LOGIN (don't ask for username and password, user is already logged in to Management server as 'root' user) mgmt_cli login --root true > id_add_host.txt on_error_print_and_exit "Error: Failed to login, check that the server is up and running (run 'api status')" #READ HOST NAME printf "Enter host name:\n" read -e host_name on_empty_input_print_and_exit "$host_name" "Error: The host's name cannot be empty." #READ IP ADDRESS printf "\nEnter host IP address:\n" read -e ip on_empty_input_print_and_exit "$ip" "Error: The host's IP address cannot be empty." #CREATE HOST printf "Creating new host: $host_name with IP address: $ip\n" new_host_response=$(mgmt_cli add host name $host_name ip-address $ip -s id_add_host.txt 2> /dev/null) on_error_print_and_exit "Error: Failed to create host object. \n$new_host_response" #PUBLISH THE CHANGES printf "\nPublishing the changes\n" mgmt_cli publish --root true -s id_add_host.txt &> /dev/null on_error_print_and_exit "Error: Failed to publish the changes." #LOGOUT logout printf "Done.\n" } logout(){ mgmt_cli logout --root true -s id_add_host.txt &> /dev/null } on_error_print_and_exit(){ if [ $? -ne 0 ]; then handle_error "$1" fi } handle_error(){ printf "\n$1\n" #print error message mgmt_cli discard --root true -s id_add_host.txt &> /dev/null logout exit 1 } on_empty_input_print_and_exit(){ if [ -z "$1" ]; then printf "$2\n" #print error message logout exit 0 fi } # Script starts here. Call function "main". main
興味がある場合は、対応するビデオを見ることができます:
3)SmartConsoleを介して、CLIウィンドウを開きます
以下の画像に示すように、必要なことはSmartConsoleから直接CLIウィンドウを起動することだけです。

このウィンドウで、APIコマンドの入力をすぐに開始できます。
4)Webサービス。 HTTPS Postリクエストを使用(REST API)
私たちの意見では、これは最も有望な方法の1つです。 管理サーバーを管理するためのアプリケーション全体を「ビルド」できます (トートロジーについては謝罪します )。 以下では、この方法をより詳細に検討します。
要約すると:
- API + cliは 、シスコに慣れている人により適しています。
- スクリプトを適用し、ルーチンタスクを実行するためのAPI +シェル 。
- 自動化のためのREST API 。
API有効
デフォルトでは、4GB以上のRAMを備えた管理サーバーおよび8GB以上のRAMを備えたスタンドアロン構成でAPIが有効になっています。 次のコマンドを使用してステータスを確認できます: api status
APIがオフになっていることが判明した場合、SmartConsoleで有効にするのは非常に簡単です: 管理と設定>ブレード>管理API>詳細設定
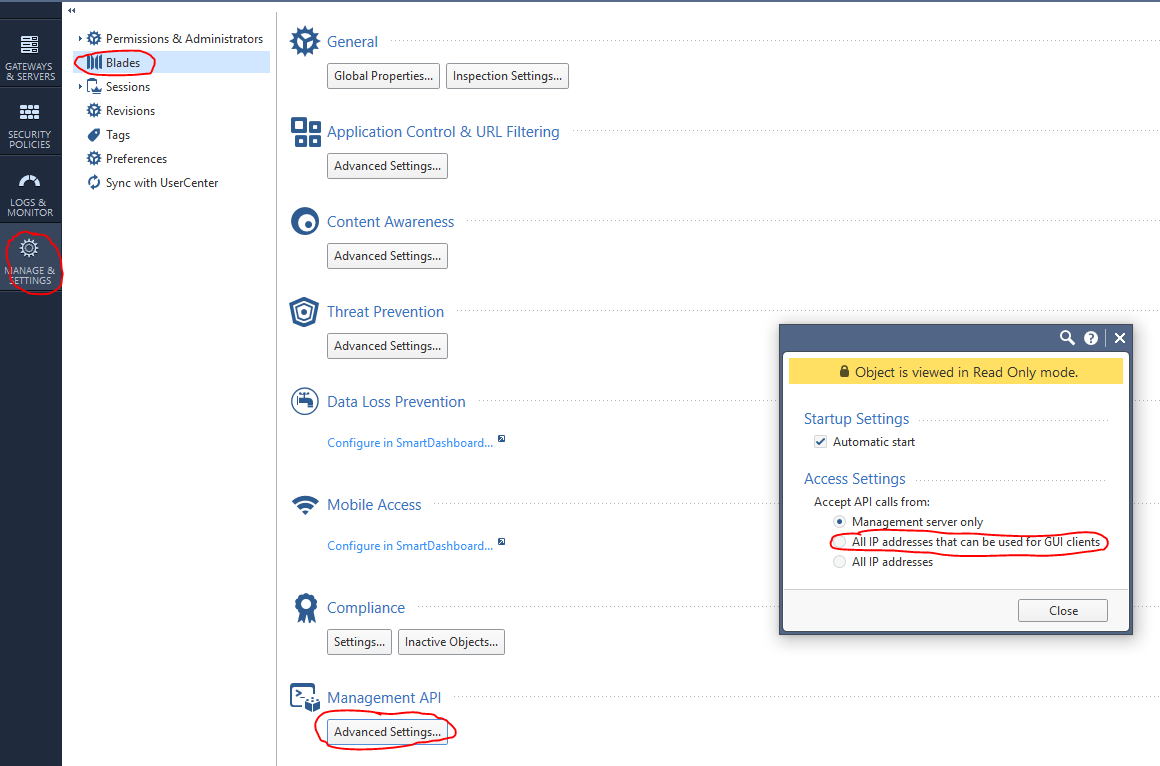
次に、変更の公開を公開し 、 api restartコマンドを実行します。
Webリクエスト+ Python
Pythonおよびrequest 、 jsonライブラリを使用してWeb要求を使用して、APIコマンドを実行できます。 一般に、Webリクエストの構造は3つの部分で構成されています。
1)住所
(https://<managemenet server>:<port>/web_api/<command>)
2)HTTPヘッダー
content-Type: application/json x-chkp-sid: <session ID token as returned by the login command>
3)要求ペイロード
さまざまなパラメーターを含むJSON形式のテキスト
さまざまなコマンドを呼び出す例:
def api_call(ip_addr, port, command, json_payload, sid): url = 'https://' + ip_addr + ':' + str(port) + '/web_api/' + command if sid == “”: request_headers = {'Content-Type' : 'application/json'} else: request_headers = {'Content-Type' : 'application/json', 'X-chkp-sid' : sid} r = requests.post(url,data=json.dumps(json_payload), headers=request_headers,verify=False) return r.json() 'xxx.xxx.xxx.xxx' -> Ip address GAIA
以下に、Check Pointを管理するときに最も頻繁に発生するいくつかの典型的なタスクを示します。
1)許可およびログアウト機能の例:
スクリプト
payload = {'user': 'your_user', 'password' : 'your_password'} response = api_call('xxx.xxx.xxx.xxx', 443, 'login',payload, '') return response["sid"] response = api_call('xxx.xxx.xxx.xxx', 443,'logout', {} ,sid) return response["message"]
2)ブレードとネットワーク設定の有効化:
スクリプト
new_gateway_data = {'name':'CPGleb','anti-bot':True,'anti-virus' : True,'application-control':True,'ips':True,'url-filtering':True,'interfaces': [{'name':"eth0",'topology':'external','ipv4-address': 'xxx.xxx.xxx.xxx',"ipv4-network-mask": "255.255.255.0"}, {'name':"eth1",'topology':'internal','ipv4-address': 'xxx.xxx.xxx.xxx',"ipv4-network-mask": "255.255.255.0"}]} new_gateway_result = api_call('xxx.xxx.xxx.xxx', 443,'set-simple-gateway', new_gateway_data ,sid) print(json.dumps(new_gateway_result))
3)ファイアウォールルールを変更します。
スクリプト
new_access_data={'name':'Cleanup rule','layer':'Network','action':'Accept'} new_access_result = api_call('xxx.xxx.xxx.xxx', 443,'set-access-rule', new_access_data ,sid) print(json.dumps(new_access_result))
4)アプリケーション層の追加:
スクリプト
add_access_layer_application={ 'name' : 'application123',"applications-and-url-filtering" : True,"firewall" : False} add_access_layer_application_result = api_call('xxx.xxx.xxx.xxx', 443,'add-access-layer', add_access_layer_application ,sid) print(json.dumps(add_access_layer_application_result)) set_package_layer={"name" : "Standard","access":True,"access-layers" : {"add" : [ { "name" : "application123","position" :2}]} ,"installation-targets" : "CPGleb"} set_package_layer_result = api_call('xxx.xxx.xxx.xxx', 443,'set-package', set_package_layer ,sid) print(json.dumps(set_package_layer_result))
5)コマンドの実行(task-id)を検証する公開およびポリシー設定:
スクリプト
publish_result = api_call('xxx.xxx.xxx.xxx', 443,"publish", {},sid) print("publish result: " + json.dumps(publish_result)) new_policy = {'policy-package':'Standard','access':True,'targets':['CPGleb']} new_policy_result = api_call('xxx.xxx.xxx.xxx', 443,'install-policy', new_policy ,sid) print(json.dumps(new_policy_result) task_id=(json.dumps(new_policy_result ["task-id"])) len_str=len(task_id) task_id=task_id[1:(len_str-1)] show_task_id ={'task-id':(task_id)} show_task=api_call('xxx.xxx.xxx.xxx',443,'show-task',show_task_id,sid) print(json.dumps(show_task))
6)ホストを追加:
スクリプト
new_host_data = {'name':'JohnDoePc', 'ip-address': '192.168.0.10'} new_host_result = api_call('xxx.xxx.xxx.xxx', 443,'add-host', new_host_data ,sid) print(json.dumps(new_host_result))
7)脅威防止フィールドを追加します。
スクリプト
set_package_layer={'name':'Standard','threat-prevention' :True,'installation-targets':'CPGleb'} set_package_layer_result = api_call('xxx.xxx.xxx.xxx', 443,'set-package',set_package_layer,sid) print(json.dumps(set_package_layer_result))
8)セッションのリストを表示する
スクリプト
new_session_data = {'limit':'50', 'offset':'0','details-level' : 'standard'} new_session_result = api_call('xxx.xxx.xxx.xxx', 443,'show-sessions', new_session_data ,sid) print(json.dumps(new_session_result))
9)新しいプロファイルを作成します。
スクリプト
add_threat_profile={'name':'Apeiron', "active-protections-performance-impact" : "low","active-protections-severity" : "low or above","confidence-level-medium" : "prevent", "confidence-level-high" : "prevent", "threat-emulation" : True,"anti-virus" : True,"anti-bot" : True,"ips" : True, "ips-settings" : { "newly-updated-protections" : "staging","exclude-protection-with-performance-impact" : True,"exclude-protection-with-performance-impact-mode" : "High or lower"}, "overrides" : [ {"protection" : "3Com Network Supervisor Directory Traversal","capture-packets" : True,"action" : "Prevent","track" : "Log"}, {"protection" : "7-Zip ARJ Archive Handling Buffer Overflow", "capture-packets" : True,"action" : "Prevent","track" : "Log"} ]} add_threat_profile_result=api_call('xxx.xxx.xxx.xxx',443,'add-threat-profile',add_threat_profile,sid) print(json.dumps(add_threat_profile_result))
10)IPS署名のアクションを変更します。
スクリプト
set_threat_protection={ "name" : "3Com Network Supervisor Directory Traversal", "overrides" : [{ "profile" : "Apeiron","action" : "Detect","track" : "Log","capture-packets" : True}, { "profile" : "Apeiron", "action" : "Detect", "track" : "Log", "capture-packets" : False} ]} set_threat_protection_result=api_call('xxx.xxx.xxx.xxx',443,'set-threat-protection',set_threat_protection,sid) print(json.dumps(set_threat_protection_result))
11)サービスを追加します。
スクリプト
add_service_udp={ "name" : "Dota2_udp", "port" : '27000-27030', "keep-connections-open-after-policy-installation" : False, "session-timeout" : 0, "match-for-any" : True, "sync-connections-on-cluster" : True, "aggressive-aging" : {"enable" : True, "timeout" : 360,"use-default-timeout" : False }, "accept-replies" : False} add_service_udp_results=api_call('xxx.xxx.xxx.xxx',443,"add-service-udp",add_service_udp,sid) print(json.dumps(add_service_udp_results))
12)カテゴリ、サイト、またはグループを追加します:
スクリプト
add_application_site_category={ "name" : "Valve","description" : "Valve Games"} add_application_site_category_results=api_call('xxx.xxx.xxx.xxx',443,"add-application-site-category",add_application_site_category,sid) print(json.dumps(add_application_site_category_results)) add_application_site={ "name" : "Dota2", "primary-category" : "Valve", "description" : "Dotka", "url-list" : [ "www.dota2.ru" ], "urls-defined-as-regular-expression" : False} add_application_site_results=api_call('xxx.xxx.xxx.xxx',443,"add-application-site " , add_application_site , sid) print(json.dumps(add_application_site_results)) add_application_site_group={"name" : "Games","members" : [ "Dota2"]} add_application_site_group_results=api_call('xxx.xxx.xxx.xxx',443,"add-application-site-group",add_application_site_group,sid) print(json.dumps(add_application_site_group_results))
さらに、 Web APIを使用して、ネットワーク、ホスト、アクセスロールなどを追加および削除できます。 アンチウイルス、アンチボット、IPS、VPNブレードを構成することが可能です。 run-scriptコマンドを使用してライセンスをインストールすることもできます。 すべてのCheck Point APIはここにあります 。
Check Point API + Postman
PostmanとともにCheck Point Web APIを使用することも便利です。 Postmanには、Windows、Linux、およびMacOS用のデスクトップバージョンがあります。 さらに、Google Chrome用のプラグインがあります。 使用します。 まず、Google ChromeストアでPostmanを見つけてインストールする必要があります。
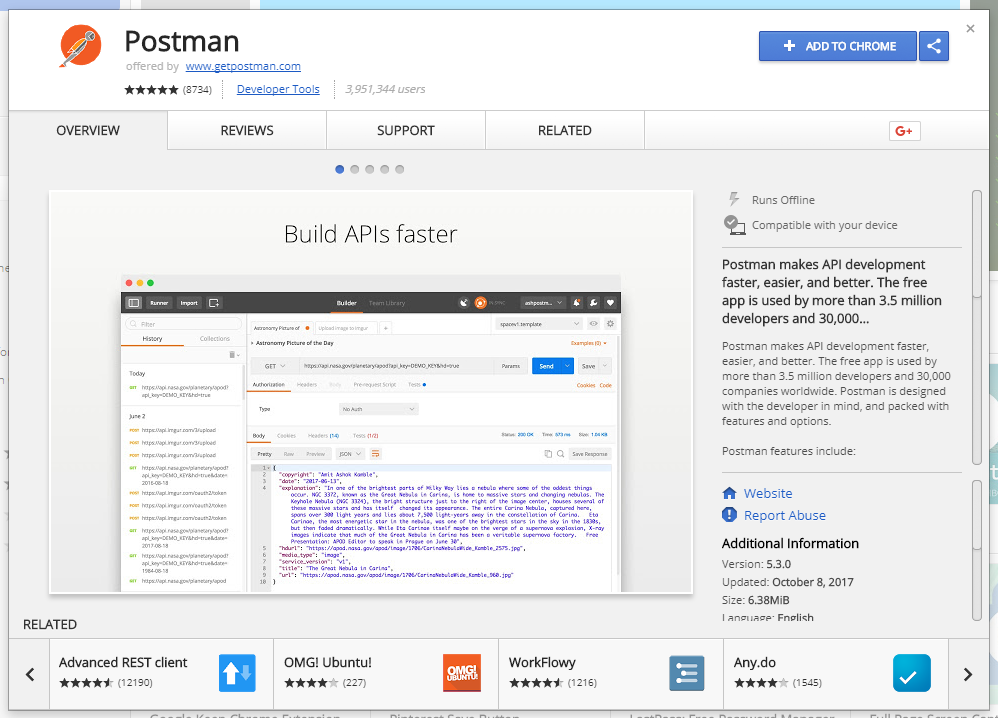
このユーティリティを使用して、Check Point APIへのWebリクエストを生成できます。 すべてのAPIコマンドを記憶しないために、必要なすべてのコマンドが既に含まれている、いわゆるコレクション(テンプレート)をインポートすることができます。
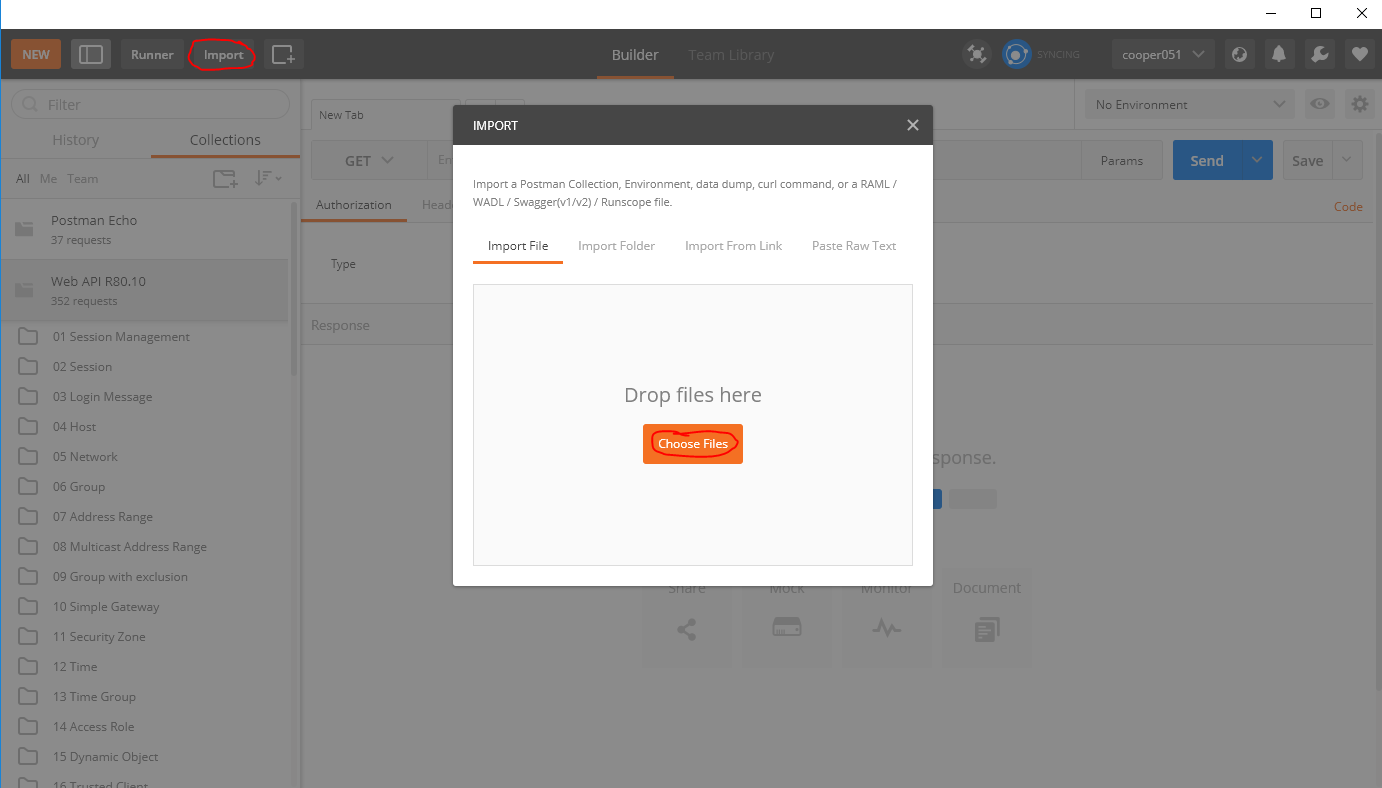
ここにR80.10の コレクションがあります。 インポート後、APIコマンドテンプレートが利用可能になります。

私の意見では、それは非常に便利です。 Check Point APIを使用して、アプリケーションの開発をすぐに開始できます。
チェックポイント+ ansible
また、CheckPoint APIにはAnsible モジュールがあることに注意してください。 このモジュールを使用すると、構成を管理できますが、エキゾチックな問題を解決するにはそれほど便利ではありません。 任意のプログラミング言語でスクリプトを記述すると、より柔軟で便利なソリューションが提供されます。
おわりに
これで、Check Point APIの短いレビューは終了です。 私の意見では、この機能は非常に待望され、必要でした。 APIの登場は、システム管理者とCheck Point製品を使用するシステムインテグレーターの両方に非常に幅広い機会をもたらします。 オーケストレーション、自動化、SIEMからのフィードバック...これらすべてが可能になりました。
PSいつものように、 Habrブログまたはウェブサイトのブログで、 Check Pointに関する記事を見つけることができます。
PSS Check Pointのセットアップに関する技術的な質問については、ここをクリックしてください。