
Bareosを使用したバックアップオプションに関する一連の出版物を継続しています。 この記事では、Bareosを使用したVM ESXiのバックアップについて説明します。
以前の投稿: 「オープンソースソリューションを使用したバックアップ-Bareos」
仮想マシンをバックアップするために、VMware ESXiは多くの場合、Veeamやghettovcbスクリプトなどのツールを使用します。 この記事では、Bareos 16.2を使用して仮想マシンをバックアップする方法を検討します。つまり、Bareosの機能を拡張できるプラグインの1つであるvmware-pluginを使用します。 16番目のバージョンでは、構成ファイルの場所が変更され、各リソース(プール、クライアント、ジョブなど)が独自のディレクトリに分散され、Web UIの多言語性が追加され、MySQLプラグインが改善され、より詳細なドキュメントをここで表示できます 。
この例では、ESXi 6.0(プラグインが機能するには評価ライセンスで十分です)と、BareosがインストールされるCentOS 7のサーバーがあります。
リポジトリを追加します。
wget http://download.bareos.org/bareos/release/16.2/CentOS_7/bareos.repo -O /etc/yum.repos.d/bareos.repo
必要なコンポーネントをインストールします。
yum install -y bareos-client bareos-database-tools bareos-filedaemon bareos-database-postgresql bareos bareos-bconsole bareos-database-common bareos-storage bareos-director bareos-common
データベースをインストールします。
yum install -y postgresql-server postgresql-contrib
インストール後、次を実行します。
# postgresql-setup initdb
Bareosと共にインストールされたデータベース準備スクリプトを実行します。
su postgres -c /usr/lib/bareos/scripts/create_bareos_database su postgres -c /usr/lib/bareos/scripts/make_bareos_tables su postgres -c /usr/lib/bareos/scripts/grant_bareos_privileges
インストールの詳細とコンポーネントの説明、および主要なディレクティブの説明は、 ここにあります。
バージョン16のディレクトリのリストは次のようになります。
/bareos-dir-export /bareos-dir.d /catalog /client /console /counter /director /fileset /job /jobdefs /messages /pool /profile /schedule /storage /bareos-fd.d /client /director /messages /bareos-sd.d /autochanger /device /director /messages /ndmp /storage /tray-monitor.d /client /director /storage bconsole.conf
各サブディレクトリには、ディレクトリの名前に対応するリソースを担当する独自の構成ファイルがあります。
設定を行う前に、VMwareプラグインの動作に関するすべての要件が満たされていることを確認する必要があります。 要件の公式リストは、 ここで表示できます 。
プラグインをインストールする前に、すべての依存関係をインストールする必要があります
EPELリポジトリの1つを次のように追加します さらにインストールするためにいくつかのパッケージが必要になります。
rpm -ivh yum install python yum install python-pip yum install python-wheel pip install --upgrade pip pip install pyvmomi yum install python-pyvmomi : yum install bareos-vmware-plugin
前提条件は、ESXi上のVMがCBT(変更ブロック追跡)をサポートおよび有効にすることです。 VMware Webサイトでは、このオプションを有効にする方法が示されていますが、より簡単な方法-スクリプトを使用する方法があります。 スクリプト自体はvmware_cbt_toolと呼ばれ、GitHubで入手できます。
BareOSサーバーにダウンロードし、スクリプトディレクトリに移動した後、次を実行する必要があります。
./vmware_cbt_tool.py -s 172.17.10.1 -u bakuser -p kJo@#!a -d ha-datacenter -f / -v ubuntu --info
オプションで:
-s-サーバーアドレス
-u-ESXiのユーザー(特別にユーザーbakuserを導入)
-pは彼のパスワードです
-dはESXiの「データセンター」の名前で、デフォルトでは「ha-datacenter」
-f-VMがあるフォルダー、デフォルトではルート
-vはVM自体の名前です
--info-VMの現在のCBT設定を表示します

コマンドを実行すると、以下が表示されます。
INFO: VM ubuntu CBT supported: True INFO: VM ubuntu CBT enabled: False
つまり、CBTはサポートされていますが、現在有効化されていないため、コマンドの最後に--enablecbtオプションを追加して同じスクリプトで有効にします
./vmware_cbt_tool.py -s 172.17.10.1 -u bakuser -p kJo@#!a -d ha-datacenter -f / -v ubuntu --enablecbt
その結果、次のように表示されます。
INFO: VM ubuntu CBT supported: True INFO: VM ubuntu CBT enabled: False INFO: VM ubuntu trying to enable CBT now INFO: VM ubuntu trying to create and remove a snapshot to activate CBT INFO: VM ubuntu successfully created and removed snapshot
CBTは正常に有効化されました。
ここで、BareOS自体の設定に移動する必要があります。また、公式ドキュメントを参照することもできます。
構成の内容は次のとおりです。
/etc/bareos/bareos-dir.d/client/bareos-fd.conf Client { Name = vmware # localhost Address = localhost Password = "wai2Aux0" } /etc/bareos/bareos-dir.d/director/bareos-dir.conf Director { Name = "bareos-dir" QueryFile = "/usr/lib/bareos/scripts/query.sql" Maximum Concurrent Jobs = 10 Password = "wai2Aux0" Messages = Standard Auditing = yes }
この例の次のファイルは、最も重要なファイルの1つです。 プラグインのオプションを指定します
/etc/bareos/bareos-dir.d/fileset/SelfTest.conf FileSet { Name = "vm-ubuntu" Include { Options { signature = MD5 Compression = GZIP } Plugin = "python:module_path=/usr/lib64/bareos/plugins/vmware_plugin:module_name=bareos-fd-vmware:dc=ha-datacenter:folder=/:vmname=ubuntu:vcserver=172.17.10.1:vcuser=bakuser:vcpass=kJo@#!a" } }
python:module_path = / usr / lib64 / bareos / plugins / vmware_plugin-プラグインの場所を示します
module_name = bareos-fd-vmware-その名前を指定
dc-ESXiのデータセンター名
folder-VMのあるフォルダー、デフォルトではroot
vmname-仮想マシン名
vcserver-サーバーアドレス
vcuser-バックアップを使用するために特別に設定されたユーザーログイン
vcpass-彼のパスワード
バックアップのジョブの説明:
/etc/bareos/bareos-dir.d/job/backup-bareos-fd.conf Job { Name = "vm-ubuntu-backup-job" JobDefs = "DefaultJob" Client = "vmware" } /etc/bareos/bareos-dir.d/jobdefs/DefaultJob.conf JobDefs { Name = "DefaultJob" Type = Backup Level = Incremental FileSet = "vm-ubuntu" Schedule = "WeeklyCycle" Storage = bareos-sd Messages = Standard Pool = Incremental Priority = 10 Write Bootstrap = "/var/lib/bareos/%c.bsr" Full Backup Pool = Full Differential Backup Pool = Differential Incremental Backup Pool = Incremental }
リカバリーのジョブ記述:
/etc/bareos/bareos-dir.d/job/RestoreFiles.conf Job { Name = "RestoreFiles" Type = Restore Client = vmware FileSet = "vm-ubuntu" Storage = bareos-sd Pool = Incremental Messages = Standard Where = /tmp/ }
アラート設定:
/etc/bareos/bareos-dir.d/messages/Standard.conf Messages { Name = Standard # email mailcommand = "/usr/bin/bsmtp -h localhost -f \"\(Bareos\) \<%r\>\" -s \"Bareos: Intervention needed for %j\" %r" operator = root@localhost = mount # mail = admin@testdomain.com = alert,error,fatal,terminate, !skipped # console = all, !skipped, !saved # , , .. append = "/var/log/bareos/bareos.log" = all, !skipped # catalog = all }
到着する手紙の種類は、わかりやすくするために後で表示されます。
プールの説明:
/etc/bareos/bareos-dir.d/pool/Full.conf Pool { Name = Full Pool Type = Backup Recycle = yes AutoPrune = yes Volume Retention = 365 days Maximum Volume Bytes = 50G Maximum Volumes = 100 Label Format = "Full-" } /etc/bareos/bareos-dir.d/pool/Incremental.conf Pool { Name = Incremental Pool Type = Backup Recycle = yes AutoPrune = yes Volume Retention = 30 days Maximum Volume Bytes = 1G Maximum Volumes = 100 Label Format = "Incremental-" }
差分プールの例は示しません。なぜなら、 JobDefsで指定されていますが、使用しません。
スケジュール設定:
/etc/bareos/bareos-dir.d/schedule/WeeklyCycle.conf Schedule { Name = "WeeklyCycle" # 21:00 Run = Full on 1 at 21:00 # 31 Run = Full 2-31 at 01:00 # 2 31 10,15 19:00 Run = Incremental on 2-31 at 10:00 Run = Incremental on 2-31 at 15:00 Run = Incremental on 2-31 at 19:00 }
サイトへの接続の説明:
/etc/bareos/bareos-dir.d/storage/File.conf Storage { Name = bareos-sd Address = localhost Password = "wai2Aux0" Device = FileStorage Media Type = File }
ページ自体の設定:
/etc/bareos/bareos-sd.d/device/FileStorage.conf Device { Name = FileStorage Media Type = File Archive Device = /opt/backup LabelMedia = yes; Random Access = yes; AutomaticMount = yes; RemovableMedia = no; AlwaysOpen = no; }
ボードをディレクターに接続するためのパラメーター:
/etc/bareos/bareos-sd.d/director/bareos-dir.conf Director { Name = bareos-dir Password = "wai2Aux0" }
使用される通知パラメーター:
/etc/bareos/bareos-sd.d/messages/Standard.conf Messages { Name = Standard Director = bareos-dir = all } /etc/bareos/bareos-sd.d/storage/bareos-sd.conf Storage { Name = bareos-sd Maximum Concurrent Jobs = 20 }
サーバー側でプラグインを接続することが絶対に必要です。これは次の構成で行われます。
/etc/bareos/bareos-fd.d/client/myself.conf Client { Name = vmware Maximum Concurrent Jobs = 20 # Plugin Directory = /usr/lib64/bareos/plugins Plugin Names = "python" }
ディレクターへの接続:
/etc/bareos/bareos-fd.d/director/bareos-dir.conf Director { Name = bareos-dir Password = "wai2Aux0" }
ディレクターに送信される通知のタイプ:
/etc/bareos/bareos-fd.d/messages/Standard.conf Messages { Name = Standard Director = bareos-dir = all, !skipped, !restored }
強制的な手動バックアップが実行されます。このため、bconsoleを入力します
*run Automatically selected Catalog: MyCatalog Using Catalog "MyCatalog" A job name must be specified. The defined Job resources are: 1: RestoreFiles 2: vm-ubuntu-backup-job Select Job resource (1-2): 2 Run Backup job JobName: vm-ubuntu-backup-job Level: Incremental Client: vmware Format: Native FileSet: vm-ubuntu Pool: Incremental (From Job IncPool override) Storage: bareos-sd (From Job resource) When: 2016-11-14 07:22:11 Priority: 10 OK to run? (yes/mod/no): yes
メッセージコマンドを使用すると、タスクで何が起こっているかを確認でき、プロセスが正常に開始されたことがわかります。
14-Nov 07:22 vmware JobId 66: python-fd: Starting backup of /VMS/ha-datacenter/ubuntu/[datastore1] ubuntu/ubuntu.vmdk_cbt.json 14-Nov 07:22 vmware JobId 66: python-fd: Starting backup of /VMS/ha-datacenter/ubuntu/[datastore1] ubuntu/ubuntu.vmdk
ESXi側でのタスクの実行中に、仮想マシンのディスクにアクセスしていることを示すメッセージ出力コンソールに対応する通知が表示され、最後に一時スナップショットが削除されることを確認できます。

着信メッセージは次のようになります。
13-Nov 22:47 bareos-dir JobId 36: No prior Full backup Job record found. 13-Nov 22:47 bareos-dir JobId 36: No prior or suitable Full backup found in catalog. Doing FULL backup. 13-Nov 22:47 bareos-dir JobId 36: Start Backup JobId 36, Job=vm-ubuntu-backup-job.2016-11-13_22.47.47_04 13-Nov 22:47 bareos-dir JobId 36: Using Device "FileStorage" to write. 13-Nov 22:47 bareos-sd JobId 36: Volume "Full-0001" previously written, moving to end of data. 13-Nov 22:47 bareos-sd JobId 36: Ready to append to end of Volume "Full-0001" size=583849836 13-Nov 22:47 vmware JobId 36: python-fd: Starting backup of /VMS/ha-datacenter/ubuntu/[datastore1] ubuntu/ubuntu.vmdk_cbt.json 13-Nov 22:47 vmware JobId 36: python-fd: Starting backup of /VMS/ha-datacenter/ubuntu/[datastore1] ubuntu/ubuntu.vmdk 13-Nov 22:51 bareos-sd JobId 36: Elapsed time=00:04:01, Transfer rate=2.072 M Bytes/second 13-Nov 22:51 bareos-dir JobId 36: Bareos bareos-dir 16.2.4 (01Jul16): Build OS: x86_64-redhat-linux-gnu redhat CentOS Linux release 7.0.1406 (Core) JobId: 36 Job: vm-ubuntu-backup-job.2016-11-13_22.47.47_04 Backup Level: Full (upgraded from Incremental) Client: "vmware" 16.2.4 (01Jul16) x86_64-redhat-linux-gnu,redhat,CentOS Linux release 7.0.1406 (Core) ,CentOS_7,x86_64 FileSet: "vm-ubuntu" 2016-11-13 22:47:47 Pool: "Full" (From Job FullPool override) Catalog: "MyCatalog" (From Client resource) Storage: "bareos-sd" (From Job resource) Scheduled time: 13-Nov-2016 22:47:45 Start time: 13-Nov-2016 22:47:50 End time: 13-Nov-2016 22:51:51 Elapsed time: 4 mins 1 sec Priority: 10 FD Files Written: 2 SD Files Written: 2 FD Bytes Written: 499,525,599 (499.5 MB) SD Bytes Written: 499,527,168 (499.5 MB) Rate: 2072.7 KB/s Software Compression: 73.1 % (gzip) VSS: no Encryption: no Accurate: no Volume name(s): Full-0001 Volume Session Id: 9 Volume Session Time: 1479067525 Last Volume Bytes: 1,083,996,610 (1.083 GB) Non-fatal FD errors: 0 SD Errors: 0 FD termination status: OK SD termination status: OK Termination: Backup OK
ご覧のとおり、バックアップが正常に完了したことを示すメッセージが表示されます。バックアップタイプはフルで、499.5 Mbが記録されました(ESXi側ではvmdkファイルが560 Mを占有します)。 FileSet設定では、gzip圧縮タイプを設定します。このメッセージでは、Software Compression行にも表示されます。
エラーメッセージは次のようになります。 この例では、ご覧のとおり、VMのCBTモードをアクティブにしていない場合にエラーがシミュレートされました。これは、前の手順で特別なスクリプトを使用してオンにしたものです。
展開する
14-Nov 01:17 vmware JobId 39: Fatal error: python-fd: Error VM VMBitrix5.1.8 is not CBT enabled 14-Nov 01:17 vmware JobId 39: Fatal error: fd_plugins.c:654 Command plugin "python:module_path=/usr/lib64/bareos/plugins/vmware_plugin:module_name=bareos-fd-vmware:dc=ha-datacenter:folder=/:vmname=VMBitrix5.1.8:vcserver=172.17.10.1:vcuser=bakuser:vcpass=kJo@#!a" requested, but is not loaded. 14-Nov 01:17 bareos-dir JobId 39: Error: Bareos bareos-dir 16.2.4 (01Jul16): Build OS: x86_64-redhat-linux-gnu redhat CentOS Linux release 7.0.1406 (Core) JobId: 39 Job: vm-bitrix-backup-job.2016-11-14_01.17.51_04 Backup Level: Full (upgraded from Incremental) Client: "vmware" 16.2.4 (01Jul16) x86_64-redhat-linux-gnu,redhat,CentOS Linux release 7.0.1406 (Core) ,CentOS_7,x86_64 FileSet: "vm-bitrix-fileset" 2016-11-14 01:17:51 Pool: "vm-bitrix-Full" (From Job FullPool override) Catalog: "MyCatalog" (From Client resource) Storage: "bareos-sd" (From Job resource) Scheduled time: 14-Nov-2016 01:17:47 Start time: 14-Nov-2016 01:17:53 End time: 14-Nov-2016 01:17:54 Elapsed time: 1 sec Priority: 10 FD Files Written: 0 SD Files Written: 0 FD Bytes Written: 0 (0 B) SD Bytes Written: 0 (0 B) Rate: 0.0 KB/s Software Compression: None VSS: no Encryption: no Accurate: no Volume name(s): Volume Session Id: 12 Volume Session Time: 1479067525 Last Volume Bytes: 0 (0 B) Non-fatal FD errors: 1 SD Errors: 0 FD termination status: Fatal Error SD termination status: Canceled Termination: *** Backup Error ***
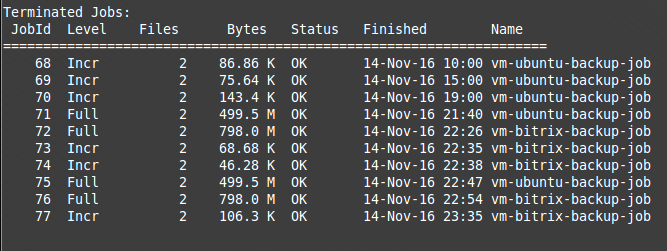
スケジュールに従って、ディレクターのSchedule {}ディレクティブで、1日のうちに3回の増分バックアップが実行されました(フルリストの最後のバックアップは手動で行われました)。 bconsoleでは、「status dir」コマンドを使用して、増分バックアップのサイズが完全バックアップとどれだけ異なるかを確認できます。

リカバリに関しては、ESXiを搭載したホストでデフォルトで実行されますが、このためには仮想マシン自体をオフにする必要があります。 または、BareOSを使用してサーバーでリカバリを実行できます。 両方のオプションを検討してください。
BareOSを使用してサーバーにローカルでリカバリする場合。 bconsoleに移動します。
*restore Automatically selected Catalog: MyCatalog Using Catalog "MyCatalog" First you select one or more JobIds that contain files to be restored. You will be presented several methods of specifying the JobIds. Then you will be allowed to select which files from those JobIds are to be restored. To select the JobIds, you have the following choices: 1: List last 20 Jobs run 2: List Jobs where a given File is saved 3: Enter list of comma separated JobIds to select 4: Enter SQL list command 5: Select the most recent backup for a client 6: Select backup for a client before a specified time 7: Enter a list of files to restore 8: Enter a list of files to restore before a specified time 9: Find the JobIds of the most recent backup for a client 10: Find the JobIds for a backup for a client before a specified time 11: Enter a list of directories to restore for found JobIds 12: Select full restore to a specified Job date 13: Cancel Select item: (1-13): 3 Enter JobId(s), comma separated, to restore: 66 Building directory tree for JobId(s) 66 ... 1 files inserted into the tree. You are now entering file selection mode where you add (mark) and remove (unmark) files to be restored. No files are initially added, unless you used the "all" keyword on the command line. Enter "done" to leave this mode. cwd is: / $ ls VMS/ $ mark * 1 file marked. $ done Defined Clients: 1: vmware ... Select the Client (1-4): 1 Using Catalog "MyCatalog" Client "bareos-fd" not found. Automatically selected Client: vmware Restore Client "bareos-fd" not found. Automatically selected Client: vmware Run Restore job JobName: RestoreFiles Bootstrap: /var/lib/bareos/bareos-dir.restore.1.bsr Where: /tmp/ Replace: Always FileSet: vm-ubuntu Backup Client: bareos-fd Restore Client: vmware Format: Native Storage: bareos-sd When: 2016-11-14 07:37:57 Catalog: MyCatalog Priority: 10 Plugin Options: *None* OK to run? (yes/mod/no): mod Parameters to modify: 1: Level 2: Storage 3: Job 4: FileSet 5: Restore Client 6: Backup Format 7: When 8: Priority 9: Bootstrap 10: Where 11: File Relocation 12: Replace 13: JobId 14: Plugin Options Select parameter to modify (1-14): 14 Please enter Plugin Options string: python:localvmdk=yes Run Restore job JobName: RestoreFiles Bootstrap: /var/lib/bareos/bareos-dir.restore.1.bsr Where: /tmp/ Replace: Always FileSet: vm-ubuntu Backup Client: vmware Restore Client: vmware Format: Native Storage: bareos-sd When: 2016-11-14 07:37:57 Catalog: MyCatalog Priority: 10 Plugin Options: python:localvmdk=yes OK to run? (yes/mod/no): yes
その後、/ tmpフォルダーに移動して、復元されたvmdkファイルを確認できます。
cd /tmp/" [datastore1] ubuntu" ls ubuntu.vmdk
ESXiにすぐに復元する場合、復元を実行する前に変更を加える必要はありませんが、前述のとおり、エラーが発生する前に仮想マシンをオフにする必要があります。
JobId 80: Fatal error: python-fd: Error VM VMBitrix5.1.8 must be poweredOff for restore, but is poweredOn
テストとして、仮想マシンにいくつかのテストファイルを作成し、バックアップでジョブを実行するだけで十分です。 これらのファイルを削除し、マシンの電源を切り、前の例のように変更を加えずに復元コマンドで復元します。原則として、削除されたファイルは同じ場所にあります。
次に、別のVMのバックアップを追加することを検討してください。その名前は「VMBitrix5.1.8」です
重要! まず、/ etc / bareos / bareos-dir.d / director / bareos-dir.confファイルのdirectorの設定で、VMwareを操作するためにプラグインを接続する必要があります。そうしないと、VMバックアップの追加タスクを接続するときに、プラグインがロードされないというエラーが表示されます:
例:
JobId 41: Fatal error: fd_plugins.c:654 Command plugin "python:module_path=/usr/lib64/bareos/plugins/vmware_plugin:module_name=bareos-fd-vmware:dc=ha-datacenter:folder=/:vmname=" requested, but is not loaded
ファイル/etc/bareos/bareos-dir.d/director/bareos-dir.confは次のようになります。
Director { # define myself Name = "bareos-dir" QueryFile = "/usr/lib/bareos/scripts/query.sql" Maximum Concurrent Jobs = 10 Password = "wai2Aux0" # Console password Messages = Standard Auditing = yes Plugin Directory = /usr/lib64/bareos/plugins Plugin Names = "python" }
以下の行を見て、プラグイン接続を完了したように:
Plugin Directory = /usr/lib64/bareos/plugins Plugin Names = "python"
次に、2番目の仮想マシンのバックアップ用にFileSetディレクティブ{}を編集します
/etc/bareos/bareos-dir.d/fileset/SelfTest.conf
VMBitrix5.1.8仮想マシンのバックアップ用に新しい行を追加すると、ファイルは次のようになります。
FileSet { Name = "vm-ubuntu" Include { Options { signature = MD5 Compression = GZIP } Plugin = "python:module_path=/usr/lib64/bareos/plugins/vmware_plugin:module_name=bareos-fd-vmware:dc=ha-datacenter:folder=/:vmname=ubuntu:vcserver=172.17.10.1:vcuser=bakuser:vcpass=qLpE1QQv" } } FileSet { Name = "vm-bitrix" Include { Options { signature = MD5 Compression = GZIP } Plugin = "python:module_path=/usr/lib64/bareos/plugins/vmware_plugin:module_name=bareos-fd-vmware:dc=ha-datacenter:folder=/:vmname=VMBitrix5.1.8:vcserver=172.17.10.1:vcuser=bakuser:vcpass=kJo@#!a" } }
新しいVMのバックアップ用の新しいジョブの追加に進み、/ etc / bareos / bareos-dir.d / jobディレクトリにbackup-bareos-bitrix.confファイルを作成します。 このファイルでは、新しいジョブのパラメーターを作成します(作成されたすべてのファイルのグループと所有者は「bareos」である必要があります)。
Job { Name = "vm-bitrix-backup-job" Client = "vmware" Type = Backup Level = Incremental FileSet = "vm-bitrix" Schedule = "WeeklyCycle" Storage = bareos-sd Messages = Standard Pool = vm-bitrix-Incremental Priority = 10 Write Bootstrap = "/var/lib/bareos/%c.bsr" Full Backup Pool = vm-bitrix-Full Incremental Backup Pool = vm-bitrix-Incremental }
2番目のVMBitrix5.1.8仮想マシンに必要な場合は、リカバリ用のジョブを作成することも必要です。 ファイル/etc/bareos/bareos-dir.d/job/restorefiles-vm-bitrix.confを作成します。
その内容:
Job { Name = "restorefiles-vm-bitrix" Type = Restore Client = vmware FileSet = "vm-bitrix" Storage = bareos-sd Pool = vm-bitrix-Incremental Messages = Standard Where = /tmp/ }
FileSetとPoolの間の対応を必ず確認してください。
ご覧のとおり、新しいプールを作成することも必要です。 /etc/bareos/bareos-dir.d/poolディレクトリに行きましょう
2つのファイルFull-vm-bitrix.confおよびIncremental-vm-bitrix.confを作成します。 それぞれの内容をリストします。
# cat /etc/bareos/bareos-dir.d/pool/Full-vm-bitrix.conf Pool { Name = vm-bitrix-Full Pool Type = Backup Recycle = yes AutoPrune = yes Volume Retention = 365 days Maximum Volume Bytes = 50G Maximum Volumes = 100 Label Format = "Full-vm-bitrix-" } # cat /etc/bareos/bareos-dir.d/pool/Incremental-vm-bitrix.conf Pool { Name = vm-bitrix-Incremental Pool Type = Backup Recycle = yes AutoPrune = yes Volume Retention = 30 days Maximum Volume Bytes = 1G Maximum Volumes = 100 Label Format = "Incremental-vm-bitrix-" }
繰り返しますが、前の手順と同様に、vmware_cbt_toolスクリプトを介して2番目のVMのCBTをアクティブにする必要があります
構成に変更を加えた後、サービスを再起動する必要があります。
systemctl restart bareos-fd systemctl restart bareos-dir
エラーが発生していない場合は、bconsoleコンソールに戻って、新しいVMに追加されたジョブを確認できます
新しい仕事のリスト:
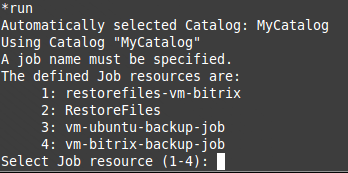
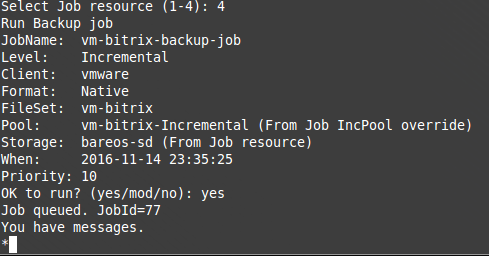
新しいタスクを実行します。
バックアップが成功した後の「status dir」コマンドの部分的な出力:
2番目の仮想マシンの回復に関しては、最初の仮想マシンの復元の例と違いはありません。 追加のVMをバックアップするタスクを追加することは、2番目のVMをバックアップするタスクを追加することに似ています。

SIM-CLOUD-ドイツのフェールオーバークラウド
ドイツの信頼できるデータセンターの専用サーバー!
あらゆる構成、迅速な組み立て、無料インストール