幾何学的ポストプロセスアンチエイリアシング(GPAA)
GBAAはGeometric Post-process Anti-Aliasing(GPAA)アルゴリズムの高度なバージョンです 。 その根底にある考え方は、元の画像の鋭いエッジを検索する代わりに、幾何学的なエッジの位置を推定する(MLAAのように)代わりに、「純粋な形」でエッジに関する情報を使用してレンダラーから受け取ることができるということです。 アルゴリズムは非常に簡単です。
- シーンのレンダリング(メインパッセージ);
- バックバッファのコピーを作成します。
- 追加のパスで幾何学的エッジをレンダリングし、隣接するピクセルの色を混合して滑らかなエッジを取得します。
ピクセルカラーの混合(ブレンド)は、次のように実行されます。
- 各ピクセルについて、方向(垂直または水平)と最も近いエッジまでの距離が決定されます。
- 方向と距離を使用して、隣接する三角形のピクセルカバレッジが計算されます。
- 方向は隣接するピクセルを選択するために使用され、カバレッジは混合係数を計算するために使用されます。
この図は、アルゴリズムのロジックを示しています。
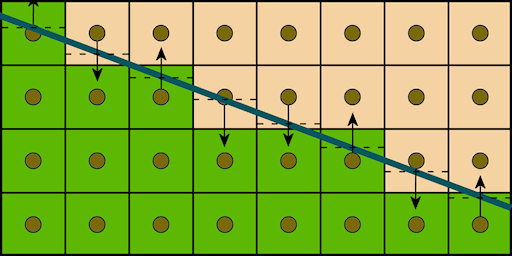
太線は、幾何学的エッジを示します。 矢印は、隣接するピクセルの選択を示します。 破線はピクセルの中心に対するオフセットを示し、ブレンド係数の計算に使用されます。 ブレンドは、テクスチャからの単一の選択で行われます。オフセットが現在のピクセルのテクスチャ座標に追加され、線形フィルターが残りを行います。
頂点シェーダーでは、幾何学的エッジの座標がスクリーン平面に投影され、エッジが位置する直線の方程式を取得するために使用されます。 4次元ベクトル形式の方程式はピクセルシェーダーに分類され、そこでピクセルのカバレッジと色が計算されます。
シェーダーコード(HLSL)
struct VsIn { float3 Position0 : Position0; float3 Position1 : Position1; }; struct PsIn { float4 Position : SV_Position; // The parameters are constant across the line so use the nointerpolation attribute. // This is not necessarily required, but using this we can make the vertex shader slightly shorter. nointerpolation float4 KMF : KMF; }; float4x4 ViewProj; float4 ScaleBias; PsIn main(VsIn In) { PsIn Out; float4 pos0 = mul(ViewProj, float4(In.Position0, 1.0)); float4 pos1 = mul(ViewProj, float4(In.Position1, 1.0)); Out.Position = pos0; // Compute screen-space position and direction of line float2 pos = (pos0.xy / pos0.w) * ScaleBias.xy + ScaleBias.zw; float2 dir = (pos1.xy / pos1.w) * ScaleBias.xy + ScaleBias.zw - pos; // Select between mostly horizontal or vertical bool x_gt_y = abs(dir.x) > abs(dir.y); // Pass down the screen-space line equation if (x_gt_y) { float k = dir.y / dir.x; Out.KMF.xy = float2(k, -1); } else { float k = dir.x / dir.y; Out.KMF.xy = float2(-1, k); } Out.KMF.z = -dot(pos.xy, Out.KMF.xy); Out.KMF.w = asfloat(x_gt_y); return Out; } Texture2D BackBuffer; SamplerState Filter; float2 PixelSize; float4 main(PsIn In) : SV_Target { // Compute the difference between geometric line and sample position float diff = dot(In.KMF.xy, In.Position.xy) + In.KMF.z; // Compute the coverage of the neighboring surface float coverage = 0.5f - abs(diff); float2 offset = 0; if (coverage > 0) { // Select direction to sample a neighbor pixel float off = diff >= 0 ? 1 : -1; if (asuint(In.KMF.w)) offset.y = off; else offset.x = off; } // Blend pixel with neighbor pixel using texture filtering and shifting the coordinate appropriately. return BackBuffer.Sample(Filter, (In.Position.xy + coverage * offset.xy) * PixelSize); }
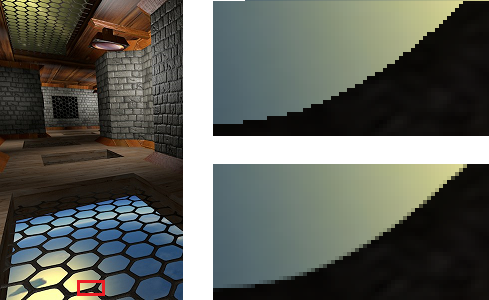
このアルゴリズムの主な利点は、品質とパフォーマンスです。 アンチエイリアシングの品質は、リブの角度に依存しません。これは、後処理技術の伝統的な問題です。 最初の図は、さまざまな品質プリセットを使用したFXAAの結果を示し、2番目の図はGPAAの結果を示しています。

FXAA 3、FXAA 5

GPAA
最も高価な操作はスクリーンバッファーのコピーです:1280x720解像度でHD 5870ビデオカードに1フレーム(元の実装)をレンダリングするには0.93ミリ秒かかります。スクリーンバッファーのコピーには0.08ミリ秒かかり、エッジの平滑化には実際に0.01ミリ秒かかります。 欠点は、明らかに、エッジとそれらを格納するための追加メモリを抽出するためのジオメトリの予備処理が必要なことです。 さらに、消費者レベルのGPUは、ラインラスタライゼーションを比較的ゆっくり実行します。 一緒に、これらの問題はGPAAのスケーラビリティに悪影響を及ぼし、シーンの幾何学的な複雑さが増大します。
ジオメトリバッファーアンチエイリアシング(GBAA)
したがって、GBAAはGPAAの改良バージョンです。 改善自体は、三角形の境界線への方向と距離がジオメトリシェーダーで計算されるという事実にあります。これにより、ジオメトリの予備処理とラインのラスタライズが不要になり、使用されるメモリ量が削減され、最も重要なことは、パフォーマンスがシーンのジオメトリの複雑さに依存することがなくなります。
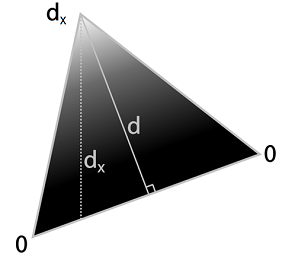
次の図は、境界までの距離の定義を示しています。各エッジについて、幾何学的シェーダーは最初に高さdを計算し、次に軸方向距離d xを計算します。 結果は頂点属性に格納され、ラスタライザーによって補間され、ピクセルシェーダーのブレンド係数の計算に使用されます。
GPAAに対する追加の利点は、幾何学的なエッジだけでなく、距離を推定できる他の境界(たとえば、アルファ透明テクスチャの境界)のアンチエイリアスを実行できることです。
ピクセルシェーダーは、ジオメトリシェーダーの計算結果を使用して、ピクセルと交差するエッジを見つけます。 エッジへの最小オフセットがピクセルの半分未満の場合、隣接するピクセルが選択され、ブレンド係数が計算され、ブレンドが実行されます。 それ以外の場合、ピクセルは変更されません。 シルエットリブの変位に関する情報は、シルエットの内側にあるピクセルでのみ利用できるため、これらのピクセルには追加の処理が必要です。
- オフセットは、隣接する4つのピクセルから選択されます。
- オフセットに応じて、4つの近傍の1つが選択されます(オフセットが現在のピクセルに向かう方向に対応するもの):
-左:0.5 <= offset.x <= 1.0
-右:-1.0 <= offset.x <= -0.5
-上:0.5 <= offset.y <= 1.0
-下限:-1.0 <= offset.y <= -0.5
- 選択したオフセットから、現在のピクセルの調整されたオフセットが取得されます。その後、係数を計算してブレンドを実行するためだけに残ります。
シェーダーコード(HLSL)
struct PsIn { float4 Position : SV_Position; float2 TexCoord : TexCoord; }; [Vertex shader] PsIn main(uint VertexID : SV_VertexID) { // Produce a fullscreen triangle PsIn Out; Out.Position.x = (VertexID == 0)? 3.0f : -1.0f; Out.Position.y = (VertexID == 2)? 3.0f : -1.0f; Out.Position.zw = 1.0f; Out.TexCoord = Out.Position.xy * float2(0.5f, -0.5f) + 0.5f; return Out; } [Fragment shader] Texture2D BackBuffer; Texture2D <float2> GeometryBuffer; SamplerState Linear; SamplerState Point; float2 PixelSize; float4 main(PsIn In) : SV_Target { float2 offset = GeometryBuffer.Sample(Point, In.TexCoord); // Check geometry buffer for an edge cutting through the pixel. [flatten] if (min(abs(offset.x), abs(offset.y)) >= 0.5f) { // If no edge was found we look in neighboring pixels' geometry information. This is necessary because // relevant geometry information may only be available on one side of an edge, such as on silhouette edges, // where a background pixel adjacent to the edge will have the background's geometry information, and not // the foreground's geometric edge that we need to antialias against. Doing this step covers up gaps in the // geometry information. offset = 0.5f; // We only need to check the component on neighbor samples that point towards us float offset_x0 = GeometryBuffer.Sample(Point, In.TexCoord, int2(-1, 0)).x; float offset_x1 = GeometryBuffer.Sample(Point, In.TexCoord, int2( 1, 0)).x; float offset_y0 = GeometryBuffer.Sample(Point, In.TexCoord, int2( 0, -1)).y; float offset_y1 = GeometryBuffer.Sample(Point, In.TexCoord, int2( 0, 1)).y; // Check range of neighbor pixels' distance and use if edge cuts this pixel. if (abs(offset_x0 - 0.75f) < 0.25f) offset = float2(offset_x0 - 1.0f, 0.5f); // Left x-offset [ 0.5 .. 1.0] cuts this pixel if (abs(offset_x1 + 0.75f) < 0.25f) offset = float2(offset_x1 + 1.0f, 0.5f); // Right x-offset [-1.0 .. -0.5] cuts this pixel if (abs(offset_y0 - 0.75f) < 0.25f) offset = float2(0.5f, offset_y0 - 1.0f); // Up y-offset [ 0.5 .. 1.0] cuts this pixel if (abs(offset_y1 + 0.75f) < 0.25f) offset = float2(0.5f, offset_y1 + 1.0f); // Down y-offset [-1.0 .. -0.5] cuts this pixel } // Convert distance to texture coordinate shift float2 off = (offset >= float2(0, 0))? float2(0.5f, 0.5f) : float2(-0.5f, -0.5f); offset = off - offset; // Blend pixel with neighbor pixel using texture filtering and shifting the coordinate appropriately. return BackBuffer.Sample(Linear, In.TexCoord + offset * PixelSize); }
修正
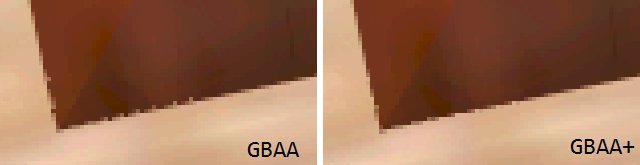
GBAAには不快な機能があり、収束するエッジ付近のアーチファクトで表現されます。
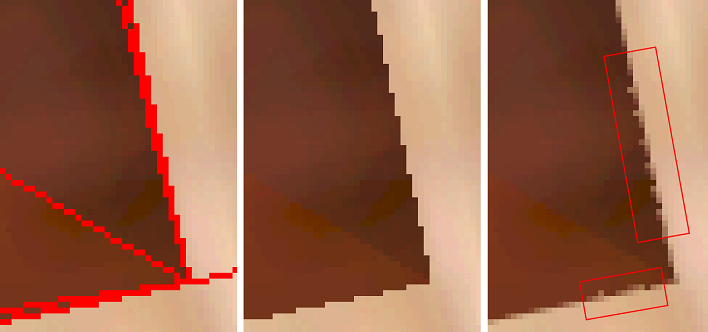
細いサブピクセルの三角形は、画面解像度で画像を操作するすべてのポストフィルタリングアルゴリズムの問題の原因であり、残念ながらGBAAも例外ではありません。 問題のあるケースでアンチエイリアスの品質を改善するために、これらのアーティファクトのメカニズムを理解し、元のアルゴリズムを変更しようとしました。 最初のケースを考えます:
ここで、中央の現在のピクセルのサンプリングポイントは細い三角形の内側になり、左右のピクセルのサンプリングポイントは細い三角形に隣接する大きな三角形になります。 写真に示すように、細い三角形の右端が中央のピクセルの中心に近い場合、GBAAは、中央に対する右端のオフセットに基づいて、中央のピクセルで直角三角形のカバレッジを決定し、中央と右のピクセルの間に線形補間された色を生成します。 ただし、中央のピクセルは一度に3つの三角形のフラグメントをカバーし、少なくとも1つのピクセルの色が他のピクセルと異なる場合、結果の色は誤って決定されます。 a 、 b 、 cを3つのピクセルの初期色とし、 α 、 β 、 γを中央のピクセルで覆われた三角形の断片の面積とピクセル面積の比とします。 この場合の中央のピクセルの調整色は、式によって決定できます
b out =αa+βb+γc 、
元のアルゴリズムは式によってそれを計算しますが
b out =(α+β)b +γc
たとえば、左のピクセルが白で、中央と右のピクセルが黒の場合、前述の状況では、元のアルゴリズムは中央のピクセルに常に黒を生成し、元の画像の断片を変更しません。
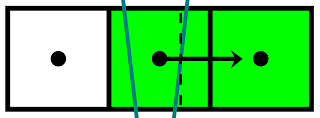
2番目のケースは、細い三角形が2つのピクセルの中心の間にある場合に発生します。

ここでは、最初の場合とは異なり、正しい色を計算するために必要な情報の一部が失われます。細い三角形の中に収まるサンプリングポイントはありません。 そのような場合が最終画像にどのように影響するかを理解するために、より大きなフラグメントを考えてみましょう。
右に移動すると、暗い三角形が上に移動し、さらに小さな領域を占めるため、上の行のピクセルの輝度が増加します。 これは、キューが最後の列に達するまで発生します。 処理中に発生するケースは以前に考慮されています。 ここで、最初の2列が問題の主な原因です。上のピクセルは元の色を取得する必要がありますが、代わりに元のアルゴリズムはそれらを下のピクセルの色と混合します。 左側は間違ったブレンド係数を使用して取得された三角形の境界の断片であり、右側は正しい結果です。
この場合、元のアルゴリズムの動作は、薄い三角形の間にあるピクセルの元の色を保持することで改善できます。
これらの2つのケースを処理するために、元のアルゴリズムにいくつかの変更を加えることができます。
- 最初の場合のピクセルの色を正しく計算するには、2番目のオフセットに関する情報が必要ですが、元のアルゴリズムでは1つしか保存されません。 これには、ジオメトリバッファに追加のスペースが必要です。 1つ目と同じ軸に沿って2つ目のオフセットがあり、その反対側にある場合は、このオフセットもジオメトリバッファーに格納する必要があります。 後処理段階で、トリプルカバレッジのケースを判断するには、ピクセルが異なる側面の2つのエッジと交差するかどうかを確認し、交差する場合は、補正された色を計算する必要があります。
- 2番目のケースの処理は、アルゴリズムの構造に最小限の影響しか与えないため、後処理段階で追加の検証を導入する必要があります。 隣接するピクセルが同じ軸のオフセットの反対方向に対応する対応するオフセットの方向にある場合、ピクセルは元の色を取得する必要があります。
シェーダーコード(HLSL)
struct PsIn { float4 Position : SV_Position; float2 TexCoord : TexCoord; }; [Vertex shader] PsIn main(uint VertexID : SV_VertexID) { // Produce a fullscreen triangle PsIn Out; Out.Position.x = (VertexID == 0)? 3.0f : -1.0f; Out.Position.y = (VertexID == 2)? 3.0f : -1.0f; Out.Position.zw = 1.0f; Out.TexCoord = Out.Position.xy * float2(0.5f, -0.5f) + 0.5f; return Out; } [Fragment shader] Texture2D BackBuffer; Texture2D <float2> GeometryBuffer; Texture2D <float> InvGeometryBuffer; SamplerState Linear; SamplerState Point; float2 PixelSize; int Tweak; int ShowEdges; void check_opposite_neighbor(float2 tex_coord, inout float2 offset) { // Select major offset float2 off; bool x_major = abs(offset.x) < abs(offset.y); if (x_major) off = float2(sign(offset.x), 0); else off = float2(0, sign(offset.y)); // Select neighbor's offset float2 opp_offset = GeometryBuffer.Sample(Point, tex_coord + off*PixelSize); // Make sure it is valid bool apply_offset = true; if (min(abs(opp_offset.x), abs(opp_offset.y)) < 0.5f) { // Make sure it points towards current sample // if so - don't apply texture coordinate offset if (x_major) { if (sign(offset.x)!=sign(opp_offset.x) && abs(opp_offset.x) < 0.5f) offset = 0.5f; } else { if (sign(offset.y)!=sign(opp_offset.y) && abs(opp_offset.y) < 0.5f) offset = 0.5f; } } } float4 main(PsIn In) : SV_Target { float2 offset = GeometryBuffer.Sample(Point, In.TexCoord); bool edge_found = false; bool triple_coverage = false; float4 result; // Check geometry buffer for an edge cutting through the pixel. [flatten] if (min(abs(offset.x), abs(offset.y)) >= 0.5f) { // If no edge was found we look in neighboring pixels' geometry information. This is necessary because // relevant geometry information may only be available on one side of an edge, such as on silhouette edges, // where a background pixel adjacent to the edge will have the background's geometry information, and not // the foreground's geometric edge that we need to antialias against. Doing this step covers up gaps in the // geometry information. offset = 0.5f; // We only need to check the component on neighbor samples that point towards us float offset_x0 = GeometryBuffer.Sample(Point, In.TexCoord, int2(-1, 0)).x; float offset_x1 = GeometryBuffer.Sample(Point, In.TexCoord, int2( 1, 0)).x; float offset_y0 = GeometryBuffer.Sample(Point, In.TexCoord, int2( 0, -1)).y; float offset_y1 = GeometryBuffer.Sample(Point, In.TexCoord, int2( 0, 1)).y; // Check range of neighbor pixels' distance and use if edge cuts this pixel. if (abs(offset_x0 - 0.75f) < 0.25f) { edge_found = true; offset = float2(offset_x0 - 1.0f, 0.5f); // Left x-offset [ 0.5 .. 1.0] cuts this pixel } if (abs(offset_x1 + 0.75f) < 0.25f) { edge_found = true; offset = float2(offset_x1 + 1.0f, 0.5f); // Right x-offset [-1.0 .. -0.5] cuts this pixel } if (abs(offset_y0 - 0.75f) < 0.25f) { edge_found = true; offset = float2(0.5f, offset_y0 - 1.0f); // Up y-offset [ 0.5 .. 1.0] cuts this pixel } if (abs(offset_y1 + 0.75f) < 0.25f) { edge_found = true; offset = float2(0.5f, offset_y1 + 1.0f); // Down y-offset [-1.0 .. -0.5] cuts this pixel } } else { edge_found = true; if (Tweak) { float inv_offset = InvGeometryBuffer.Sample(Point, In.TexCoord); if (inv_offset != 0.0f) { triple_coverage = true; // Sample two neighbors float maj_offset; float2 off = 0; if (abs(offset.x) < abs(offset.y)) { off.x = -sign(inv_offset); maj_offset = offset.x; } else { off.y = -sign(inv_offset); maj_offset = offset.y; } float4 n1 = BackBuffer.Sample(Point, In.TexCoord + off*PixelSize); float4 n2 = BackBuffer.Sample(Point, In.TexCoord - off*PixelSize); // Calculate coverage for this sample (b) and two neighbors (a, c) float alpha = 0.5f-abs(maj_offset); // a (n1) float gamma = 0.5f-abs(inv_offset); // c (n2) float beta = 1-alpha-gamma; // b (this) // Blend final color result = alpha*n1 + beta*BackBuffer.Sample(Point, In.TexCoord) + gamma*n2; } else check_opposite_neighbor(In.TexCoord, offset); } } if (ShowEdges && edge_found) result = float4(1, 0, 0, 1); else if (!triple_coverage) { // Convert distance to texture coordinate shift float2 off = (offset >= float2(0, 0))? float2(0.5f, 0.5f) : float2(-0.5f, -0.5f); offset = off - offset; // Blend pixel with neighbor pixel using texture filtering and shifting the coordinate appropriately. result = BackBuffer.Sample(Linear, In.TexCoord + offset * PixelSize); } return result; }
テスト
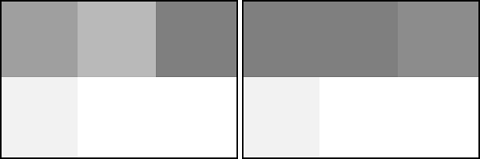
アンチエイリアスの品質を比較するために、元のGBAAが顕著なアーティファクトを生成したシーンのフラグメントが選択されました。 次に、各フラグメントについて、カメラの位置が固定され、4つのスクリーンショットが保存されました。元の画像、強調表示されたエッジを含む元の画像、GBAAの結果、および変更されたGBAAの結果です。
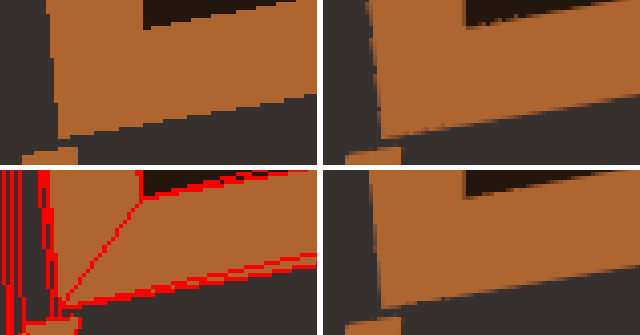


エッジが収束するフラグメントの品質はまだ理想的ではありませんが、それらのアーチファクトは目立たなくなりました。 複雑なテクスチャのシーンは、残余効果をよくマスクします。 達成された品質改善は、生産性の低下を犠牲にして得られます。 元のGBAAの後処理段階が1920x1080の解像度で0.14ミリ秒かかった場合、修正されたアルゴリズムは0.22ミリ秒を必要とし、57%増加します。 ただし、このレベルのパフォーマンスでさえ満足のいくものであり続け、MLAAとその修正は残されています。
おわりに
ピクセルシェーダーの分岐を最適化するためにあまり努力しなかったことに注意する必要があります。これにより、パフォーマンスが向上する可能性があります。 GCNなどの新しいGPUアーキテクチャは、ピクセルシェーダーで頂点属性を読み取る機能を提供します。これにより、ジオメトリシェーダーを使用せずにアルゴリズム(元のアルゴリズムと変更されたアルゴリズムの両方)を実装し、それに関連するオーバーヘッドを排除できます。
コンパイルされたバイナリとソースはGitHubで入手できます 。