たとえば、1つのコア、512 MBのRAM、および10 GBのディスクを備えたサーバーのコストは、1か月あたり90ルーブルです。 そのようなサーバーにicinga2をインストールします。 ただし、リソースを節約するために、データを保存せず、標準のWebインターフェイス(icingaweb2)の代わりに、icinga2 APIにアクセスする独自のインターフェイスを作成します。
icinga2のインストールはすでに2回以上説明されており、大きな問題を引き起こすことはありません。 インストールの主な段階について簡単に説明します。 ubuntuにインストールします。
wget -O - http://debmon.org/debmon/repo.key 2>/dev/null | apt-key add - echo 'deb http://debmon.org/debmon debmon-jessie main' >/etc/apt/sources.list.d/debmon.list apt-get update apt-get install icinga2
ウィザードを起動します。
icinga2 node wizard
マスターホストを設定したいので、ウィザードの最初の質問に「いいえ」と答えます。 構成アシスタントは、証明書を生成し、構成ファイルの初期セットアップを行い、API機能をオンにします。これは、デフォルトではオフになっています。
構成を変更した後、それらを有効にするには、サービスを再起動する必要があります。
service icinga2 reload
何か問題が発生した場合は、システムが気に入らないものを調べてエラーを処理します。
service icinga2 checkconfig
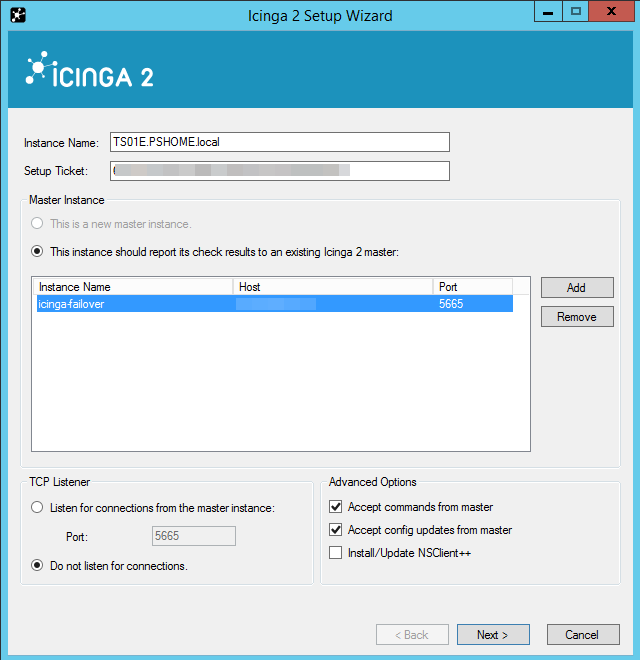
サーバーは監視の準備ができています。 監視するWindowsホストにicinga2をインストールします。 Windowsクライアントのインストールに問題はないはずです。NETが必要です。 枠組み 必要に応じて、ウィザードを起動します。ホスト名を変更し(名前の大文字と小文字を区別する)、サーバーを追加し、ウィザードからコマンドと構成を受け入れることを示します。
サーバーで、クライアントのインストールチケットを生成し、クライアントウィザードに入力します。
icinga2 pki ticket --cn TS01E.PSHOME.local
クライアントウィザードが作業を終了し、サービスが開始したら、サーバー上に作成されたノードを確認し、構成を更新します。
icinga2 node list icinga2 node update-config service icinga2 reload
同様に、他のクライアントをインストールします。 現在、ホストが監視されています。
追加の構成設定に進みます。 まず、ファイル/etc/icinga2/conf.d/users.confにメールを書き込み、通知を受け取ります。
object User "icingaadmin" { import "generic-user" display_name = "Icinga 2 Admin" groups = [ "icingaadmins" ] email = "icingaadmin@yandex.ru" } object UserGroup "icingaadmins" { display_name = "Icinga 2 Admin Group" }
サーバーでsmtpを構成します(まだ実行されていない場合)。
apt-get install ssmtp
icinga2が機能するユーザーのメールを指定します。
echo nagios:icingarobot@yandex.ru >> /etc/ssmtp/revaliases
Yandex smtp経由でメールを送信するための/etc/ssmtp/ssmtp.confファイルのサンプルコンテンツ:
root=postmaster mailhub=smtp.yandex.ru:465 hostname=icinga-failover FromLineOverride=YES AuthUser=icingarobot@yandex.ru AuthPass=password UseTLS=YES
監視ではデータを保存しないため、電子メールよりも効率的なものが必要です。 プッシュオーバーを設定します。 これを行うには、スクリプト/etc/icinga2/scripts/pushovernotify.shを作成します。
#!/bin/sh curl -F "token=$PUSHOVERTOKEN" \ -F "user=$PUSHOVERUSER" \ -F "title=$PUSHOVERTITLE" \ -F "message=$PUSHOVERMESSAGE" \ -F "html=$PUSHOVERHTML" \ https://api.pushover.net/1/messages exit 0
/etc/icinga2/conf.d/commands.confファイルに次の行を追加します。
object NotificationCommand "pushover-host-notification" { import "plugin-notification-command" command = [ SysconfDir + "/icinga2/scripts/pushovernotify.sh" ] env = { PUSHOVERUSER = "$user.vars.pushover_user$" PUSHOVERTOKEN = "$user.vars.pushover_token$" PUSHOVERTITLE = "Icinga2 Host Notification" PUSHOVERMESSAGE = " <b>$notification.type$</b> <a href='http://__/host.php?host=$host.display_name$'>$host.display_name$</a> <b>$host.state$</b> $icinga.long_date_time$" PUSHOVERHTML = "1" } } object NotificationCommand "pushover-service-notification" { import "plugin-notification-command" command = [ SysconfDir + "/icinga2/scripts/notifybypushover2.sh" ] env = { PUSHOVERUSER = "$user.vars.pushover_user$" PUSHOVERTOKEN = "$user.vars.pushover_token$" PUSHOVERTITLE = "Icinga2 Service Notification" PUSHOVERMESSAGE = " <b>$notification.type$</b> <a href='http://__/host.php?host=$host.display_name$'>$host.display_name$</a> $service.display_name$ <b>$service.state$</b> $icinga.long_date_time$" PUSHOVERHTML = "1" } }
/etc/icinga2/conf.d/templates.confファイルに次の行を追加します。
template Notification "pushover-host-notification" { command = "pushover-host-notification" states = [ Up, Down ] types = [ Problem, Acknowledgement, Recovery, Custom, FlappingStart, FlappingEnd, DowntimeStart, DowntimeEnd, DowntimeRemoved ] period = "24x7" } template Notification "pushover-service-notification" { command = "pushover-service-notification" states = [ OK, Warning, Critical, Unknown ] types = [ Problem, Acknowledgement, Recovery, Custom, FlappingStart, FlappingEnd, DowntimeStart, DowntimeEnd, DowntimeRemoved ] period = "24x7" }
/etc/icinga2/conf.d/notifications.confファイルに次の行を追加します。
apply Notification "pushover-icingaadmin" to Host { import "pushover-host-notification" user_groups = host.vars.notification.mail.groups users = host.vars.notification.mail.users assign where host.vars.notification.mail interval = 0 // disable re-notification } apply Notification "pushover-icingaadmin" to Service { import "pushover-service-notification" user_groups = host.vars.notification.mail.groups users = host.vars.notification.mail.users assign where host.vars.notification.mail interval = 0 // disable re-notification }
/etc/icinga2/conf.d/users.confファイルにプッシュオーバーキーを追加します
object User "icingaadmin" { import "generic-user" display_name = "Icinga 2 Admin" groups = [ "icingaadmins" ] email = "icingaadmin@yandex.ru" vars.pushover_user = "1111111111111111111111111111111" vars.pushover_token = "1111111111111111111111111111111" }
この段階では、監視オブジェクトに何か問題がある場合はすでに聞いています。もちろん、全体像を確認したいと思います。 これを行うには、phpを備えたWebサーバーが必要です。たとえば、自宅のコンピューターまたはicinga2と同じVDSに配置できます。
そのため、icinga2 APIへのリクエストに対してWebフェイスを描画します。 構成ウィザードは、ファイル/etc/icinga2/conf.d/api-users.confも作成しました。このファイルから、ユーザー名とパスワードを取得してAPIにアクセスします。 Webインターフェースプロジェクトは、すべてのホストのリストを表示するページと、個々のホストの詳細情報ページで構成されています。 Webインターフェイスは別のサーバーでホストできるという前提に基づいて、クロスドメインリクエストをプロキシするために、急いでphpスクリプトを使用します。
スクリプトテキストicinga-proxy.php:
<?php require_once( "config.php" ); if (!empty($_GET['host'])) { $host = trim($_GET['host']); $json_url = "https://".ICINGA2_HOST.":5665/v1/objects/hosts/".$host."/"; try { $ch = curl_init(); if (FALSE === $ch) throw new Exception('failed to initialize'); curl_setopt($ch, CURLOPT_URL, $json_url); curl_setopt($ch, CURLOPT_RETURNTRANSFER, true); curl_setopt($ch, CURLOPT_SSL_VERIFYPEER, false); curl_setopt($ch, CURLOPT_SSL_VERIFYHOST, false); curl_setopt($ch, CURLOPT_USERPWD, "$username:$password"); curl_setopt($ch, CURLOPT_HTTPAUTH, CURLAUTH_BASIC); $content = curl_exec($ch); echo $content; if (FALSE === $content) throw new Exception(curl_error($ch), curl_errno($ch)); } catch(Exception $e) { trigger_error(sprintf( 'Curl failed with error #%d: %s', $e->getCode(), $e->getMessage()), E_USER_ERROR); } } else { if (!empty($_GET['domain'])) { $domain = trim($_GET['domain']); $json_url = "https://".ICINGA2_HOST.":5665/v1/objects/hosts?filter=match%28%22*" . $domain . "*%22%2Chost%2Ename%29"; } else { $json_url = "https://".ICINGA2_HOST.":5665/v1/objects/hosts"; } try { $ch = curl_init(); if (FALSE === $ch) throw new Exception('failed to initialize'); curl_setopt($ch, CURLOPT_URL, $json_url); curl_setopt($ch, CURLOPT_RETURNTRANSFER, true); curl_setopt($ch, CURLOPT_SSL_VERIFYPEER, false); curl_setopt($ch, CURLOPT_SSL_VERIFYHOST, false); curl_setopt($ch, CURLOPT_USERPWD, "$username:$password"); curl_setopt($ch, CURLOPT_HTTPAUTH, CURLAUTH_BASIC); $content = curl_exec($ch); echo $content; if (FALSE === $content) throw new Exception(curl_error($ch), curl_errno($ch)); } catch(Exception $e) { trigger_error(sprintf( 'Curl failed with error #%d: %s', $e->getCode(), $e->getMessage()), E_USER_ERROR); } } ?>
私はjQuery.GetJSON()を使用して、ページをリロードせずに、最新のすべてのホストのリストを見たいと思います。
スクリプトテキストicinga-get-host.js:
$(document).ready(function () { $('#get-data').click(function () { var showData = $('#show-data'); var www_path = ""; var json_url = 'icinga-proxy.php?domain=' + domainFilter.value; $.getJSON(json_url, function (data) { var data0 = data.results; var items = data0.map(function (item) { var hostdown = item.attrs.state; var icon_image_src = item.attrs.icon_image; var hostdown_bage; var hostdown_bage_span; if (hostdown == 1) { hostdown_bage = "<span class='mdl-badge mdl-badge--overlap' data-badge='!'>"; hostdown_bage_span = "</span>"; icon_image_src = item.attrs.icon_image.slice(0, -4) + "_gray.png"; } else { hostdown_bage = ""; hostdown_bage_span = ""; if (item.attrs.icon_image) { icon_image_src = item.attrs.icon_image; } else { icon_image_src = "img/my/dot.png"; } } return "<td class='mdl-data-table__cell--non-numeric'><img src='" + www_path + icon_image_src + "' id='host" + item.attrs.display_name.split('.')[0] + "' />" + "<div class='mdl-tooltip' for='host" + item.attrs.display_name.split('.')[0] + "'>" + item.attrs.display_name + "</div>" + hostdown_bage_span + "</td><td class='mdl-data-table__cell--non-numeric' onclick='location=\"host.php?host=" + item.attrs.__name + "\"'>" + hostdown_bage + hostdown_bage_span + item.attrs.display_name + "</td>" + "<td class='mdl-data-table__cell--non-numeric'>" + item.attrs.vars.domain_name + "</td>" //+ "<td class='mdl-data-table__cell--non-numeric'>" + item.attrs.vars.os + "</td>" ; }); showData.empty(); if (items.length) { var content = '<tr>' + items.join('</tr><tr>') + '</tr>'; var list = $('<table class="mdl-data-table mdl-js-data-table" style="margin: auto; width: 100%" />').html(content); showData.append(list); } }); showData.text('Loading the JSON file.'); }); $('#get-data').click(); setInterval(function(){$('#get-data').click();},60*1000); });
ウェブインターフェースプロジェクトのリポジトリはこちらにあります 。
Material Design Liteスタイルを使用すると、Webインターフェースは次のようになります。
ホストリスト 
ホストの1つにアクセスできないことを示すホストのリスト 
ホストの詳細 
最小限のicinga2機能を備えたこのオプションの場合、アプリケーションの多くの領域を考え出すことができます。 たとえば、小規模プロジェクト、個人が接続していないコンピューターの護衛、または既存の技術サポートシステム(HelpDesk)への統合。 おそらく次回、Windowsホストに、署名したPowerShellスクリプトをダウンロードして、要求に応じて実行し、エージェントをインストールせずに他のコンピューターを監視し、ネットワークのアクティブな機器などを最小限のコストで監視し、機能を拡張および拡張できる可能性が高いことを教えます。
参照資料
ホワイトペーパーicinga2-インストール
Icinga2ホワイトペーパー-API