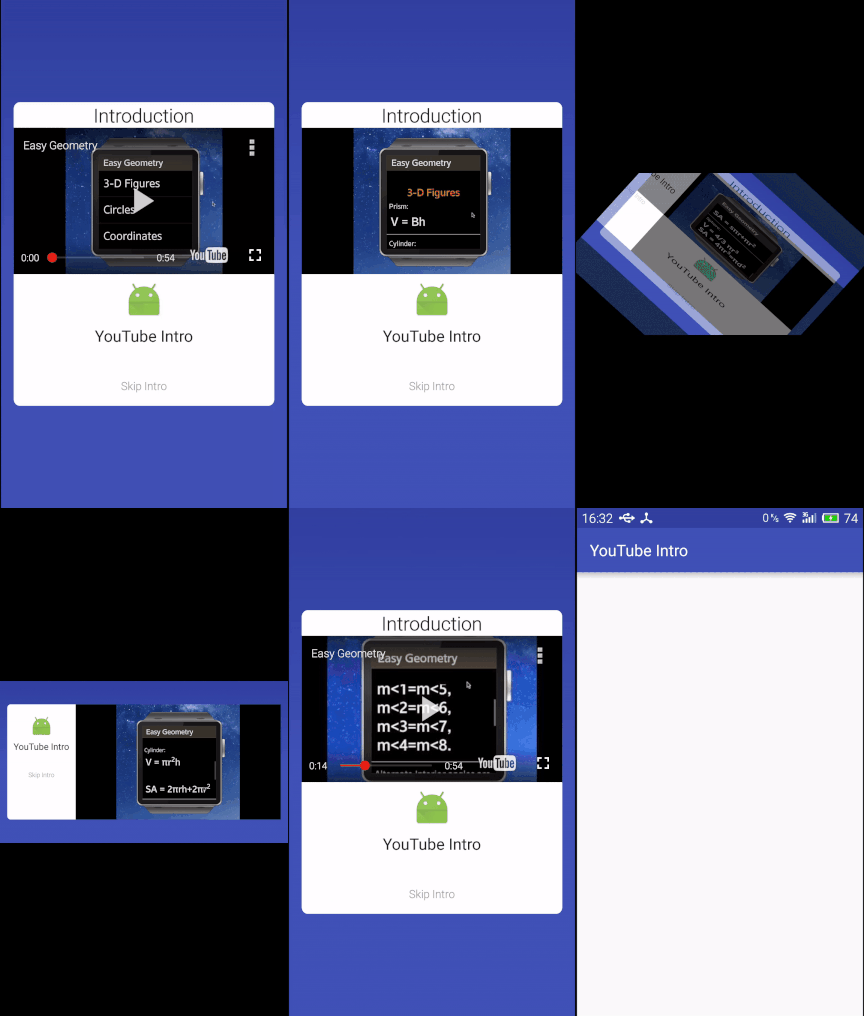
次に、YouTubeのビデオを使用してApp Introを実装する方法を説明します。
あなたが超巨大プロジェクトをやっていて、そのプロモーションビデオを持っているとしましょう。 私たちの目標は、アプリケーション内でこのビデオを事実調査として示し、ユーザーが正しい選択をしたことをユーザーに明確にすることです。

YouTubeのビデオに基づいたイントロ(アプリケーションがデバイスで最初に起動されたときに開始される情報の紹介アクティビティ)は、ユーザーに実際のビデオのすべての機能を表示するのに非常に役立ちます。 または、コマーシャルにすることもできます-どのアプリがおもしろく、便利で、かっこいいかなどの広告ほどの機能ではありません。
それでは、実装に進みましょう。
1)まず、プロジェクトを作成し、 Google Developer ConsoleでAPIキーを取得する必要があります。
a)プロジェクトを作成し、YouTube Data APIを有効にします:

b)AndroidアプリケーションのAPIキーを作成します。名前(任意)、プロジェクトのパッケージを指定し、SHA-1を生成します

これらの手順の後、次のようなAPIキーを受け取ります:AIzaSyCKQSxJFAHFHj9r2wfwfqkagkhFFa
保存して、使用します。
2)Android Studioで新しいプロジェクトを作成します。
a)strings.xmlに追加します。
<string name="intro_header">Introduction</string> <string name="skip_intro">Skip Intro</string> <string name="error_player">Error initializing Youtube player: %1$s</string>
b)colors.xml内:
<!-- Intro Youtube video --> <color name="intro_skip_normal">#9e9e9e</color> <color name="intro_skip_active">#616161</color>
c)dens.xmlで:
<!-- Additional margins including ones for Intro Youtube video --> <dimen name="middle_margin">8dp</dimen> <dimen name="bottom_text_margin">40dp</dimen>
d)カラーディレクトリとその中にintro_text_link.xmlファイルを作成します(レイアウトではこのスタイルを使用します)。
<?xml version="1.0" encoding="utf-8"?> <selector xmlns:android="http://schemas.android.com/apk/res/android"> <item android:state_pressed="true" android:color="@color/intro_skip_active" /> <item android:state_focused="true" android:color="@color/intro_skip_active" /> <item android:color="@color/intro_skip_normal" /> <!-- default --> </selector>
この段階で、ライブラリを接続してビデオクリップを表示する必要があります。
このリンクからYouTubeライブラリアーカイブをダウンロードします。
次に、YouTubeAndroidPlayerApi.jarファイルをapp / libs(スタジオでプロジェクトに切り替えます)にコピーして貼り付け、ツールバーの[同期]ボタンをクリックします(またはメニューで[ツール]> [Android]> [プロジェクトをGradleファイルと同期])
3)次に、JavaクラスConfigを作成します。このクラスには、Introで使用するビデオのGoogle APIキーとIDを保存します(URLに「?V = "、たとえばwww.youtube.com/watch? v = aScEqSidNf8 idはaScEqSidNf8になります):
public class Config { //Google API Key static final String API_KEY = "AIzaSyCKQSxJFAHFHj9r2wfwfqkagkhFFa"; //YouTube video id for intro static final String YOUTUBE_INTRO_ID = "aScEqSidNf8"; }
4)次に、Drawableフォルダー内にxmlファイルを作成します。これは、Introの背景とコーナーの丸めを担当します。
a)intro_gradient.xml:
<?xml version="1.0" encoding="utf-8"?> <shape xmlns:android="http://schemas.android.com/apk/res/android"> <gradient android:startColor="@color/colorPrimaryDark" android:centerColor="@color/colorPrimary" android:endColor="@color/colorPrimary" android:angle="270" /> </shape>
b)intro_rounded_corners.xml:
<?xml version="1.0" encoding="utf-8"?> <layer-list xmlns:android="http://schemas.android.com/apk/res/android" > <item> <shape android:shape="rectangle" > <solid android:color="@android:color/white" /> <corners android:radius="8dp" /> </shape> </item> </layer-list>
5)次に、Intro(垂直方向)のレイアウトファイルactivity_intro.xmlを作成します。
<?xml version="1.0" encoding="utf-8"?> <LinearLayout xmlns:android="http://schemas.android.com/apk/res/android" android:layout_width="match_parent" android:layout_height="match_parent" android:background="@drawable/intro_gradient"> <LinearLayout android:layout_width="match_parent" android:layout_height="wrap_content" android:layout_gravity="center" android:gravity="center_horizontal" android:layout_marginStart="@dimen/activity_horizontal_margin" android:layout_marginEnd="@dimen/activity_horizontal_margin" android:orientation="vertical" android:background="@drawable/intro_rounded_corner"> <TextView android:text="@string/intro_header" android:layout_width="wrap_content" android:layout_height="wrap_content" android:gravity="center" android:textAppearance="@style/TextAppearance.AppCompat.Headline" /> <com.google.android.youtube.player.YouTubePlayerView android:id="@+id/youtube_view" android:layout_width="match_parent" android:layout_height="wrap_content" android:layout_marginBottom="@dimen/middle_margin" /> <ImageView android:src="@mipmap/ic_launcher" android:contentDescription="@string/app_name" android:layout_width="wrap_content" android:layout_height="wrap_content" android:layout_marginBottom="@dimen/middle_margin" /> <TextView android:text="@string/app_name" android:layout_width="wrap_content" android:layout_height="wrap_content" android:layout_marginBottom="@dimen/bottom_text_margin" android:textAppearance="@style/TextAppearance.AppCompat.Title" /> <TextView android:id="@+id/skip_intro" android:text="@string/skip_intro" android:layout_width="wrap_content" android:layout_height="wrap_content" android:layout_marginBottom="@dimen/activity_vertical_margin" android:textColor="@color/intro_text_link" /> </LinearLayout> </LinearLayout>
水平方向の場合(同一のactivity_intro.xmlファイルを配置するlayout-landディレクトリを作成します):
<?xml version="1.0" encoding="utf-8"?> <LinearLayout xmlns:android="http://schemas.android.com/apk/res/android" android:layout_width="match_parent" android:layout_height="match_parent" android:background="@drawable/intro_gradient"> <LinearLayout android:layout_width="match_parent" android:layout_height="wrap_content" android:orientation="horizontal" android:background="@drawable/intro_rounded_corner" android:layout_gravity="center" android:gravity="center_vertical" android:baselineAligned="false" android:layout_marginStart="@dimen/activity_horizontal_margin" android:layout_marginEnd="@dimen/activity_horizontal_margin"> <LinearLayout android:layout_width="0dp" android:layout_height="match_parent" android:layout_weight="1" android:orientation="vertical" android:layout_marginTop="@dimen/activity_vertical_margin"> <ImageView android:src="@mipmap/ic_launcher" android:contentDescription="@string/app_name" android:layout_width="wrap_content" android:layout_height="wrap_content" android:layout_gravity="center_horizontal" android:layout_marginBottom="@dimen/middle_margin" /> <TextView android:text="@string/app_name" android:layout_width="wrap_content" android:layout_height="wrap_content" android:layout_gravity="center_horizontal" android:layout_marginBottom="@dimen/bottom_text_margin" android:textAppearance="@style/TextAppearance.AppCompat.Title" /> <TextView android:id="@+id/skip_intro" android:text="@string/skip_intro" android:layout_width="wrap_content" android:layout_height="wrap_content" android:layout_gravity="center_horizontal" android:layout_marginBottom="@dimen/activity_vertical_margin" android:textColor="@color/intro_text_link" /> </LinearLayout> <com.google.android.youtube.player.YouTubePlayerView android:id="@+id/youtube_view" android:layout_width="0dp" android:layout_height="wrap_content" android:layout_weight="3" /> </LinearLayout> </LinearLayout>
6)YouTubeFailureRecoveryActivityクラスを作成します。 アプリケーションの他の部分にYouTube機能がある場合、同じクラスが使用されるため、別のクラスにそれを取り出します。
public abstract class YouTubeFailureRecoveryActivity extends YouTubeBaseActivity implements YouTubePlayer.OnInitializedListener { private static final int RECOVERY_DIALOG_REQUEST = 1; @Override public void onInitializationFailure(YouTubePlayer.Provider provider, YouTubeInitializationResult errorReason) { if (errorReason.isUserRecoverableError()) { errorReason.getErrorDialog(this, RECOVERY_DIALOG_REQUEST).show(); } else { String errorMessage = String.format(getString(R.string.error_player), errorReason.toString()); Toast.makeText(this, errorMessage, Toast.LENGTH_LONG).show(); } } @Override protected void onActivityResult(int requestCode, int resultCode, Intent data) { if (requestCode == RECOVERY_DIALOG_REQUEST) { // Retry initialization if user performed a recovery action getYouTubePlayerProvider().initialize(Config.API_KEY, this); } } protected abstract YouTubePlayer.Provider getYouTubePlayerProvider(); }
7)IntroActivity.javaを作成します。
public class IntroActivity extends YouTubeFailureRecoveryActivity { YouTubePlayerView youTubeView; @Override protected void onCreate(Bundle savedInstanceState) { super.onCreate(savedInstanceState); getWindow().setFlags(WindowManager.LayoutParams.FLAG_FULLSCREEN, WindowManager.LayoutParams.FLAG_FULLSCREEN); setContentView(R.layout.activity_intro); youTubeView = (YouTubePlayerView) findViewById(R.id.youtube_view); youTubeView.initialize(Config.API_KEY, this); // Intro Skip Intro TextView skipIntro = (TextView) findViewById(R.id.skip_intro); skipIntro.setOnClickListener(new View.OnClickListener() { @Override public void onClick(View view) { /* Intro , , * Intro, * : intent.putExtra(EXTRA_TEXT, "MainActivity"). * : - Intro * - Skip Intro Intro. * - Intro - * , Intro. */ Intent intent = getIntent(); String extra = intent.getStringExtra(MainActivity.EXTRA_TEXT); if (extra == null) { intent.setClass(getApplicationContext(), MainActivity.class); startActivity(intent); } finish(); } }); } @Override protected YouTubePlayer.Provider getYouTubePlayerProvider() { return youTubeView; } @Override public void onInitializationSuccess(YouTubePlayer.Provider provider, YouTubePlayer youTubePlayer, boolean b) { if (!b) { youTubePlayer.cueVideo(Config.YOUTUBE_INTRO_ID); } } }
この機能を実装する最後の手順は、マニフェストとIntroActivity宣言にアクセス許可を追加することです。
<uses-permission android:name="android.permission.INTERNET"/> ... <activity android:name=".IntroActivity" />
これは、垂直および水平方向で行われた作業の結果です。

この記事では、有用なことを伝えようとしましたが、興味深いプロジェクトを作成するのに役立つこと、そして役に立つことを願っています。 まだ質問がある場合は、それらに答えようとします。