この記事では、ユーザーと向き合い、インターフェース部分で作業します。NSFetchRequestとNSFetchedResultsControllerがこれに役立ちます。 この部分はかなり大きいことが判明しましたが、いくつかの出版物に分割する理由はありません。 より正確には、カットの下に多くのコードと写真があります。
インターフェースは曖昧なものであり、製品の要件に応じて、大幅に変更される可能性があります。 この記事では、彼にあまり時間を割くことはせず、より正確には、ほとんど費やすことはしません( ガイドラインなどに従うことを意味します)。 この記事のこの部分での私のタスクは、
Core Data
がiOSコントロールに非常にシームレスに適合する方法を示すことです。 したがって、コントロールと
Core Data
相互作用がよりシンプルで視覚的に見える場合、これらの目的でこのようなインターフェイスを使用します。 明らかに、実際のアプリケーションでは、インターフェース部分はより多くの時間を費やす必要があります。
ディレクトリ
始める前に、記事の最後の部分で実験したアプリケーションデリゲートモジュール(
AppDelegate.swift
)に元の外観を与えましょう。
// AppDelegate.swift // core-data-habrahabr-swift import UIKit import CoreData @UIApplicationMain class AppDelegate: UIResponder, UIApplicationDelegate { var window: UIWindow? func application(application: UIApplication, didFinishLaunchingWithOptions launchOptions: [NSObject: AnyObject]?) -> Bool { return true } func applicationWillTerminate(application: UIApplication) { CoreDataManager.instance.saveContext() } }
ストーリーボードから始めましょう:
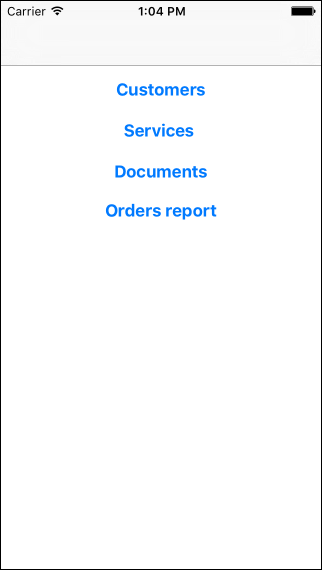
- ビューにいくつかのボタンを追加します。2つのディレクトリ(「顧客」と「サービス」)、1つのドキュメント(「注文」)、1つのドキュメントに関するレポートがあります。
- Navigation Controllerの追加(メニュー
Editor\Embed In\Navigation Controller
) - タイトル(タイトル)を持つ新しいTable View Controllerを追加します
- 追加されたTable View Controllerをメインメニューの対応するボタンに接続します(
Action Segue\Show
)
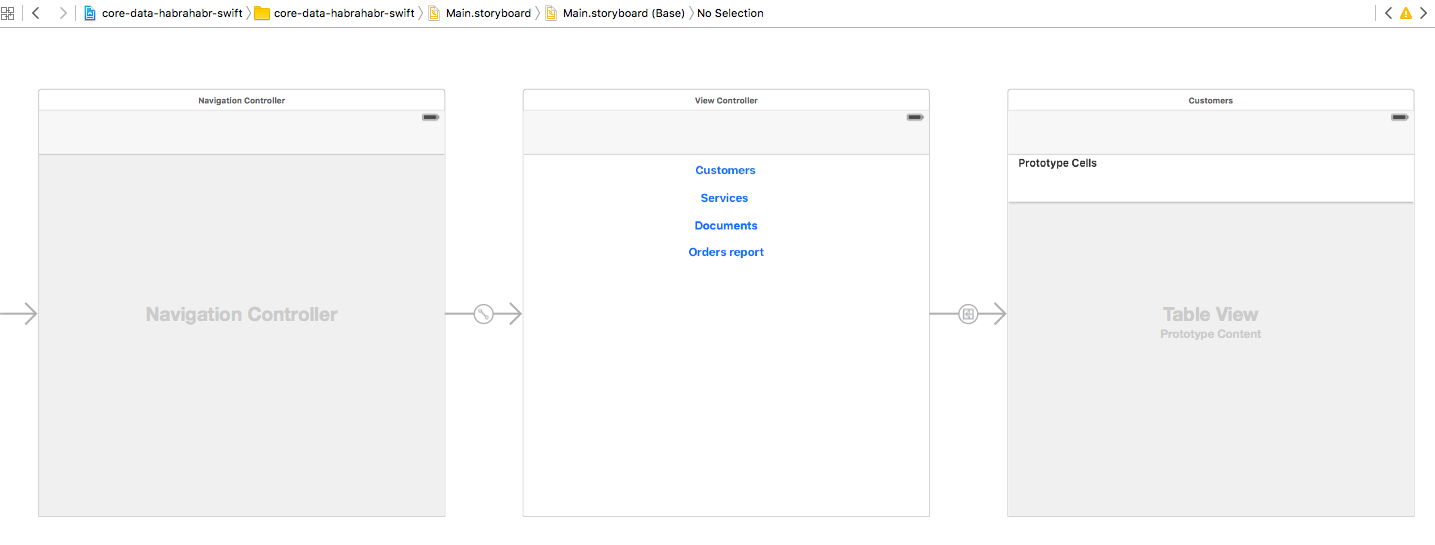
次に、 Table View Controllerのクラスを追加する必要があります 。
- メニューファイル\新規\ファイル...
- テンプレートとしてCocoaクラスを選択します

-
UITableViewController
を親クラスとして選択し、クラスの名前を指定しますUITableViewController
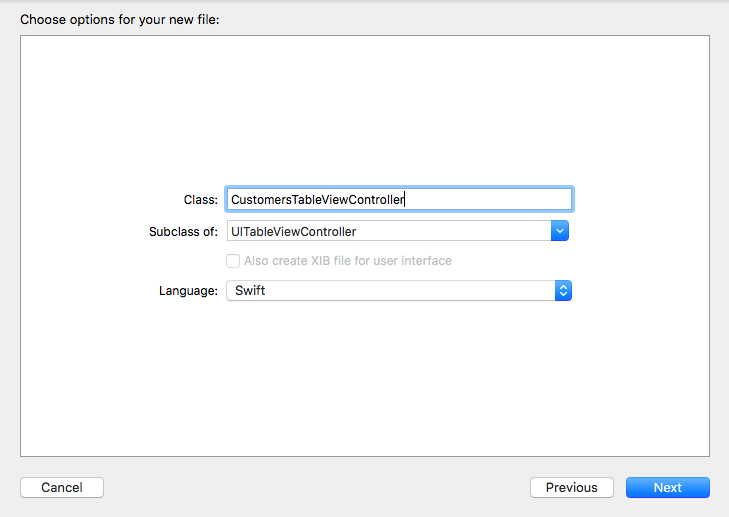
- ファイルを保存する場所を選択し、[ 作成 ]をクリックします
Table View Controller (
Identity Inspector\Custom Class\Class
)に作成したこのクラスを指定することは忘れられません。
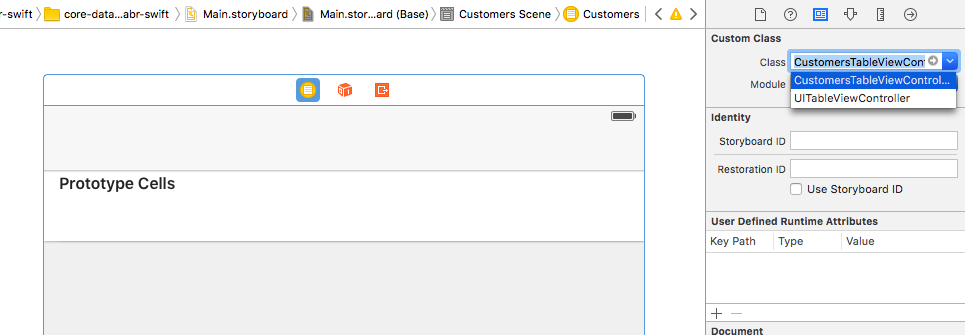
ここではプロトタイプセルを使用せず、テーブルセルの「カスタム」クラスを作成します(他のことに集中するため)。そのようなセルの数をゼロに設定しましょう(
Attributes Inspector\Table View\Prototype Cells
)。
次に、 テーブルビューデータソースプロトコルを実装するために、データソースを定義する必要があります。 最後の部分では、 NSFetchRequestに会いましたが 、一見するとこの目的に適しているようです。 これを使用すると、配列の形式ですべてのオブジェクトのリストを取得できます。これは実際、必要なものです。 しかし、顧客のリストを見るだけでなく、それらを追加、削除、編集したいのです。 この場合、これらすべての変更を手動で追跡し、毎回手動でリストを更新する必要があります。 それはあまり良くないですね。 しかし、別のオプション-NSFetchedResultsControllerがあります。これはNSFetchRequestに非常に似ていますが、リクエスト時に必要なオブジェクトの配列を返すだけでなく、すべてのレコードを監視し続けます。レコードが変更された場合、レコードは別の管理されたコンテキストを介してバックグラウンドでロードされます-彼はこれについても教えてくれます。 このイベントを処理するだけで済みます。
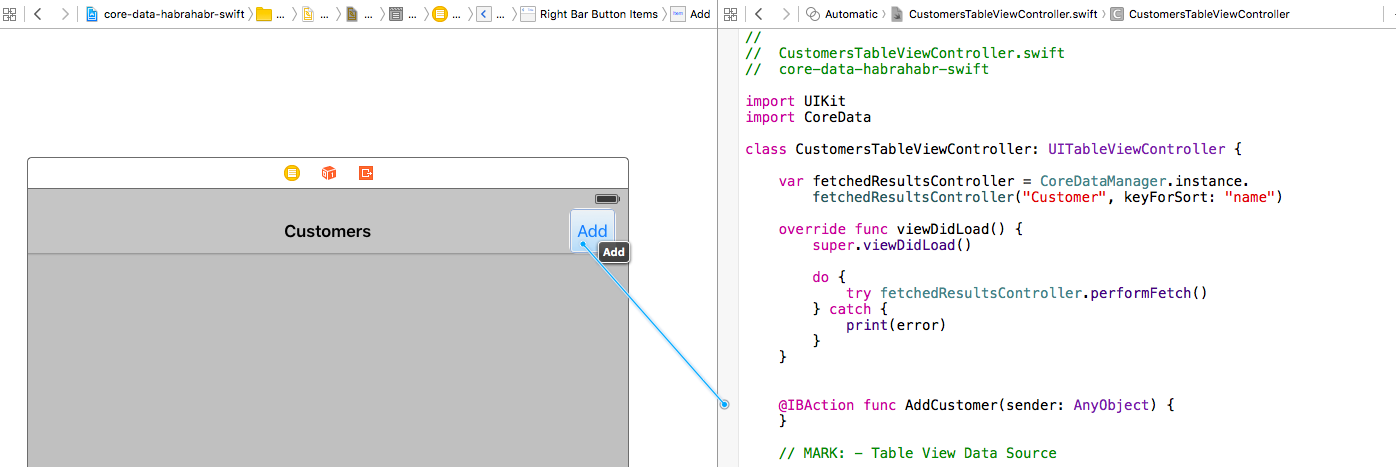
モジュールにNSFetchedResultsControllerを実装しましょう。 最初にすべてのコードを提供し、次にコメントします。
// CustomersTableViewController.swift // core-data-habrahabr-swift import UIKit import CoreData class CustomersTableViewController: UITableViewController { var fetchedResultsController:NSFetchedResultsController = { let fetchRequest = NSFetchRequest(entityName: "Customer") let sortDescriptor = NSSortDescriptor(key: "name", ascending: true) fetchRequest.sortDescriptors = [sortDescriptor] let fetchedResultsController = NSFetchedResultsController(fetchRequest: fetchRequest, managedObjectContext: CoreDataManager.instance.managedObjectContext, sectionNameKeyPath: nil, cacheName: nil) return fetchedResultsController }() override func viewDidLoad() { super.viewDidLoad() do { try fetchedResultsController.performFetch() } catch { print(error) } } // MARK: - Table View Data Source override func tableView(tableView: UITableView, numberOfRowsInSection section: Int) -> Int { if let sections = fetchedResultsController.sections { return sections[section].numberOfObjects } else { return 0 } } override func tableView(tableView: UITableView, cellForRowAtIndexPath indexPath: NSIndexPath) -> UITableViewCell { let customer = fetchedResultsController.objectAtIndexPath(indexPath) as! Customer let cell = UITableViewCell() cell.textLabel?.text = customer.name return cell } }
変数定義セクションで、タイプ
NSFetchedResultsController
fetchedResultsControllerオブジェクトを作成します。 ご覧のとおり、
NSFetchRequest
基づいて作成されています(「Customer」エンティティに基づいてNSFetchRequestを作成し、顧客の名前でソートを設定します)。 次に、
NSFetchedResultsController
自体を作成し、コンストラクターに必要な
NSFetchRequest
とマネージコンテキストを渡します。ここでは、追加のコンストラクターパラメーター(sectionNameKeyPath、cacheName)を使用しません。
次に、 View Controller (
func viewDidLoad()
)をロードするときに、 fetchedResultsControllerを実行して実行します。
try fetchedResultsController.performFetch()
また、 Table View Data Sourceを実装するには、2つの関数を再定義する必要があります 。
- 最初の関数では、現在のセクション内のオブジェクトの数を返します(実際、ここではセクションを使用しないため、すべてのオブジェクトが1つのセクションに含まれます)
- 2番目の方法では、プログラムで各オブジェクトのセルを作成し、それを返します。
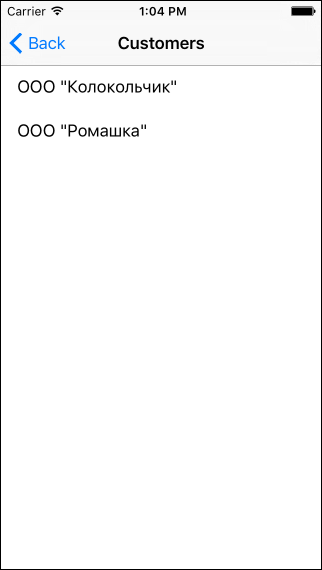
それをチェックしてみましょう! ここでアプリケーションを起動し、[
«Customers»
]メニューに移動すると、記事の最後の部分で追加されたすべての顧客が表示されます。 それほど複雑ではなかったでしょう?
続行する前に、少し最適化しましょう。NSFetchedResultsControllerオブジェクトの作成は簡潔ではありません。他のエンティティに対しても作成する必要があります。 この場合、本質的には、エンティティの名前と、場合によっては並べ替えフィールドの名前のみが変更されます。 「コピー&ペースト」を行わないために、このオブジェクトの作成をCoreDataManagerに移動しましょう。
import CoreData import Foundation class CoreDataManager { // Singleton static let instance = CoreDataManager() // Entity for Name func entityForName(entityName: String) -> NSEntityDescription { return NSEntityDescription.entityForName(entityName, inManagedObjectContext: self.managedObjectContext)! } // Fetched Results Controller for Entity Name func fetchedResultsController(entityName: String, keyForSort: String) -> NSFetchedResultsController { let fetchRequest = NSFetchRequest(entityName: entityName) let sortDescriptor = NSSortDescriptor(key: keyForSort, ascending: true) fetchRequest.sortDescriptors = [sortDescriptor] let fetchedResultsController = NSFetchedResultsController(fetchRequest: fetchRequest, managedObjectContext: CoreDataManager.instance.managedObjectContext, sectionNameKeyPath: nil, cacheName: nil) return fetchedResultsController } // MARK: - Core Data stack // ...
これを念頭に置いて、fetchedResultsControllerの定義は次のように変更されます。
var fetchedResultsController = CoreDataManager.instance.fetchedResultsController("Customer", keyForSort: "name")
ここで、顧客を選択するときに、必要に応じて編集できるすべてのデータを含む「カード」が開くことを確認する必要があります。 これを行うには、別のView Controllerを追加し(
«Customer»
ヘッダーとします)、 Table View Controllerに接続します 。
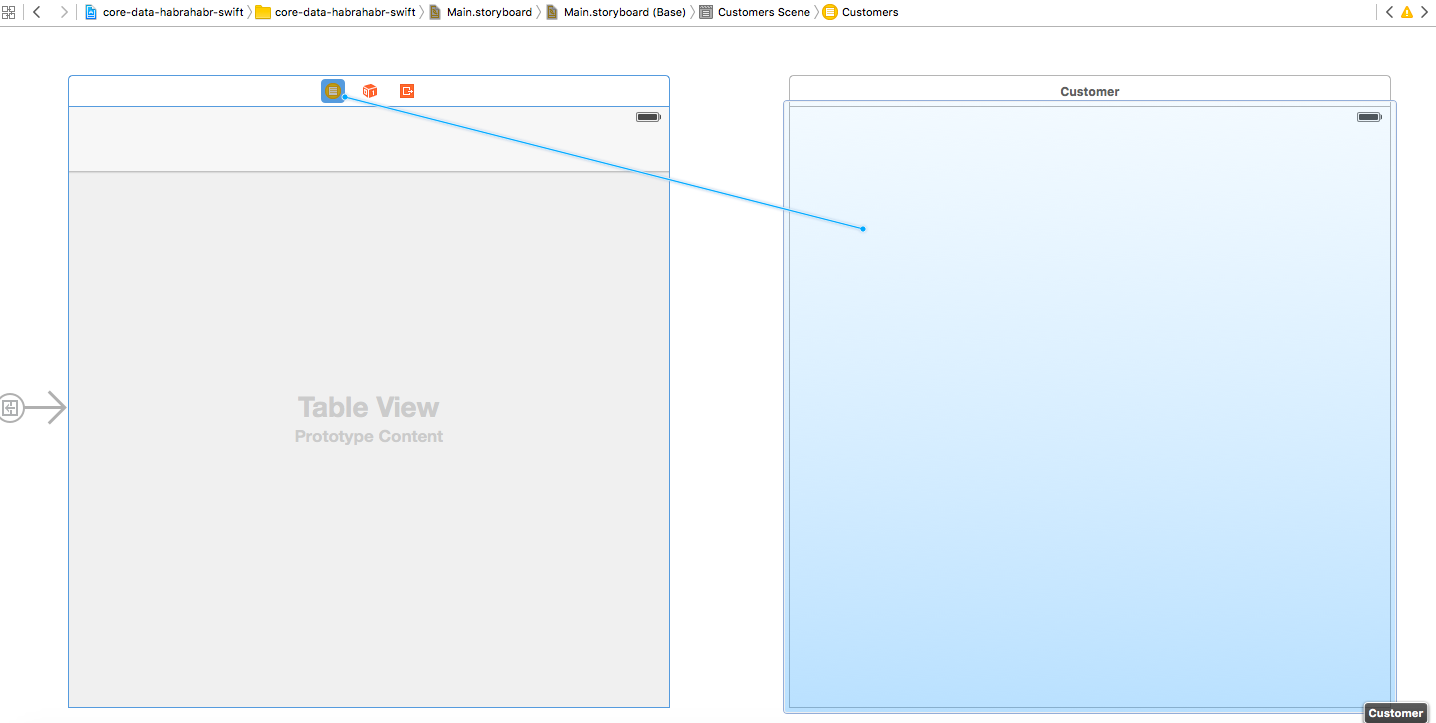
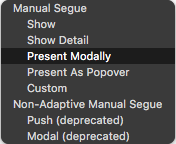
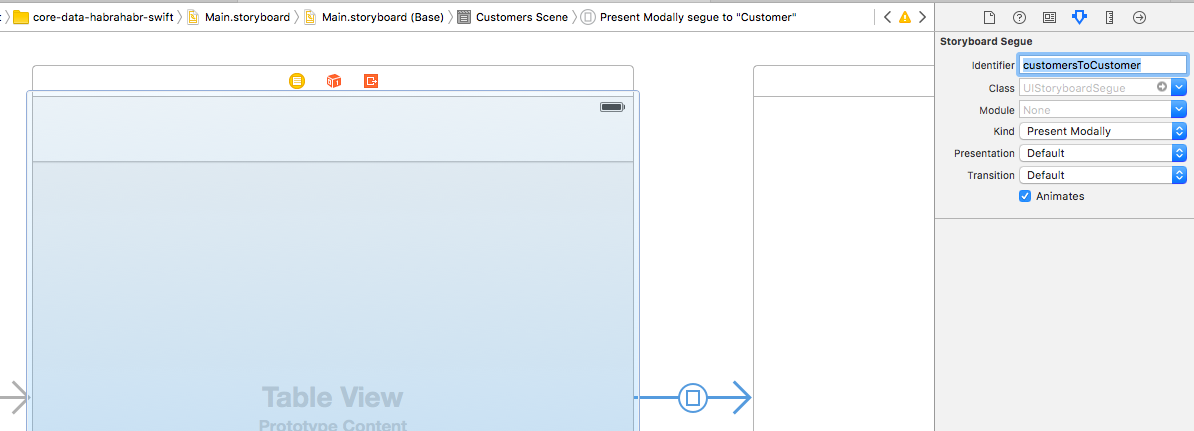
コントローラー間の遷移のタイプについては、「
Present Modally
」を選択します。
また、このSegueを名前で参照する必要があり
customersToCustomer
。名前-customersToCustomerを指定しましょう。
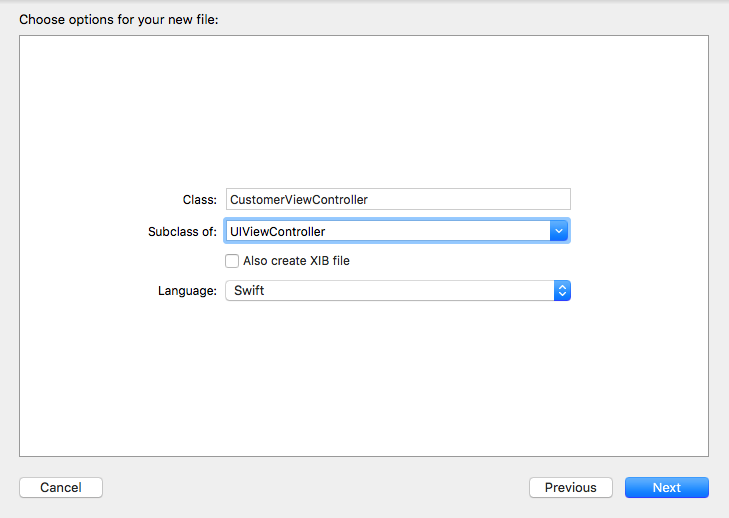
このView Controllerには独自のクラスが必要です。すべてがTable View Controllerで行ったものに似ていますが 、選択する親クラスである
UIViewController
としてのみ、クラス名は
CustomerViewController
です。
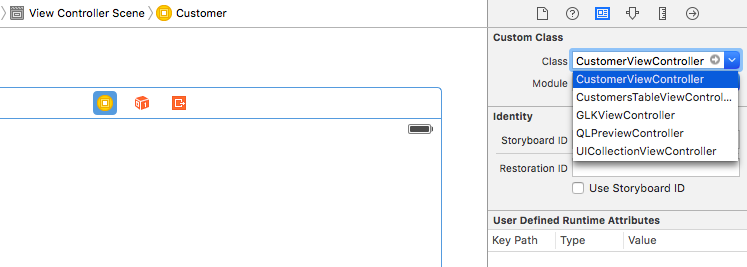
そして、新しいView Controllerにこのクラスを示します 。
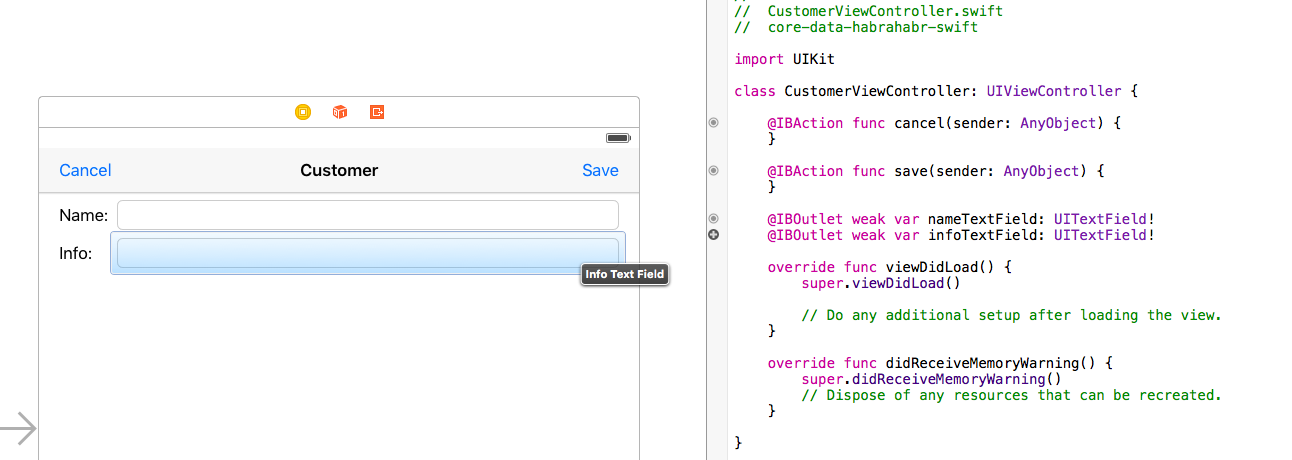
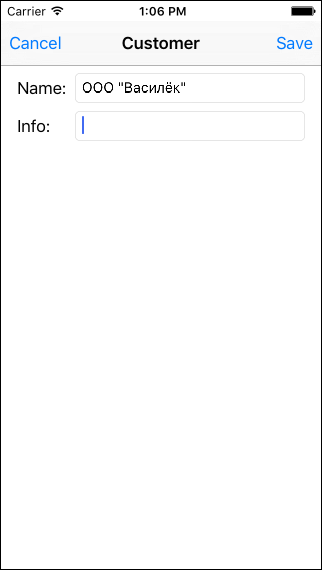
次に、2つのボタンでナビゲーションバーを追加します( 保存 -変更を保存するためとキャンセル - キャンセルするため)。 また、情報( nameとinfo )を表示および編集するために2つのテキストフィールドが必要です。 2つのアクション (保存とキャンセル用)と2つのアウトレット (名前と情報用)を作成しましょう。
お客様の「カード」のインターフェースの準備ができました。今、コードを書く必要があります。 ロジックは次のようになります。顧客のリストから顧客の「カード」に移動するとき、選択されたリスト行に基づいて顧客オブジェクトを転送します 。 「カード」が開かれると、このオブジェクトからのデータがインターフェース要素(
name
、 info )にロードされ、オブジェクトが保存されると、反対に、インターフェース要素の内容が保存されたオブジェクトのフィールドに転送されます。
また、必須のフィールド名があるという事実を考慮する必要があります。 ユーザーが空の名前で顧客を保存しようとすると、重大なエラーを受け取ります。 これを防ぐために、保存されたデータの正確性のチェックを追加しましょう。データが正しくない場合、対応する警告を表示し、そのようなオブジェクトの記録をブロックします。 ユーザーは正しいデータを入力するか、そのようなオブジェクトの記録を拒否する必要があります。
ここで最後に考慮する必要があるのは、確かに、既存の顧客を編集するだけでなく、新しい顧客を追加することです。 これを次のように行います。顧客のリストに、新しい顧客を作成するボタンを追加します。これにより、 nilを渡すことで「カード」が開きます。 そして、顧客の「カード」のデータを保存するとき、 顧客オブジェクトがまだ作成されていないかどうかを確認します (つまり、これは新しい顧客の入力です)。その後、すぐに作成します。
したがって、次のコードを取得します。
// CustomerViewController.swift // core-data-habrahabr-swift import UIKit class CustomerViewController: UIViewController { var customer: Customer? @IBAction func cancel(sender: AnyObject) { dismissViewControllerAnimated(true, completion: nil) } @IBAction func save(sender: AnyObject) { if saveCustomer() { dismissViewControllerAnimated(true, completion: nil) } } @IBOutlet weak var nameTextField: UITextField! @IBOutlet weak var infoTextField: UITextField! override func viewDidLoad() { super.viewDidLoad() // Reading object if let customer = customer { nameTextField.text = customer.name infoTextField.text = customer.info } } func saveCustomer() -> Bool { // Validation of required fields if nameTextField.text!.isEmpty { let alert = UIAlertController(title: "Validation error", message: "Input the name of the Customer!", preferredStyle: .Alert) alert.addAction(UIAlertAction(title: "OK", style: .Cancel, handler: nil)) self.presentViewController(alert, animated: true, completion: nil) return false } // Creating object if customer == nil { customer = Customer() } // Saving object if let customer = customer { customer.name = nameTextField.text customer.info = infoTextField.text CoreDataManager.instance.saveContext() } return true } }
それでは、 Table View Controllerに戻ってボタンを追加し、新しい顧客を作成します(顧客のカードに似た
Navigation Item + Bar Button Item
)。 そして、このボタンの
AddCustomer
というアクションを作成します。
このアクションは「カード」を開いて新しい顧客を作成し、 nilを渡します。
@IBAction func AddCustomer(sender: AnyObject) { performSegueWithIdentifier("customersToCustomer", sender: nil) }
既存の顧客を選択するときに、彼の「カード」が開くことを確認するために残っています。 これには、2つの手順が必要です。
override func tableView(tableView: UITableView, didSelectRowAtIndexPath indexPath: NSIndexPath) { let customer = fetchedResultsController.objectAtIndexPath(indexPath) as? Customer performSegueWithIdentifier("customersToCustomer", sender: customer) } override func prepareForSegue(segue: UIStoryboardSegue, sender: AnyObject?) { if segue.identifier == "customersToCustomer" { let controller = segue.destinationViewController as! CustomerViewController controller.customer = sender as? Customer } }
最初の手順(リスト行を強調表示するとき)では、現在の顧客を「読み取り」、2番目(リストから「カード」に切り替えるとき)では、選択した顧客へのリンクを「カード」の顧客変数に割り当てて、開いたときにすべてを読み取れるようにしますオブジェクトデータ。
アプリケーションを実行して、すべてが正常に機能することを確認しましょう。
アプリケーションは機能します。新しい顧客を入力し、既存の顧客を編集できますが、リスト内の情報は自動的に更新されず、不要な(または誤って入力した)顧客を削除するメカニズムはありません。 それを修正しましょう。
ここでは、これらすべての変更を「認識」しているNSFetchedResultsControllerを使用しているため、単に「リッスン」する必要があります。 これを行うには、 NSFetchedResultsControllerDelegateデリゲートプロトコルを実装する必要があります 。 このプロトコルを実装することを宣言します。
class CustomersTableViewController: UITableViewController, NSFetchedResultsControllerDelegate {
NSFetchedResultsControllerのデリゲートとして自分自身を宣言します。
override func viewDidLoad() { super.viewDidLoad() fetchedResultsController.delegate = self do { try fetchedResultsController.performFetch() } catch { print(error) } }
このプロトコルの次の実装を追加します。
// MARK: - Fetched Results Controller Delegate func controllerWillChangeContent(controller: NSFetchedResultsController) { tableView.beginUpdates() } func controller(controller: NSFetchedResultsController, didChangeObject anObject: AnyObject, atIndexPath indexPath: NSIndexPath?, forChangeType type: NSFetchedResultsChangeType, newIndexPath: NSIndexPath?) { switch type { case .Insert: if let indexPath = newIndexPath { tableView.insertRowsAtIndexPaths([indexPath], withRowAnimation: .Automatic) } case .Update: if let indexPath = indexPath { let customer = fetchedResultsController.objectAtIndexPath(indexPath) as! Customer let cell = tableView.cellForRowAtIndexPath(indexPath) cell!.textLabel?.text = customer.name } case .Move: if let indexPath = indexPath { tableView.deleteRowsAtIndexPaths([indexPath], withRowAnimation: .Automatic) } if let newIndexPath = newIndexPath { tableView.insertRowsAtIndexPaths([newIndexPath], withRowAnimation: .Automatic) } case .Delete: if let indexPath = indexPath { tableView.deleteRowsAtIndexPaths([indexPath], withRowAnimation: .Automatic) } } } func controllerDidChangeContent(controller: NSFetchedResultsController) { tableView.endUpdates() }
比較的大きなボリュームにもかかわらず-それは非常に簡単です。 ここでは、どのオブジェクトとどのように正確に変更されたかに関する情報を取得し、変更の種類に応じて、さまざまなアクションを実行します。
- 挿入 (挿入)-指定されたインデックスに新しい行を挿入します(行はリストの最後だけでなく、指定されたソートに従ってリスト内のその場所に追加されます)
- 更新 -オブジェクトデータが変更されました。指定されたインデックスでリストから行を取得し、それに関する情報を更新します
- 移動 -行の順序が変更された(たとえば、顧客の名前が変更され、現在別の場所での並べ替えに従って配置されている)、元の場所から行を削除し、新しいインデックスで追加する
- 削除 -指定したインデックスの行を削除します。
また、2つの「補助」関数
controllerWillChangeContent
と
controllerDidChangeContent
があり、それに応じて、データ変更の開始と終了を通知します。 これらの関数を使用して、表示するデータの一部を変更することを
Table View
に通知します(これが正しく機能するために必要です)。
顧客の削除を実装するためにのみ残ります。 これは非常に簡単に行われ、1つの小さな手順を再定義する必要があります。
override func tableView(tableView: UITableView, commitEditingStyle editingStyle: UITableViewCellEditingStyle, forRowAtIndexPath indexPath: NSIndexPath) { if editingStyle == .Delete { let managedObject = fetchedResultsController.objectAtIndexPath(indexPath) as! NSManagedObject CoreDataManager.instance.managedObjectContext.deleteObject(managedObject) CoreDataManager.instance.saveContext() } }
削除コマンドが到着すると、現在のオブジェクトをインデックスで取得し、削除するために管理コンテキストに渡します。 削除するオブジェクトのタイプは
NSManagedObject
なければならないことに注意してください。
これで、ディレクトリ「Customers」での作業が完了しました。 アプリケーションを実行して、その動作を確認しましょう。

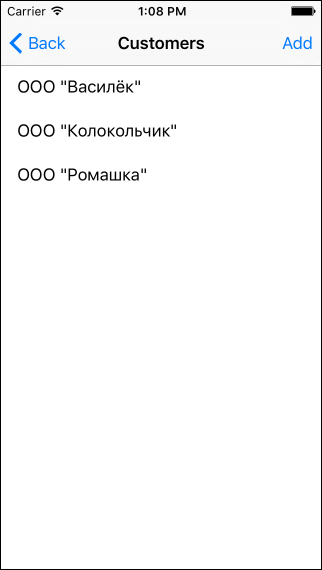
ご覧のとおり、 Core Dataは標準のインターフェイス要素と完全に組み合わされています。
モジュールテキストCustomersTableViewController.swift
// CustomersTableViewController.swift // core-data-habrahabr-swift import UIKit import CoreData class CustomersTableViewController: UITableViewController, NSFetchedResultsControllerDelegate { var fetchedResultsController = CoreDataManager.instance.fetchedResultsController("Customer", keyForSort: "name") override func viewDidLoad() { super.viewDidLoad() fetchedResultsController.delegate = self do { try fetchedResultsController.performFetch() } catch { print(error) } } @IBAction func AddCustomer(sender: AnyObject) { performSegueWithIdentifier("customersToCustomer", sender: nil) } // MARK: - Table View Data Source override func tableView(tableView: UITableView, numberOfRowsInSection section: Int) -> Int { if let sections = fetchedResultsController.sections { return sections[section].numberOfObjects } else { return 0 } } override func tableView(tableView: UITableView, cellForRowAtIndexPath indexPath: NSIndexPath) -> UITableViewCell { let customer = fetchedResultsController.objectAtIndexPath(indexPath) as! Customer let cell = UITableViewCell() cell.textLabel?.text = customer.name return cell } // MARK: - Table View Delegate override func tableView(tableView: UITableView, commitEditingStyle editingStyle: UITableViewCellEditingStyle, forRowAtIndexPath indexPath: NSIndexPath) { if editingStyle == .Delete { let managedObject = fetchedResultsController.objectAtIndexPath(indexPath) as! NSManagedObject CoreDataManager.instance.managedObjectContext.deleteObject(managedObject) CoreDataManager.instance.saveContext() } } override func tableView(tableView: UITableView, didSelectRowAtIndexPath indexPath: NSIndexPath) { let customer = fetchedResultsController.objectAtIndexPath(indexPath) as? Customer performSegueWithIdentifier("customersToCustomer", sender: customer) } override func prepareForSegue(segue: UIStoryboardSegue, sender: AnyObject?) { if segue.identifier == "customersToCustomer" { let controller = segue.destinationViewController as! CustomerViewController controller.customer = sender as? Customer } } // MARK: - Fetched Results Controller Delegate func controllerWillChangeContent(controller: NSFetchedResultsController) { tableView.beginUpdates() } func controller(controller: NSFetchedResultsController, didChangeObject anObject: AnyObject, atIndexPath indexPath: NSIndexPath?, forChangeType type: NSFetchedResultsChangeType, newIndexPath: NSIndexPath?) { switch type { case .Insert: if let indexPath = newIndexPath { tableView.insertRowsAtIndexPaths([indexPath], withRowAnimation: .Automatic) } case .Update: if let indexPath = indexPath { let customer = fetchedResultsController.objectAtIndexPath(indexPath) as! Customer let cell = tableView.cellForRowAtIndexPath(indexPath) cell!.textLabel?.text = customer.name } case .Move: if let indexPath = indexPath { tableView.deleteRowsAtIndexPaths([indexPath], withRowAnimation: .Automatic) } if let newIndexPath = newIndexPath { tableView.insertRowsAtIndexPaths([newIndexPath], withRowAnimation: .Automatic) } case .Delete: if let indexPath = indexPath { tableView.deleteRowsAtIndexPaths([indexPath], withRowAnimation: .Automatic) } } } func controllerDidChangeContent(controller: NSFetchedResultsController) { tableView.endUpdates() } }
参照「サービス」
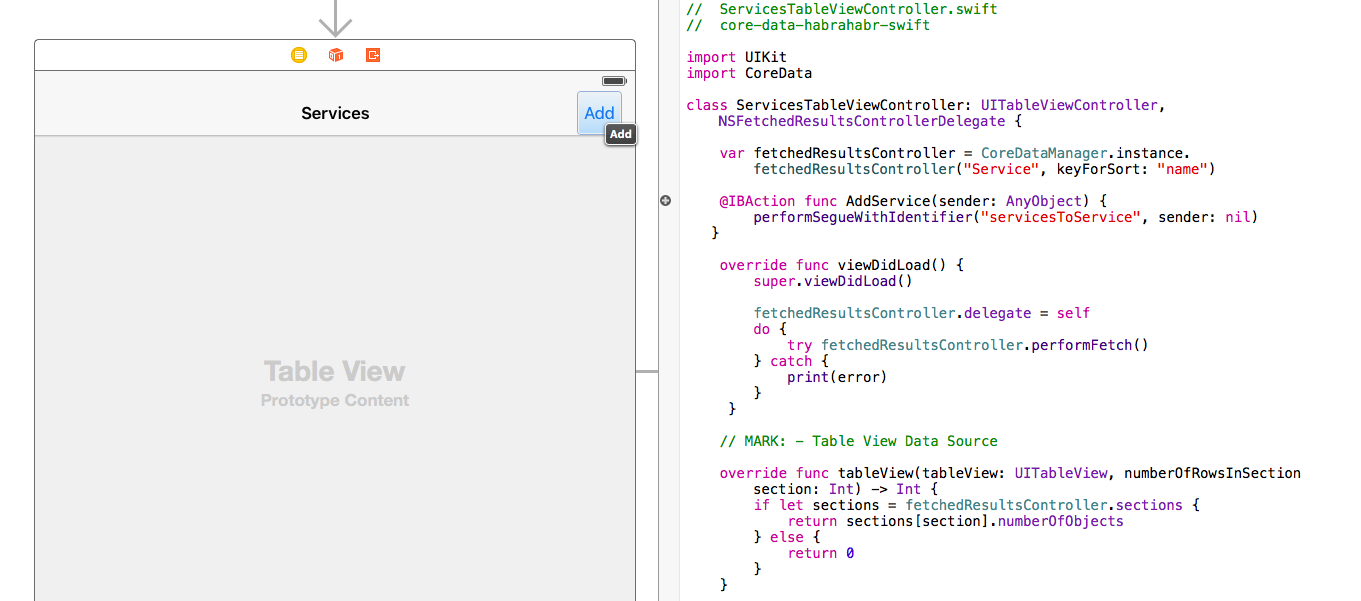
私たちが持っているサービスのディレクトリは、顧客のディレクトリと同じ構造とロジックを持っています。 違いは最小限であるため、ここではすべてを詳細に説明するのではなく、簡単な手順を説明します(この概要に従ってすべてを自分で簡単に行えると確信しています)。
- 新しいTable View Controllerを作成し、それを
«Services»
ボタンにバインドします - 新しいクラス
ServicesTableViewController
作成して割り当てる(UITableViewController
基づく) - import(
import
)CoreData
、fetchedResultsController
(Service
エンティティに基づく)を追加し、コントローラーがロードされたら、コントローラーを起動して実行します - Table View Data Sourceを実装するための2つのプロシージャを追加します。1つ目は行数を返し、2つ目は指定されたインデックスのオブジェクトに関する情報を含む行を返します
- 新しいView Controllerを作成して、サービスの「カード」を表示し、その上にインターフェース要素を配置します(すべてが顧客の「カード」に似ています)
- このコントローラーの新しいクラス
ServiceViewController
(ServiceViewController
基づく)を作成して割り当てる - 2つのアクション ([
Save
Cancel
と[Cancel
)と2つのアウトレット (name
とinfo
フィールド)を作成 - 必要なコードを追加します(変数
service
宣言し、オブジェクトのロードと保存の手順を規定します。書き込み前にデータをチェックすることを忘れないでください) -
ServiceViewController
という名前のServicesTableViewController
とServiceViewController
間に接続を追加しservicesToService
(Segue \ Present Modally
) -
ServicesTableViewController
戻り、[ 追加 ]ボタンを追加して新しいサービス(Navigation Item \ Bar Button Item
)を追加し、AddService
というアクションを作成します - 新しい「サービス」のカードへの移行に必要なコードを登録し、 Table View Delegateメソッドを実装します(選択したサービスの「カード」に移動します)
-
NSFetchedResultsControllerDelegate
プロトコルNSFetchedResultsControllerDelegate
を実装し、現在のクラスをデリゲートとして宣言します - すべてチェック!
モジュールテキストServicesTableViewController.swift
// ServicesTableViewController.swift // core-data-habrahabr-swift import UIKit import CoreData class ServicesTableViewController: UITableViewController, NSFetchedResultsControllerDelegate { var fetchedResultsController = CoreDataManager.instance.fetchedResultsController("Service", keyForSort: "name") @IBAction func AddService(sender: AnyObject) { performSegueWithIdentifier("servicesToService", sender: nil) } override func viewDidLoad() { super.viewDidLoad() fetchedResultsController.delegate = self do { try fetchedResultsController.performFetch() } catch { print(error) } } // MARK: - Table View Data Source override func tableView(tableView: UITableView, numberOfRowsInSection section: Int) -> Int { if let sections = fetchedResultsController.sections { return sections[section].numberOfObjects } else { return 0 } } override func tableView(tableView: UITableView, cellForRowAtIndexPath indexPath: NSIndexPath) -> UITableViewCell { let service = fetchedResultsController.objectAtIndexPath(indexPath) as! Service let cell = UITableViewCell() cell.textLabel?.text = service.name return cell } // MARK: - Table View Delegate override func tableView(tableView: UITableView, commitEditingStyle editingStyle: UITableViewCellEditingStyle, forRowAtIndexPath indexPath: NSIndexPath) { if editingStyle == .Delete { let managedObject = fetchedResultsController.objectAtIndexPath(indexPath) as! NSManagedObject CoreDataManager.instance.managedObjectContext.deleteObject(managedObject) CoreDataManager.instance.saveContext() } } override func tableView(tableView: UITableView, didSelectRowAtIndexPath indexPath: NSIndexPath) { let service = fetchedResultsController.objectAtIndexPath(indexPath) as? Service performSegueWithIdentifier("servicesToService", sender: service) } override func prepareForSegue(segue: UIStoryboardSegue, sender: AnyObject?) { if segue.identifier == "servicesToService" { let controller = segue.destinationViewController as! ServiceViewController controller.service = sender as? Service } } // MARK: - Fetched Results Controller Delegate func controllerWillChangeContent(controller: NSFetchedResultsController) { tableView.beginUpdates() } func controller(controller: NSFetchedResultsController, didChangeObject anObject: AnyObject, atIndexPath indexPath: NSIndexPath?, forChangeType type: NSFetchedResultsChangeType, newIndexPath: NSIndexPath?) { switch type { case .Insert: if let indexPath = newIndexPath { tableView.insertRowsAtIndexPaths([indexPath], withRowAnimation: .Automatic) } case .Update: if let indexPath = indexPath { let service = fetchedResultsController.objectAtIndexPath(indexPath) as! Service let cell = tableView.cellForRowAtIndexPath(indexPath) cell!.textLabel?.text = service.name } case .Move: if let indexPath = indexPath { tableView.deleteRowsAtIndexPaths([indexPath], withRowAnimation: .Automatic) } if let newIndexPath = newIndexPath { tableView.insertRowsAtIndexPaths([newIndexPath], withRowAnimation: .Automatic) } case .Delete: if let indexPath = indexPath { tableView.deleteRowsAtIndexPaths([indexPath], withRowAnimation: .Automatic) } } } func controllerDidChangeContent(controller: NSFetchedResultsController) { tableView.endUpdates() } }
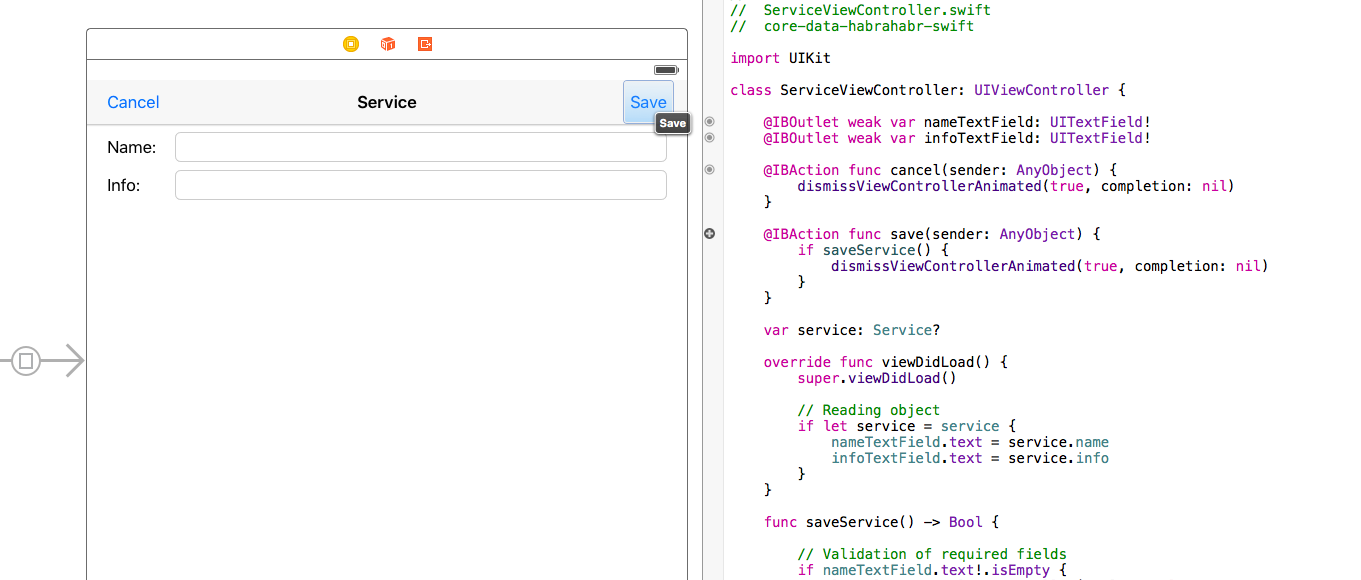
ServiceViewController.swiftモジュールテキスト
// ServiceViewController.swift // core-data-habrahabr-swift import UIKit class ServiceViewController: UIViewController { @IBOutlet weak var nameTextField: UITextField! @IBOutlet weak var infoTextField: UITextField! @IBAction func cancel(sender: AnyObject) { dismissViewControllerAnimated(true, completion: nil) } @IBAction func save(sender: AnyObject) { if saveService() { dismissViewControllerAnimated(true, completion: nil) } } var service: Service? override func viewDidLoad() { super.viewDidLoad() // Reading object if let service = service { nameTextField.text = service.name infoTextField.text = service.info } } func saveService() -> Bool { // Validation of required fields if nameTextField.text!.isEmpty { let alert = UIAlertController(title: "Validation error", message: "Input the name of the Service!", preferredStyle: .Alert) alert.addAction(UIAlertAction(title: "OK", style: .Cancel, handler: nil)) self.presentViewController(alert, animated: true, completion: nil) return false } // Creating object if service == nil { service = Service() } // Saving object if let service = service { service.name = nameTextField.text service.info = infoTextField.text CoreDataManager.instance.saveContext() } return true } }
Xcode 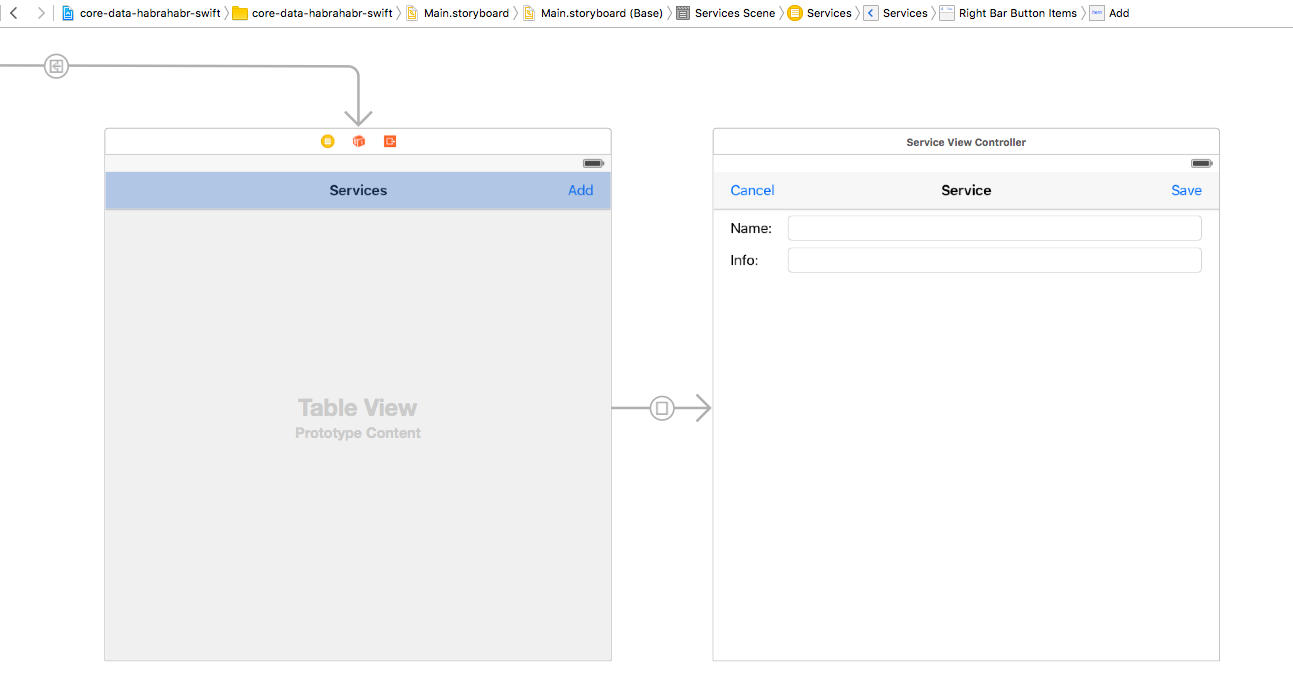
次のようなものが得られるはずです。

文書
各ドキュメントは、最初は2つの異なるエンティティによって表されるため、ドキュメントではもう少し複雑になります。次に、関係があります。つまり、何らかの方法で値の選択を保証する必要があります。
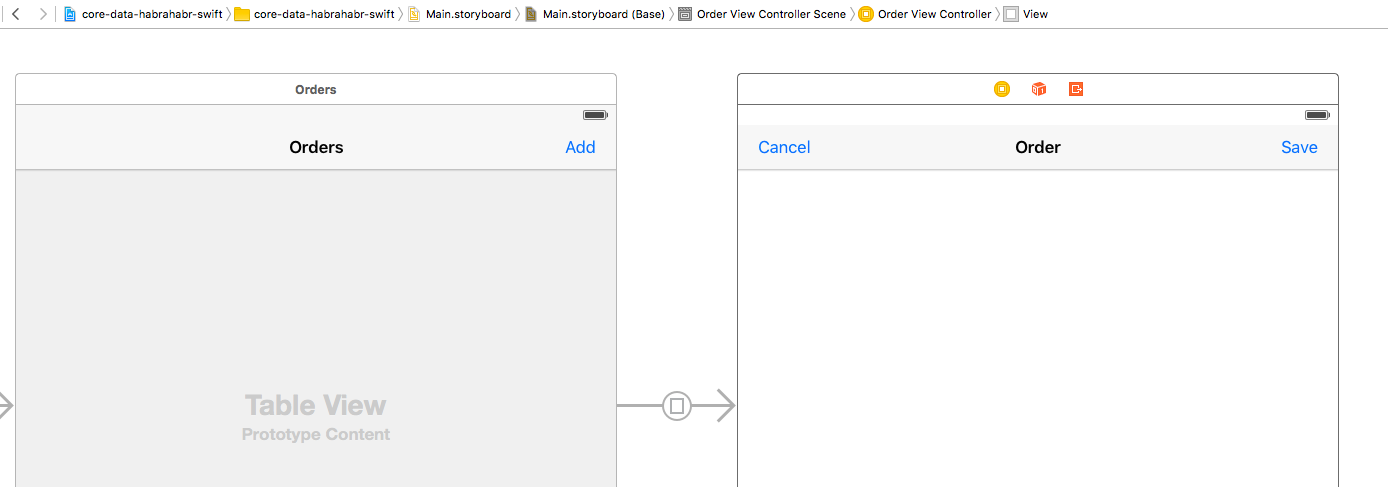
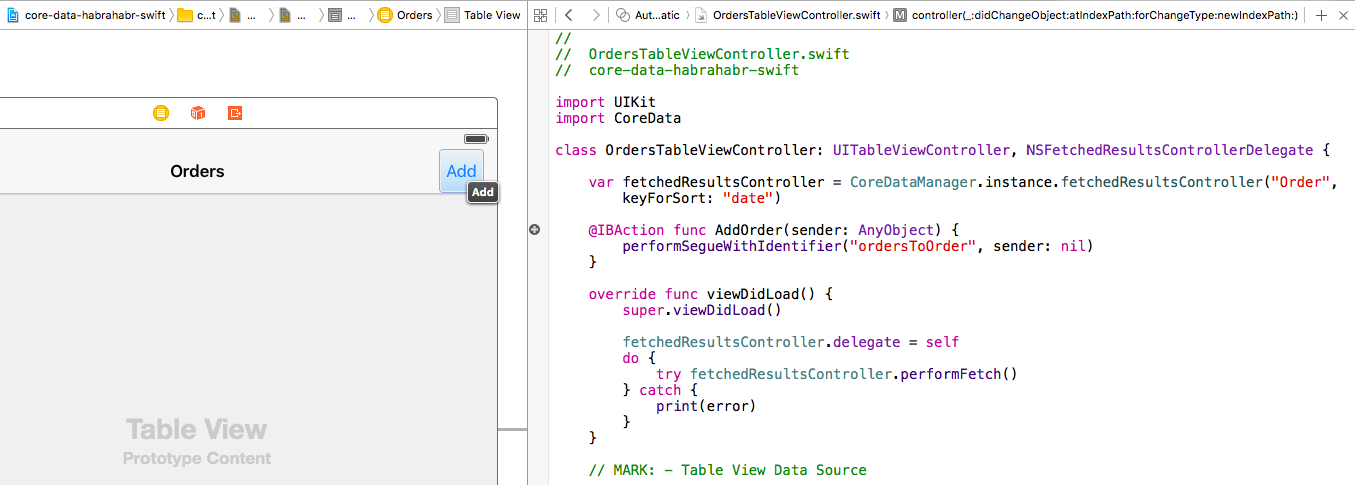
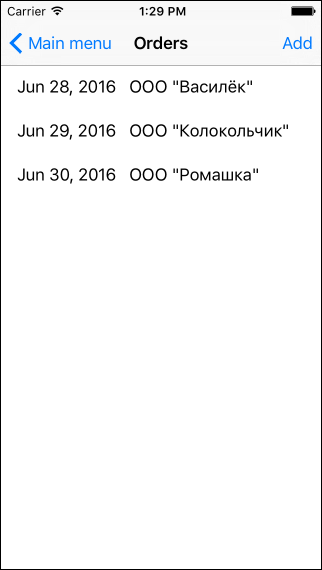
シンプルで既に馴染みのあるものから始めましょう- ドキュメントのリストとドキュメント自体を表示するView Controllerを備えたTable View Controllerを作成します(これまでは詳細なしで、空白のみ)。私はそれを繰り返さない-すべてがディレクトリと同じアルゴリズムに従って。2つの新しいコントローラーを作成します(ドキュメントのリスト用のTable View Controllerおよびドキュメント自体用のView Controller):アクションの追加、プロトコルの作成および実装:
fetchedResultsController
ドキュメント自体に空白を作成します。
モジュールテキストOrdersTableViewController.swift
// OrdersTableViewController.swift // core-data-habrahabr-swift import UIKit import CoreData class OrdersTableViewController: UITableViewController, NSFetchedResultsControllerDelegate { var fetchedResultsController = CoreDataManager.instance.fetchedResultsController("Order", keyForSort: "date") @IBAction func AddOrder(sender: AnyObject) { performSegueWithIdentifier("ordersToOrder", sender: nil) } override func viewDidLoad() { super.viewDidLoad() fetchedResultsController.delegate = self do { try fetchedResultsController.performFetch() } catch { print(error) } } // MARK: - Table View Data Source override func tableView(tableView: UITableView, numberOfRowsInSection section: Int) -> Int { if let sections = fetchedResultsController.sections { return sections[section].numberOfObjects } else { return 0 } } override func tableView(tableView: UITableView, cellForRowAtIndexPath indexPath: NSIndexPath) -> UITableViewCell { let cell = UITableViewCell() let order = fetchedResultsController.objectAtIndexPath(indexPath) as! Order configCell(cell, order: order) return cell } func configCell(cell: UITableViewCell, order: Order) { let formatter = NSDateFormatter() formatter.dateFormat = "MMM d, yyyy" let nameOfCustomer = (order.customer == nil) ? "-- Unknown --" : (order.customer!.name!) cell.textLabel?.text = formatter.stringFromDate(order.date) + "\t" + nameOfCustomer } // MARK: - Table View Delegate override func tableView(tableView: UITableView, commitEditingStyle editingStyle: UITableViewCellEditingStyle, forRowAtIndexPath indexPath: NSIndexPath) { if editingStyle == .Delete { let managedObject = fetchedResultsController.objectAtIndexPath(indexPath) as! NSManagedObject CoreDataManager.instance.managedObjectContext.deleteObject(managedObject) CoreDataManager.instance.saveContext() } } override func tableView(tableView: UITableView, didSelectRowAtIndexPath indexPath: NSIndexPath) { let order = fetchedResultsController.objectAtIndexPath(indexPath) as? Order performSegueWithIdentifier("ordersToOrder", sender: order) } override func prepareForSegue(segue: UIStoryboardSegue, sender: AnyObject?) { if segue.identifier == "ordersToOrder" { let controller = segue.destinationViewController as! OrderViewController controller.order = sender as? Order } } // MARK: - Fetched Results Controller Delegate func controllerWillChangeContent(controller: NSFetchedResultsController) { tableView.beginUpdates() } func controller(controller: NSFetchedResultsController, didChangeObject anObject: AnyObject, atIndexPath indexPath: NSIndexPath?, forChangeType type: NSFetchedResultsChangeType, newIndexPath: NSIndexPath?) { switch type { case .Insert: if let indexPath = newIndexPath { tableView.insertRowsAtIndexPaths([indexPath], withRowAnimation: .Automatic) } case .Update: if let indexPath = indexPath { let order = fetchedResultsController.objectAtIndexPath(indexPath) as! Order let cell = tableView.cellForRowAtIndexPath(indexPath) configCell(cell!, order: order) } case .Move: if let indexPath = indexPath { tableView.deleteRowsAtIndexPaths([indexPath], withRowAnimation: .Automatic) } if let newIndexPath = newIndexPath { tableView.insertRowsAtIndexPaths([newIndexPath], withRowAnimation: .Automatic) } case .Delete: if let indexPath = indexPath { tableView.deleteRowsAtIndexPaths([indexPath], withRowAnimation: .Automatic) } } } func controllerDidChangeContent(controller: NSFetchedResultsController) { tableView.endUpdates() } }
いくつかのメモ:
fetchedResultsController
ソート用のフィールドを作成するとき、「日付」として指定します。つまり、ドキュメントは日付でソートされます- 独立したヘルパー関数を使用してセルを構築します
configCell
- 文書と顧客との接続は1対1で確立されるため、セルのテキストを作成するときに行う「ドットを介して」すぐにアクセスできます。
これでドキュメントのジャーナルが完成しますが、ドキュメント自体を作成する必要があります。3つのセクション(2つのディレクトリとドキュメント)がすべて(実装の観点から)非常に類似していることが判明し、1つの普遍的なクラスとコントローラーではなく、異なるクラスとコントローラーを使用することが望ましいという疑問が生じることに注意してください。このアプローチも可能ですが、コントローラーの類似性は、実際のアプリケーションではエンティティが非常に単純なデータモデルであるため、原則として依然として大きく異なり、その結果、コントローラーとインターフェイスソリューションもまったく異なって見えます。
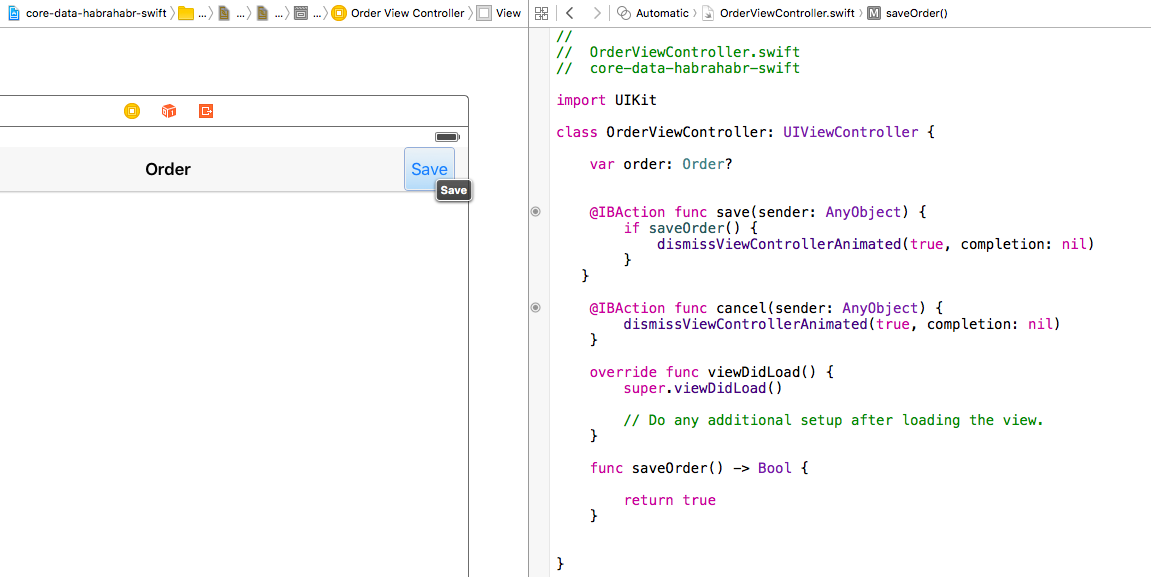
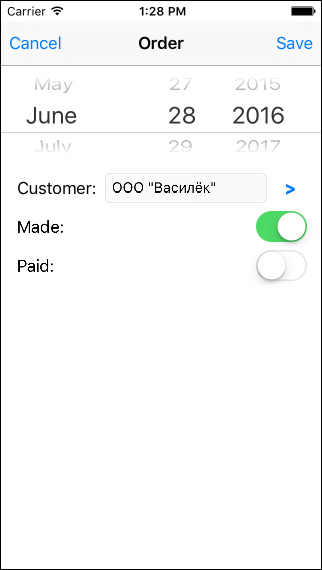
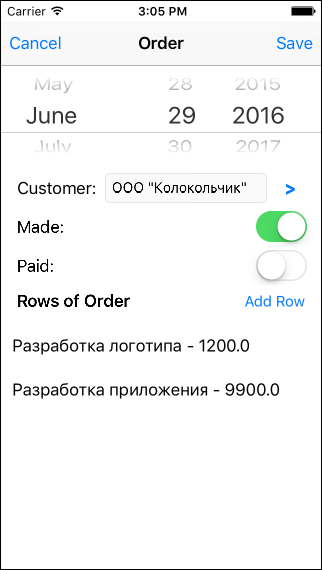
最も興味深いのは、ドキュメントです。必要なすべてのインターフェイス要素を反映してみましょう。
- ドキュメントの日付 - 日付ピッカーはこれに適しています
- — : ( )
- — Switch
- —
- — Table View . , «» , .
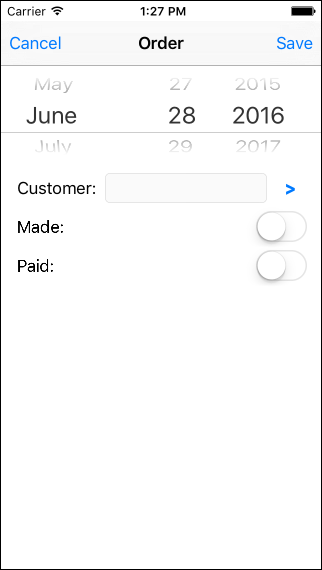
これは次のようなものになります(もちろん、デザインは最悪ですが、これは主なものではありません。
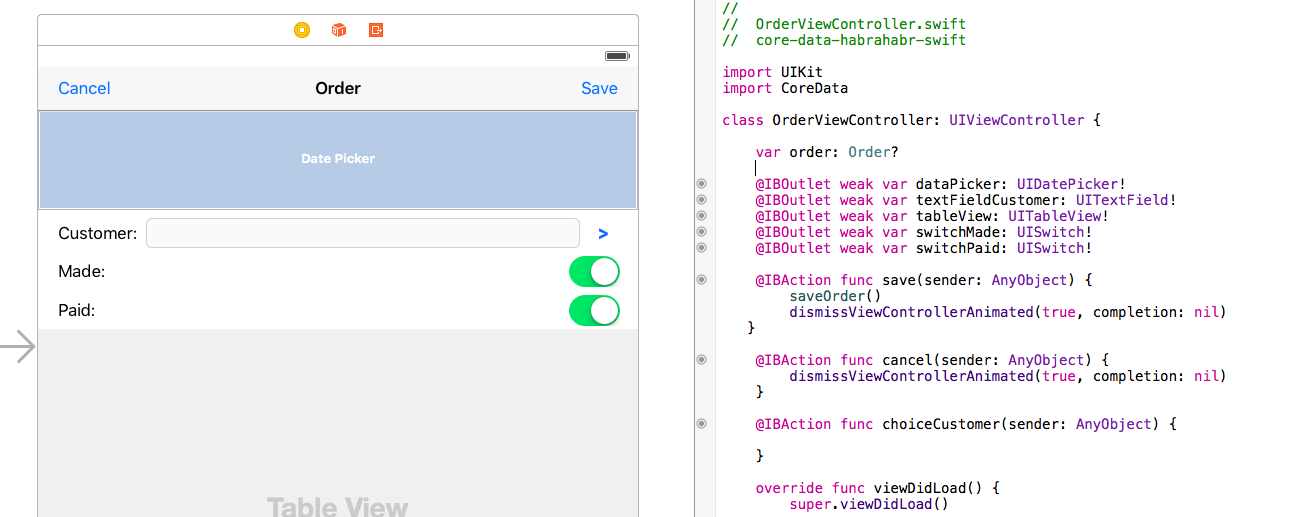
今は別の目標があります):ここで、顧客を選択するプロセスを何らかの形で整理する必要があります。選択したオブジェクトをコントローラーに戻し、ドキュメントで使用できるようにします。通常、これには委任メカニズムが使用されます。つまり、必要なプロトコルの作成とその実装です。しかし、私たちは反対に行きます-ここではクロージャーを使用してコンテキストキャプチャを使用します(このこと自体に特化した記事があるため、メカニズム自体については詳しく説明しません)。少しでも難しくはありませんが、実装はより速く、よりエレガントに見えます。
将来、顧客と同様にサービスも選択する必要があることを考慮すると、リストから値を選択するための別のユニバーサルコントローラーを作成できますが、時間を節約するために、当社が作成した既製のコントローラー(顧客のリストとサービスのリスト)まずは、参加してみましょうビューコントローラにして、当社の文書を表ビューコントローラのご利用のお客様リストセグエの。

そして、この遷移の呼び出しを顧客選択ボタンで登録します。
@IBAction func choiceCustomer(sender: AnyObject) { performSegueWithIdentifier("orderToCustomers", sender: nil) }
また、コンテキストキャプチャを実装するには、請負業者のリストの表示を担当するコントローラーに小さな変更を加える必要があります(
CustomersTableViewController.swift
)。まず、クロージャー変数を追加する必要があります。
// CustomersTableViewController.swift // core-data-habrahabr-swift import UIKit import CoreData class CustomersTableViewController: UITableViewController, NSFetchedResultsControllerDelegate { typealias Select = (Customer?) -> () var didSelect: Select?
次に、リストの現在の行を選択する手順を変更します。
override func tableView(tableView: UITableView, didSelectRowAtIndexPath indexPath: NSIndexPath) { let customer = fetchedResultsController.objectAtIndexPath(indexPath) as? Customer if let dSelect = self.didSelect { dSelect(customer) dismissViewControllerAnimated(true, completion: nil) } else { performSegueWithIdentifier("customersToCustomer", sender: customer) } }
ロジックに注意してください。オプションのクロージャー変数を使用します。定義されていない場合、リストは通常どおり機能します。データを追加および編集するモードで、定義されている場合、リストはドキュメントから呼び出されて顧客を選択します。
ドキュメントコントローラーに戻り、クロージャーを実装します。しかしその前に、ドキュメントをロードして保存する手順を定義します。ここでの作業のロジックは、ディレクトリの操作とは少し異なります。覚えているように、新しいドキュメントを作成するときは、ビューを開くときにnilとドキュメントオブジェクト自体を渡しますまだです。ディレクトリを操作するときにこれが気にならず、書き込む直前にオブジェクト自体を作成した場合は、表部分の行を編集するときに特定の文書へのリンクを提供する必要があるため、文書に対してすぐに作成します。原則として、統一のために参考書に同じアプローチを使用することを妨げるものは何もありませんが、異なるアプローチを示すために、両方のオプションを残します。
したがって、データをフォーム要素に「読み込む」手順は次のようになります。
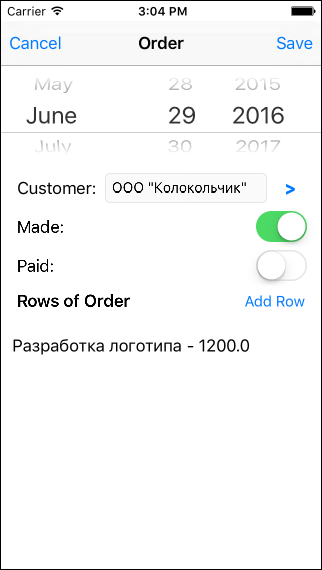
override func viewDidLoad() { super.viewDidLoad() // Creating object if order == nil { order = Order() order?.date = NSDate() } if let order = order { dataPicker.date = order.date switchMade.on = order.made switchPaid.on = order.paid textFieldCustomer.text = order.customer?.name } }
注:オブジェクトを作成するとき、私はすぐにドキュメントに現在の日付を割り当てました(コンストラクタ
NSDate()
は現在の日付/時刻を返します)。データ記録手順:
func saveOrder() { if let order = order { order.date = dataPicker.date order.made = switchMade.on order.paid = switchPaid.on CoreDataManager.instance.saveContext() } }
最後に、Customerセレクションのクロージャを実装しましょう。これは非常に簡単です。
override func prepareForSegue(segue: UIStoryboardSegue, sender: AnyObject?) { if segue.identifier == "orderToCustomers" { let viewController = segue.destinationViewController as! CustomersTableViewController viewController.didSelect = { [unowned self] (customer) in if let customer = customer { self.order?.customer = customer self.textFieldCustomer.text = customer.name! } } } }
Table View Controllerに切り替えると、それに応じてハンドラーを定義します。このハンドラーは、顧客を選択するときに、それをドキュメントオブジェクトに割り当て、対応するドキュメントコントロールに顧客の名前を表示します。
このメカニズムでは、顧客の選択が完了します。すべてが正常に機能することを確認しましょう。
次に、表形式のセクションに進みましょう。ここですべてがおなじみのはずです。作成する必要があることは明らかである
fetchedResultsController
とプロトコルを実装する
NSFetchedResultsControllerDelegate
、
UITableViewDataSource
と
UITableViewDelegate
。
ただし、使用する場合はしばらくお待ちください
fetchedResultsController
前のものと同様に作成されます-実際には表部分のすべての行を取得しますが、これらはすべてのドキュメントの行であり、ユーザーが作業している現在のドキュメントの行のみが必要です。
これを行うには、適切なフィルターをに追加する必要があり
fetchRequest
ます。これは、述語メカニズム(
NSPredicate
)によって行われます。これについては記事の最後でもう少し説明します
Order.swift
が、とりあえず、フォームのドキュメントの表部分を返すドキュメント()のクラス関数を追加しましょう
NSFetchedResultsController
。
class func getRowsOfOrder(order: Order) -> NSFetchedResultsController { let fetchRequest = NSFetchRequest(entityName: "RowOfOrder") let sortDescriptor = NSSortDescriptor(key: "service.name", ascending: true) fetchRequest.sortDescriptors = [sortDescriptor] let predicate = NSPredicate(format: "%K == %@", "order", order) fetchRequest.predicate = predicate let fetchedResultsController = NSFetchedResultsController(fetchRequest: fetchRequest, managedObjectContext: CoreDataManager.instance.managedObjectContext, sectionNameKeyPath: nil, cacheName: nil) return fetchedResultsController }
次のコード行に注意してください。
let sortDescriptor = NSSortDescriptor(key: "service.name", ascending: true)
ここでは、オブジェクトのネストされたフィールドを「ポイントを介して」ソートキーとして設定します。それは素晴らしい機会ではありませんか?
さて、再び
OrderViewController.swift
、テーブルパーツを含む変数を宣言し、View Controllerの読み込み時にドキュメント自体が初期化された後に初期化する必要があります。
// OrderViewController.swift // core-data-habrahabr-swift import UIKit import CoreData class OrderViewController: UIViewController { var order: Order? var table: NSFetchedResultsController? //… override func viewDidLoad() { super.viewDidLoad() // Creating object if order == nil { order = Order() order?.date = NSDate() } if let order = order { dataPicker.date = order.date switchMade.on = order.made switchPaid.on = order.paid textFieldCustomer.text = order.customer?.name table = Order.getRowsOfOrder(order) table!.delegate = self do { try table!.performFetch() } catch { print(error) } } }
すぐに新しいView Controllerを作成して、ドキュメントの行データを表示し、新しいクラスを割り当て
RowOfOrderViewController
ます。必要なナビゲーションおよび制御要素OutletおよびActionを追加して、オブジェクトの読み取りおよび書き込みの手順を実装します。また、金額入力フィールドには、テンキーパッド(
Keyboard Type = Number Pad
)を設定します。
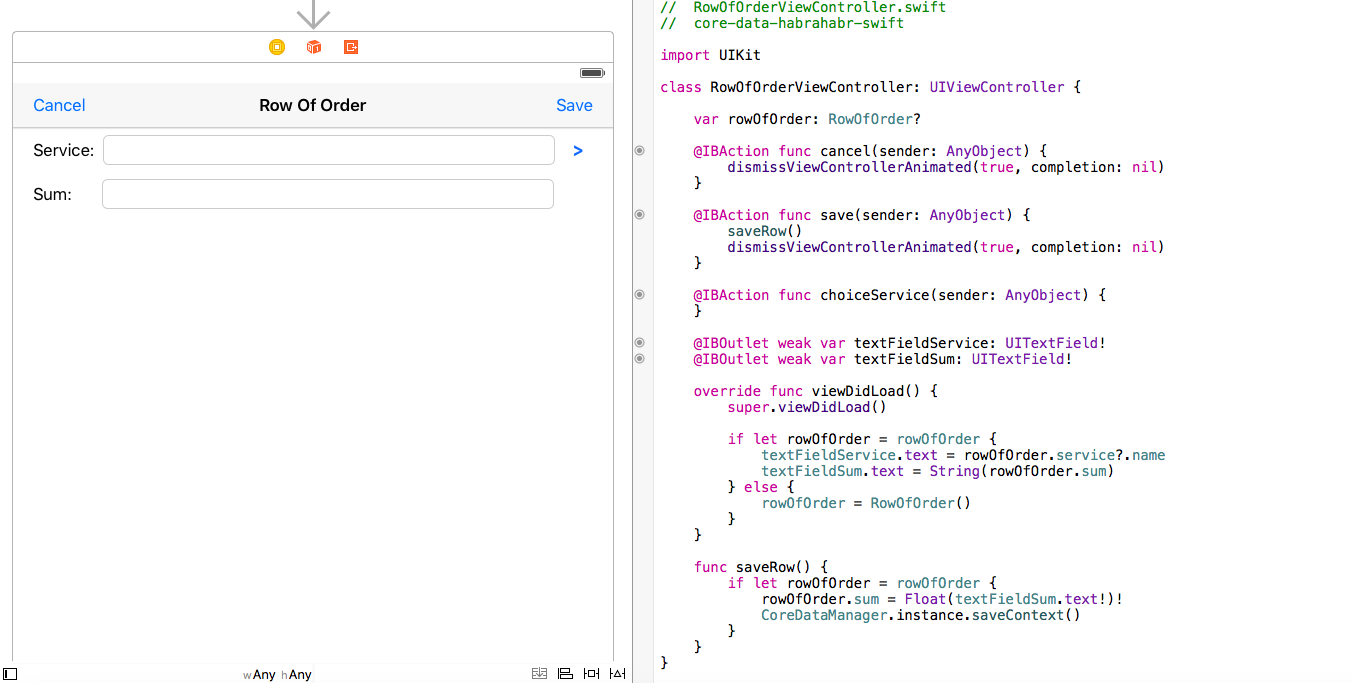
次に、orderToRowOfOrderという名前のSegueを追加して(ドキュメントと作成したばかりのView Controllerを接続します)、ドキュメントに必要なプロトコルのデリゲートを実装します。すべてが以前のコントローラーと同じであり、ここで根本的に新しいものは何もありません(モジュールの全文を以下に示します)。
また、文書の表セクションに行を追加するボタンを追加しましょう。注意点が1つあります。以前に新しいオブジェクトを作成するときにnilが渡され、オブジェクト自体が別のコントローラーで作成された場合、表セクションの行の場合、何らかの方法で特定のドキュメントを「登録」する必要があります。これは、プログラムのロジックに応じて、さまざまな方法で実行できます。最も明確にする-nilではなく、オブジェクト(
RowOfOrder
)を渡します。オブジェクト()を作成し、すぐにドキュメントへのリンクを設定します。
@IBAction func AddRowOfOrder(sender: AnyObject) { if let order = order { let newRowOfOrder = RowOfOrder() newRowOfOrder.order = order performSegueWithIdentifier("orderToRowOfOrder", sender: newRowOfOrder) } }
注:データモデル内のエンティティ間に指定された逆の関係があったため、作成を心配する必要はありません。自動的に追加されます。

モジュールテキストOrderViewController.swift
// OrderViewController.swift // core-data-habrahabr-swift import UIKit import CoreData class OrderViewController: UIViewController, NSFetchedResultsControllerDelegate, UITableViewDataSource, UITableViewDelegate { var order: Order? var table: NSFetchedResultsController? @IBOutlet weak var dataPicker: UIDatePicker! @IBOutlet weak var textFieldCustomer: UITextField! @IBOutlet weak var tableView: UITableView! @IBAction func save(sender: AnyObject) { saveOrder() dismissViewControllerAnimated(true, completion: nil) } @IBAction func cancel(sender: AnyObject) { dismissViewControllerAnimated(true, completion: nil) } @IBAction func choiceCustomer(sender: AnyObject) { performSegueWithIdentifier("orderToCustomers", sender: nil) } @IBAction func AddRowOfOrder(sender: AnyObject) { if let order = order { let newRowOfOrder = RowOfOrder() newRowOfOrder.order = order performSegueWithIdentifier("orderToRowOfOrder", sender: newRowOfOrder) } } override func viewDidLoad() { super.viewDidLoad() tableView.dataSource = self tableView.delegate = self // Creating object if order == nil { order = Order() order!.date = NSDate() } if let order = order { dataPicker.date = order.date switchMade.on = order.made switchPaid.on = order.paid textFieldCustomer.text = order.customer?.name table = Order.getRowsOfOrder(order) table!.delegate = self do { try table!.performFetch() } catch { print(error) } } } func saveOrder() { if let order = order { order.date = dataPicker.date order.made = switchMade.on order.paid = switchPaid.on CoreDataManager.instance.saveContext() } } override func prepareForSegue(segue: UIStoryboardSegue, sender: AnyObject?) { switch segue.identifier! { case "orderToCustomers": let viewController = segue.destinationViewController as! CustomersTableViewController viewController.didSelect = { [unowned self] (customer) in if let customer = customer { self.order?.customer = customer self.textFieldCustomer.text = customer.name! } } case "orderToRowOfOrder": let controller = segue.destinationViewController as! RowOfOrderViewController controller.rowOfOrder = sender as? RowOfOrder default: break } } // MARK: - Table View Data Source func tableView(tableView: UITableView, numberOfRowsInSection section: Int) -> Int { if let sections = table?.sections { return sections[section].numberOfObjects } else { return 0 } } func tableView(tableView: UITableView, cellForRowAtIndexPath indexPath: NSIndexPath) -> UITableViewCell { let rowOfOrder = table?.objectAtIndexPath(indexPath) as! RowOfOrder let cell = UITableViewCell() let nameOfService = (rowOfOrder.service == nil) ? "-- Unknown --" : (rowOfOrder.service!.name!) cell.textLabel?.text = nameOfService + " - " + String(rowOfOrder.sum) return cell } // MARK: - Table View Delegate func tableView(tableView: UITableView, commitEditingStyle editingStyle: UITableViewCellEditingStyle, forRowAtIndexPath indexPath: NSIndexPath) { if editingStyle == .Delete { let managedObject = table?.objectAtIndexPath(indexPath) as! NSManagedObject CoreDataManager.instance.managedObjectContext.deleteObject(managedObject) CoreDataManager.instance.saveContext() } } func tableView(tableView: UITableView, didSelectRowAtIndexPath indexPath: NSIndexPath) { let rowOfOrder = table?.objectAtIndexPath(indexPath) as! RowOfOrder performSegueWithIdentifier("orderToRowOfOrder", sender: rowOfOrder) } // MARK: - Fetched Results Controller Delegate func controllerWillChangeContent(controller: NSFetchedResultsController) { tableView.beginUpdates() } func controller(controller: NSFetchedResultsController, didChangeObject anObject: AnyObject, atIndexPath indexPath: NSIndexPath?, forChangeType type: NSFetchedResultsChangeType, newIndexPath: NSIndexPath?) { switch type { case .Insert: if let indexPath = newIndexPath { tableView.insertRowsAtIndexPaths([indexPath], withRowAnimation: .Automatic) } case .Update: if let indexPath = indexPath { let rowOfOrder = table?.objectAtIndexPath(indexPath) as! RowOfOrder let cell = tableView.cellForRowAtIndexPath(indexPath)! let nameOfService = (rowOfOrder.service == nil) ? "-- Unknown --" : (rowOfOrder.service!.name!) cell.textLabel?.text = nameOfService + " - " + String(rowOfOrder.sum) } case .Move: if let indexPath = indexPath { tableView.deleteRowsAtIndexPaths([indexPath], withRowAnimation: .Automatic) } if let newIndexPath = newIndexPath { tableView.insertRowsAtIndexPaths([newIndexPath], withRowAnimation: .Automatic) } case .Delete: if let indexPath = indexPath { tableView.deleteRowsAtIndexPaths([indexPath], withRowAnimation: .Automatic) } } } func controllerDidChangeContent(controller: NSFetchedResultsController) { tableView.endUpdates() } }
これで、ドキュメント自体との直接的な作業が完了しました。ドキュメントの行に情報を表示するView Controllerで終了します。ここでは、ドキュメントヘッダーを操作するときとまったく同じロジックを使用します。また、閉鎖によるコンテキストのキャプチャを通じて、サービスの選択を行います。
まず、View Controllerをドキュメントの行に接続し、Table View Controllerをサービスのリストに接続する名前のセグエを追加します。Table View Controllerを少し改良して、クロージャーを使用できるようにする必要があります。まず、クロージャー変数を追加します。
rowOfOrderToServices
// ServicesTableViewController.swift // core-data-habrahabr-swift import UIKit import CoreData class ServicesTableViewController: UITableViewController, NSFetchedResultsControllerDelegate { typealias Select = (Service?) -> () var didSelect: Select? // …
次に、リスト行選択機能を変更します。
override func tableView(tableView: UITableView, didSelectRowAtIndexPath indexPath: NSIndexPath) { let service = fetchedResultsController.objectAtIndexPath(indexPath) as? Service if let dSelect = self.didSelect { dSelect(service) dismissViewControllerAnimated(true, completion: nil) } else { performSegueWithIdentifier("servicesToService", sender: service) } }
RowOfOrderViewController
クロージャに戻って実装しましょう。ここでは、すべてが顧客を選択するときと同じ原理に基づいています。
@IBAction func choiceService(sender: AnyObject) { performSegueWithIdentifier("rowOfOrderToServices", sender: nil) } override func prepareForSegue(segue: UIStoryboardSegue, sender: AnyObject?) { if segue.identifier == "rowOfOrderToServices" { let controller = segue.destinationViewController as! ServicesTableViewController controller.didSelect = {[unowned self] (service) in if let service = service { self.rowOfOrder!.service = service self.textFieldService.text = service.name } } } }
モジュールテキストRowOfOrderViewController.swift
// RowOfOrderViewController.swift // core-data-habrahabr-swift import UIKit class RowOfOrderViewController: UIViewController { var rowOfOrder: RowOfOrder? @IBAction func cancel(sender: AnyObject) { dismissViewControllerAnimated(true, completion: nil) } @IBAction func save(sender: AnyObject) { saveRow() dismissViewControllerAnimated(true, completion: nil) } @IBAction func choiceService(sender: AnyObject) { performSegueWithIdentifier("rowOfOrderToServices", sender: nil) } override func prepareForSegue(segue: UIStoryboardSegue, sender: AnyObject?) { if segue.identifier == "rowOfOrderToServices" { let controller = segue.destinationViewController as! ServicesTableViewController controller.didSelect = {[unowned self] (service) in if let service = service { self.rowOfOrder!.service = service self.textFieldService.text = service.name } } } } @IBOutlet weak var textFieldService: UITextField! @IBOutlet weak var textFieldSum: UITextField! override func viewDidLoad() { super.viewDidLoad() if let rowOfOrder = rowOfOrder { textFieldService.text = rowOfOrder.service?.name textFieldSum.text = String(rowOfOrder.sum) } else { rowOfOrder = RowOfOrder() } } func saveRow() { if let rowOfOrder = rowOfOrder { rowOfOrder.sum = Float(textFieldSum.text!)! CoreDataManager.instance.saveContext() } } }
実際、それだけです!これでドキュメントの作業は完了です。すべてを確認しましょう。


重要なお知らせ!
ここでは、[ キャンセル ]ボタンのクリックを処理しなかったため、次の状況が発生しました。新しいドキュメントを作成し、保存についての考えを変更して[ キャンセル]をクリックすると、現在のコンテキストCore Dataから、ドキュメントジャーナルで「ドラフト」としてハングしたままになります。誰もそれを削除しませんでした。そこに戻って記入を続けることも、強制的に削除することもできます。ただし、メインメニューに戻ってドキュメントジャーナルを再度開くと、下書きはありません。ジャーナルを開くとストレージからデータが読み取られるためです。同じことが文書行にも当てはまります。私たちのプログラムにとって、この振る舞いは少なくとも論理的に思えます。しかし、おそらくこの振る舞いは、あなたがあなたのプログラムで望んでいることとはまったく異なります。この場合、そのようなイベントに応答するためのロジックを実装する必要があります。いずれにしても、プログラムの動作はユーザーにとって完全に明確で透過的であることを忘れないでください。
ドキュメントレポート
このセクションは非常に小さくなります(前のセクションと比較)。もう少し
NSFetchRequest
詳しく知ることができたので、詳しく見ていきましょう。すぐに新しいTable View Controllerを作成し、それに
ReportTableViewController
基づいて新しいクラスを作成して割り当て
UITableViewController
ます。完了した日付でソートされたリストを表示する単純なレポートの例

を使用することを検討
NSFetchRequest
しますが、有料のドキュメントは使用しません。これを行うには、次の2つの強力なツールを使用します
NSFetchRequest
。
-
NSSortDescriptor
-データを並べ替える -
NSPredicate
-さまざまな選択条件(フィルター)を設定します。
データのソートから始めましょう。次の定義を見てください。
var fetchRequest = NSFetchRequest(entityName: "Order") // Sort Descriptor let sortDescriptor = NSSortDescriptor(key: "date", ascending: true) fetchRequest.sortDescriptors = [sortDescriptor] return fetchRequest }()
ここで、新しいデータソートオブジェクト(
NSSortDescriptor
)を作成し、コンストラクタにソートフィールドの名前を含む文字列を渡し、目的のソート方向を示します(
ascending
:
true
-昇順、
false
-降順)。
NSFetchRequest
ソートオブジェクトを配列としてオブジェクトに渡すことに注意してください。これはどういう意味ですか?はい、それだけです-配列として複数の並べ替えルールを同時に渡すことができます。
また、並べ替えフィールドの品質は、「ポイントを介して」複合フィールドを指定できることを思い出します(これは、ドキュメントの表部分の行を並べ替えたときに行いました)。日付内の顧客の名前でドキュメントをソートするために、2番目のソートオブジェクトを追加しましょう。
var fetchRequest:NSFetchRequest = { var fetchRequest = NSFetchRequest(entityName: "Order") // Sort Descriptor let sortDescriptor1 = NSSortDescriptor(key: "date", ascending: true) let sortDescriptor2 = NSSortDescriptor(key: "customer.name", ascending: true) fetchRequest.sortDescriptors = [sortDescriptor1, sortDescriptor2] return fetchRequest }()
実際には、これでソートがすべて完了しました。私があなたに思い出させる唯一のことは、あなたが積極的にソートを使用している場合、使用されているフィールドのインデックス付けの妥当性について考えることを忘れないでください。
述語メカニズムに渡します。 SQLに似たクエリのように見えるかなり単純な構文を使用します。述語は次のように作成および使用されます。
// Predicate let predicate = NSPredicate(format: "%K == %@", "made", true) fetchRequest.predicate = predicate
書式文字列がコンストラクタに渡され、その後に引数が続きます。フォーマット文字列に応じて、渡されるパラメーターの数は異なる場合があります。書式文字列を詳しく見てみましょう-独自のクエリ言語のようなものを使用します。 " %K "-オブジェクトのフィールド(プロパティ)の名前を意味します。 " %@ "-このフィールドの値。以下は、厳密に同じ順序での引数(選択で置き換える必要のある実際の値)です。つまり、このフォーマット文字列は次を意味します:Order.made == true。
あなたがいないだけで、操作を使用することができます==が、<、> =、!=などなど。また、CONTAINS、LIKE、MATCHES、BEGINSWITH、ENDSWITH、およびANDやORなどのキーワードを使用することもできます。正規表現を使用することもできます。これは本当に非常に強力なツールです。ここではすべての可能なオプションをリストしません;それらは公式のAppleドキュメントによく表されています。フィールド名の引数として、次のようにできます。
NSSortDescriptor
、複合フィールド(「ポイントツーポイント」)を使用します。ただし、複数の述語を同時に使用することはできませんが、代わりに、単一の述語でより複雑な条件を使用する必要があります。これを念頭に置いて、レポートの最終的な述語の定義は次のようになります。
var fetchRequest:NSFetchRequest = { var fetchRequest = NSFetchRequest(entityName: "Order") // Sort Descriptor let sortDescriptor1 = NSSortDescriptor(key: "date", ascending: true) let sortDescriptor2 = NSSortDescriptor(key: "customer.name", ascending: true) fetchRequest.sortDescriptors = [sortDescriptor1, sortDescriptor2] // Predicate let predicate = NSPredicate(format: "%K == %@ AND %K == %@", "made", true, "paid", false) fetchRequest.predicate = predicate return fetchRequest }()
UITableViewDataSourceプロトコルを実装するだけであり(これは既に知っています。ここでは新しいことは何もありません)、確認することができます。
ReportTableViewController.swiftモジュールテキスト
// ReportTableViewController.swift // core-data-habrahabr-swift import UIKit import CoreData class ReportTableViewController: UITableViewController { var fetchRequest:NSFetchRequest = { var fetchRequest = NSFetchRequest(entityName: "Order") // Sort Descriptor let sortDescriptor1 = NSSortDescriptor(key: "date", ascending: true) let sortDescriptor2 = NSSortDescriptor(key: "customer.name", ascending: true) fetchRequest.sortDescriptors = [sortDescriptor1, sortDescriptor2] // Predicate let predicate = NSPredicate(format: "%K == %@ AND %K == %@", "made", true, "paid", false) fetchRequest.predicate = predicate return fetchRequest }() var report: [Order]? override func viewDidLoad() { super.viewDidLoad() do { report = try CoreDataManager.instance.managedObjectContext.executeFetchRequest(fetchRequest) as? [Order] } catch { print(error) } } // MARK: - Table View Data Source override func numberOfSectionsInTableView(tableView: UITableView) -> Int { return 1 } override func tableView(tableView: UITableView, numberOfRowsInSection section: Int) -> Int { if let report = report { return report.count } else { return 0 } } override func tableView(tableView: UITableView, cellForRowAtIndexPath indexPath: NSIndexPath) -> UITableViewCell { let cell = UITableViewCell() if let report = report { let order = report[indexPath.row] let formatter = NSDateFormatter() formatter.dateFormat = "MMM d, yyyy" let nameOfCustomer = (order.customer == nil) ? "-- Unknown --" : (order.customer!.name!) cell.textLabel?.text = formatter.stringFromDate(order.date) + "\t" + nameOfCustomer } return cell } }
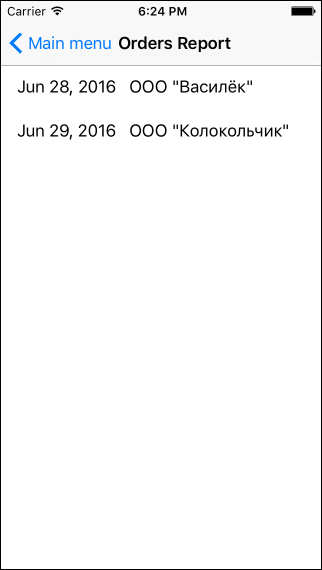
すべてが正常に機能し、指定された条件に従ってドキュメントのリストを取得しました。
ストーリーボードの最終ビュー 
おわりに
例として単純なアプリケーションを使用
Core Data
して、かなり短い期間で完全に機能するアプリケーションを操作および受信するすべての主要なポイントを調べました。もちろん、デザインには少なくとも改善が必要ですが、この出版物には別の目的がありました。データウェアハウスの組織化や一貫性のチェックなど、データを使用したすべての直接作業は「裏側」に隠されていることを改めて注目する価値
Core Data
があります。実際にはそれについては考えませんでしたが、通常のOOPオブジェクトと同様に管理対象オブジェクトで作業しました 私の意見では、iOS開発者に必要な、で
作業するための基本的なテクニックを非常に明確に説明できることを願ってい
Core Data
ます。あなたが恐れることをやめ、少なくとも少しは恋に落ちたら素晴らしいことです
Core Data
。ご清聴ありがとうございました。
このプロジェクトはgithubにあります