名前が示すように、この記事ではAndroid用のReact Nativeアプリケーションを作成するプロセスを検討します。 テキストボックスがあれば簡単です。 そこで、ポケモンの1つの名前を入力する必要があります。アプリケーションは、受信したデータに関する詳細情報を表示し、テキスト読み上げ機能を使用して読み取ります。
Android SDKのインストール、 React Native、プロジェクトの作成、その他の開発ツールについては触れません。 これが、React Nativeを使用してアプリケーションを作成する初めての経験であると想定するため、各コードを詳しく見ていきます。
サーバー作成
まず、アプリケーションのサーバーコンポーネントを作成する必要があります。 PHPで作成し、CouchDBはデータベースとして機能します。 インストール手順: PHPおよびCouchDB インストールと構成の後、データベースが実行されていることを確認する必要があります。 これを行うには、
curl localhost:5984
を実行し、次のようなものを取得します。
{"couchdb":"Welcome","uuid":"xxxxxxxxxxxxxxxx","version":"1.6.0","vendor":{"name":"Ubuntu","version":"15.10"}}
CouchDB管理システムであるFutonにアクセスするには、 http:// localhost:5984 / _utilsをブラウザーで開きます 。 [ データベースの作成]をクリックして、 Pokemon APIから受信した詳細データを保存するデータベースを作成します。 ベースpokedexに名前を付け 、[ 作成 ]をクリックします 。 React NativeからAPIに直接アクセスできますが、ネットワークトラフィックが増加します。 また、データベースにすべてを保存すると、1回の要求でいつでもデータを取得できます。
データ保存
次に、サーバーコンポーネントの作成に直接進みます。 Webサーバーフォルダー内に作業フォルダーを作成し、その中にcomposer.jsonファイルを作成してコードを追加します。
{ "require": { "doctrine/couchdb-odm": "@dev" }, "minimum-stability": "dev", "prefer-stable": true }
これは、
doctrine/couchdb-odm
ライブラリーがプロジェクトの一部になったことを意味します。 彼女は、PHPでCouchDBを操作するのを手伝ってくれます。 それをインストールするには、
composer install
ます。
作業フォルダー内にpokemon.phpファイルを作成し、コードを貼り付けます:
<?php require 'vendor/autoload.php'; set_time_limit(0); $client = \Doctrine\CouchDB\CouchDBClient::create(array('dbname' => 'pokedex')); $pokedex = file_get_contents('http://pokeapi.co/api/v1/pokedex/1/'); $pokedex_data = json_decode($pokedex, true); foreach($pokedex_data['pokemon'] as $row){ //get details $pokemon = file_get_contents('http://pokeapi.co/' . $row['resource_uri']); $pokemon = json_decode($pokemon, true); //get description $pokemon_description = file_get_contents('http://pokeapi.co/' . $pokemon['descriptions'][0]['resource_uri']); $pokemon['description'] = json_decode($pokemon_description, true)['description']; //get sprites $pokemon_sprites = file_get_contents('http://pokeapi.co' . $pokemon['sprites'][0]['resource_uri']); $pokemon_sprites = json_decode($pokemon_sprites, true); $pokemon['small_photo'] = 'http://pokeapi.co' . $pokemon_sprites['image']; $client->postDocument($pokemon); }
上記のコードを検討してください。 まず、自動ロードファイルが追加されます。 Composerを使用してインストールしたすべてのライブラリを自動的にロードします。 次に、
set_time_limit
ゼロに
set_time_limit
れます。 実際、PHPスクリプトでは、デフォルトで実行時間が制限され、この時間の終わりにスクリプトが中断されます。 上記のパラメーターをゼロにして、時間制限をオフにします。
この記事の執筆時点では721のポケモンがあり、それぞれについて3つのHTTPリクエストを完了して、詳細なデータ、説明、スプライトを取得する必要があります。
<?php require 'vendor/autoload.php'; set_time_limit(0);
CouchDBクライアントを初期化し、データベースの名前を入力します。
<?php $client = \Doctrine\CouchDB\CouchDBClient::create(array('dbname' => 'pokedex'));
file_get_contents
関数を使用して、APIからポケモンの完全なリストを取得します。 データはJSON形式で返されるため、さらに作業を進めるには、データを配列に変換する必要があります。
<?php $pokedex = file_get_contents('http://pokeapi.co/api/v1/pokedex/1/'); $pokedex_data = json_decode($pokedex, true);
すべての結果に対してサイクルを実行します。
<?php foreach($pokedex_data['pokemon'] as $row){ ... }
各ポケモンのループ内で、
resource_uri
を使用し、それを使用して詳細データを返すURLを作成します。
<?php //get details $pokemon = file_get_contents('http://pokeapi.co/' . $row['resource_uri']); $pokemon = json_decode($pokemon, true);
前のリクエストに応じて受信したデータを使用して、ポケモンとそのスプライトの説明のリクエストを作成します。
<?php //get description $pokemon_description = file_get_contents('http://pokeapi.co/' . $pokemon['descriptions'][0]['resource_uri']); $pokemon['description'] = json_decode($pokemon_description, true)['description']; //get sprites $pokemon_sprites = file_get_contents('http://pokeapi.co' . $pokemon['sprites'][0]['resource_uri']); $pokemon_sprites = json_decode($pokemon_sprites, true); $pokemon['small_photo'] = 'http://pokeapi.co' . $pokemon_sprites['image'];
受信した情報をCouchDBに保存します。
<?php $client->postDocument($pokemon);
保存を開始するには、ブラウザーでpokemon.phpファイルを開きます。 これには少し時間がかかりますが、今のところは次のステップに進むことができます。
データ抽出
CouchDBからデータを取得するには、ビューを作成する必要があります。 作成したデータベースに移動し、ドロップダウンメニューで[ 表示 ]をクリックし、[ 一時ビュー ]を選択します。 マップ関数のテキストボックスの下に、コードを貼り付けます。
function(doc) { emit(doc.name, null); }
次に、「 実行」ボタンをクリックして、データの表示方法を確認します。
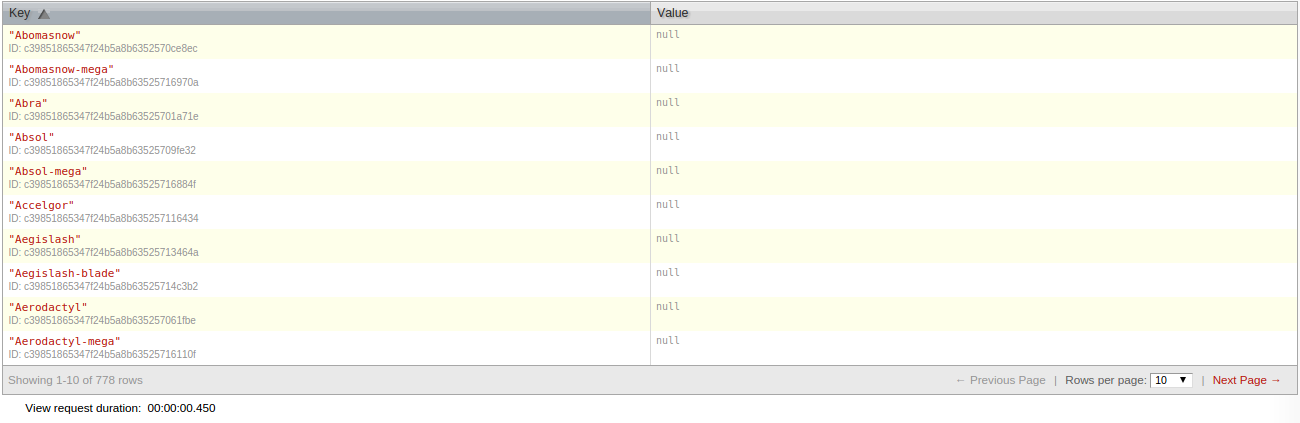
[名前を付けて保存]をクリックし、[ デザインドキュメント] フィールドにポケモンベースの名前を入力し、 [ビュー名] フィールドに by_nameを入力します 。 作業フォルダーに戻り、 get.phpファイルを作成してコードを入力します。
<?php require 'vendor/autoload.php'; $client = \Doctrine\CouchDB\CouchDBClient::create(array('dbname' => 'pokedex')); $pokemon = $_GET['name']; $query = $client->createViewQuery('pokemon', 'by_name'); $query->setKey($pokemon); $query->setReduce(false); $query->setIncludeDocs(true); $result = $query->execute(); if(!empty($result[0])){ $data = $result[0]; echo json_encode($data); }else{ $result = array('no_result' => true); echo json_encode($result); }
それを分解してみましょう。 まず、アプリケーションから送信されたポケモンの名前を取得します。
<?php $pokemon = $_GET['name'];
createViewQuery
メソッドを呼び出すことにより、ビュー
createViewQuery
作成し、
Design document
View name
と
View name
を設定し、オプションの値を決定します。 setKeyメソッドは、リクエストを記述するために使用されます。 ビューから受信したデータのフィルタリングは
setReduce
を使用して実行され、
setIncludeDocs
は返された結果ごとに特定のドキュメントを追加します。 上のスクリーンショットからドキュメントが欠落していることに気づいたかもしれません。 実際には、
setIncludeDocs
が
setIncludeDocs
れ、引数が
true
場合、デフォルトのドキュメントは、 pokemon.phpファイルにアクセスしたときに保存されたドキュメントです。
<?php $query = $client->createViewQuery('pokemon', 'by_name'); // design document view name $query->setKey($pokemon); // pokemon $query->setReduce(false); // reduce $query->setIncludeDocs(true); // $result = $query->execute(); //
次に、結果を確認する必要があります。 存在する場合はJSONバージョンを返し、存在しない場合はデータの不足に関するメッセージを返します。
<?php if(!empty($result[0])){ $data = $result[0]; echo json_encode($data); }else{ $result = array('no_result' => true); echo json_encode($result); }
ローカルマシンで作業している場合は、 Ngrokを使用してサーバーのインターネットアクセスを開くことができます。 または、内部IPを使用します。後で、アプリケーションで使用されます。
アプリケーション作成
依存関係のインストール
React Nativeで新しいプロジェクトを初期化することから始めましょう。
react-native init Pokedex
操作が完了したら、npmを使用して依存関係をインストールします。
cd Pokedex
npm install lodash react-native-android-speech react-native-gifted-spinner --save
このコードの機能:
-
lodash
テキストを大文字に変換し、配列から特定のデータを抽出するために使用されます。 -
react-native-android-speech
テキストの説明を音声に変換します。 -
react-native-gifted-spinner
ネットワーク要求を実行する際の読み込みアニメーションを表示します。
node_modules / react-native / node_modulesフォルダーにインストールされているすべてのモジュールを表示できます 。
インストールが完了したら、 React Native Android Speechリポジトリに移動し、指示に従って構成します。
ネットワーククエリ
React Nativeプロジェクトのルートディレクトリで、 srcフォルダーを作成し、その中にapi.jsファイルを作成し、 そこにコードを追加します。
module.exports = function(pokemon){ var url = 'http://192.168.xxx.xxx/pokedex/get.php?name=' + pokemon; return fetch(url).then(function(response){ return response.json(); }).then(function(json){ return json; }); }
fetch
メソッドは、サーバーからデータを抽出する機能をエクスポートします。 このようにして、React Nativeはネットワーク要求を作成します。 このメソッドは、URLを受信してリクエストを作成し、
then
メソッドを使用することを約束し、コールバック関数を使用して応答を受信します。
応答で受信したデータを「そのまま」使用することはできません。最初に、それらを
response
オブジェクトから利用可能な
json
メソッドに渡す必要があります。 そこから、別の
then
メソッドを呼び出すことで、JSON形式のデータを既に取得できます。 これらは引数としてコールバック関数に渡され、引数として返されます。
fetch
メソッドの戻り結果も約束であることに注意してください。 したがって、後でメインスクリプトからこのモジュールを呼び出す場合、JSONデータにアクセスする前に
then
メソッドを再度使用する必要があります。
注 :
http://192.168.xxx.xxx/
:
http://192.168.xxx.xxx/
を前述のIPアドレスまたはドメイン名に変更してください。 pokedexはWebインデックス内のフォルダーであることを忘れないでください。
メインアプリケーションファイル
index.android.jsファイルを開きます。 いくつかのデフォルトコードが必要です。すべて削除してください。
各ファイルの先頭で、厳格モードを有効にします。 これは、値が初期化される前の変数定義の欠如など、一般的な間違いを避けるのに役立ちます。
React Nativeと追加のプロジェクト依存関係をインポートします。
'use strict'; var React = require('react-native'); var tts = require('react-native-android-speech') var GiftedSpinner = require('react-native-gifted-spinner'); var _ = require('lodash');
必要なすべてのコンポーネントとAPIを初期化します。
var { AppRegistry, StyleSheet, Text, TextInput, View, Image, ListView } = React;
React Nativeでは、さまざまなコンポーネントとAPIを使用できます。 デフォルトではロードされないため、必要なものをすべて具体的に指定する必要があります。 これらをユーザーインターフェイス要素と見なすことができます。 Webページにテキストフィールド、リスト、テーブル、画像、タブなどがあるとします。 React Nativeでは、これらのインターフェース要素はすべてコンポーネントです。 たとえば、 画像の 表示、スクロールバーの表示 、 リストの作成などのためのコンポーネントがあります 。
React APIは、カメラやプッシュ通知などのさまざまなデバイス機能にアクセスするために使用されます。 一部のAPIを使用することはほとんどありませんが、すべてのプロジェクトで一部が必要です。 例には、 StyleSheetおよびAppRegistryが含まれます 。
以下は、アプリケーションで使用するコンポーネントとAPIの簡単な説明です。
-
AppRegistry
カスタムコンポーネントを登録します。 React Nativeのすべてはコンポーネントであり、コンポーネントはさらに小さなコンポーネントで構成できます。 -
StyleSheet
アプリケーションで使用されるスタイルを記述するために使用されます。 -
Text
-テキストの表示を担当します。 -
TextInput
テキストフィールドの作成に使用されます。 -
View
-ユーザーインターフェイスを作成するときのメインコンポーネント。 一般にラッパーとして使用されます。 -
Image
-画像を表示します。 -
ListView
表示します。
次に、以前に作成したsrc / api.jsファイルをインポートします 。 これにより、
api
メソッドを呼び出してネットワーク要求を許可します。
var api = require('./src/api.js');
すべてのインターフェイスとアプリケーションロジックを含む新しいカスタムコンポーネントをReactで作成します。
var Pokedex = React.createClass({ ... });
クラス内の状態を初期化します。 React Nativeの「状態」とは、コンポーネント全体で利用可能なデータを保存する方法を意味します。
-
query
-ユーザーが入力したテキスト。 -
hasResult
検索結果があることを示します。 -
noResult
検索結果がないことを示します。hasResult
の逆を実行しますが、結果なしを示すメッセージを表示するかどうかを決定するために使用されます。 検索がまだ実行されていないアプリケーションの最初のダウンロード時に、ユーザーにそのような啓示がすぐに表示されることは望ましくありません。 -
result
サーバーから受け取った現在の結果を保存します。 -
isLoading
進行状況バーを表示します。 -
dataSource
リストビューのデータソースが含まれます。 まず、ListView.DataSource
新しいインスタンスが作成され、rowHasChanged
関数を含むオブジェクトをrowHasChanged
ます。 データソースを変更する場合、この関数はListView
内の行を再レンダリングするようにListView
に指示します。 この例では、ソースはポケモンタイプのオブジェクトの配列です。search
方法を見ると、このデータがどのように提供されるかを理解できます。
getInitialState: function(){ return { query: null, hasResult: false, noResult: false, result: null, isLoading: false, dataSource: new ListView.DataSource({ rowHasChanged: (row1, row2) => row1 !== row2, }) } },
次に、
render
メソッドを見てください。 彼は、ユーザーインターフェイスのレンダリングを担当しています。
render: function() { ... },
インターフェイスはメソッド内に返されます。
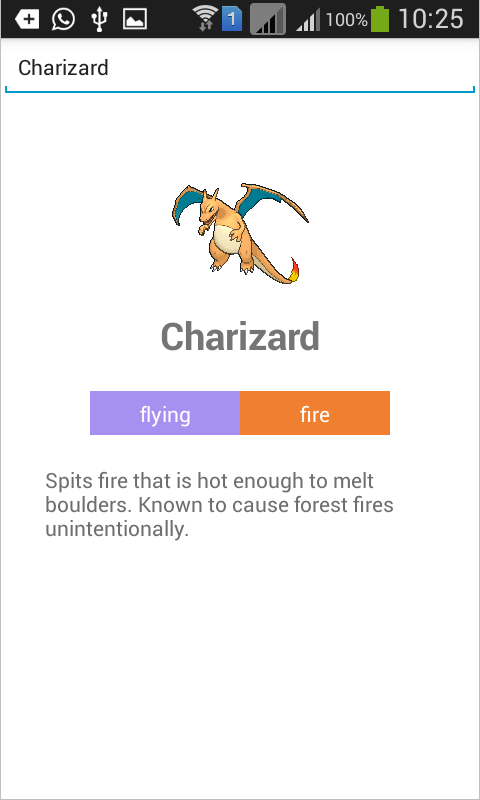
return ( <View style={styles.container}> <View style={styles.search}> <TextInput style={styles.text_input} onChangeText={this.changeText} onSubmitEditing={this.search} placeholder="Type a pokemon name" /> </View> { this.state.hasResult && <View style={styles.result}> <View style={styles.main_details}> <Image source={{uri: this.state.result.small_photo}} style={styles.image_dimensions} resizeMode={Image.resizeMode.contain} /> <Text style={styles.main_text}>{this.state.result.name}</Text> <ListView contentContainerStyle={styles.types} dataSource={this.state.types} renderRow={this.renderType}></ListView> <View style={styles.description}> <Text style={styles.description_text}>{this.state.result.description}</Text> </View> </View> </View> } { this.state.noResult && <View style={styles.no_result}> <Text style={styles.main_text}>Pokemon not found</Text> <Text style={styles.sub_text}>Please type the exact name</Text> </View> } { this.state.isLoading && <View style={styles.loader}> <GiftedSpinner /> </View> } </View> );
このコードを分析しましょう。 メインコンテナを作成します。
<View style={styles.container}> </View>
注 :これは前提条件です。1つのルートコンポーネントが存在する必要があり、他のすべてのコンポーネントはネストされているためです。
style
属性の値は、コンポーネントのスタイルを記述するオブジェクトです。 以下では、
styles
オブジェクトがどのように宣言されているかを説明し
styles
が、現時点では、オブジェクトを引用符として使用する場合、引用符を使用する必要がないことを覚えておいてください。
メインコンテナ内には、ポケモンの名前を入力するように設計されたコンポーネントがあります。 次の3つの属性があります。
-
onChangeText
テキストフィールドのテキストが変更されるたびに実行される関数を設定します。 -
onSubmitEditing
テキストがテキストフィールドに送信されるたびに実行される関数を設定します。 -
placeholder
-入力するデータがないときに表示されるテキストを設定します。
<View style={styles.search}> <TextInput style={styles.text_input} onChangeText={this.changeText} onSubmitEditing={this.search} placeholder="Type a pokemon name" /> </View>
次は、検索結果を表示するコンポーネントです。 その構文は前のものとわずかに異なり、中括弧で囲まれ、最初に条件があります。 これにより、Reactは状態が結果に保存されている場合にのみコンポーネントをレンダリングします。 このコンポーネントの内部には、ポケモンの画像を表示する
Image
と、小さな動物の名前の
Text
2つがあります。 次は
ListView
コンポーネントで、ポケモンの種類に関する情報が含まれています。 実際、いくつかのポケモンは複数の種に属することができるため、このコンポーネントが必要です。 最後に、
View
コンポーネントは、ポケモンの説明を表示する役割を果たします。
{ this.state.hasResult && <View style={styles.result}> <View style={styles.main_details}> <Image source={{uri: this.state.result.small_photo}} style={styles.image_dimensions} resizeMode={Image.resizeMode.contain} /> <Text style={styles.main_text}>{this.state.result.name}</Text> <ListView contentContainerStyle={styles.types} dataSource={this.state.types} renderRow={this.renderType}></ListView> <View style={styles.description}> <Text style={styles.description_text}>{this.state.result.description}</Text> </View> </View> </View> }
各コンポーネントを詳しく見てみましょう。
Image
は
source
属性を取得します。これにより、画像のソースを指定できます。 これは、ネットワーク、ローカルファイルシステム、またはアプリケーションリソースからの画像です。 この場合、ネットワークからの画像が使用され、データは状態で保存されます。
resizeMode
は、フレームに収まらない場合に画像のサイズ変更を設定します。 使用される値は
contain
です。 これは、比率を歪めることなく、画像がフレームに収まることを意味します。
<Image source={{uri: this.state.result.small_photo}} style={styles.image_dimensions} resizeMode={Image.resizeMode.contain} />
Text
コンポーネントはテキストを表示します。 React Nativeでは、出力テキストは
Text
コンポーネントに収まる必要があります。
<Text style={styles.main_text}>{this.state.result.name}</Text>
ListView
コンポーネントは
ListView
表示します。 ここで1つの注意事項があります:
contentContainerStyle
、
style
属性の代わりにスタイルを定義するために使用されます。
dataSource
使用
dataSource
と、リストをレンダリングするためのデータソースを決定でき、
renderRow
はリスト内の各アイテムをレンダリングするときに実行される関数を設定します。
<ListView contentContainerStyle={styles.types} dataSource={this.state.types} renderRow={this.renderType}></ListView>
検索結果を表示した後、結果がない場合に表示されるコンポーネントがあります。
{ this.state.noResult && <View style={styles.no_result}> <Text style={styles.main_text}>Pokemon not found</Text> <Text style={styles.sub_text}>Please type the exact name</Text> </View> }
以下は、 Gifted Spinnerモジュールを使用してアニメーションを表示するダウンロードインジケーターです。 このインジケータは、状態の
isLoading
プロパティが
true
設定されている場合にのみ表示され
true
。 これは、ネットワーク要求を実行する直前に行われ、応答が受信されると、値が
false
変わり
false
。
{ this.state.isLoading && <View style={styles.loader}> <GiftedSpinner /> </View> }
次に、リスト内の各アイテムをレンダリングするメソッドが追加されます。
ListView
コンポーネントの宣言では、
renderRow
属性の値として使用されます。 これはまさに方法です。
renderType: function(type){ return ( <View style={[styles[type.name], styles.type]}> <Text style={styles.type_text}>{type.name}</Text> </View> ); },
ListView
コードを見ると、
renderRow
属性には、以下で参照する
type
バインダーが他にないことがわかります。 実際、
renderRow
は非表示の方法でデータを自動的に転送します。
サーバーから返された応答から次のように、
types
オブジェクトには、さまざまなタイプのポケモンに対応するオブジェクトの配列が含まれています。
[ { "name":"electric", "resource_uri":"\/api\/v1\/type\/13\/" } ]
type
引数を介して
renderType
メソッドでこのオブジェクトにアクセスします。 ポケモンのタイプとスタイルのコントロールを表示するために使用されます。 次に、スタイル宣言で、タイプごとに異なるスタイルを追加する必要があります。 お気づきかもしれませんが、
View
コンポーネントには2つのスタイル宣言を使用します。 したがって、React Nativeでは、各スタイル宣言が配列に追加されます。
<View style={[styles[type.name], styles.type]}> <Text style={styles.type_text}>{type.name}</Text> </View>
これで
changeText
メソッドが
changeText
。これは、テキストフィールドのテキストが変更されるたびに実行されます。 実際のテキストデータはこのメソッドに送信されるため、ユーザーが入力した現在の情報を格納する状態プロパティを更新するのに適した場所です。
changeText: function(text){ this.setState({ query: text }); },
search
メソッドは、データがテキストフィールドで送信されるたびに実行されます。 Androidでテキストを入力すると、[ 完了 ]ボタンが表示され、クリックすると
onSubmitEditing
イベントがトリガーされます。
onSubmitEditing
属性の値として既に定義しています。 その結果、次のメソッドが実行されます。
search: function(){ var pokemon = _.capitalize(this.state.query); this.setState({ isLoading: true }); api(pokemon).then( (data) => { var speech = 'Pokemon was not found. Please type the exact name.'; if(data.doc){ var types = this.state.dataSource.cloneWithRows(data.doc.types); this.setState({ hasResult: true, noResult: false, result: data.doc, types: types, isLoading: false }); var type_names = _.map(data.doc.types, function(type){ return type.name; }); speech = data.doc.name + ". A " + type_names.join(' and ') + ' pokemon. ' + data.doc.description; }else{ this.setState({ hasResult: false, noResult: true, isLoading: false, result: null }); } tts.speak({ text: speech, forceStop : true , language : 'en' }); } ); }
このコードを扱います。 Lodashが提供する
capitalize
メソッドは、最初の文字を除くすべての文字を大文字に変換するために呼び出されます。 その後、状態が更新され、
isLoading
プロパティが
true
に設定され
true
。これにより、最後のコンポーネントの下にローディングインジケーターが表示されます。
var pokemon = _.capitalize(this.state.query); this.setState({ isLoading: true });
api
モジュールを使用して、ネットワークリクエストを実行します。
api(pokemon).then( (data) => { ... } );
注意 :コールバック関数の構文は、私たちが慣れているものとはわずかに異なります。
api(pokemon).then(function(data){ ... });
this
オブジェクトの値も異なります。 新しい構文によれば、このオブジェクトはコールバック関数ではなく外部スコープを参照します。 これにより、これを使用して、現在のスコープを保持する変数を作成することなく、コールバック関数内から状態を更新できます。
コールバック関数内で、デフォルトのテキストが設定され、音声に変換されます。
var speech = 'Pokemon was not found. Please type the exact name.';
doc
,
cloneWithRows
, ,
dataSource
. ,
dataSource
ListView
.
.
type_names
, , . Lodash
map
. , :
if(data.doc){ //create the list view data source var types = this.state.dataSource.cloneWithRows(data.doc.types); //update the state this.setState({ hasResult: true, noResult: false, result: data.doc, types: types, isLoading: false }); //create an array containing the type names var type_names = _.map(data.doc.types, function(type){ return type.name; }); //construct the text to be used for the speech speech = data.doc.name + ". A " + type_names.join(' and ') + ' pokemon. ' + data.doc.description; }
, :
-
hasResult
false
, , . -
noResult
true
, . -
isLoading
false
, . -
result
null
.
... else{ this.setState({ hasResult: false, noResult: true, isLoading: false, result: null }); }
:
if(data.doc){ ... }else{ ... } tts.speak({ text: speech, forceStop : true , language : 'en' });
Pokodex
StyleSheet
API:
var styles = StyleSheet.create({ container: { flex: 1, backgroundColor: '#FFF' }, search: { flex: 1 }, result: { flex: 8 }, no_result: { flex: 8, alignItems: 'center' }, loader: { flex: 1, alignItems: 'center' }, main_details: { padding: 30, alignItems: 'center' }, image_dimensions: { width: 100, height: 100 }, main_text: { fontSize: 25, fontWeight: 'bold', textAlign: 'center' }, sub_text: { color: '#6e6e6e' }, description: { marginTop: 20 }, text_input: { height: 40, borderColor: 'gray', borderWidth: 1 }, types: { flexDirection: 'row', marginTop: 20 }, type: { padding: 5, width: 100, alignItems: 'center' }, type_text: { color: '#fff', }, normal: { backgroundColor: '#8a8a59' }, fire: { backgroundColor: '#f08030' }, water: { backgroundColor: '#6890f0' }, electric: { backgroundColor: '#f8d030' }, grass: { backgroundColor: '#78c850' }, ice: { backgroundColor: '#98d8d8' }, fighting: { backgroundColor: '#c03028' }, poison: { backgroundColor: '#a040a0' }, ground: { backgroundColor: '#e0c068' }, flying: { backgroundColor: '#a890f0' }, psychic: { backgroundColor: '#f85888' }, bug: { backgroundColor: '#a8b820' }, rock: { backgroundColor: '#b8a038' }, ghost: { backgroundColor: '#705898' }, dragon: { backgroundColor: '#7038f8' }, dark: { backgroundColor: '#705848' }, steel: { backgroundColor: '#b8b8d0' }, fairy: { backgroundColor: '#e898e8' } });
. ,
flex
1
, Flexbox. , . , . , .
container: { flex: 1, backgroundColor: '#FFF' },
, , :
search: { flex: 1 }, result: { flex: 8 }, no_result: { flex: 8, alignItems: 'center' }, loader: { flex: 1, alignItems: 'center' },
, . , . .
flex: 1
, . 10 , 1 , 8 .
<View style={styles.search}> ... </View> <View style={styles.result}> ... </View> <View style={styles.no_result}> ... </View> <View style={styles.loader}> ... </View>
, ,
main_details
. , , .
main_details: { padding: 30, alignItems: 'center' },
– CSS.
image_dimensions: { width: 100, height: 100 }, main_text: { fontSize: 25, fontWeight: 'bold', textAlign: 'center' }, sub_text: { color: '#6e6e6e' }, description: { marginTop: 20 },
.
ListView
flexDirection
row
. , , (inline effect). . ,
width
. 5 .
alignItems
.
types: { flexDirection: 'row', marginTop: 20 }, type: { padding: 5, width: 100, alignItems: 'center', }, type_text: { color: '#fff', },
. , , .
normal: { backgroundColor: '#8a8a59' }, fire: { backgroundColor: '#f08030' }, water: { backgroundColor: '#6890f0' }, electric: { backgroundColor: '#f8d030' }, grass: { backgroundColor: '#78c850' }, ice: { backgroundColor: '#98d8d8' }, fighting: { backgroundColor: '#c03028' }, poison: { backgroundColor: '#a040a0' }, ground: { backgroundColor: '#e0c068' }, flying: { backgroundColor: '#a890f0' }, psychic: { backgroundColor: '#f85888' }, bug: { backgroundColor: '#a8b820' }, rock: { backgroundColor: '#b8a038' }, ghost: { backgroundColor: '#705898' }, dragon: { backgroundColor: '#7038f8' }, dark: { backgroundColor: '#705848' }, steel: { backgroundColor: '#b8b8d0' }, fairy: { backgroundColor: '#e898e8' }
AppRegistry
. React Native
Pokedex
.
AppRegistry.registerComponent('Pokedex', () => Pokedex);
, -,
react-native run-android
. :

, React, . (, index.android.js ). React
react-native start
. :
[7:38:33 AM] <START> Building Dependency Graph [7:38:33 AM] <START> Crawling File System [7:38:33 AM] <START> Loading bundles layout [7:38:33 AM] <END> Loading bundles layout (1ms) React packager ready. [7:38:46 AM] <END> Crawling File System (13516ms) [7:38:46 AM] <START> Building in-memory fs for JavaScript [7:38:52 AM] <END> Building in-memory fs for JavaScript (6200ms) [7:38:52 AM] <START> Building in-memory fs for Assets [7:38:59 AM] <END> Building in-memory fs for Assets (6048ms) [7:38:59 AM] <START> Building Haste Map [7:39:03 AM] <START> Building (deprecated) Asset Map [7:39:05 AM] <END> Building (deprecated) Asset Map (2191ms) [7:39:08 AM] <END> Building Haste Map (9348ms) [7:39:08 AM] <END> Building Dependency Graph (35135ms)
Building Dependency Graph
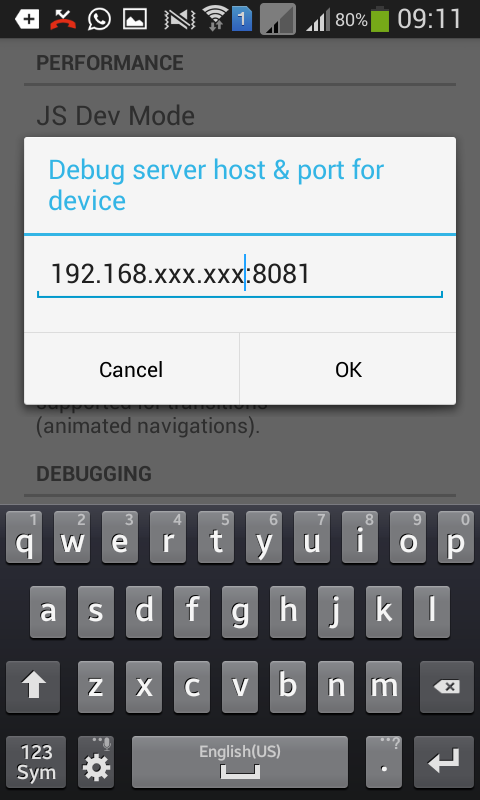
adb shell input keyevent 82
. . Dev settings , Debugging IP- , React.
, Reload JS . , .
React
, Watchman.
Error building DependencyGraph:
Error: Watcher took too long to load
Try running `watchman version` from your terminal
https://facebook.github.io/watchman/docs/troubleshooting.html
at [object Object]._onTimeout (index.js:103:16)
at Timer.listOnTimeout (timers.js:89:15)
:
sudo sysctl fs.inotify.max_user_instances=99999
sudo sysctl fs.inotify.max_user_watches=99999
sudo sysctl fs.inotify.max_queued_events=99999
watchman shutdown-server
, :
echo 999999 | sudo tee -a /proc/sys/fs/inotify/max_user_instances
echo 999999 | sudo tee -a /proc/sys/fs/inotify/max_user_watches
echo 999999 | sudo tee -a /proc/sys/fs/inotify/max_queued_events
watchman shutdown-server
, , . Watchman, .
React , . :
- Android- .
- IP- IP- .
, .
, , Chrome . Debug in Chrome Enable Live Reload . console.log Chrome. , .
次は?
, React Native app?
- React Native , API .
- , index.android.js .
- .
- Reapp UI Kit .
結論として
React Native. : , , . , GitHub , .