しかし、今日は、Microsoft Project Oxford Client SDKとHow-Old.netに似たC#を使用したWPFアプリケーションの例を示します
続行:
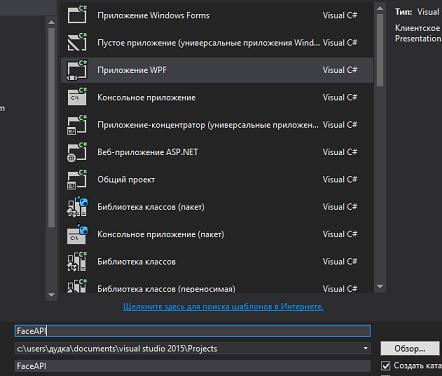
1)Visual Studio 2015を開き、WPFプロジェクトを作成します
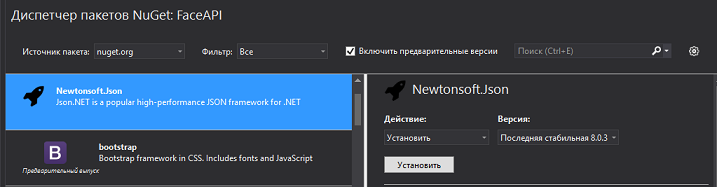
2)NuGetパッケージの管理-Newtonsoft.Jsonでインストールする必要がある次のステップ
3)MainWindow.xamlを開き、画像とボタンを追加します
<Image x:Name="FacePhoto" HorizontalAlignment="Left" Height="240" Margin="72,25,0,0" VerticalAlignment="Top" Width="381"/> <Button x:Name="button" Content=" " HorizontalAlignment="Left" Height="28" Margin="72,281,0,0" VerticalAlignment="Top" Width="381" Click="button_Click"/>
4)コードに移動し、ボタンにコードを追加して写真をアップロードします
private async void button_Click(object sender, RoutedEventArgs e) { var openDlg = new Microsoft.Win32.OpenFileDialog(); openDlg.Filter = "JPEG Image(*.jpg)|*.jpg"; bool? result = openDlg.ShowDialog(this); if (!(bool)result) { return; } string filePath = openDlg.FileName; Uri fileUri = new Uri(filePath); BitmapImage bitmapSource = new BitmapImage(); bitmapSource.BeginInit(); bitmapSource.CacheOption = BitmapCacheOption.None; bitmapSource.UriSource = fileUri; bitmapSource.EndInit(); FacePhoto.Source = bitmapSource; }
5)次に、NuGetパッケージの管理-Microsoft.ProjectOxford.Faceから同じものをインストールする必要があります

6)次のディレクティブを接続する必要があります
using Microsoft.ProjectOxford.Face; using Microsoft.ProjectOxford.Face.Contract;
すべての準備が完了したら、最も興味深いものに進みます=)
7)APIキーを格納する変数を作成します
private readonly IFaceServiceClient faceServiceClient = new FaceServiceClient("key");
8)写真を処理する機能。
private async Task<FaceRectangle[]> UploadAndDetectFaces(string imageFilePath) { List<FaceAttributeType> FaceAG = new List<FaceAttributeType>(); a.Add(FaceAttributeType.Age); a.Add(FaceAttributeType.Gender);// try { using (Stream imageFileStream = File.OpenRead(imageFilePath)) { var faces = await faceServiceClient.DetectAsync(imageFileStream, true, false, FaceAG); // var faceRects = faces.Select(face => face.FaceRectangle); // var faceA = faces.Select(face => face.FaceAttributes);// - faceAtr = faceA.ToArray(); return faceRects.ToArray(); } } catch (Exception) { return new FaceRectangle[0]; } }
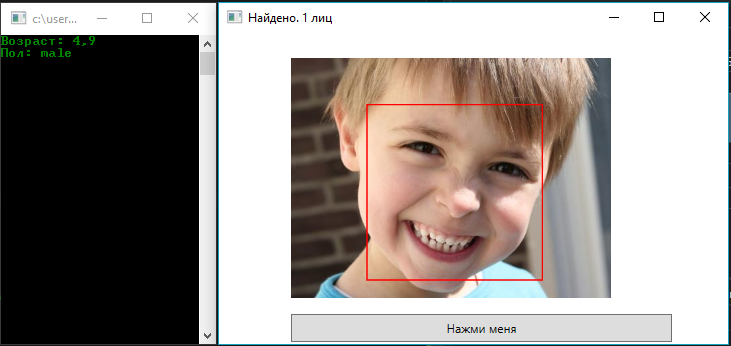
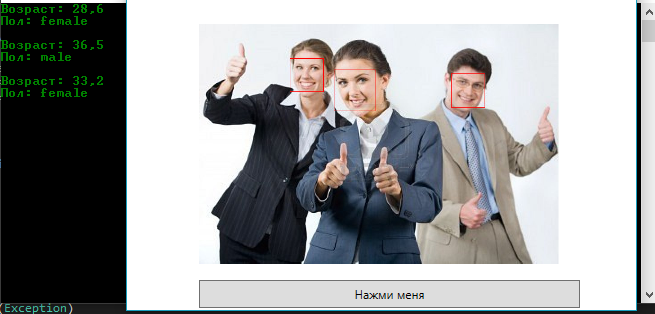
以上で、アプリケーションを少し作成し、写真の顔を丸で囲み、性別と年齢を表示することができます。
便宜上、コンソールを接続し、年齢と性別を表示します。
ボタンハンドラー関数に移動し、そこに次のコードを追加します。
Title = "..."; FaceRectangle[] faceRects = await UploadAndDetectFaces(filePath); Title = String.Format(". {0} ", faceRects.Length); if (faceRects.Length > 0) { DrawingVisual visual = new DrawingVisual(); DrawingContext drawingContext = visual.RenderOpen(); drawingContext.DrawImage(bitmapSource, new Rect(0, 0, bitmapSource.Width, bitmapSource.Height)); double dpi = bitmapSource.DpiX; double resizeFactor = 96 / dpi; foreach (var faceRect in faceRects) { drawingContext.DrawRectangle( Brushes.Transparent, new Pen(Brushes.Red, 2), new Rect( faceRect.Left * resizeFactor, faceRect.Top * resizeFactor, faceRect.Width * resizeFactor, faceRect.Height * resizeFactor ) ); } drawingContext.Close(); RenderTargetBitmap faceWithRectBitmap = new RenderTargetBitmap( (int)(bitmapSource.PixelWidth * resizeFactor), (int)(bitmapSource.PixelHeight * resizeFactor), 96, 96, PixelFormats.Pbgra32); faceWithRectBitmap.Render(visual); FacePhoto.Source = faceWithRectBitmap; } foreach (var fecea in faceAtr) { Console.WriteLine(": {0}", fecea.Age); Console.WriteLine(": {0}", fecea.Gender); Console.WriteLine(); }
その結果、次のようになります
以上で、小さなサンプルアプリケーションの準備が整いました。皆さんに幸運を!