最も人気のあるBaaSの中で、GoogleからFirebaseを選び出すことができます。 基本的に、Firebaseはパフォーマンス、実装、および操作において非常に優れています。 Firebaseは、リアルタイムで変化し、データをJSONに保存するデータベースとして機能します。 データベース内の変更は、すべてのクライアント、または同じデータベースを使用するデバイス間で即座に同期されます。 つまり、Firebaseの更新は即座に行われます。
Firebaseはストレージとともにユーザー認証も提供するため、すべてのデータは安全なSSL接続を介して送信されます。 Facebook、Twitter、GitHub、Google、またはその他のものであるかどうかに関係なく、認証用の電子メールとパスワードの組み合わせを選択できます。
Firebaseには、iOS SDKに加えて、AndroidおよびJavaScript用のSDKがあります。 すべてのプラットフォームで1つのデータベースを使用できます。
これらすべての機能を備えたFirebaseが予算の解決策であると想像するのは困難です。
この記事の執筆時点で、無料パッケージでは、Firebaseは最大100の同時接続を処理できます。 これは、一般的なアプリケーションには十分です。 月額49ドルで、ネットワークアクティビティに制限はありません。
FirebaseJokesアプリ
今日は、ユーザーがFirebaseを使用してさまざまなジョークを投稿できるアプリケーションを作成します。 アプリケーションでは、メールとパスワードを使用してアカウントを作成できます。 ジョークを投稿する機会もあり、表示されたジョークのリストは即座に更新されます。 別のユーザーが新しいジョークを投稿すると、ジョークのリストも更新されます。 アプリケーションでは、投票機能を追加し、最もおかしなジョークに値するポイントを受け取ります。
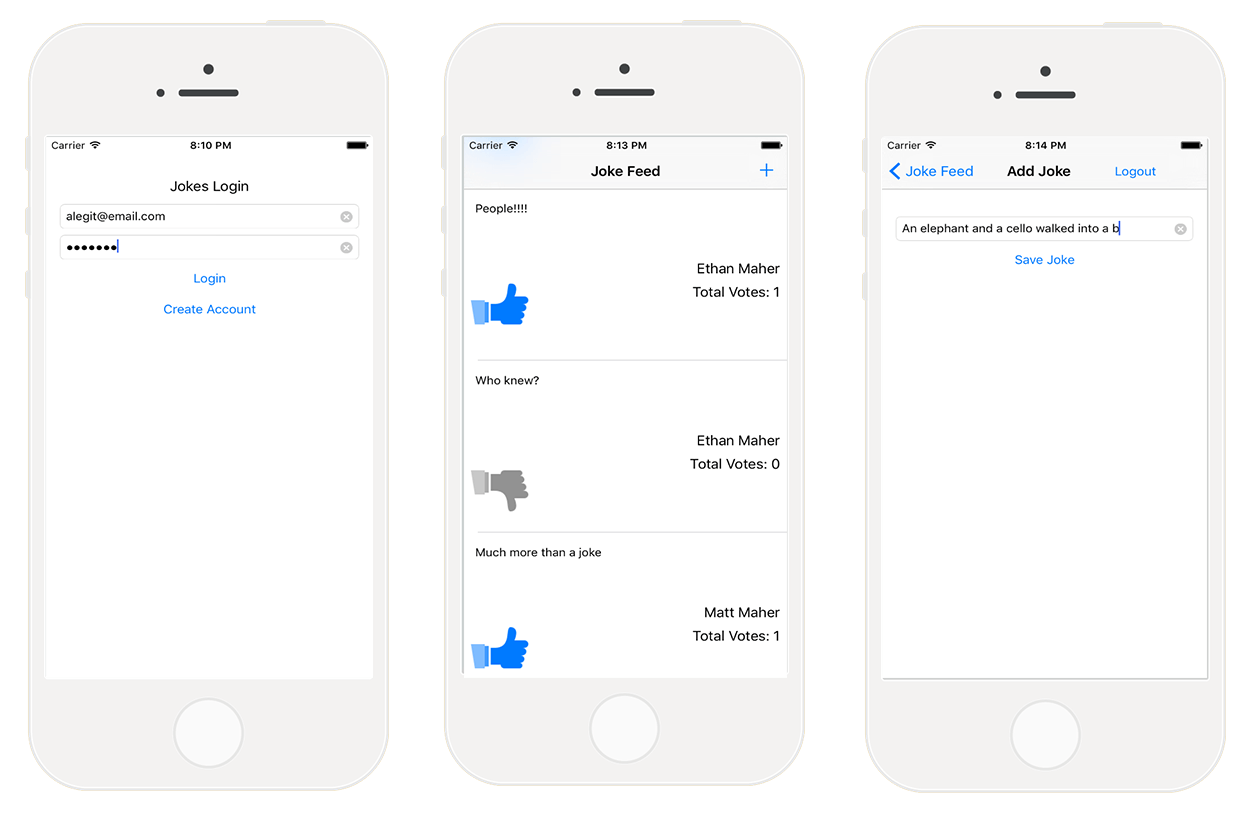
FirebaseJokesアプリケーションに実装する機能のリストは次のとおりです。
- アカウント作成
- メールとパスワードを使用してログイン
- ログアウト
- 登録ユーザーの登録スキップ
- 新しいジョークを追加する
- 作成者と投票数を示すジョークをUITableViewにロードする
- 冗談に投票する能力
開始プロジェクトを見てみましょう。
まず、Main.Storyboardを開いて、アプリケーションの視覚的な概要を取得します。

アプリケーションの開発中に、実際にFirebaseの機能と非常に使いやすいという事実をテストします。 FirebaseJokesを作成する楽しい時間を過ごします。
Firebaseを知る時間
Firebaseページに移動してFirebaseアカウントを登録するか、既存のアカウントにログインします。 GOOGLEアカウントを使用して登録することもできます。 登録後、5分間のトレーニングを受講できますが、JavaScriptで記述されたアプリケーションを対象としています。
Firebaseで何が起こっているかを確認するには、My First AppでManage Appをクリックします。 この新しい環境は、Firebase Forgeとして知られています。 これはクールなデバッガーですので、試してみる価値があります。 Forgeチュートリアルは、プラス記号を使用してキー、値、さらには子ノードを作成するのに役立ちます。 JSONを見るのは理にかなっていますよね? Quick Forgeを終了するには、画面の左上隅にあるツールバーをクリックします。
新しいアプリケーションを作成する
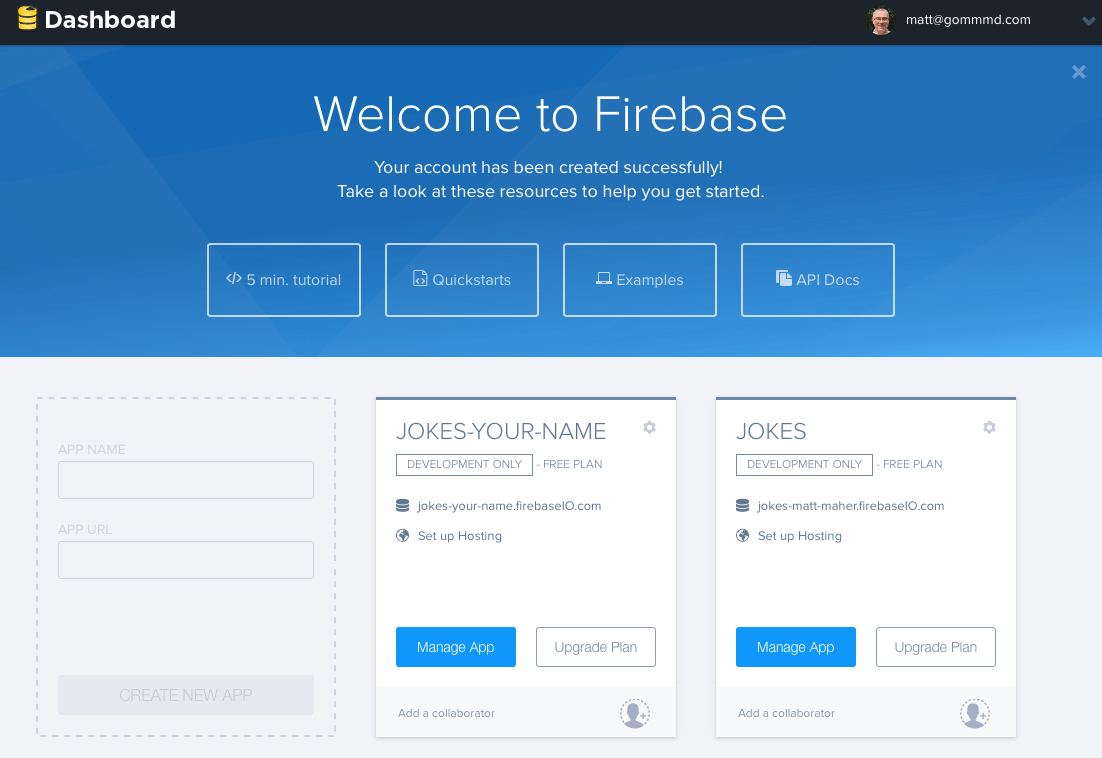
FirebaseJokesを作成する時間です。 My First Appの左側で、透明な長方形をクリックして新しいアプリケーションを作成します。 [APP NAME]フィールドに「Jokes」と入力し、APP URLに「jokes-your-name」と入力します。「your-name」は自分の名前です。 フィールドは一意でなければなりません。なぜなら これは、アプリケーションのURLです。 新しいアプリの作成を押して、アプリの管理を行います。
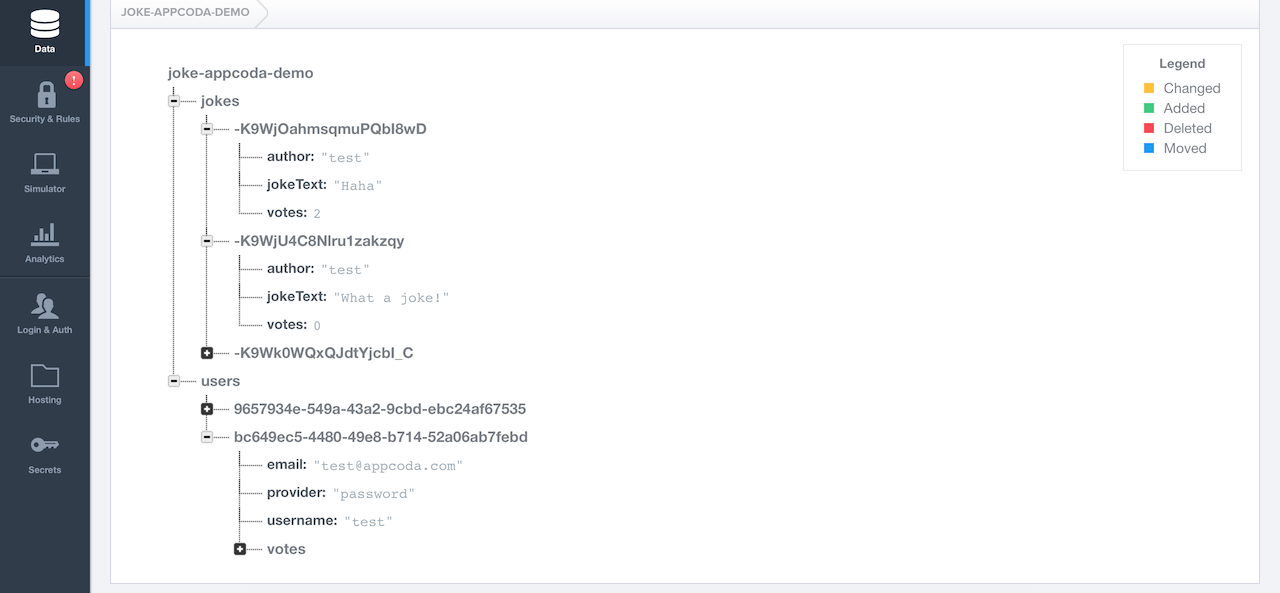
そして、これが私たち自身のForgeスクリーンです。 ここにデータを追加すると、アプリケーションで自動的に更新されます。 [Forge]タブでアプリケーションのデータを追加することもできます。 データの観点からアプリケーションの動作を理解するために、いくつかのデータを手動で入力します。
- jokes-your-name行の「+」をクリックします。
- 名前フィールドに「ジョーク」と入力します。
- 新しいジョークの横にある「+」をクリックします。
- 名前フィールドにランダムな値を入力します。
- ランダム値の横にある「+」を押します。
- 名前フィールドに「jokeText」と入力します。
- 「あるコンピューターが他のコンピューターに何を言ったのか? 11001001010101」値フィールド。
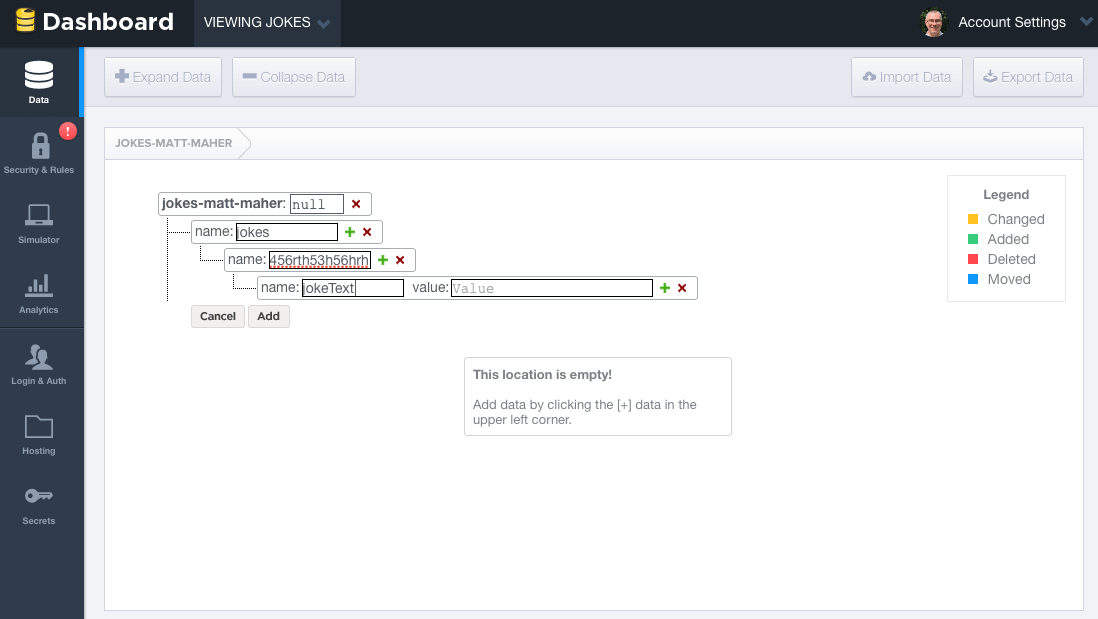
ジョークオブジェクトがどのように見えるかの例を次に示します。 「ジョーク」オブジェクトに新しいジョークを追加します。 「users」オブジェクトも必要です。 Forgeでアプリケーションによって作成されたデータがどのように変化するかを見るのはおもしろいですが、同時にそれは良い習慣です。
FirebaseデータベースのすべてのデータはJSONとして保存されることに注意してください。 Parseとは異なり、テーブルやレコードはありません。 Firebaseデータベースにデータを追加すると、それらがJSON構造のキーになります。 たとえば、作成したデータは次のようになります。
{ "jokes" : { "e32e223r44" : { "jokeText" : "What did one computer say to the other? 11001001010101" } } }
Firebasデータベースにあるデータの基本的な知識が得られたので、次に進みましょう。
ただし、ユーザー認証に進む前に、アプリケーションからプログラムでデータを作成するのと同じように、作成したデータを削除します。
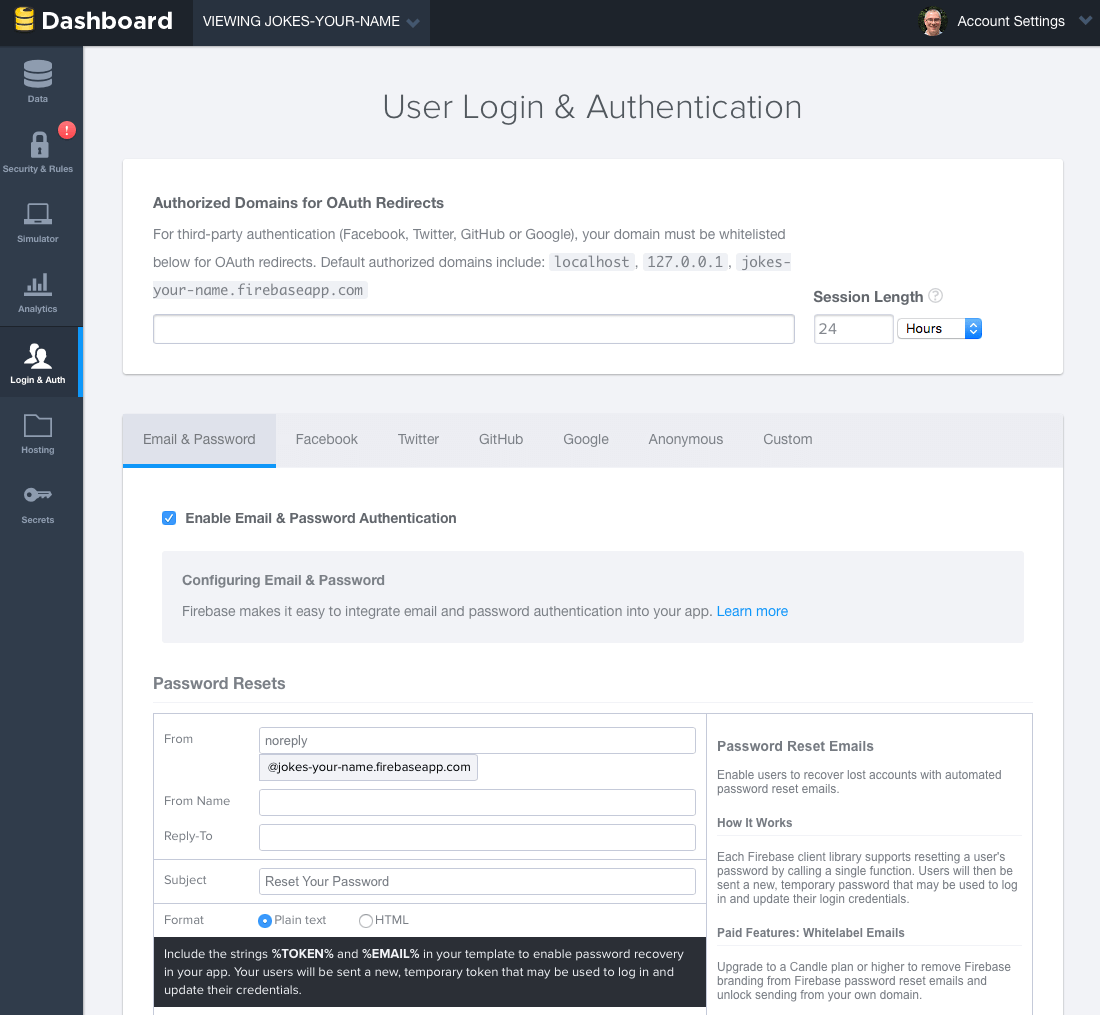
FirebaseJokesの場合、電子メールとパスワードによる認証を使用します。 この機能を有効にするには、Forgeの左ペインでログインと認証をクリックします。 [メールとパスワード]で、[メールとパスワード認証を有効にする]チェックボックスをオンにします。 押されたセルのすぐ下には、パスワード回復に関する情報があります。 また、他の認証オプションにも注意してください。
Firebase SDKを追加する
アプリケーションのベースURLを取得するには、Forgeのメイン画面に戻ります。 現在のURLはアプリケーションのURLであるため、Constants.swift XcodeのBASE_URLにコピーして貼り付けます。
import Foundation let BASE_URL = "https://jokes-matt-maher.firebaseio.com"
Firebase SDKをアプリケーションに追加します。 その前に、CocoaPodsをインストールする必要があります。 まだインストールしていない場合は、CocoaPodsのインストール手順をご覧ください。
CocoaPodsがインストールされたら、ターミナルを開きます。 次のコマンドを実行して、XcodeプロジェクトにCocoapodsをインストールします。
cd <your-xcode-project-directory> pod init
次に、XcodeでPodfileを開くために次のコマンドを入力します。
open -a Xcode Podfile
編集する:
platform :ios, '8.0' use_frameworks! pod 'Firebase', '>= 2.5.0'
次に、次のコマンドを実行してFirebase SDKをダウンロードします。
pod install
作成されたFirebaseJokes.xcworkspaceファイルを開きます。
Firebase SDKをインポートするには、新しいObjective-cファイルFileType-Empty Fileを作成します。 Tempという名前を付けます。 ファイルを作成すると、FirebaseJokes-Bridging-Header.hファイルが自動的に作成されます。 その中に次の行を書きます:
#import <Firebase/Firebase.h>
Temp.mは削除しますが、必要ありません。
Firebase SDKを使用する
生活を少し簡略化するために、まずDataService.swiftで少しセットアップします。 まず、いくつかのリンクが必要です。
import Foundation import Firebase class DataService { static let dataService = DataService() private var _BASE_REF = Firebase(url: "\(BASE_URL)") private var _USER_REF = Firebase(url: "\(BASE_URL)/users") private var _JOKE_REF = Firebase(url: "\(BASE_URL)/jokes") var BASE_REF: Firebase { return _BASE_REF } var USER_REF: Firebase { return _USER_REF } var CURRENT_USER_REF: Firebase { let userID = NSUserDefaults.standardUserDefaults().valueForKey("uid") as! String let currentUser = Firebase(url: "\(BASE_REF)").childByAppendingPath("users").childByAppendingPath(userID) return currentUser! } var JOKE_REF: Firebase { return _JOKE_REF } }
Firebaseを使用するには、Firebaseフレームワークをインポートする必要があります。 DataServiceクラスは、Firebaseと対話するために使用されます。 データの読み取りまたは書き込みを行うには、Firebase URLを使用してFirebaseデータベースへのリンクを作成する必要があります。 ベースURLは、アプリケーションデータベースのURLです。 後で、すべてのユーザーとすべてのジョークを子ノードとして保存します。 子ノードにアクセスするには、子名(つまり、ユーザー)をメインURLに設定するだけです。
新しいユーザーアカウントを作成する
CreateAccountViewController.swiftから始めます。 フレームワークをインポートする必要があります。
import UIKit import Firebase class CreateAccountViewController: UIViewController {
createAccount()メソッドでは、ユーザーが入力したテキストを取得し、それを使用して新しいユーザーを作成しようとします。 これは、Firebase createUser()メソッドに適用されます。 次のように既存のメソッドを更新します。
@IBAction func createAccount(sender: AnyObject) { let username = usernameField.text let email = emailField.text let password = passwordField.text if username != "" && email != "" && password != "" { // Set Email and Password for the New User. DataService.dataService.BASE_REF.createUser(email, password: password, withValueCompletionBlock: { error, result in if error != nil { // There was a problem. self.signupErrorAlert("Oops!", message: "Having some trouble creating your account. Try again.") } else { // Create and Login the New User with authUser DataService.dataService.BASE_REF.authUser(email, password: password, withCompletionBlock: { err, authData in let user = ["provider": authData.provider!, "email": email!, "username": username!] // Seal the deal in DataService.swift. DataService.dataService.createNewAccount(authData.uid, user: user) }) // Store the uid for future access - handy! NSUserDefaults.standardUserDefaults().setValue(result ["uid"], forKey: "uid") // Enter the app. self.performSegueWithIdentifier("NewUserLoggedIn", sender: nil) } }) } else { signupErrorAlert("Oops!", message: "Don't forget to enter your email, password, and a username.") } }
新しいユーザーに関する入力情報が正しい場合、ユーザーは登録され、アプリケーションにログインできます。 不足している情報がある場合は、通知がポップアップ表示されます。 これを行うには、次のメソッドをクラスに挿入します。
func signupErrorAlert(title: String, message: String) { // Called upon signup error to let the user know signup didn't work. let alert = UIAlertController(title: title, message: message, preferredStyle: UIAlertControllerStyle.Alert) let action = UIAlertAction(title: "Ok", style: .Default, handler: nil) alert.addAction(action) presentViewController(alert, animated: true, completion: nil) }
実際、保存はDataService.swiftのcreateNewAccount()メソッドで行われます。
func createNewAccount(uid: String, user: Dictionary<String, String>) { // A User is born. USER_REF.childByAppendingPath(uid).setValue(user) }
Firebaseデータベースにデータを保存するには、setValueメソッドを呼び出すだけです。 上記のコードでは、ユーザーオブジェクトは、この子uid上のusersキー(約/ Users / 1283834 /)の下のデータベースに保存されます。
Firebaseデータベースにユーザーを保存することに加えて、NSUserDefaultsにユーザーのuidを保存します。 これにより、現在のユーザーが追跡されます。
ユーザー認証
先に進む前に、FirebaseをLoginViewController.swiftにインポートします。 そのため、誰かがすでにログインしているか、ユーザーを登録しようとしているかを追跡できます。
viewDidAppear()メソッドで、保存した「uid」がnilであるかどうか、およびユーザーがアカウントを持っているかどうかを確認します。 ユーザーが認証されている場合、ユーザーは認証画面をスキップします。 そうでなければ、彼はログインを強制されます。
override func viewDidAppear(animated: Bool) { super.viewDidAppear(animated) // If we have the uid stored, the user is already logger in - no need to sign in again! if NSUserDefaults.standardUserDefaults().valueForKey("uid") != nil && DataService.dataService.CURRENT_USER_REF.authData != nil { self.performSegueWithIdentifier("CurrentlyLoggedIn", sender: nil) } }
tryLogin()メソッド。認証が試行されたときに呼び出されます。 以下に示すようにこのメソッドを更新し、loginErrorAlertヘルパーメソッドを挿入します。
@IBAction func tryLogin(sender: AnyObject) { let email = emailField.text let password = passwordField.text if email != "" && password != "" { // Login with the Firebase's authUser method DataService.dataService.BASE_REF.authUser(email, password: password, withCompletionBlock: { error, authData in if error != nil { print(error) self.loginErrorAlert("Oops!", message: "Check your username and password.") } else { // Be sure the correct uid is stored. NSUserDefaults.standardUserDefaults().setValue(authData.uid, forKey: "uid") // Enter the app! self.performSegueWithIdentifier("CurrentlyLoggedIn", sender: nil) } }) } else { // There was a problem loginErrorAlert("Oops!", message: "Don't forget to enter your email and password.") } } func loginErrorAlert(title: String, message: String) { // Called upon login error to let the user know login didn't work. let alert = UIAlertController(title: title, message: message, preferredStyle: UIAlertControllerStyle.Alert) let action = UIAlertAction(title: "Ok", style: .Default, handler: nil) alert.addAction(action) presentViewController(alert, animated: true, completion: nil) }
Firebaseには、メールアドレスとパスワードでユーザーを認証するためのサポートが組み込まれています。 tryLogin()メソッドはauthUser()メソッドを使用します。これにより、ユーザーアカウントの電子メールとパスワードが一致するかどうかを確認できます。 その場合、「uid」を保存して、アプリケーション内に入ります。 そうでない場合は、再度ログインを試みることをユーザーに通知します。
これで、アプリケーションのユーザー登録と承認の準備ができました。次は、アプリケーションの実装に戻ります。
ジョークオブジェクト
Joke.swiftに進み、Firebaseをインポートしてみましょう。 データベースでは、ジョークはID番号で表されます。 この番号は自動的に生成され、ジョークのすべてのプロパティが含まれます。 ここにあります:
- jokeText
- ジョーク
- ユーザー名(ジョーク作成者)
init()メソッドで新しいオブジェクトを初期化します。ここで、ジョークのidがキーとなり、ジョークデータは辞書形式で送信されます。
class Joke { private var _jokeRef: Firebase! private var _jokeKey: String! private var _jokeText: String! private var _jokeVotes: Int! private var _username: String! var jokeKey: String { return _jokeKey } var jokeText: String { return _jokeText } var jokeVotes: Int { return _jokeVotes } var username: String { return _username } // Initialize the new Joke init(key: String, dictionary: Dictionary<String, AnyObject>) { self._jokeKey = key // Within the Joke, or Key, the following properties are children if let votes = dictionary["votes"] as? Int { self._jokeVotes = votes } if let joke = dictionary["jokeText"] as? String { self._jokeText = joke } if let user = dictionary["author"] as? String { self._username = user } else { self._username = "" } // The above properties are assigned to their key. self._jokeRef = DataService.dataService.JOKE_REF.childByAppendingPath(self._jokeKey) } }
新しいジョークを追加する
AddJokeViewController.swiftでは、Firebaseのインポートを行います。 ユーザーがジョークを追加すると、それがリポジトリに送信され、そこから即座にすべてのデバイスに送信されます。
viewDidLoad()メソッドでは、新しいジョークの作成者を指定できるように、現在のユーザーのユーザー名を取得します。
override func viewDidLoad() { super.viewDidLoad() // Get username of the current user, and set it to currentUsername, so we can add it to the Joke. DataService.dataService.CURRENT_USER_REF.observeEventType(FEventType.Value, withBlock: { snapshot in let currentUser = snapshot.value.objectForKey("username") as! String print("Username: \(currentUser)") self.currentUsername = currentUser }, withCancelBlock: { error in print(error.description) }) }
saveJoke()メソッドが呼び出されると、newJokeディクショナリが作成され、jokeFieldでテキストを取得し、投票、現在の投票数、および現在のユーザー名-authorの値を0に設定します。 これらの値は、それらを対応するIDに割り当て、保存のためにDataServiceのcreateNewJoke()メソッドに渡されます。
AddJokeViewControllerクラスで可変パラメーターを定義します。
var currentUsername = ""
saveJokeメソッドを更新します。
@IBAction func saveJoke(sender: AnyObject) { let jokeText = jokeField.text if jokeText != "" { // Build the new Joke. // AnyObject is needed because of the votes of type Int. let newJoke: Dictionary<String, AnyObject> = [ "jokeText": jokeText!, "votes": 0, "author": currentUsername ] // Send it over to DataService to seal the deal. DataService.dataService.createNewJoke(newJoke) if let navController = self.navigationController { navController.popViewControllerAnimated(true) } } }
辞書を使用して、ジョークデータを一時的に保存します。 実際、保存はDataServiceのcreateNewJokeメソッドで行われます。 DataService.swiftで、createNewJokeメソッドを追加します。
func createNewJoke(joke: Dictionary<String, AnyObject>) { // Save the Joke // JOKE_REF is the parent of the new Joke: "jokes". // childByAutoId() saves the joke and gives it its own ID. let firebaseNewJoke = JOKE_REF.childByAutoId() // setValue() saves to Firebase. firebaseNewJoke.setValue(joke) }
この場合も、setValue()メソッドを使用してオブジェクトを保存できます。 childByAutoIdメソッドが呼び出されると、Firebaseはマーカーに基づいてジョークごとに一意のIDを生成します。これにより、ジョークが一意のIDを確実に取得できます。
現在のユーザーをログアウトする
通常、これは[設定]または[プロファイル]セクションで修正されますが、AddJokeViewController.swiftを終了する機会をユーザーに提供します。
logout()メソッドは、Firebase unauth()メソッドを使用して認証解除を行います。 リポジトリからユーザー「uid」を削除して、LoginViewControllerに送り返す必要もあります。
ログアウト方法を更新します。
@IBAction func logout(sender: AnyObject) { // unauth() is the logout method for the current user. DataService.dataService.CURRENT_USER_REF.unauth() // Remove the user's uid from storage. NSUserDefaults.standardUserDefaults().setValue(nil, forKey: "uid") // Head back to Login! let loginViewController = self.storyboard!.instantiateViewControllerWithIdentifier("Login") UIApplication.sharedApplication().keyWindow?.rootViewController = loginViewController }
ユーザー「uid」を削除しないと、新しいユーザーをアプリケーションに入力するときに問題が発生します。
画面にすべてのジョークを表示する
最終的に、データはFirebaseから取得されます。 JokesFeedTableViewController.swiftにあるUITableViewですべてのジョークのリストを作成します。 当然のことながら、ここではFirebaseをインポートします。
viewDidLoad()メソッドから始めましょう。 observeEventType()メソッドを設定します。 Firebaseデータは、データベースリンクに非同期リスナーを追加することによって取得されます。 このメソッドは、JokesFeedTableViewController.swiftに切り替えるときにviewDidLoad()で呼び出されません。データベース側からのジョークへの変更に対して呼び出されます。
var jokes = [Joke]() override func viewDidLoad() { super.viewDidLoad() // observeEventType is called whenever anything changes in the Firebase - new Jokes or Votes. // It's also called here in viewDidLoad(). // It's always listening. DataService.dataService.JOKE_REF.observeEventType(.Value, withBlock: { snapshot in // The snapshot is a current look at our jokes data. print(snapshot.value) self.jokes = [] if let snapshots = snapshot.children.allObjects as? [FDataSnapshot] { for snap in snapshots { // Make our jokes array for the tableView. if let postDictionary = snap.value as? Dictionary<String, AnyObject> { let key = snap.key let joke = Joke(key: key, dictionary: postDictionary) // Items are returned chronologically, but it's more fun with the newest jokes first. self.jokes.insert(joke, atIndex: 0) } } } // Be sure that the tableView updates when there is new data. self.tableView.reloadData() }) }
このメソッドはスナップショットを提供します。 スナップショットを使用して、一連のジョークを作成してtableViewを作成できます。 Firebaseジョークの場合、新しいジョークが上部に表示されるリストを作成します。 Firebaseはジョークを時系列で配信するため、逆方向にのみシリーズを作成できます。
ジョークの配列を絶えず更新しておくといいでしょう。tableViewのデータを更新して表示できるようにする必要があることを覚えています。
残りの作業は、tableView:cellForRowAtIndexPath:とカスタムセルJokeCellTableViewCell.swiftの間で分散されます。 tableView:cellForRowAtIndexPath:メソッドで、ジョークをJokeCellTableViewCell.swiftのconfigureCell()メソッドに送信します。
override func numberOfSectionsInTableView(tableView: UITableView) -> Int { return 1 } override func tableView(tableView: UITableView, numberOfRowsInSection section: Int) -> Int { return jokes.count } override func tableView(tableView: UITableView, cellForRowAtIndexPath indexPath: NSIndexPath) -> UITableViewCell { let joke = jokes[indexPath.row] // We are using a custom cell. if let cell = tableView.dequeueReusableCellWithIdentifier("JokeCellTableViewCell") as? JokeCellTableViewCell { // Send the single joke to configureCell() in JokeCellTableViewCell. cell.configureCell(joke) return cell } else { return JokeCellTableViewCell() } } configureCell(), in JokeCellTableViewCell.swift, is where we set the labels and listen for a vote tap. func configureCell(joke: Joke) { self.joke = joke // Set the labels and textView. self.jokeText.text = joke.jokeText self.totalVotesLabel.text = "Total Votes: \(joke.jokeVotes)" self.usernameLabel.text = joke.username // Set "votes" as a child of the current user in Firebase and save the joke's key in votes as a boolean. voteRef = DataService.dataService.CURRENT_USER_REF.childByAppendingPath("votes").childByAppendingPath(joke.jokeKey) // observeSingleEventOfType() listens for the thumb to be tapped, by any user, on any device. voteRef.observeSingleEventOfType(.Value, withBlock: { snapshot in // Set the thumb image. if let thumbsUpDown = snapshot.value as? NSNull { // Current user hasn't voted for the joke... yet. print(thumbsUpDown) self.thumbVoteImage.image = UIImage(named: "thumb-down") } else { // Current user voted for the joke! self.thumbVoteImage.image = UIImage(named: "thumb-up") } }) } func configureCell(joke: Joke) { self.joke = joke // Set the labels and textView. self.jokeText.text = joke.jokeText self.totalVotesLabel.text = "Total Votes: \(joke.jokeVotes)" self.usernameLabel.text = joke.username // Set "votes" as a child of the current user in Firebase and save the joke's key in votes as a boolean. voteRef = DataService.dataService.CURRENT_USER_REF.childByAppendingPath("votes").childByAppendingPath(joke.jokeKey) // observeSingleEventOfType() listens for the thumb to be tapped, by any user, on any device. voteRef.observeSingleEventOfType(.Value, withBlock: { snapshot in // Set the thumb image. if let thumbsUpDown = snapshot.value as? NSNull { // Current user hasn't voted for the joke... yet. print(thumbsUpDown) self.thumbVoteImage.image = UIImage(named: "thumb-down") } else { // Current user voted for the joke! self.thumbVoteImage.image = UIImage(named: "thumb-up") } }) }
configureCell()メソッドをJokeCellTableViewCell.swiftに追加します。
var joke: Joke! var voteRef: Firebase! override func awakeFromNib() { super.awakeFromNib() // UITapGestureRecognizer is set programatically. let tap = UITapGestureRecognizer(target: self, action: "voteTapped:") tap.numberOfTapsRequired = 1 thumbVoteImage.addGestureRecognizer(tap) thumbVoteImage.userInteractionEnabled = true }
voteTapped()メソッドでは、リスナーはシグナルを期待しています。 このメソッドでは、現在のユーザーの「声」がジョークのIDと真の値を含むキーとともに保存されます。 これはすべて、作成されたvoteRefを介してconfigureCell()メソッドに送信されます。
func voteTapped(sender: UITapGestureRecognizer) { // observeSingleEventOfType listens for a tap by the current user. voteRef.observeSingleEventOfType(.Value, withBlock: { snapshot in if let thumbsUpDown = snapshot.value as? NSNull { print(thumbsUpDown) self.thumbVoteImage.image = UIImage(named: "thumb-down") // addSubtractVote(), in Joke.swift, handles the vote. self.joke.addSubtractVote(true) // setValue saves the vote as true for the current user. // voteRef is a reference to the user's "votes" path. self.voteRef.setValue(true) } else { self.thumbVoteImage.image = UIImage(named: "thumb-up") self.joke.addSubtractVote(false) self.voteRef.removeValue() } }) }
voteTapped()メソッドは、シグナルをブール値としてJoke.swiftのaddSubtractVote()メソッドに中継します。 値trueは、ユーザーがジョークに投票したことを意味します。 falseは、ユーザーがまだ投票していないことを意味します。
// Add or Subtract a Vote from the Joke. func addSubtractVote(addVote: Bool) { if addVote { _jokeVotes = _jokeVotes + 1 } else { _jokeVotes = _jokeVotes - 1 } // Save the new vote total. _jokeRef.childByAppendingPath("votes").setValue(_jokeVotes) }
Joke.swiftのaddSubtractVote()メソッドは、ブール値を使用してジョークに投票を追加または削除します。 次に、FirebaseのsetValue()メソッドがデータベースに関する音声を更新します。
アプリケーションテスト
現在、アプリケーションをテストしています。 新しいユーザーを作成し、ジョークを追加します。 ジョークに投票する機会があります。 ツールバーを見ると、作成されたユーザーと作成されたジョークが表示されます。
まとめると
やった! これは、ユーザーの反応の良さから愛される、かなり面白い小さなアプリです。 また、Firebaseでの経験も得ました。
完成したFirebaseJokesプロジェクトはGitHubからダウンロードできます。
iOS開発者には、Firebaseの新機能が世界中にあります。 FirebaseJokesを使用することは良い習慣ですが、これはほんの始まりに過ぎません。
他のユーザー認証オプションを参照し、FirebaseJokesに新機能を追加し、チャット機能を学びましょう。要するに、それは可能性に満ちています。
画像を保存するためのいくつかのヒント:Firebaseは、画像を保存するための比較的控えめな量のメモリを提供するため、画像を別の場所に保存することをお勧めします。
将来のプロジェクトでFirebaseを使って頑張ってください!