
今年の9月、開発者のグループがワシントンで開催されたSpringOne2GX Java会議に参加しました。 これはそのような最大の会議の一つであり、私たちは通り抜けることができませんでした。 この会議の結果から私たちが有用で興味深いことを学んだことについて、あなたの注意を喚起します。
Springフレームワークは、プログラマーにアプリケーション開発用の優れたツールを提供します。必要なものはほぼすべて揃っています。 さらに、今日のSpringは、業界全体のさらなる発展のためのベクトルを設定しています。 スプリングブートとマイクロサービスはその一例です。
この記事では、Springを使用して、OAuth 2.0とOpenID Connectを使用して独自のマイクロサービスを作成し、Googleで認証し、マイクロサービスに何らかのタスクを実行する権利を与えるユーザーに関する情報を取得する方法を示します。 簡単にするために、ここでは認証とユーザー情報の表示のみの例を示します。OAuth理論やOpenID Connectを含む他のすべては省略します。 それでは始めましょう。
まず、プロジェクトを作成します。 最も簡単な方法は、Spring Initializerを使用することです。この例では、プロジェクト名と必要なモジュールが単純に示されています。 したがって、必要なすべての依存関係を接続するmavenファイルを含むSpring Bootアプリケーションが自動的に作成されます。
次に、
@EnableOAuth2Sso
アノテーションが必要になります。 ドキュメントによると、シングルサインオン認証ポイントを作成できる一方で、それ自体が構成パラメーターを読み取ります。 この例ではWebアプリケーションを作成するため、標準の
WebSecurityConfigurerAdapter
を拡張します
WebSecurityConfigurerAdapter
。 これは次のようなものです。
@EnableOAuth2Sso public static class LoginConfigurer extends WebSecurityConfigurerAdapter { @Override public void configure(HttpSecurity http) throws Exception { http.antMatcher("/main/**").authorizeRequests().anyRequest() .authenticated(); } }
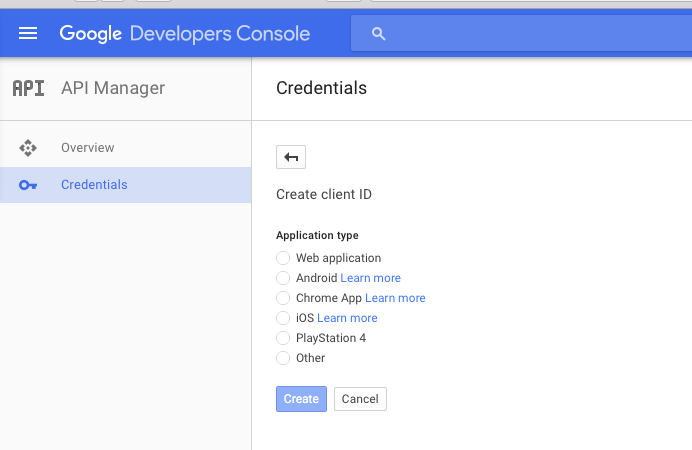
ここでmainはアプリケーションの完全なルートであり、それに対するすべてのリクエストは認証される必要があります。 ここで、Googleサービスを使用した認証の構成を見ていきましょう。 これを行うには、シークレットコードを作成し、プロバイダーからのクライアントIDに関連付ける必要があります。 ここで実行できます: https : //console.developers.google.com
クライアントIDを作成するためのウィンドウは次のとおりです。
Webアプリケーションを選択し、認証に成功した後にアプリケーションの名前とリダイレクトポイントを指定すると、次のウィンドウが表示されます。
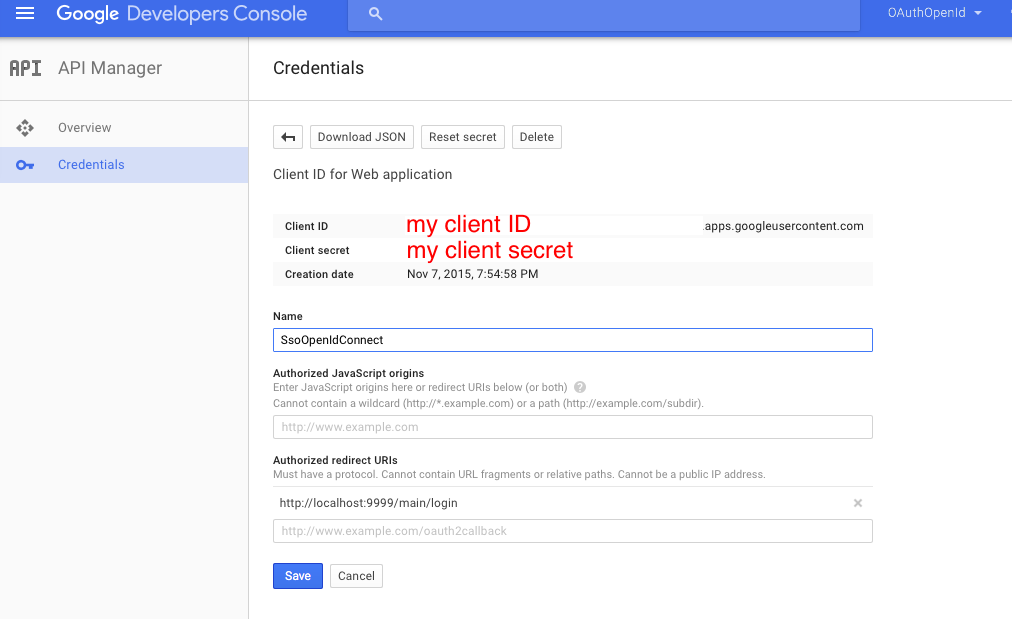
クライアントIDとクライアントシークレットが示されている場所に、自分のIDとシークレットが表示されます。 次に、構成を作成します。
spring: profiles: google security: oauth2: client: clientId: my client ID.apps.googleusercontent.com clientSecret: my client secret accessTokenUri: https://accounts.google.com/o/oauth2/token userAuthorizationUri: https://accounts.google.com/o/oauth2/auth scope: openid profile resource: jwt.keyUri: userInfoUri: https://www.googleapis.com/oauth2/v3/userinfo
スコープでopenidが指定されるだけでなく、プロファイルも指定されることに注意してください-これにより、アプリケーションに具体的に与えられるアクセスをログインで指定できます。 googleにはさまざまなサービスがあるため、設定に追加するだけでこれらのサービスにアクセスできます。
サービスの作業を実行するユーザーのデータを表示するには、プリンシパルから情報を取得するだけで十分です。 これを行う最も簡単な方法は次のとおりです。
@RequestMapping("/user") public Principal user(Principal user) { return user; }
そして今、それをすべてまとめてください。 以下は、IDEのアプリケーションのスクリーンショットとすべてのファイルのリストです。
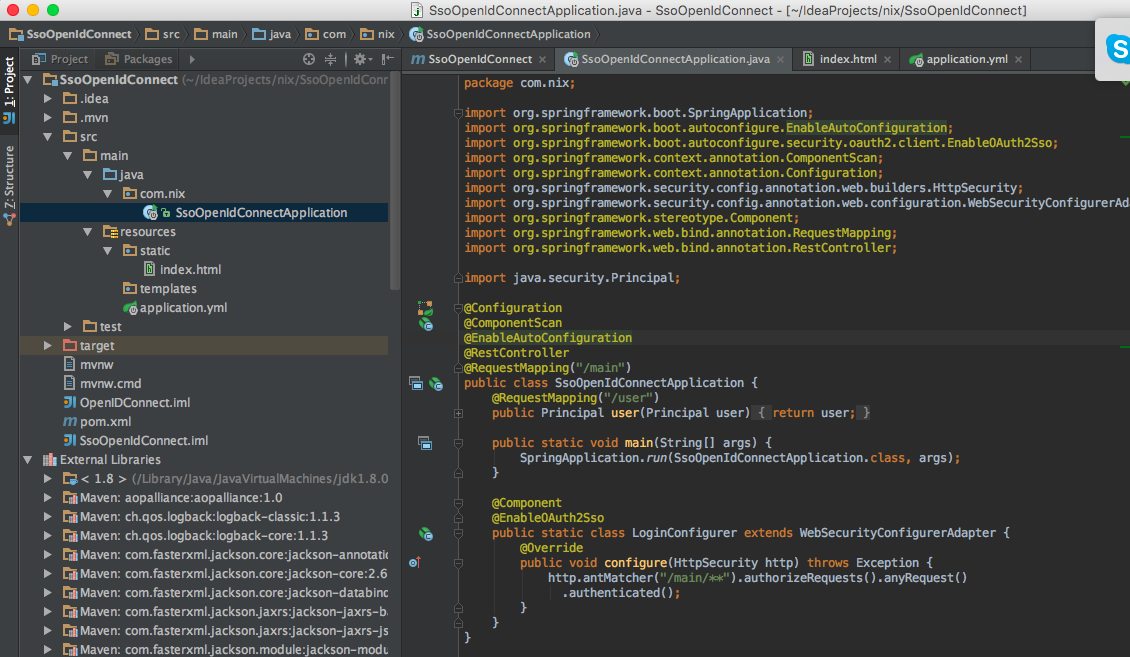
アプリケーション:
package com.nix; import org.springframework.boot.SpringApplication; import org.springframework.boot.autoconfigure.EnableAutoConfiguration; import org.springframework.boot.autoconfigure.security.oauth2.client.EnableOAuth2Sso; import org.springframework.context.annotation.ComponentScan; import org.springframework.context.annotation.Configuration; import org.springframework.security.config.annotation.web.builders.HttpSecurity; import org.springframework.security.config.annotation.web.configuration.WebSecurityConfigurerAdapter; import org.springframework.stereotype.Component; import org.springframework.web.bind.annotation.RequestMapping; import org.springframework.web.bind.annotation.RestController; import java.security.Principal; @Configuration @ComponentScan @EnableAutoConfiguration @RestController @RequestMapping("/main") public class SsoOpenIdConnectApplication { @RequestMapping("/user") public Principal user(Principal user) { return user; } public static void main(String[] args) { SpringApplication.run(SsoOpenIdConnectApplication.class, args); } @Component @EnableOAuth2Sso public static class LoginConfigurer extends WebSecurityConfigurerAdapter { @Override public void configure(HttpSecurity http) throws Exception { http.antMatcher("/main/**").authorizeRequests().anyRequest() .authenticated(); } } }
それへの設定(application.yml)。 Spring Bootで設定を実行する場合、アクティブなプロファイルとして「google」を指定することを忘れないでください。
server: port: 9999 security: ignored: /,/favicon.ico,/index.html sessions: ALWAYS oauth2: sso: loginPath: /main/login --- spring: profiles: google security: oauth2: client: clientId: my client ID.apps.googleusercontent.com clientSecret: my client secret accessTokenUri: https://accounts.google.com/o/oauth2/token userAuthorizationUri: https://accounts.google.com/o/oauth2/auth scope: openid profile resource: jwt.keyUri: userInfoUri: https://www.googleapis.com/oauth2/v3/userinfo
さて、index.html:
<html> <head> <script src="https://ajax.googleapis.com/ajax/libs/jquery/1.11.3/jquery.min.js"></script> <script> $(document).ready(function() { $("#userInfo").click(function(){ $.get("main/user", function(data, status) { if (status === "success") { $("#userData").text(JSON.stringify(data, null, '\t')); } }); }); }); </script> </head> <body> <div> <a href='main/login' id="login">login</a> <button id="userInfo">User info</button> <pre id="userData"></pre> </div> </body> </html>
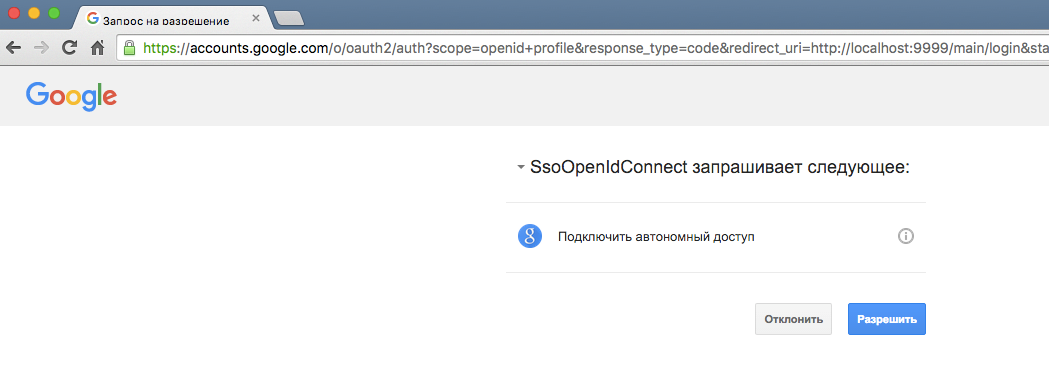
これは、起動時のアプリケーションの認証の外観です。
上記のすべてのアクションの結果、GoogleをOpenID Connectのプロバイダーとして使用して、クラウドで動作できるシングルサインオンアプリケーションを取得しました。 必要に応じて、同様に構成され、同じシングルサインオンを使用する他の多くのマイクロサービスを作成できます。 Googleのすべての設定が設定にあるという事実により、別のプロバイダーにすばやく切り替えることができます。 また、SSOの設定は明らかに複雑ですが、このソリューションは基本認証と同じくらい簡単です。