はじめに
インターネットにプログラム設定を保存する方法はたくさんありますが、それらはすべて何らかの形で散在しているので、それらをまとめて使用方法をペイントすることにしました。
C#およびapp.config
テーマはすでにハブでそれ専用になっているため、... pass
C#およびProperties.Settings
Properties.Settingsに関する情報
Organization Properties.Settingsは、ユーザーフォルダーにある通常のxmlファイルです。
C:\ Users \ [ユーザー名] \ AppData \ Local \ [(プロジェクト名)または(AssemblyCompany)] \ [name project_cashBuild] \ [AssemblyVersion] \ user.config
最初に、Properties.Settingsにこのような変数を作成する必要があります。 [プロパティ]-> [Settings.settings]に移動します。
プロパティ-> VS 2013のSettings.settings 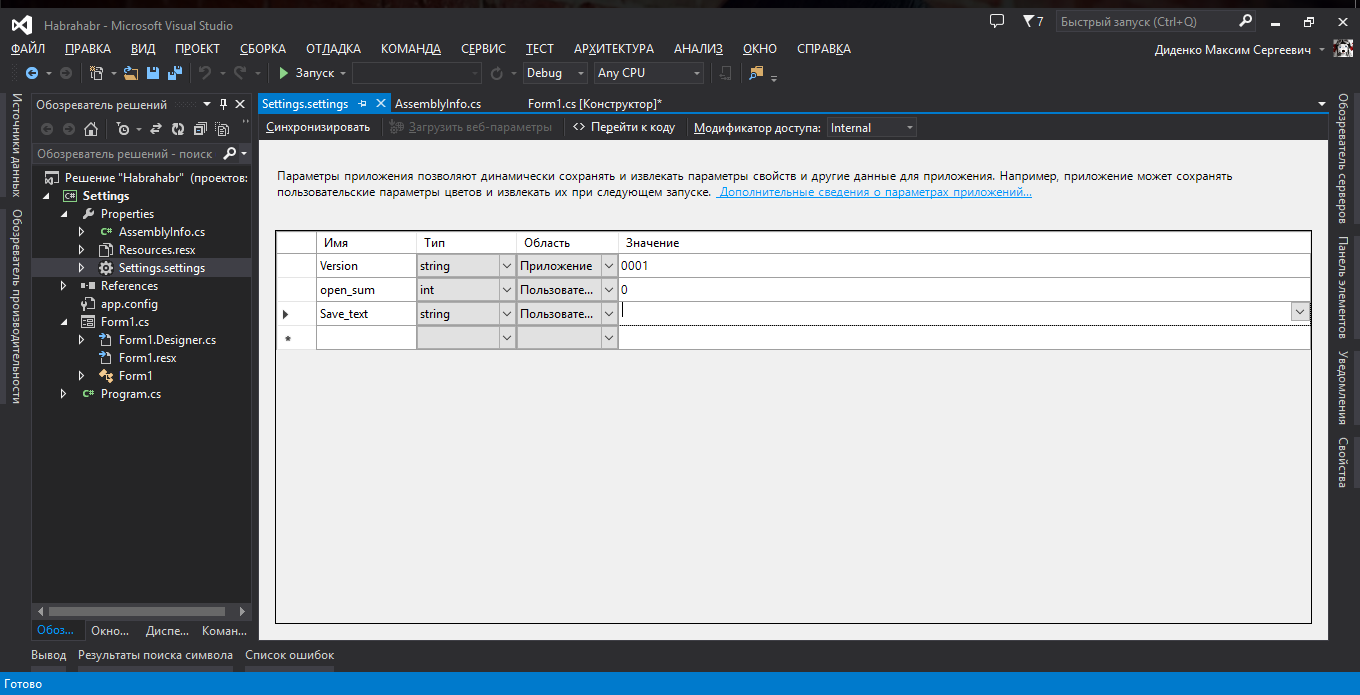
3つの変数を作成し、それらの使用領域を選択しました。2ユーザー領域と1アプリケーションです。
エリアの区別は簡単です。 アプリケーション領域は読み取りのみが可能で、ユーザーは変更および読み取りができます。
変数に戻ります。
- バージョンは、プログラムのバージョンです。 アプリケーションのラインとスコープを定義しました。 なぜなら バージョンには文字が含まれる場合があります(たとえば、bはベータ版です)。 そして、彼はアプリケーションのバージョンが変更されないように領域を選択しました(AssemblyVersionはだれにも使用されないためです)。
- Save_textは、テキストを保存する変数です。
- open_sum-プログラムを開いた回数。
それではコードに移りましょう
コードForm1.cs
namespace Habrahabr { public partial class Form1 : Form { public Form1() { InitializeComponent(); this.Text += " " + Properties.Settings.Default.Version; // , . Properties.Settings.Default.open_sum++; // +1 - . label2.Text = Properties.Settings.Default.open_sum.ToString(); // Label2 - . richTextBox1.Text = Properties.Settings.Default.Save_text; // Properties.Settings.Default.Save(); // . } private void button1_Click(object sender, EventArgs e) { Properties.Settings.Default.Save_text = richTextBox1.Text; // richTextBox1 Save_text Properties.Settings.Default.Save(); // . MessageBox.Show(" ", "", MessageBoxButtons.OK, MessageBoxIcon.Asterisk); // , . } } }
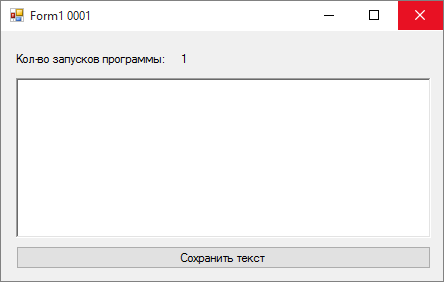
プログラム結果
最初の起動では、開始数が1であることがわかります。また、richTextBox1にはテストがありません。
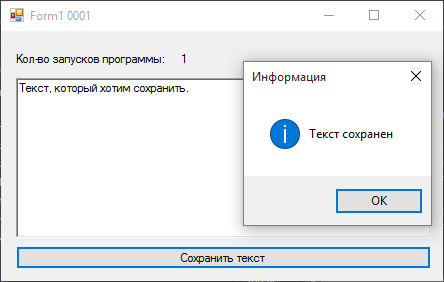
次に、テキストを作成して保存します。
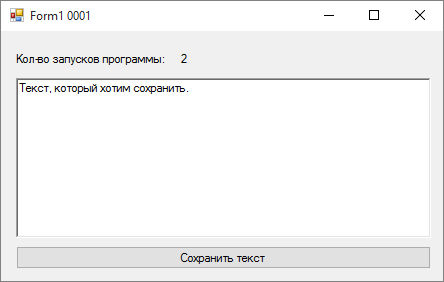
2回目の開始時に、テキストが保存され、開始数が既に2であることがわかります。
おわりに
1つのプロジェクトで異なる可視領域で作業する必要がある場合、このオブジェクトを使用すると非常に便利です。 この方法は、通常のユーザーがプログラム設定ファイルを探し回る必要がない場合に適しています。
C#およびiniファイル
iniファイルを使用すると、すべてが元に戻り、プログラムの隣のフォルダーに格納されます。これにより、ユーザーはプログラム外の設定を変更できます。 この方法は、プログラム設定を手動で入力する場合に適しています。 たとえば、ライセンスなしでゲームを起動するためのエミュレータ(revLoader)。
では、トピックに移りましょう。 このタイプのファイルを操作するには、そのファイルを操作するためのクラスを作成する必要があります。 「IniFile」などのクラスを作成し、存在しない名前空間を接続します。
using System.IO; using System.Reflection; using System.Runtime.InteropServices; using System.Text;
そして今、順番に分析します:
コードIniFiles.cs
using System.IO; using System.Reflection; using System.Runtime.InteropServices; using System.Text; namespace IniFiles { class IniFile { string Path; // . [DllImport("kernel32")] // kernel32.dll WritePrivateProfilesString static extern long WritePrivateProfileString(string Section, string Key, string Value, string FilePath); [DllImport("kernel32")] // kernel32.dll, GetPrivateProfileString static extern int GetPrivateProfileString(string Section, string Key, string Default, StringBuilder RetVal, int Size, string FilePath); // . public IniFile(string IniPath) { Path = new FileInfo(IniPath).FullName.ToString(); } // ini- . public string ReadINI(string Section, string Key) { var RetVal = new StringBuilder(255); GetPrivateProfileString(Section, Key, "", RetVal, 255, Path); return RetVal.ToString(); } // ini-. . public void Write(string Section, string Key, string Value) { WritePrivateProfileString(Section, Key, Value, Path); } // . public void DeleteKey(string Key, string Section = null) { Write(Section, Key, null); } // public void DeleteSection(string Section = null) { Write(Section, null, null); } //, , public bool KeyExists(string Key, string Section = null) { return ReadINI(Section, Key).Length > 0; } } }
次に、メインプログラムに移動します。
コードForm1.cs
using System; using System.Collections.Generic; using System.ComponentModel; using System.Data; using System.Drawing; using System.Linq; using System.Text; using System.Windows.Forms; namespace IniFiles { public partial class Form1 : Form { IniFile INI = new IniFile("config.ini"); public Form1() { InitializeComponent(); auto_read(); } private void auto_read() { if (INI.KeyExistsINI("SettingForm1", "Width")) numericUpDown2.Value = int.Parse(INI.ReadINI("SettingForm1", "Height")); else numericUpDown1.Value = this.MinimumSize.Height; if (INI.KeyExistsINI("SettingForm1", "Height")) numericUpDown1.Value = int.Parse(INI.ReadINI("SettingForm1", "Width")); else numericUpDown2.Value = this.MinimumSize.Width; if (INI.KeyExistsINI("SettingForm1", "Width")) textBox1.Text = INI.ReadINI("Other", "Text"); this.Height = int.Parse(numericUpDown1.Value.ToString()); this.Width = int.Parse(numericUpDown2.Value.ToString()); } private void button1_Click(object sender, EventArgs e) { INI.WriteINI("SettingForm1", "Height", numericUpDown2.Value.ToString()); INI.WriteINI("SettingForm1", "Width", numericUpDown1.Value.ToString()); INI.WriteINI("Other", "Text", textBox1.Text); MessageBox.Show(" SettingForm1 Other ", "", MessageBoxButtons.OK, MessageBoxIcon.Asterisk); // , . } private void button2_Click(object sender, EventArgs e) { auto_read(); // . } private void button3_Click(object sender, EventArgs e) { INI.WriteINI("SettingForm1", "Height", numericUpDown2.Value.ToString()); INI.WriteINI("SettingForm1", "Width", numericUpDown1.Value.ToString()); this.Height = int.Parse(numericUpDown1.Value.ToString()); this.Width = int.Parse(numericUpDown2.Value.ToString()); MessageBox.Show(" SettingForm1 ", "", MessageBoxButtons.OK, MessageBoxIcon.Asterisk); // , . } } }
プログラム結果
最初の起動時には、config.iniファイルはありません。 したがって、チェックするとき、fasleは戻り、ウィンドウを最小パラメーターと同等にします。
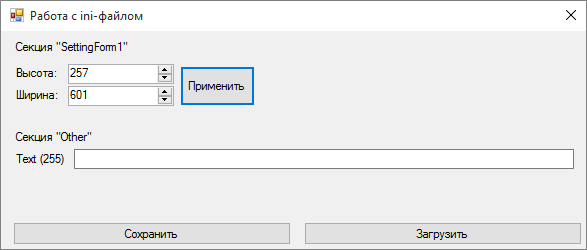
ウィンドウの設定を変更し、「適用」をクリックします
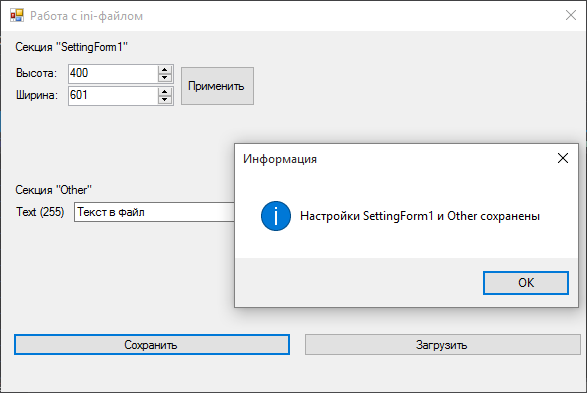
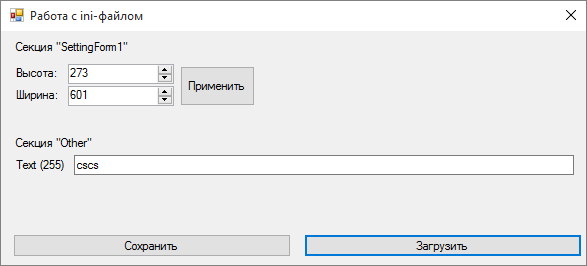
config.iniファイルを手で編集し、[ダウンロード]をクリックします。
次回は、xmlファイルとバイナリファイルの操作について説明します。