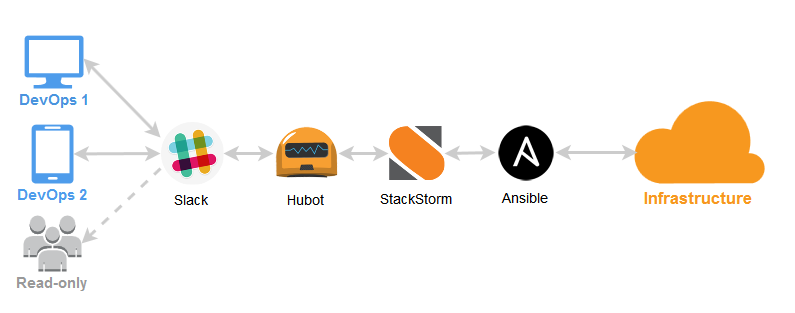
ChatOpsとは何ですか?
ChatOpsは、インフラストラクチャでの作業が一般的なチャットに移行されるときに、DevOpsの世界ではまだ新鮮で珍しい出来事です。 開発者/システム管理者はチャットから直接コマンドを実行でき、開発者/システム管理者はリアルタイムで何が起こっているかを確認し、変更履歴を表示し、チームを実行し、仕事に関するコミュニケーションを維持し、経験を共有することさえできます。 したがって、情報とワークフローはチーム全体に属し、これには多くの利点があります。
コードの展開やチャットからのサーバーの展開、監視スケジュールの表示、SMSの送信、クラスターの管理、シェルコマンドの実行などを考えることができます。 ChatOpsは、非常に複雑なCI / CDシステムの高レベルの表現であり、次のようなチャットコマンドでシンプルさをもたらします。 このアプローチは、可視性を改善し、展開プロセスの複雑さを軽減することには驚異的です。
ChatOpsの改善
StackStormは、自動化とChatOpsに特に重点を置いたオープンソースプロジェクトです。 このプラットフォームは、構成管理、監視、グラフ、アラートなどの膨大な数の既存のDevOpsツールを接続します。 一緒に、単一のチェックポイントからすべてを支配できます。 また、これはChatOpsの観点から理想的です。チャットから直接ツールボックスを制御することで、考えられるワークフローと考えられないワークフローを作成および自動化できます。
StackStormにはAnsibleが統合されており、バージョン1.0以降では、より多くのChatOps機能が1.2および1.4リリースで追加され、ボットを使用して面白い猫の写真を投稿するだけでなく、ChatOpsの実際のアプリケーションへの道を開きます。 この記事では、StackStormプラットフォームを使用してChatOpsとAnsibleを動作させる方法を説明します。
ちなみに、StackStormはAnsibleのように、Pythonで記述された宣言型であり、Yaml + Jinjaを使用しています。これにより、わかりやすくなります。
計画
最初に、Ubuntu 14で実行される制御マシンをインストールします。次に、Hubotフレームワークを備えたAnsibleおよびChatOpsコントロールパックを含むStackStormプラットフォームを構成します。 最後に、システム全体をSlackチャットに接続し、Ansibleのインタラクティブな使用の簡単だが実際の例をいくつか示します。
始めましょう。同時に、どこまで進んだか、 技術的な特異点が来たかどうかを確認し、チャットボットへのルートアクセスを許可し、100以上のサーバーやデータセンターを管理できるようにします(ちなみに、RackSpaceはChatOpsと連携します)。
ステップ0. Slackを準備する
すでに述べたように、チャットプラットフォームとしてSlack.comを使用します(他の統合も利用可能です)。 Slackアカウントをまだお持ちでない場合は登録してください。 設定でHubot統合を有効にします。
Hubot - ChatOps専用に設計されたGitHubボットフレームワーク

その結果、Slackは次のようなAPIトークンを提供します。
HUBOT_SLACK_TOKEN=xoxb-5187818172-I7wLh4oqzhAScwXZtPcHyxCu
次に、StackStormプラットフォームを構成し、実際の使用例を示します。もちろん、独自のChatOpsコマンドを作成する方法を説明します。
しかし、待って、簡単な方法があります!
最も怠Forな
怠け者(ほとんどのDevOps開発者)には、Vagrantを使用して特別に準備されたリポジトリがあり、シンプルなbashスクリプトの助けを借りて必要なものをすべてインストールし、スタートラインからフィニッシュラインに直接移動して、自動インストール後にショーケース SlackチャットからChatOpsコマンドをすぐに起動できます-ansible-chatops :
# export HUBOT_SLACK_TOKEN=xoxb-5187818172-I7wLh4oqzhAScwXZtPcHyxCu git clone https://github.com/StackStorm/showcase-ansible-chatops.git cd showcase-ansible-chatops vagrant up
詳細に興味がある人のために-自動モードから手動モードに切り替えて、すべてのステップを実行します。 うまくいかない場合は注意してください-ansible&chatopsデモリポジトリの例をご覧ください。
ステップ1. StackStormをインストールする
インストールは簡単です。 1チームのみ:
curl -sSL https://stackstorm.com/packages/install.sh | sudo bash -- --user=demo --password=demo
これはデモンストレーション用であることを忘れないでください。 運用環境を展開するときは、 Ansible Playbookを使用して署名を確認し 、インストールコマンドを1行で信頼しないでください! インストールの詳細は、ドキュメントに記載されています: docs.stackstorm.com/install/deb.html
ステップ2. StackStormプラグインのインストール:Ansible
StackStormの統合パック(プラグイン)のアイデアは、システムを他のツールや外部サービスと接続するというものです。
そのため、Ansibleパックが必要です。インストール:
st2 pack install ansible
Ansible自体はPython virtualenvで利用可能になります:
/opt/stackstorm/virtualenvs/ansible
統合の完全なリスト: exchange.stackstorm.org 、その中:AWS
、GitHub
、RabbitMQ
、Pagerduty
、Jenkins
、Nagios
、Docker
、合計で100以上
ステップ3. ChatOpsを構成する
次に、環境変数を使用して
/opt/stackstorm/chatops/st2chatops.env
ファイルを構成する必要があります。
stanley
という名前のSlackボットを探す方法は次のとおりです。
# Bot name export HUBOT_NAME=stanley export HUBOT_ALIAS='!' # StackStorm API key # Use: `st2 apikey create -k` to generate # Replace with your key (!) export ST2_API_KEY="123randomstring789" # ST2 AUTH credentials # Replace with your username/password (!) export ST2_AUTH_USERNAME="demo" export ST2_AUTH_PASSWORD="demo" # Configure Hubot to use Slack export HUBOT_ADAPTER="slack" # Replace with your token (!) export HUBOT_SLACK_TOKEN="xoxb-5187818172-I7wLh4oqzhAScwXZtPcHyxCu"
変更後、サービスを再起動することを忘れないでください。
sudo service st2chatops restart
ステップ4.最初のChatOpsエクスペリエンス
この時点で、Stanleyボットはオンラインチャットしているはずです。 彼を特定のSlackルームに招待するには:
/invite @stanley
利用可能なコマンドのリストを取得します。
!help
きっとあなたはshipitが好きになるでしょう:
!ship it
既存のチームで十分にプレーしたので、私たちは本当に真剣なことをします。
ステップ5.独自のChatOpsコマンドを作成する
StackStormの機能の1つは、チームの周りに単純なエイリアス/ラッパーを作成する機能であり、ChatOpsでの作業が容易になります。 長いコマンドを入力する代わりに、それをより友好的で簡単な構文糖にバインドすることができます。
したがって、必要なコマンドを含む独自のStackStormパックを作成します。 GitHubでStackStormテンプレートパックをフォークします。 最初のアクションエイリアス
aliases/ansible.yaml
:
--- name: "chatops.ansible_local" action_ref: "ansible.command_local" description: "Run Ansible command on local machine" formats: - display: "ansible <command>" representation: - "ansible {{ args }}" result: format: | Ansible command `{{ execution.parameters.args }}` result: {~} {% if execution.result.stderr %}*Stdout:* {% endif %} ```{{ execution.result.stdout }}``` {% if execution.result.stderr %}*Stderr:* ```{{ execution.result.stderr }}```{% endif %} extra: slack: color: "{% if execution.result.succeeded %}good{% else %}danger{% endif %}"
参考:上記のエイリアスは、 ansible st2統合パックを使用します
新しく作成されたGitHubリポジトリに変更を送信し、パックをインストールできます。 これにはすでにChatOpsエイリアスがあります。
!pack install https://github.com/armab/st2_chatops_aliases
Slackチャットから簡単なAnsibleアドホックコマンドを直接実行できるようになりました。
!ansible "uname -a"

低レベルでは、これは次と同じです。
/opt/stackstorm/virtualenvs/ansible/bin/ansible all --connection=local --args='uname -a' --inventory-file='127.0.0.1,'
しかし、インタラクティブなChatOpsのより便利な例を見てみましょう。
例1.サーバーのステータスを取得する
Ansibleには、ホストに接続し、成功すると
pong
を返すpingモジュールがあります。 シンプルだが強力な例で、ターミナルに行くことなく、数秒でチャットからサーバーのステータスを直接理解できます。
これを行うには、実際のコマンドと
action alias
を起動する
action
をパッケージに作成します。これは、アクションの構文糖であり、このようなChatOpsコンストラクトを作成できます。
!status 'web'
アクション
actions/server-status.yaml
:
--- name: server_status description: Show server status by running ansible ping ad-hoc command runner_type: local-shell-cmd entry_point: "" enabled: true parameters: sudo: description: "Run command with sudo" type: boolean immutable: true default: true kwarg_op: immutable: true cmd: description: "Command to run" type: string immutable: true default: "/opt/stackstorm/virtualenvs/ansible/bin/ansible {{hosts}} --module-name=ping" hosts: description: "Ansible hosts to ping" type: string required: true
ところで、bash
スクリプトに加えて、ActionはPythonランナーまたはjson
を返すことができる任意のバイナリと連携できます-これはすべて使用の柔軟性です。
アクションエイリアス
aliases/server_status.yaml
:
--- name: chatops.ansible_server_status action_ref: st2_chatops_aliases.server_status description: Show status for hosts (ansible ping module) formats: - display: "status <hosts>" representation: - "status {{ hosts }}" - "ping {{ hosts }}" result: format: | Here is your status for `{{ execution.parameters.hosts }}` host(s): {~} ```{{ execution.result.stdout }}``` extra: slack: color: "{% if execution.result.succeeded %}good{% else %}danger{% endif %}" fields: - title: Alive value: "{{ execution.result.stdout|regex_replace('(?!SUCCESS).', '')|wordcount }}" short: true - title: Dead value: "{{ execution.result.stdout|regex_replace('(?!UNREACHABLE).', '')|wordcount }}" short: true footer: "{{ execution.id }}" footer_icon: "https://stackstorm.com/wp/wp-content/uploads/2015/01/favicon.png"
正しいホストをAnsibleインベントリファイルに追加してください:
/etc/ansible/hosts
リポジトリにコードを送信した後、チャットからパックをリロードすることを忘れないでください:
!pack install armab/st2_chatops_aliases
すべてのChatOps設定をst2パックの形式で保存し、リポジトリから変更をキャッチできるのは非常に便利です。インフラストラクチャはコードのようなものです。
Slackで新しく作成されたコマンドの結果:
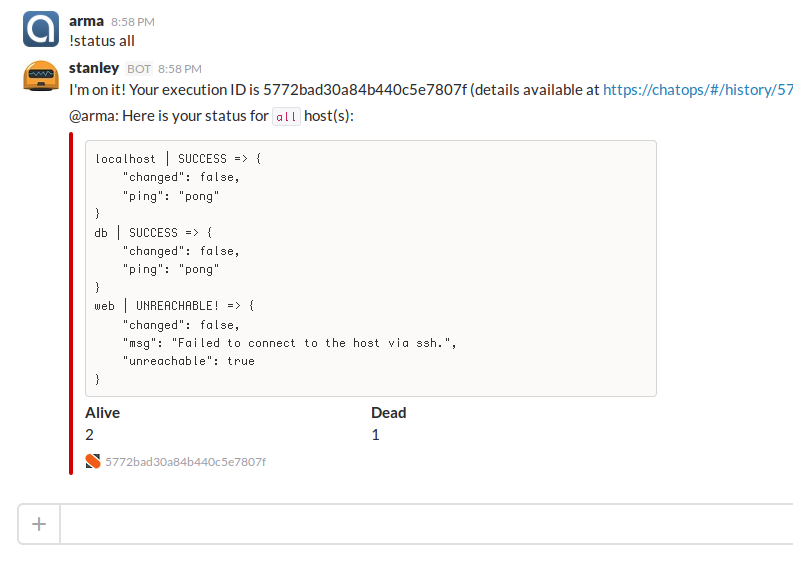
CEOでさえ、サーバーにアクセスしなくてもステータスを確認できます。 このアプローチを使用すると、インフラストラクチャの通信、展開、および作業がチャットで直接行われます。オフィスにいるか、リモートで作業しているか(私たちの一部はビーチから直接作業できます)。
例2.サービスのリロード
サービスの簡単な再起動が助けになったということはあなたに起こったことがありますか? 理想的な方法ではありませんが、多くの場合、迅速な修正が必須です。 特定のサーバーで指定されたサービスをオーバーロードするChatOpsコマンドを作成しましょう。
タスクは、この設計を取得することです。
!service restart "rabbitmq-server" on "mq-01"
これを行うには、既存のst2パッケージに
actions/service_restart.yaml
を作成します。
--- name: service_restart description: Restart service on remote hosts runner_type: local-shell-cmd entry_point: "" enabled: true parameters: sudo: description: "Run command with sudo" type: boolean immutable: true default: true kwarg_op: immutable: true cmd: description: "Command to run" type: string immutable: true default: "/opt/stackstorm/virtualenvs/ansible/bin/ansible {{hosts}} --become --module-name=service --args='name={{service_name}} state=restarted'" hosts: description: "Ansible hosts" type: string required: true service_name: description: "Service to restart" type: string required: true
ChatOpsエイリアス
aliases/service_restart.yaml
:
--- name: chatops.ansible_service_restart action_ref: st2_chatops_aliases.service_restart description: Restart service on remote hosts formats: - display: "service restart <service_name> on <hosts>" representation: - "service restart {{ service_name }} on {{ hosts }}" result: format: | Service restart `{{ execution.parameters.service_name }}` on `{{ execution.parameters.hosts }}` host(s): {~} {% if execution.result.stderr %} *Exit Status*: `{{ execution.result.return_code }}` *Stderr:* ```{{ execution.result.stderr }}``` *Stdout:* {% endif %} ```{{ execution.result.stdout }}``` extra: slack: color: "{% if execution.result.succeeded %}good{% else %}danger{% endif %}" fields: - title: Restarted value: "{{ execution.result.stdout|regex_replace('(?!SUCCESS).', '')|wordcount }}" short: true - title: Failed value: "{{ execution.result.stdout|regex_replace('(?!(FAILED|UNREACHABLE)!).', '')|wordcount }}" short: true footer: "{{ execution.id }}" footer_icon: "https://stackstorm.com/wp/wp-content/uploads/2015/01/favicon.png"
結果:
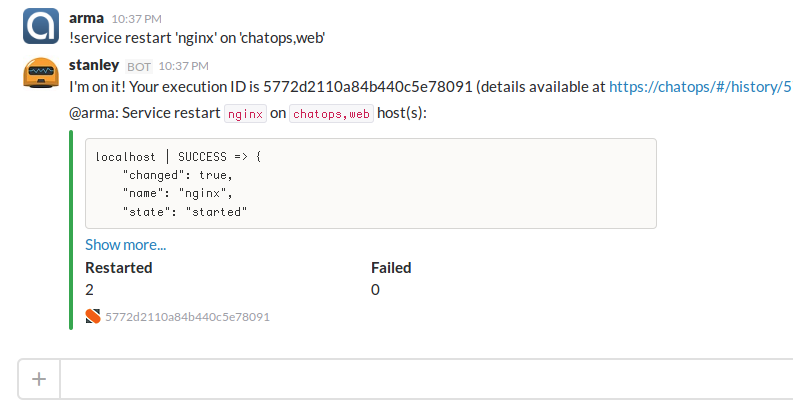
そして、あなたは何を知っていますか? Slackモバイルアプリのおかげで、携帯電話から直接サービスをリロードできます!
例3. MySQLプロセスリスト
MySQLサーバーで実行されているSQLクエリのリストを表示する簡単なSlackコマンドを作成します。
!show mysql processlist
アクション
actions/mysql_processlist.yaml
:
--- name: mysql_processlist description: Show MySQL processlist runner_type: local-shell-cmd entry_point: "" enabled: true parameters: sudo: immutable: true default: true kwarg_op: immutable: true cmd: description: "Command to run" type: string immutable: true default: "/opt/stackstorm/virtualenvs/ansible/bin/ansible {{ hosts }} --become --become-user=root -m shell -a \"mysql --execute='SHOW PROCESSLIST;' | expand -t 10\"" hosts: description: "Ansible hosts" type: string default: db
ChatOpsのアクションエイリアス:
aliases/mysql_processlist.yaml
:
--- name: chatops.mysql_processlist action_ref: st2_chatops_aliases.mysql_processlist description: Show MySQL processlist formats: - display: "show mysql processlist <hosts=db>" representation: - "show mysql processlist {{ hosts=db }}" - "show mysql processlist on {{ hosts=db }}" result: format: | {% if execution.status == 'succeeded' %}MySQL queries on `{{ execution.parameters.hosts }}`: ```{{ execution.result.stdout }}```{~}{% else %} *Exit Code:* `{{ execution.result.return_code }}` *Stderr:* ```{{ execution.result.stderr }}``` *Stdout:* ```{{ execution.result.stdout }}``` {% endif %}
hosts
パラメーターをオプション(デフォルトでは
db
)にしたため、これら2つのコマンドは同等です。
!show mysql processlist !show mysql processlist 'db'
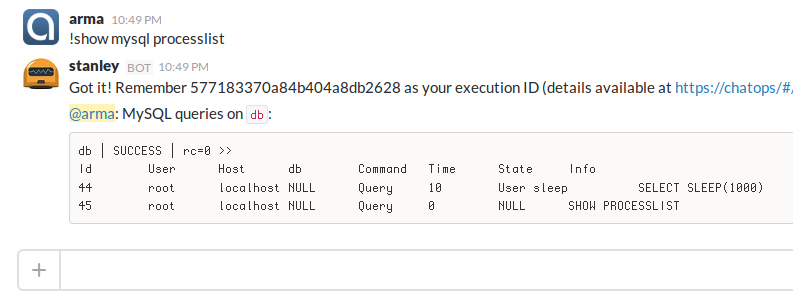
DBAが幸せになります!
例4. nginxからHTTP統計を取得する
nginxログからHTTPステータスコードの配列を取得し、それらを番号で並べ替えてチャットで適切に表示して、正常範囲内であるかどうかにかかわらず、Webサーバーに
200
または
50x
エラーがいくつあるかを理解します。
!show nginx stats on 'web'
これを行うには、シェルコマンド
actions/http_status_codes.yaml
を実行するアクションを作成します。
--- name: http_status_codes description: Show sorted http status codes from nginx logs runner_type: local-shell-cmd entry_point: "" enabled: true parameters: sudo: immutable: true default: true kwarg_op: immutable: true cmd: description: "Command to run" type: string immutable: true default: "/opt/stackstorm/virtualenvs/ansible/bin/ansible {{ hosts }} --become -m shell -a \"awk '{print \\$9}' /var/log/nginx/access.log|sort |uniq -c |sort -k1,1nr 2>/dev/null|column -t\"" hosts: description: "Ansible hosts" type: string required: true
エイリアス
aliases/http_status_codes.yaml
:
--- name: chatops.http_status_codes action_ref: st2_chatops_aliases.http_status_codes description: Show sorted http status codes from nginx on hosts formats: - display: "show nginx stats on <hosts>" representation: - "show nginx stats on {{ hosts }}" result: format: "```{{ execution.result.stdout }}```"
Ansibleのコア開発者であるBrian Cocaの素晴らしいアイデアに感謝します!

ますます、
例5.セキュリティパッチ
Shellshockのような別の重大な脆弱性を緊急に修正する必要があると想像してください。 これを行うには、すべてのサーバーで
bash
を更新します。 Ansibleは、おそらくこのようなアトミック操作に最適なツールです。 しかし、単一行のansibleコマンドを実行する代わりに、堅実なプレイブックを作成しましょう。
playbooks/update_package.yaml
:
--- - name: Update package on remote hosts, run on 25% of servers at a time hosts: "{{ hosts }}" serial: "25%" become: True become_user: root tasks: - name: Check if Package is installed command: dpkg-query -l {{ package }} register: is_installed failed_when: is_installed.rc > 1 changed_when: no - name: Update Package only if installed apt: name={{ package }} state=latest update_cache=yes cache_valid_time=600 when: is_installed.rc == 0
Playbook
、パッケージが既にインストールされている場合にのみパッケージ
Playbook
更新します。操作は一度に20%のホスト(5つのステップで実行)で実行されます。 非常に多くのサーバーで
nginx
ようなもっと深刻なものを更新する必要があるときに役立ちます。 したがって、Webクラスター全体をdownに送信しません。 さらに、ロードバランサーからの切断をグループで追加できます。 実生活の例。
プレイブック変数
{{hosts}}
と
{{package}}
は、StackStormパッケージの
actions/update_package.yaml
由来することがわかります。
--- name: update_package description: Update package on remote hosts runner_type: local-shell-cmd entry_point: "" enabled: true parameters: sudo: immutable: true default: true kwarg_op: immutable: true timeout: default: 6000 cmd: description: "Command to run" immutable: true # default: "/opt/stackstorm/virtualenvs/ansible/bin/ansible-playbook /opt/stackstorm/packs/${ST2_ACTION_PACK_NAME}/playbooks/update_package.yaml --extra-vars='hosts={{ hosts }} package={{ package }}'" hosts: description: "Ansible hosts" type: string required: true package: description: "Package to upgrade" type: string required: true
アクションエイリアス。簡単なChatOpsコマンドとしてプレイブックを実行できます。
aliases/update_package.yaml
:
--- name: chatops.ansible_package_update action_ref: st2_chatops_aliases.update_package description: Update package on remote hosts formats: - display: "update <package> on <hosts>" representation: - "update {{ package }} on {{ hosts }}" - "upgrade {{ package }} on {{ hosts }}" result: format: | Update package `{{ execution.parameters.package }}` on `{{ execution.parameters.hosts }}` host(s): {~} {% if execution.result.stderr %} *Exit Status*: `{{ execution.result.return_code }}` *Stderr:* ```{{ execution.result.stderr }}``` *Stdout:* {% endif %} ```{{ execution.result.stdout }}``` extra: slack: color: "{% if execution.result.succeeded %}good{% else %}danger{% endif %}" fields: - title: Updated nodes value: "{{ execution.result.stdout|regex_replace('(?!changed=1).', '')|wordcount }}" short: true - title: Executed in value: ":timer_clock: {{ execution.elapsed_seconds | to_human_time_from_seconds }}" short: true footer: "{{ execution.id }}" footer_icon: "https://stackstorm.com/wp/wp-content/uploads/2015/01/favicon.png"
ここにあります:
!update 'bash' on 'all'
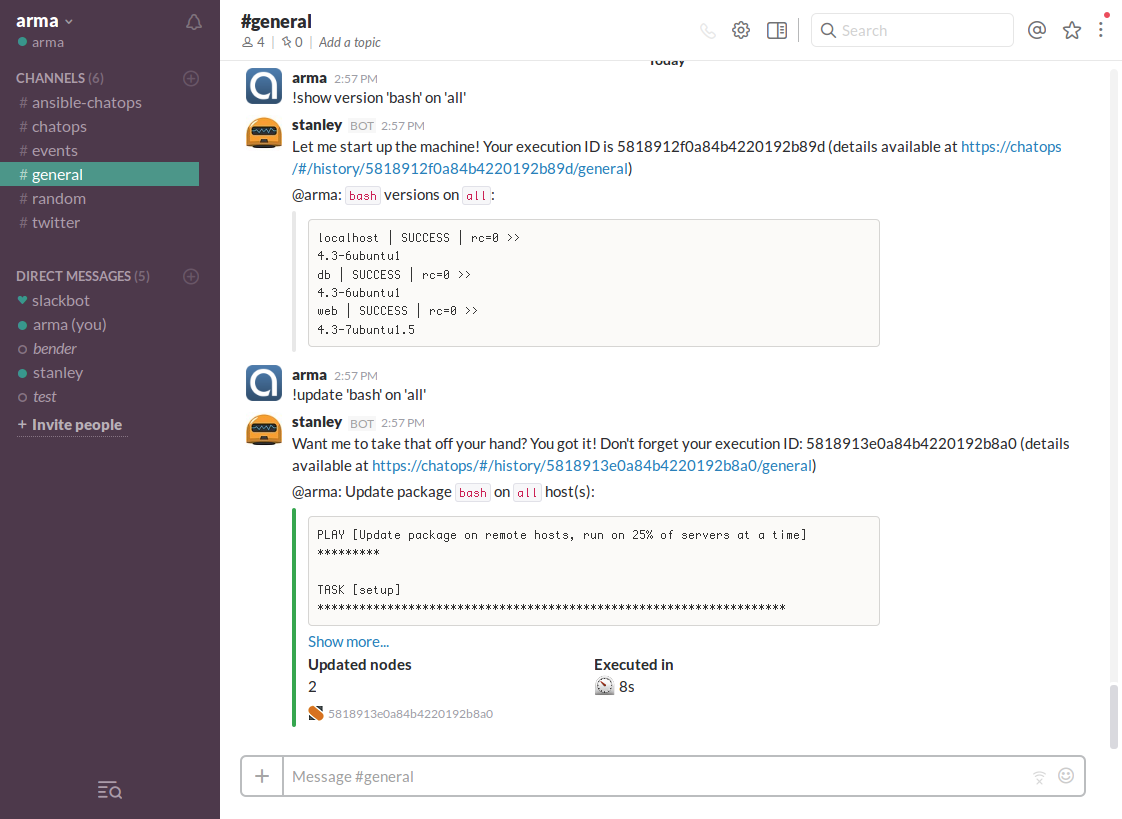
DevOpsエンジニアの仕事の重要な部分は、プロセスの改善、開発者の作業の容易化、チームコミュニケーションの改善、適切なツールの自動化と使用による問題の迅速な診断がすべて会社を成功させることです。
ChatOpsは、これらの問題をまったく新しい効果的な方法で解決するのに役立ちます。
結論として。 神聖な牛
ご存知のように、Ansible
cowsay
。 ChatOpsに移動しましょう!
まず、ユーティリティ自体をインストールします。
sudo apt-get install cowsay
アクション
actions/cowsay.yaml
:
--- name: cowsay description: Draws a cow that says what you want runner_type: local-shell-cmd entry_point: "" enabled: true parameters: sudo: immutable: true kwarg_op: immutable: true cmd: description: "Command to run" type: string immutable: true default: "/usr/games/cowsay {{message}}" message: description: "Message to say" type: string required: true
エイリアス
aliases/cowsay.yaml
:
--- name: chatops.cowsay action_ref: st2_chatops_aliases.cowsay description: Draws a cow that says what you want formats: - display: "cowsay <message>" representation: - "cowsay {{ message }}" ack: enabled: false result: format: | {% if execution.status == 'succeeded' %}Here is your cow: ```{{ execution.result.stdout }}``` {~}{% else %} Sorry, no cows this time {~} Exit Code: `{{ execution.result.return_code }}` Stderr: ```{{ execution.result.stderr }}``` Hint: Make sure `cowsay` utility is installed. {% endif %}
Cowの聖なるChatOpsに電話:
!cowsay 'Holy ChatOps Cow!'
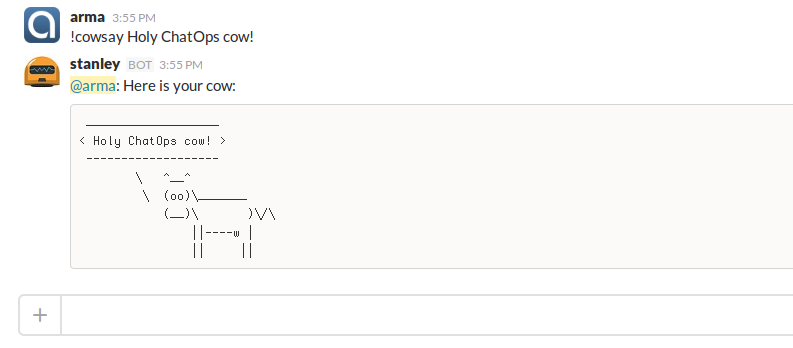
参考:コマンド実行のすべての結果は、StackStormコントロールパネルで表示できます。
https:// chatops / login:demo
password:demo
( Vagrantデモを使用しなかった場合、ホスト名をIPに置き換えます):
停止しないでください!
これらはシンプルですが、戦闘のユースケースです。 複数のDevOpsツールを組み合わせて動的なワークフローを作成する場合のより複雑なことについては、今後の記事で説明します。 ここで、 StackStormは状況に応じて決定を下し、すべての力を発揮します。これは、インシデント後の自己修復システムのようなイベント指向アーキテクチャと呼ばれます。
StackStormで必要な機能が見つからなかった場合は、アイデアを提案するか、 GitHubにプルリクエストを追加します (Pythonがメイン言語です)。 また、質問をしたり、体験を共有したりできるコミュニティがあります。 公開Slackチャンネル (#StackStorm
事前にインストールされています)およびIRC:#StackStorm
です。
ご清聴ありがとうございました。DevOpsの世界におけるこのかなり新しいアプローチの特徴を明らかにすることができたと思います。
また、どのような場合にChatOpsを使用しますか? アイデアやストーリーを共有してください(ストーリーが大好きです)。