
すべての良い一日。 今日は、 チェックポイントファイアウォールの構成と方法についてのサイクルを開始したいと思います。
Chekpointは1993年以来、ネットワークセキュリティソリューション企業です。 同社は、自身の管理\対話アーキテクチャ-SMART(SecurityManagment Architecture)の開発者としての地位を確立しています。 この概念に基づいて、Gaiaオペレーティングシステムは、最終的にIPSO(Nokia)OSとSPLAT OS(Unixベースのシステムに基づいたCPの初期開発)を組み合わせて作成されました。 このソフトウェアは、データ交換のセキュリティ(パケットフィルタリング、IPSなど)に関連する多くのテクノロジと、特定の接続をリアルタイムで制御することを主なタスクとする独自のステートフルインスペクションを実装しています。
残念ながら、Habréにはこのベンダーに関する記事はあまりありません。 私の意見では、もっと注目に値しますが。
経験豊富なセキュリティエンジニアが、この記事および後続の記事で新しい情報を見つけることはまずありません。 しかし、初心者にとっては、それらが役に立つことを願っています。 メインモジュールとシステム全体の動作原理を理解し、「ベストプラクティス」の構成例を検討します。
今日、デバイスのインストールと初期構成はアジェンダにあります。 猫へようこそ。
Habrには、2つのファイアウォールノードをインストールし、それらのクラスターを作成する方法に関する記事が既にありました。 私はその記事で考慮されなかった問題に注意を払おうとします。
ステージ0。準備
それでは始めましょう。
まず、機器を拾う必要があります。 実際には、2つのオプションしかありません。Checkpointラベルを貼って愛情を込めて貼り付け、特別に用意されたケースに入れてデバイスを購入するか、プラットフォームを自分で組み立てます。 いずれにせよ、デバイスの選択は非常に多くのパラメーターに依存します。 私たちの経験とベンダー自身が提供してくれたドキュメントだけに頼ることができます。 サポートされているサーバーのリストはここにあります 。 また、Checkpointから特定のデバイスを設計する際の負荷を大まかに計算することもできます( 慎重にPDFを参照)。 残念ながら、チェックポイントはデバイスにインストールされている機器に関する情報ではなく、RAMの量とインターフェイスの数のみを提供しますが、インターネットではCPUに関する情報を見つけることができます。
手順1. Gaiaオペレーティングシステムのインストール
プラットフォームを選択したら、オペレーティングシステムのインストールに進みます。 オペレーティングシステムといえば、Gaia(チェックポイントの最後のオペレーティングシステム)はRedHat 5.2ディストリビューションに基づいています。 そのため、以前にLinuxベースのオペレーティングシステムを使用したことがある場合は、多くの使い慣れたユーティリティとコマンドが表示されます。
ここでは、仮想環境のGaia R77.10を検討します。 このオペレーティングシステムの以前のバージョンと後続のバージョンをインストールする場合も同じです。 これまでのところ、最新のものはGaia R77.30です。
チェックポイントは、サイトでの登録
これで、必要なすべての準備が整い、インストールに直接進むことができます。
次のスクリーンショットのほとんどは説明を必要としません:さらに、さらに、準備ができています。 Mail。Agentまたはトピックに関連しない他のアプリケーションのインストールを申し出る人はいません。
注目したいのは、ディスクレイアウトだけです。 ハードドライブが8GB未満の場合、システムはエラーを表示し、インストールを停止します。 8〜15 GBの場合、システムはディスクを必要なパーティションに個別に分割します。 ボリュームが15GBを超える場合、このプロセスにわずかに影響を与えることができます。つまり、system-root(/)およびlogs(/ var / logs /)の下でパーティションのサイズを変更します。 この情報は、仮想マシンにCheckpointをインストールするユーザーに役立つ場合があります。 残りは基本ルールを知っていれば十分です。オペレーティングシステムのスナップショットがそこに配置されるため、「バックアップとアップグレード」セクションのサイズはシステムルートとログの合計以上でなければなりません。
管理サーバーとファイアウォールノードのディスクレイアウトに関するいくつかの推奨事項があります。
管理サーバー:
- ルートは少なくとも6 GBである必要があります。IPS、アプリケーション制御、URLフィルタリングなどの追加コンポーネント(ブレード)を使用する場合は、サイズを少なくとも10 GBに増やす必要があります。
- ログは私たちのすべてです。 少なくとも管理サーバー上。 サーバー管理の主な機能は、ルールの設定に加えて、すべての種類のログと更新を保存することなので、利用可能なすべてのスペースをそれらに割り当てます。
ファイアウォール:
- ファイアウォールが本当に必要とするパーティションはルートだけであり、追加のブレードをオンにした10GBでも十分です。
- ログのセクションのサイズはそれほど重要ではありません。ログは管理サーバーに書き込まれ、ファイアウォールではこのディレクトリは主に更新に使用されるため、5GBでも十分です。
たくさんの写真
図1.1
「このシステムにGaiaをインストール」を選択します。
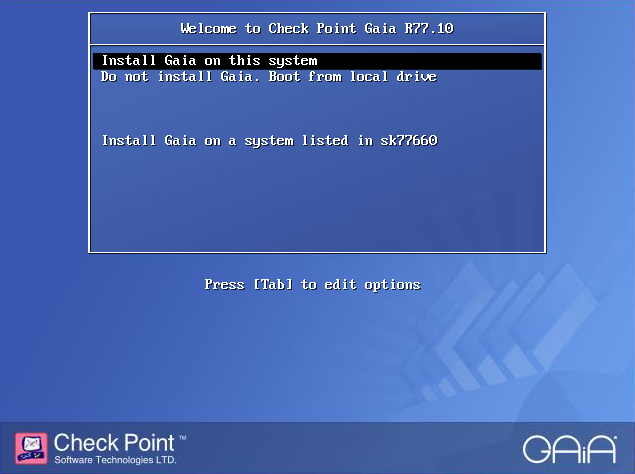
図1.2
ここでは、設置された機器に関する情報を見ることができます:

図1.3
言語を選択してください:
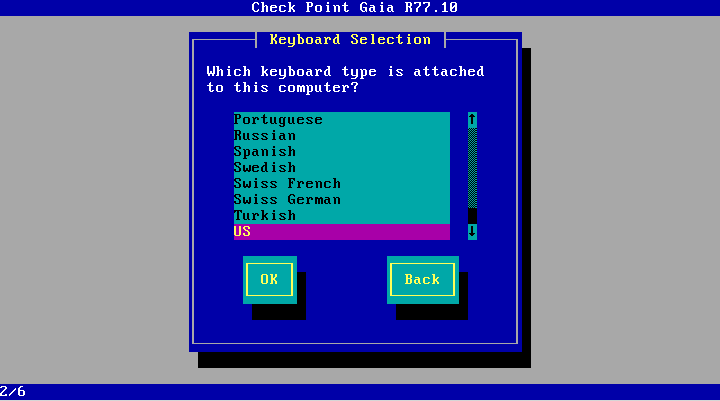
図1.4
ディスクをマークアップします。

図1.5
パスワードを作成します。

図1.6
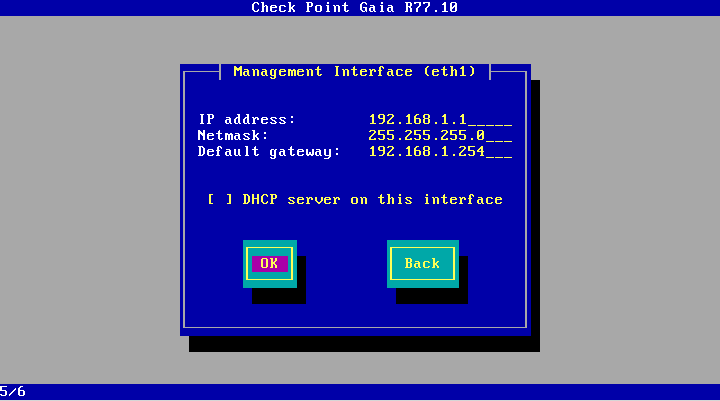
ここで、インターフェイスを選択して構成できます。これは、将来的にhttpsおよびsshを介してデバイスに接続するために使用します。

図1.7
直接設定。
その後、選択したサーバーにシステムがインストールされるまで少し待つ必要があります。
「このシステムにGaiaをインストール」を選択します。
図1.2
ここでは、設置された機器に関する情報を見ることができます:
図1.3
言語を選択してください:
図1.4
ディスクをマークアップします。
図1.5
パスワードを作成します。
図1.6
ここで、インターフェイスを選択して構成できます。これは、将来的にhttpsおよびsshを介してデバイスに接続するために使用します。
図1.7
直接設定。
その後、選択したサーバーにシステムがインストールされるまで少し待つ必要があります。
ステップ2.1セットアップの準備
オペレーティングシステムをインストールした後、すぐにポリシーやその他のファイアウォールチャームを構成することは論理的です。 しかし、ここでは、まずサーバーが実行する機能を選択する必要があることがわかりました。それがファイアウォールであるか管理サーバーであるかです。 したがって、初期構成には次の項目が含まれます。
- サーバーの役割を選択する
- 管理インターフェイスの設定
- アクセス規則
- DNS、NTP、プロキシサーバーのパラメーター(WebUIを介したプロキシのみ)
Checkpointをさらに使用するためのCheckpointの初期構成は、上記の記事で入手できます。 これからも同じことを試みますが、コマンドラインを使用すると、
CLIを介してファイアウォールを設定するために、特別なユーティリティconfig_systemがあります。より正確には、これは通常のbashスクリプトであり、その内容を表示および編集できます。 / bin / config_systemにあります。
このスクリプトは、Gaia OSデータベースファイル/ config / db / initialを編集します。
IPアドレスを変更するための関数の例を使用して、その動作の原理を分析しましょう。
DBSET=/bin/dbset DBGET=/bin/dbget ........... # configure new ip for interface # $1 - interface name # $2 - ip # $3 - mask set_ip() { local cip # get current ip cip=$(dbget -c interface:$1:ipaddr) # if interface configured, delete old ip first if [[ ! -z $cip ]]; then log "Configure IPv4 - remove old ip:$cip from $1" $DBSET interface:$1:ipaddr:$cip $DBSET interface:$1:ipaddr:$cip:mask fi # now configure new ip/mask log "Configure IPv4 - interface:$1, new ip:$2, mask:$3" $DBSET interface:$1:state on $DBSET interface:$1:ipaddr:$2 t $DBSET interface:$1:ipaddr:$2:mask $3 } ........ $DBSET :save
現在の設定は、 / bin / dbgetユーティリティを使用してデータベースから取得され、 / bin / dbsetコマンドは構成を変更します。 eth0インターフェイス設定を説明するファイルの一部を次に示します。
[Expert@Gaia_R77.10_test:0]# cat /config/db/initial | grep eth0 management:interface eth0 interface:eth0 t interface:eth0:link_speed 1000M/full interface:eth0:state on interface:eth0:ipaddr:192.168.1.2 t interface:eth0:ipaddr:192.168.1.2:mask 24 interface:eth0:duplicity full interface:eth0:speed 1000M interface:eth0:auto_negotiation on
パラメーターは、スペースによって値と区切られます。 これで、DBGETを使用していくつかの値を取得できます。
[Expert@Gaia_R77.10_test:0]# dbget -c interface:eth0:ipaddr 192.168.1.2
-cスイッチは、ゼロ以外の値を持つ子パラメーターの名前を表示するために必要です。 このパラメーターの値をさらに表示するために、 -vスイッチが存在します。
[Expert@Gaia_R77.10_test:0]# dbget -cv interface:eth0:ipaddr 192.168.1.2 t
tに等しい値、つまりtrueを取得しました。 本質的に、これは192.168.1.2のIPアドレスがインターフェイスで指定されることを意味します。
次に、インターフェースのIPアドレスを変更します。 これを行うには、次のものが必要です。
- 現在のIPアドレスとマスク値を削除します
- 新しいIPアドレス値を設定します
- 新しいマスク値を設定します
- 設定を保存する
[Expert@Gaia_R77.10_test:0]# dbset interface:eth0:ipaddr:192.168.1.2 [Expert@Gaia_R77.10_test:0]# dbset interface:eth0:ipaddr:192.168.1.2:mask
[Expert@Gaia_R77.10_test:0]# dbset interface:eth0:ipaddr:192.168.1.1 t
[Expert@Gaia_R77.10_test:0]# dbset interface:eth0:ipaddr:192.168.1.1:mask 24
[Expert@Gaia_R77.10_test:0]# dbset :save
ステップ2.2初期設定
Config_systemは、アンパサンド(&)で区切られたファイルまたは必須パラメーターの文字列を受け入れます。 パラメーターとして文字列を使用したコマンド構文は次のようになります。
Gaia_R77.10_test> config_system "hostname=myhost&domainname=somedomain.com&timezone='UTC-3'&ftw_sic_key=aaaa&install_security_gw=true&gateway_daip=false&install_ppak=true&gateway_cluster_member=true&install_security_managment=false"
これらの各パラメーターの値については、以下で説明します。 次に、構成ファイルを扱います。
構成ファイルには、同じ値がすべて別々の行に含まれています。
まず、構成ファイルのテンプレートを作成し、編集します。
[Expert@Gaia_R77.10_test:0]# config_system -t /home/admin/initial.conf
initial.conf
######################################################################### # # # Products configuration # # # # For keys below set "true"/"false" after '=' within the quotes # ######################################################################### # Install Security Gateway. install_security_gw= # Install Acceleration Blade (aka Performance Pack). install_ppak= # Enable DAIP (dynamic ip) gateway. # Should be "false" if CXL or Security Management enabled gateway_daip="false" # Enable/Disable CXL. gateway_cluster_member= # Install Security Management. install_security_managment= # Optional parameters, only one of the parameters below can be "true". # If no primary of secondary specified, log server will be installed. # Requires Security Management to be installed. install_mgmt_primary= install_mgmt_secondary= # Provider-1 paramters # eg: install_mds_primary=true # install_mds_secondary=false # install_mlm=false # install_mds_interface=eth0 install_mds_primary= install_mds_secondary= install_mlm= install_mds_interface= # Automatically download Blade Contracts and other important data (highly recommended) # It is highly recommended to keep this setting enabled, to ensure smooth operation of Check Point products. # for more info see sk94508 # # possible values: "true" / "false" download_info="true" # Improve product experience by sending data to Check Point # If you enable this setting, the Security Management Server and Security Gateways may upload data that will # help Check Point provide you with optimal services. # for more info see sk94509 # # possible values: "true" / "false" upload_info="false" # In case of Smart1 SmartEvent appliance, choose # Security Management only, log server will be installed automatically ######################################################################### # # # Products Parameters # # # # For keys below set value after '=' # ######################################################################### # Management administrator name # Must be provided, if Security Management installed mgmt_admin_name= # Management administrator password # Must be provided, if Security Management installed mgmt_admin_passwd= # Management GUI client allowed eg any, 1.2.3.4, 192.168.0.0/24 # Set to "any" if any host allowed to connect to managment # Set to "range" if range of IPs allowed to connect to management # Set to "network" if IPs from specific network allowed to connect # to management # Set to "this" if it' a single IP # Must be provided if Security Management installed mgmt_gui_clients_radio= # # In case of "range", provide the first and last IPs in dotted format mgmt_gui_clients_first_ip_field= mgmt_gui_clients_last_ip_field= # # In case of "network", provide IP in dotted format and netmask length # in range 0-32 mgmt_gui_clients_ip_field= mgmt_gui_clients_subnet_field= # # In case of a single IP mgmt_gui_clients_hostname= # Secure Internal Communication key, eg "aaaa" # Must be provided, if primary Security Management not installed ftw_sic_key= ######################################################################### # # # Operating System configuration - optional section # # # # For keys below set value after '=' # ######################################################################### # Password (hash) of user admin. # To get hash of admin password from configured system: # dbget passwd:admin:passwd # OR # grep admin /etc/shadow | cut -d: -f2 # # IMPORTANT! In order to preserve the literal value of each character # in hash, inclose hash string within the quotes. # eg admin_hash='put_here_your_hash_string' # # Optional parameter admin_hash='' # Interface name, optional parameter iface= # Management interface IP in dotted format (eg 1.2.3.4), # management interface mask length (in range 0-32, e,g 24 ) and # default gateway. # Pay attention, that if you run first time configuration remotely # and you change IP, in order to maintain the connection, # an old IP address will be retained as a secondary IP address. # This secondary IP address can be delete later. # Your session will be disconnected after first time condiguration # process. # Optional prameter, requires "iface" to be specified # IPv6 address format: 0000:1111:2222:3333:4444:5555:6666:7777 # ipstat_v4 manually/off ipstat_v4= ipaddr_v4= masklen_v4= default_gw_v4= ipstat_v6= ipaddr_v6= masklen_v6= default_gw_v6= # Host Name eg host123, optional parameter hostname= # Domain Name eg checkpoint.com, optional parameter domainname= # Time Zone in format Area/Region (eg America/New_York or Etc/GMT-5) # Pay attention that GMT offset should be in classic UTC notation: # GMT-5 is 5 hours behind UTC (ie west to Greenwich) # Inclose time zone string within the quotes. # Optional parameter timezone='' # NTP servers # NTP parameters are optional ntp_primary= ntp_primary_version= ntp_secondary= ntp_secondary_version= # DNS - IP address of primary, secondary, tertiary DNS servers # DNS parameters are optional. primary= secondary= tertiary=
テンプレート自体では、各パラメータについて詳しく説明しています。 したがって、管理サーバーの構成例を簡単に示します。
install_security_managment="true" mgmt_admin_name=admin mgmt_admin_passwd=password mgmt_gui_clients_radio="network" mgmt_gui_clients_ip_field=192.168.1.0 mgmt_gui_clients_subnet_field=24 admin_hash='HASH_OF_ADMIN_PASSWORD' install_mgmt_primary="true" iface=eth0 ipstat_v4=manual ipaddr_v4=192.168.1.1 masklen_v4=24 default_gw_v4=192.168.1.254 ipstat_v6=off hostname=Gaia_R77.10_MGMT timezone='Etc/GMT+3' primary=8.8.8.8
1つのファイアウォール:
install_security_gw="true" admin_hash='HASH_OF_ADMIN_PASSWORD' iface=eth0 ipstat_v4=manual ipaddr_v4=192.168.1.2 masklen_v4=24 default_gw_v4=192.168.1.254 ipstat_v6=off hostname=Gaia_R77.10_FW1 timezone='Etc/GMT+3' ftw_sic_key='onetimepassword' primary=8.8.8.8
個別に説明したいのは、 ftw_sic_key = ""パラメーターのみです。 SIC、またはセキュア内部通信キーは、ファイアウォールを管理サーバーから制御できるようにするために必要なワンタイムパスワードです(したがって、ファイアウォールでのみ設定します)。 サーバー管理コントロールパネルにファイアウォールを追加するときに一度必要になります。
最後の手順は、結果のファイルをスクリプトに渡し、構成が完了するのを待つことです。
[Expert@Gaia_R77.10_test:0]# config_system -f /home/admin/initial.conf
サーバーを再起動すると、すべての準備が整いました。
ステージ3.まとめ
これで、1つの管理サーバーと1つのファイアウォールができました。 さらにカスタマイズする準備ができています。
次の記事では、1つの管理サーバーから管理用のファイアウォールを追加する方法を学習します。 最初は準備ができていなかった場合、それらからクラスターを形成する方法を学びます。 クラスタのオプションとその動作原理を検討してください。 また、NATの構成方法と最も単純なファイアウォールポリシーについても説明します。
ご清聴ありがとうございました。 ご質問にお答えできることを嬉しく思います。