GlusterFSは非常に便利で使いやすく、使いやすい分散ファイルシステムであり、FUSEテクノロジーを使用してユーザー空間で動作します。 メインファイルシステム上で実行されます。 インストールと構成には、Ubuntu 12.04 OSを使用します。
2つのサーバーのクラスターを構成し、1つのクライアントにマウント(テスト)します。 次の設定があります。
| IP
| ホスト名
| 短い名前
|
| 192.168.1.100 | server1.example.com | server1 |
| 192.168.1.101 | server2.example.com | server2 |
| 192.168.1.102 | client1.example.com | client1 |
1.一般設定
まず、便宜上、各マシンのホストにすべてのアドレスを追加します。
root@server1:~# cat /etc/hosts 127.0.0.1 localhost 192.168.1.100 server1.example.com server1 192.168.1.101 server2.example.com server2 192.168.1.102 client1.example.com client1 root@server2:~# cat /etc/hosts 127.0.0.1 localhost 192.168.1.100 server1.example.com server1 192.168.1.101 server2.example.com server2 192.168.1.102 client1.example.com client1 root@client1:~# cat /etc/hosts 127.0.0.1 localhost 192.168.1.100 server1.example.com server1 192.168.1.101 server2.example.com server2 192.168.1.102 client1.example.com client1
ファイアウォールを使用する場合、サーバーとして機能するすべてのマシン(この場合は2つ)でTCPポート111、24007-24050を開く必要があります。
2.サーバー側(クラスター)の構成
すべてのサーバーはgluster-serverをインストールする必要があります。 現時点では、最新バージョンは3.5.2です。 PPAリポジトリからインストールします。
root@server1:~#apt-get install python-software-properties root@server1:~#add-apt-repository ppa:semiosis/ubuntu-glusterfs-3.5 root@server1:~#apt-get update root@server1:~#apt-get install glusterfs-server - root@server2:~#apt-get install python-software-properties root@server2:~#add-apt-repository ppa:semiosis/ubuntu-glusterfs-3.5 root@server2:~#apt-get update root@server2:~# apt-get install glusterfs-server -
次に、いずれかのサーバーに接続してクラスターを作成します。
root@server1:~# gluster peer probe server2.example.com Probe successful
ステータスを確認します。
root@server1:~# gluster peer status Number of Peers: 1 Hostname: server2.example.com Uuid: 0f3aa4f4-f9dd-4cd2-a7a5-126606fbab33 State: Peer in Cluster (Connected)
ご覧のとおり、server2がクラスターに追加され、そのステータスは接続済みです。 2番目のサーバーですべてが正常であることを確認することもできます。
root@server2:~# gluster peer status Number of Peers: 1 Hostname: 192.168.1.100 Uuid: ae4e6766-787f-4d0c-8b96-8fc9523ef346 State: Peer in Cluster (Connected)
GlusterFSは、ボリュームで組み合わせた5種類のコンテンツ配信をサポートしています。
- 分散型
- 複製
- ストライプ(部分に分割)
- 分散ストライプ(分散および部分分割)
- 分散複製(分散および複製)
最初に、各タイプのコンテンツ配布を個別に構成してから、テストのために5つのボリュームすべてをクライアントにマウントします。
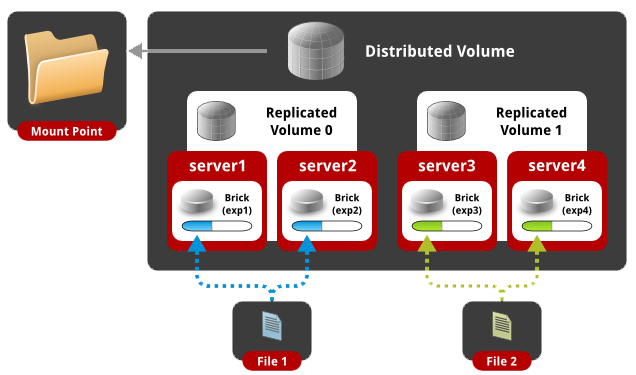
2.1分散ボリュームのセットアップ
この設定では、ボリューム内の各フォルダー間でデータがランダムに分散されます。
最初のサーバーでdist1、dist2パック、2番目のサーバーでdist3、dist4を作成しましょう。
root@server1:~# mkdir /mnt/dist{1,2} root@server2:~# mkdir /mnt/dist{3,4}
これで、ボリュームを作成して開始できます。
root@server1:~# gluster volume create distributed transport tcp server1:/mnt/dist1 server1:/mnt/dist2 server2:/mnt/dist3 server2:/mnt/dist4 force Creation of volume distributed has been successful. Please start the volume to access data. root@server1:~# gluster volume start distributed Starting volume distributed has been successful
2.2複製ボリュームの構成
この設定では、ボリューム内の各フォルダー(サーバー)間でデータがミラーリングされます(RAID1など)。 もちろん、ボリュームに含まれるフォルダー(サーバー)の数はレプリカの倍数でなければなりません。
最初のサーバーでrepl1、repl2パック、2番目のサーバーでrepl3、repl4を作成してみましょう。
root@server1:~# mkdir /mnt/repl{1,2} root@server2:~# mkdir /mnt/repl{3,4}
これで、ボリュームを作成して開始できます。
root@server1:~# gluster volume create replicated replica 4 transport tcp server1:/mnt/repl1 server2:/mnt/repl3 server1:/mnt/repl2 server2:/mnt/repl4 force Multiple bricks of a replicate volume are present on the same server. This setup is not optimal. Do you still want to continue creating the volume? (y/n) y volume create: replicated: success: please start the volume to access data root@server1:~# gluster volume start replicated volume start: replicated: success
この場合、すべてのファイルが4つのフォルダーすべてに複製されます。 つまり すべてのフォルダに同じコンテンツが含まれます。
2.3ストライプボリュームの設定
この設定では、ファイルはパーツに分割され、各ピースはボリュームに含まれる各フォルダーに保存されます。 このタイプのコンテンツ配信は、非常に大きなサイズの容量性データ(高品質のビデオコンテンツなど)の保存に適しています。 もちろん、ボリュームに含まれるフォルダーの数は、ストライプの値と同じでなければなりません。 つまり 5つのサーバーがある場合、ファイルは5つの部分に分割され、各ファイルは5つのサーバーすべてに保存されます。
最初のサーバーでstrip1、strip2パック、2番目のサーバーでstrip3、strip4を作成してみましょう。
root@server1:~# mkdir /mnt/strip{1,2} root@server2:~# mkdir /mnt/strip{3,4}
これで、ボリュームを作成して開始できます。
root@server1:~# gluster volume create striped stripe 4 transport tcp server1:/mnt/strip1 server1:/mnt/strip2 server2:/mnt/strip3 server2:/mnt/strip4 force Creation of volume striped has been successful. Please start the volume to access data. root@server1:~# gluster volume start striped Starting volume striped has been successful
この場合、4つのサーバー(フォルダー)のそれぞれに、アップロードされたファイルが1つあります。
2.4分散ストライプボリュームの構成
この設定では、ファイルは複数の部分に分割され、ファイルの一部はフォルダーに分散され、そのうちの1つに保存されます。 もちろん、ボリュームに含まれるフォルダーの数は、ストライプ値の倍数でなければなりません。 つまり 8台のサーバーがあり、ストライプ値が4の場合、ファイルは4つの部分に分割され、最初の4台のサーバーまたは次の4台のサーバーのいずれかに保存されます。 また、4台のサーバーがあり、ストライプが2の場合、ファイルは2つの部分に分割され、最初の2台または次の2台のサーバーに保存されます。
最初のサーバーでdist-strip1パック、dist-strip2パック、2番目のサーバーでdist-strip3、dist-strip4を作成しましょう。
root@server1:~# mkdir /mnt/dist-strip{1,2} root@server2:~# mkdir /mnt/dist-strip{3,4}
これで、ボリュームを作成して開始できます。 同時に、サーバーの順序は非常に大きな役割を果たします。ファイルの一部は、サーバーの最初のペア(ストライプ= 2)または最初の4つのサーバー(ストライプ= 4)に保存され、コンテンツは最初と2番目のペアまたは4とtの間で配信されます.p。
root@server1:~# gluster volume create distributed-striped stripe 2 transport tcp server1:/mnt/dist-strip1 server2:/mnt/dist-strip3 server1:/mnt/dist-strip2 server2:/mnt/dist-strip4 force Creation of volume distributed-striped has been successful. Please start the volume to access data. root@server1:~# gluster volume start distributed-striped Starting volume distributed-striped has been successful
2.5分散複製ボリュームの構成
この設定では、データはフォルダー間でランダムに分散され、各フォルダーには独自のミラーコピーがあります。 もちろん、ボリュームに含まれるフォルダーの数はレプリカ値の倍数でなければなりません。 つまり 4つのサーバーがあり、レプリカの値が2の場合、ファイルは2つのサーバーにランダムな順序で配布され、残りの2つのサーバーは最初の2つのコンテンツの同一のコピーを保存します。 8つのサーバーがあり、レプリカが4の場合、4つのサーバーのミラーが1つあります。
最初のサーバーでdist-repl1、dist-repl2パック、2番目のサーバーでdist-repl3、dist-repl4を作成します。
root@server1:~# mkdir /mnt/dist-repl{1,2} root@server2:~# mkdir /mnt/dist-repl{3,4}
これで、ボリュームを作成して開始できます。 同時に、サーバーのシーケンスは非常に大きな役割を果たします。順番に記録されるサーバーの最初のペア(4)は1つのレプリカです。 つまり 8つのサーバーがあり、レプリカが4の場合、最初の4つのサーバーには1つの同一コンテンツがあり、2番目の4つのサーバーには異なる同一コンテンツがあります。
root@server1:~# gluster volume create distributed-replicated replica 2 transport tcp server1:/mnt/dist-repl1 server2:/mnt/dist-repl3 server1:/mnt/dist-repl2 server2:/mnt/dist-repl4 force Creation of volume distributed-replicated has been successful. Please start the volume to access data. root@server1:~# gluster volume start distributed-replicated Starting volume distributed-replicated has been successful
次に、作成したボリュームを確認します。
root@server1:~# gluster volume info Volume Name: distributed Type: Distribute Volume ID: 01622619-fd93-4ee1-85ad-ca8cf1d85f7e Status: Started Number of Bricks: 4 Transport-type: tcp Bricks: Brick1: server1:/mnt/dist1 Brick2: server1:/mnt/dist2 Brick3: server2:/mnt/dist3 Brick4: server2:/mnt/dist4 Volume Name: replicated Type: Replicate Volume ID: 67afcb89-7e5d-4a02-b4ac-0c2de7cd97be Status: Started Number of Bricks: 1 x 4 = 4 Transport-type: tcp Bricks: Brick1: server1:/mnt/repl1 Brick2: server2:/mnt/repl3 Brick3: server1:/mnt/repl2 Brick4: server2:/mnt/repl4 Volume Name: striped Type: Stripe Volume ID: e9ef42bf-8265-4973-85de-4cafd2a68fec Status: Started Number of Bricks: 1 x 4 = 4 Transport-type: tcp Bricks: Brick1: server1:/mnt/strip1 Brick2: server1:/mnt/strip2 Brick3: server2:/mnt/strip3 Brick4: server2:/mnt/strip4 Volume Name: distributed-striped Type: Distributed-Stripe Volume ID: aa70dd67-3ca9-48cb-865b-b10f8ca1ccad Status: Started Number of Bricks: 2 x 2 = 4 Transport-type: tcp Bricks: Brick1: server1:/mnt/dist-strip1 Brick2: server2:/mnt/dist-strip3 Brick3: server1:/mnt/dist-strip2 Brick4: server2:/mnt/dist-strip4 Volume Name: distributed-replicated Type: Distributed-Replicate Volume ID: 59a819c4-6e84-4c49-9e90-23daa59d12ee Status: Started Number of Bricks: 2 x 2 = 4 Transport-type: tcp Bricks: Brick1: server1:/mnt/dist-repl1 Brick2: server2:/mnt/dist-repl3 Brick3: server1:/mnt/dist-repl2 Brick4: server2:/mnt/dist-repl4
ご覧のとおり、5種類のボリュームがあり、異なるタイプのコンテンツが配信されています。 クライアント側に行くことができます。
3.クライアント側の構成
すべてのクライアントで、ppaリポジトリからgluster-clientをインストールする必要があります。
root@client1:~#apt-get install python-software-properties root@client1:~#add-apt-repository ppa:semiosis/ubuntu-glusterfs-3.5 root@client1:~#apt-get update root@client1:~#apt-get install glusterfs-client
次に、作成したvolum-aの名前でネットワークフォルダーをマウントするだけです。 この場合、サーバーのIPまたはドメイン名は重要ではありません。 1つのクラスターに10個のサーバーを追加した場合、クライアントでは10個のIPのいずれかを使用してボールをマウントできますが、volum-aという名前は変わりません。
3.1分散ボリュームのマウントとテスト
クライアントに接続し、新しいディスク用のフォルダーを作成して、分散ボリュームをマウントします。
root@client1:~# mkdir /mnt/distrib root@client1:~# mount.glusterfs server1:/distributed /mnt/distrib/ root@client1:~# df -h Filesystem Size Used Avail Use% Mounted on /dev/sda1 7.3G 1.5G 5.5G 21% / udev 236M 4.0K 236M 1% /dev tmpfs 49M 280K 49M 1% /run none 5.0M 0 5.0M 0% /run/lock none 245M 0 245M 0% /run/shm server1:/distributed 30G 6.3G 22G 23% /mnt/distrib
ご覧のとおり、サイズが30 GB(ボリュームに含まれるすべてのサーバーの合計ディスクサイズ)の新しいネットワークドライブが正常にマウントされました。 次に、1ダースのファイルを作成します。
root@client1:~# seq 1 10 | while read line; do echo "This is File${line}" > /mnt/distrib/file${line};done root@client1:~# ls /mnt/distrib/ file1 file10 file2 file3 file4 file5 file6 file7 file8 file9
コンテンツがサーバー間でどのように分散されるかを調べます。
root@server1:~# ls /mnt/dist[0-9]/ /mnt/dist1/: file10 file3 file4 file9 /mnt/dist2/: file7 root@server2:~# ls /mnt/dist[0-9]/ /mnt/dist3/: file1 file2 /mnt/dist4/: file5 file6 file8
ご覧のとおり、ファイルは4つのフォルダーすべてに分散しており、それらは分散ボリュームに含まれていました。
3.2複製ボリュームのマウントとテスト
クライアントに接続し、新しいディスク用のフォルダーを作成し、複製されたボリュームをマウントします。
root@client1:~# mkdir /mnt/replica root@client1:~# mount.glusterfs server1:/replicated /mnt/replica/ root@client1:~# df -h Filesystem Size Used Avail Use% Mounted on /dev/sda1 7.3G 1.5G 5.5G 21% / udev 131M 4.0K 131M 1% /dev tmpfs 28M 280K 28M 1% /run none 5.0M 0 5.0M 0% /run/lock none 140M 0 140M 0% /run/shm server1:/replicated 7.3G 1.9G 5.1G 28% /mnt/replica
ご覧のとおり、サイズが7.3 GBの新しいネットワークドライブ(ボリュームに含まれるすべてのサーバーの合計ディスクサイズをレプリカの数で割った値)が正常にマウントされました。 次に、1ダースのファイルを作成します。
root@client1:~# seq 1 10 | while read line; do echo "This is File${line}" > /mnt/replica/file${line};done root@client1:~# ls /mnt/replica/ file1 file10 file2 file3 file4 file5 file6 file7 file8 file9
コンテンツがサーバー間でどのように分散されるかを調べます。
root@server1:~# ls /mnt/repl* /mnt/repl1: file1 file10 file2 file3 file4 file5 file6 file7 file8 file9 /mnt/repl2: file1 file10 file2 file3 file4 file5 file6 file7 file8 file9 root@server2:~# ls /mnt/repl* /mnt/repl3: file1 file10 file2 file3 file4 file5 file6 file7 file8 file9 /mnt/repl4: file1 file10 file2 file3 file4 file5 file6 file7 file8 file9
ご覧のとおり、レプリケートされたボリュームの一部であるすべてのフォルダーでファイルがミラーリングされました。
3.3ストライプボリュームのマウントとテスト
クライアントに接続し、新しいディスク用のフォルダーを作成して、ストライプボリュームをマウントします。
root@client1:~# mkdir /mnt/strip root@client1:~# mount.glusterfs server1:/striped /mnt/strip/ root@client1:~# df -h Filesystem Size Used Avail Use% Mounted on /dev/sda1 7.3G 1.5G 5.5G 21% / udev 131M 4.0K 131M 1% /dev tmpfs 28M 280K 28M 1% /run none 5.0M 0 5.0M 0% /run/lock none 140M 0 140M 0% /run/shm server1:/striped 30G 6.3G 22G 23% /mnt/strip
ご覧のとおり、サイズが30 GB(ボリュームに含まれるすべてのサーバーの合計ディスクサイズ)の新しいネットワークドライブが正常にマウントされました。 次に、いくつかの大きなファイルを作成し、フォルダーにコピーします。
root@client1:~# dd if=/dev/urandom of=test2.bin bs=30M count=10 root@client1:~# dd if=/dev/urandom of=test1.bin bs=30M count=10 root@client1:~# cp test* /mnt/strip/ root@client1:~# ls -lh /mnt/strip/ total 601M -rw-r--r-- 1 root root 300M Mar 2 14:13 test1.bin -rw-r--r-- 1 root root 300M Mar 2 14:13 test2.bin
ご覧のとおり、フォルダーには300Mbのサイズの2つのファイルがあります。 次に、コンテンツがサーバー間でどのように分散されているかを見てみましょう。
root@server1:~# ls -lh /mnt/strip* /mnt/strip1: total 151M -rw-r--r-- 2 root root 75M Mar 2 14:13 test1.bin -rw-r--r-- 2 root root 75M Mar 2 14:13 test2.bin /mnt/strip2: total 151M -rw-r--r-- 2 root root 75M Mar 2 14:13 test1.bin -rw-r--r-- 2 root root 75M Mar 2 14:13 test2.bin root@server2:~# ls -lh /mnt/strip* /mnt/strip3: total 151M -rw-r--r-- 2 root root 75M Mar 2 14:13 test1.bin -rw-r--r-- 2 root root 75M Mar 2 14:13 test2.bin /mnt/strip4: total 151M -rw-r--r-- 2 root root 75M Mar 2 14:13 test1.bin -rw-r--r-- 2 root root 75M Mar 2 14:13 test2.bin
ご覧のとおり、ファイルは75 MBの均等な部分に分割され、ストライプボリュームの一部である4つのフォルダーすべてに散らばっています。
3.4分散ストライプボリュームのマウントとテスト
クライアントに接続し、新しいディスク用のフォルダーを作成し、分散ストライプボリュームをマウントします。
root@client1:~# mkdir /mnt/distrib-strip root@client1:~# mount.glusterfs server1:/distributed-striped /mnt/distrib-strip/ root@client1:~# df -h Filesystem Size Used Avail Use% Mounted on /dev/sda1 7.3G 1.8G 5.2G 25% / udev 131M 4.0K 131M 1% /dev tmpfs 28M 280K 28M 1% /run none 5.0M 0 5.0M 0% /run/lock none 140M 0 140M 0% /run/shm server1:/distributed-striped 30G 6.9G 21G 26% /mnt/distrib-strip
ご覧のとおり、サイズが30 GB(ボリュームに含まれるすべてのサーバーの合計ディスクサイズ)の新しいネットワークドライブが正常にマウントされました。 次に、いくつかの大きなファイルを作成し、フォルダーにコピーします。
root@client1:~# dd if=/dev/urandom of=test2.bin bs=30M count=10 root@client1:~# dd if=/dev/urandom of=test1.bin bs=30M count=10 root@client1:~# cp test* /mnt/distrib-strip/ root@client1:~# ls -lh /mnt/distrib-strip/ total 600M -rw-r--r-- 1 root root 300M Mar 2 14:35 test1.bin -rw-r--r-- 1 root root 300M Mar 2 14:34 test2.bin
ご覧のとおり、フォルダーには300Mbのサイズの2つのファイルがあります。 次に、コンテンツがサーバー間でどのように分散されているかを見てみましょう。
root@server1:~# ls -lh /mnt/dist-strip* /mnt/dist-strip1: total 151M -rw-r--r-- 2 root root 150M Mar 2 14:35 test1.bin /mnt/dist-strip2: total 151M -rw-r--r-- 2 root root 150M Mar 2 14:34 test2.bin root@server2:~# ls -lh /mnt/dist-strip* /mnt/dist-strip3: total 151M -rw-r--r-- 2 root root 150M Mar 2 14:35 test1.bin /mnt/dist-strip4: total 151M -rw-r--r-- 2 root root 150M Mar 2 14:34 test2.bin
ご覧のとおり、ファイルはさまざまなフォルダーに分散され、150 MBの均等な部分に分割されました。
3.5分散複製ボリュームのマウントとテスト
クライアントに接続し、新しいディスク用のフォルダーを作成して、分散複製ボリュームをマウントします。
root@client1:~# mkdir /mnt/distrib-repl root@client1:~# mount.glusterfs server1:/distributed-replicated /mnt/distrib-repl/ root@client1:~# df -h Filesystem Size Used Avail Use% Mounted on /dev/sda1 7.3G 1.8G 5.1G 27% / udev 131M 4.0K 131M 1% /dev tmpfs 28M 280K 28M 1% /run none 5.0M 0 5.0M 0% /run/lock none 140M 0 140M 0% /run/shm server1:/distributed-replicated 15G 4.4G 9.5G 32% /mnt/distrib-repl
ご覧のとおり、新しい15GBネットワークドライブ(ボリュームに含まれるすべてのサーバーの合計ディスクサイズをレプリカの数で割った値)が正常にマウントされました。 次に、1ダースのファイルを作成します。
root@client1:~# seq 1 10 | while read line; do echo "This is File${line}" > /mnt/distrib-repl/file${line};done root@client1:~# ls /mnt/distrib-repl/ file1 file10 file2 file3 file4 file5 file6 file7 file8 file9
コンテンツがサーバー間でどのように分散されるかを調べます。
root@server1:~# ls /mnt/dist-repl* /mnt/dist-repl1: file10 file3 file4 file7 file9 /mnt/dist-repl2: file1 file2 file5 file6 file8 root@server2:~# ls /mnt/dist-repl* /mnt/dist-repl3: file10 file3 file4 file7 file9 /mnt/dist-repl4: file1 file2 file5 file6 file8
ご覧のとおり、最初のサーバーのコンテンツは、フォルダーに散在する2番目のサーバーと同じです。
4.結論
実際の状態では、各フォルダは個別にマウントされたディスクである必要があります(ルートファイルシステムではありません)。 これで、glusterFSで使用されるあらゆる種類のコンテンツ配信に精通しました。
GlusterFSは基本的なセットアップを備えたローカルネットワークで良好に機能します。各国に分散したデータセンターにアクセスする場合、サーバー側とクライアントのマウントの両方で設定を構成する必要があります。これについては次の記事で説明します。