春-休止状態:1対多の関連付け
さあ始めましょう...
このチュートリアルでは、Spring MVC 3を使用して顔のリストを管理する簡単なアプリケーションを作成します。人を表示、追加、編集、削除するための簡単なCRUD(読み取り、更新、削除の作成)システムを構築します。 データベースを操作するためのレイヤーとして、Hibernate 3とMySQLデータベースを使用しますが、別のデータベースを使用することもできます。 このレッスンは、MVC、ORM、およびSQLに精通していることを前提としています( 翻訳者から :これらの複雑な単語に驚かないでください、大胆に読んでください、すべてが非常に簡単です)
Hibernateとは何ですか?
Hibernateは、オブジェクトリレーショナルマッピング(ORM)の問題を解決するために設計されたJavaプログラミング言語のライブラリです。 このライブラリは、オブジェクト指向のデータモデルを従来のリレーショナルデータベースにマッピングするための使いやすいフレームワーク(フレームワーク)を提供します。
Hibernateは、データベースにオブジェクトを保存することと、言語レベルでのオブジェクト指向の表現との間の問題を解決します。
MySQLとは何ですか?
MySQLデータベースは、最も要求の厳しいネットワーク、eコマース、トランザクション処理アプリケーションを提供します。 トランザクションのセキュリティを保証し、ACID互換性により、障害発生時のコミット、ロールバック、復元、および回線のロックが可能になります。 MySQLは使いやすさ、スケーラビリティ、パフォーマンスを提供します;これらの特性により、MySQLは世界で最も人気のあるオープンソースデータベースになりました。 Facebook、Google、Ticketmaster、Ebayなど、最も訪問されたネットワークリソースの一部はMySQLを使用しています。
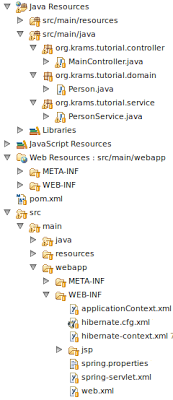
まず、プロジェクトの最終的な構造を見てみましょう。
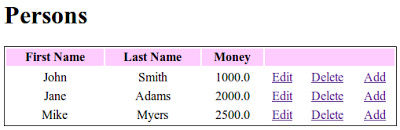
そして、アプリケーションがどのように見えるか見てみましょう。
ドメインオブジェクトPerson(エンティティPerson)を定義することから始めます。
人
package org.krams.tutorial.domain; import java.io.Serializable; import javax.persistence.Column; import javax.persistence.Entity; import javax.persistence.GeneratedValue; import javax.persistence.Id; import javax.persistence.Table; /** * For a complete reference see * <a href="http://docs.jboss.org/hibernate/stable/annotations/reference/en/html_single/"> * Hibernate Annotations Communit Documentations</a> */ @Entity @Table(name = "PERSON") public class Person implements Serializable { private static final long serialVersionUID = -5527566248002296042L; @Id @Column(name = "ID") @GeneratedValue private Integer id; @Column(name = "FIRST_NAME") private String firstName; @Column(name = "LAST_NAME") private String lastName; @Column(name = "MONEY") private Double money; public Integer getId() { return id; } public void setId(Integer id) { this.id = id; } public String getFirstName() { return firstName; } public void setFirstName(String firstName) { this.firstName = firstName; } public String getLastName() { return lastName; } public void setLastName(String lastName) { this.lastName = lastName; } public Double getMoney() { return money; } public void setMoney(Double money) { this.money = money; } }
Personは、4つのプライベート変数を含む単純なPOJOです。
id
firstName
lastName
お金
翻訳者からの追加 :POJO(英語のプレーンオールドJavaオブジェクト)-「古いスタイルのシンプルなJavaオブジェクト」、特定のオブジェクトから継承されず、ビジネスに必要なものを超えるサービスインターフェイスを実装しないシンプルなJavaオブジェクトモデル(Wiki)
@Columnアノテーションが付いたこれらの各変数は、データベース内の列に対応します。
ID
FIRST_NAME
LAST_NAME
お金
それらに対処する必要はありません; Hibernateが引き継ぎます。 ただし、これらの名前を正しく宣言する必要があります(例:@Column(name = `` ID``))。 データベースで宣言しません。 覚えておいてください-データベースはまだ存在していません。
POJOはデータベースのテーブルを参照します。このオブジェクトに対応するテーブルの名前を示すTableアノテーションに注意してください。
@Entity @Table(name = "PERSON") public class Person implements Serializable
EntityアノテーションはTableアノテーションに面していることに注意してください。これは、POJOがデータベーステーブルのマッピングであることをHibernateに伝えます。
個人のリストを操作するため、このためのサービスを作成します。
PersonService
package org.krams.tutorial.service; import java.util.List; import javax.annotation.Resource; import org.apache.log4j.Logger; import org.hibernate.Query; import org.hibernate.Session; import org.hibernate.SessionFactory; import org.krams.tutorial.domain.Person; import org.springframework.stereotype.Service; import org.springframework.transaction.annotation.Transactional; /** * Service for processing Persons * */ @Service("personService") @Transactional public class PersonService { protected static Logger logger = Logger.getLogger("service"); @Resource(name="sessionFactory") private SessionFactory sessionFactory; /** * Retrieves all persons * * @return a list of persons */ public List<person> getAll() { logger.debug("Retrieving all persons"); // Retrieve session from Hibernate Session session = sessionFactory.getCurrentSession(); // Create a Hibernate query (HQL) Query query = session.createQuery("FROM Person"); // Retrieve all return query.list(); } /** * Retrieves a single person */ public Person get( Integer id ) { // Retrieve session from Hibernate Session session = sessionFactory.getCurrentSession(); // Retrieve existing person first Person person = (Person) session.get(Person.class, id); return person; } /** * Adds a new person */ public void add(Person person) { logger.debug("Adding new person"); // Retrieve session from Hibernate Session session = sessionFactory.getCurrentSession(); // Save session.save(person); } /** * Deletes an existing person * @param id the id of the existing person */ public void delete(Integer id) { logger.debug("Deleting existing person"); // Retrieve session from Hibernate Session session = sessionFactory.getCurrentSession(); // Retrieve existing person first Person person = (Person) session.get(Person.class, id); // Delete session.delete(person); } /** * Edits an existing person */ public void edit(Person person) { logger.debug("Editing existing person"); // Retrieve session from Hibernate Session session = sessionFactory.getCurrentSession(); // Retrieve existing person via id Person existingPerson = (Person) session.get(Person.class, person.getId()); // Assign updated values to this person existingPerson.setFirstName(person.getFirstName()); existingPerson.setLastName(existingPerson.getLastName()); existingPerson.setMoney(existingPerson.getMoney()); // Save updates session.save(existingPerson); } }
次の方法を使用した簡単なCRUDシステムを発表しました。
getAll()
()を追加
削除()
編集()
各メソッドでセッションを取得します:
セッションsession = sessionFactory.getCurrentSession();
データベースに接続して作業を行うようなものです。 Sessionオブジェクトは、エンティティオブジェクトを操作するための多くのメソッドを提供します。 このチュートリアルでは、Sessionクラスの次のメソッドを使用します。
session.createQuery()
session.save()
session.delete()
ドメインレイヤーとサービスレイヤーを作成しました。Springコントローラーを作成しましょう。
メインコントローラー
package org.krams.tutorial.controller; import java.util.List; import javax.annotation.Resource; import org.apache.log4j.Logger; import org.krams.tutorial.domain.Person; import org.krams.tutorial.service.PersonService; import org.springframework.stereotype.Controller; import org.springframework.ui.Model; import org.springframework.web.bind.annotation.ModelAttribute; import org.springframework.web.bind.annotation.RequestMapping; import org.springframework.web.bind.annotation.RequestMethod; import org.springframework.web.bind.annotation.RequestParam; /** * Handles and retrieves person request */ @Controller @RequestMapping("/main") public class MainController { protected static Logger logger = Logger.getLogger("controller"); @Resource(name="personService") private PersonService personService; /** * Handles and retrieves all persons and show it in a JSP page * * @return the name of the JSP page */ @RequestMapping(value = "/persons", method = RequestMethod.GET) public String getPersons(Model model) { logger.debug("Received request to show all persons"); // Retrieve all persons by delegating the call to PersonService List<person> persons = personService.getAll(); // Attach persons to the Model model.addAttribute("persons", persons); // This will resolve to /WEB-INF/jsp/personspage.jsp return "personspage"; } /** * Retrieves the add page * * @return the name of the JSP page */ @RequestMapping(value = "/persons/add", method = RequestMethod.GET) public String getAdd(Model model) { logger.debug("Received request to show add page"); // Create new Person and add to model // This is the formBackingOBject model.addAttribute("personAttribute", new Person()); // This will resolve to /WEB-INF/jsp/addpage.jsp return "addpage"; } /** * Adds a new person by delegating the processing to PersonService. * Displays a confirmation JSP page * * @return the name of the JSP page */ @RequestMapping(value = "/persons/add", method = RequestMethod.POST) public String add(@ModelAttribute("personAttribute") Person person) { logger.debug("Received request to add new person"); // The "personAttribute" model has been passed to the controller from the JSP // We use the name "personAttribute" because the JSP uses that name // Call PersonService to do the actual adding personService.add(person); // This will resolve to /WEB-INF/jsp/addedpage.jsp return "addedpage"; } /** * Deletes an existing person by delegating the processing to PersonService. * Displays a confirmation JSP page * * @return the name of the JSP page */ @RequestMapping(value = "/persons/delete", method = RequestMethod.GET) public String delete(@RequestParam(value="id", required=true) Integer id, Model model) { logger.debug("Received request to delete existing person"); // Call PersonService to do the actual deleting personService.delete(id); // Add id reference to Model model.addAttribute("id", id); // This will resolve to /WEB-INF/jsp/deletedpage.jsp return "deletedpage"; } /** * Retrieves the edit page * * @return the name of the JSP page */ @RequestMapping(value = "/persons/edit", method = RequestMethod.GET) public String getEdit(@RequestParam(value="id", required=true) Integer id, Model model) { logger.debug("Received request to show edit page"); // Retrieve existing Person and add to model // This is the formBackingOBject model.addAttribute("personAttribute", personService.get(id)); // This will resolve to /WEB-INF/jsp/editpage.jsp return "editpage"; } /** * Edits an existing person by delegating the processing to PersonService. * Displays a confirmation JSP page * * @return the name of the JSP page */ @RequestMapping(value = "/persons/edit", method = RequestMethod.POST) public String saveEdit(@ModelAttribute("personAttribute") Person person, @RequestParam(value="id", required=true) Integer id, Model model) { logger.debug("Received request to update person"); // The "personAttribute" model has been passed to the controller from the JSP // We use the name "personAttribute" because the JSP uses that name // We manually assign the id because we disabled it in the JSP page // When a field is disabled it will not be included in the ModelAttribute person.setId(id); // Delegate to PersonService for editing personService.edit(person); // Add id reference to Model model.addAttribute("id", id); // This will resolve to /WEB-INF/jsp/editedpage.jsp return "editedpage"; } }
コントローラーは次のビューを宣言します。
/人-すべての人を受け入れるため
/人/追加(GET)-「追加」フォームを表示します
/人/追加(POST)-新しい人を保存します
/人/削除-既存の人を削除します
/人/編集(GET)-「編集」フォームを表示します
/人/編集(POST)-「修正済み」人を保存します
各ビューはPersonServiceを呼び出します。 PersonServiceの処理が完了すると、コントローラーはJSPページにリクエストを送信し、確認メッセージが表示されます。 JSPページは次のとおりです。
personspage.jsp
<%@ taglib uri="http://java.sun.com/jsp/jstl/core" prefix="c" %> <%@ page language="java" contentType="text/html; charset=UTF-8" pageEncoding="UTF-8"%> <!DOCTYPE html PUBLIC "-//W3C//DTD HTML 4.01 Transitional//EN" "http://www.w3.org/TR/html4/loose.dtd"> <html> <head> <meta http-equiv="Content-Type" content="text/html; charset=UTF-8"> <title>Insert title here</title> </head> <body> <h1>Persons</h1> <c:url var="addUrl" value="/krams/main/persons/add" /> <table style="border: 1px solid; width: 500px; text-align:center"> <thead style="background:#fcf"> <tr> <th>First Name</th> <th>Last Name</th> <th>Money</th> <th colspan="3"></th> </tr> </thead> <tbody> <c:forEach items="${persons}" var="person"> <c:url var="editUrl" value="/krams/main/persons/edit?id=${person.id}" /> <c:url var="deleteUrl" value="/krams/main/persons/delete?id=${person.id}" /> <tr> <td><c:out value="${person.firstName}" /></td> <td><c:out value="${person.lastName}" /></td> <td><c:out value="${person.money}" /></td> <td><a href="${editUrl}">Edit</a></td> <td><a href="${deleteUrl}">Delete</a></td> <td><a href="${addUrl}">Add</a></td> </tr> </c:forEach> </tbody> </table> <c:if test="${empty persons}"> There are currently no persons in the list. <a href="${addUrl}">Add</a> a person. </c:if> </body> </html>
editpage.jsp
<%@ taglib uri="http://java.sun.com/jsp/jstl/core" prefix="c" %> <%@ taglib uri="http://www.springframework.org/tags/form" prefix="form" %> <%@ page language="java" contentType="text/html; charset=UTF-8" pageEncoding="UTF-8"%> <!DOCTYPE html PUBLIC "-//W3C//DTD HTML 4.01 Transitional//EN" "http://www.w3.org/TR/html4/loose.dtd"> <html> <head> <meta http-equiv="Content-Type" content="text/html; charset=UTF-8"> <title>Insert title here</title> </head> <body> <h1>Edit Person</h1> <c:url var="saveUrl" value="/krams/main/persons/edit?id=${personAttribute.id}" /> <form:form modelAttribute="personAttribute" method="POST" action="${saveUrl}"> <table> <tr> <td><form:label path="id">Id:</form:label></td> <td><form:input path="id" disabled="true"/></td> </tr> <tr> <td><form:label path="firstName">First Name:</form:label></td> <td><form:input path="firstName"/></td> </tr> <tr> <td><form:label path="lastName">Last Name</form:label></td> <td><form:input path="lastName"/></td> </tr> <tr> <td><form:label path="money">Money</form:label></td> <td><form:input path="money"/></td> </tr> </table> <input type="submit" value="Save" /> </form:form> </body> </html>
addpage.jsp
<%@ taglib uri="http://java.sun.com/jsp/jstl/core" prefix="c" %> <%@ taglib uri="http://www.springframework.org/tags/form" prefix="form" %> <%@ page language="java" contentType="text/html; charset=UTF-8" pageEncoding="UTF-8"%> <!DOCTYPE html PUBLIC "-//W3C//DTD HTML 4.01 Transitional//EN" "http://www.w3.org/TR/html4/loose.dtd"> <html> <head> <meta http-equiv="Content-Type" content="text/html; charset=UTF-8"> <title>Insert title here</title> </head> <body> <h1>Create New Person</h1> <c:url var="saveUrl" value="/krams/main/persons/add" /> <form:form modelAttribute="personAttribute" method="POST" action="${saveUrl}"> <table> <tr> <td><form:label path="firstName">First Name:</form:label></td> <td><form:input path="firstName"/></td> </tr> <tr> <td><form:label path="lastName">Last Name</form:label></td> <td><form:input path="lastName"/></td> </tr> <tr> <td><form:label path="money">Money</form:label></td> <td><form:input path="money"/></td> </tr> </table> <input type="submit" value="Save" /> </form:form> </body> </html>
editedpage.jsp
<%@ taglib uri="http://java.sun.com/jsp/jstl/core" prefix="c" %> <%@ page import="java.util.Date" %> <%@ page language="java" contentType="text/html; charset=UTF-8" pageEncoding="UTF-8"%> <!DOCTYPE html PUBLIC "-//W3C//DTD HTML 4.01 Transitional//EN" "http://www.w3.org/TR/html4/loose.dtd"> <html> <head> <meta http-equiv="Content-Type" content="text/html; charset=UTF-8"> <title>Insert title here</title> </head> <body> <h1>Persons</h1> <p>You have edited a person with id ${id} at <%= new java.util.Date() %></p> <c:url var="mainUrl" value="/krams/main/persons" /> <p>Return to <a href="${mainUrl}">Main List</a></p> </body> </html>
addedpage.jsp
<%@ taglib uri="http://java.sun.com/jsp/jstl/core" prefix="c" %> <%@ page import="java.util.Date" %> <%@ page language="java" contentType="text/html; charset=UTF-8" pageEncoding="UTF-8"%> <!DOCTYPE html PUBLIC "-//W3C//DTD HTML 4.01 Transitional//EN" "http://www.w3.org/TR/html4/loose.dtd"> <html> <head> <meta http-equiv="Content-Type" content="text/html; charset=UTF-8"> <title>Insert title here</title> </head> <body> <h1>Persons</h1> <p>You have added a new person at <%= new java.util.Date() %></p> <c:url var="mainUrl" value="/krams/main/persons" /> <p>Return to <a href="${mainUrl}">Main List</a></p> </body> </html>
deletedpage.jsp
<%@ taglib uri="http://java.sun.com/jsp/jstl/core" prefix="c" %> <%@ page import="java.util.Date" %> <%@ page language="java" contentType="text/html; charset=UTF-8" pageEncoding="UTF-8"%> <!DOCTYPE html PUBLIC "-//W3C//DTD HTML 4.01 Transitional//EN" "http://www.w3.org/TR/html4/loose.dtd"> <html> <head> <meta http-equiv="Content-Type" content="text/html; charset=UTF-8"> <title>Insert title here</title> </head> <body> <h1>Persons</h1> <p>You have deleted a person with id ${id} at <%= new java.util.Date() %></p> <c:url var="mainUrl" value="/krams/main/persons" /> <p>Return to <a href="${mainUrl}">Main List</a></p> </body> </html>
アプリケーションを設定しましょう。
web.xmlでSpring MVCを動作させるには:
web.xml
<servlet> <servlet-name>spring</servlet-name> <servlet-class>org.springframework.web.servlet.DispatcherServlet</servlet-class> <load-on-startup>1</load-on-startup> </servlet> <servlet-mapping> <servlet-name>spring</servlet-name> <url-pattern>/krams/*</url-pattern> </servlet-mapping> <listener> <listener-class>org.springframework.web.context.ContextLoaderListener</listener-class> </listener>
URLパターンに注意してください。 アプリケーションのページにアクセスする場合、ホスト名には次の形式で追加が含まれている必要があります。
/ krams
web.xmlでは、サーブレットの名前としてspringを指定しました。 慣例により、spring-servlet.xmlファイルも作成する必要があります。
spring-servlet.xml
<!-- Declare a view resolver --> <bean id="viewResolver" class="org.springframework.web.servlet.view.InternalResourceViewResolver" p:prefix="/WEB-INF/jsp/" p:suffix=".jsp" />
applicationContext.xmlファイルも作成する必要があります。
applicationContext.xml
<!-- Activates various annotations to be detected in bean classes --> <context:annotation-config /> <!-- Scans the classpath for annotated components that will be auto-registered as Spring beans. For example @Controller and @Service. Make sure to set the correct base-package--> <context:component-scan base-package="org.krams.tutorial" /> <!-- Configures the annotation-driven Spring MVC Controller programming model. Note that, with Spring 3.0, this tag works in Servlet MVC only! --> <mvc:annotation-driven /> <!-- Load Hibernate related configuration --> <import resource="hibernate-context.xml" />
applicationContext.xmlファイルで、次のインポートを宣言したことに注意してください。
<import resource="hibernate-context.xml" />
Hibernate構成ファイルが含まれています。
Hibernate-context.xml
<?xml version="1.0" encoding="UTF-8"?> <beans xmlns="http://www.springframework.org/schema/beans" xmlns:xsi="http://www.w3.org/2001/XMLSchema-instance" xmlns:p="http://www.springframework.org/schema/p" xmlns:tx="http://www.springframework.org/schema/tx" xmlns:context="http://www.springframework.org/schema/context" xsi:schemaLocation=" http://www.springframework.org/schema/beans http://www.springframework.org/schema/beans/spring-beans-3.0.xsd http://www.springframework.org/schema/tx http://www.springframework.org/schema/tx/spring-tx-3.0.xsd http://www.springframework.org/schema/context http://www.springframework.org/schema/context/spring-context-3.0.xsd "> <context:property-placeholder location="/WEB-INF/spring.properties" /> <!-- Enable annotation style of managing transactions --> <tx:annotation-driven transaction-manager="transactionManager" /> <!-- Declare the Hibernate SessionFactory for retrieving Hibernate sessions --> <!-- See http://static.springsource.org/spring/docs/3.0.x/javadoc-api/org/springframework/orm/hibernate3/annotation/AnnotationSessionFactoryBean.html --> <!-- See http://docs.jboss.org/hibernate/stable/core/api/index.html?org/hibernate/SessionFactory.html --> <!-- See http://docs.jboss.org/hibernate/stable/core/api/index.html?org/hibernate/Session.html --> <bean id="sessionFactory" class="org.springframework.orm.hibernate3.annotation.AnnotationSessionFactoryBean" p:dataSource-ref="dataSource" p:configLocation="${hibernate.config}" p:packagesToScan="org.krams.tutorial"/> <!-- Declare a datasource that has pooling capabilities--> <bean id="dataSource" class="com.mchange.v2.c3p0.ComboPooledDataSource" destroy-method="close" p:driverClass="${app.jdbc.driverClassName}" p:jdbcUrl="${app.jdbc.url}" p:user="${app.jdbc.username}" p:password="${app.jdbc.password}" p:acquireIncrement="5" p:idleConnectionTestPeriod="60" p:maxPoolSize="100" p:maxStatements="50" p:minPoolSize="10" /> <!-- Declare a transaction manager--> <bean id="transactionManager" class="org.springframework.orm.hibernate3.HibernateTransactionManager" p:sessionFactory-ref="sessionFactory" /> </beans>
このファイルでは、関連するすべてのHibernateおよびSpring構成をカプセル化しました。
構成コメント:
1. Springアノテーションを使用してトランザクションサポートを有効にします。
<tx:annotation-driven transaction-manager="transactionManager" />
2. HibernateのSessionFactoryを発表しました。
<bean id="sessionFactory" class="org.springframework.orm.hibernate3.annotation.AnnotationSessionFactoryBean" p:dataSource-ref="dataSource" p:configLocation="${hibernate.config}" p:packagesToScan="org.krams.tutorial"/>
SessionFactoryは、セッションオブジェクトを生成するファクトリです。 これは、人々のために車を作る仕事をしている自動車工場に似ています。
セッションとは何ですか?
セッションの主な機能は、エンティティクラス( エンティティアノテーションでマークされたクラス)のオブジェクトを作成、読み取り、削除することです。
SessionFactoryには、このレッスンではデータベースであるデータソースが必要です。
SessionFactoryには、特定のHibernate構成のファイルが必要です。
Hibernate.cfg.xml
<?xml version="1.0" encoding="UTF-8"?> <!DOCTYPE hibernate-configuration PUBLIC "-//Hibernate/Hibernate Configuration DTD 3.0//EN" "http://hibernate.sourceforge.net/hibernate-configuration-3.0.dtd"> <hibernate-configuration> <session-factory> <!-- We're using MySQL database so the dialect needs to MySQL as well--> <property name="hibernate.dialect">org.hibernate.dialect.MySQL5InnoDBDialect</property> <!-- Enable this to see the SQL statements in the logs--> <property name="show_sql">false</property> <!-- This will drop our existing database and re-create a new one. Existing data will be deleted! --> <property name="hbm2ddl.auto">create</property> </session-factory> </hibernate-configuration>
ここで、データベースのタイプを示しました。 MySQLの方言を使用します。 InnoDBエンジンを使用してメモリを管理するため、MySQL5InnoDBDialectという特別な方言を使用します。
MySQL InnoDBとは何ですか?
InnoDB-MySQLエンジン。トランザクションセキュリティを提供し、コミット、ロールバック、リカバリを許可してユーザーデータを保護します。
したがって、SessionFactory Beanに戻って、エンティティオブジェクトの場所を知る必要があります。 したがって、このレッスンでは、それらがorg.krams.tutorialパッケージにあることを示します。
3. hibernate-context.xmlファイルでデータソースを指定します。
<bean id="dataSource" class="com.mchange.v2.c3p0.ComboPooledDataSource" destroy-method="close" p:driverClass="${app.jdbc.driverClassName}" p:jdbcUrl="${app.jdbc.url}" p:user="${app.jdbc.username}" p:password="${app.jdbc.password}" p:acquireIncrement="5" p:idleConnectionTestPeriod="60" p:maxPoolSize="100" p:maxStatements="50" p:minPoolSize="10" />
データベースへの効果的なアクセスのために、C3p0プールを使用します。 データをプールにラップする必要があるのはなぜですか?
JDBC接続は、ドライバーを介して直接管理されるよりも、プールを介して管理されることが多くなります。 接続プールの例は、BoneCP、C3P0、およびDBCPです。
なぜプールが必要なのですか?
ソフトウェア接続プールを開発するとき、それは開いている接続のキャッシュです。 プールはパフォーマンスを改善するために必要です。 各ユーザーがデータベースを開いて接続するには、多くのリソースが必要です。 また、プールを使用する場合、必要な接続をキャッシュから抽出するだけでよく、接続を再度確立する必要はありません。
データベースへの接続の特性は、spring.propertiesファイルで指定されています。
spring.properties
# database properties app.jdbc.driverClassName=com.mysql.jdbc.Driver app.jdbc.url=jdbc:mysql://localhost/mydatabase app.jdbc.username=root app.jdbc.password= #hibernate properties hibernate.config=/WEB-INF/hibernate.cfg.xml
データベース名はmydatabaseです。
別の方法として、これらの機能をhibernate-context.xmlファイルで直接指定できます。
個別の構成ファイルを使用する利点は、データベースへの接続に関するデータのカプセル化です。
申し込みが完了しました。 Hibernateを使用してMySQLにアクセスする簡単なSpring MVCアプリケーションを作成できました。
メインページにアクセスするには、次のURLを入力します。localhost:8080 / spring-hibernate-mysql / krams / main / people
学ぶための最良の方法は、自分でアプリケーションを作成することです。
プロジェクトをダウンロードするには、リンクに従ってください: spring-mvc-hibernate-annotations-integration-tutorial.googlecode.com/files/spring-hibernate-mysql.zip
UPD:約束どおり-githubへのリンク: github.com/sa4ek/spring-hibernate-mysql/tree/master