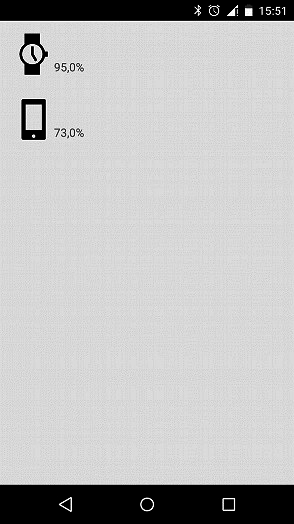
重要な点はすべて、時計とスマートフォンのバッテリー残量を表示するアプリケーションの例で最も簡単に表示できます。
Android Studioをダウンロードします。
新しいプロジェクトを作成します。

両方のデバイスを選択します。

さらに、すべてが標準です:
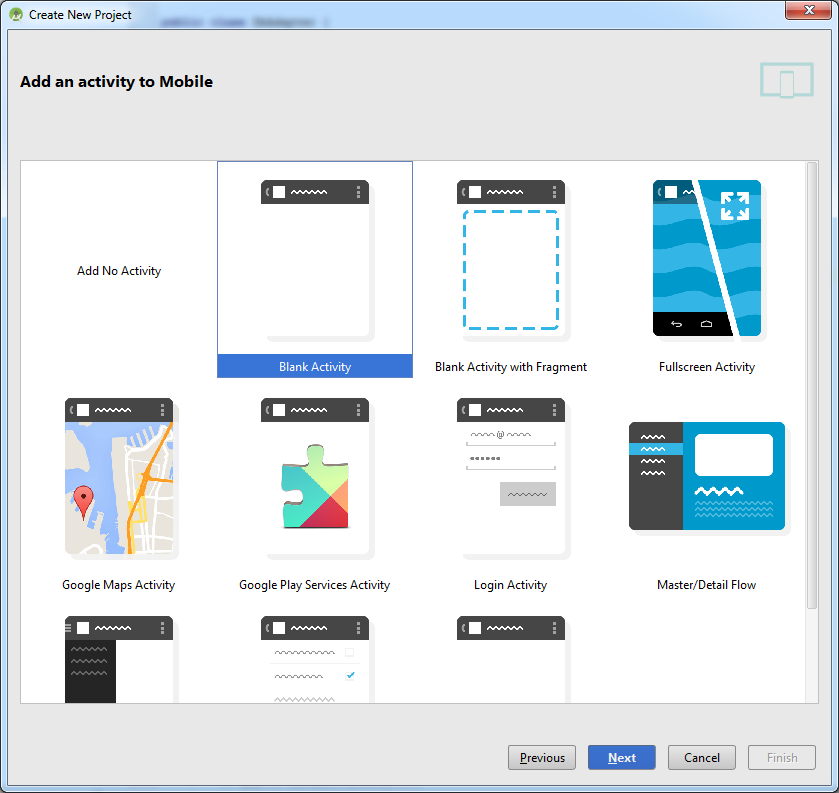
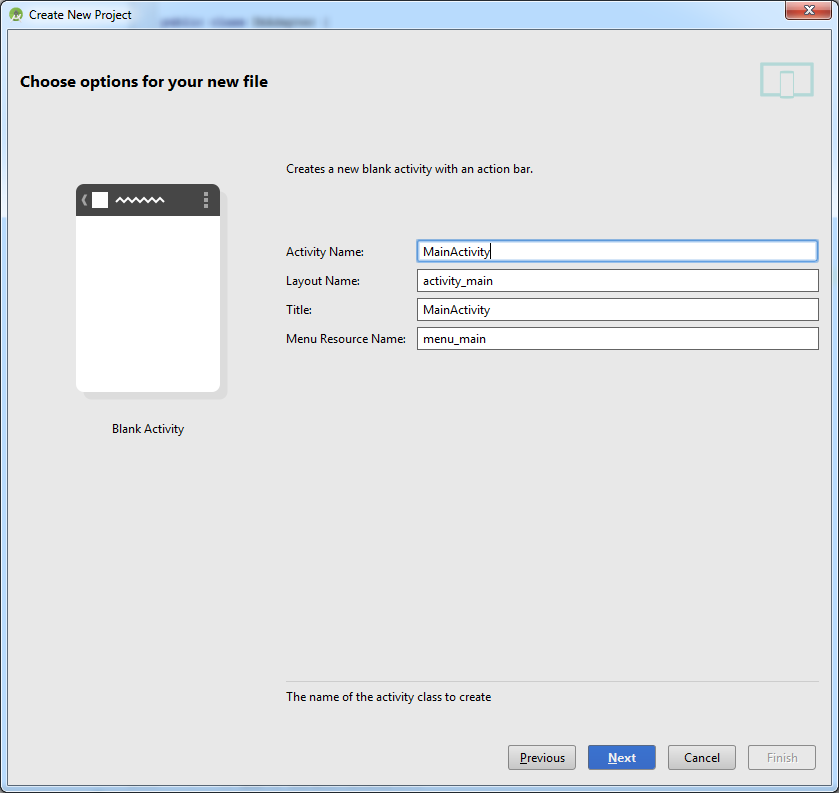

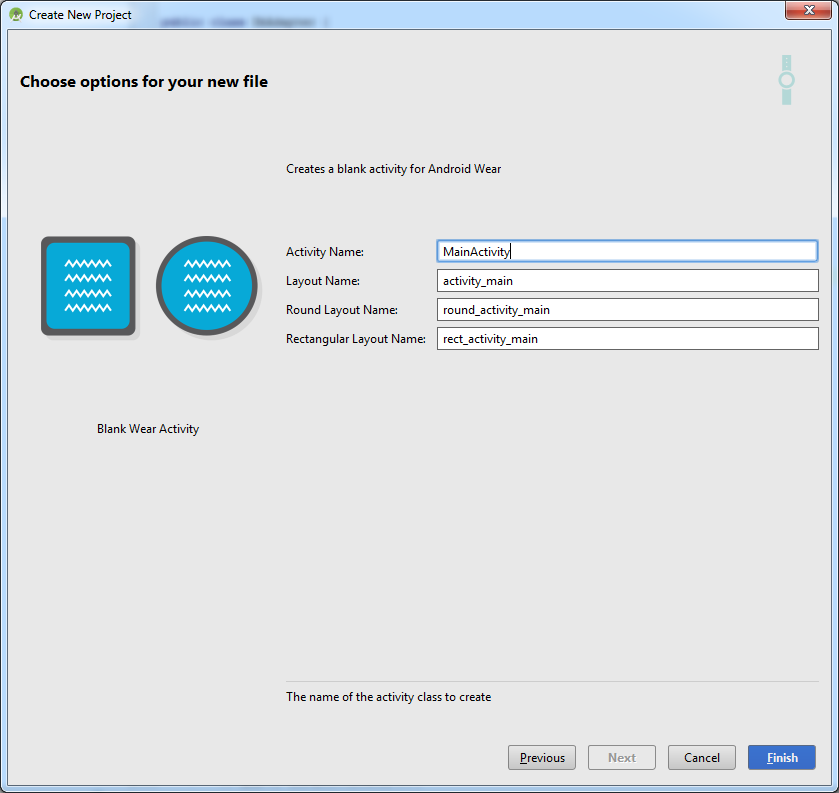
その結果、空のアクティビティで、両方のデバイスに適切な空白が表示されます。
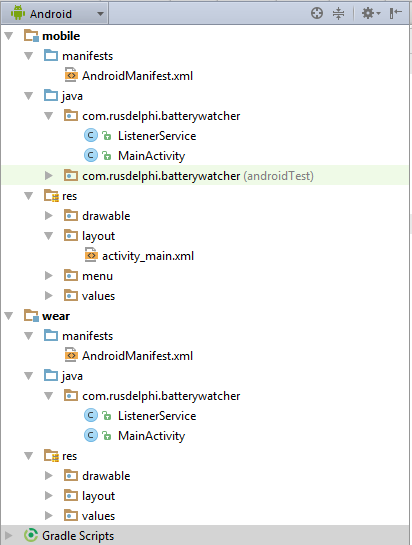
ListenerServiceは表示されません。以下に追加方法を説明します。
デバイスを接続するために、トリッキーなレイヤーが発明されました。 アプリケーションはこの層を介してメッセージを交換できます。 メッセージの送信は、別のスレッドで行う必要があります。 このタスクの実装については、 ここで詳しく説明します 。
GoogleApiClientに接続してから、別のストリームでメッセージを送信する必要があります。 これについては例で詳しく説明しますが、メッセージを扱うすべての作業を別のサービスに入れることにし、非常にコンパクトになりました。
ListenerServiceは次のとおりです。プロジェクトの両方の部分で同じです。
package com.rusdelphi.batterywatcher; import android.content.Intent; import android.content.SharedPreferences; import android.support.v4.content.LocalBroadcastManager; import android.util.Log; import com.google.android.gms.common.ConnectionResult; import com.google.android.gms.common.api.GoogleApiClient; import com.google.android.gms.wearable.MessageApi; import com.google.android.gms.wearable.MessageEvent; import com.google.android.gms.wearable.Node; import com.google.android.gms.wearable.NodeApi; import com.google.android.gms.wearable.Wearable; import com.google.android.gms.wearable.WearableListenerService; import java.util.concurrent.TimeUnit; /** * Created by User on 04.01.2015. */ public class ListenerService extends WearableListenerService { private SharedPreferences prefs; private boolean mIsAlarmOn; GoogleApiClient googleClient; public static final String ACTION_SM = "com.rusdelphi.batterywatcher.action.SM"; public static final String ACTION_SM_PARAM = "com.rusdelphi.batterywatcher.action.SM.PARAM"; private static final String WEAR_MESSAGE_PATH = "batterywatcher_message_path"; public ListenerService() { } @Override public void onCreate() { super.onCreate(); googleClient = new GoogleApiClient.Builder(this) .addApi(Wearable.API) .build(); googleClient.connect(); } @Override public void onDestroy() { if (null != googleClient && googleClient.isConnected()) { googleClient.disconnect(); } super.onDestroy(); } @Override public int onStartCommand(Intent intent, int flags, int startId) { if (intent != null) { final String action = intent.getAction(); if (ACTION_SM.equals(action)) { final String param1 = intent.getStringExtra(ACTION_SM_PARAM); if (googleClient.isConnected()) { new Thread(new Runnable() { @Override public void run() { NodeApi.GetConnectedNodesResult nodes = Wearable.NodeApi.getConnectedNodes(googleClient).await(); for (Node node : nodes.getNodes()) { MessageApi.SendMessageResult result = Wearable.MessageApi.sendMessage(googleClient, node.getId(), WEAR_MESSAGE_PATH, param1.getBytes()).await(); if (result.getStatus().isSuccess()) { Log.d("main", "Message: {" + param1 + "} sent to: " + node.getDisplayName()); } else { // Log an error Log.d("main", "ERROR: failed to send Message"); } } } }).start(); } if (!googleClient.isConnected()) new Thread(new Runnable() { @Override public void run() { ConnectionResult connectionResult = googleClient.blockingConnect(30, TimeUnit.SECONDS); NodeApi.GetConnectedNodesResult nodes = Wearable.NodeApi.getConnectedNodes(googleClient).await(); for (Node node : nodes.getNodes()) { MessageApi.SendMessageResult result = Wearable.MessageApi.sendMessage(googleClient, node.getId(), WEAR_MESSAGE_PATH, param1.getBytes()).await(); if (result.getStatus().isSuccess()) { Log.d("main", "Message: {" + param1 + "} sent to: " + node.getDisplayName()); } else { // Log an error Log.d("main", "ERROR: failed to send Message"); } } } }).start(); } } return super.onStartCommand(intent, flags, startId); } @Override public void onMessageReceived(MessageEvent messageEvent) { if (messageEvent.getPath().equals(WEAR_MESSAGE_PATH)) { final String message = new String(messageEvent.getData()); Intent messageIntent = new Intent(); messageIntent.setAction(Intent.ACTION_SEND); messageIntent.putExtra("message", message); LocalBroadcastManager.getInstance(this).sendBroadcast(messageIntent); } else { super.onMessageReceived(messageEvent); } } }
両方のマニフェストに追加する必要があります。
<service android:name=".ListenerService"> <intent-filter> <action android:name="com.google.android.gms.wearable.BIND_LISTENER" /> </intent-filter> </service>
サービスの作成中に、GoogleApiClientを収集し、データレイヤーに接続します。
onMessageReceivedイベントは 、メッセージが受信されると発生します。 受信したイベント(MessageEvent)で、宛先フォルダー(getPath())を確認します。 これがフォルダーの場合、データを取得します(messageEvent.getData())。 さらに、このデータは設定データベースに保存できます。 通常、必要に応じて使用します。 そして、LocalBroadcastManagerを使用して、それらをメインプログラム(MainActivity)に送信します。 ただし、このためには、ローカルレシーバーを登録する必要があります。 開始時にこれを行い、終了時に登録を解除します。
別のデバイスにメッセージを送信するには、必要なデータを使用してサービスを開始します。
サービスには既にGoogleApiClientが接続されている場合と接続されていない場合があります。 まだ接続されていない場合は、blockingConnectを起動する必要があります。つまり、接続をブロックして直接接続する必要があります。 これはすべて、別のスレッドで行う必要があります。なぜなら、 すべて非同期で動作します。
モバイルデバイスのMainActivityコードは次のとおりです。
package com.rusdelphi.batterywatcher; import android.app.Activity; import android.content.BroadcastReceiver; import android.content.Context; import android.content.Intent; import android.content.IntentFilter; import android.os.BatteryManager; import android.os.Bundle; import android.support.v4.content.LocalBroadcastManager; import android.view.Menu; import android.view.MenuItem; import android.widget.TextView; public class MainActivity extends Activity { public static String mWatchLevel = "?", mSmartphoneLevel = "?"; private TextView mWatch; private TextView mSmartphone; MessageReceiver messageReceiver = new MessageReceiver(); private BroadcastReceiver mBatteryLevelReceiver; @Override protected void onCreate(Bundle savedInstanceState) { super.onCreate(savedInstanceState); setContentView(R.layout.activity_main); mWatch = (TextView) findViewById(R.id.tv_watch); mSmartphone = (TextView) findViewById(R.id.tv_smartphone); IntentFilter batteryLevelFilter = new IntentFilter(Intent.ACTION_BATTERY_CHANGED); mBatteryLevelReceiver = new BroadcastReceiver() { @Override public void onReceive(Context context, Intent i) { int level = i.getIntExtra(BatteryManager.EXTRA_LEVEL, -1); int scale = i.getIntExtra(BatteryManager.EXTRA_SCALE, -1); mSmartphoneLevel = new java.text.DecimalFormat("0.0") .format((((float) level / (float) scale) * 100.0f)) + "%"; sendMessage(MainActivity.this, mSmartphoneLevel); updateUI(); } }; registerReceiver(mBatteryLevelReceiver, batteryLevelFilter); IntentFilter messageFilter = new IntentFilter(Intent.ACTION_SEND); LocalBroadcastManager.getInstance(this).registerReceiver(messageReceiver, messageFilter); } public static void sendMessage(Context context, String param1) { Intent intent = new Intent(context, ListenerService.class); intent.setAction(ListenerService.ACTION_SM); intent.putExtra(ListenerService.ACTION_SM_PARAM, param1); context.startService(intent); } public void updateUI() { mWatch.setText(mWatchLevel); mSmartphone.setText(mSmartphoneLevel); } @Override protected void onResume() { super.onResume(); updateUI(); } @Override public boolean onCreateOptionsMenu(Menu menu) { // Inflate the menu; this adds items to the action bar if it is present. getMenuInflater().inflate(R.menu.menu_main, menu); return true; } @Override public boolean onOptionsItemSelected(MenuItem item) { // Handle action bar item clicks here. The action bar will // automatically handle clicks on the Home/Up button, so long // as you specify a parent activity in AndroidManifest.xml. int id = item.getItemId(); //noinspection SimplifiableIfStatement if (id == R.id.action_settings) { return true; } return super.onOptionsItemSelected(item); } @Override protected void onDestroy() { LocalBroadcastManager.getInstance(this).unregisterReceiver(messageReceiver); if (mBatteryLevelReceiver!=null) { unregisterReceiver(mBatteryLevelReceiver); mBatteryLevelReceiver=null; } super.onDestroy(); } public class MessageReceiver extends BroadcastReceiver { @Override public void onReceive(Context context, Intent intent) { String message = intent.getStringExtra("message"); mWatchLevel = message; updateUI(); } } }
ここでは、起動時に、デバイスのバッテリーに関するメッセージを受信するレシーバーを作成します。 メッセージを受信すると(onReceive)、メッセージとしてデータレイヤーに送信し(sendMessage)、変数の値を更新します(updateUI)。 次に、ローカルレシーバー(MessageReceiver)を登録し、受信時にアプリケーション画面(updateUI)も更新します。
ウェアデバイスのMainActivityコードは次のとおりです。 何時間も:
package com.rusdelphi.batterywatcher; import android.app.Activity; import android.content.BroadcastReceiver; import android.content.Context; import android.content.Intent; import android.content.IntentFilter; import android.os.BatteryManager; import android.os.Bundle; import android.support.v4.content.LocalBroadcastManager; import android.support.wearable.view.WatchViewStub; import android.widget.TextView; public class MainActivity extends Activity { public static String mWatchLevel = "?", mSmartphoneLevel = "?"; private TextView mWatch; private TextView mSmartphone; MessageReceiver messageReceiver = new MessageReceiver(); private BroadcastReceiver mBatteryLevelReceiver; @Override protected void onCreate(Bundle savedInstanceState) { super.onCreate(savedInstanceState); setContentView(R.layout.activity_main); final WatchViewStub stub = (WatchViewStub) findViewById(R.id.watch_view_stub); stub.setOnLayoutInflatedListener(new WatchViewStub.OnLayoutInflatedListener() { @Override public void onLayoutInflated(WatchViewStub stub) { mWatch = (TextView) stub.findViewById(R.id.tv_watch); mSmartphone = (TextView) stub.findViewById(R.id.tv_smartphone); updateUI(); } }); IntentFilter batteryLevelFilter = new IntentFilter(Intent.ACTION_BATTERY_CHANGED); mBatteryLevelReceiver = new BroadcastReceiver() { @Override public void onReceive(Context context, Intent i) { int level = i.getIntExtra(BatteryManager.EXTRA_LEVEL, -1); int scale = i.getIntExtra(BatteryManager.EXTRA_SCALE, -1); mWatchLevel = new java.text.DecimalFormat("0.0") .format((((float) level / (float) scale) * 100.0f)) + "%"; sendMessage(MainActivity.this, mWatchLevel); updateUI(); } }; registerReceiver(mBatteryLevelReceiver, batteryLevelFilter); IntentFilter messageFilter = new IntentFilter(Intent.ACTION_SEND); LocalBroadcastManager.getInstance(this).registerReceiver(messageReceiver, messageFilter); } public void updateUI() { if (mWatch != null) mWatch.setText(mWatchLevel); if (mSmartphone != null) mSmartphone.setText(mSmartphoneLevel); } public static void sendMessage(Context context, String param1) { Intent intent = new Intent(context, ListenerService.class); intent.setAction(ListenerService.ACTION_SM); intent.putExtra(ListenerService.ACTION_SM_PARAM, param1); context.startService(intent); } @Override protected void onDestroy() { LocalBroadcastManager.getInstance(this).unregisterReceiver(messageReceiver); if (mBatteryLevelReceiver != null) { unregisterReceiver(mBatteryLevelReceiver); mBatteryLevelReceiver = null; } super.onDestroy(); } public class MessageReceiver extends BroadcastReceiver { @Override public void onReceive(Context context, Intent intent) { String message = intent.getStringExtra("message"); mSmartphoneLevel = message; updateUI(); } } }
彼は原則として兄のように見えますが、マークアップの構成には違いがあります。 デバイスは正方形と円形のスクリーンを使用できます。 WatchViewStubコンポーネントを使用すると、レイアウトの選択を簡素化できます。このため、2つのrect_activity_main.xmlファイルとround_activity_main.xmlファイルを設計するだけです。
最初のコードは次のとおりです。
<?xml version="1.0" encoding="utf-8"?> <RelativeLayout xmlns:android="http://schemas.android.com/apk/res/android" xmlns:tools="http://schemas.android.com/tools" android:layout_width="match_parent" android:layout_height="match_parent" android:orientation="vertical" tools:context=".MainActivity" tools:deviceIds="wear_square"> <LinearLayout android:orientation="vertical" android:layout_width="wrap_content" android:layout_height="wrap_content" android:layout_centerVertical="true" android:layout_centerHorizontal="true"> <LinearLayout android:orientation="horizontal" android:layout_width="wrap_content" android:layout_height="wrap_content"> <ImageView android:layout_width="50dp" android:layout_height="50dp" android:id="@+id/imageView" android:src="@drawable/watch" /> <TextView android:layout_width="wrap_content" android:layout_height="wrap_content" android:id="@+id/tv_watch" android:layout_gravity="bottom" style="@style/TextAppearance.Wearable.Large" /> </LinearLayout> <LinearLayout android:orientation="horizontal" android:layout_width="wrap_content" android:layout_height="wrap_content" android:layout_marginTop="5dp"> <ImageView android:layout_width="50dp" android:layout_height="50dp" android:id="@+id/imageView2" android:src="@drawable/smartphone" /> <TextView android:layout_width="wrap_content" android:layout_height="wrap_content" android:id="@+id/tv_smartphone" android:layout_gravity="bottom" style="@style/TextAppearance.Wearable.Large" /> </LinearLayout> </LinearLayout> </RelativeLayout>
次に2つ目を示します。
<?xml version="1.0" encoding="utf-8"?> <RelativeLayout xmlns:android="http://schemas.android.com/apk/res/android" xmlns:tools="http://schemas.android.com/tools" android:layout_width="match_parent" android:layout_height="match_parent" tools:context=".MainActivity" tools:deviceIds="wear_round"> <LinearLayout android:orientation="vertical" android:layout_width="wrap_content" android:layout_height="wrap_content" android:layout_centerVertical="true" android:layout_centerHorizontal="true"> <LinearLayout android:orientation="horizontal" android:layout_width="wrap_content" android:layout_height="wrap_content"> <ImageView android:layout_width="50dp" android:layout_height="50dp" android:id="@+id/imageView" android:src="@drawable/watch" /> <TextView android:layout_width="wrap_content" android:layout_height="wrap_content" android:id="@+id/tv_watch" android:layout_gravity="bottom" style="@style/TextAppearance.Wearable.Large" /> </LinearLayout> <LinearLayout android:orientation="horizontal" android:layout_width="wrap_content" android:layout_height="wrap_content" android:layout_marginTop="5dp"> <ImageView android:layout_width="50dp" android:layout_height="50dp" android:id="@+id/imageView2" android:src="@drawable/smartphone" /> <TextView android:layout_width="wrap_content" android:layout_height="wrap_content" android:id="@+id/tv_smartphone" android:layout_gravity="bottom" style="@style/TextAppearance.Wearable.Large" /> </LinearLayout> </LinearLayout> </RelativeLayout>
ここで、マークアップを作成するときに、2つのTextViewコンポーネントを取得し、それらのコンテンツを更新します(updateUI)。 残りのコードは、モバイル版と同じように機能します。 アプリケーションを起動し、現在のバッテリーレベルを取得し、それを隣接デバイスに送信して、そのメッセージを聞きます。 何かが変わった方法->測定値を更新します。
Googleマーケットでアプリケーションを公開する場合、両方のモジュールに同じバージョン(versionCode)のコードと同じパッケージ名が必要です。 デフォルトでは、Android Studioがこの作業を行います。 モバイルデバイスのapkファイルを収集すると、その中にウェア用のapkが作成されます。 この作業はEclipseでも実行できます。 一般的に、誰に簡単です。 モバイルデバイスに市場からアプリケーションをインストールすると、厚いapkが表示されます。これにより、ウェアデバイス自体のapkがインストールされます。
デバイスのスクリーンショット: