全般
この記事では、Cloudifyオーケストレーションおよび自動化システムについて説明し、OpenStackクラウド内にインストールする例、IceHouseの現在のバージョン、およびその後のテストアプリケーションのデプロイについて説明します。
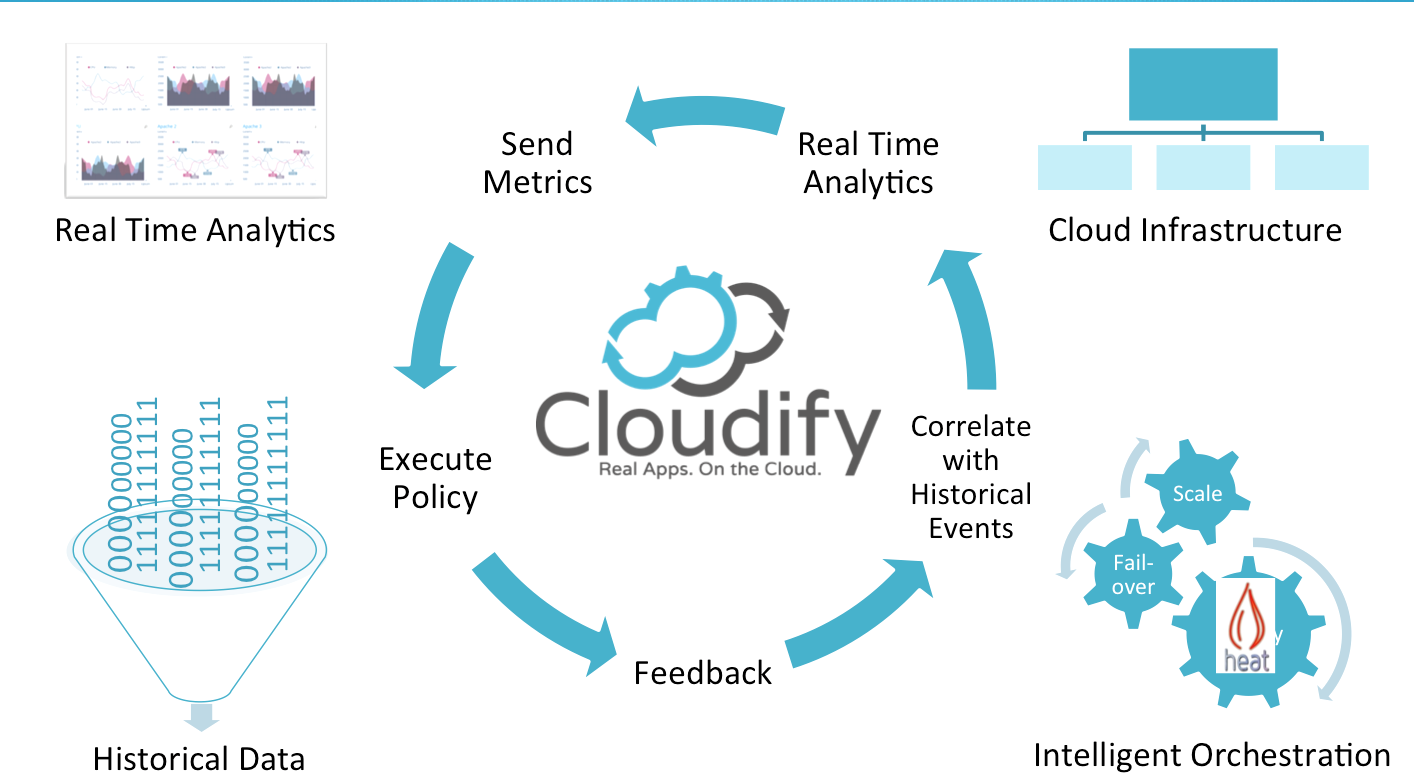
Cloudifyは、クラウドへのスムーズな移行と、ライフサイクル全体を通して最も複雑なアプリケーションでも簡単に自動化できるシステムです。 コンピューティングリソースからネットワーク、データブロック用のストレージデバイスまで、アプリケーションに必要なクラウドインフラストラクチャ全体の作成を整理します。 Cloudifyは、アプリケーションをクラウド(Amazon EC2、OpenStack、VMWare Vsphere、または純粋なハードウェア)にデプロイし、必要に応じて進捗状況とスケールを表示できます。 さまざまなプラットフォームのサポートにより、同じフロントエンドを持つクラウドサービスプロバイダーを選択できます。 アプリケーションがデプロイされているスタック、トポロジ、またはプラットフォームに関係なく、Cloudify内のアプリケーションを監視、管理、およびスケーリングします。

これは彼の説明で説明されていますが、Bash、Chef、OpenStack、Puppet、WindowsおよびLinuxエージェントインストーラーで作業できるプラグインがサポートされていることを追加できます。
現在のバージョンは3.0で、3.1は開発中です。 重大な欠点の1つ-バージョン3.0では、2.7にあった高度な機能が削除され、サブスクリプションで有料で提供されます。
Cloudifyには、アプリケーションへのアクセスを可能にするゲートウェイであるコントロールノードが含まれています。 Cloduify自体の管理は、GUI、CLI、および広範なREST APIを通じても可能です。
既存のパッケージはDebianまたはUbuntu用に提供されています。また、Centos \ RedHatにはgithubまたはpypi pythonからインストールできます。 使用されているpythonのバージョンは2.7です。
設置
OpenStackがデプロイされているノードはRedHatを実行していました。 したがって、手順は次のとおりでした。
Python 2.7をインストールします。
私の意見では、最も簡単な方法は、リポジトリから既製のパッケージを取得することです: mirror.yandex.ru/centos/6/SCL/x86_64/python27
Pythonは/opt/rh/python27/root/usr/bin/python2.7に配置されます

pipをインストールします。
wget bootstrap.pypa.io/get-pip.py
/opt/rh/python27/root/usr/bin/python2.7 /var/repo-python/get-pip.py
原則として、githubからもインストールできますが、PyPiを使用する方が簡単で高速だと思われます。
clodifyをインストールします。
/opt/rh/python27/root/usr/bin/pip install cloudify
/opt/rh/python27/root/usr/bin/pip install cloudify-openstack
/opt/rh/python27/root/usr/bin/pip install cloudify-openstack-provider
Python 2.7の絶対パスを指定することを忘れないでください。そうしないと、シンボリックリンクを作成できます。
ln -s /opt/rh/python27/root/usr/bin/python2.7 /usr/bin/python2.7
ln -s /opt/rh/python27/root/usr/bin/pip /usr/bin/pip2.7
ln -s /opt/rh/python27/root/usr/bin/cfy /usr/bin/cfy
コマンドをより高速に実行するため。
次のステップは、openstack内でcloudify自体の管理ノードを起動することです。 これを行うには、選択したディレクトリ(〜/ cloudify / init1など)で次のコマンドを実行します。
cfy init openstack
このディレクトリには、
.cloudify cloudify-config.yaml
2つのファイルがあります。
plugin.yamlは、後続のブートストラップを開始するために編集する必要がある設定です。
動作する構成ファイルの例:
keystone: username: admin password: ADMIN_PASSWORD tenant_name: admin auth_url: http://controller:5000/v2.0 networking: neutron_url: http://controller:9696 int_network: create_if_missing: true name: cloudify-admin-network subnet: create_if_missing: true name: cloudify-admin-network-subnet ip_version: 4 cidr: 10.67.79.0/24 dns_nameservers: ['8.8.8.8'] ext_network: name: Ext-Net compute: management_server: user_on_management: root userhome_on_management: /root instance: image: 883293298-fn32u98-fnf83-fkdfs flavor: 102 management_keypair: create_if_missing: false name: default_keypair private_key_path: ~/.ssh/default_keypair.pem
編集に必要な行のみが表示されます。
自動的にCloudifyはUbuntu \ Debianにのみデプロイされます。Ubuntuを選択しましたが、バージョン14.04は適切ではありません。 ブートストラップ中に、それを誓います。 したがって、選択は公式にサポートされているバージョン12.04にインストールされました。 おそらくバージョン3.1でこれは修正されるでしょう。
最初にイメージを準備する必要があります。つまり、イメージに3つのパッケージ(java、unzip、github)をインストールする必要があります。
たとえば、VirtualBoxで自分でUbuntuイメージを作成し、それを一目で混乱させることもできますが、このステップは省略します。 困難は生じないはずです。 または、こちらからダウンロードできます: cloud-images.ubuntu.com/releases/12.04.2/release-20120424/ubuntu-12.04-server-cloudimg-amd64-disk1.img
キー入力のみ。
Unzipとgithubを配置するだけです:apt-get install unzip github。 Javaはやや困難です。jre-7u67-linux-x64.gzアーカイブをダウンロードするか、異なるバージョンを使用してください。 / opt / java / 64または別の選択したパッケージに解凍し、システムに書き込みます。
update-alternatives --install "/usr/bin/java" "java" "/opt/java/64/jre1.7.0_67/bin/java" 1

その後、イメージの準備ができたと考え、スナップショットを作成し、作成したイメージから管理ノードを既に起動しています。
cloudify-config.yaml configに、イメージIDを書き込みます。 cfy init openstackを作成したディレクトリに移動して、コマンドを実行します。
cfy bootstrap
成功の出力例:
cfy bootstrap prefix for all resources: '' bootstrapping using cloudify_openstack validating provider resources and configuration schema validated successfully validating networking resources... validating compute resources... resources validated successfully provider validations completed successfully provisioning resources for management server... attaching IP 10.10.10.227 to the instance provisioning complete ensuring connectivity with the management server... connected with the management server successfully bootstrapping the management server... uploading keystone and neutron and files to manager [10.10.10.227] put: /root/.ssh/cloudify-agents-kp.pem -> /root/.ssh/cloudify-agents-kp.pem [10.10.10.227] put: /tmp/tmpel_Iyv/keystone_config.json -> /root/keystone_config.json [10.10.10.227] put: /tmp/tmpel_Iyv/neutron_config.json -> /root/neutron_config.json initializing manager on the machine at 10.10.10.227 downloading cloudify-components package... downloading cloudify-core package... downloading cloudify-ui... unpacking cloudify-core packages... installing cloudify on 10.10.10.227... [10.10.10.227] out: [10.10.10.227] out: Installing cloudify-components version 3.0.0... [10.10.10.227] out: [10.10.10.227] out: (by the way, you may tail /var/log/cloudify-bootstrap.log for the full installation log) [10.10.10.227] out: NOTE: this should take approx 5 minutes on an average machine... [10.10.10.227] out: [10.10.10.227] out: checking whether the system meets the minimum installation requirements... [10.10.10.227] out: the system meets the requirements necessary for Cloudify's installation [10.10.10.227] out: [10.10.10.227] out: checking whether openjdk-7-jdk is installed...openjdk-7-jdk is not installed, installing... [10.10.10.227] out: checking whether openjdk-7-jdk is installed...Status: install ok installed [10.10.10.227] out: checking whether curl is installed...Status: install ok installed [10.10.10.227] out: curl is already installed, skipping... [10.10.10.227] out: checking whether logstash is installed...logstash is not installed, installing... [10.10.10.227] out: checking whether logstash is installed...Status: install ok installed [10.10.10.227] out: checking whether elasticsearch is installed...elasticsearch is not installed, installing... [10.10.10.227] out: checking whether elasticsearch is installed...Status: install ok installed [10.10.10.227] out: checking whether kibana3 is installed...kibana3 is not installed, installing... [10.10.10.227] out: checking whether kibana3 is installed...Status: install ok installed [10.10.10.227] out: checking whether riemann is installed...riemann is not installed, installing... [10.10.10.227] out: checking whether riemann is installed...Status: install ok installed [10.10.10.227] out: checking whether rabbitmq-server is installed...rabbitmq-server is not installed, installing... [10.10.10.227] out: checking whether rabbitmq-server is installed...Status: install ok installed [10.10.10.227] out: checking whether nginx is installed...nginx is not installed, installing... [10.10.10.227] out: checking whether virtualenv is installed...virtualenv is not installed, installing... [10.10.10.227] out: checking whether virtualenv is installed...Status: install ok installed [10.10.10.227] out: checking whether make is installed...make is not installed, installing... [10.10.10.227] out: checking whether make is installed...Status: install ok installed [10.10.10.227] out: checking whether nodejs is installed...nodejs is not installed, installing... [10.10.10.227] out: checking whether nodejs is installed...Status: install ok installed [10.10.10.227] out: [10.10.10.227] out: performing post installation tests... [10.10.10.227] out: post installation tests completed successfully. [10.10.10.227] out: [10.10.10.227] out: cloudify-components 3.0.0 installation completed successfully! [10.10.10.227] out: [10.10.10.227] out: [10.10.10.227] out: [10.10.10.227] out: Installing cloudify-core version 3.0.0... [10.10.10.227] out: [10.10.10.227] out: checking whether celery and the management plugins are installed...celery is not installed, installing... [10.10.10.227] out: checking whether celery is installed...Status: install ok installed [10.10.10.227] out: checking whether manager is installed...manager is not installed, installing... [10.10.10.227] out: checking whether manager is installed...Status: install ok installed [10.10.10.227] out: [10.10.10.227] out: performing post installation tests... [10.10.10.227] out: post installation tests completed successfully. [10.10.10.227] out: [10.10.10.227] out: cloudify-core 3.0.0 installation completed successfully! [10.10.10.227] out: [10.10.10.227] out: installing cloudify-ui... cloudify-ui installation successful. deploying cloudify agents cloudify agents installation successful. bootstrapping complete management server is up at 10.10.10.227 (is now set as the default management server)
その後、httpでアドレス10.10.10.227にアクセスできます。
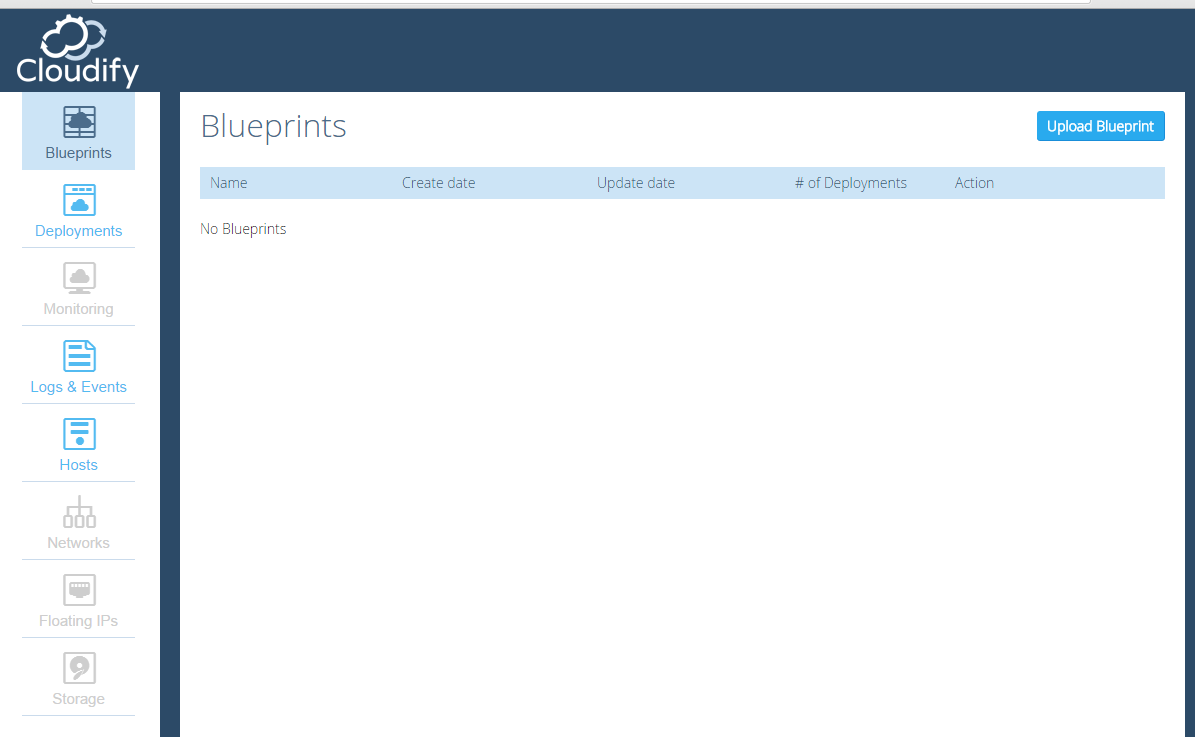
バージョン2.7と比較して、無料版ではインターフェイスが非常に貧弱で、ブループリントのダウンロード、展開の作成と実行、ログの監視とホストからの情報の受信が可能です。
たとえば、バージョン2.7の画面:

アプリケーションのインストール
レシピ自体の例:
imports: - http://www.getcloudify.org/spec/bash-plugin/1.0/plugin.yaml - http://www.getcloudify.org/spec/openstack-plugin/1.0/plugin.yaml plugins: nodecellar_config_plugin: derived_from: cloudify.plugins.agent_plugin properties: folder: nodecellar-config-plugin types: vm_host: derived_from: cloudify.openstack.server properties: - cloudify_agent: user: ubuntu - server: ### if defined, will serve as the hostname for the started instance, ### otherwise, the node_id will be used #name: no_name ### HOST_NAME"" image: 75d47d10-fef8-473b-9dd1-fe2f7649cb41 ### IMAGE_NAME flavor: 101 ### FLAVOR_NAME security_groups: ['node_cellar_security_group'] mongo_database: derived_from: cloudify.types.bash.db_server properties: - role - port nodejs_server: derived_from: cloudify.types.bash.app_server nodejs_app: derived_from: cloudify.types.bash.app_module properties: - app_name - startup_script - git_url - git_branch - base_port - num_instances - env_file_path relationships: nodecellar_connected_to_mongo: derived_from: cloudify.relationships.connected_to source_interfaces: cloudify.interfaces.relationship_lifecycle: - postconfigure: nodecellar_config_plugin.tasks.get_mongo_host_and_port blueprint: name: nodecellar nodes: - name: node_cellar_security_group type: cloudify.openstack.security_group properties: security_group: name: node_cellar_security_group rules: - remote_ip_prefix: 0.0.0.0/0 port: 8080 - remote_ip_prefix: 0.0.0.0/0 port: 27017 - remote_ip_prefix: 0.0.0.0/0 port: 28017 - name: floatingip type: cloudify.openstack.floatingip properties: floatingip: floating_network_name: Ext-Net - name: mongod_vm type: vm_host instances: deploy: 1 relationships: - target: node_cellar_security_group type: cloudify.relationships.depends_on - name: nodejs_vm type: vm_host instances: deploy: 1 relationships: - target: floatingip type: cloudify.openstack.server_connected_to_floating_ip - target: node_cellar_security_group type: cloudify.relationships.depends_on - name: mongod type: mongo_database properties: role: mongod port: 27017 scripts: create: mongo-scripts/install-mongo.sh start: mongo-scripts/start-mongo.sh stop: mongo-scripts/stop-mongo.sh relationships: - target: mongod_vm type: cloudify.relationships.contained_in - name: nodejs type: nodejs_server properties: scripts: create: nodejs-scripts/install-nodejs.sh relationships: - type: cloudify.relationships.contained_in target: nodejs_vm - name: nodecellar_app type: nodejs_app properties: app_name: nodecellar startup_script: server.js git_url: https://github.com/cloudify-cosmo/nodecellar.git git_branch: master base_port: 8080 num_instances: 1 env_file_path: /tmp/mongo_host_and_port.sh scripts: create: nodejs-scripts/install-app.sh start: nodejs-scripts/start-app.sh stop: nodejs-scripts/stop-app.sh relationships: - type: cloudify.relationships.contained_in target: nodejs - type: nodecellar_connected_to_mongo target: mongod
次に、アプリケーションのテスト展開を実行できます。
Gitaから図面をダウンロードし、当社のバージョンを選択します。
cd ~/simple/blueprints
git clone github.com/cloudify-cosmo/cloudify-nodecellar-singlehost.git
cd cloudify-nodecellar-singlehost/
git checkout tags/3.0
cd ~/simple
図面をダウンロードする:
cfy blueprints upload -b nodecellar1 blueprints/cloudify-nodecellar-singlehost/blueprint.yaml
展開を作成します。
cfy deployments create -b nodecellar1 -d nodecellar1
そしてインストールを開始します。
cfy deployments execute -d nodecellar1 install
ログには次のように表示されます。
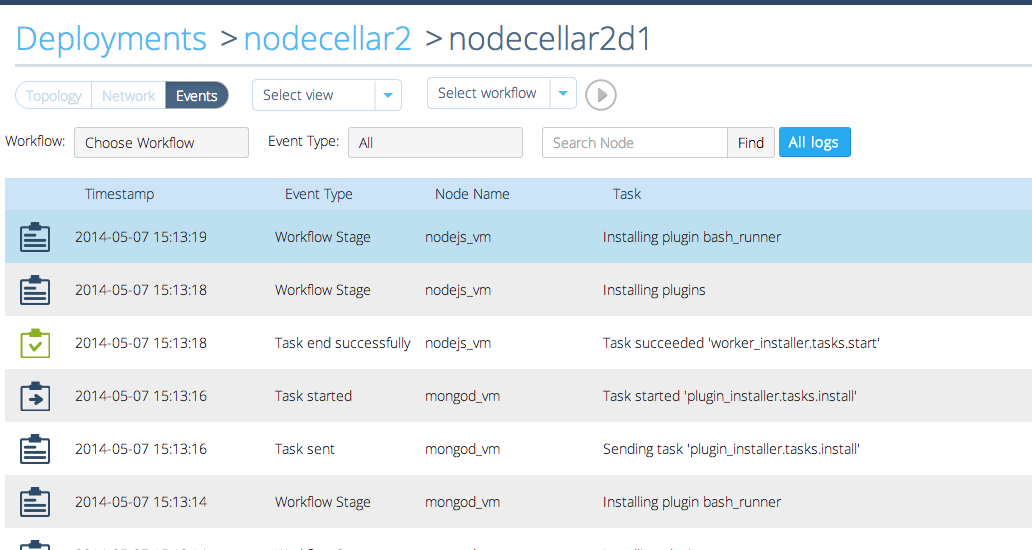
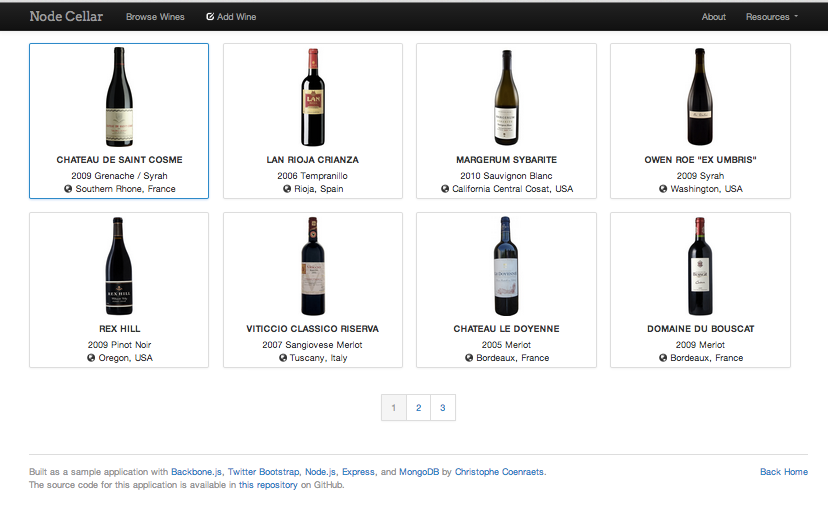
出力には、開発アプリケーションにアクセスできるURLが含まれます。ページは次のようになります。
おわりに
この記事では、準備手順を実行し、イメージを作成してCloudifyをOpenStackにインストールし、テストアプリケーションもデプロイしました。 現在のバージョンのレビューが行われます。
誰でもこのアプリケーションの使用経験がある場合は、それが使用されたケースと私の印象についてのコメントで退会してください。 この製品に関する私の知識はまだ探索的なものです。