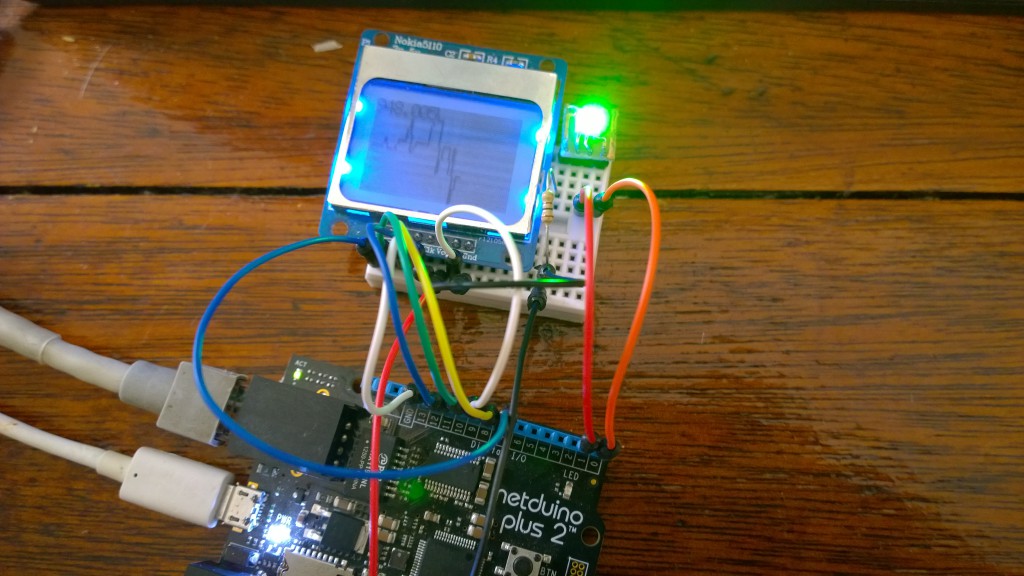
点滅するLEDだけでなく、実際のライブシナリオに関連するものを表示したかったのです。 そして、これを実証することにしました:

ひどいGIFでごめんなさい。 あなたはそれをビットコイン価格変更トラッカーと呼ぶことができます。 グラフは変更を反映し、LEDは価格が上がると緑色に変わり、価格が下がると赤色に変わります。 (画面には、誤字が表示される場合があります-USDではなく、BTCが表示されます)。

紺Azure
私たちにとって最初の明白なステップは、データがどこから来るかを決定することです。 シンプルで使いやすいAPIの1つはmtgoxによって提供されます (注:それらの周りのさまざまな種類の矛盾する議論のため、Bitstampのようなものを使用することは理にかなっているかもしれません)。 問題は、必要な価格データと一緒に、ソースが、Netduinoでダウンロードして処理するには高すぎる他の多くのデータを生成することです。 解決策は、デバイスとAPIの間に中間サービスを作成し、不要なデータをカットすることです。 そして、Azureでそれを行うのは本当に簡単です。
Azureポータルで新しいWebサイトを作成します。

必要に応じてURLを指定し、サイトの作成を開始してからVisual Studioに移動します。 新しいASP.NET MVC Webアプリケーションを作成します。

mtgox APIから最新の価格データをダウンロードし、短縮価格データを送信します。 これを行うには、JSONデータを.NETオブジェクトにデシリアライズする必要があります。 APIにアクセスし 、JSONの結果をコピーします。 次に、ModelsフォルダーにMtGoxTicker.csという新しい.csファイルを作成します。 デフォルトのクラス定義を削除し、[ 編集]> [形式を選択して貼り付け]> [JSONをクラスとして貼り付け]コマンドを使用して、コピーしたテキストを貼り付けます。 APIの構造を表示するクラス全体が自動的に作成されます。 RootObjectの名前をMtGoxTickerに変更します。
非表示のテキスト
public class MtGoxTicker { public string result { get; set; } public Data data { get; set; } } public class Data { public High high { get; set; } public Low low { get; set; } public Avg avg { get; set; } public Vwap vwap { get; set; } public Vol vol { get; set; } public Last_Local last_local { get; set; } public Last_Orig last_orig { get; set; } public Last_All last_all { get; set; } public Last last { get; set; } public Buy buy { get; set; } public Sell sell { get; set; } public string item { get; set; } public string now { get; set; } } public class High { public string value { get; set; } public string value_int { get; set; } public string display { get; set; } public string display_short { get; set; } public string currency { get; set; } } public class Low { public string value { get; set; } public string value_int { get; set; } public string display { get; set; } public string display_short { get; set; } public string currency { get; set; } } public class Avg { public string value { get; set; } public string value_int { get; set; } public string display { get; set; } public string display_short { get; set; } public string currency { get; set; } } public class Vwap { public string value { get; set; } public string value_int { get; set; } public string display { get; set; } public string display_short { get; set; } public string currency { get; set; } } public class Vol { public string value { get; set; } public string value_int { get; set; } public string display { get; set; } public string display_short { get; set; } public string currency { get; set; } } public class Last_Local { public string value { get; set; } public string value_int { get; set; } public string display { get; set; } public string display_short { get; set; } public string currency { get; set; } } public class Last_Orig { public string value { get; set; } public string value_int { get; set; } public string display { get; set; } public string display_short { get; set; } public string currency { get; set; } } public class Last_All { public string value { get; set; } public string value_int { get; set; } public string display { get; set; } public string display_short { get; set; } public string currency { get; set; } } public class Last { public string value { get; set; } public string value_int { get; set; } public string display { get; set; } public string display_short { get; set; } public string currency { get; set; } } public class Buy { public string value { get; set; } public string value_int { get; set; } public string display { get; set; } public string display_short { get; set; } public string currency { get; set; } } public class Sell { public string value { get; set; } public string value_int { get; set; } public string display { get; set; } public string display_short { get; set; } public string currency { get; set; } }
Controllersフォルダーで、新しいWebAPIコントローラーを作成するか、既存のコントローラーのいずれかを使用します。 Get以外のすべてのメソッドを削除できます。 このメソッドに必要なのは、APIから最新の価格データをダウンロードし、必要な1つのBUY値を返すことだけです。
Getの戻り値の型をdoubleに変更し、メソッドを次の形式にキャストします。
非表示のテキスト
public double Get() { try { var wc = new WebClient(); var response = JsonConvert.DeserializeObject<MtGoxTicker>(wc.DownloadString("https://data.mtgox.com/api/2/BTCUSD/money/ticker")); if (response != null) { return double.Parse(response.data.buy.value); } } catch (Exception) { } return -1; }
簡単に言えば、誰かがGetメソッドを呼び出すと、APIから価格を読み込み、それらを逆シリアル化し、必要なデータのみを返します。
最後に行う必要があるのは、APIが常にJSONで応答を返すようにすることです。 Global.asax.csのAppication_Startメソッドの最後の行に移動し、既存の行の後に次のコードを追加します。
GlobalConfiguration.Configuration.Formatters.Clear(); GlobalConfiguration.Configuration.Formatters.Add(new JsonMediaTypeFormatter());
この時点で、AzureでWebサイトが作成されているはずなので、Visual Studioから直接サイトを移動してホストできます。 これを行う最も簡単な方法は、ソリューションエクスプローラーでプロジェクトを右クリックし、Publshコマンドを選択することです。 次に、[インポート]をクリックして、Azureサブスクリプションの詳細のログインおよびインポートプロセスを実行します(このプロセスはVisual Studio 2013でより見栄えがよくなります)。 サイトの公開には1〜2分かかります。その後、サイトにアクセスできます。
サイトの外観をテストするために、 http://bitcoinpusher.azurewebsites.net/api/Priceにアクセスできます(注:このリンクが永久に機能することは保証できません)。
ハードウェア
-Netduino Plus(またはPlus 2)

-Nokia 5110 LCD (DXポータルで4ドル)
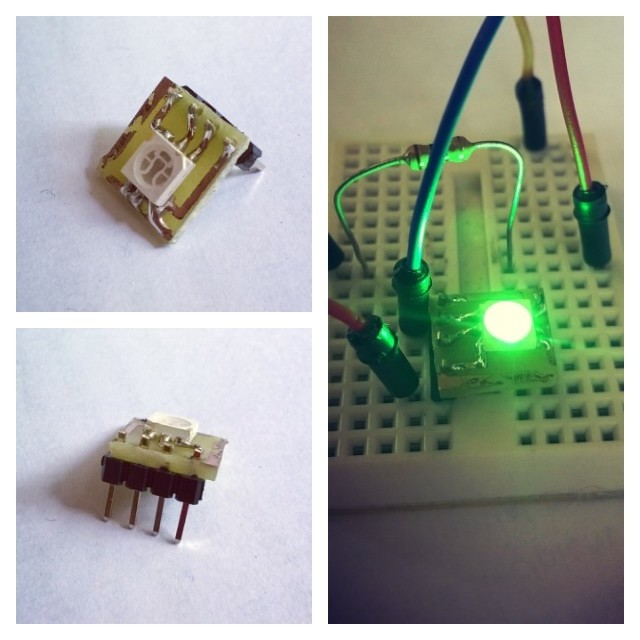
-RGB LED- SMD 5050を使用しましたが、どのRGB LEDでも使用できます。
Netduino
Netduinoは、Azureのサービスから最新の価格データをダウンロードして表示し、グラフを描画します。 このプロセスは、無限のサイクルで定期的に繰り返され、できるだけ早くデータを更新します(インターネットの速度に依存します)。
Nokia 5110 LCDの画面に書き込むには、Netduinoコミュニティのメンバーが開発したライブラリを使用します。このライブラリについては、 こちらをご覧ください 。 線描画アルゴリズムにエラーがあるため、修正版を使用するために(この記事の最後に)ソースコードをダウンロードする必要がある場合があることに注意してください。
ネットワーク呼び出しを簡素化するために、 .NET MF Toolboxの HTTPクライアントを使用できます。
コードを1行ずつ記述するのではなく、すべてのProgram.csコードをコメント付きで公開します。 理解するのに十分簡単です:
非表示のテキスト
public class Program { //the red and green pins of the RGB LED private static OutputPort _redPin = new OutputPort(Pins.GPIO_PIN_D1, false); private static OutputPort _greenPin = new OutputPort(Pins.GPIO_PIN_D0, false); public static void Main() { //setup the LCD with appropriate pins. var lcd = new Nokia_5110(true, Pins.GPIO_PIN_D10, Pins.GPIO_PIN_D9, Pins.GPIO_PIN_D7, Pins.GPIO_PIN_D8) { BacklightBrightness = 100 }; //create these to store values var history = new Queue(); double lastValue = 0; var nextUpdateTime = DateTime.MinValue; while (true) { try { //download the price from our API var WebSession = new HTTP_Client(new IntegratedSocket("bitcoinpusher.azurewebsites.net", 80)); var response = WebSession.Get("/api/price/"); if (response.ResponseCode == 200) { //convert the price to a double from a string var result = double.Parse(response.ResponseBody); //if the value went up, change the LED to green, if it went down change to red if (result > lastValue) { _greenPin.Write(true); _redPin.Write(false); } else if (result < lastValue) { _greenPin.Write(false); _redPin.Write(true); } //store this value so we can compare it to the next one lastValue = result; //only add points to the graph every x seconds, else it will barely move if (DateTime.Now > nextUpdateTime) { history.Enqueue(result); //store a max of 80 data points as each point will take up 1 pixel, and the screen is //only 80 wide if (history.Count > 80) { history.Dequeue(); } //store a value of what time we should add the next data point to the list nextUpdateTime = DateTime.Now.AddSeconds(15); } var high = 0d; var low = double.MaxValue; //find the max and min value to determine our range (for the graph). //The reason for this is so that the min value will be the very bottom of the graph, and //the max value will be the very top of the graph regardless of what the values are foreach (double item in history) { if (item < low) { low = item; } if (item > high) { high = item; } } if (high == low) { //if all numbers are the same, artificially seperate high and low so that the //graph will draw in the middle of the screen. Without doing this the //point will be at the very top. high--; low++; } double diff = high - low; lcd.Clear(); short x = 1; short prevY = -1; //this loop draws a line from the previous point to the current point, which makes the graph foreach (double item in history) { //work out the y value based on the min/max range, and the available height. //We have 39 pixels height to work with, and shift it by 9 at the end so it doesn't //overlap the text at the top var thisY = (short)((39 - (((item - low) / diff) * 39)) + 9); if (prevY != -1) //don't draw from 0,0 { //draw a line from the previous point to this point lcd.DrawLine((short)(x - 1), prevY, x, thisY, true); } //remember this pos so we can draw a line from it in the next iteration prevY = thisY; x++; } //Refresh pushes all DrawLine/Rect/Point calls to the screen //Note that this does not apply to writing text, which pushes instantly lcd.Refresh(); //there is no Math.Round(double,int) so use ToString to get 4 decimals lcd.WriteText("$ " + result.ToString("f4") + " / BTC"); } else { FlickerLEDForFaliure(); } } catch (Exception) { FlickerLEDForFaliure(); } } } private static void FlickerLEDForFaliure() { //if the downlaod of the new value fails then flicker the LED. After flickering turn the LED off for (int i = 0; i < 30; i++) { _redPin.Write(true); Thread.Sleep(100); _greenPin.Write(true); Thread.Sleep(100); _redPin.Write(false); Thread.Sleep(100); _greenPin.Write(false); } } }
以下に接続図を示します。

私はこの回路を夜間接続したままにして、うまくいきました。 ネットワークからの切断と逆接続も正常に処理されます。
Windows Phone
Windows Phoneアプリケーションは、Netduino自体とまったく同じことを行います。価格を読み込み、表示してからグラフを描画します。
UIは、価格を表示するTextBlockと、線を含むグリッドです。

非表示のテキスト
<Grid x:Name="LayoutRoot" Background="Transparent"> <Grid.RowDefinitions> <RowDefinition Height="Auto"/> <RowDefinition Height="*"/> </Grid.RowDefinitions> <StackPanel x:Name="TitlePanel" Grid.Row="0" Margin="12,17,0,28"> <TextBlock Text="price" x:Name="PriceTextBlock" Margin="9,-7,0,0" Style="{StaticResource PhoneTextTitle2Style}" FontSize="40"/> </StackPanel> <Grid x:Name="ContentPanel" Grid.Row="1" Margin="0"> </Grid> </Grid>
以下にコードがあります。 コードはNetduinoのコードに完全に基づいているため、詳細についてはコメントしていません。 理解できない場合は、Netduinoのコードを参照してください。
非表示のテキスト
public partial class MainPage : PhoneApplicationPage { private Queue<double> _history = new Queue<double>(); private double _lastValue = 0; private DateTime _nextUpdateTime = DateTime.MinValue; public MainPage() { InitializeComponent(); DownloadAndPlotPrice(); } private async void DownloadAndPlotPrice() { try { var WebSession = new HttpClient(); var response = await WebSession.GetAsync("http://bitcoinpusher.azurewebsites.net/api/price/"); if (response.IsSuccessStatusCode) { var result = double.Parse(await response.Content.ReadAsStringAsync()); //if the value went up, change the back to green, if it went down change to red if (result > _lastValue) { LayoutRoot.Background = new SolidColorBrush(Colors.Green); } else if (result < _lastValue) { LayoutRoot.Background = new SolidColorBrush(Colors.Red); } _lastValue = result; //only add points to the graph every x seconds, else it will barely move if (DateTime.Now > _nextUpdateTime) { _history.Enqueue(result); if (_history.Count > 400) { _history.Dequeue(); } _nextUpdateTime = DateTime.Now.AddSeconds(4); } var high = 0d; var low = double.MaxValue; //find the max and min value to determine our range (for the graph) foreach (double item in _history) { if (item < low) { low = item; } if (item > high) { high = item; } } if (high == low) { //if all numbers are the same, artificially seperate high and low so that the //graph will draw in the middle of the screen high--; low++; } double diff = high - low; //remove all previous lines in preperation for redrawing them ContentPanel.Children.Clear(); short x = 1; short prevY = -1; foreach (double item in _history) { //we now have 300 pixels of vertical space to play with var thisY = (short)(300 - (((item - low) / diff) * 300)); if (prevY != -1) //don't draw from 0,0 { //draw a line from the previous point to this point //Line is a XAML control that we use to display lines ContentPanel.Children.Add(new Line { X1 = (x - 1), Y1 = prevY, X2 = x, Y2 = thisY, StrokeThickness = 4, Stroke = new SolidColorBrush(Colors.White) }); } prevY = thisY; x++; } PriceTextBlock.Text = ("$ " + result.ToString("f5") + " / BTC"); } else { ShowFaliureFaliure(); } } catch (Exception) { ShowFaliureFaliure(); } DownloadAndPlotPrice(); } private async void ShowFaliureFaliure() { //if the download of the new value fails then flicker the background. for (int i = 0; i < 30; i++) { LayoutRoot.Background = new SolidColorBrush(Colors.Orange); await Task.Delay(100); LayoutRoot.Background = new SolidColorBrush(Colors.Black); await Task.Delay(100); } } }
以上です。 コメント(元の記事-約Transl。)またはTwitterで質問や懸念がある場合はお知らせください。
ここからソースファイルをダウンロードできます!
サイトリンク
Azureを30日間無料でお試しください !
無料または試用版のVisual Studioをダウンロードする
Microsoft Virtual Academy (MVA)でトレーニングコースを受講する
- Microsoftアプリケーション開発
- Windows PhoneおよびWindows 8向けのクロスプラットフォームアプリケーション開発
- Windows 8およびWindows Phoneプラットフォーム用の共通コードを使用したアプリケーション開発
- Windows Phone 8の複雑なアプリケーション開発のコツ
- Windows Phone 8の高度な開発機能
- またはAzureクラウド開発コース
- または他の多くの無料MVAコース !
Windows Phoneアプリケーション開発者になる