まだ完璧ではありませんが、非常に有用で機能するものがすでに迫っています。
過去の部分はここにあります:
パート1:描画の学習
パート2:マウスイベントの処理
パート3:機能の追加とキーボード処理の継続
パート4:ドラッグアンドドロップの実装
パート5:ノードの接続
13.最も単純な接続を作成する
ノード接続を追跡するために、最も単純な形式では次のような重要なコンポーネントである接続クラスから始めます。
class Connection(CanvasObject): def __init__(self, source, destination, **kwargs): super(Connection, self).__init__(**kwargs) self.source = source self.destination = destination def Render(self, gc): gc.SetPen(wx.Pen('#000000', 1, wx.SOLID)) gc.DrawLines([self.source.position, self.destination.position]) def RenderHighlighting(self, gc): return def ReturnObjectUnderCursor(self, pos): return None
すべてが単純で些細なもので、開始オブジェクトと終了オブジェクトがあり、これらのオブジェクトの位置の間に線を引くだけです。 他のメソッドの代わりに、スタブはまだ使用中です。
次に、ノードを接続するプロセスを実装する必要があります。 ユーザーインターフェイスはシンプルです。Shiftキーを押しながら、ソースノードをクリックし、接続を最後のノードにプルします。 実装のために、クリックしたときにソースオブジェクトを記憶し、「OnMouseLeftDown」に次のコードを追加します。
if evt.ShiftDown() and self._objectUnderCursor.connectableSource: self._connectionStartObject = self._objectUnderCursor
ボタンを離すと、カーソルの下のオブジェクトが着信接続を受け入れて、すべてがうまくいけばそれらを接続できることも確認します。 これを行うには、「OnMouseLeftUp」の最初に適切なコードを追加します。
if (self._connectionStartObject and self._objectUnderCursor and self._connectionStartObject != self._objectUnderCursor and self._objectUnderCursor.connectableDestination): self.ConnectNodes(self._connectionStartObject, self._objectUnderCursor)
ConnectNodesメソッドは接続を作成し、接続された両方のノードに登録します:
def ConnectNodes(self, source, destination): newConnection = Connection(source, destination) self._connectionStartObject.AddOutcomingConnection(newConnection) self._objectUnderCursor.AddIncomingConnection(newConnection)
接続するノードを教えることは残っています。 これを行うために、1つだけでなく3つまでの適切なインターフェイスを導入します。「ConnectableObject」は、別のオブジェクトに接続できるオブジェクトの共通インターフェイスになります。 この場合、接続ポイントとノードセンターを提供する必要があります(少し後で、これを使用します)。
class ConnectableObject(CanvasObject): def __init__(self, **kwargs): super(ConnectableObject, self).__init__(**kwargs) def GetConnectionPortForTargetPoint(self, targetPoint): """ GetConnectionPortForTargetPoint method should return an end point position for a connection object. """ raise NotImplementedError() def GetCenter(self): """ GetCenter method should return a center of this object. It is used during a connection process as a preview of a future connection. """ raise NotImplementedError()
また、「ConnectableObject」から、着信接続と発信接続に適したオブジェクトの2つのクラスを継承します。
class ConnectableDestination(ConnectableObject): def __init__(self, **kwargs): super(ConnectableDestination, self).__init__(**kwargs) self.connectableDestination = True self._incomingConnections = [] def AddIncomingConnection(self, connection): self._incomingConnections.append(connection) def DeleteIncomingConnection(self, connection): self._incomingConnections.remove(connection) class ConnectableSource(ConnectableObject): def __init__(self, **kwargs): super(ConnectableSource, self).__init__(**kwargs) self.connectableSource = True self._outcomingConnections = [] def AddOutcomingConnection(self, connection): self._outcomingConnections.append(connection) def DeleteOutcomingConnection(self, connection): self._outcomingConnections.remove(connection) def GetOutcomingConnections(self): return self._outcomingConnections
これらのクラスはどちらも非常に似ており、それぞれ着信接続と発信接続のリストを保存できます。 さらに、適切なフラグを設定して、キャンバスがそのようなオブジェクトとそのようなオブジェクトを接続できることを認識します。
最後の手順は残ります。適切な基本クラスをその親に追加してノードをわずかに変更し、レンダリングプロセスを変更します。 レンダリングのすべてが面白いです。ノードをキャンバスに保存して同じ場所にレンダリングするか、このタスクをノードに割り当てて発信接続をレンダリングさせることができます。 これを行うには、ノードレンダリングコードに次のコードを追加します。
for connection in self.GetOutcomingConnections(): connection.Render(gc)
したがって、このビジネスを始めて少しプレイすると、次のようになります。
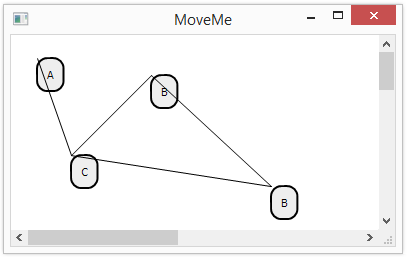
あまり美しくありませんが、すでに機能しています:)現在のバージョンのコードはここにあります 。
14.美しい矢印を作る
ノードの角を結ぶ線はテストには適していますが、あまり美しくなく、見た目も美しくありません。 さて、それは怖くありません。今、私たちは美しくて美しい矢を作ります。 はじめに、矢印を描画する方法が必要になります。矢印を簡単に記述し、学校のジオメトリを記憶し、NumPyを使用します。
def RenderArrow(self, gc, sourcePoint, destinationPoint): gc.DrawLines([sourcePoint, destinationPoint]) #Draw arrow p0 = np.array(sourcePoint) p1 = np.array(destinationPoint) dp = p0-p1 l = np.linalg.norm(dp) dp = dp / l n = np.array([-dp[1], dp[0]]) neck = p1 + self.arrowLength*dp lp = neck + n*self.arrowWidth rp = neck - n*self.arrowWidth gc.DrawLines([lp, destinationPoint]) gc.DrawLines([rp, destinationPoint])
ここでは、矢印の端から先頭まで「self.arrowLength」をカウントし、法線に沿って距離「self.arrowWidth」まで両方向に移動します。 だから、矢印の端をつなぐセグメントの端のポイントを見つけます...私はそれを何と呼ぶか、先端の端か何かでわかりません。
線の描画を矢印の描画に置き換えるのはレンダリングメソッドのままであり、次の図を考えることができます。

コードはここにあります 。
15.接続の両端の正しいポイントを取得します
見た目は良くなっていますが、まだきれいではありません。矢印の両端がどこにあるかわからないからです。 まず、接続のクラスを変更してより汎用的にし、接続の開始点と終了点を計算するメソッドを追加します。
def SourcePoint(self): return np.array(self.source.GetConnectionPortForTargetPoint(self.destination.GetCenter())) def DestinationPoint(self): return np.array(self.destination.GetConnectionPortForTargetPoint(self.source.GetCenter()))
この場合、各ノードに接続を開始する価値がある場所を示し、反対側のノードの中心をもう一方の端として渡します。 これは理想的ではなく、最も普遍的な方法ではありませんが、最初はそれで十分です。 接続のレンダリングは次のようになります。
def Render(self, gc): gc.SetPen(wx.Pen('#000000', 1, wx.SOLID)) self.RenderArrow(gc, self.SourcePoint(), self.DestinationPoint())
ノードにGetConnectionPortForTargetPointメソッドを実装するために残ります。このメソッドは、接続を開始するノードの境界上のポイントを計算します。 角が丸い長方形の場合、次の方法を使用できます。
def GetConnectionPortForTargetPoint(self, targetPoint): targetPoint = np.array(targetPoint) center = np.array(self.GetCenter()) direction = targetPoint - center if direction[0] > 0: #Check right border borderX = self.position[0] + self.boundingBoxDimensions[0] else: #Check left border borderX = self.position[0] if direction[0] == 0: t1 = float("inf") else: t1 = (borderX - center[0]) / direction[0] if direction[1] > 0: #Check bottom border borderY = self.position[1] + self.boundingBoxDimensions[1] else: #Check top border borderY = self.position[1] if direction[1] == 0: t2 = float("inf") else: t2 = (borderY - center[1]) / direction[1] t = min(t1, t2) boundaryPoint = center + t*direction return boundaryPoint
ここでは、ノードの中心から目的点に到達する光線と長方形の辺との間の最も近い交差点を見つけます。 そうすれば、ポイントは長方形の境界線上にあり、一般に私たちに合っています。 したがって、次のようなものを取得できます。
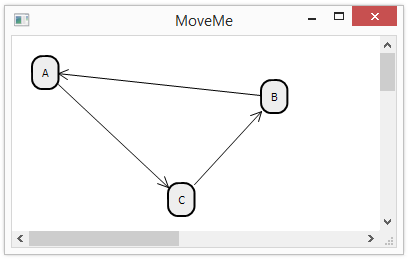
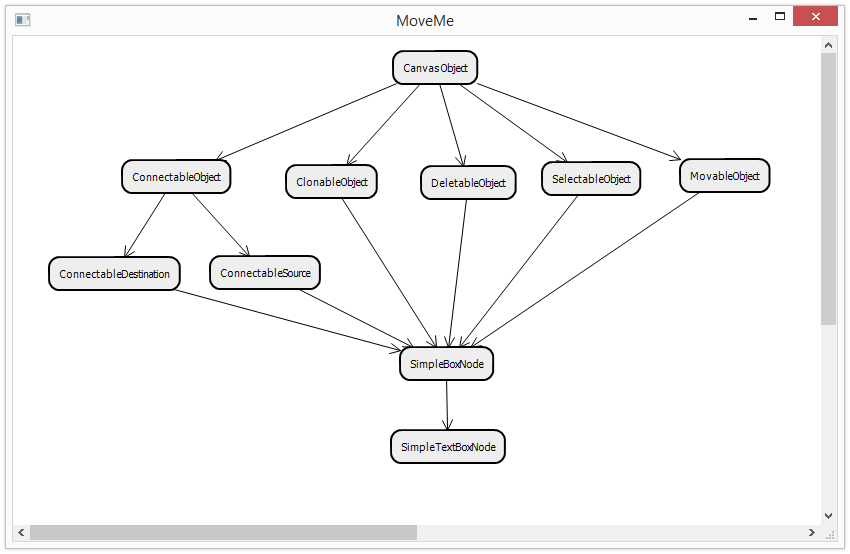
または、記事の冒頭の図に似たものは、テキストノードのクラスの階層であり、既に非常に有用なものに近いものです。
コードはここにあります 。
PS:誤字については個人で書いてください。