1.背景
集中入力(シングルサインオン、SSO)の機能が存在し、長い間議論され、適用されてきたという事実にもかかわらず、実際には、その実装にはさまざまな問題の克服が伴うことがよくあります。 この記事の目的は、SAML 2.0 IDプロバイダー(idP)の最も単純なネイティブService Provider 1 (SP)を実装し、それを使用してSSOをJava Webアプリケーションに統合する方法を示すことです。
最近のプロジェクトの1つは、大規模な大学向けのポータルソリューションの準備とクラスタリングです。 プロジェクトのフレームワークでは、次のシステムに単一の認証機能を実装(およびクラスタリング)するタスクに直面しました。
- Liferayバージョン6.1.20-ee-ga2。
- 単純なJava Webアプリケーション。
- Googleアプリ。
顧客側では、SSOを構築するための主な要件が提示されました。
- SSOを構築するには、SAML 2.0プロトコルを使用する必要があります。
- 既存のシステムを実行し続けるには、Jasig CASとの統合が必要です。
- LDAPはユーザー認証の検証に使用されます。
彼らは、SAML 1.0およびSAML 2.0プロトコルを完全に実装するオープンソースシステムとして、Shibboleth( http://shibboleth.net/about/index.html )をidPとして使用することにしました。
この問題を解決する際に遭遇した困難な瞬間:
- SAML 2.0プロトコルおよびShibboleth製品の操作に関する専門知識の不足。
- 製造元からの未加工でまだ十分に構造化されていないShibbolethドキュメント。
- SSOをJava Webアプリケーションに統合するためのサービスプロバイダーの実装の高品質な例の欠如。
これらの障壁を克服することが、この記事の出版の動機になりました。 習得した知識を共有し、開発者がそのような問題を解決できるように支援し、SAML 2.0プロトコルの理解を促進したいと考えています。
2.記事の対象者
この記事の対象読者は次のとおりです。
- SAML 2.0を使用してSSO機能をプロジェクトに統合する開発者。
- SAML 2.0を使用してSSO機能をアプリケーションに統合する実用的な例を必要とするJava開発者。
- ShibbolethコンポーネントをSSO IDプロバイダー(idP)として試してみたいJava開発者。
この記事を理解するには、SAML 2.0プロトコルに関する最低限の知識があることが推奨されます。
3. SSOの作業の主なコンポーネント
下の図は、集中型入口の全体的な機能を示しています。
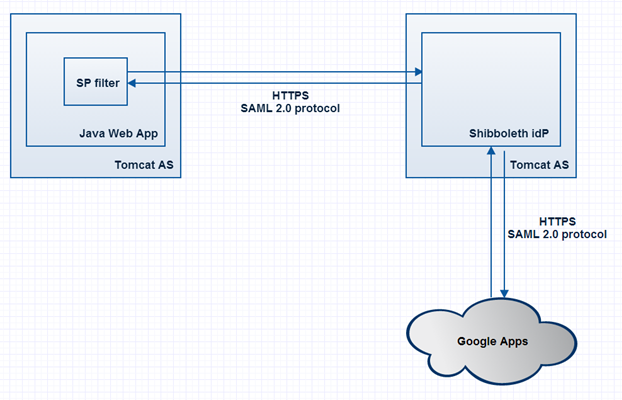
図にマークされている主なコンポーネントとポイント:
- SSOシステムには2つのアプリケーションが関係しています。
a。 Java Web App-通常のJava Webアプリケーション
b。 Google Appsは、Google Cloud Servicesのアプリケーションです。 SSOの動作を確認するためにのみ使用します。 - SPフィルター-サービスプロバイダーの実装。その機能は、SAML 2.0メッセージの送信および解析によるShibboleth idPとの対話です。
- Shibboleth idPは、SAML 1.0およびSAML 2.0を使用した認証および承認用のアプリケーションです。
- Tomcat AS-Javaアプリケーションサーバー。
- SPフィルターとShibboleth idP間の相互作用は、安全なHTTPSプロトコルを介して行われます。
注:Shibbolethの図では、idPおよびJava Webアプリケーションは、異なるTomcatサーバーから物理的に離れています。 ただし、Tomcatインスタンスを1つだけ使用して、単一のネットワークノードに環境を展開できます。
4. Shibboleth idPの環境をセットアップします
shibboleth idPのインストールと構成:
1. idPの最新バージョンをshibboleth.net/downloads/identity-provider/latest 2からダウンロードし、任意の場所$ shDistrに解凍します。
2. JAVA_HOME変数が正しく設定されていることを確認します3 。
$ shDistr / install.shを開始します(UNIXライクなオペレーティングシステムが使用されていると考えます)。 4
インストーラーは、留意するために次の情報を要求します。
- インストールパス(例:/ opt / shib)
- サーバーidP名(例:idp.local.ru)。
idPサーバーを/ etc / hostsファイルのローカルホストのエイリアスのリストに追加します。
127.0.0.1 localhost idp.local.ru - Javaキーストアのパスワード。インストールプロセス中に生成されます(例:12345)。
次に、インストールプロセスが正常に完了したことを確認します。
次の表記法を紹介します。
- $ shHome -Shibbolethがインストールされたディレクトリ。
- $ shHost -idPサーバー名;
- $ shPassword -Javaキーストア(JKS)のパスワード。
3. idPが抽出される属性とソースを決定します。 この場合、ユーザーのログインを渡します。 <resolver:AttributeDefinition id = "transientId" xsi:type = "ad:TransientId">要素の後に、 $ shHome / conf / attribute-resolver.xmlファイルに属性の説明を追加します。
<resolver:AttributeDefinition xsi:type="PrincipalName" xmlns="urn:mace:shibboleth:2.0:resolver:ad" id="userLogin" > <resolver:AttributeEncoder xsi:type="SAML1String" xmlns="urn:mace:shibboleth:2.0:attribute:encoder" name="userLogin" /> <resolver:AttributeEncoder xsi:type="SAML2String" xmlns="urn:mace:shibboleth:2.0:attribute:encoder" name="userLogin" /> </resolver:AttributeDefinition>
注:同じファイル内で、JDBCを介したLDAPやDBMSなどのさまざまなデータソースからの属性の受信を設定できます。 詳細はhttps://wiki.shibboleth.net/confluence/display/SHIB2/IdPAddAttributeをご覧ください 。
4. idPがこのSAML SP属性をフィルターに返すために、ファイル$ shHome / conf / attribute-filter.xmlに記述します。
<afp:AttributeFilterPolicy id="releaseUserLoginToAnyone"> <afp:PolicyRequirementRule xsi:type="basic:ANY"/> <afp:AttributeRule attributeID="userLogin"> <afp:PermitValueRule xsi:type="basic:ANY"/> </afp:AttributeRule> </afp:AttributeFilterPolicy>
注:ここでは、より複雑で正しいルールを設定できます。 たとえば、この属性が特定のSAML SPのみに渡されるように指定できます。
5. Shibboleth idPは、相互依存できるノード、いわゆる依存パーティ( https://wiki.shibboleth.net/confluence/display/SHIB2/IdPUnderstandingRP )について知っている必要があります 。 この情報は、ファイル$ shHome / conf / relying-party.xmlに保存されます。
ファイルを開き、次の要素を追加します。
<rp:RelyingParty id="sp.local.ru" provider="https://idp.local.ru/idp/shibboleth" defaultSigningCredentialRef="IdPCredential"> <rp:ProfileConfiguration xsi:type="saml:SAML2SSOProfile" signResponses="never" signAssertions="never" encryptNameIds="never" encryptAssertions="never" /> </rp:RelyingParty>
ここでは、id =“ sp.local.ru”のSPに対してid = "https://idp.local.ru/idp/shibboleth"でidPが使用されることを示します 。
/ etc / hostsファイルのローカルホストのエイリアスのリストにSPを追加します。
127.0.0.1 localhost sp.local.ru
また、shibboleth idPに、SAML 2.0応答と一連のアサーションに署名しないように指示します。 これまで、shibboleth idPはid = "sp.local.ru"のコンポーネントが何であるかを知りませんでした。 この瞬間を修正する時間。 次のステップに進みます。
6. SAML 2.0 SPフィルターの説明を追加します。 これを行うには、 $ shHome / conf / depending-party.xmlファイルで 、<metadata:MetadataProvider id = "IdPMD" xsi:type = "metadata:FilesystemMetadataProvider"の横にあるSPのメタ情報を定義します...>
<metadata:MetadataProvider id="spMD" xsi:type="metadata:FilesystemMetadataProvider" metadataFile="/opt/shib/metadata/saml-sp-metadata.xml"/>
shibboleth idPに、ファイル/opt/shib/metadata/saml-sp-metadata.xmlでSP定義を検索するよう指示しました。 次の内容でこのファイルを作成します。
<md:EntityDescriptor xmlns:md="urn:oasis:names:tc:SAML:2.0:metadata" entityID="sp.local.ru"> <md:SPSSODescriptor AuthnRequestsSigned="false" ID="sp.local.ru" protocolSupportEnumeration="urn:oasis:names:tc:SAML:2.0:protocol"> <md:AssertionConsumerService Binding="urn:oasis:names:tc:SAML:2.0:bindings:HTTP-POST" Location="https://sp.local.ru:8443/sso/acs" index="1" isDefault="true"/> </md:SPSSODescriptor> </md:EntityDescriptor>
ここでは、次のことを理解する必要があります。
- SAML 2.0 SPの識別子は「sp.local.ru」です
- shibboleth idPがSAML 2.0メッセージを返すアドレスLocation = " https://sp.local.ru:8443/sso/acs "は、md:AssertionConsumerService要素で指定されます。
- 最後に、Binding = "urn:oasis:names:tc:SAML:2.0:bindings:HTTP-POST"パラメーターは、SP応答がshibboleth idPからブラウザーリダイレクトを通じて送信されることを示します。
7. shibboleth idPがユーザーを認証する方法を選択する必要があります。 実稼働環境では、LDAP、DBMS、さらにはCASを介した認証など、さまざまな構成が可能です。 ここで、彼らが言うように、味と色。 すでに含まれているリモートユーザー認証メカニズム( https://wiki.shibboleth.net/confluence/display/SHIB2/IdPAuthRemoteUser )を使用します。 認証要求を受信すると、shibboleth idPはREMOTE_USER変数のコンテキストを調べます。 そのような変数がある場合、shibboleth idPは、ユーザーが外部システム(たとえば、Web Apacheサーバー)を介して既に認証されていると想定します。 この記事を複雑にしないために、私たちはトリックに行き、各リクエストに対してREMOTE_USER変数を人為的に設定することにしました。
これは、Tomcat ASを構成するときに次のセクションで行います(ステップ7)。
Shibbolethのセットアップが完了しました。おめでとうございます:)
shibboleth idP用のTomcatのインストールと構成:
- tomcat 6 http://tomcat.apache.org/download-60.cgiをダウンロードし、任意の$ tomcatHomeフォルダーに解凍します(例:opt / shib-tomcat内)。
現時点では、SPとidP間の通信がSOAPを介して直接行われる場合、Tomcat 7 *は使用できません。 この記事の例では、ブラウザーの直接リダイレクトを使用してこれらの通信を実装しますが、Tomcatバージョン6を使用することをお勧めします。 - $ shDistr / endorsedフォルダーを$ tomcatHomeフォルダーにコピーします。
- ファイル$ tomcatHome / bin / setenv.s h を変更し、動的および永続的なJVMメモリの設定を設定します。
JAVA_OPTS = "$ JAVA_OPTS -Xmx512m -XX:MaxPermSize = 128m" - ライブラリをダウンロードします( https://build.shibboleth.net/nexus/content/repositories/releases/edu/internet2/middleware/security/tomcat6/tomcat6-dta-ssl/1.0.0/tomcat6-dta-ssl-1.0.0 .jar ) $ tomcatHome / libフォルダー内のSPとidP間の通信プロセスでSOAPプロトコルをサポートします。
$ tomcatHome / conf / server.xmlを開き、HTTPSを介したトマトへのアクセスを設定します。
これを行うには、次のConnector要素を定義します。
<Connector port="8443" protocol="org.apache.coyote.http11.Http11Protocol" SSLImplementation="edu.internet2.middleware.security.tomcat6.DelegateToApplicationJSSEmplementation" scheme="https" SSLEnabled="true" clientAuth="want" keystoreFile="$shHome/credentials/idp.jks" keystorePass="$shPassword" />
変数$ shHomeと$ shPasswordを実際の値に置き換えることを忘れないでください 。 - Tomcatにshibboleth idPアプリをデプロイします。 これを行うには、ファイルを作成します
$ tomcatHome / conf / Catalina / localhost / idp.xmlと内容:
<Context docBase="$shHome/war/idp.war" privileged="true" antiResourceLocking="false" antiJARLocking="false" unpackWAR="false" swallowOutput="true" />
$ shHome変数を実際の値に置き換えることを忘れないでください - 5次のクラスをtomcat-valve.jar任意のライブラリにコンパイルします。
public class RemoteUserValve extends ValveBase{ public RemoteUserValve() { } @Override public void invoke(final Request request, final Response response) throws IOException, ServletException { final String username = "idpuser"; final String credentials = "idppass"; final List<String> roles = new ArrayList<String>(); final Principal principal = new GenericPrincipal(null, username, credentials, roles); request.setUserPrincipal(principal); getNext().invoke(request, response); } }
ライブラリを$ {tomcatHome} / libフォルダーに入れます。 そして、server.xmlファイルに行を追加します
<ValvelassName= "ru.eastbanctech.java.web.RemoteUserValve" />要素内
<ホスト名= "localhost" appBase = "webapps" ..>。 サーバーの起動後、Tomcatサーバーアプリケーションにアクセスすると、リクエストコンテキストのidpuser値を持つREMOTE_USERパラメーターが自動的に設定されます。
5. SAML 2.0プロトコル用のSPフィルターの実装
このソリューションを実装するには、SAML 2.0サービスプロバイダーフィルターを作成します。
- このフィルターは、認証が不要なパブリックリソースの要求をスキップします。
- フィルターは、Shibboleth idPの呼び出し回数を減らすために、認証されたユーザーに関する情報を保存します。
- フィルターは、SAML 2.0メッセージ( AuthN )の形式でSAML 2.0認証要求を作成し、ブラウザーをリダイレクトしてユーザーをShibboleth idPにリダイレクトします。
- フィルターはShibboleth idPからの応答を処理し、ユーザー認証プロセスが成功すると、システムは最初に要求されたリソースを表示します。
- ユーザーがJava Webアプリケーションからログアウトすると、フィルターはローカルセッションを削除します。
- 同時に、shibboleth idPのセッションは引き続きアクティブです。
技術的な観点からは、フィルターは標準のjavax.filter.Filterインターフェースの実装になります。 フィルターのスコープは、特定のWebアプリケーションで設定されます。
フィルターの機能が明確になったので、実装を進めましょう。
1.スケルトンMavenプロジェクトを作成する
mvn:archetypeプラグインで実行できます:
mvnアーキタイプ:generate -DgroupId = ru.eastbanctech.java.web -DartifactId = saml-sp-filter -DarchetypeArtifactId = maven-archetype-quickstart -DinteractiveMode = false
パラメーターgroupIdおよびartefactIdは、好みと色を示すことができます。
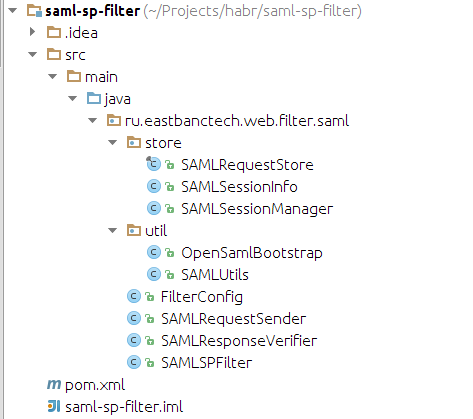
Intellij Ideaのプロジェクトの構造は次のようになります。
2. pom.xmlアセンブリファイル:
コード
<source lang="xml"> <project xmlns="http://maven.apache.org/POM/4.0.0" xmlns:xsi="http://www.w3.org/2001/XMLSchema-instance" xsi:schemaLocation="http://maven.apache.org/POM/4.0.0 http://maven.apache.org/xsd/maven-4.0.0.xsd"> <modelVersion>4.0.0</modelVersion> <groupId>ru.eastbanctech.web</groupId> <artifactId>saml-sp-filter</artifactId> <name>${project.artifactId}</name> <version>1.0-SNAPSHOT</version> <packaging>jar</packaging> <properties> <jdk.version>1.6</jdk.version> <encoding>UTF-8</encoding> <project.build.sourceEncoding>${encoding}</project.build.sourceEncoding> <project.reporting.outputEncoding>${encoding}</project.reporting.outputEncoding> </properties> <build> <pluginManagement> <plugins> <plugin> <groupId>org.apache.maven.plugins</groupId> <artifactId>maven-compiler-plugin</artifactId> <version>2.5.1</version> <configuration> <encoding>${encoding}</encoding> <soure>${jdk.version}</soure> <target>${jdk.version}</target> </configuration> </plugin> </plugins> </pluginManagement> </build> <dependency> <groupId>org.opensaml</groupId> <artifactId>opensaml</artifactId> <version>2.5.1-1</version> </dependency> <dependency> <groupId>javax.servlet</groupId> <artifactId>servlet-api</artifactId> <version>2.5</version> <scope>provided</scope> </dependency> <dependency> <groupId>org.slf4j</groupId> <artifactId>log4j-over-slf4j</artifactId> <version>1.7.1</version> </dependency> <dependency> <groupId>org.slf4j</groupId> <artifactId>slf4j-api</artifactId> <version>1.7.1</version> </dependency> </dependencies> </project>
3.フィルターの中心はSAMLSPFilterクラスになります。
public class SAMLSPFilter implements Filter { public static final String SAML_AUTHN_RESPONSE_PARAMETER_NAME = "SAMLResponse"; private static Logger log = LoggerFactory.getLogger(SAMLSPFilter.class); private FilterConfig filterConfig; private SAMLResponseVerifier checkSAMLResponse; private SAMLRequestSender samlRequestSender; @Override public void init(javax.servlet.FilterConfig config) throws ServletException { OpenSamlBootstrap.init(); filterConfig = new FilterConfig(config); checkSAMLResponse = new SAMLResponseVerifier(); samlRequestSender = new SAMLRequestSender(); } @Override public void doFilter(ServletRequest servletRequest, ServletResponse servletResponse, FilterChain chain) throws IOException, ServletException { HttpServletRequest request = (HttpServletRequest) servletRequest; HttpServletResponse response = (HttpServletResponse) servletResponse; /* 1: , 2: Shibboleth idP, 3: logout, 4: , 5: SAML Shibboleth idP */ } }
FilterConfigクラスでは、メインフィルター変数(フィルタースコープ、idP名、idPメタデータへのパス、SP名など)を定義します。 これらのパラメーターの値は、Java Webアプリケーションのweb.xml構成ファイルで設定されます。 checkSAMLResponseおよびsamlRequestSenderオブジェクトは、SAML 2.0メッセージの有効性を検証し、認証要求を送信するために必要です。 少し後で彼らに戻ります。
コード
public class FilterConfig { /** * The parameters below should be defined in web.xml file of Java Web Application */ public static final String EXCLUDED_URL_PATTERN_PARAMETER = "excludedUrlPattern"; public static final String SP_ACS_URL_PARAMETER = "acsUrl"; public static final String SP_ID_PARAMETER = "spProviderId"; public static final String SP_LOGOUT_URL_PARAMETER = "logoutUrl"; public static final String IDP_SSO_URL_PARAMETER = "idProviderSSOUrl"; private String excludedUrlPattern; private String acsUrl; private String spProviderId; private String logoutUrl; private String idpSSOUrl; public FilterConfig(javax.servlet.FilterConfig config) { excludedUrlPattern = config.getInitParameter(EXCLUDED_URL_PATTERN_PARAMETER); acsUrl = config.getInitParameter(SP_ACS_URL_PARAMETER); spProviderId = config.getInitParameter(SP_ID_PARAMETER); idpSSOUrl = config.getInitParameter(IDP_SSO_URL_PARAMETER); logoutUrl = config.getInitParameter(SP_LOGOUT_URL_PARAMETER); } // getters and should be defined below } OpenSamlBootstrap SAML 2.0 : public class OpenSamlBootstrap extends DefaultBootstrap { private static Logger log = LoggerFactory.getLogger(OpenSamlBootstrap.class); private static boolean initialized; private static String[] xmlToolingConfigs = { "/default-config.xml", "/encryption-validation-config.xml", "/saml2-assertion-config.xml", "/saml2-assertion-delegation-restriction-config.xml", "/saml2-core-validation-config.xml", "/saml2-metadata-config.xml", "/saml2-metadata-idp-discovery-config.xml", "/saml2-metadata-query-config.xml", "/saml2-metadata-validation-config.xml", "/saml2-protocol-config.xml", "/saml2-protocol-thirdparty-config.xml", "/schema-config.xml", "/signature-config.xml", "/signature-validation-config.xml" }; public static synchronized void init() { if (!initialized) { try { initializeXMLTooling(xmlToolingConfigs); } catch (ConfigurationException e) { log.error("Unable to initialize opensaml DefaultBootstrap", e); } initializeGlobalSecurityConfiguration(); initialized = true; } } }
XMLファイルのセットには、SAML 2.0メッセージの要素を解析する方法に関する指示が含まれており、opensaml-*。Jarライブラリに含まれており、mavenを介してプロジェクトをビルドするときに接続されます。
ステップ1:フィルター用ではないクエリを無視する
excludeUrlPatternパラメーター。正規表現を囲みます。 要求されたリソースがexcludeUrlPatternテンプレートに該当する場合、フィルターはそれを処理しません。
if (!isFilteredRequest(request)) { log.debug("According to {} configuration parameter request is ignored + {}", new Object[]{FilterConfig.EXCLUDED_URL_PATTERN, request.getRequestURI()}); chain.doFilter(servletRequest, servletResponse); return; } // , private boolean isFilteredRequest(HttpServletRequest request) { return !(filterConfig.getExcludedUrlPattern() != null && getCorrectURL(request).matches(filterConfig.getExcludedUrlPattern())); } // URL private String getCorrectURL(HttpServletRequest request) { String contextPath = request.getContextPath(); String requestUri = request.getRequestURI(); int contextBeg = requestUri.indexOf(contextPath); int contextEnd = contextBeg + contextPath.length(); String slash = "/"; String url = (contextBeg < 0 || contextEnd == (requestUri.length() - 1)) ? requestUri : requestUri.substring(contextEnd); if (!url.startsWith(slash)) { url = slash + url; } return url; }
ステップ2:応答がShibboleth idPから来た場合、それを処理します
要求で「SAMLResponse」パラメーターを探しており、見つかった場合は、認証要求に対するshibboleth idPからの応答を受け取りました。 SAML 2.0メッセージの処理を開始します。
コード
log.debug("Attempt to secure resource is intercepted : {}", ((HttpServletRequest) servletRequest).getRequestURL().toString()); /* Check if response message is received from identity provider; In case of successful response system redirects user to relayState (initial) request */ String responseMessage = servletRequest.getParameter(SAML_AUTHN_RESPONSE_PARAMETER_NAME); if (responseMessage != null) { log.debug("Response from Identity Provider is received"); try { log.debug("Decoding of SAML message"); SAMLMessageContext samlMessageContext = SAMLUtils.decodeSamlMessage((HttpServletRequest) servletRequest, (HttpServletResponse) servletResponse); log.debug("SAML message has been decoded successfully"); samlMessageContext.setLocalEntityId(filterConfig.getSpProviderId()); String relayState = getInitialRequestedResource(samlMessageContext); checkSAMLResponse.verify(samlMessageContext); log.debug("Starting and store SAML session.."); SAMLSessionManager.getInstance().createSAMLSession(request.getSession(), samlMessageContext); log.debug("User has been successfully authenticated in idP. Redirect to initial requested resource {}", relayState); response.sendRedirect(relayState); return; } catch (Exception e) { throw new ServletException(e); } }
これを行うには、 SAMLUtils.decodeSamlMessage(..)メソッドでSAMLメッセージをデコードし、SAMLステートメントが実行可能であることを確認します-checkSAMLResponse.verify(..) 。 すべてのチェックが完了したら、内部SAMLセッションSAMLSessionManager.getInstance()。CreateSAMLSession(..)を作成し、最初に要求されたresponse.sendRedirect(..)リソースにユーザーをリダイレクトします。
SAMLUtilsクラスでは、SAML 2.0メッセージを操作するときに便利な中間メソッドを投稿します。 そのようなメソッドの1つに、decodeSamlMessageメソッドがあります。このメソッドは、HTTPS SAML 2.0を介して受信したメッセージをデコードします。
コード
public class SAMLUtils { public static SAMLMessageContext decodeSamlMessage(HttpServletRequest request, HttpServletResponse response) throws Exception { SAMLMessageContext<SAMLObject, SAMLObject, NameID> samlMessageContext = new BasicSAMLMessageContext<SAMLObject, SAMLObject, NameID>(); HttpServletRequestAdapter httpServletRequestAdapter = new HttpServletRequestAdapter(request); samlMessageContext.setInboundMessageTransport(httpServletRequestAdapter); samlMessageContext.setInboundSAMLProtocol(SAMLConstants.SAML20P_NS); HttpServletResponseAdapter httpServletResponseAdapter = new HttpServletResponseAdapter(response, request.isSecure()); samlMessageContext.setOutboundMessageTransport(httpServletResponseAdapter); samlMessageContext.setPeerEntityRole(IDPSSODescriptor.DEFAULT_ELEMENT_NAME); SecurityPolicyResolver securityPolicyResolver = getSecurityPolicyResolver(request.isSecure()); samlMessageContext.setSecurityPolicyResolver(securityPolicyResolver); HTTPPostDecoder samlMessageDecoder = new HTTPPostDecoder(); samlMessageDecoder.decode(samlMessageContext); return samlMessageContext; } private static SecurityPolicyResolver getSecurityPolicyResolver(boolean isSecured) { SecurityPolicy securityPolicy = new BasicSecurityPolicy(); HTTPRule httpRule = new HTTPRule(null, null, isSecured); MandatoryIssuerRule mandatoryIssuerRule = new MandatoryIssuerRule(); List<SecurityPolicyRule> securityPolicyRules = securityPolicy.getPolicyRules(); securityPolicyRules.add(httpRule); securityPolicyRules.add(mandatoryIssuerRule); return new StaticSecurityPolicyResolver(securityPolicy); } }
同じクラスに、SAMLオブジェクトを文字列に変換するヘルパーメソッドを配置します。 これは、SAMLメッセージを記録するときに役立ちます。
public static String SAMLObjectToString(XMLObject samlObject) { try { Marshaller marshaller = org.opensaml.Configuration.getMarshallerFactory().getMarshaller(samlObject); org.w3c.dom.Element authDOM = marshaller.marshall(samlObject); StringWriter rspWrt = new StringWriter(); XMLHelper.writeNode(authDOM, rspWrt); return rspWrt.toString(); } catch (Exception e) { e.printStackTrace(); } return null; }
shibboleth idPから受信したSAML 2.0メッセージをチェックする機能を配置するSAMLResponseVerifierクラスを作成しましょう。 メインの検証(..)メソッドでは、次のチェックを実装します。
- idPからのこのSAML 2.0応答の前に、フィルターによって送信されたSAML 2.0要求があります。
- メッセージには、shibboleth idPによる肯定的なユーザー認証結果が含まれています。
- SAML 2.0応答の主なステートメントが満たされています(メッセージの有効期限が切れていない、このメッセージはSP向けなど)。
コード
public class SAMLResponseVerifier { private static Logger log = LoggerFactory.getLogger(SAMLResponseVerifier.class); private SAMLRequestStore samlRequestStore = SAMLRequestStore.getInstance(); public void verify(SAMLMessageContext<Response, SAMLObject, NameID> samlMessageContext) throws SAMLException { Response samlResponse = samlMessageContext.getInboundSAMLMessage(); log.debug("SAML Response message : {}", SAMLUtils.SAMLObjectToString(samlResponse)); verifyInResponseTo(samlResponse); Status status = samlResponse.getStatus(); StatusCode statusCode = status.getStatusCode(); String statusCodeURI = statusCode.getValue(); if (!statusCodeURI.equals(StatusCode.SUCCESS_URI)) { log.warn("Incorrect SAML message code : {} ", statusCode.getStatusCode().getValue()); throw new SAMLException("Incorrect SAML message code : " + statusCode.getValue()); } if (samlResponse.getAssertions().size() == 0) { log.error("Response does not contain any acceptable assertions"); throw new SAMLException("Response does not contain any acceptable assertions"); } Assertion assertion = samlResponse.getAssertions().get(0); NameID nameId = assertion.getSubject().getNameID(); if (nameId == null) { log.error("Name ID not present in subject"); throw new SAMLException("Name ID not present in subject"); } log.debug("SAML authenticated user " + nameId.getValue()); verifyConditions(assertion.getConditions(), samlMessageContext); } private void verifyInResponseTo(Response samlResponse) { String key = samlResponse.getInResponseTo(); if (!samlRequestStore.exists(key)) { { log.error("Response does not match an authentication request"); throw new RuntimeException("Response does not match an authentication request"); } samlRequestStore.removeRequest(samlResponse.getInResponseTo()); } private void verifyConditions(Conditions conditions, SAMLMessageContext samlMessageContext) throws SAMLException{ verifyExpirationConditions(conditions); verifyAudienceRestrictions(conditions.getAudienceRestrictions(), samlMessageContext); } private void verifyExpirationConditions(Conditions conditions) throws SAMLException { log.debug("Verifying conditions"); DateTime currentTime = new DateTime(DateTimeZone.UTC); log.debug("Current time in UTC : " + currentTime); DateTime notBefore = conditions.getNotBefore(); log.debug("Not before condition : " + notBefore); if ((notBefore != null) && currentTime.isBefore(notBefore)) throw new SAMLException("Assertion is not conformed with notBefore condition"); DateTime notOnOrAfter = conditions.getNotOnOrAfter(); log.debug("Not on or after condition : " + notOnOrAfter); if ((notOnOrAfter != null) && currentTime.isAfter(notOnOrAfter)) throw new SAMLException("Assertion is not conformed with notOnOrAfter condition"); } private void verifyAudienceRestrictions( List<AudienceRestriction> audienceRestrictions, SAMLMessageContext<?, ?, ?> samlMessageContext) throws SAMLException{ // TODO: Audience restrictions should be defined below<sup>7</sup> } }
verifyInResponseToメソッドは 、SAML 2.0応答の前にフィルターからの要求があったことを確認します。 実装には、SAML 2.0に送信され、idPをshibbolethするリクエストを保存するSAMLRequestStoreクラスのオブジェクトが使用されます。
コード
final public class SAMLRequestStore { private Set<String> samlRequestStorage = new HashSet<String>(); private IdentifierGenerator identifierGenerator = new RandomIdentifierGenerator(); private static SAMLRequestStore instance = new SAMLRequestStore(); private SAMLRequestStore() { } public static SAMLRequestStore getInstance() { return instance; } public synchronized void storeRequest(String key) { if (samlRequestStorage.contains(key)) throw new RuntimeException("SAML request storage has already contains key " + key); samlRequestStorage.add(key); } public synchronized String storeRequest(){ String key = null; while (true) { key = identifierGenerator.generateIdentifier(20); if (!samlRequestStorage.contains(key)){ storeRequest(key); break; } } return key; } public synchronized boolean exists(String key) { return samlRequestStorage.contains(key); } public synchronized void removeRequest(String key) { samlRequestStorage.remove(key); } }
ローカルセッションを作成するには、独自のSAMLSessionManagerクラスを使用します。 彼のタスクは、次のSAMLSessionInfoクラスのオブジェクトであるローカルセッションを作成/破棄することです。
public class SAMLSessionInfo { private String nameId; private Map<String, String> attributes; private Date validTo; public SAMLSessionInfo(String nameId, Map<String, String> attributes, Date validTo) { this.nameId = nameId; this.attributes = attributes; this.validTo = validTo; } // getters should be defined below }
実際、SAMLContextManagerクラス自体は、SAMLContextを使用してサーバーのセッションコンテキストでローカルSAMLセッションを作成および破棄します。
コード
<source lang="java"> public class SAMLSessionManager { public static String SAML_SESSION_INFO = "SAML_SESSION_INFO"; private static SAMLSessionManager instance = new SAMLSessionManager(); private SAMLSessionManager() { } public static SAMLSessionManager getInstance() { return instance; } public void createSAMLSession(HttpSession session, SAMLMessageContext<Response, SAMLObject, NameID> samlMessageContext) { List<Assertion> assertions = samlMessageContext.getInboundSAMLMessage().getAssertions(); NameID nameId = (assertions.size() != 0 && assertions.get(0).getSubject() != null) ? assertions.get(0).getSubject().getNameID() : null; String nameValue = nameId == null ? null : nameId.getValue(); SAMLSessionInfo samlSessionInfo = new SAMLSessionInfo(nameValue, getAttributesMap(getSAMLAttributes(assertions)), getSAMLSessionValidTo(assertions)); session.setAttribute(SAML_SESSION_INFO, samlSessionInfo); } public boolean isSAMLSessionValid(HttpSession session) { SAMLSessionInfo samlSessionInfo = (SAMLSessionInfo) session.getAttribute(SAML_SESSION_INFO); if (samlSessionInfo == null) return false; return samlSessionInfo.getValidTo() == null || new Date().before(samlSessionInfo.getValidTo()); } public void destroySAMLSession(HttpSession session) { session.removeAttribute(SAML_SESSION_INFO); } public List<Attribute> getSAMLAttributes(List<Assertion> assertions) { List<Attribute> attributes = new ArrayList<Attribute>(); if (assertions != null) { for (Assertion assertion : assertions) { for (AttributeStatement attributeStatement : assertion.getAttributeStatements()) { for (Attribute attribute : attributeStatement.getAttributes()) { attributes.add(attribute); } } } } return attributes; } public Date getSAMLSessionValidTo(List<Assertion> assertions) { org.joda.time.DateTime sessionNotOnOrAfter = null; if (assertions != null) { for (Assertion assertion : assertions) { for (AuthnStatement statement : assertion.getAuthnStatements()) { sessionNotOnOrAfter = statement.getSessionNotOnOrAfter(); } } } return sessionNotOnOrAfter != null ? sessionNotOnOrAfter.toCalendar(Locale.getDefault()).getTime() : null; } public Map<String, String> getAttributesMap(List<Attribute> attributes) { Map<String, String> result = new HashMap<String, String>(); for (Attribute attribute : attributes) { result.put(attribute.getName(), attribute.getDOM().getTextContent()); } return result; } }
ステップ3:ログアウトリクエストを受信した場合、ローカルセッションを削除する
if (getCorrectURL(request).equals(filterConfig.getLogoutUrl())) { log.debug("Logout action: destroying SAML session."); SAMLSessionManager.getInstance().destroySAMLSession(request.getSession()); chain.doFilter(request, response); return; }
注:セッションがshibboleth idPでアクティブのままであり、次の認証要求でshibboleth idPがアクティブなセッションを単に返すことは注目に値します。グローバルログアウトの実装には追加設定が必要であり、shibboleth idPはバージョン2.4.0以前ではサポートされていませんでした。詳細については、https
: //wiki.shibboleth.net/confluence/display/SHIB2/SLOIssuesをご覧ください。ステップ4:ユーザーが既に認証されている
場合、リソースへのアクセスを許可しますユーザーがフィルターにアクティブなSAMLセッションを持っている場合、ユーザーにこのリソースを与えます
if (SAMLSessionManager.getInstance().isSAMLSessionValid(request.getSession())) { log.debug("SAML session exists and valid: grant access to secure resource"); chain.doFilter(request, response); return; }
ステップ5:SAML認証リクエストを作成し、ユーザーを
Shibboleth idPに送信します
log.debug("Sending authentication request to idP"); try { samlRequestSender .sendSAMLAuthRequest(request, response, filterConfig.getSpProviderId(), filterConfig.getAcsUrl(), filterConfig.getIdpSSOUrl()); } catch (Exception e) { throw new ServletException(e); }
SAMLRequestSenderクラスは、SAML 2.0メッセージの形式でリクエストを作成、エンコード、および送信します。
コード
<source lang="java"> public class SAMLRequestSender { private static Logger log = LoggerFactory.getLogger(SAMLRequestSender.class); private SAMLAuthnRequestBuilder samlAuthnRequestBuilder = new SAMLAuthnRequestBuilder(); private MessageEncoder messageEncoder = new MessageEncoder(); public void sendSAMLAuthRequest(HttpServletRequest request, HttpServletResponse servletResponse, String spId, String acsUrl, String idpSSOUrl) throws Exception { String redirectURL; String idpUrl = idpSSOUrl; AuthnRequest authnRequest = samlAuthnRequestBuilder.buildRequest(spId, acsUrl, idpUrl); // store SAML 2.0 authentication request String key = SAMLRequestStore.getInstance().storeRequest(); authnRequest.setID(key); log.debug("SAML Authentication message : {} ", SAMLUtils.SAMLObjectToString(authnRequest)); redirectURL = messageEncoder.encode(authnRequest, idpUrl, request.getRequestURI()); HttpServletResponseAdapter responseAdapter = new HttpServletResponseAdapter(servletResponse, request.isSecure()); HTTPTransportUtils.addNoCacheHeaders(responseAdapter); HTTPTransportUtils.setUTF8Encoding(responseAdapter); responseAdapter.sendRedirect(redirectURL); } private static class SAMLAuthnRequestBuilder { public AuthnRequest buildRequest(String spProviderId, String acsUrl, String idpUrl){ /* Building Issuer object */ IssuerBuilder issuerBuilder = new IssuerBuilder(); Issuer issuer = issuerBuilder.buildObject("urn:oasis:names:tc:SAML:2.0:assertion", "Issuer", "saml2p"); issuer.setValue(spProviderId); /* Creation of AuthRequestObject */ DateTime issueInstant = new DateTime(); AuthnRequestBuilder authRequestBuilder = new AuthnRequestBuilder(); AuthnRequest authRequest = authRequestBuilder.buildObject(SAMLConstants.SAML20P_NS, "AuthnRequest", "saml2p"); authRequest.setForceAuthn(false); authRequest.setIssueInstant(issueInstant); authRequest.setProtocolBinding(SAMLConstants.SAML2_POST_BINDING_URI); authRequest.setAssertionConsumerServiceURL(acsUrl); authRequest.setIssuer(issuer); authRequest.setNameIDPolicy(nameIdPolicy); authRequest.setVersion(SAMLVersion.VERSION_20); authRequest.setDestination(idpUrl); return authRequest; } } private static class MessageEncoder extends HTTPRedirectDeflateEncoder { public String encode(SAMLObject message, String endpointURL, String relayState) throws MessageEncodingException { String encodedMessage = deflateAndBase64Encode(message); return buildRedirectURL(endpointURL, relayState, encodedMessage); } public String buildRedirectURL(String endpointURL, String relayState, String message) throws MessageEncodingException { URLBuilder urlBuilder = new URLBuilder(endpointURL); List<Pair<String, String>> queryParams = urlBuilder.getQueryParams(); queryParams.clear(); queryParams.add(new Pair<String, String>("SAMLRequest", message)); if (checkRelayState(relayState)) { queryParams.add(new Pair<String, String>("RelayState", relayState)); } return urlBuilder.buildURL(); } } }
ユーザー認証の手順を含むSAML 2.0メッセージはbuildRequestメソッドで作成され、XMLオブジェクトです。
<saml2p:AuthnRequest xmlns:saml2p="urn:oasis:names:tc:SAML:2.0:protocol" AssertionConsumerServiceURL="https://sp.local.ru:8443/sso/acs" Destination="https://idp.local.ru:8443/idp/profile/SAML2/Redirect/SSO" ForceAuthn="false" ID="_0ddb303f9500839762eabd30e7b1e3c28b596c69" IssueInstant="2013-09-12T09:46:41.882Z" ProtocolBinding="urn:oasis:names:tc:SAML:2.0:bindings:HTTP-POST" Version="2.0"> <saml2p:Issuer xmlns:saml2p="urn:oasis:names:tc:SAML:2.0:assertion">sp.local.ru</saml2p:Issuer> </saml2p:AuthnRequest>
AssertionConsumerServiceURLパラメーターは、shibboleth idPが応答を返すURLを指定し、ProtocolBindingパラメーターはフィルターに応答を返す方法を示します(POST HTTPプロトコルメソッド)
IDパラメーターは、メッセージを送信するときに保存するメッセージ識別子を定義します
String key = SAMLRequestStore.getInstance()。 storeRequest();
この方法でメッセージを解析するとき、チェックverifyInResponseToクラスSAMLResponseVerifier。
saml2p:Issuer要素は、SPの名前を定義します。値saml2pの使用:発行者 shibboleth idPは、どのSPから認証要求が送信されたか、およびどのように処理されるべきか(SPメタデータを介して)を決定します。
上記のSAML 2.0メッセージへの応答として、idPからXML形式のSAML 2.0メッセージとして応答を受け取ります。
コード
<source lang="xml"> <saml2p:Response xmlns:saml2p="urn:oasis:names:tc:SAML:2.0:protocol" Destination="https://sp.local.ru:8443/sso/acs" ID="_9c5e6028df334510cce22409ddbca6ac" InResponseTo="_0ddb303f9500839762eabd30e7b1e3c28b596c69" IssueInstant="2013-09-12T10:13:35.177Z" Version="2.0"> <saml2:Issuer xmlns:saml2="urn:oasis:names:tc:SAML:2.0:assertion" Format="urn:oasis:names:tc:SAML:2.0:nameid-format:entity"> https://idp.local.ru/idp/shibboleth </saml2:Issuer> <saml2p:Status> <saml2p:StatusCode Value="urn:oasis:names:tc:SAML:2.0:status:Success"/> </saml2p:Status> <saml2:Assertion xmlns:saml2="urn:oasis:names:tc:SAML:2.0:assertion" ID="_0a299e86f4b17b5e047735121a880ccb" IssueInstant="2013-09-12T10:13:35.177Z" version="2.0"> <saml2:Issuer Format="urn:oasis:names:tc:SAML:2.0:nameid-format:entity"> https://idp.local.ru/idp/shibboleth </saml2:Issuer> <saml2:Subject> <saml2:NameID Format="urn:oasis:names:tc:SAML:2.0:nameid-format:transient" NameQualifier="https://idp.local.ru/idp/shibboleth"> _f1de09ee54294d4b5ddeb3aa5e6d2aab </saml2:NameID> <saml2:SubjectConfirmation Method="urn:oasis:names:tc:SAML:2.0:cm:bearer"> <saml2:SubjectConfirmationData Address="127.0.0.1" InResponseTo="_0ddb303f9500839762eabd30e7b1e3c28b596c69" NotOnOrAfter="2013-09-12T10:18:35.177Z" Recipient="https://sp.local.ru:8443/sso/acs"/> </saml2:SubjectConfirmation> </saml2:Subject> <saml2:Conditions NotBefore="2013-09-12T10:13:35.177Z" NotOnOrAfter="2013-09-12T10:18:35.177Z"> <saml2:AudienceRestriction> <saml2:Audience>sp.local.ru</saml2:Audience> </saml2:AudienceRestriction> </saml2:Conditions> <saml2:AuthnStatement AuthnInstant="2013-09-12T10:13:35.137Z" SessionIndex="_91826738984ca8bef18a8450135b1821"> <saml2:SubjectLocality Address="127.0.0.1"/> <saml2:AuthnContext> <saml2:AuthnContextClassRef> urn:oasis:names:tc:SAML:2.0:ac:classes:PasswordProtectedTransport </saml2:AuthnContextClassRef> </saml2:AuthnContext> </saml2:AuthnStatement> <saml2:AttributeStatement> <saml2:Attribute Name="userLogin" NameFormat="urn:oasis:names:tc:SAML:2.0:attrname-format:uri"> <saml2:AttributeValue xmlns:xs="http://www.w3.org/2001/XMLSchema" xmlns:xsi="http://www.w3.org/2001/XMLSchema-instance" xsi:type="xs:string">idpuser</saml2:AttributeValue> </saml2:Attribute> </saml2:AttributeStatement> </saml2:Assertion> </saml2p:Response>
メッセージは、既に実装されているSAMLResponseVerifier.verify(..)メソッドで処理されます。
これで、フィルターが実装されました!
プロジェクトの構造は次のよう
になります。実装されたフィルターをローカルリポジトリのjarライブラリに収集します。
これを行うには、pom.xmlを使用してディレクトリでコマンドを実行します:mvn clean install
6. SSOサポートを使用してJava Webアプリケーションを作成する
Java Webアプリケーションを作成する
説明のために、プライベートリソースとパブリックリソースを備えた単純なJava Webアプリケーションを作成します。プライベートリソースへのアクセスには、Shibboleth idP Webアプリケーションを介したユーザー認証が必要です。プライベートリソースの1つを、システムの現在のユーザーに関する情報を表示するページにします。
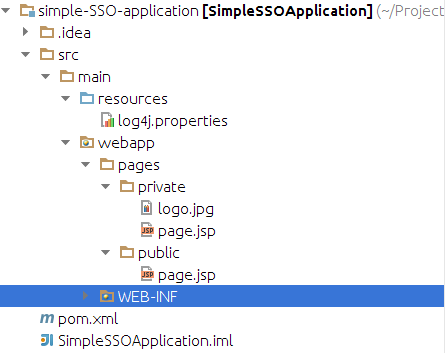
アプリケーションの構造は次のとおりです
。pom.xml
コード
<project xmlns="http://maven.apache.org/POM/4.0.0" xmlns:xsi="http://www.w3.org/2001/XMLSchema-instance" xsi:schemaLocation="http://maven.apache.org/POM/4.0.0 http://maven.apache.org/maven-v4_0_0.xsd"> <modelVersion>4.0.0</modelVersion> <groupId> ru.eastbanctech.web</groupId> <artifactId>SimpleSSOApplication</artifactId> <packaging>war</packaging> <version>1.0-SNAPSHOT</version> <name>SimpleSSOApplication</name> <url>http://maven.apache.org</url> <!-- --> <properties> <sp.id>sp.local.ru</sp.id> <acs.url>https://sp.local.ru:8443/sso/acs</acs.url> <idp.sso.url>https://idp.local.ru:8443/idp/profile/SAML2/Redirect/SSO</idp.sso.url> <logout.url>/logout</logout.url> </properties> <dependencies> <dependency> <groupId>javax.servlet</groupId> <artifactId>servlet-api</artifactId> <version>2.5</version> </dependency> <dependency> <groupId> ru.eastbanctech.web</groupId> <artifactId>saml-sp-filter</artifactId> <version>1.0-SNAPSHOT</version> </dependency><sup>8</sup> <dependency> <groupId>org.slf4j</groupId> <artifactId>slf4j-api</artifactId> <version>1.7.1</version> </dependency> <dependency> <groupId>org.slf4j</groupId> <artifactId>slf4j-log4j12</artifactId> <version>1.7.1</version> </dependency> </dependencies> <build> <finalName>sso</finalName> <plugins> <plugin> <artifactId>maven-war-plugin</artifactId> <configuration> <webResources> <resource> <filtering>true</filtering> <directory>src/main/webapp/WEB-INF</directory> <targetPath>WEB-INF</targetPath> <includes> <include>**/*.xml</include> </includes> </resource> </webResources> </configuration> </plugin> </plugins> </build> </project>
ここで、<sp.id> sp.local.ru </sp.id>フィルターのメインパラメーターが設定されているプロパティセクションに移動する必要があります-フィルターSP <acs.url> https://sp.local.ruの名前SAML 2.0 : 8443 / sso / acs </acs.url> -shibboleth idP <idp.sso.url> https://idp.local.ru:8443/idp/profile/SAML2からのSAML 2.0メッセージを処理するURLをフィルターします/リダイレクト/ SSO </idp.sso.url> - フィルターがメッセージを送信するURL shibboleth idP <logout.url> / logout </logout.url> -ログアウトURL web.xml web.xmlファイルでパラメーターを定義しますフィルターとそのスコープ。 「.jpg」形式でリソースを作成しましょうexcludedUrlPatternパラメーターで開く
。
コード
<!DOCTYPE web-app PUBLIC "-//Sun Microsystems, Inc.//DTD Web Application 2.3//EN" "http://java.sun.com/dtd/web-app_2_3.dtd" > <web-app> <display-name>Simple SSO Java Web Application</display-name>7. <filter> <filter-name>SSOFilter</filter-name> <filter-class> ru.eastbanctech.java.web.filter.saml.SAMLSPFilter</filter-class> <init-param> <param-name>excludedUrlPattern</param-name> <param-value>.*\.jpg</param-value> </init-param> <init-param> <param-name>idProviderSSOUrl</param-name> <param-value> ${idp.sso.url}</param-value> </init-param> <init-param> <param-name>spProviderId</param-name> <param-value>${sp.id}</param-value> </init-param> <init-param> <param-name>acsUrl</param-name> <param-value>${acs.url}</param-value> </init-param> <init-param> <param-name>logoutUrl</param-name> <param-value>${logout.url}</param-value> </init-param> </filter> <filter-mapping> <filter-name>SSOFilter</filter-name> <url-pattern>/pages/private/*</url-pattern> </filter-mapping> <filter-mapping> <filter-name>SSOFilter</filter-name> <url-pattern>${logout.url}</url-pattern> </filter-mapping> <filter-mapping> <filter-name>SSOFilter</filter-name> <url-pattern>/acs</url-pattern> </filter-mapping> </web-app>
private / page.jsp
ページは、認証されたユーザーのIDと属性の単なる出力です。
コード
<%@ page import=" ru.eastbanctech.java.web.filter.saml.store.SAMLSessionManager" %> <%@ page import=" ru.eastbanctech.java.web.filter.saml.store.SAMLSessionInfo" %> <%@ page import="java.util.Map" %> <html> <body> <h2>Private Resource</h2> <% SAMLSessionInfo info = (SAMLSessionInfo)request.getSession().getAttribute(SAMLSessionManager.SAML_SESSION_INFO); out.println("User id = " + info.getNameId() + " "); out.println("<TABLE> <TR> <TH> Attribute name </TH> <TH> Attribulte value </TH></TR>"); for (Map.Entry entry : info.getAttributes().entrySet()) { out.println("<TR><TD>" + entry.getKey() + "</TD><TD>" + entry.getValue() + "</TD></TR>"); } out.println("</TABLE>"); %> <a href="<%=request.getContextPath()%>/logout">Logout</a> </body> </html>
コマンドを使用してアプリケーションをアセンブルします:mvn clean package。
Java Webアプリケーションのパフォーマンスのテスト
Tomcat ASにアプリケーションをデプロイし、SSOの動作を確認します。
- ファイル$ {tomcatHome} /conf/Catalina/localhost/sso.xmlにアプリケーションコンテキストを記述します
<Context docBase="$pathToWebApp" privileged="true" antiResourceLocking="false" antiJARLocking="false" unpackWAR="false" swallowOutput="true" />
または、sso.warアプリケーションを$ {tomcatHome} / webappsにコピーするだけです - TomcatアプリケーションがHTTPSを介してshibboleth idPに接続できるようにするには、Javaキーストアにshibboleth idP証明書を追加する必要があります。
これを行うには、Javaユーティリティkeytoolを使用します
。keytool -alias idp.local.ru -importcert -file $ {shHome} /idp.crt -keystore $ {keystorePath} - Tomcat ASを起動します
- ブラウザを開き、sp.local.ruアプリケーションの閉じたリソースをたたきます:8443 / sso / pages / private / page.jsp
- ページが開き、システムがIDとユーザー名を表示することを確認します
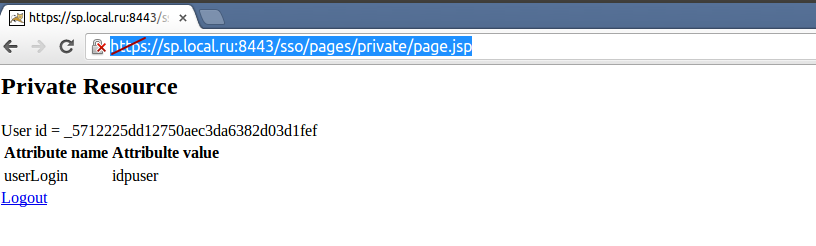
- 演習として、/ pages / privateフォルダー内の.jpg形式の写真に対する要求がフィルターでスキップされることを確認します。
Google Appsとの統合。
今こそ、SSOが本当に機能することを確認するときです。
これを行うには、Google Appsクラウドサービス(http://www.google.com/enterprise/apps/business/)のアプリケーションを使用します。
- 無料試用版を使用して、ドメイン名とスーパー管理者を登録します。すべてが完了したら、作成されたユーザーでadmin.google.comにアクセスします(完全修飾ドメイン名を使用)。
- idpuser, Super Administrator.
- « »
«».

- -> .
- :
URL * = https://idp.local.ru:8443/idp/profile/SAML2/Redirect/SSO
URL * = gmail.com
URL * = gmail.com
. - shibboleth idP HTTPS
$shHome/credentials/idp.crt
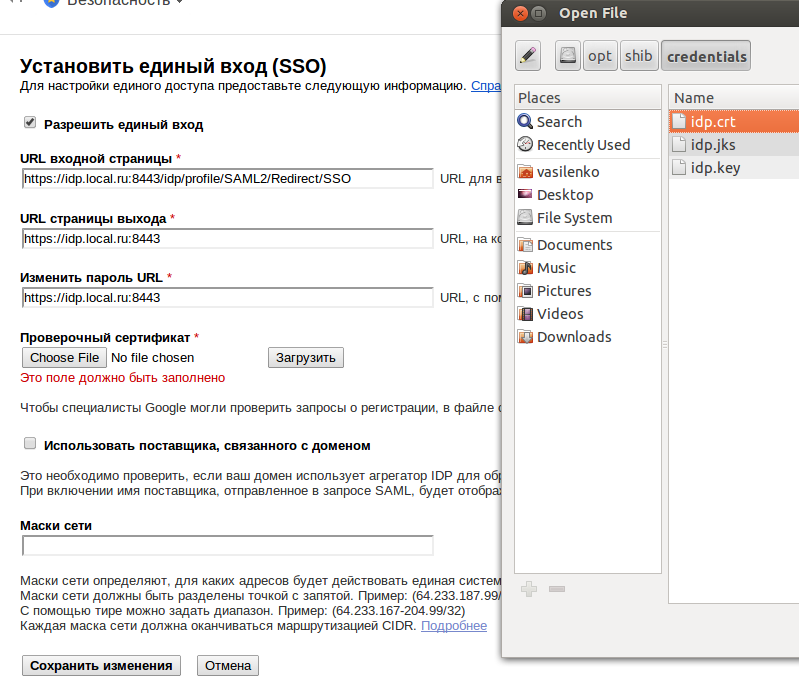
. - https://shibboleth.usc.edu/docs/google-apps/ shibboleth idP Google Apps.
: , shibboleth idP. , RelyingParty rp:RelyingParty. - logger' edu.internet2.middleware.shibboleth DEBUG
<!-- Logs IdP, but not OpenSAML, messages --> <logger name="edu.internet2.middleware.shibboleth" level="DEBUG"/>
shibboleth idP https://admin.google.com ( , Google Chrome ).
idpuser@ domain_name , domain_name – . «».
, google apps idpuser.
${shHome}/logs/idp-process.log , shibboleth idP . , RemoteUserLoginHandler
22:19:49.172 - DEBUG [edu.internet2.middleware.shibboleth.idp.authn.provider.RemoteUserLoginHandler:66] - Redirecting to <a href="https://idp.local.ru:8443/idp/Authn/RemoteUser">https://idp.local.ru:8443/idp/Authn/RemoteUser</a>
shibboleth idP . , .
sp.local.ru :8443/sso/pages/private/page.jsp
, shibboleth idP idpuser.
. SSO . , - .
注釈
1 — Service Provider . Shibboleth , Apache- Application Server'.
2 — Shibboleth idP 2.4.0
3 — Java 7 .
4 — CentOS 6.3 OS. Ubuntu 12.04.
5 — servlet-api 2.5 ${tomcatHome}/lib/catalina.jar
6 — ru.eastbanctech.java.web.RemoteUserValve – RemoteUserValve. .
7 — .
8 — .
便利なリンク
- https://developers.google.com/google-apps/sso/saml_reference_implementation — SSO Google Apps. SSO Google Docs SAML.
- https://shibboleth.usc.edu/docs/google-apps/ — Shibboleth Google docs.
- http://stackoverflow.com/questions/7553967/getting-a-value-from-httpservletrequest-getremoteuser-in-tomcat-without-modify — Tomcat Valve
- https://wiki.shibboleth.net/confluence/display/SHIB2/Home — Shibboleth