ActionBar
を美しくユニークにアニメーション化する方法に焦点を当てました。 この効果を適用する可能性のいくつかを述べましたが、この種の
ActionBar
アニメーションを自分のアプリケーションに追加する時間はありませんでした。 しかし、Playストアでそれを使用するアプリケーションを見ました。
Google I / Oに
ActionBar
して、ついに
ActionBar
アニメーション手法を使用するアプリケーションを見つけました。 正直に言って、初めて見たときは文字通り私の心を吹き飛ばしました。 私は素敵で、微妙で、非常に便利なアニメーション効果に夢中になりました。おそらく、アプリケーション自体よりもさらに魅力的です! 私が話しているアプリケーションは、Google I / Oで導入されたので、きっとご存知だと思います。 これはPlayミュージックアプリです!
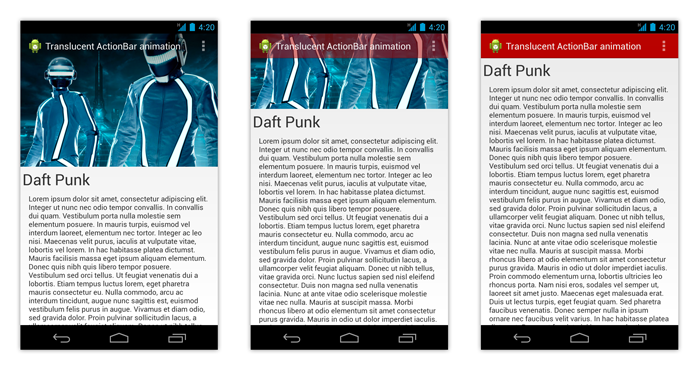
Play Music(v5.0)の最新のアップデートでは、アーティストとアルバムの説明を含むページのデザインが一新され、外観が変更されました。 このようなページを開くと、
ActionBar
最初は表示されず、アーティストまたはアルバムを説明する大きな画像がオーバーレイされていることに気付くでしょう。 ただし、ページのスクロールを開始すると(可能な場合)、
ActionBar
徐々に表示されます。 画像が画面の背後でスクロールすると、
ActionBar
は完全に不透明になります。
このような
ActionBar
アニメーションの主な利点は次の2つです。
- 洗練されたUI :アニメーションはユーザーが操作する要素と同期し、ユーザーがアクションに応答するUIを自然に感じるため、ユーザーから積極的に評価されます。 アニメーションの減衰は、一度だけ実行されるアニメーションではなく、ピクセルごとのスクロール状態の直接的な結果です。
- 画面の実際の状態を活用します 。UXプラットフォームを保持するこのモデルにより、ユーザーは管理ではなくコンテンツに主に集中できます。 これは、美しいデザインへの追加として使用され、アプリケーションのインターフェースで魅力的なゲームとして認識できます。
この記事では、「 Action Bar in motion 」という記事で説明されている方法論の実装の詳細を掘り下げて、Play Musicアプリケーションで使用されるものと同様の効果を作成します。 達成する予定の目標をよりよく理解するには、以下のスクリーンショットをご覧になるか、サンプルアプリケーションをダウンロードしてください。
サンプルAPKをダウンロードする
アプリケーションのテーマとスタイル
簡単にわかるように、このような効果を再現するには、
ActionBar
が画面のコンテンツに重なる必要があります。 これは、
android:windowActionBarOverlay
XML属性を使用して行われます。 以下のコードは、使用するトピックの定義を説明しています。
値/ themes.xml
<?xml version="1.0" encoding="utf-8"?> <resources> <style name="Theme.TranslucentActionBar" parent="@android:style/Theme.Holo.Light.DarkActionBar"> <item name="android:actionBarStyle">@style/Widget.ActionBar</item> </style> <style name="Theme.TranslucentActionBar.ActionBar" /> <style name="Theme.TranslucentActionBar.ActionBar.Overlay"> <item name="android:actionBarStyle">@style/Widget.ActionBar.Transparent</item> <item name="android:windowActionBarOverlay">true</item> </style> </resources>
論理的に、ActionBarスタイルは次のようにvalues / styles.xmlで定義されます。
値/ styles.xml
<?xml version="1.0" encoding="utf-8"?> <resources> <style name="Widget.ActionBar" parent="@android:style/Widget.Holo.Light.ActionBar.Solid.Inverse"> <item name="android:background">@drawable/ab_background</item> </style> <style name="Widget.ActionBar.Transparent"> <item name="android:background">@android:color/transparent</item> </style> </resources>
結論として、このスタイルを
Activity
に適用するには、このテーマを使用する必要があります。
AndroidManifest.xml
<?xml version="1.0" encoding="utf-8"?> <manifest xmlns:android="http://schemas.android.com/apk/res/android" package="com.cyrilmottier.android.translucentactionbar" android:versionCode="1" android:versionName="1.0" > <uses-sdk android:minSdkVersion="14" android:targetSdkVersion="17" /> <application android:allowBackup="true" android:icon="@drawable/ic_launcher" android:label="@string/app_name" android:theme="@style/Theme.TranslucentActionBar"> <activity android:name=".HomeActivity" android:theme="@style/Theme.TranslucentActionBar.ActionBar.Overlay"> <intent-filter> <action android:name="android.intent.action.MAIN" /> <category android:name="android.intent.category.LAUNCHER" /> </intent-filter> </activity> </application> </manifest>
テーマとスタイルの助けを借りて、起動時のちらつきの潜在的な問題をすべて取り除きます(詳細については、「 正常に起動したAndroidアプリケーション 」を参照してください)。
完成したコンテンツを取得する
前に説明したように、
ActionBar
の減衰は、スクロールコンテナーのピクセルごとの状態で同期されます。 この例では、
ScrollView
をスクロールコンテナとして使用します。 このコンテナの主な欠点の1つは、スクロール状態が変更されたときに通知を受信するためにリスナーを登録できないことです。 しかし、これは元の
ScrollView
から継承した
ScrollView
作成することで簡単に回避できます。
NotifyingScrollView.java
package com.cyrilmottier.android.translucentactionbar; import android.content.Context; import android.util.AttributeSet; import android.widget.ScrollView; /** * @author Cyril Mottier */ public class NotifyingScrollView extends ScrollView { /** * @author Cyril Mottier */ public interface OnScrollChangedListener { void onScrollChanged(ScrollView who, int l, int t, int oldl, int oldt); } private OnScrollChangedListener mOnScrollChangedListener; public NotifyingScrollView(Context context) { super(context); } public NotifyingScrollView(Context context, AttributeSet attrs) { super(context, attrs); } public NotifyingScrollView(Context context, AttributeSet attrs, int defStyle) { super(context, attrs, defStyle); } @Override protected void onScrollChanged(int l, int t, int oldl, int oldt) { super.onScrollChanged(l, t, oldl, oldt); if (mOnScrollChangedListener != null) { mOnScrollChangedListener.onScrollChanged(this, l, t, oldl, oldt); } } public void setOnScrollChangedListener(OnScrollChangedListener listener) { mOnScrollChangedListener = listener; } }
これで、この新しいスクロールコンテナをXMLレイアウトで使用できます。
レイアウト/ activity_home.xml
<?xml version="1.0" encoding="utf-8"?> <com.cyrilmottier.android.translucentactionbar.NotifyingScrollView xmlns:android="http://schemas.android.com/apk/res/android" android:id="@+id/scroll_view" android:layout_width="match_parent" android:layout_height="match_parent"> <LinearLayout android:layout_width="match_parent" android:layout_height="wrap_content" android:orientation="vertical"> <ImageView android:id="@+id/image_header" android:layout_width="match_parent" android:layout_height="wrap_content" android:scaleType="centerCrop" android:src="@drawable/daft_punk"/> <! -- Some long content --> </LinearLayout> </com.cyrilmottier.android.translucentactionbar.NotifyingScrollView>
アクションバーの表示/非表示
これでテンプレートのほとんどの準備が整い、これらすべてのコンポーネントを接続できます。
ActionBar
使用されるアルゴリズム
ActionBar
非常にシンプルで、
NotifyingScrollView
スクロール
NotifyingScrollView
現在のピクセル状態に応じてアルファチャネルを計算するだけです。 Androidのスクロールコンテナーバーの動作によって発生する可能性のある誤った値を避けるために、有効なスクロール距離を
[0, image_height - actionbar_height]
に付加する必要があることに注意してください。
HomeActivity.java
package com.cyrilmottier.android.translucentactionbar; import android.app.Activity; import android.graphics.drawable.Drawable; import android.os.Build; import android.os.Bundle; import android.support.v4.view.GravityCompat; import android.support.v4.widget.DrawerLayout; import android.util.Log; import android.view.Menu; import android.widget.ScrollView; public class HomeActivity extends Activity { private Drawable mActionBarBackgroundDrawable; @Override public void onCreate(Bundle savedInstanceState) { super.onCreate(savedInstanceState); setContentView(R.layout.activity_home); mActionBarBackgroundDrawable = getResources().getDrawable(R.drawable.ab_background); mActionBarBackgroundDrawable.setAlpha(0); getActionBar().setBackgroundDrawable(mActionBarBackgroundDrawable); ((NotifyingScrollView) findViewById(R.id.scroll_view)).setOnScrollChangedListener(mOnScrollChangedListener); } private NotifyingScrollView.OnScrollChangedListener mOnScrollChangedListener = new NotifyingScrollView.OnScrollChangedListener() { public void onScrollChanged(ScrollView who, int l, int t, int oldl, int oldt) { final int headerHeight = findViewById(R.id.image_header).getHeight() - getActionBar().getHeight(); final float ratio = (float) Math.min(Math.max(t, 0), headerHeight) / headerHeight; final int newAlpha = (int) (ratio * 255); mActionBarBackgroundDrawable.setAlpha(newAlpha); } }; }
「 移動中のActionBar 」の記事で説明されているように、上記のこのコードスニペットはJELLY_BEAN_MR1以前のデバイスでは機能しません。 実際、
ActionBar
は
ActionBar
のコールバックとして自身を登録しないため、必要なときに自身を無効にしません。
onCreate(Bundle)
メソッドに次の
Callback
を添付するだけで、この問題を回避できます。
HomeActivity.java
private Drawable.Callback mDrawableCallback = new Drawable.Callback() { @Override public void invalidateDrawable(Drawable who) { getActionBar().setBackgroundDrawable(who); } @Override public void scheduleDrawable(Drawable who, Runnable what, long when) { } @Override public void unscheduleDrawable(Drawable who, Runnable what) { } };
HomeActivity.java
if (Build.VERSION.SDK_INT < Build.VERSION_CODES.JELLY_BEAN_MR1) { mActionBarBackgroundDrawable.setCallback(mDrawableCallback); }
すでにコードを実行できます。 結果はPlayミュージックアプリのアニメーションと同じに見えますが、さらに改善するために引き続き改善できます。
最終的なブラシストローク
ActionBarのコントラストを強化する
通常、透明な
ActionBar
を使用すると、上部に表示される背景色がわからないため、設計上の問題が発生する可能性があります。 たとえば、説明に白いキャプションと白い画像を含む透明な
ActionBar
を表示する場合があります。 言うまでもなく、これにより
ActionBar
見えなくなり、役に立たなくなります。
この問題を回避する最も簡単な方法は、上部を少し暗くするように画像を修正することです。 したがって、最悪の場合(つまり、白い画像)、
ActionBar
の上部の灰色の領域は、そのコンテンツ(名前、アイコン、ボタンなど)を表示します。
これを行うには、画像の上部に暗い半透明のグラデーションを適用します。これは、
Drawable
XMLの説明で作成します。
drawable / gradient.xml
<?xml version="1.0" encoding="utf-8"?> <shape xmlns:android="http://schemas.android.com/apk/res/android" android:shape="rectangle"> <size android:height="100dp"/> <gradient android:angle="270" android:startColor="#8000" android:endColor="#0000"/> </shape>
FrameLayout
を介してグラデーションオーバーレイを実装し
FrameLayout
。
レイアウト/ activity_home.xml
<FrameLayout android:layout_width="match_parent" android:layout_height="wrap_content"> <ImageView android:id="@+id/image_header" android:layout_width="match_parent" android:layout_height="wrap_content" android:scaleType="centerCrop" android:src="@drawable/daft_punk"/> <View android:layout_width="match_parent" android:layout_height="wrap_content" android:background="@drawable/gradient"/> </FrameLayout>
オーバースクロールを避ける
Gingerbread(API 9)で、Androidはスクロールコンテナーが境界を越えようとしていることをユーザーに通知する新しい方法を導入しました。
EdgeEffect
の概念が初めて導入されました(API 14からはAPIがあります)。これにはオーバースクロールが含まれます。 これは問題ではありませんが、一般的に、スクロール可能なコンテンツの端の1つが背景色と異なる場合、非常に迷惑になります。
ScrollView
すばやく
ScrollView
アップするだけで、これを簡単に再現できます。 そして、画像がそれを超えてスクロールされるため、画面上部に白いもの(背景色)がどのように表示されるかがわかります。 個人的には、これはインターフェイスの不具合と考えており、通常はこの動作を無効にすることを好みます。
オーバースクロールを回避する最善の方法の1つは、
View#setOverScrollMode(int)
を使用して
View#OVER_SCROLL_NEVER
を変更すること
View#OVER_SCROLL_NEVER
。 これは機能しますが、視覚的に許容できない可能性のある
EdgeEffect
も削除します。 したがって、必要に応じて
NotifyingScrollView
を変更して、オーバースクロール値をゼロに制限する方が簡単です。
NotifyingScrollView.java
private boolean mIsOverScrollEnabled = true; public void setOverScrollEnabled(boolean enabled) { mIsOverScrollEnabled = enabled; } public boolean isOverScrollEnabled() { return mIsOverScrollEnabled; } @Override protected boolean overScrollBy(int deltaX, int deltaY, int scrollX, int scrollY, int scrollRangeX, int scrollRangeY, int maxOverScrollX, int maxOverScrollY, boolean isTouchEvent) { return super.overScrollBy( deltaX, deltaY, scrollX, scrollY, scrollRangeX, scrollRangeY, mIsOverScrollEnabled ? maxOverScrollX : 0, mIsOverScrollEnabled ? maxOverScrollY : 0, isTouchEvent); }
おわりに
Playミュージックアプリチームが私の記事に基づいた行動を使用したかどうかはわかりません。 しかし、彼らは見事にこの手法を使用して、ユーザーインターフェイスを洗練し、強調しました。 明らかに、これは、その内容が自明であり、ActionBarの内容よりも重要な画面を実装する必要がある場合に最適なパターンです。