この記事は最初の部分の続きであり、 SpecFlowを使用して「実行可能な仕様」を操作する技術的な詳細を明らかにします 。
開始するには、Visual Studioのプラグイン(公式サイトからダウンロード)およびSpecFlowパッケージ( nugetからインストール )が必要です。
そのため、製品所有者はチームに電卓の開発を依頼しました...
@calculator Feature: Sum As a math idiot I want to be told the sum of two numbers So that I can avoid silly mistakes @positive @sprint1 Scenario: Add two numbers Given I have entered 50 into the calculator And I have entered 70 into the calculator When I press add Then the result should be 120 on the screen
@属性に注意する価値があります。 それらにはいくつかの重要な特性があります。 まず、NUnitを使用する場合、SpecFlowは属性[NUnit.Framework.CategoryAttribute( "calculator")]を追加します。 テスト計画を立てるのに非常に便利です。 分類は、ネイティブのNUnitランナーでありチームシティであるR#によってサポートされています。
このシナリオを自動化しましょう。 この時点で、開発者はすでに計算インターフェースを準備しています:
public interface ICalculator { decimal Sum(params decimal[] values); decimal Minus(decimal a, decimal b); decimal Sin(decimal a); decimal Multiply(params decimal[] values); decimal Divide(decimal a, decimal b); }
サービステストコンテキストを追加します。
public class CalculationContext { private readonly List<decimal> _values = new List<decimal>(); public ICalculator Calculator { get; private set; } public decimal Result { get; set; } public Exception Exception { get; set; } public List<decimal> Values { get { return _values; } } public CalculationContext() { Calculator = new Calculator(); } }
SpecFlowは特別な属性を使用して手順を自動化します。
[Binding] public class Sum : CalcStepsBase { public CalculationContext Context {get;set;} public Sum(CalculationContext context) { Context = CalculationContext(); } [Given("I have entered (.*) into the calculator")] public void Enter(int digit) { Context.Values.Add(digit); } [When("I press (.*)")] public void Press(string action) { switch (action.ToLower()) { case "add": case "plus": Context.Result = Context.Calculator.Sum(Context.Values.ToArray()); break; default: throw new InconclusiveException(string.Format("Action \"{0}\" is not implemented", action)); } } [Then("the result should be (.*) on the screen")] public void Result(decimal expected) { Assert.AreEqual(expected, Context.Result); } }
このアプローチにはいくつかの利点があります。
- 各ステップは1回だけ自動化する必要があります。
- 複雑な継承チェーンの問題を回避し、コードがより明確に見える
- 属性は正規表現を使用するため、単一の属性で複数のステップを「キャッチ」できます。 この場合、When属性は「add」および「plus」というフレーズに対して機能します。
代替記録
@positive Scenario: Paste numbers Given I have entered two numbers | a | b | | 1 | 2 | When I press add Then the result should be 3 on the screen [Given("I have entered two numbers")] public void Paste(Table values) { var calcRow = values.CreateInstance<CalcTable>(); Context.Values.Add(calcRow.A); Context.Values.Add(calcRow.B); } public class CalcTable { public decimal A { get; set; } public decimal B { get; set; } }
このタイプの記録は、大きなオブジェクトを埋める必要がある場合に便利です。 たとえば、ユーザーアカウント情報。
1つのデータセットのみをテストしますか?
もちろん、1つのテストだけでは十分ではないため、さまざまな数のスクリプトを数十個書くのは怪しい喜びです。 シナリオの概要が助けになります @calculator Feature: Calculations As a math idiot I want to be told the calculation result of two numbers So that I can avoid silly mistakes @positive @b12 @tc34 Scenario Outline: Add two numbers Given I have entered <firstValue> into the calculator And I have entered <secondValue> into the calculator When I press <action> Then the <result> should be on the screen Examples: | firstValue | secondValue | action | result | | 1 | 2 | plus | 3 | | 2 | 3 | minus | -1 | | 2 | 2 | multiply | 4 |
SpecFlowは、テーブルの値をプレースホルダーに置き換えます。 すでに悪くはありませんが、自動化を追加する必要があります。
[When("I press (.*)")] public void Press(string action) { switch (action.ToLower()) { case "add": case "plus": Context.Result = Context.Calculator.Sum(Context.Values.ToArray()); break; case "minus": Context.Result = Context.Calculator.Minus(Context.Values[0], Context.Values[1]); break; case "multiply": Context.Result = Context.Calculator.Multiply(Context.Values.ToArray()); break; case "sin": Context.Result = Context.Calculator.Sin(Context.Values[0]); break; default: throw new InconclusiveException(string.Format("Action \"{0}\" is not implemented", action)); } } [Then("the result should be (.*) on the screen")] [Then("the (.*) should be on the screen")] public void Result(decimal expected) { Assert.AreEqual(expected, Context.Result); }
読みやすくするために2行目を変更しました。 したがって、2番目の属性はResultメソッドでハングする必要があります。 出口で、次の形式のレポートを含む3つのテストを受け取ります。
Given I have entered 1 into the calculator -> done: Sum.Enter(1) (0,0s) And I have entered 2 into the calculator -> done: Sum.Enter(2) (0,0s) When I press plus -> done: Sum.Press("plus") (0,0s) Then the result should be 3 on the screen -> done: Sum.Result(3) (0,0s)
陰性検査はどうですか?
0による除算チェックを追加します。 @calculator Feature: Devision As a math idiot I want to be told the devision of two numbers So that I can avoid silly mistakes @negative @exception Scenario: Zero division Given I have entered 10 into the calculator And I have entered 0 into the calculator When I press divide Then exception must occur
この場合、私はカツレツのハエを邪魔したくありません、そして、分割のために、私は別個のファイルを持つことを好むでしょう。 問題は。 コンテキストをどうするか? 彼はSumクラスにとどまりました。 SpecFlowは、コンストラクターへの注入をサポートしています。 基本クラスを選択します。
public class CalcStepsBase { protected CalculationContext Context; public CalcStepsBase(CalculationContext context) { Context = context; } }
それから分割するための手順で新しいクラスを継承します。
[Binding] public class Division : CalcStepsBase { public Division(CalculationContext context) : base(context) { } [When("I press divide"), Scope(Scenario = "Zero division")] public void ZeroDivision() { try { Context.Calculator.Divide(Context.Values[0], Context.Values[1]); } catch (DivideByZeroException ex) { Context.Exception = ex; } } [Then("exception must occur")] public void Exception() { Assert.That(Context.Exception, Is.TypeOf<DivideByZeroException>()); } }
入札が競合しないように、プラスとマイナスに分けます
[When("I press (.*)"), Scope(Tag = "positive")] [When("I press divide"), Scope(Scenario = "Zero division")]
スクリプトとタグの両方でスコープをフィルタリングできます。
データ駆動型テスト
加算、減算、乗算の4つの例では明らかに不十分です。 大量の入力値と出力値を持つシステムが多数あります。 この場合、DSLのシートはあまり明確に見えません。 一方でテストを記述し、他方でGWT形式を保存するには、次の2つの方法があります。2つの形式をサポートしないように、2番目のオプションに決めました。
[TestFixture] [Feature( "Sum Excel", As = "Math idiot", IWant = "to be told sum of two numbers", SoThat = "I can avoid silly mistakes")] public class ExcelSumTests : GherkinGenerationTestsBase { [TestCaseSource("Excel")] [Scenario("Sum Excel", "excel", "positive", "calculator")] public void AddTwoNumbers_TheResultShouldBeOnTheScreen(string firstValue, string secondValue, string action, string result) { Given(string.Format("I have entered {0} into the calculator", firstValue)); Given(string.Format("I have entered {0} into the calculator", secondValue), "And "); When(string.Format("I press {0}", action)); Then(string.Format("the result should be {0} on the screen", result)); } public static IEnumerable<object[]> Excel() { return ExcelTestCaseDataReader.FromFile("Sum.xlsx").GetArguments(); } }
背景と前提条件
場合によっては、一連のシナリオ全体に対して、一連の前提条件を指定する必要があります。 それらを各シナリオにコピーすることは明らかに便利ではありません。 2つのアプローチが助けになります。背景
Background: Given Calculator is initialized @positive Scenario: Add two numbers Given I have entered 1 into the calculator When I press sin Then the result should be 0.841470984807896 on the screen
[ 背景]セクションでは、スクリプトの前提条件をより多く作成できます。
タグを使用する
前提条件は、タグを使用して実装することもできます。 [Binding] public class Sum : CalcStepsBase { public Sum(CalculationContext context) : base(context) { } [BeforeScenario("calculator")] [Given("Calculator is initialized")] public void InitCalculator() { Context.Init(); } }
BeforeScenario属性でマークされたメソッドは、スクリプトの実行前に実行されます。 属性は、スコープを制限するためにコンストラクターに渡されます。 スクリプトに電卓タグをタグ付けしました。 現在、このようなスクリプトを実行する前に、 InitCalculatorメソッドが実行されます。
報告書
レポートを作成するには、ユーティリティspecflow.exeとnunitが必要です。 以下は、最初にnunitを実行してからspecflowレポートを作成するmsbuildスクリプトです。 <?xml version="1.0" encoding="utf-8" ?> <Project ToolsVersion="4.0" DefaultTarget="Compile" xmlns="http://schemas.microsoft.com/developer/msbuild/2003"> <ItemGroup> <NUnitAddinFiles Include="$(teamcity_dotnet_nunitaddin)-2.6.2.*" /> </ItemGroup> <PropertyGroup> <teamcity_build_checkoutDir Condition=" '$(teamcity_build_checkoutDir)' == '' ">.</teamcity_build_checkoutDir> <NUnitHome>C:/Program Files (x86)/NUnit 2.6.2</NUnitHome> <NUnitConsole>"$(NUnitHome)\bin\nunit-console.exe"</NUnitConsole> <testResultsTxt>"$(teamcity_build_checkoutDir)\TestResult.txt"</testResultsTxt> <testResultsXml>"$(teamcity_build_checkoutDir)\TestResult.xml"</testResultsXml> <projectFile>"$(teamcity_build_checkoutDir)\Etna.QA.SpecFlow.Examples\Etna.QA.SpecFlow.Examples.csproj"</projectFile> <SpecflowExe>"C:\Program Files (x86)\TechTalk\SpecFlow\specflow.exe"</SpecflowExe> </PropertyGroup> <Target Name="RunTests"> <MakeDir Directories="$(NUnitHome)/bin/addins" /> <Copy SourceFiles="@(NUnitAddinFiles)" DestinationFolder="$(NUnitHome)/bin/addins" /> <Exec Command="$(NUnitConsole) /domain:multiple /labels /out=$(testResultsTxt) /xml=$(testResultsXml) $(projectFile)" ContinueOnError="true"/> </Target> <Target Name="SpecflowReports"> <Exec Command="$(SpecflowExe) nunitexecutionreport $(projectFile) /xmlTestResult:$(testResultsXml) /testOutput:$(testResultsTxt) /out:"$(teamcity_build_checkoutDir)/SpecFlowExecutionReport.html""/> <Exec Command="$(SpecflowExe) stepdefinitionreport $(projectFile) /out:"$(teamcity_build_checkoutDir)/SpecFlowStepDefinitionReport.html""/> </Target> </Project>
/ domain:multiple flagに注意する価値があります 。 NUnitに、アセンブリが配置されているフォルダーからアセンブリを実行するように指示します。 そうしないと、構成に関する問題が発生する可能性があります。
その結果、このようなレポートを取得します

チームシティでの予定された打ち上げ
ビルドのセットアップで、新しい成果物を指定する必要があります。進捗レポート: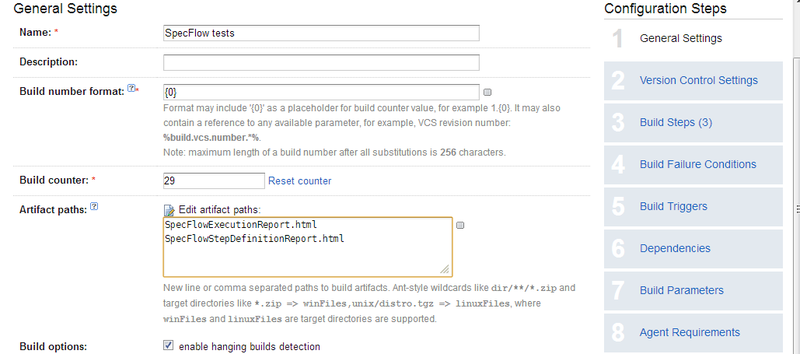
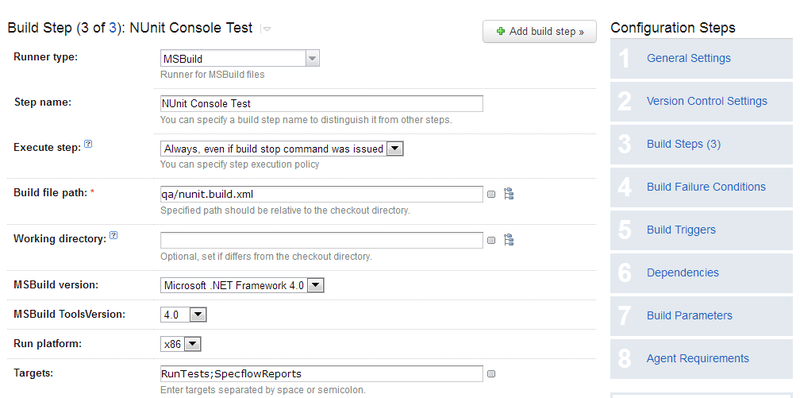
NUnitを起動するステップの代わりに、前に書いたmsbuildスクリプトを使用します。
チームシティに新しいレポートタブが表示されます。 これは次のようになります。
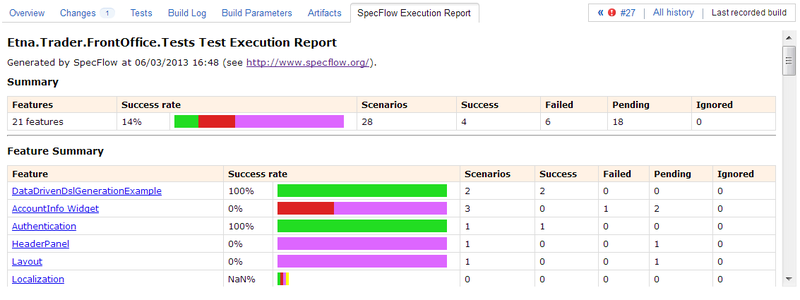
自動化されていないスクリプトは紫色で表示され、成功したテストは緑色で完了し、テストは赤色で失敗します。
残っているのは、スケジュールに基づいてテストを実行するトリガーを配置することです。