
Ubuntu TouchディストリビューションへのアプリケーションとQt 5 for Androidの 追加に関するニュースの後、Ubuntu SDKとは何かを確認し、簡単なアプリケーションを作成することにしました。 選択はGoogleのタスクにかかっていました。現在、アプリケーションはoauth承認を渡し、選択したリストからタスクを受け取ります。 アプリケーションコードはgithubで入手できます。 QMLに精通していると、コードの理解が非常に簡単になります。このページにはいくつかのリンクが集められています。
設置
現在、 Ubuntu用のパッケージは、12.04から正式に入手可能です。
インストール後、Qt Creatorは、Ubuntuの追加の開発ツールとインターフェイス用のコンポーネントセットとともに利用できるようになります。 このサイトの例を使って最初の習熟を始めることをお勧めします。
柔軟性を高めるために、新しいQt Quick 2アプリケーションプロジェクトを作成しました。 サンプルのコードをmain.qmlにコピーして、アプリケーションを実行できます。 QQmlComponent:Component is ready consoleの出力は小さなバグですが、SDKはまだプレビュー状態です。
ログイン
APIを使用するには、 コンソールでアプリケーションを登録する必要があります。 ステップ2:アプリケーションの登録の詳細な説明
ユーザーにアプリケーションの認証ページを表示し、トークンを取得する必要があります。 QMLは長い間存在しており、基本としてqml-google-tasksプロジェクトからコードを取得しました。 2つのGoogleOAuth.qmlファイルは承認を実装します-GUIとgoogle_oauth.js-ロジック。
QtQuick 2およびUbuntuコンポーネントとの統合で動作するようにGoogleOAuth.qmlを変更します。
コード
import QtQuick 2.0 import QtWebKit 3.0 import Ubuntu.Components 0.1 import "google_oauth.js" as OAuth Page { id: google_oauth title: i18n.tr("Login") anchors.fill: parent property string oauth_link: "https://accounts.google.com/o/oauth2/auth?" + "client_id=" + OAuth.client_id + "&redirect_uri=" + OAuth.redirect_uri + "&response_type=code" + "&scope=https://www.googleapis.com/auth/tasks" + "&access_type=offline" + "&approval_prompt=force" property bool authorized: accessToken != "" property string accessToken: "" property string refreshToken: "" signal loginDone(); onAccessTokenChanged: { console.log('onAccessTokenChanged'); if(accessToken != ''){ console.log("accessToken = ", accessToken) loginDone(); } } function login(){ loginView.url = oauth_link } function refreshAccessToken(refresh_token){ OAuth.refreshAccessToken(refresh_token) } Flickable { id: web_view_window property bool loading: false anchors.fill: parent WebView { id: loginView anchors.fill: parent onUrlChanged: OAuth.urlChanged(url) } } }
google_oauth.jsでは 、 client_id client_secretおよびredirect_uriをコンソールで受信したものに変更します。
GoogleOAuth.qmlコードを少し変更することで、作業を確認できます。
コード
import QtQuick 2.0 import QtWebKit 3.0 import Ubuntu.Components 0.1 import "google_oauth.js" as OAuth Page { id: google_oauth title: i18n.tr("Login") anchors.fill: parent property string oauth_link: "https://accounts.google.com/o/oauth2/auth?" + "client_id=" + OAuth.client_id + "&redirect_uri=" + OAuth.redirect_uri + "&response_type=code" + "&scope=https://www.googleapis.com/auth/tasks" + "&access_type=offline" + "&approval_prompt=force" property bool authorized: accessToken != "" property string accessToken: "" property string refreshToken: "" signal loginDone(); onAccessTokenChanged: { console.log('onAccessTokenChanged'); if(accessToken != ''){ console.log("accessToken = ", accessToken) loginDone(); } } function login(){ loginView.url = oauth_link } function refreshAccessToken(refresh_token){ OAuth.refreshAccessToken(refresh_token) } Flickable { id: web_view_window property bool loading: false //anchors.fill: parent // width: 800 height: 800 WebView { id: loginView anchors.fill: parent onUrlChanged: OAuth.urlChanged(url) } } // Component.onCompleted: { console.log("onCompleted") login() } }
そして、qmlsceneユーティリティ、GoogleOAuth.qmlファイルを実行します(Qt Creatorでは、メニューで使用できます: ツール > 外部 > Qtクイック > Qtクイック2プレビュー 、現在開いているファイルを起動します)
承認後、次の行がログに表示されます。
onAccessTokenChanged
accessToken = xxxx.xxxxxxxxxxxxxxxxxxxxxxxxxx
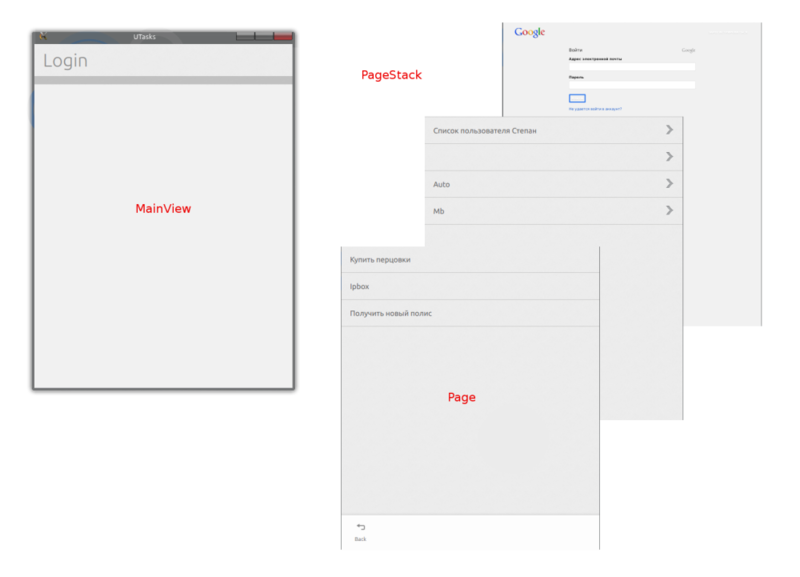
ナビゲーション
構造的には、インターフェースは、Androidのフラグメントに似たページのセットを持つMainViewです。 簡単にするために、Pageを別のファイルで作成しました。main.qmlには、ページ間のナビゲーションを担当するPageStackと、ページを切り替えるコードがあります。
コード
import QtQuick 2.0 import Ubuntu.Components 0.1 import "tasks_data_manager.js" as TasksDataManager MainView { objectName: "mainView" applicationName: "UTasks" id: root width: units.gu(60) height: units.gu(80) PageStack { id: pageStack Component.onCompleted: push(taskLists) // TaskLists { id: taskLists visible: false onItemClicked: { var item = taskLists.curItem console.log("onItemClicked: ", item) tasks.title = item["title"] TasksDataManager.getMyTasks(item["id"]) pageStack.push(tasks) } } // Tasks { id: tasks visible: false } // GoogleOAuth { id: google_oauth visible: false onLoginDone: { pageStack.clear() pageStack.push(taskLists) console.log("Login Done") //tasks.refreshToken = refreshToken settings.setValueFor("accessToken", accessToken) settings.setValueFor("refreshToken", refreshToken) TasksDataManager.getMyTaskLists() } } } // Component.onCompleted: { console.log("onCompleted") if (settings.getValueFor("refreshToken") === "") { pageStack.push(google_oauth) console.log("google_oauth") google_oauth.login() } else { pageStack.push(taskLists) google_oauth.refreshAccessToken(settings.getValueFor("refreshToken")) } } }
保存中
ユーザーに認証を要求しないために、毎回トークンを保存する必要があります。 QML 2では、SQLiteでの作業が可能ですが、1行のために、SQLを使用したくありません。 QSettingsのラッパーである小さなC ++クラスTasksSettingsを作成しました 。 C ++オブジェクトでQMLを操作するには、呼び出されたメソッドをQ_INVOKABLEとしてマークし、オブジェクトをコンテキストに追加する必要があります。
viewer.rootContext()->setContextProperty("settings", &settings);
その後、QMLでgetValueForメソッドを使用してgetおよびsetValueForを使用して値を設定できます。
settings.setValueFor("refreshToken", refreshToken) if (settings.getValueFor("refreshToken") === "") {
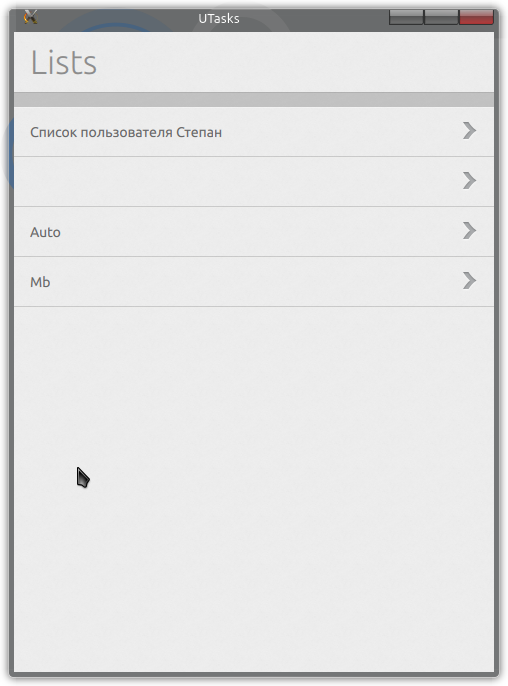
タスクリスト
インターフェースはTaskLists.qmlです。
UbuntuのListItemを使用した単純なListView
コード
import QtQuick 2.0 import QtQuick.XmlListModel 2.0 import Ubuntu.Components 0.1 import Ubuntu.Components.ListItems 0.1 import Ubuntu.Components.Popups 0.1 Page { id: taskLists title: i18n.tr("Lists") anchors.fill: parent ListModel { id: taskListsModel ListElement { title: "My" } } Flickable { id: flickable anchors.fill: parent ListView {// id: taskListsView model: taskListsModel anchors.fill: parent delegate: Standard { text: title // progression: true // onClicked: { console.log("index: ", index); taskListsView.currentIndex = index curItem = taskListsModel.get(index) itemClicked() } } } } }
ロジックはtasks_data_manager.jsに実装されており 、 getMyTaskLists()関数が必要です。 onloadの内容を変更します
taskLists.itemsList = result["items"];
TaskLists.qmlで 、要素のリストを追加し、その変更を処理します。
property variant itemsList; signal itemClicked(); onItemsListChanged: { taskListsModel.clear() if(itemsList === undefined) return for(var i = 0; i < itemsList.length; ++i) { console.log("append:", itemsList[i]["title"], itemsList[i]["id"]); var item = itemsList[i] taskListsModel.append( item ); // } }
そして最後に、リスト項目をクリックするためのハンドラーを追加します
property variant curItem; onClicked: { console.log("index: ", index); taskListsView.currentIndex = index curItem = taskListsModel.get(index) itemClicked() }
main.qmlでは 、要素をクリックしたときにリストへの切り替えを実装します
onItemClicked: { var item = taskLists.curItem console.log("onItemClicked: ", item) tasks.title = item["title"] TasksDataManager.getMyTasks(item["id"]) pageStack.push(tasks) }
タスクリストのダウンロードは、リストのロードと同じ方法で行われます。 コードはリポジトリで表示できます。
デスクトップ版のスクリーンショット: 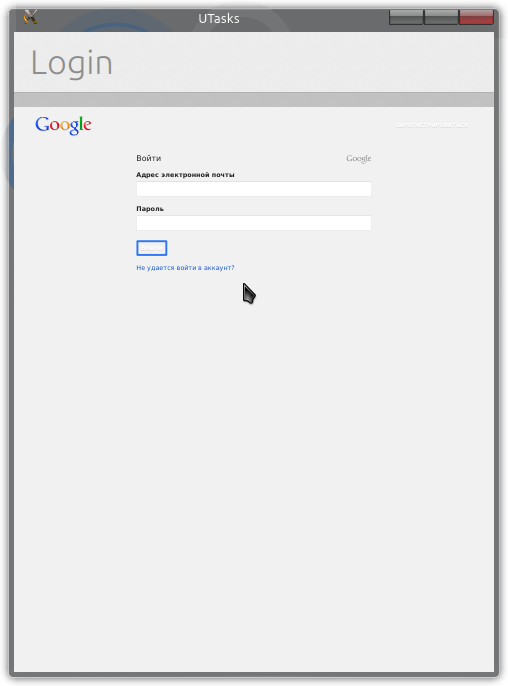

継続するには...