エントリー
SL4A(Androidのスクリプティングレベル)のようなすばらしいことはもはやニュースではありません。 SL4Aの新しいリリースごとに、スマートフォンにアクセス/管理するためのAPI機能が成長しています。 最近まで、ユーザーインターフェイスの作成はwebViewと標準のダイアログボックスに限定されていました。 しかし、r5バージョンでは、開発者が言ったように、これまで実験的なユーザーインターフェイスを作成する新しい方法、fullScreenUIが登場しました。
FullScreenUIを使用すると、標準の
SL4Aを既にご存じであることを願っています(そうでない場合は、Habré に 役立つ有益な情報がたくさんあります)。
何が起こる
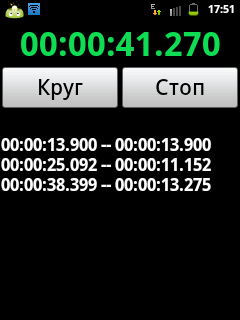
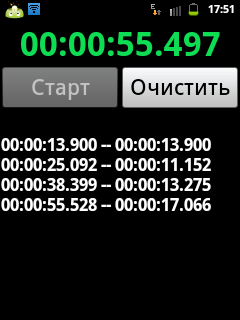
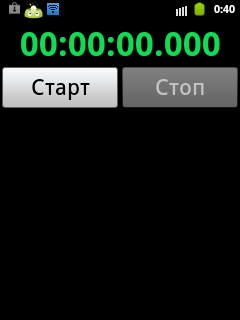
最終結果のスクリーンショットは次のとおりです。
マークアップ
まず、インターフェイスのレイアウトを作成しましょう。 これは標準の
マークアップ自体を検討してください。
<?xml version="1.0" encoding="utf-8"?> <RelativeLayout android:id="@+id/MainWidget" android:layout_width="fill_parent" android:layout_height="fill_parent" xmlns:android="http://schemas.android.com/apk/res/android"> android:background="#ff000000" <TextView android:id="@+id/display" android:layout_width="fill_parent" android:layout_height="wrap_content" android:layout_alignParentTop="true" android:textColor="#0bda51" android:text="00:00:00.000" android:textStyle="bold" android:gravity="center" android:textSize="60dp" /> <Button android:id="@+id/startbutton" android:layout_width="0dp" android:layout_height="wrap_content" android:layout_below="@id/display" android:layout_alignParentLeft="true" android:textSize="40dp" android:layout_toLeftOf = "@id/center"/> <Button android:id="@+id/center" android:layout_below="@id/display" android:layout_height="wrap_content" android:layout_width="0dp" android:layout_centerHorizontal="true" /> <Button android:id="@+id/stopbutton" android:layout_width="0pdp" android:layout_height="wrap_content" android:enabled="false" android:textSize="40dp" android:layout_below="@id/display" android:layout_alignParentRight="true" android:layout_toRightOf = "@id/center"/> <TextView android:id="@+id/info" android:layout_width="fill_parent" android:layout_height="0dp" android:layout_below="@id/stopbutton" android:textColor="#FFFFFF" android:text="" android:textStyle="bold" android:layout_alignParentBottom="true" android:textSize="30dp" android:layout_alignParentBottom="true"/> </RelativeLayout>
初めてこのマークアップを見ても、HTMLまたはXMLの経験がある場合は、すべてが明確になっているはずです。 RelativeLayoutのサポートについて話すと、次のようなタイプの属性の後に、このタイプのマークアップの完全な使用が可能になりました。
-
android:layout_alignParentBottom="true"
-ウィジェットの下端は親ウィジェットの下端に揃えられます(layout_alignParentTop
、layout_alignParentLeft
、layout_alignParentRight
) -
android:layout_below="@id/display"
-指定されたidのウィジェットの下にウィジェットを配置します -
android:layout_toRightOf = "@id/center"
-指定されたIDを持つウィジェットの左側にウィジェットを配置します -
android:layout_centerHorizontal="true"
-親ウィジェットを中央に配置 - など
idが「center」のボタンは、「Start」ボタンと「Stop」ボタンが引き伸ばされるようにのみ作成されます(中央に配置されます)。 あなたが得るべきものは次のとおりです。
コード
実際にはストップウォッチのコード自体。 些細なコードや重複するコードは省略されています。 完全版: http : //pastebin.com/z4H2p7Wq
Pythonコミュニティは許してください。しかし、codeいコードとグローバル変数のために、最近このプログラミング言語に出会いました。
#StopWatch.py #------------------------ layout="""<?xml version="1.0" encoding="utf-8"?> ... </RelativeLayout> """ rCircle_label = "" rStart_label = "" rClear_label = "" rStop_label = "" #--------------------- import android, os, datetime # starttime=datetime.datetime.now() runed = False # True lastcircle = 0 cleared = True # True, def format_time(tm): hours = int(tm.seconds / 3600) minuts = int((tm.seconds - hours*3600)/60) seconds=tm.seconds - hours*3600 - minuts*60 microseconds = round(tm.microseconds/1000) return "{0:0>02}:{1:0>02}:{2:0>02}.{3:0>03}".format(hours,minuts,seconds,microseconds) # . now =0, def timediff(prev, now=0): if not now: now=datetime.datetime.now() diff=now-prev return format_time(diff) def stopwatch_start(): global runed,lastcircle,starttime runed=True starttime=datetime.datetime.now() lastcircle = starttime droid.fullSetProperty("startbutton","text",rCircle_label) droid.fullSetProperty("stopbutton","enabled","true") def stopwatch_circle(): # # t - lastdata = droid.fullQueryDetail("info").result['text'] newdata = lastdata+"\n"+t; droid.fullSetProperty("info","text",newdata) lastcircle = datetime.datetime.now() def stopwatch_stop(): # def stopwatch_clear(): # def eventloop(): while True: event=droid.eventWait(50).result if runed: droid.fullSetProperty("display","text",timediff(starttime)) if event != None: if event["name"]=="key": droid.vibrate(30) if event["data"]["key"] == '4': return elif event["data"]["key"]=='24' and cleared: if runed: stopwatch_circle() else: stopwatch_start() elif event["data"]["key"]=='25' and runed: stopwatch_stop() elif event["name"]=="click": droid.vibrate(30) id=event["data"]["id"] if id=="startbutton" and not runed: stopwatch_start() elif id=="stopbutton" and runed: stopwatch_stop() elif id=="stopbutton" and not runed: stopwatch_clear() elif id=="startbutton" and runed: stopwatch_circle() elif event["name"]=="screen": if event["data"]=="destroy": return droid = android.Android() try: print(droid.fullShow(layout)) droid.fullKeyOverride([24,25],True) droid.fullSetProperty("MainWidget","background","#ff000000") droid.fullSetProperty("startbutton","text",rStart_label) droid.fullSetProperty("stopbutton","text",rStop_label) eventloop() finally: droid.fullDismiss()
コード解析
したがって、xmlマークアップとして作成したインターフェイスを表示するには、マークアップを含む行を
droid.fullShow
関数に渡す必要があります。 もちろん、マークアップを含む別のファイルを作成してから読み取ることもできますが、私のようにマークアップが単純な場合は、
layout
変数に割り当てただけです。 デバッグのために、
droid.fullShow
によって返された結果をコンソールに
droid.fullShow
できます。
マークアップまたはサポートされている属性にエラーがあった場合、対応するメッセージが表示されます。 この関数を呼び出した後、マークアップが正しい場合、デバイスの画面に表示されます。 削除するには、関数を呼び出す必要があります。print(droid.fullShow(layout))
プログラムの異常終了など、何らかの理由でこの関数が呼び出されない場合、作成されたインターフェイスは自動的にクリアされず、そのまま残ります。そのため、droid.fullDismiss()
try finally
構造を使用することが重要です。
次の行:
droid.fullKeyOverride([24,25],True)
コード24および25のキーを押すときの標準の動作を置き換えます(これらはボリュームキー、他のキーのコードはこちらです )。 これはどういう意味ですか? つまり、スクリプトを起動してこれらのキーのいずれかを押すと、これらのキーの標準アクションは実行されません(この特定のケースでは音量は変更されません)。
スクリプトからウィジェットのプロパティを変更するために、ウィジェットID、プロパティ名、割り当てられた値の3つのパラメータを取る関数
droid.fullSetProperty
があります。 たとえば、この行
droid.fullSetProperty("startbutton","text",rStart_label)
ボタンの碑文を変更します。
プロパティを要求するために、
droid.fullQueryDetail
は1つの値(ウィジェットID)を取ります。 たとえば、次のようなid
info
を持つテキストフィールドの-textプロパティの値を取得できます。
droid.fullQueryDetail("info").result['text']
メッセージ処理
ボタンやキーを押すなどのすべてのユーザーアクションは、メッセージとしてスクリプトを入力します。
メッセージ処理は、別の関数で簡単に実装できます。
eventloop()
関数があります。 メッセージを処理するための機能がいくつかあります。 この例では、
droid.eventWait
を使用すると便利
droid.eventWait
。 この関数は、メッセージが受信されるまでスクリプトを停止します。 オプションのパラメーター(最大タイムアウト(ミリ秒))を受け入れます。 この間にメッセージが受信されなかった場合、スクリプトは実行を継続し、関数は
None
オブジェクトになります。 メッセージを受信した場合、実行の結果
event=droid.eventWait(50).result
イベントの名前とその情報を含む連想配列があります。
まず、
event["name"]
の値を確認し、それが"key"と等しい場合、ボタンが押されました。そのコードは
event["data"]["key"]
から見つけることができます。 「click」と等しい場合、
event["data"]["id"]
からidを見つけることができるボタン(または他のウィジェット)をクリックしました。
コードの残りが理解可能であり、説明を必要としないことを願っています。
まとめ
Python、Perl、JRuby、Lua、BeanShellの開発者であるsl4aのfullScreenUIの出現により、JavaScriptはJavaの開発者と競合できるようになりました。 sl4aでのfullScreenUIのサポートはまだ理想とはほど遠いですが、スクリプト用にかなり優れた高速のグラフィカルインターフェイスを作成することはすでに可能です。 開発者はこのAPIを絶えず改善していますが、これは非常に楽しいことです。
upd:ストップウォッチはsl4a + pythonを使用した最も成功した例ではなく(言語の仕様が同じではないため)、事実調査記事のためだけです。