現在、実装にはさまざまなソリューションがあり、特別なハードウェアソリューションと、搭載されている任意のOSの従来のコンピューターの両方を使用できます。
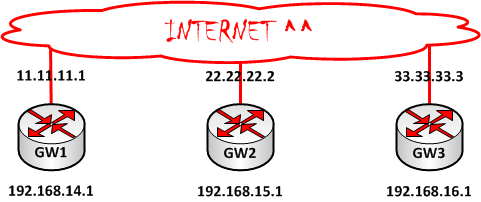
この記事では、ユニットごとに異なるサブネットを使用して、3つのリモートオフィスを1つの企業ネットワークに結合する方法について説明します。 OpenBSD配布キットのみを使用して、これをすべて上げることを提案します。
必要なもの:
- 3つのミッドレンジPC(1.7Ghz CPU、512Mb RAM、20Gb HDD、2x Lan100Mb)
- WANポートの静的IPアドレス
- OpenBSDディストリビューション
- 貴重な時間の40分(OSインストールを含む)
- gw1- 「中央」ゲート
- gw2- 「娘」ゲート番号1
- gw3- 「娘」ゲート番号2
- vic0-外部インターフェイス
- vic1-内部インターフェイス
- 緑色のフォント gw1-gw2
- 青いフォント gw1-gw3
システムが正常にインストールされたら、ファイアウォールを有効にし、転送し、静的ルートのコンテンツを含むファイルを実行するために登録する必要があります。
# vi /etc/rc.conf ( PF)
pf=YES
# vi /etc/sysctl.conf ( )
net.inet.ip.forwarding=1
# vi /etc/rc.local ( static_routes )
/etc/static_routes
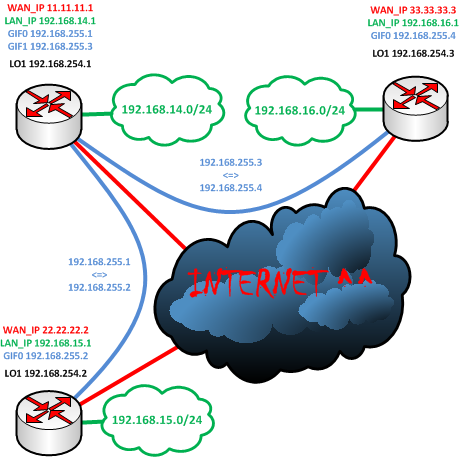
ここで、将来の「中央」ゲートを決定し、決定します(GW1を所有します)、その構成に進みましょう。まず、ゲートのネットワークインターフェイスが次のように構成されていると仮定します。
Gw1
まず、ルーターを一意に識別し、常に発生する専用ネットワークインターフェイスlo1を選択しましょう。
# vi /etc/hostname.lo1
!ifconfig lo1 create
!ifconfig lo1 192.168.254.1 netmask 255.255.255.255
gifインターフェースのキュー:
# vi /etc/hostname.gif0
!ifconfig gif0 create
!ifconfig gif0 192.168.255.1 netmask 255.255.255.252 192.168.255.2
!ifconfig gif0 tunnel 11.11.11.1 22.22.22.2
!ifconfig gif0 up
# vi /etc/hostname.gif1
!ifconfig gif1 create
!ifconfig gif1 192.168.255.3 netmask 255.255.255.252 192.168.255.4
!ifconfig gif1 tunnel 11.11.11.1 33.33.33.3
!ifconfig gif1 up
権利を設定します。
# chmod 640 /etc/hostname.*
ルートを追加します。
# vi /etc/static_routes
/sbin/route add -host 192.168.254.2 192.168.255.2
/sbin/route add -net 192.168.15.0/24 192.168.255.2
/sbin/route add -host 192.168.254.3 192.168.255.4
/sbin/route add -net 192.168.16.0/24 192.168.255.4
そして、実行するために必要な権限を設定します。
# chmod a+x /etc/static_routes
次に、ファイアウォールを構成します。
# vi /etc/pf.conf
ext_if="vic0"
int_if="vic1"
set skip on lo
set skip on gif0
set skip on gif1
match in all scrub (no-df)
match out all scrub (no-df)
match on $ext_if from 192.168.0.0/16 to !192.168.0.0/16 binat-to ($ext_if:0)
block in on $int_if
pass in quick on $int_if from 192.168.0.0/16 to 192.168.0.0/16 keep state
pass out quick on $int_if from 192.168.0.0/16 to 192.168.0.0/16 keep state
gw1のセットアップが完了したら、再起動して残りに進みます
# reboot
gw1の準備ができました。gw2とgw3に移動します
Gw2
ここではすべてが類似しているため、コメントは不要です。
# vi /etc/hostname.lo1
!ifconfig lo1 create
!ifconfig lo1 192.168.254.2 netmask 255.255.255.255
# vi /etc/hostname.gif0
!ifconfig gif0 create
!ifconfig gif0 192.168.255.2 netmask 255.255.255.252 192.168.255.1
!ifconfig gif0 tunnel 22.22.22.2 11.11.11.1
!ifconfig gif0 up
# chmod 640 /etc/hostname.*
# vi /etc/static_routes
/sbin/route add -net 192.168.0.0/16 192.168.255.2
# chmod a+x /etc/static_routes
# vi /etc/pf.conf
ext_if="vic0"
int_if="vic1"
set skip on lo
set skip on gif0
match in all scrub (no-df)
match out all scrub (no-df)
match on $ext_if from 192.168.0.0/16 to !192.168.0.0/16 binat-to ($ext_if:0)
block in on $int_if
pass in quick on $int_if from 192.168.0.0/16 to 192.168.0.0/16 keep state
pass out quick on $int_if from 192.168.0.0/16 to 192.168.0.0/16 keep state
# reboot
Gw3
# vi /etc/hostname.lo1
!ifconfig lo1 create
!ifconfig lo1 192.168.254.3 netmask 255.255.255.255
# vi /etc/hostname.gif0
!ifconfig gif0 create
!ifconfig gif0 192.168.255.4 netmask 255.255.255.252 192.168.255.3
!ifconfig gif0 tunnel 33.33.33.3 11.11.11.1
!ifconfig gif0 up
# chmod 640 /etc/hostname.*
# vi /etc/static_routes
/sbin/route add -net 192.168.0.0/16 192.168.255.4
# chmod a+x /etc/static_routes
# vi /etc/pf.conf
ext_if="vic0"
int_if="vic1"
set skip on lo
set skip on gif0
match in all scrub (no-df)
match out all scrub (no-df)
match on $ext_if from 192.168.0.0/16 to !192.168.0.0/16 binat-to ($ext_if:0)
block in on $int_if
pass in quick on $int_if from 192.168.0.0/16 to 192.168.0.0/16 keep state
pass out quick on $int_if from 192.168.0.0/16 to 192.168.0.0/16 keep state
# reboot
その結果、次のスキームが得られます。
それでは、その仕組みを見てみましょう。
ネットワーク192.168.14.0/24からのトレース
# traceroute 192.168.15.2
traceroute to 192.168.15.2 (192.168.15.2), 64 hops max, 40 byte packets
1 192.168.14.1 (192.168.14.1) 0.437 ms 0.215 ms 0.294 ms
2 192.168.255.2 (192.168.255.2) 0.934 ms 0.674 ms 0.646 ms
3 192.168.15.2 (192.168.15.2) 1.107 ms 1.3 ms 0.920 ms
# traceroute 192.168.16.2
traceroute to 192.168.16.2 (192.168.16.2), 64 hops max, 40 byte packets
1 192.168.14.1 (192.168.14.1) 0.356 ms 0.206 ms 0.192 ms
2 192.168.255.4 (192.168.255.4) 0.748 ms 0.666 ms 0.631 ms
3 192.168.16.2 (192.168.16.2) 0.940 ms 0.892 ms 0.843 ms
ネットワーク192.168.15.0/24からのトレース
# traceroute 192.168.14.2
traceroute to 192.168.14.2 (192.168.14.2), 64 hops max, 40 byte packets
1 192.168.15.1 (192.168.15.1) 0.745 ms 0.208 ms 0.294 ms
2 192.168.255.1 (192.168.255.1) 0.768 ms 0.855 ms 0.677 ms
3 192.168.14.2 (192.168.14.2) 0.933 ms 0.830 ms 0.853 ms
# traceroute 192.168.16.2
traceroute to 192.168.16.2 (192.168.16.2), 64 hops max, 40 byte packets
1 192.168.15.1 (192.168.15.1) 0.450 ms 0.207 ms 0.372 ms
2 192.168.255.1 (192.168.255.1) 0.710 ms 1.290 ms 0.711 ms
3 192.168.255.4 (192.168.255.4) 1.243 ms 1.194 ms 1.42 ms
4 192.168.16.2 (192.168.16.2) 1.341 ms 1.445 ms 1.315 ms
ネットワーク192.168.16.0/24からのトレース
# traceroute 192.168.14.2
traceroute to 192.168.14.2 (192.168.14.2), 64 hops max, 40 byte packets
1 192.168.16.1 (192.168.16.1) 0.480 ms 0.222 ms 0.191 ms
2 192.168.255.3 (192.168.255.3) 0.814 ms 0.775 ms 0.715 ms
3 192.168.14.2 (192.168.14.2) 1.168 ms 1.43 ms 0.861 ms
# traceroute 192.168.15.2
traceroute to 192.168.15.2 (192.168.15.2), 64 hops max, 40 byte packets
1 192.168.16.1 (192.168.16.1) 0.458 ms 0.234 ms 0.269 ms
2 192.168.255.3 (192.168.255.3) 0.780 ms 0.642 ms 0.661 ms
3 192.168.255.2 (192.168.255.2) 1.171 ms 0.989 ms 1.11 ms
4 192.168.15.2 (192.168.15.2) 1.519 ms 1.595 ms 1.333 ms
まあ、それはそうです、すべてが動作します。 もちろん、IPsecを台無しにすることもできますが、このトピックは別の記事のためのものです。