Dockが常に画面に表示されるのが大好きです。 しかし、iOSシミュレーターを起動するとき、シミュレーターが画面に完全に収まるように、自動非表示を常にオンにする必要がありました。 タスクがありました-このプロセスを自動化すること。 数日間、「プログラムが実行中」、「プログラムが完了」、「プログラムがアクティブ化」、「プログラムが非アクティブ化」など、プログラムの特定のアクションにAppleScriptを設定できるユニバーサルプログラムをスケッチしました。
このトピックを2つの部分に分けます。 1つは、プログラムを使用する(または慣れる)だけのユーザー向けです。 開発者向けの2番目-プログラムのスキームを説明し、ソースコードを提供します。 プログラム自体の見た目の単純さにもかかわらず、ソースコードはさまざまなトピックの多くのニュアンスをカバーしているため、将来の時間を大幅に節約できます。
リンクからプログラムをダウンロードできます(10.6+のみ) ( 18.51で 、バグレポートのおかげでプログラムとソースコードを更新しました。リストからプログラムを削除した後、アシスタントがメッセージを受信しなかった小さなバグを修正しました。 。
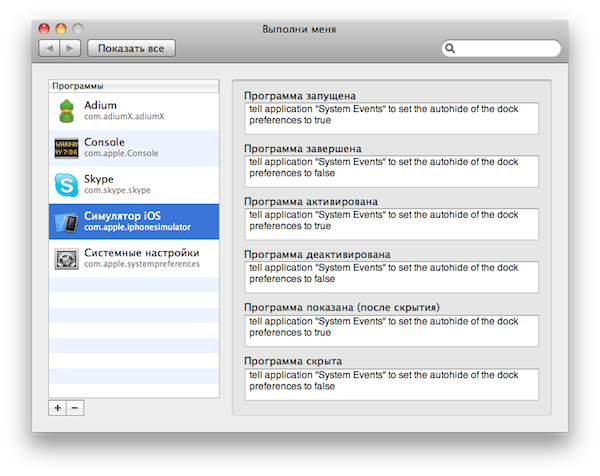
このプログラムは非常に使いやすいです(AppleScriptを使用するスキルがある場合)。 これは別個のアプリケーションではなく、「システム環境設定」のパネルです。 それをマウスでダブルクリックし、「システム環境設定」に新しいパネル「フォローアップ」を取得します。 左側にはプログラムのリストがあります。 そして、選択したプログラムに設定された適切なスクリプト。
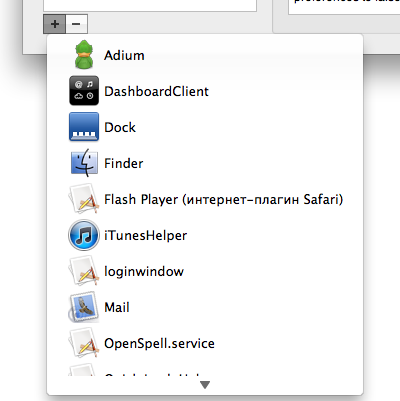
「+」ボタンをクリックすると、実行中のプログラムのリスト(識別子-バンドル識別子を持つ)が開き、そこから追加するプログラムを選択できます(目的のプログラムが実行されていない場合は、最初に起動する必要があります)。
あとは、必要なアクション用のスクリプトを設定するだけです。 たとえば、Dockの自動非表示モードを有効にします。
tell application "System Events" to set the autohide of the dock preferences to true
または、ある種のプログラムを実行します。
tell application "iTunes" to activate
または、いくつかのコンソールスクリプトを実行します。
do shell script "…"
可能性は事実上無限です-AppleScriptは多くのことを行います。
実際、プログラムは2つの部分で構成されています。 システム設定パネル。 そして、特別な隠しアシスタントプログラム-「Follow me(assistant)」。起動時に自動的に登録されます。 あまりにも乏しいため、実際にはシステムリソースを消費しませんが、設定パネルで規定されているスクリプトの実行を担当するのは彼女です。
プログラムをアンインストールするには、「自分を実行」パネルの名前を右クリック(またはタッチパッドでCtrlを押しながらクリック)し、「パネルを削除」を選択します。

初心者向け
プロジェクトのソースコードへのリンクを次に示します。
githubのオプションを次に示します。
プログラムは、設定パネルとアシスタントプログラムの2つの部分で構成されています。 それぞれについて、個別のプロジェクトを作成しました(この場合、私にとってはより便利でした)。 必要に応じて、2つのプロジェクトを2つのターゲットを持つ1つに結合できます。
「システム環境設定」のパネルを作成することは、通常のプログラムを作成することと大差ありません。 Xcodeには、このシステムプラグイン>設定ペインのテンプレートが既にあります。 NSPreferencePaneに基づくクラスとインターフェイス(xib)ファイルが既に追加されています。 誰もがこのモジュールのテスト方法を自分で決めます。 たとえば、すべてを通常のプログラムの形式で実行でき、最終段階でのみすべてを設定ペインに転送できます。
これは独立したプログラムではなく、「システム設定」のモジュールであることを理解することが重要です。 これは、メインバンドルにバインドされているすべてのメソッドが正しく実行されないことを意味します(メインバンドルは「システム環境設定」であるため)。
次のマクロは使用できません。
NSLocalizedString ( NSString * key, NSString * comment )
使用する必要がある:
NSLocalizedStringFromTableInBundle ( NSString * key, NSString * tableName, NSBundle * bundle, NSString * comment )
または、NSImageメソッドを使用できません。
+ ( id ) imageNamed : ( NSString * ) name
以下を使用する必要があります。
- ( id ) initWithContentsOfFile : ( NSString * ) filename
等
クラスNSPreferencePaneのオブジェクトにはメソッドがあります:
- ( NSBundle * ) bundle
使用する必要があります。
プロジェクトでは、2つのボタン「+」と「-」を使用してプログラムのリストを編集します。
削除ボタンの初期化は簡単で平凡です:
removeButton = [ [ NSButton alloc ] initWithFrame : NSMakeRect ( 43 , 19 , 22 , 22 ) ] ;<br/>
[ removeButton setButtonType : NSMomentaryChangeButton ] ;<br/>
[ removeButton setImage : buttonImage ] ;<br/>
[ removeButton setImagePosition : NSImageOnly ] ;<br/>
[ removeButton setBordered : NO ] ;<br/>
[ removeButton setTarget : self ] ;<br/>
[ removeButton setAction : @selector ( removeButtonAction : ) ] ;<br/>
[ [ self mainView ] addSubview : removeButton ] ;
しかし、追加ボタンはすでにより複雑です。 NSPopUpButtonとNSPopUpButtonCellの2つのサブクラスを入力する必要があります。 正式には、NSPopUpButtonクラスはドロップダウンリスト付きのボタンに使用されます。 しかし、その裸の形では、私たちには合いません。 まず、ボタンに静的な画像を設定することはできません(より正確には、許可しますが、ボタンの実際のサイズは静的な画像の実際のサイズに対応していません。2つのボタンが並んでいるため、この場合は受け入れられません)-サブクラスを使用してこれをバイパスしますNSPopUpButtonCell。 第二に、NSPopUpButtonでは、クリックされたときにメニューの内容を動的に変更することはできません(ボタンがクリックされたときにメニューを形成する必要があります)-NSPopUpButtonサブクラスを使用してこれをバイパスします。
指定された画像でボタンのサイズを1対1にするには、PopUpCellクラスを作成します。
@interface PopUpCell : NSPopUpButtonCell <br/>
{ <br/>
NSButtonCell * buttonCell;<br/>
} <br/>
<br/>
- ( id ) initWithimage : ( NSImage * ) image;<br/>
<br/>
@end <br/>
<br/>
…<br/>
<br/>
@implementation PopUpCell<br/>
<br/>
- ( id ) initWithimage : ( NSImage * ) image<br/>
{ <br/>
self = [ super initTextCell : @ "" pullsDown : YES ] ;<br/>
<br/>
buttonCell = [ [ NSButtonCell alloc ] initImageCell : image ] ;<br/>
[ buttonCell setButtonType : NSPushOnPushOffButton ] ;<br/>
[ buttonCell setImagePosition : NSImageOnly ] ;<br/>
[ buttonCell setImageDimsWhenDisabled : YES ] ;<br/>
[ buttonCell setBordered : NO ] ;<br/>
<br/>
return self;<br/>
} <br/>
<br/>
...<br/>
<br/>
- ( void ) drawWithFrame : ( NSRect ) cellFrame inView : ( NSView * ) controlView<br/>
{ <br/>
[ buttonCell drawWithFrame : cellFrame inView : controlView ] ;<br/>
} <br/>
<br/>
- ( void ) highlight : ( BOOL ) flag withFrame : ( NSRect ) cellFrame inView : ( NSView * ) controlView<br/>
{ <br/>
[ buttonCell highlight : flag withFrame : cellFrame inView : controlView ] ;<br/>
} <br/>
<br/>
@end
このコードはすべてどういう意味ですか? 簡単です-NSButtonCellクラスのオブジェクトを作成し、NSPopUpButtonCellの代わりに描画します。 つまり プログラムは、NSPopUpButtonCellの代わりにNSButtonCell(サイズは指定された画像と1対1で一致可能)を描画しますが、機能的にはNSPopUpButtonです。
次にメニュー...動的メニューを使用して、次の手順を実行します。NSPopUpButtonにデリゲートを追加します。これにより、マウスの左ボタンがクリックされたときにメニューが表示されます。
NSPopUpButtonのサブクラスを作成します。
@protocol PopUpDelegate <NSObject><br/>
@optional<br/>
- ( NSMenu * ) menuForPopUp;<br/>
@end <br/>
<br/>
<br/>
@interface PopUpButton : NSPopUpButton <br/>
{ <br/>
id<PopUpDelegate> delegate; <br/>
} <br/>
<br/>
@property ( assign ) id delegate;<br/>
<br/>
@end <br/>
したがって、1つのメソッドのみを持つデリゲートプロトコルを発表しました。
- ( NSMenu * ) menuForPopUp<br/>
実装:
@implementation PopUpButton<br/>
<br/>
@synthesize delegate;<br/>
<br/>
- ( void ) mouseDown : ( NSEvent * ) event<br/>
{ <br/>
if ( [ delegate respondsToSelector : @selector ( menuForPopUp ) ] ) <br/>
{ <br/>
[ self setMenu : [ delegate menuForPopUp ] ] ;<br/>
} <br/>
<br/>
[ super mouseDown : event ] ;<br/>
} <br/>
<br/>
@end <br/>
マウスでクリックすると、イベントがNSPopUpButtonクラスのオブジェクトによって処理される前に、デリゲートメニューをこのオブジェクトに設定します。
これで、パネルに「+」ボタンを追加できます。
addButton = [ [ PopUpButton alloc ] initWithFrame : NSMakeRect ( 20 , 19 , 23 , 22 ) pullsDown : YES ] ;<br/>
addButton.delegate = self;<br/>
[ addButton setCell : [ [ [ PopUpCell alloc ] initWithimage : buttonImage ] autorelease ] ] ;<br/>
[ addButton setMenu : [ self menuForPopUp ] ] ;<br/>
[ [ self mainView ] addSubview : addButton ] ;
「addButton.delegate = self」に注意してください。 メインクラスにaddButtonへのデリゲートを割り当てました。 これを行うために、さらにメソッドを実装します。
- ( NSMenu * ) menuForPopUp<br/>
{ <br/>
...<br/>
}
メインクラスで。
メニューで実行中のプログラムのリストを取得する方法は?
NSWorkspaceクラスのオブジェクトにはメソッドがあります:
- ( NSArray * ) runningApplications
これにより、実行中のすべてのプログラムの配列(名前、識別子、アイコンなどの完全な情報)が得られます。
NSArray * apps = [ [ NSWorkspace sharedWorkspace ] runningApplications ] ;
このオブジェクトから、追加ボタンのメニューが作成されます(ソースコードを参照)。
NSTableViewオブジェクトは、セルに画像、タイトル、サブタイトルを表示します。 このタイプの標準セルはありません。独立して実行する必要があります。
AppCellクラスを宣言します。
@interface AppCell : NSTextFieldCell <br/>
{ <br/>
NSImage * image;<br/>
NSString * title;<br/>
NSString * subtitle;<br/>
} <br/>
...<br/>
@end <br/>
最も重要なことは、セルのレンダリング方法を再割り当てすることです。
- ( void ) drawInteriorWithFrame : ( NSRect ) inCellFrame inView : ( NSView * ) inView<br/>
{ <br/>
// image <br/>
// title <br/>
// subtitle <br/>
…<br/>
} <br/>
セルクラスの準備ができました。NSTableViewオブジェクトに追加するだけです。 2つの方法があります。
1)。 テーブル内のオブジェクトの数が少ない場合、NSTableViewにdelagateメソッド(メインクラスNSPreferencePane)を使用できます。
- ( NSCell * ) tableView : ( NSTableView * ) tableView dataCellForTableColumn : ( NSTableColumn * ) tableColumn row : ( NSInteger ) row<br/>
{ <br/>
AppCell * cell = [ [ [ AppCell alloc ] init ] autorelease ] ;<br/>
[ cell setEditable : NO ] ;<br/>
cell.title = [ [ tableDataSource objectAtIndex : row ] objectForKey : @ "name" ] ;<br/>
cell.subtitle = [ [ tableDataSource objectAtIndex : row ] objectForKey : @ "ID" ] ;<br/>
cell.image = [ [ tableDataSource objectAtIndex : row ] objectForKey : @ "icon" ] ;<br/>
<br/>
return cell;<br/>
}
2)。 オブジェクトが多数ある場合は、列全体にユニバーサルセルを指定できます。
NSTableColumn * column = [ [ appTable tableColumns ] objectAtIndex : 0 ] ;
[列setDataCell : [ [ [ AppCell alloc ] init ] autorelease ] ] ;
NSTableViewのデリゲートメソッドに必要な値を記録します。
- ( void ) tableView : ( NSTableView * ) aTableView willDisplayCell : ( id ) aCell forTableColumn : ( NSTableColumn * ) aTableColumn row : ( NSInteger ) rowIndex<br/>
{ <br/>
AppCell * cell = ( AppCell * ) aCell;<br/>
[ cell setEditable : NO ] ;<br/>
cell.title = [ [ tableDataSource objectAtIndex : row ] objectForKey : @ "name" ] ;<br/>
cell.subtitle = [ [ tableDataSource objectAtIndex : row ] objectForKey : @ "ID" ] ;<br/>
cell.image = [ [ tableDataSource objectAtIndex : row ] objectForKey : @ "icon" ] ;<br/>
}
データ(プログラムとスクリプトとアイコンのリストを含むファイル)は、対応するアプリケーションサポートフォルダー(ユーザーライブラリ)に保存されます。 次のようにして、このフォルダへのパスを取得できます(また取得する必要があります)。
NSArray * paths = NSSearchPathForDirectoriesInDomains ( NSApplicationSupportDirectory, NSUserDomainMask, YES ) ; <br/>
NSString * appSupportPath = [ paths objectAtIndex : 0 ] ;<br/>
NSString * prefDir = [ appSupportPath stringByAppendingPathComponent : @ "info.yuriev.OnAppBehaviour" ] ;
アイコンはPNG形式で保存します。 NSImageからPNGデータを取得する方法はいくつかありますが、そのうちの1つ(最も汎用的なもの)をプログラムで使用します。 NSImageクラスの場合、新しいメソッドを導入します。 その実装は次のようになります。
@implementation NSImage ( PNGExport ) <br/>
<br/>
- ( NSData * ) PNGData<br/>
{ <br/>
[ self lockFocus ] ;<br/>
NSBitmapImageRep * rep = [ [ NSBitmapImageRep alloc ] initWithFocusedViewRect : NSMakeRect ( 0 , 0 , [ self size ] .width, [ self size ] .height ) ] ;<br/>
[ self unlockFocus ] ;<br/>
<br/>
NSData * PNGData = [ rep representationUsingType : NSPNGFileType properties : nil ] ;<br/>
[ rep release ] ;<br/>
<br/>
return PNGData;<br/>
} <br/>
<br/>
@end
テーブルのセルが変更されると、データは自動的に保存されます。 または、ユーザーがスクリプトを変更してから3秒後。 これを行うには、NSTextViewへのデリゲートメソッドと遅延実行を使用します。
- ( void ) textDidChange : ( NSNotification * ) aNotification<br/>
{ <br/>
[ NSObject cancelPreviousPerformRequestsWithTarget : self ] ;<br/>
[ self performSelector : @selector ( saveCurrentData ) withObject : nil afterDelay : 3.0 ] ;<br/>
<br/>
saved = NO ;<br/>
}
ユーザーがデータを変更すると、3秒後に自動的に保存されます。 この期間中にユーザーがデータの編集を続けると、以前の保存要求はキャンセルされ、新しい保存要求が作成されます。 検索時などに、同様のメカニズムを使用すると便利です(編集が終了してからしばらくすると検索が機能します)。
保存後、データが変更されたことをアシスタントに通知します。
NSString * observedObject = @ "info.yuriev.OnAppBehaviourHelper" ;<br/>
NSDistributedNotificationCenter * center = [ NSDistributedNotificationCenter defaultCenter ] ;<br/>
[ center postNotificationName : @ "OABReloadScripts" object : observedObject userInfo : nil deliverImmediately : YES ] ;
私たちのプログラムは、アシスタントが(起動していない場合)独立して起動でき、起動に追加できます。 起動は非常に簡単です(ヘルパーはバンドル内にあります):
[ [ NSWorkspace sharedWorkspace ] launchApplicationAtURL : [ NSURL fileURLWithPath : helperPath ] options : NSWorkspaceLaunchDefault configuration : nil error : NULL ] ;
LaunchServicesフレームワークは、自動起動プログラム(ログインアイテム)のアイテムを管理します。 Cで書かれています。 タスクに便利なObjective-Cラッパーを作成します。 LoginItemsクラスを宣言します。
@interface LoginItems : NSObject <br/>
{ <br/>
<br/>
} <br/>
<br/>
+ ( void ) addApplication : ( NSString * ) path;<br/>
+ ( void ) removeApplication : ( NSString * ) path;<br/>
+ ( BOOL ) findApplication : ( NSString * ) path;<br/>
<br/>
@end
これらはクラスメソッドです。 これらはどのオブジェクトにも結び付けられておらず、単に[LoginItems addApplication:path]と呼ぶことができます。
これらのメソッドの完全な実装は、ソースコードに記載されています。 たとえば、addメソッドの実装方法は次のとおりです。
+ ( void ) addApplication : ( NSString * ) path<br/>
{ <br/>
LSSharedFileListRef loginItemsRef = LSSharedFileListCreate ( NULL , kLSSharedFileListSessionLoginItems, NULL ) ;<br/>
<br/>
if ( loginItemsRef ) <br/>
{ <br/>
LSSharedFileListItemRef itemRef = LSSharedFileListInsertItemURL ( loginItemsRef, kLSSharedFileListItemLast, NULL , NULL , ( CFURLRef ) [ NSURL fileURLWithPath : path ] , NULL , NULL ) ;<br/>
if ( itemRef ) CFRelease ( itemRef ) ;<br/>
CFRelease ( loginItemsRef ) ; <br/>
} <br/>
}
それは基本的に私たちのパネル全体です。
今アシスタント...彼は非常にシンプルです。 なぜなら アシスタントはユーザーには表示されません。プログラム記述ファイルで、LSBackgroundOnlyキーをYESに設定します。 つまり、プログラムはドックや強制終了ウィンドウに表示されず、メニューなども表示されません。
アシスタントを初期化する最も重要な部分は、パネルから設定が変更されたというメッセージを受信し(再起動するため)、プログラムのステータスに関するNSWorkspaceメッセージを受信することです。
NSNotificationCenter * notificationCenter = [ [ NSWorkspace sharedWorkspace ] notificationCenter ] ;<br/>
<br/>
[ notificationCenter addObserver : self selector : @selector ( didLaunchApplication : ) name : NSWorkspaceDidLaunchApplicationNotification object : nil ] ;<br/>
[ notificationCenter addObserver : self selector : @selector ( didTerminateApplication : ) name : NSWorkspaceDidTerminateApplicationNotification object : nil ] ;<br/>
[ notificationCenter addObserver : self selector : @selector ( didHideApplication : ) name : NSWorkspaceDidHideApplicationNotification object : nil ] ;<br/>
[ notificationCenter addObserver : self selector : @selector ( didUnhideApplication : ) name : NSWorkspaceDidUnhideApplicationNotification object : nil ] ;<br/>
[ notificationCenter addObserver : self selector : @selector ( didActivateApplication : ) name : NSWorkspaceDidActivateApplicationNotification object : nil ] ;<br/>
[ notificationCenter addObserver : self selector : @selector ( didDeactivateApplication : ) name : NSWorkspaceDidDeactivateApplicationNotification object : nil ] ;<br/>
<br/>
NSString * observedObject = @ "info.yuriev.OnAppBehaviourHelper" ;<br/>
NSDistributedNotificationCenter * dNotificationCenter = [ NSDistributedNotificationCenter defaultCenter ] ;<br/>
<br/>
[ dNotificationCenter addObserver : self selector : @selector ( loadPreferences : ) name : @ "OABReloadScripts" object : observedObject ] ;
そして、プログラムとそのアクションが設定に一致する場合にAppleScriptが実行するメインメソッド:
- ( void ) preformScriptOnApp : ( NSRunningApplication * ) app forKey : ( NSString * ) key<br/>
{ <br/>
if ( ( ! app ) || ( ! [ app bundleIdentifier ] ) ) return ;<br/>
<br/>
NSString * bundleID = [ app bundleIdentifier ] ;<br/>
<br/>
for ( int i = 0 ; i < [ preferences count ] ; i ++ ) <br/>
{ <br/>
if ( [ [ [ preferences objectAtIndex : i ] objectForKey : @ "ID" ] isEqualToString : bundleID ] ) <br/>
{ <br/>
NSString * script = [ [ preferences objectAtIndex : i ] objectForKey : key ] ;<br/>
<br/>
if ( script && ( [ script length ] > 0 ) ) <br/>
{ <br/>
NSAppleScript * AScript = [ [ NSAppleScript alloc ] initWithSource : script ] ;<br/>
[ AScript executeAndReturnError : NULL ] ;<br/>
[ AScript release ] ;<br/>
} <br/>
<br/>
break ;<br/>
} <br/>
} <br/>
<br/>
}
ここにそのような小さなプロジェクトがありますが、内部には多くの興味深いものがあります。 この資料が誰かに役立つことを願っています。 私はすでに利益を得ています-iOSシミュレータがアクティブになると、Dockは自動的に非表示になります:)。