Canvasについての記事が増えていますが、これは朗報です。 基本はすでに研究されていることを期待していますが、キャンバスの実用的な使用例、つまりアニメーションの進行状況インジケーターを作成する例を共有したいと思います。
せっかちな実験結果については、 http : //pastehtml.com/view/1d7z824.html 、および最終結果のスクリーンショットを参照してください。
プログレスバーは非常にシンプルであることが判明しましたが、同時にWeb 2.0スタイルで-丸みを帯びた(もちろん!)、深さとボリュームの要素、つまり影とグラデーションがあります。
猫の下で詳細を尋ねます。
基板
背景を描画することから始めましょう。背景には進行状況が表示されます。 arc()関数を使用して長方形の端を丸めます。したがって、この場合、長方形は常に半円で端が丸められます;任意の丸めを作成するには(境界半径を使用する場合)、2つのベジェ曲線と2次曲線と直線を使用するだけで十分ですそれらの間のセグメント(私たちの場合のように、半円のあるポイントに縮退しています)。 したがって、サブストレートの塗りつぶしアウトラインを作成する関数は次のようになります。
function roundRect(ctx, x, y, width, height, radius) { ctx.beginPath(); ctx.moveTo(x + radius, y); ctx.lineTo(x + width - radius, y); ctx.arc(x+width-radius, y+radius, radius, -Math.PI/2, Math.PI/2, false); ctx.lineTo(x + radius, y + height); ctx.arc(x+radius, y+radius, radius, Math.PI/2, 3*Math.PI/2, false); ctx.closePath(); ctx.fill(); }
影とボリュームを素材に追加します。 3つのストップを持つ線形グラデーションを使用してボリュームを作成し、標準のコンテキストプロパティを使用してシャドウを作成します。
function progressLayerRect(ctx, x, y, width, height, radius) { ctx.save(); // ctx.shadowOffsetX = 2; ctx.shadowOffsetY = 2; ctx.shadowBlur = 5; ctx.shadowColor = '#666'; // ctx.fillStyle = 'rgba(189,189,189,1)'; roundRect(ctx, x, y, width, height, radius); // // ctx.shadowColor = 'rgba(0,0,0,0)'; var lingrad = ctx.createLinearGradient(0,y+height,0,0); lingrad.addColorStop(0, 'rgba(255,255,255, 0.1)'); lingrad.addColorStop(0.4, 'rgba(255,255,255, 0.7)'); lingrad.addColorStop(1, 'rgba(255,255,255,0.4)'); ctx.fillStyle = lingrad; roundRect(ctx, x, y, width, height, radius); ctx.restore(); }
ここでは2つのレイヤーが使用されます。下は無地のグレーで、上は透明なグラデーションの白です。 私の意見では、これにより、素材の境界線がより鮮明になり、よりリアルに見えるようになります。いずれにしても、すべての色設定をいつでも試すことができます。
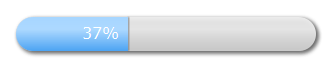
すべてが正しく行われた場合、次のようなメッセージが表示されます。

進捗インジケータ
それでは、進行状況の塗りつぶしの作成に移りましょう。
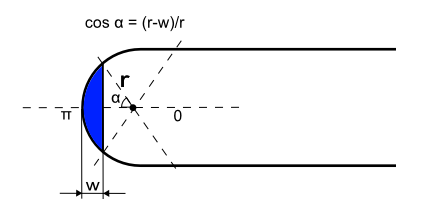
進行状況は、丸みを帯びたエッジを持つ同じ長方形で、異なる色でのみ表示されます。 ただし、サブストレートと区別する機能があり、レンダリング時に考慮する必要があります-進行幅が曲線の半径より小さく、幅がサブストレートの長さから半径を引いた値より大きい場合。 これらの場合、曲線の角度と円の弦の位置をさらに計算する必要があります。すべての計算は学校の幾何学コースに基づいています。明確にするために、以下の図に示します。
さらに、進行状況の右端から影を追加して、ボリューム効果を与えます。
その結果、次の進行レンダリングコードを取得します。
function progressBarRect(ctx, x, y, width, height, radius, max) { // var offset = 0; ctx.beginPath(); if (width<radius) { offset = radius - Math.sqrt(Math.pow(radius,2)-Math.pow((radius-width),2)); // var left_angle = Math.acos((radius - width) / radius); ctx.moveTo(x + width, y+offset); ctx.lineTo(x + width, y+height-offset); ctx.arc(x + radius, y + radius, radius, Math.PI - left_angle, Math.PI + left_angle, false); } else if (width+radius>max) { offset = radius - Math.sqrt(Math.pow(radius,2)-Math.pow((radius - (max-width)),2)); // var right_angle = Math.acos((radius - (max-width)) / radius); ctx.moveTo(x + radius, y); ctx.lineTo(x + width, y); ctx.arc(x+max-radius, y + radius, radius, -Math.PI/2, -right_angle, false); ctx.lineTo(x + width, y+height-offset); ctx.arc(x+max-radius, y + radius, radius, right_angle, Math.PI/2, false); ctx.lineTo(x + radius, y + height); ctx.arc(x+radius, y+radius, radius, Math.PI/2, 3*Math.PI/2, false); } else { ctx.moveTo(x + radius, y); ctx.lineTo(x + width, y); ctx.lineTo(x + width, y + height); ctx.lineTo(x + radius, y + height); ctx.arc(x+radius, y+radius, radius, Math.PI/2, 3*Math.PI/2, false); } ctx.closePath(); ctx.fill(); // if (width<max-1) { ctx.save(); ctx.shadowOffsetX = 1; ctx.shadowBlur = 1; ctx.shadowColor = '#666'; if (width+radius>max) offset = offset+1; ctx.fillRect(x+width,y+offset,1,total_height-offset*2); ctx.restore(); } }
ここでは、前の機能とは異なり、サブストレートの場合のようにコンテキストを保存および復元しません。これは、進行状況のグローバルコンテキスト属性を設定するためです。
進捗テキスト
進行状況をパーセンテージで説明するテキストを追加します。 テキストは、テキストの長さが進行状況の長さより短い場合は進行状況の右境界に直接配置され、そうでない場合は進行状況の左端に配置されます。 テストの長さを測定するには、 measureText()関数を使用します。
function progressText(ctx, x, y, width, height, radius, max) { ctx.save(); ctx.fillStyle = 'white'; var text = Math.floor(width/max*100)+"%"; var text_width = ctx.measureText(text).width; var text_x = x+width-text_width-radius/2; if (width<=radius+text_width) { text_x = x+radius/2; } ctx.fillText(text, text_x, y+22); ctx.restore(); }
進行状況の完全なインジケータ
これで、すべてのパーツを一緒に接続し、0から100%までの進行を埋めるアニメーションを設定することができます。 アニメーションでは、関数setInterval()およびclearInterval()を使用します。
// var i = 0; var res = 0; var context = null; var total_width = 300; var total_height = 34; var initial_x = 20; var initial_y = 20; var radius = total_height/2; window.onload = function() { // canvas var elem = document.getElementById('myCanvas'); // canvas if (!elem || !elem.getContext) { return; } context = elem.getContext('2d'); if (!context) { return; } // context.font = "16px Verdana"; // var progress_lingrad = context.createLinearGradient(0,initial_y+total_height,0,0); progress_lingrad.addColorStop(0, '#4DA4F3'); progress_lingrad.addColorStop(0.4, '#ADD9FF'); progress_lingrad.addColorStop(1, '#9ED1FF'); context.fillStyle = progress_lingrad; // res = setInterval(draw, 50); } function draw() { // 1 i+=1; // context.clearRect(initial_x-5,initial_y-5,total_width+15,total_height+15); progressLayerRect(context, initial_x, initial_y, total_width, total_height, radius); progressBarRect(context, initial_x, initial_y, i, total_height, radius, total_width); progressText(context, initial_x, initial_y, i, total_height, radius, total_width ); // 100% if (i>=total_width) { clearInterval(res); } }
それだけです。javascriptコードを<script>タグ に配置し、ドキュメントの<body>に追加します。
<canvas id="myCanvas" width="500" height="150">Your browser does not have support for canvas.</canvas>
もう一度、結果へのリンク: http : //pastehtml.com/view/1d7z824.html
はめ込み影
結論として、インセットシャドウを使用して異なるスタイルの素材を準備しました。この場合、素材は内側に押し付けられているように見えます。 ここから取られた元のアイデア: http : //weblog.bocoup.com/can-i-draw-an-inset-shadow-with-the-html5-canvas-api
実際には、キャンバスにはcssほど単純なインセットシャドウを作成する手段がなく、上記の方法の本質は、キャンバスにも適用される「逆巻き」と呼ばれる手法を使用することです。
目的の効果を得るには、最初にバイパスの反時計回りの方向で十分に大きな外側の長方形を描画し、次にバイパスの時計回りの方向で内部の図形を描画します。 すべてが正しく行われた場合、最終的には内側のシェイプのインセットシャドウが得られます。
影のはめ込み効果を得るには、新しいroundInsetRect()関数を作成し、 progressLayerRect()関数を次のように変更します。
function roundInsetRect(ctx, x, y, width, height, radius) { ctx.beginPath(); // ctx.moveTo(1000, 1000); ctx.lineTo(1000, -1000); ctx.lineTo(-1000, -1000); ctx.lineTo(-1000, 1000); ctx.lineTo(1000, 1000); ctx.moveTo(x + radius, y); ctx.lineTo(x + width - radius, y); ctx.arc(x+width-radius, y+radius, radius, -Math.PI/2, Math.PI/2, false); ctx.lineTo(x + radius, y + height); ctx.arc(x+radius, y+radius, radius, Math.PI/2, 3*Math.PI/2, false); ctx.closePath(); ctx.fill(); } function progressLayerRect(ctx, x, y, width, height, radius) { ctx.save(); // ctx.shadowOffsetX = 2; ctx.shadowOffsetY = 2; ctx.shadowBlur = 5; ctx.shadowColor = '#666'; // ctx.fillStyle = 'rgba(189,189,189,1)'; roundRect(ctx, x, y, width, height, radius); ctx.fillStyle = 'white'; roundInsetRect(ctx, x, y, width, height, radius); ctx.restore(); }
見た目はこちら: http : //pastehtml.com/view/1d80e6t.html
私は実装に関するコメント/追加を一度聞くでしょう、それが役に立つことを願っています。