
この記事は、すでにAndroid用のHelloWorldを作成し、アクティビティとインテントが何であるか、マニフェストの場所とレイアウトが必要な理由を知っている人を対象としています。 そうでなければ、例えばdeveloper.android.comでこの資料を読むことができます。
この記事では、組み込みフレームワークの機能に基づいて検索実装メカニズムを使用する単純なアプリケーションの作成について説明します。 読み取り後、標準のAndroid検索ダイアログを使用してデータを検索するようにアプリケーションを構成することもできます。
理論のビット
Android検索ダイアログ(以下「検索ダイアログ」と呼びます)は、検索フレームワークを使用して管理されます。 これは、開発者が描画方法や検索クエリをキャッチする方法について考える必要がないことを意味します。 SearchManagerがあなたのために仕事をします。
そのため、ユーザーが検索を開始すると、SearchManagerがIntentを作成し、それをデータの検索を担当するアクティビティに向けます(この場合、リクエスト自体はエクストラに配置されます)。 つまり、実際には、アプリケーションには、検索インテントを受け取り、検索を実行し、ユーザーに結果を提供する少なくとも1つのアクティビティが必要です。 実装には、次のものが必要です。
- 構成xmlファイル(ダイアログに関する情報が含まれています)
- 検索クエリを受け取り、検索を実行し、結果を表示するアクティビティ
- 検索ダイアログを呼び出すためのメカニズム(ボード上のすべてのAndroidデバイスにケースに検索ボタンがあるわけではないため)
構成ファイル
これが最も簡単な部分であるため、構成ファイルを作成することから始めましょう。 もちろん、事前に準備し、新しいプロジェクトActivityを作成する必要があります(アクティビティ「Main」を使用し、プロジェクトの名前は「SearchExample」です)。 構成に必要なのは、プロジェクトのres / xml /サブディレクトリにsearchable.xmlファイルを作成することです。次の内容が含まれます。
<? xml version ="1.0" encoding ="utf-8" ? >
< searchable xmlns:android ="http://schemas.android.com/apk/res/android"
android:label ="@string/app_name"
android:hint ="@string/search_hint"
>
</ searchable >
* This source code was highlighted with Source Code Highlighter .
唯一の必須属性はandroid:labelであり、アプリケーションの名前と同じ文字列を参照する必要があります。 2番目の属性android:hintは、空のダイアログに文字列を表示するために使用されます。 たとえば、「ビデオ検索」や「連絡先検索」などです。 この属性は、検索されているデータを示します。 また、検索可能な要素が他の多くの属性をサポートしていることを知ることも重要です 。詳細については、こちらをご覧ください。
アクティビティを作成する
少なくとも、アクティビティユーザーインターフェイスから必要なのは、検索結果を表示するリストと、検索ダイアログを呼び出すためのメカニズムです。 データベースに入力できるように、テキスト入力フィールドとボタンのみを追加してこれを行います。 今後は、SQLiteデータベースにデータを保存すると言います。
Activityインターフェースを次のように説明します(ファイルはres / layout / main.xmlにあります)。
<? xml version ="1.0" encoding ="utf-8" ? >
< LinearLayout xmlns:android ="http://schemas.android.com/apk/res/android"
android:orientation ="vertical"
android:layout_width ="fill_parent"
android:layout_height ="fill_parent" >
< LinearLayout
android:orientation ="horizontal"
android:layout_width ="fill_parent"
android:layout_height ="wrap_content"
android:gravity ="top" >
< EditText
android:id ="@+id/text"
android:layout_width ="wrap_content"
android:layout_height ="wrap_content"
android:hint ="@string/text"
android:layout_weight ="100.0" />
< Button
android:id ="@+id/add"
android:layout_width ="wrap_content"
android:layout_height ="wrap_content"
android:text ="@string/add" />
</ LinearLayout >
< ListView
android:id ="@android:id/list"
android:layout_width ="fill_parent"
android:layout_height ="wrap_content" />
< TextView
android:layout_gravity ="left"
android:id ="@android:id/empty"
android:layout_width ="fill_parent"
android:layout_height ="fill_parent"
android:text ="@string/no_records" />
</ LinearLayout >
* This source code was highlighted with Source Code Highlighter .
次のようになります。
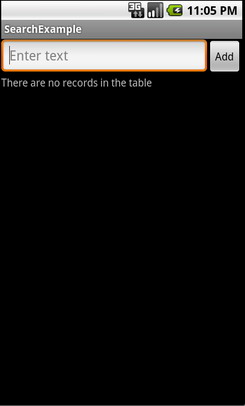
リストアイテムの外観のレイアウトも必要です。最も単純な方法で説明します(ファイルはres / layout / record.xmlにあります)
<? xml version ="1.0" encoding ="utf-8" ? >
< TextView
android:id ="@+id/text1"
xmlns:android ="http://schemas.android.com/apk/res/android"
android:layout_width ="wrap_content"
android:layout_height ="wrap_content"
/>
* This source code was highlighted with Source Code Highlighter .
また、行が保存されているリソースファイル(res / values / strings.xmlのファイル)を忘れないでください
<? xml version ="1.0" encoding ="utf-8" ? >
< resources >
< string name ="app_name" > SearchExample </ string >
< string name ="add" > Add </ string >
< string name ="text" > Enter text </ string >
< string name ="no_records" > There are no records in the table </ string >
< string name ="search_hint" > Search the records </ string >
< string name ="search" > Search </ string >
</ resources >
* This source code was highlighted with Source Code Highlighter .
ユーザーが検索を実行するとき、SearchManagerがアクティビティに検索リクエストとともにインテントを送信する必要があることを思い出してください。 SearchManagerがインテントを送信する場所を正確に知るためには、マニフェストで宣言する必要があります。 そのため、AndroidManifest.xmlに移動し、アクティビティが検索タイプのインテントを受け入れることができるように変更します。 さらに、構成ファイルsearchable.xmlを適用します。 したがって、マニフェストは次のようになります。
<? xml version ="1.0" encoding ="utf-8" ? >
< manifest xmlns:android ="http://schemas.android.com/apk/res/android"
package ="com.example.search"
android:versionCode ="1"
android:versionName ="1.0" >
< application android:icon ="@drawable/icon" android:label ="@string/app_name" >
< activity android:name =".Main"
android:label ="@string/app_name" >
< intent-filter >
< action android:name ="android.intent.action.MAIN" />
< category android:name ="android.intent.category.LAUNCHER" />
</ intent-filter >
< intent-filter >
< action android:name ="android.intent.action.SEARCH" />
</ intent-filter >
< meta-data
android:name ="android.app.searchable"
android:resource ="@xml/searchable"
/>
</ activity >
</ application >
< uses-sdk android:minSdkVersion ="5" />
</ manifest >
* This source code was highlighted with Source Code Highlighter .
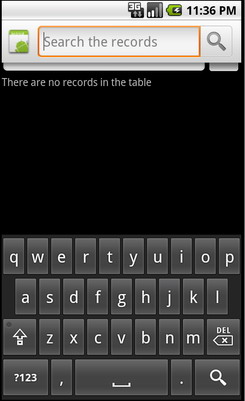
これで、すべてを正しく行ったかどうかをすでに確認できます。 たとえば、検索ボタンをクリックして、エミュレータでダイアログを呼び出すことができます。 まあ、またはデバイスをチェックしたら、「メニュー」を押し続けます。 次のようになります。
検索する
アクティビティをアナウンスし、AndroidManifest.xmlに必要な変更を加えた後、検索自体を検討できます。 次の3つのステージが含まれます。
- リクエストを受け取る
- データ検索
- 出力結果
リクエストを受け取る
SearchManagerは検索タイプのインテントをアクティビティに送信するため、アクティビティの開始時にこのタイプのインテントを確認するだけです。 次に、目的のインテントを取得したら、そこから余分なものを抽出して検索を実行できます。
データ検索
異なるアプリケーションのデータストレージ構造のタイプは異なる場合があるため、それらの方法は異なります。 この場合、SQLiteデータベーステーブルでLIKEクエリを使用してクエリを実行するのが最も簡単です。 もちろん、FTS3を使用することをお勧めします 。はるかに高速です。SQLite.orgでFTS3の詳細を読むことができます。 理想的には、検索に時間がかかる可能性があることも常に考慮する必要があります。そのため、何らかのProgressDialogを作成して、インターフェイスがハングアップせず、ユーザーがアプリケーションが動作していることを知ることができます。
出力結果
一般に、結果の出力はUIの問題ですが、ListViewを使用しているため、アダプターを更新するだけで問題を解決できます。
ソースコード
最後に、2つのクラスの完全なソースコードとコメントを提供します。 最初はListActivityの子孫であるMainで、データベースにデータを入力して結果を出力するために使用されます。 2番目のクラスはRecordsDbHelperで、データベースと対話するためのインターフェイスを実装します。 最も重要な方法は、レコードを追加し、LIKEクエリを使用して一致を見つけることです。
Main.javaファイル
package com.example.search;
import android.app.ListActivity;
import android.app.SearchManager;
import android.content.Intent;
import android.database.Cursor;
import android.os.Bundle;
import android.view.Menu;
import android.view.MenuInflater;
import android.view.MenuItem;
import android.view.View;
import android.widget.Button;
import android.widget.EditText;
import android.widget.SimpleCursorAdapter;
public class Main extends ListActivity {
private EditText text;
private Button add;
private RecordsDbHelper mDbHelper;
@Override
public void onCreate(Bundle savedInstanceState) {
super.onCreate(savedInstanceState);
setContentView(R.layout.main);
//
mDbHelper = new RecordsDbHelper( this );
//
mDbHelper.open();
// Intent
Intent intent = getIntent();
// Intent
if (Intent.ACTION_SEARCH.equals(intent.getAction())) {
//
String query = intent.getStringExtra(SearchManager.QUERY);
//
showResults(query);
}
add = (Button) findViewById(R.id.add);
text = (EditText) findViewById(R.id.text);
add.setOnClickListener( new View.OnClickListener() {
public void onClick(View view) {
String data = text.getText().toString();
if (!data.equals( "" )) {
saveTask(data);
text.setText( "" );
}
}
});
}
private void saveTask( String data) {
mDbHelper.createRecord(data);
}
private void showResults( String query) {
//
Cursor cursor = mDbHelper.fetchRecordsByQuery(query);
startManagingCursor(cursor);
String [] from = new String [] { RecordsDbHelper.KEY_DATA };
int [] to = new int [] { R.id.text1 };
SimpleCursorAdapter records = new SimpleCursorAdapter( this ,
R.layout.record, cursor, from , to);
//
setListAdapter(records);
}
// ( res/menu/main_menu.xml)
public boolean onCreateOptionsMenu(Menu menu) {
MenuInflater inflater = getMenuInflater();
inflater.inflate(R.menu.main_menu, menu);
return true ;
}
public boolean onOptionsItemSelected(MenuItem item) {
switch (item.getItemId()) {
case R.id.search_record:
onSearchRequested();
return true ;
default :
return super.onOptionsItemSelected(item);
}
}
}
* This source code was highlighted with Source Code Highlighter .
ファイルRecordsDbHelper.java
package com.example.search;
import android.content.ContentValues;
import android.content.Context;
import android.database.Cursor;
import android.database.SQLException;
import android.database.sqlite.SQLiteDatabase;
import android.database.sqlite.SQLiteOpenHelper;
import android.util.Log;
public class RecordsDbHelper {
public static final String KEY_DATA = "data" ;
public static final String KEY_ROWID = "_id" ;
private static final String TAG = "RecordsDbHelper" ;
private DatabaseHelper mDbHelper;
private SQLiteDatabase mDb;
private static final String DATABASE_CREATE = "CREATE TABLE records(_id INTEGER PRIMARY KEY AUTOINCREMENT, "
+ "data TEXT NOT NULL);" ;
private static final String DATABASE_NAME = "data" ;
private static final String DATABASE_TABLE = "records" ;
private static final int DATABASE_VERSION = 1;
private final Context mCtx;
private static class DatabaseHelper extends SQLiteOpenHelper {
DatabaseHelper(Context context) {
super(context, DATABASE_NAME, null , DATABASE_VERSION);
}
@Override
public void onCreate(SQLiteDatabase db) {
db.execSQL(DATABASE_CREATE);
}
@Override
public void onUpgrade(SQLiteDatabase db, int oldVersion, int newVersion) {
Log.w(TAG, "Upgrading database from version " + oldVersion + " to "
+ newVersion + ", which will destroy all old data" );
db.execSQL( "DROP TABLE IF EXISTS tasks" );
onCreate(db);
}
}
public RecordsDbHelper(Context ctx) {
this .mCtx = ctx;
}
public RecordsDbHelper open() throws SQLException {
mDbHelper = new DatabaseHelper(mCtx);
mDb = mDbHelper.getWritableDatabase();
return this ;
}
public void close() {
mDbHelper.close();
}
//
public long createRecord( String data) {
ContentValues initialValues = new ContentValues();
initialValues.put(KEY_DATA, data);
return mDb.insert(DATABASE_TABLE, null , initialValues);
}
// LIKE
public Cursor fetchRecordsByQuery( String query) {
return mDb.query( true , DATABASE_TABLE, new String [] { KEY_ROWID,
KEY_DATA }, KEY_DATA + " LIKE" + "'%" + query + "%'" , null ,
null , null , null , null );
}
}
* This source code was highlighted with Source Code Highlighter .
おわりに
developer.android.comのドキュメントを使用して記事を書いてください。
プロジェクト全体はcode.google.comで取得できます。