用語
補間、補間-計算数学において、既知の値の利用可能な離散セットから量の中間値を見つける方法。
(c)Wiki
キュービック補間
バイキュービック補間の原理をよりよく理解するために、キュービック補間の原理を検討することを提案します。
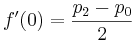
関数f(x)とその導関数の値が点x = 0およびx = 1で既知の場合、関数は3次多項式を使用して区間[0、1]で補間できます。 計算式は簡単に取得できます。
3次多項式とその導関数:


点x = 0およびx = 1での多項式とその微分の値


これらの4つのIDは、次のように記述できます。


補間式を取得しました
実際には、アルゴリズムは特定のポイントで特定の既知の値を持つ関数を補間するために使用されます。 この場合、関数の導関数を知ることはできません。 与えられた点の導関数を0とすることもできますが、より滑らかでもっともらしい関数グラフを得るために、前の点と次の点の間の線の傾きを導関数とします。 したがって、計算には4つのポイントが必要です。 それぞれx = -1、x = 0、x = 1およびx = 2にあるポイントp0、p1、p2およびp3に4つの関数値があるとします。 得られた値f(0)、f(1)、f(2)およびf(3)を代入します。


これらのデータを以前に取得した式と比較すると、次のようになります。


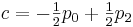

結果:

PHPでのこのアルゴリズムの実装を検討してください。
/** * * * @param array $p : f(x0), f(x1), f(x2), f(x3) * @param float $x x- * @return float f($x) */ function cubicInterpolate ($p, $x) { return $p[1] + (-0.5 * $p[0] + 0.5 * $p[2]) * $x + ($p[0] - 2.5 * $p[1] + 2.0 * $p[2] - 0.5 * $p[3]) * $x * $x + (-0.5 * $p[0] + 1.5 * $p[1] - 1.5 * $p[2] + 0.5 * $p[3]) * $x * $x * $x; }
バイキュービック補間
バイキュービック補間は、2次元のキュービック補間です。 実際、より多くの次元で補間することができますが、この記事の枠組みの中で、この例のみを検討します。
原点が(i-1、j-1)で16点p ijを知っていると想像してください。ここで、i、jは0から3まで変化します。その後、領域[0,0] x [ 1,1]、このために4列を補間してから、得られた結果を水平方向に補間します:

最初の関数と組み合わせたPHPメソッドの実装:
/** * * * @param array $p 2- (4 x 4), 16- * @param float $x x- * @param float $y y- * @return float f($x, $y) */ function bicubicInterpolate ($p, $x, $y) { $tmp = array(); $tmp[0] = cubicInterpolate($p[0], $y); $tmp[1] = cubicInterpolate($p[1], $y); $tmp[2] = cubicInterpolate($p[2], $y); $tmp[3] = cubicInterpolate($p[3], $y); return cubicInterpolate($tmp, $x); }
1つの問題(パフォーマンス)がなければ、すべてが素晴らしいでしょう。 比較的少量のデータでも補間するには、深刻なコンピューティングリソースが必要です。 パフォーマンスを最適化するには、次のアプローチがあります。
多次元多項式の形式の式を考えてみましょう。
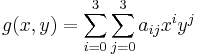
展開された形式では、次のようなものがあります。
  g(x、y)= a00 * x ^ 0 * y ^ 0 + a01 * x ^ 0 * y ^ 1 +
          a02 * x ^ 0 * y ^ 2 + a03 * x ^ 0 * y ^ 3 +
          a10 * x ^ 1 * y ^ 0 + a11 * x ^ 1 * y ^ 1 +
          a12 * x ^ 1 * y ^ 2 + a13 * x ^ 1 * y ^ 3 +
          a20 * x ^ 2 * y ^ 0 + a21 * x ^ 2 * y ^ 1 +
          a22 * x ^ 3 * y ^ 2 + a23 * x ^ 2 * y ^ 3 +
          a30 * x ^ 3 * y ^ 0 + a31 * x ^ 3 * y ^ 1 +
          a32 * x ^ 3 * y ^ 2 + a33 * x ^ 3 * y ^ 3
ここで、係数a ijを計算する必要があります。 ここで特に注意したいのは、係数を計算したら、それらを使用して[0,0]から[1,1]までのセクションのすべての値を補間できることです。


このメソッドを実装するには、次のクラスを作成します。
class CachedBicubicInterpolator { private $a00, $a01, $a02, $a03, $a10, $a11, $a12, $a13, $a20, $a21, $a22, $a23, $a30, $a31, $a32, $a33; /** * . * * @param array $p 2- (4 x 4), * @return void */ public function updateCoefficients ($p) { $this->a00 = $p[1][1]; $this->a01 = -.5 * $p[1][0] + .5 * $p[1][2]; $this->a02 = $p[1][0] - 2.5 * $p[1][1] + 2 * $p[1][2] - .5 * $p[1][3]; $this->a03 = -.5 * $p[1][0] + 1.5 * $p[1][1] - 1.5 * $p[1][2] + .5 * $p[1][3]; $this->a10 = -.5 * $p[0][1] + .5 * $p[2][1]; $this->a11 = .25 * $p[0][0] - .25 * $p[0][2] - .25 * $p[2][0] + .25 * $p[2][2]; $this->a12 = -.5 * $p[0][0] + 1.25 * $p[0][1] - $p[0][2] + .25 * $p[0][3] + .5 * $p[2][0] - 1.25 * $p[2][1] + $p[2][2] - .25 * $p[2][3]; $this->a13 = .25 * $p[0][0] - .75 * $p[0][1] + .75 * $p[0][2] - .25 * $p[0][3] - .25 * $p[2][0] + .75 * $p[2][1] - .75 * $p[2][2] + .25 * $p[2][3]; $this->a20 = $p[0][1] - 2.5 * $p[1][1] + 2 * $p[2][1] - .5 * $p[3][1]; $this->a21 = -.5 * $p[0][0] + .5 * $p[0][2] + 1.25 * $p[1][0] - 1.25 * $p[1][2] - $p[2][0] + $p[2][2] + .25 * $p[3][0] - .25 * $p[3][2]; $this->a22 = $p[0][0] - 2.5 * $p[0][1] + 2 * $p[0][2] - .5 * $p[0][3] - 2.5 * $p[1][0] + 6.25 * $p[1][1] - 5 * $p[1][2] + 1.25 * $p[1][3] + 2 * $p[2][0] - 5 * $p[2][1] + 4 * $p[2][2] - $p[2][3] - .5 * $p[3][0] + 1.25 * $p[3][1] - $p[3][2] + .25 * $p[3][3]; $this->a23 = -.5 * $p[0][0] + 1.5 * $p[0][1] - 1.5 * $p[0][2] + .5 * $p[0][3] + 1.25 * $p[1][0] - 3.75 * $p[1][1] + 3.75 * $p[1][2] - 1.25 * $p[1][3] - $p[2][0] + 3 * $p[2][1] - 3 * $p[2][2] + $p[2][3] + .25 * $p[3][0] - .75 * $p[3][1] + .75 * $p[3][2] - .25 * $p[3][3]; $this->a30 = -.5 * $p[0][1] + 1.5 * $p[1][1] - 1.5 * $p[2][1] + .5 * $p[3][1]; $this->a31 = .25 * $p[0][0] - .25 * $p[0][2] - .75 * $p[1][0] + .75 * $p[1][2] + .75 * $p[2][0] - .75 * $p[2][2] - .25 * $p[3][0] + .25 * $p[3][2]; $this->a32 = -.5 * $p[0][0] + 1.25 * $p[0][1] - $p[0][2] + .25 * $p[0][3] + 1.5 * $p[1][0] - 3.75 * $p[1][1] + 3 * $p[1][2] - .75 * $p[1][3] - 1.5 * $p[2][0] + 3.75 * $p[2][1] - 3 * $p[2][2] + .75 * $p[2][3] + .5 * $p[3][0] - 1.25 * $p[3][1] + $p[3][2] - .25 * $p[3][3]; $this->a33 = .25 * $p[0][0] - .75 * $p[0][1] + .75 * $p[0][2] - .25 * $p[0][3] - .75 * $p[1][0] + 2.25 * $p[1][1] - 2.25 * $p[1][2] + .75 * $p[1][3] + .75 * $p[2][0] - 2.25 * $p[2][1] + 2.25 * $p[2][2] - .75 * $p[2][3] - .25 * $p[3][0] + .75 * $p[3][1] - .75 * $p[3][2] + .25 * $p[3][3]; } /** * . * * @param float $x $x = $x - $x0 * @param float $y $y = $y - $y0 * @return float . */ public function getValue ($x, $y) { // 2 3 . $x2 = $x * $x; $x3 = $x2 * $x; $y2 = $y * $y; $y3 = $y2 * $y; return ($this->a00 + $this->a01 * $y + $this->a02 * $y2 + $this->a03 * $y3) + ($this->a10 + $this->a11 * $y + $this->a12 * $y2 + $this->a13 * $y3) * $x + ($this->a20 + $this->a21 * $y + $this->a22 * $y2 + $this->a23 * $y3) * $x2 + ($this->a30 + $this->a31 * $y + $this->a32 * $y2 + $this->a33 * $y3) * $x3; } }
実用化
次の例でバイキュービック補間の使用を検討してください。
ソースデータ:データ配列7 x 7ポイント
要件:表面を300 x 300ピクセルの画像として提示します。
コードの各ステップについて可能な限りコメントしようとしましたが、すべてが明確になると思います
<?php header("Content-type: image/png");// include 'interpolation.php';// include 'colormap.php';// $simpleData = array( array(0, 0.1, 0.15, 0.2, 0.15, 0.1, 0), array(0, 0.1, 0.5, 1, 0.9, 0.1, 0), array(0, 0.1, 0.7, 1, 0.9, 0.1, 0), array(0, 0.1, 0.6, 0.7, 0.5, 0.1, 0), array(0, 0.2, 0.8, 0.6, 0.15, 0.08, 0.1), array(0.08, 0.2, 0.15, 0.2, 0.15, 0.1, 0.1), array(0.1, 0.8, 0.1, 0.1, 0.1, 0, 0) );// 7 7 $countX = count($simpleData[0]);// $countY = count($simpleData); $input = array(); /* * , * - */ for ($i = 0; $i < $countX; $i ++) { for ($j = 0; $j < $countY; $j ++) { $input[$i + 1][$j + 1] = $simpleData[$j][$i]; if ($i == 0) { $input[0][$j + 1] = $simpleData[$j][$i] - $simpleData[$j][$i + 1];// } if ($i == ($countX - 1)) { $input[$countX + 1][$j + 1] = $simpleData[$j][$i] - $simpleData[$j][$i - 1];// } if ($j == 0) { $input[$i + 1][0] = $simpleData[$j][$i] - $simpleData[$j + 1][$i];// } if ($j == ($countY - 1)) { $input[$i + 1][$countY + 1] = $simpleData[$j][$i] - $simpleData[$j - 1][$i];// } } } /* * , . */ $input[0][0] = ($input[1][0] + $input[0][1]) / 2; $input[$countX + 1][0] = ($input[$countX][0] + $input[$countX][1]) / 2; $input[0][$countY + 1] = ($input[0][$countY] + $input[1][$countY]) / 2; $input[$countX + 1][$countY + 1] = ($input[$countX + 1][$countY] + $input[$countX][$countY]) / 2; $step = 50; // 50 $img = imagecreatetruecolor(($countX - 1) * $step, ($countY - 1) * $step);// $colormap = createColormap($img);// $b2i = new CachedBicubicInterpolator(); for ($i = 1; $i < $countX; $i ++) {// for ($j = 1; $j < $countY; $j ++) { $points = array(); $points[0][0] = $input[$i - 1][$j - 1]; $points[1][0] = $input[$i][$j - 1]; $points[2][0] = $input[$i + 1][$j - 1]; $points[3][0] = $input[$i + 2][$j - 1]; $points[0][1] = $input[$i - 1][$j]; $points[1][1] = $input[$i][$j]; $points[2][1] = $input[$i + 1][$j]; $points[3][1] = $input[$i + 2][$j]; $points[0][2] = $input[$i - 1][$j + 1]; $points[1][2] = $input[$i][$j + 1]; $points[2][2] = $input[$i + 1][$j + 1]; $points[3][2] = $input[$i + 2][$j + 1]; $points[0][3] = $input[$i - 1][$j + 2]; $points[1][3] = $input[$i][$j + 2]; $points[2][3] = $input[$i + 1][$j + 2]; $points[3][3] = $input[$i + 2][$j + 2]; $b2i->updateCoefficients($points);// for ($x = 0; $x < $step; $x ++) {// for ($y = 0; $y < $step; $y ++) { $rx = ($i - 1) * $step + $x;// $ry = ($j - 1) * $step + $y;//y $ax = $x / $step;//x - x0 $ay = $y / $step;//y - y0 $val = $b2i->getValue($ax, $ay);// $color = ceil(($val) * 1024) - 1;// if ($color < 0) $color = 0;// if ($color > 1023) $color = 1023;// imagesetpixel($img, $rx, $ry, $colormap[$color]);// } } } } imagepng($img); ?>
カラーマップを作成するために個別にレンダリングされたファイル
function createColormap(&$image) { $colormap = array(); for ($i = 0; $i < 256; $i ++) { $colormap[$i] = imagecolorallocate($image, 0, $i, 255); } for ($i = 0; $i < 256; $i ++) { $colormap[$i + 256] = imagecolorallocate($image, 0, 255, 255 - $i); } for ($i = 0; $i < 256; $i ++) { $colormap[$i + 512] = imagecolorallocate($image, $i, 255, 0); } for ($i = 0; $i < 256; $i ++) { $colormap[$i + 768] = imagecolorallocate($image, 255, 255 - $i, 0); } return $colormap; }
仕事の結果:
