.Netを使用したWindowsアプリケーションのテスト自動化
テスト自動化
テストは、ソフトウェアの品質を評価および改善するために実行されるアクティビティです。 このアクティビティは、一般に、ソフトウェアシステムの欠陥と問題の検出に基づいています。
ソフトウェアシステムのテストは、アプリケーション領域の通常実行されるアクションから適切に選択された有限の(制限された)テストセットでプログラムの動作を動的に検証し、システムの予想される動作への準拠を検証することで構成されます。
ソフトウェアをテストするための主なアプローチは、ブラックボックスのテストです。 このアプローチでは、テスターはプログラムの内部構造を知りません。 テスターはプログラムと対話します。データを入力し、ボタンを押し、他の視覚的なコンポーネントを操作し、結果を評価します。
通常、完全なテストを実施することは不可能または困難であるため、テスト担当者のタスクは、テスト対象プログラムのエラーが発生する可能性が最も高いデータと一連のアクションを選択することです。
ソフトウェアを開発する際、テスターは受け入れテストおよび回帰テスト中に多数の同一のテストを実行します。 この点で、テストの自動化は多くの工数を節約できます。 自動テストを実施する場合、テスターのタスクは一連のテストを開発することです。 直接テストにより、テスターはより重要でインテリジェントなタスクを実行できます。 さらに、夜間に多数のテストタスクを起動できるため、開発プロセスが強化され、プロジェクトコストが削減されます。 午前中、テスターは結果を分析し、いくつかのテストを改良または再確認し、プロジェクトマネージャーまたは開発者に送信するために必要なレポートを作成します。
.Netプラットフォームメカニズム
.NetプラットフォームでWindowsアプリケーションを開発する場合、プラットフォームを使用して、開発されたテストを実行する軽量で柔軟なツールを作成できます。 完全なソリューションを作成する必要はありません。コードに直接設定される一連の自動テストを迅速に作成することが理にかなっている場合があります。 テストをすばやく変更および追加するには、プログラムのユーザーインターフェイスを使用してテスターに必要なアクションを実行するさまざまなメソッドを含むアセンブリを作成して使用する必要があります。
Windowsアプリケーションのユーザーインターフェイスの自動テストでは、2つのソリューションが可能です。 これらの最初のものは、反射メカニズムに基づいています。
リフレクションメカニズムを使用すると、アセンブリ、モジュール、およびタイプを記述するオブジェクトを取得できます。 リフレクションを使用して、型のインスタンスを動的に作成し、型を既存のオブジェクトにバインドし、既存のオブジェクトから型を取得してメソッドを呼び出したり、フィールドやプロパティにアクセスしたりできます。
2番目のアプローチは、Win32 APIライブラリの低レベル関数であるFindWindow、FindWindowEx、SendMessage、PostMessage、およびP / Invokeメカニズム(アンマネージコードの呼び出し)に基づいています。
アンマネージコード呼び出しは、マネージプログラムコードがダイナミックリンクライブラリ(DLL)に実装されたアンマネージ関数を呼び出すことができるサービスです。 アンマネージコードの呼び出しは、エクスポートされた関数を検出して呼び出します。
2番目のアプローチは、.Netアプリケーションだけでなく、ユーザーインターフェイスを備えたWindowsアプリケーションでも機能します。
テストアプリケーション
テスト対象のアプリケーションは2つの整数を追加し、ボタンをクリックすると結果が表示されます。 何らかの理由で追加が失敗した場合、結果の代わりに「エラー」という単語が表示されます。


「ブラックボックス」をテストするときにコードにアクセスする必要はありません。 コードを使用して、アセンブリおよび実行中のアプリケーションから必要な情報をすべて取得することはできません。 ただし、コードにアクセスする場合、一部の手順は簡略化されます。
アプリケーションはDにあります:\ visual studio 2010 \ Projects \ WindowsFormsApplication1 \ WindowsFormsApplication1 \ bin \ Debug \ AUT.exe
AUTという名前は、テスト中のアプリケーションの一般的な略語です。
リフレクションメカニズムに基づくテスト。
リフレクションメカニズムを使用する場合、アセンブリをロードし、フォームのタイプを取得し、インスタンスを作成して、このフォームを使用して新しいストリームでアプリケーションを起動する必要があります。
テスターがソースコードにアクセスできない場合は、Red GateのReflectorユーティリティを使用できます。 その助けを借りて、フォーム、コントロール、およびメソッドの名前を確認できます。
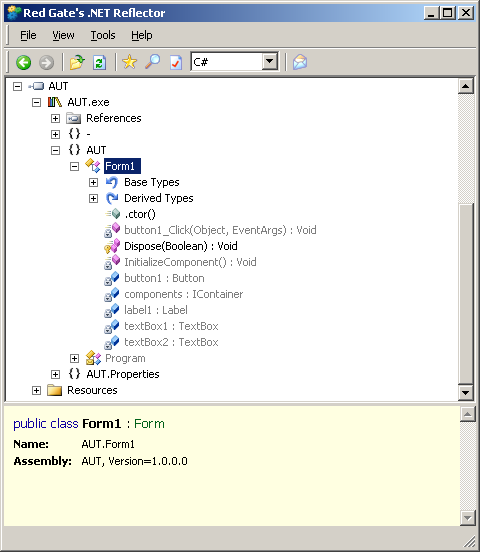
これにより、フォームクラスがForm1と呼ばれることがわかります。 テキストフィールドの名前はtextBox1とtextBox2、ボタンはbutton1、結果はlabel1という名前でLabelに出力されます。 ボタンクリックを処理するメソッドはbutton1_Clickと呼ばれ、入力としてオブジェクト型とEventArgs型のパラメーターを受け入れます。
データの自動テストを作成するには、アプリケーションの内部構造に関する知識があれば十分です。
コードの再利用を増やすには、多くのクラスとメソッドを作成します。
テストアプリケーションは、StartApplicationメソッドを使用して起動されます。
static Form StartApplication( string path, string formName)
{
Form result = null ;
Assembly a = Assembly .LoadFrom(path);
Type t = a.GetType(formName);
result = (Form)a.CreateInstance(t.FullName);
ApplicationState aps = new ApplicationState(result);
ThreadStart ts = new ThreadStart(aps.RunApp);
Thread thread = new Thread(ts);
thread.Start();
return result;
}
* This source code was highlighted with Source Code Highlighter .
アセンブリへのパスとフォームの名前が入力に渡されます。 指定されたアセンブリがロードされ、フォームのタイプが決定され、フォームのインスタンスが作成され、それを使用してアプリケーションが新しいスレッドで起動されます。デリゲートと新しいスレッドで開始するメソッドが指定されます。
クラスApplicationState。
class ApplicationState
{
public readonly Form formToRun;
public ApplicationState(Form f)
{
this .formToRun = f;
}
public void RunApp()
{
Application.Run(formToRun);
}
}
* This source code was highlighted with Source Code Highlighter .
再利用するには、多数のメソッド、フィールド、およびデリゲートを定義する必要があります。
static BindingFlags flags = BindingFlags.Public |
BindingFlags.NonPublic |
BindingFlags.Static |
BindingFlags.Instance;
delegate void SetControlPropertyValueHandler(Form f, string controlName, string propertyName, object newValue);
static void SetControlPropertyValue(Form f, string controlName, string propertyName, object newValue)
{
if (f.InvokeRequired)
{
f.Invoke(
new SetControlPropertyValueHandler(SetControlPropertyValue),
new object [] { f, controlName, propertyName, newValue }
);
}
else
{
Type t1 = f.GetType();
FieldInfo fi = t1.GetField(controlName, flags);
object ctrl = fi.GetValue(f);
Type t2 = ctrl.GetType();
PropertyInfo pi = t2.GetProperty(propertyName);
pi.SetValue(ctrl, newValue, null );
}
}
static AutoResetEvent are = new AutoResetEvent( false );
delegate void InvokeMethodHandler(Form f, string methodName, params object [] parms);
static void InvokeMethod(Form f, string methodName, params object [] parms)
{
if (f.InvokeRequired)
{
f.Invoke(
new InvokeMethodHandler(InvokeMethod),
new object [] { f, methodName, parms }
);
}
else
{
Type t = f.GetType();
MethodInfo mi = t.GetMethod(methodName, flags);
mi.Invoke(f, parms);
are.Set();
}
}
delegate object GetControlPropertyValueHandler(Form f, string controlName, string propertyName);
static object GetControlPropertyValue(Form f, string controlName, string propertyName)
{
if (f.InvokeRequired)
{
object iResult = f.Invoke(
new GetControlPropertyValueHandler(GetControlPropertyValue),
new object [] { f, controlName, propertyName }
);
return iResult;
}
else
{
Type t1 = f.GetType();
FieldInfo fi = t1.GetField(controlName, flags);
object ctrl = fi.GetValue(f);
Type t2 = ctrl.GetType();
PropertyInfo pi = t2.GetProperty(propertyName);
object gResult = pi.GetValue(ctrl, null );
return gResult;
}
}
delegate object GetControlHandler(Form f, string controlName);
static object GetControl(Form f, string controlName)
{
if (f.InvokeRequired)
{
object iCtrl = f.Invoke(
new GetControlHandler(GetControl),
new object [] { f, controlName }
);
return iCtrl;
}
else
{
Type t1 = f.GetType();
FieldInfo fi = t1.GetField(controlName, flags);
object gCtrl = fi.GetValue(f);
return gCtrl;
}
}
delegate object GetFormPropertyValueHandler(Form f, string propertyName);
static object GetFormPropertyValue(Form f, string propertyName)
{
if (f.InvokeRequired)
{
object iResult = f.Invoke(
new GetFormPropertyValueHandler(GetFormPropertyValue),
new object [] { f, propertyName }
);
return iResult;
}
else
{
Type t = f.GetType();
PropertyInfo pi = t.GetProperty(propertyName);
object gResult = pi.GetValue(f, null );
return gResult;
}
}
delegate void SetFormPropertyValueHandler(Form f, string propertyName, object newValue);
static void SetFormPropertyValue(Form f, string propertyName, object newValue)
{
if (f.InvokeRequired)
{
f.Invoke(
new SetFormPropertyValueHandler(SetFormPropertyValue),
new object [] { f, propertyName, newValue }
);
}
else
{
Type t = f.GetType();
PropertyInfo pi = t.GetProperty(propertyName);
pi.SetValue(f, newValue, null );
}
}
* This source code was highlighted with Source Code Highlighter .
InvokeRequiredプロパティは、呼び出し元のオペレーターがコントロールが作成されたストリームにないため、呼び出し元のオペレーターがコントロールからのメソッド呼び出し中にinvokeメソッドを呼び出す必要があるかどうかを示す値を取得します[4]。
InvokeMethod-指定されたパラメーターを使用して、パラメーターで指定されたメソッドを呼び出します。
SetControlPropertyValue-指定されたコントロールのプロパティを設定します。
GetControlPropertyValue-指定されたコントロールプロパティの値を取得します。
SetFormPropertyValue-指定されたフォームプロパティを設定します。
GetFormPropertyValue-フォームプロパティの値を取得します。
GetControl-指定されたコントロールを取得します。
これらの方法を使用して、テストアプリケーションを作成できます。
static void Main( string [] args)
{
string path = @"D:\visual studio 2010\Projects\WindowsFormsApplication1\WindowsFormsApplication1\bin\Debug\aut.exe" ;
string nameForm = "AUT.Form1" ;
Form myForm = StartApplication(path, nameForm);
string f1 = "521" ;
string f2 = "367" ;
SetControlPropertyValue(myForm, "textBox1" , "Text" , f1);
SetControlPropertyValue(myForm, "textBox2" , "Text" , f2);
object ctrl = GetControl(myForm, "button1" );
InvokeMethod(myForm, "button1_Click" , ctrl, EventArgs .Empty);
string res = GetControlPropertyValue(myForm, "label1" , "Text" ).ToString();
string resTest = "FAIL" ;
if (res == "888" ) resTest = "PASS" ;
Console .WriteLine( "{0} + {1} = {2}. Test {3}" , f1, f2, res, resTest);
}
* This source code was highlighted with Source Code Highlighter .
必要な値がテキストフィールドに設定され、その後、button1_Clickメソッドが必要なパラメーターで呼び出されます。 その後、コントロールlabel1のTextプロパティの値が取得され、目的の値と比較されます。その後、テストに関する情報が画面に表示されます。
リフレクションメカニズムを使用する特別なケースのみが示されており、テスターはテストスイートを補足できます。
アンマネージコードの呼び出しに基づいたテスト。
テストには、user32.dllライブラリの多数の関数が使用されます。
関数をインポートするには、DllImport属性を使用します。
[DllImport( "user32.dll" , EntryPoint = "FindWindow" , CharSet = CharSet.Auto)]
static extern IntPtr FindWindow( string lpClassName, string lpWindowName);
[DllImport( "user32.dll" , EntryPoint = "FindWindowEx" , CharSet = CharSet.Auto)]
static extern IntPtr FindWindowEx( IntPtr hwndParent, IntPtr hwndChildAfter, string lpszClass, string lpszWindow);
[DllImport( "user32.dll" , EntryPoint = "SendMessage" , CharSet = CharSet.Auto)]
static extern void SendMessage1( IntPtr hWnd, uint Msg, int wParam, int lParam);
[DllImport( "user32.dll" , EntryPoint = "PostMessage" , CharSet = CharSet.Auto)]
static extern bool PostMessage1( IntPtr hWnd, uint Msg, int wParam, int lParam);
[DllImport( "user32.dll" , EntryPoint = "SendMessage" , CharSet = CharSet.Auto)]
static extern int SendMessage3( IntPtr hWndControl, uint Msg, int wParam, byte [] lParam);
* This source code was highlighted with Source Code Highlighter .
これらの関数を使用すると、メインフォームハンドラの検索、必要なコントロールの検索、テキストの入力、ボタンのクリック、およびコントロール値の取得が可能になります。
再利用のために、いくつかのメソッドを定義します
static void ClickKey( IntPtr hControl, VKeys key)
{
PostMessage1(hControl, ( int )WMessages.WM_KEYDOWN, ( int )key, 0);
PostMessage1(hControl, ( int )WMessages.WM_KEYUP, ( int )key, 0);
}
static void ClickOn( IntPtr hControl)
{
PostMessage1(hControl, ( int )WMessages.WM_LBUTTONDOWN, 0, 0); // button down
PostMessage1(hControl, ( int )WMessages.WM_LBUTTONUP, 0, 0); // button up
}
static void SendChar( IntPtr hControl, char c)
{
uint WM_CHAR = 0x0102;
SendMessage1(hControl, WM_CHAR, c, 0);
}
static void SendChars( IntPtr hControl, string s)
{
foreach ( char c in s)
{
SendChar(hControl, c);
}
}
static IntPtr FindWindowByIndex( IntPtr hwndParent, int index)
{
if (index == 0)
return hwndParent;
else
{
int ct = 0;
IntPtr result = IntPtr .Zero;
do
{
result = FindWindowEx(hwndParent, result, null , null );
if (result != IntPtr .Zero)
++ct;
} while (ct < index && result != IntPtr .Zero);
return result;
}
}
static List < IntPtr > GetAllControls( IntPtr hwndParent)
{
IntPtr ctrl = IntPtr .Zero;
List < IntPtr > res = new List < IntPtr >();
ctrl = FindWindowEx(hwndParent, ctrl, null , null );
while (ctrl != IntPtr .Zero)
{
res.Add(ctrl);
ctrl = FindWindowEx(hwndParent, ctrl, null , null );
}
return res;
}
static IntPtr FindMainWindowHandle( string caption)
{
IntPtr mwh = IntPtr .Zero;
bool formFound = false ;
int attempts = 0;
do
{
mwh = FindWindow( null , caption);
if (mwh == IntPtr .Zero)
{
Thread.Sleep(100);
++attempts;
}
else
{
formFound = true ;
}
} while (!formFound && attempts < 25);
if (mwh != IntPtr .Zero)
return mwh;
else
throw new Exception( "Could not find Main Window" );
}
* This source code was highlighted with Source Code Highlighter .
主なタスクは、コントロールの順序を決定することです。 その名前/タイトル/キャプションプロパティがわかっている場合、コントロールへのポインターを取得できます。 このプロパティが不明であるか、一意でない場合、FindWindowByIndexメソッドを使用する必要があります。 ゼロコントロールはウィンドウ自体になります。 コントロールは、追加の順に続きます。
this .Controls.Add( this .label1);
this .Controls.Add( this .button1);
this .Controls.Add( this .textBox2);
this .Controls.Add( this .textBox1);
* This source code was highlighted with Source Code Highlighter .
ただし、ソースコードは不明であると想定されているため、SPY ++ユーティリティを使用する必要があります。 コントロールの順序を示しています。
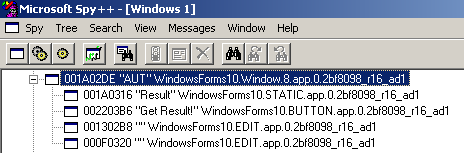
最初の番号はラベル、2番目のボタン、3番目と4番目のテキストフィールドです。
この情報に基づいて、アプリケーションをテストするためのコードが作成されます。
static void Main( string [] args)
{
string path = @"D:\visual studio 2010\Projects\WindowsFormsApplication1\WindowsFormsApplication1\bin\Debug\aut.exe" ;
string nameForm = "AUT" ;
Process p = Process.Start(path);
//
IntPtr mwh = FindMainWindowHandle(nameForm);
//
IntPtr tb1 = FindWindowByIndex(mwh, 3);
IntPtr tb2 = FindWindowByIndex(mwh, 4);
//
string f1 = "521" ;
SendChars(tb1, f1);
string f2 = "367" ;
SendChars(tb2, f2);
//
IntPtr btn = FindWindowByIndex(mwh, 2);
ClickOn(btn);
//
Thread.Sleep(150);
IntPtr lbl = FindWindowByIndex(mwh, 1);
uint WM_GETTEXT = 0x000D;
byte [] buffer = new byte [256];
string res = null ;
int numFetched = SendMessage3(lbl, WM_GETTEXT, 256, buffer);
res = System.Text. Encoding .Unicode.GetString(buffer);
// Label
string resTest = "FAIL" ;
if (res == "888" ) resTest = "PASS" ;
Console .WriteLine( "{0} + {1} = {2}. Test {3}" , f1, f2, res, resTest);
Thread.Sleep(3000);
p.CloseMainWindow();
p.Close();
}
* This source code was highlighted with Source Code Highlighter .
おわりに
自動テスト用の完全なツールの開発は、この記事の目的ではありませんでした。 この記事では、自動テストに使用される.Netプラットフォームのメカニズムのみを示しました。 この記事以外にも、テストスイートの保存と結果の保存に関する質問があります。 テスト目標、データ、オラクルの問題を選択する質問は考慮されませんでした。
ソースのリスト
1. swebok.sorlik.ru/4_software_testing.htmlソフトウェアエンジニアリング知識体系の IEEEガイド、SWEBOK、2004年。ソフトウェアエンジニアリングの基礎。 セルゲイ・オルリクによる翻訳。
2.サム・カナー、ジャック・フォーク、ヤング・ケグ・グエン。 ソフトウェアのテスト。 基本的なビジネスアプリケーション管理の概念。 DiaSoft、2001。
3. msdn.microsoft.com/en-us/library/ms173183.aspx-リフレクション(C#およびVisual Basic)。
4. msdn.microsoft.com/en-us/library/system.windows.forms.control.invokerequired.aspx-.NET Frameworkクラスライブラリ。 プロパティControl.InvokeRequired。
5. msdn.microsoft.com/en-us/library/26thfadc.aspx-アンマネージDLL関数の使用。
6.ジェームズD.マカフリー。 ネットテスト自動化のレシピ:問題解決アプローチ。 books.google.com/books?id=3vN9zsMLvxkC
7. www.automatedtestinginstitute.com/home/index.php?option=com_content&task=view&id=1312&option=com_content&Itemid=1000プレゼンテーション層の下のUIオートメーション。 Bjロリソン。 記事の完全版を含む雑誌へのリンク。 www.automatedtestinginstitute.com/home/ASTMagazine/2010/AutomatedSoftwareTestingMagazine_June2010.pdf
8. msdn.microsoft.com/en-us/magazine/cc163864.aspx .NETを使用したLightweight UI Test Automation。 ジェームズ・マカフリー。
9.管理されていない環境でのhabrahabr.ru/blogs/net/58582 NET:プラットフォーム呼び出しまたはLPTSTRとは。
10. PInvoke.net
プロジェクトのソースコード
All Articles