Now many teams systematize the design of their applications. We decided to go further and automate code synchronization with our component library.
The fact is that hh uses the notorious Figma service to design the UI, which, among other advantages, has an open API. And this, in turn, opens up great opportunities for developers, which we decided to use.
So the idea of the FigmaGen project was born - a tool that synchronizes code with the library of components in Figma. At first it looked like an experiment specific only to our product, but a more universal solution was obtained, and in this article we will share the first fruits of our development.
How it works
Figma allows you to build a library of components and styles that can be globally reused. Ideally, if these components are grouped and are in a separate file, then it will be easier for designers to work with them, and developers will receive a single source of knowledge for implementing these entities in code.
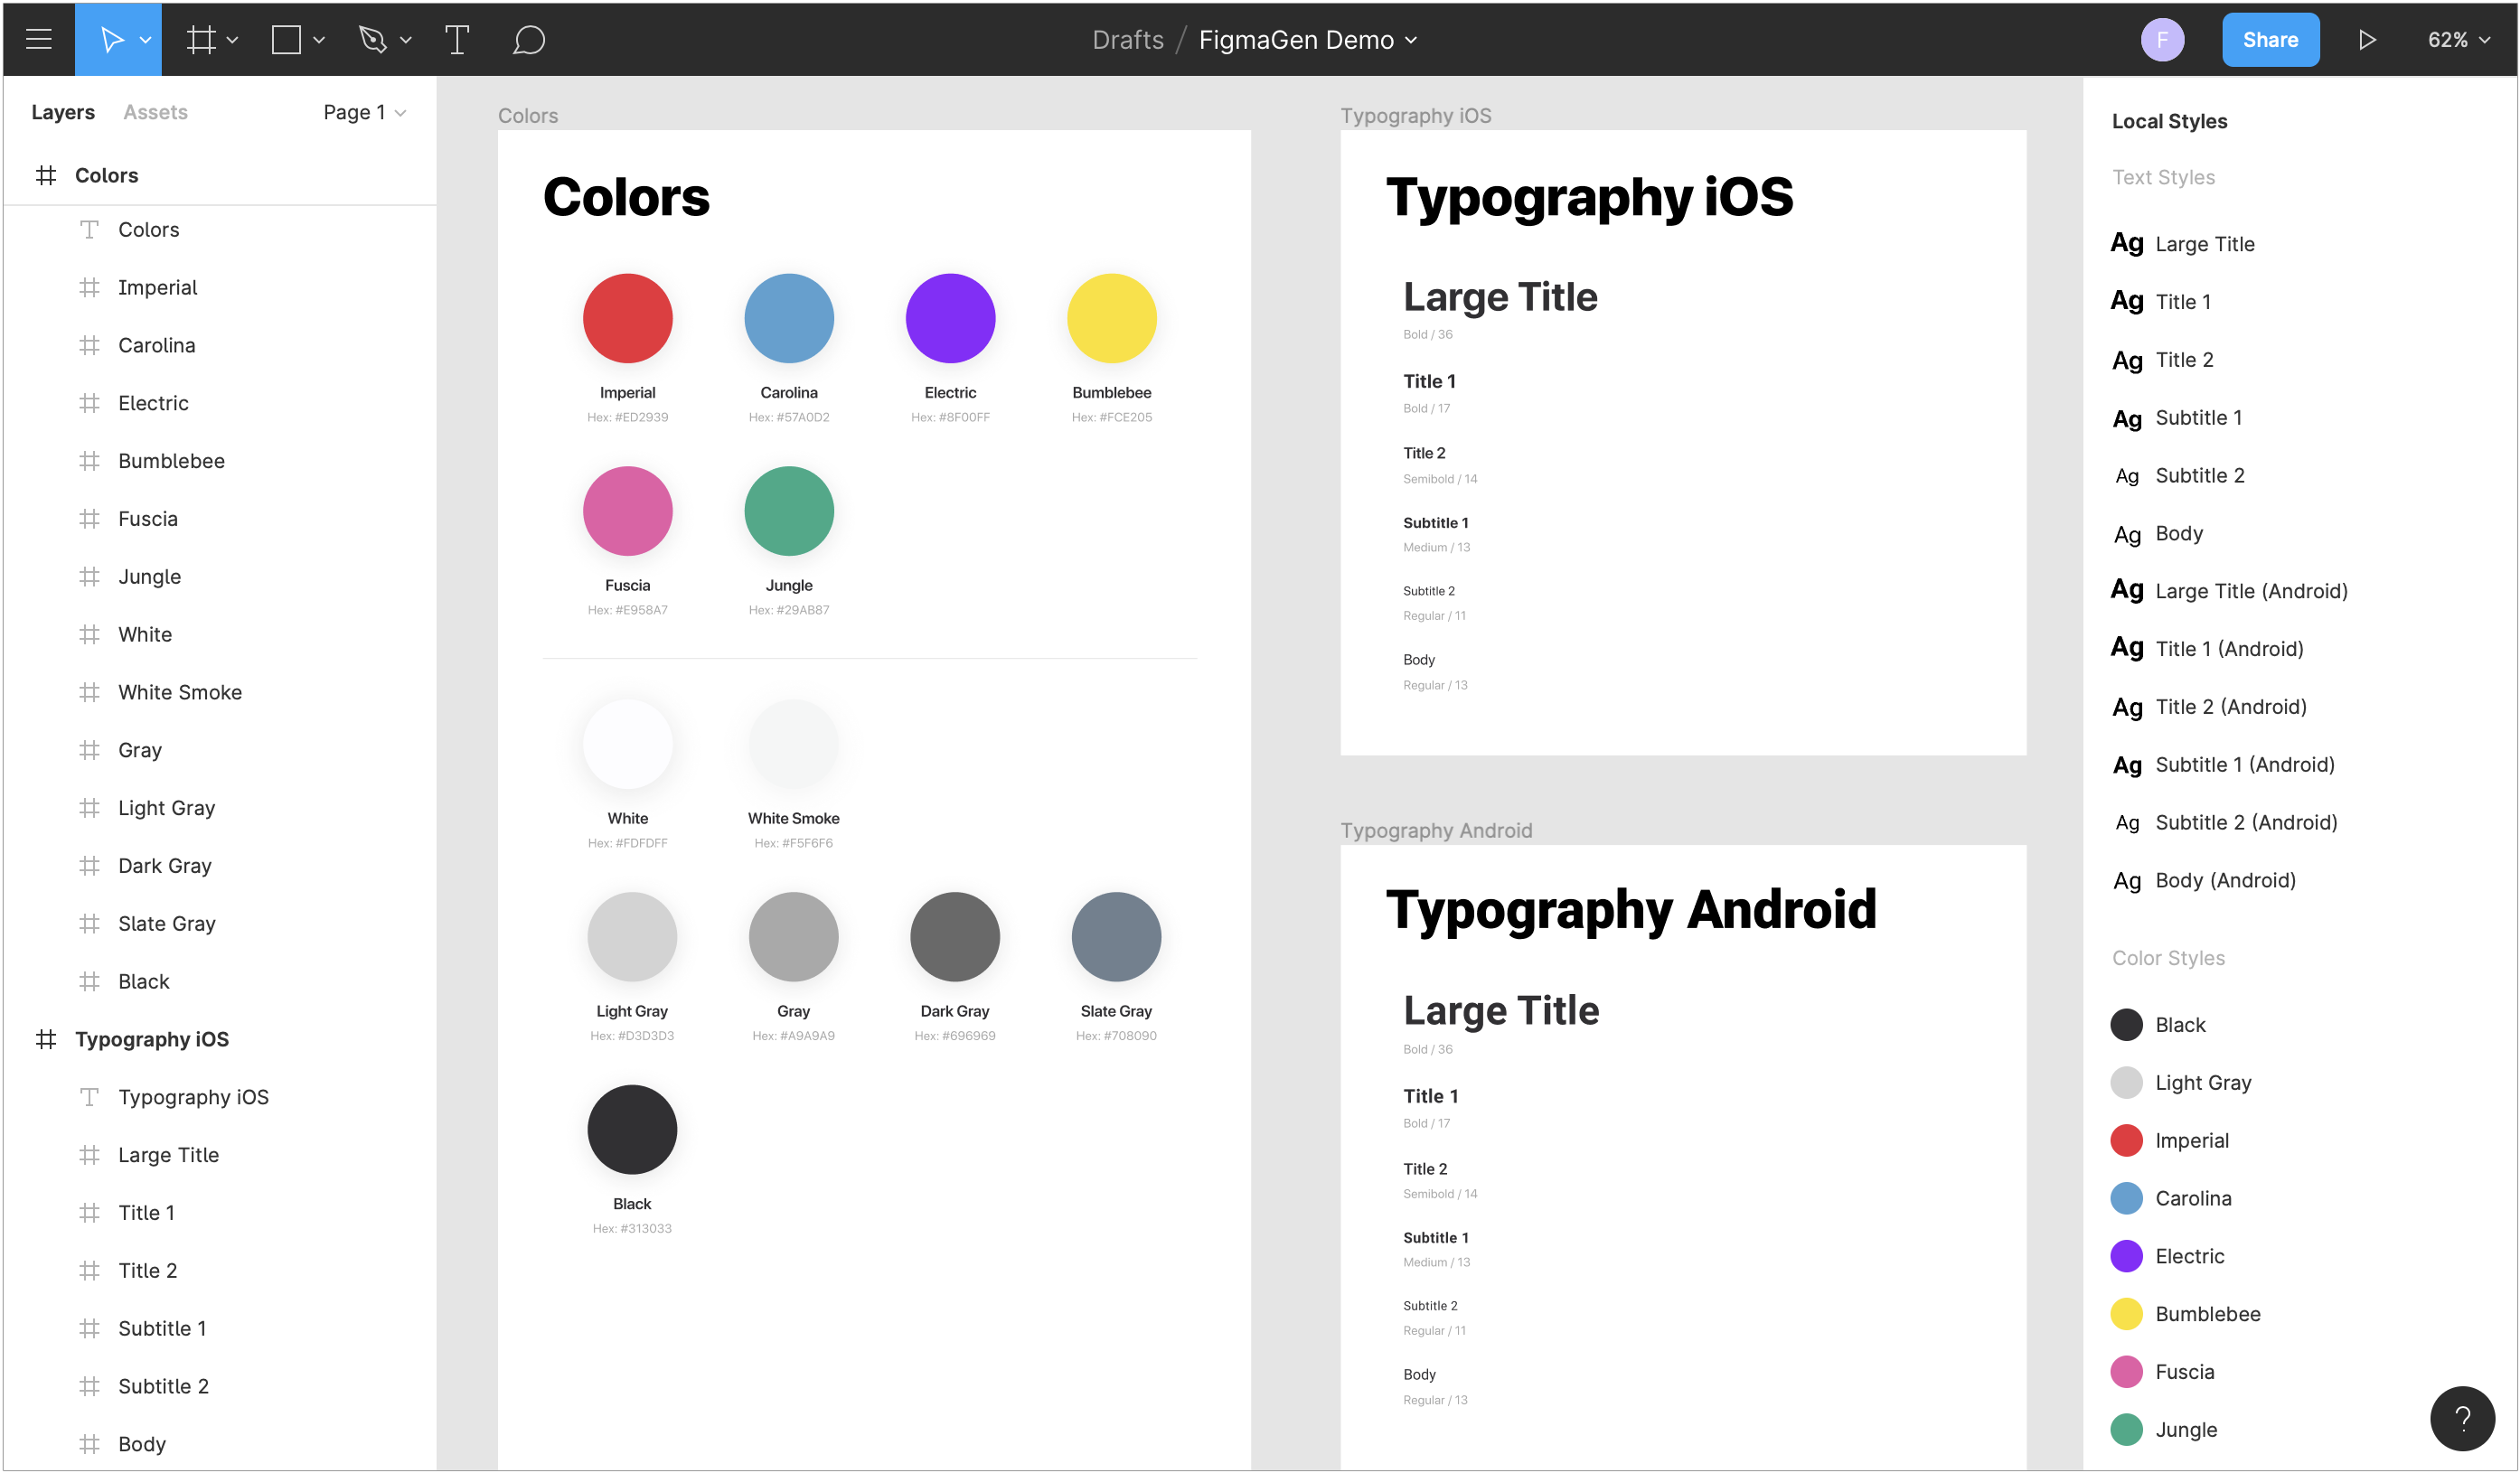
We have prepared a small demo file in Figma for styles, which is available by reference and looks like this:
FigmaGen receives such Figma files using its API , then it extracts all the necessary data and renders it using Stencil templates in the source code. All these steps can be configured in the configuration file, and then to start the generation you just need to run the command:
figmagen generate
Currently, FigmaGen supports the generation of color and text styles, which as a result can be used as follows:
titleLabel.attributedText = "Hello world".styled( .title2, textColor: Colors.imperial ) view.backgroundColor = Colors.whiteSmoke
All the generated code can be easily customized using its own Stencil templates. Therefore, there are no restrictions on the platform, it is only necessary to implement a template for the corresponding language and indicate the path to it in the configuration. An additional bonus is the use of the StencilSwiftKit framework in FigmaGen , which adds useful filters and tags to the templates.
Installation
FigmaGen installation is standard for such tools, and there are several basic ways:
- CocoaPods : add the
pod 'FigmaGen'
linepod 'FigmaGen'
to thePodfile
and run thepod install --repo-update
command. - Homebrew : run the
brew install hhru/tap/FigmaGen
. - Manually download and unzip the zip archive of the latest release from the repository .
In the case of installation using CocoaPods, the generation command should include the path to the Pods/FigmaGen
:
Pods/FigmaGen/figmagen generate
Installation using CocoaPods is the recommended method, since it allows you to fix the version of FigmaGen on all machines of the team.
Configuration
To configure FigmaGen, you need to create a .figmagen.yml
file in the project root folder. If necessary, you can specify a different path in the --config
parameter of the generation command, for example:
figmagen generate --config 'MyFolder/figmagen.yml'
The configuration file itself is in the YAML format and is divided into several sections:
-
base
: basic parameters relevant to all other sections. Any parameter from this section can be overridden to configure the generation subcommand itself. -
colors
: options for the color generation subcommand. -
textStyles
: options for the text style generation subcommand.
However, if any section of the generation subcommand is missing from the configuration, then this subcommand will be skipped.
Basic parameters
In order not to duplicate some fields in the configuration, we selected them in a separate base
section, which contains the parameters relevant for each generation subcommand:
-
accessToken
: string with Figma access token. -
fileKey
: line with the file identifier Figma.
These parameters are used by those generation subcommands for which they are not defined, for example:
base: accessToken: 27482-71b3313c-0e88-481b-8c93-0e465ab8a868 colors: fileKey: ZvsRf99Ik11qS4PjS6MAFc textStyles: fileKey: D1rfFI220qwaG8fD8iBqWa
In this case, colors and text styles will be generated from different Figma files, but using the same access token.
Access token
To receive the Figma file, authorization is required, which is carried out by transferring a personal access token. Such a token can be created in a few simple steps:
- Open account settings in Figma.
- Click the "Create a new personal access token" button in the "Personal Access Tokens" section.
- Enter a description for the token being created (for example, “FigmaGen”).
- Copy the created token to the clipboard.

Next, you need to insert the received token into the accessToken
field of the configuration. If this token allows access to all Figma files that appear in the configuration, then it is enough to define it only in the base
section.
For security reasons, it is recommended to use a specially created user token that has read-only rights to the Figma file.
Figma Files
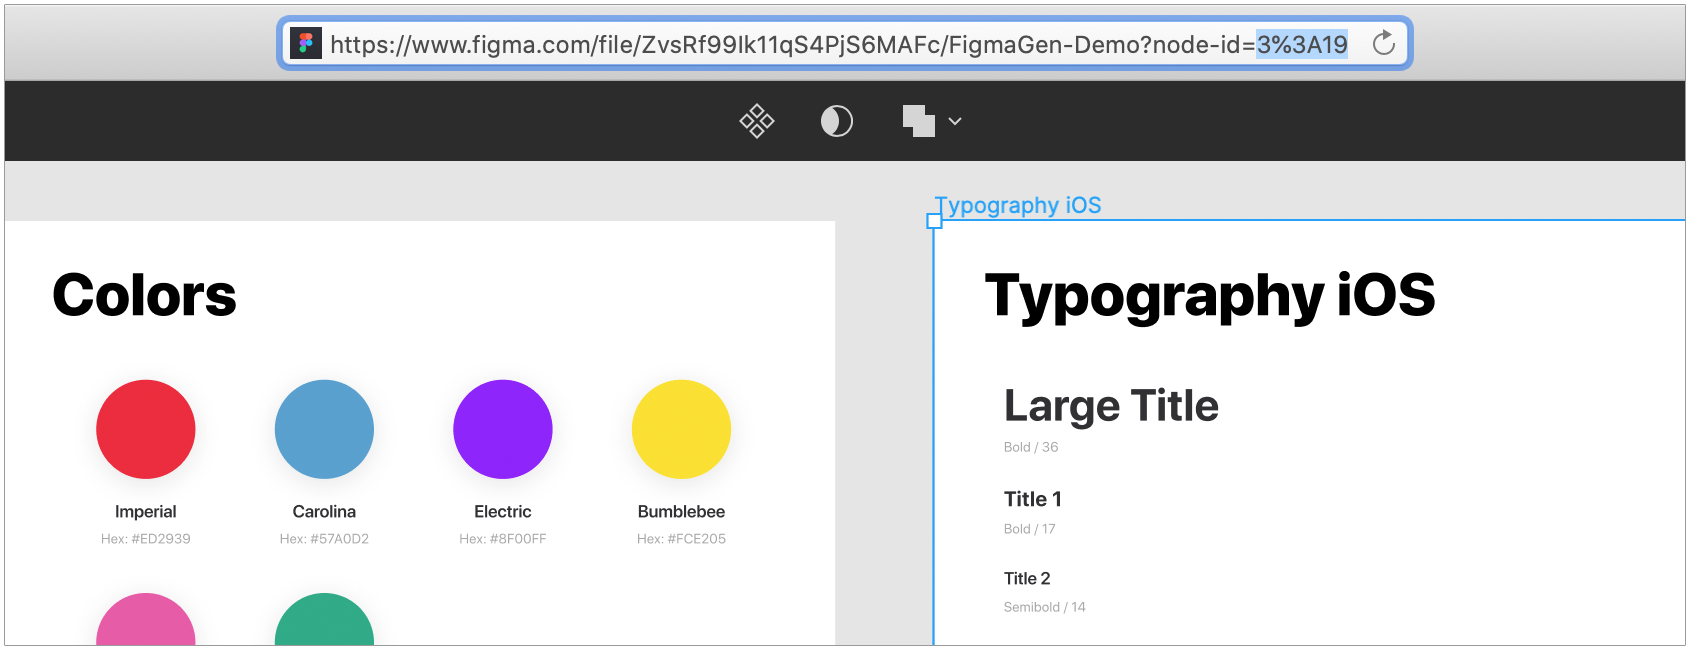
FigmaGen requests the Figma file by its standard identifier, which can be obtained from the URL in the address bar of the browser.

In general, this URL has the following format:
https://www.figma.com/file/<>/<>?node-id=< >
Having received the file identifier, it must be specified in the fileKey
field of the configuration. Similar to an access token, if for all generation sub-commands a single file is used, then you can determine the identifier only in the base
section.
Generation Settings
In addition to the basic parameters, for each generation subcommand it is necessary to determine the following settings:
-
destinationPath
: path to save the generated file. -
templatePath
: path to the Stencil template file. If the parameter is omitted, then the standard template will be used. -
includingNodes
: frame identifiers that should be used when generating the code. If this parameter is omitted, then all nodes of the file will be used. -
excludingNodes
: frame identifiers that should be ignored when generating code. If this parameter is omitted, then all file frames specified in theincludingNodes
field will be used.
For example, the settings for generating text styles can be as follows:
textStyles: destinationPath: Sources/Generated/TextStyle.swift templatePath: Templates/TextStyles.stencil includingNodes: - 7:24 - 3:19 ...
With this configuration, only those text styles will be generated that are in frames with identifiers "7:24" and "3:19".
Node Filtering
Our project library contains platform-specific components. For example, the font is different in text styles: in iOS it is San Francisco , and in Android it is Roboto . In order not to generate extra code, filtering of such styles is necessary, but, alas, standard Figma tools are not enough here, and we considered a couple of options for its implementation:
- Systematization of names of styles and components: in this case, the name of each element would contain some meta-information, which was processed accordingly in FigmaGen.
- Filtering by frame identifiers: all styles are grouped into separate frames by type and platform, and the identifiers of these frames are fixed in the FigmaGen configuration.
At this stage, we chose the second method, because we did not want to change the processes of the design team for automation on the development side. So in the parameters includingNodes
and excludingNodes
you can list the frame identifiers, which should be included or excluded, respectively, for generation subcommands.
You can also use the address bar of the browser to get the identifiers themselves. To do this, select the desired frame in Figma, and the URL will have its identifier in the value of the node-id
parameter. You can insert either a shielded or an unshielded identifier in the configuration.
Perhaps, to implement the new functionality, filtering frames by their identifiers will still be insufficient for us. In this case, we will definitely expand the capabilities of FigmaGen, if by this moment a standard solution from Figma does not appear, for example, in the form of tags for components.
Generation
In a separate repository there is a demo project ready for battle, you can download it and feel free to experiment. In it, FigmaGen is installed using CocoaPods, so you should first run the pod install
command. For convenience, a call to the generation command has been added to the build phase, and each launch of it updates all generated files.
After playing with the code for the styles from the demo library , you can copy its file to your Figma account by clicking the "Duplicate to your Drafts" button.

This will allow you to modify the styles and better understand how their code is generated. You only need to reconfigure FigmaGen by specifying the data for the new file.
Also, the demo project is perfect as a playground for customizing the Stencil templates located in the Templates folder. You can edit them directly in Xcode and check the correctness of both the templates themselves and the code they generate with one run of the project build.
Project Integration
It is recommended that you run various code generation tools ( SwiftGen , R.Swift ) in the build phase of the project, because they use local resources, which can change during development. In this case, such integration ensures that the most current code always gets into the assembly.
FigmaGen does not use local resources, all the data for generation is in Figma, therefore, it makes no sense to call it for each assembly. It is much better to generate code once and periodically update when new versions of the component library appear, or when updating the version of FigmaGen itself.
Now in our project, the on-duty developer is engaged in updating the generated code. In the next versions of FigmaGen, it is planned to add support for versioning Figma files, then it may be possible to automate this procedure, but this is a completely different story.

To summarize
These are just our first steps towards creating a powerful tool that will allow developers to automate as much as possible the entire routine associated with the design system.
The most difficult part of the project was completed: the architecture was defined, the main reusable nodes were formed, and the infrastructure was configured. This allows us to quickly increase the new FigmaGen functionality, and we still have a lot of interesting plans:
- versioning Figma files
- image automation
- support for light and dark themes
- code generation for gradients, shadows, strokes, etc.
And for sure, new versions with these features will appear very soon, stay tuned in FigmaGen repository .
That's all. We welcome feedback in the comments. Till!