I believe that not only beauty will save the world, but also interdisciplinarity . Since my daughter loves art, and I like programming, I often look at the intersection of these areas, which can be called generative art , and which is part of Science Art . In this article, I want to share the results of one creative portrait-painting experiment, from which the Cognitive People Blending technique was born:

| 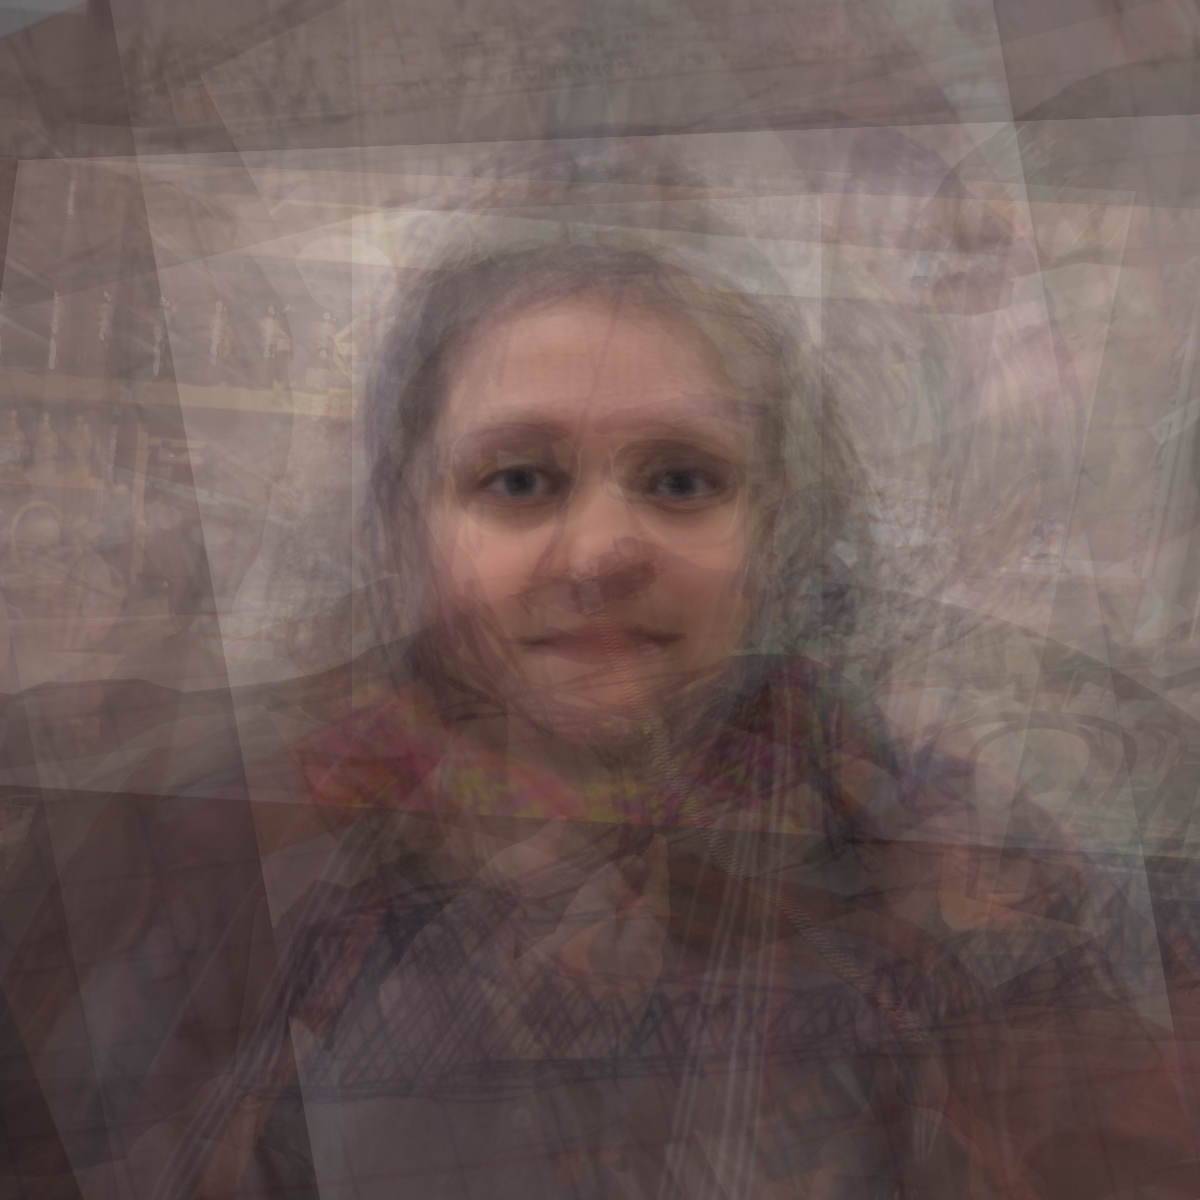 |
| Glass Girl , 2019 | Vickie Rotator , 2019 |
These portraits were created from several photographs superimposed in such a way that the eyes coincided - while the main features of the face are emphasized, the background is blurred, and a curious mixed portrait is obtained. This can certainly be done in PhotoShop, but it is painful, and leaves no room for quick experiments with different photos. Below I will show how such portraits can be created automatically using Microsoft cognitive services and a small amount of creativity. You can find all the code I’m considering in this repository , and immediately start using it with Azure Notebooks . If you suddenly create masterpieces in this genre - please refer to Cognitive People Blending .
main idea
To begin with, we need a set of portrait photographs - these can be photographs of one person, or different people that we want to mix together. The more photos you have, the more interesting, but you should definitely not take less than 10 photos.
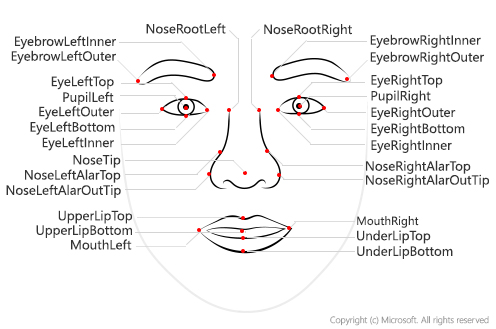
To find the eye coordinates in the photo, we will use the Face API , which can extract the so-called reference points of the face . Then we apply the affine transformation implemented in the OpenCV library to align the eyes in all photos. Finally, we mix all the images together to get the result.
We extract the anchor points of the face
To begin with, we will learn how to determine the coordinates of the reference points of a face from a photograph. The Microsoft Face API provides a simple REST API for face analysis, which, in addition to reference points, can extract a lot of useful information - gender, age, head angles, emotions, the presence of a beard, etc.
It is relatively easy to call the Face API directly using the REST protocol, but it’s even better to use the special Python SDK, which is part of the Azure SDK library . For more information on calling Face API from other languages, see Microsoft Docs .
To install the SDK (and at the same time OpenCV, which we will also need), we enter the following command in the operating system console:
pip install azure-cognitiveservices-vision-face opencv-python
If you are using Azure Notebook, then use the prefix !
and enter the code in a normal cell - you can see an example here .
To use the Face API, we need a key and an endpoint URL , which can be obtained in several ways:
- If you already have an Azure subscription, you need to create a cognitive services service , and get the key and URL from there
- You can always create a free trial subscription (you will need a credit card for this, but you can use some free resources, including cognitive services, for a whole year)
- If you want to just experiment a little, ask for a trial key that will last 7 days.
Important: If you use a trial key, you will have limited access to the Face API by the number of images that you can process, and by the number of requests per minute (no more than 20 pcs.). If you want to process more than 20 photos in this example, you will need to insert a delay between calls so as not to exceed this limit.
The resulting key and URL will be remembered in the key
and endpoint
variables:
key = '--INSERT YOUR KEY HERE--' endpoint = 'https://westus2.api.cognitive.microsoft.com'
The main requests to the Face API are made through the static module cognitive_face
, which for brevity we will call cf
:
import azure.cognitiveservices.vision.face as cf from msrest.authentication import CognitiveServicesCredentials cli = cf.FaceClient(endpoint,CognitiveServicesCredentials(key))
The main functions for analyzing faces are face.detect_with_url
and face.detect_with_stream
. Depending on these parameters, they can extract a lot of useful information - in our case, we only need reference points (facial landmarks):
im_url='https://2016.dotnext-piter.ru/assets/images/people/soshnikov.jpg' res = cli.face.detect_with_url(im_url,return_face_landmarks=True) print(res[0])
As a result, we get the res
array, each element of which corresponds to the face found in the photo. We will assume that we are dealing with portraits on which there is exactly one face, therefore res[0]
will give us the relevant information:
{'face_rectangle': <azure.cognitiveservices.vision.face.models._models_py3.FaceRectangle object at 0x7f72f23570b8>, 'additional_properties': {}, 'face_attributes': None, 'face_id': '59dc97ef-b5e2-4c83-99c0-75cdb69048fa', 'face_landmarks': <azure.cognitiveservices.vision.face.models._models_py3.FaceLandmarks object at 0x7f72f2357080>, 'recognition_model': None}
Since it is more convenient to operate with dictionaries in Python, we can get all the attributes of the analyzed face using res[0].facial_landmarks.as_dict()
:
{'nose_left_alar_top': {'y': 147.4, 'x': 131.9}, 'eyebrow_right_inner': {'y': 106.3, 'x': 157.2}, 'pupil_right': {'y': 118.9, 'x': 170.9}, 'eye_right_outer': {'y': 118.5, 'x': 181.5}, 'pupil_left': {'y': 126.7, 'x': 112.6}, 'eyebrow_right_outer': {'y': 106.6, 'x': 192.1}, 'eye_right_top': {'y': 115.0, 'x': 171.3}, 'nose_tip': {'y': 158.4, 'x': 148.7}, 'upper_lip_top': {'y': 173.6, 'x': 150.3}, 'eyebrow_left_outer': {'y': 120.3, 'x': 84.1}, 'nose_right_alar_top': {'y': 143.8, 'x': 158.4}, 'nose_root_right': {'y': 124.3, 'x': 151.5}, 'nose_root_left': {'y': 126.3, 'x': 135.4}, 'eye_left_inner': {'y': 126.7, 'x': 122.4}, 'eyebrow_left_inner': {'y': 110.1, 'x': 122.9}, 'nose_left_alar_out_tip': {'y': 159.3, 'x': 128.2}, 'eye_left_outer': {'y': 128.9, 'x': 103.3}, 'eye_left_bottom': {'y': 131.4, 'x': 113.7}, 'eye_left_top': {'y': 122.8, 'x': 112.3}, 'eye_right_bottom': {'y': 123.5, 'x': 172.7}, 'under_lip_bottom': {'y': 193.0, 'x': 154.5}, 'under_lip_top': {'y': 186.2, 'x': 152.7}, 'upper_lip_bottom': {'y': 176.9, 'x': 151.7}, 'nose_right_alar_out_tip': {'y': 153.0, 'x': 167.0}, 'mouth_left': {'y': 182.6, 'x': 121.6}, 'mouth_right': {'y': 172.1, 'x': 177.8}, 'eye_right_inner': {'y': 120.8, 'x': 162.7}}
Uploading Images
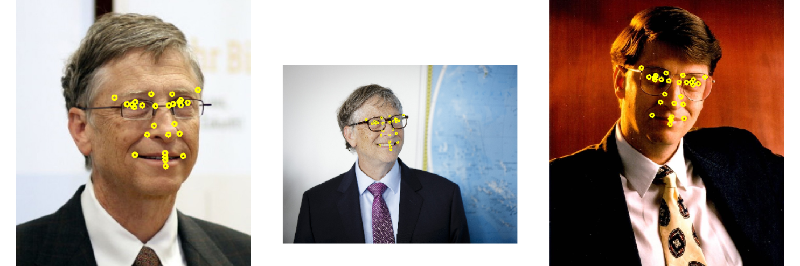
By this time, we need a set of pictures. I recommend starting with 15-20 of my portrait photos of good quality. However, if you are too lazy to look for photos, you can take ready-made images of Bill Gates obtained using Bing Image Search . Put them in the images
directory:
mkdir images wget https://github.com/shwars/NeuroWorkshopData/raw/master/Data/Gates50.zip unzip -q Gates50.zip -d images rm Gates50.zip
If you use Azure Notebook and want to take your photos, create the images
directory in your project and upload the photos there manually from the project’s home page.
Let's start the fun! Download all the images, and also call the Face API to get all the control points:
import glob filenames = [] images = [] imagepoints = [] for fn in glob.glob("images/*"): print("Processing {}".format(fn)) with open(fn,'rb') as f: res = cli.face.detect_with_stream(f,return_face_landmarks=True) if len(res)>0: filenames.append(fn) images.append(cv2.cvtColor(cv2.imread(fn),cv2.COLOR_BGR2RGB)) imagepoints.append(res[0].face_landmarks.as_dict())
For clarity, apply anchor points on top of the image of some random picture:
def decorate(i): img = images[i].copy() for k,v in imagepoints[i].items(): cv2.circle(img,(int(v['x']),int(v['y'])),7,(255,255,0),5) return img display_images([decorate(i) for i in range(1,5)])
Here I use the display_images
function to display a list of pictures on the screen. We will need this function further. For brevity, I will not provide the code here, but will refer you to the repository .
Affine transformations
After receiving the control points for all the photos, we need to align them so that all the eyes in all the photos are in the same coordinates. To do this, you have to scale, rotate and stretch the images - in other words, apply affine transformations to them. It is known that the affine transformation is entirely determined by three points , more precisely, the changes that occur with them.
In our case, we have the coordinates of two eyes that we want to move to points with coordinates (130,120) and (170,120) - these coordinates are matched to the eye if we want to get a target image of 300x300 pixels. But for a complete description of the transformation, we need one more point!
As such a point, you can take, for example, the middle of the mouth - since it is in some way opposite the eyes, and the triangle formed by these points more or less completely covers the face. We do not have ready coordinates for the middle of the mouth, but we can calculate them by taking the middle point between mouth_left
and mouth_right
.
The affine transformation is determined by the matrix. The getAffineTransform
function in OpenCV calculates this matrix by the coordinates of three points before and after the transformation. Then we use warpAffine
to apply the transform to the image - this function also cuts the image to the specified size.
target_triangle = np.float32([[130.0,120.0],[170.0,120.0],[150.0,160.0]]) size = 300 def affine_transform(img,attrs): mc_x = (attrs['mouth_left']['x']+attrs['mouth_right']['x'])/2.0 mc_y = (attrs['mouth_left']['y']+attrs['mouth_right']['y'])/2.0 tr = cv2.getAffineTransform(np.float32( [(attrs['pupil_left']['x'],attrs['pupil_left']['y']), (attrs['pupil_right']['x'],attrs['pupil_right']['y']), (mc_x,mc_y)]), target_triangle) return cv2.warpAffine(img,tr,(size,size))
Having defined this function, we can transform all our pictures:
img_aligned = [affine_transform(i,a) for i,a in zip(images,imagepoints)] display_images(img_aligned[:5])

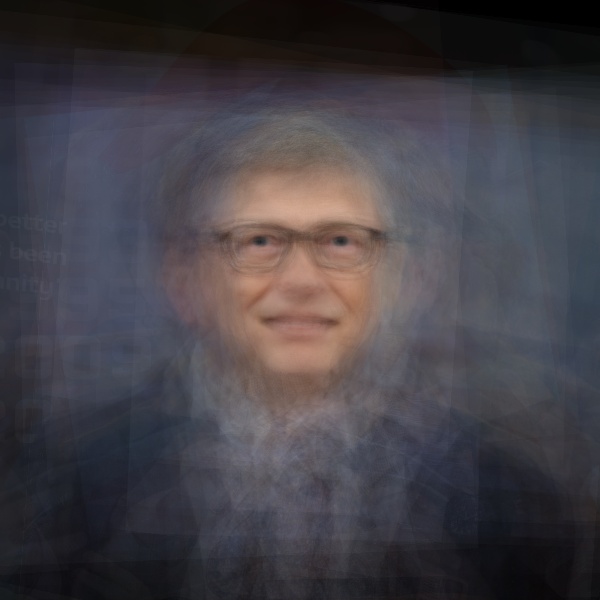
Voila!
To get the final picture, we just have to mix all the images together. This is done by simply averaging all numpy
arrays:
imgs=np.array(img_aligned,dtype=np.float32)/255. plt.imshow(np.average(imgs,axis=0))
Here we nevertheless apply one trick - we float32
type of array elements to float32
, so that they can then be averaged correctly. Otherwise, division may be difficult :)
And now - try it yourself!
Now you have everything you need to start creating your wonderful portraits! The complete code with an example is in the repository on GitHub , and it is not even necessary to install Python, since you can use Azure Notebooks directly from the browser. Therefore, there is no excuse not to try it yourself!
To give you one more reason to try (besides curiosity and creativity ), I myself will personally present my book on F # for the best work in the PeopleBlending genre (pickup, or Russian post)! Leave links to work (and preferably to posts on social networks) in the comments, or send me before January 1 . I reserve the right to publish the best works on the blog.
By the way, it is not necessary to limit yourself to overlaying photos! Think about what creative scenarios for using reference points of the face you can come up with, and translate ideas into reality!
All creative success!