On the eve of the launch of the Backend PHP Developer course , we had a traditional open lesson . This time we got acquainted with the Serverless concept, talked about its implementation in AWS, discussed the principles of operation, assembly and launch, and also built a simple PHP TG-bot based on AWS Lambda.
Lecturer - Alexander Pryakhin , CTO of Westwing Russia.

A brief excursion into history

How did we get to such a life that serverless computing appeared? Of course, they appeared not just like that, but became a logical continuation of existing virtualization technologies.

What do we usually virtualize? For example, a processor. You can also virtualize memory by highlighting certain areas of memory and making them available to some users and inaccessible to others. You can virtualize a VPN network. And so on.

Virtualization is good because we better utilize resources and increase productivity. But there are also disadvantages, for example, at one time there were compatibility problems. However, there are practically no architectures that would be incompatible with modern virtual machines.
The next minus is that we add an additional layer of abstraction, add a hypervisor, add a virtual machine by itself, and, of course, we can lose a little speed. Somewhat complicated and the use of the server.
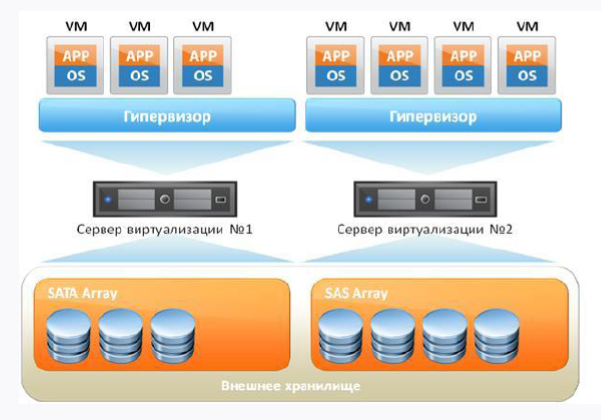
If we take a standard virtual machine with you, it will look something like this:

Firstly, we have an iron server, and secondly, the operating system on which our hypervisor will spin. And on top of all this stuff, our virtual machines are spinning, in which there is a guest OS, libraries and applications. If you think logically, then we see some overhead in the presence of the guest OS, because in fact we spend extra resources.
How can I solve the overhead problem? Refusing virtual machines and putting a container management system on top of the main operating system. Of course, the most popular system now is the Docker Engine. Then the libraries inside the container will use the host kernel of the operating system.

In this way, we remove the overhead, but Docker is not ideal either, and it has its own problems and work features that not everyone likes.
The main thing to understand is that Docker and virtual are different approaches, and you do not need to equate them. Docker is not a microvirtual with which you can work as with a virtual machine, because a container for that and a container. But the container allows us to provide flexibility and a completely different approach to Continuous delivery, when we deliver things to production and understand that they are already tested and working.
Cloud technologies
With the further development of virtualization, cloud technologies also began to develop. This is a good solution, but it’s worth mentioning right away that clouds are not a silver bullet and not a panacea for all ills. Here one cannot help but recall one famous quote:
“When I hear someone touting the cloud as a magic-bullet for all computing problems, I silently replace“ cloud ”with“ clown ”and carry on with a zen-like smile.”
Amy rich
However, for medium-sized companies that want to receive a certain level of service and fault tolerance without huge financial injections, the clouds are quite an option. And for many companies, keeping their data center with the same SLA will be much more expensive than being served in the cloud. In addition, we can use the clouds for our needs, because they provide some things in just a few clicks of the mouse, which is very convenient. For example, the ability to lift a virtual machine or network in a few clicks.
Yes, there are restrictions, for example, the 152nd Federal Law prohibiting the storage of personal data abroad, so the same Amazon will not be suitable for us during an audit. Do not forget about Vendor-lock. Many cloud solutions do not port to each other, although the same S3-compatible storage is supported by most providers.
Clouds provide us with the opportunity to receive different levels of service without narrowly focused knowledge. The less knowledge you need, the more we will pay. In the figure below, you can look at the pyramid, where, from the bottom up, the decrease in technical knowledge requirements when using the cloud is displayed:

Serverless and FaaS (Function As A Service)
Serverless is a fairly young way to run scripts in the clouds, for example, such as AWS (in terms of AWS, the server is implemented in Lambda). The * aaS approaches listed on the pyramid above are already familiar: IaaS (EC2, VDS), PaaS (Shared Hosting), SaaS (Office 365, Tilda). So, Serverless is an implementation of the FaaS approach. And this approach consists in providing the user with a ready-made platform for the development, launch and management of certain functionality without the need for independent preparation and configuration.
Imagine that you have a machine that is engaged in night processing of documents, performing tasks from 00:00 to 6:00, and during the rest of the hours it is idle. The question is: why pay for it during the day? And why not use free resources for something else? This desire for optimization and the desire to spend money only on what you really use, and led to the emergence of FaaS.
Serverless is a resource for executing code and nothing more. This does not mean that there is no server behind our script - it is, but we, in fact, do not have any specifically allocated resource on which our Lambda will be launched. When we run our script, the micro-infrastructure immediately unfolds under it, and this is not your problem in principle - you only think that you have the code executed, and you don’t need to think about anything else.
This requires, of course, a certain approach to the development of your code. For example, you can’t store anything in this environment, you need to take everything out. If this is data, then an external database is needed, if it is a log, then an external log service, if it is a file, then an external file storage. Fortunately, any Serverless provider provides the ability to connect to external systems.
You only have code, you work in the Stateless paradigm, you have no state. For the same world of PHP, this means, for example, that you can forget about the standard session mechanism. In principle, you can even build your Serverless, and recently there was an article on this topic on Habré.
The main idea of Serverless is that the infrastructure does not require support from the team. Everything falls on the shoulders of the platform, for which you, in fact, pay money. Of the minuses - you do not control the execution environment and do not know where what is performed.
So Serverless:
- does not mean physical absence of the server;
- not a killer of virtualoks and Docker;
- not hype here and now.
Serverless should be pushed consciously and deliberately. For example, if you need to quickly test a hypothesis without involving half the team. So you get Function As A Service. The function will respond to some events, and since there is a reaction to events, these events must be called by something - for this, there are many triggers in the same AWS.
FaaS Features:
- infrastructure does not require configuration;
- “out of the box” event model;
- Stateless;
- scaling is very easy and is performed automatically according to the needs of the user.
AWS Lambda
The first and publicly available FaaS implementation is AWS Lambda. If it is thesis, then it has the following features:
- available since 2014;
- supports out of the box Java, Node.js, Python, Go and custom runtimes;
- we pay for:
number of calls;
lead time.
AWS Lambda: why is it needed:
Disposal You pay only for the time when the service is running.
Speed. Lambda itself rises and works very fast.
Functional. Lambda has many features for integrating with AWS services.
Performance. Putting a lambda is pretty hard. In parallel, it can be performed depending on the region from a maximum of 1000 to 3000 copies. And if desired, this limit can be increased by writing in support.
We have a lambda body, an online editor, VPC as a virtual grid of computations, logging, the code itself, environment variables and triggers that cause lambda (by the way, versioning works very well). Excellent Lambda anatomy is outlined in this article .
The code is stored either in the body (if these are languages supported out of the box), or in layers. We have a trigger that calls the lambda, the lambda reads the temporary environment, pulls them to itself and executes our code:

If we have a custom runtime, we will have to place the code in a layer. If you worked with Docker, then the Docker layer is very similar to the layer in lambda - a kind of quasi-storage in which our necessary binding is located. There we have the executable file of the environment (if we are talking about PHP, you should place the compiled PHP binary in advance), the lambda bootstrap file (located by default) and the directly called scripts that will be executed.

With delivery, everything is not so rosy:

That is, we are offered to take files with the code, upload it to the zip archive, upload it to the layer and run our code. It’s completely cool that this is offered in the official documentation of Amazon.

Of course, this does not correspond to modern realities, and the smell of two thousandths in the air. Fortunately, kind people tried and made several frameworks, so we will use the Serverless framework developed on Node.js and allowing us to manage applications based on AWS Lambda. In addition, when we talk about deployment and development, of course, I don’t really want to deploy manually, but there is a desire to do something flexible and automated.
So, we need:
- AWS CLI - command line interface for working with AWS services;
- the Serverless framework already mentioned above (the development version is free, and its functionality is enough for the eyes);
- The Bref library, which is needed for writing code. This library is installed using composer, so the code will be compatible with any framework. A great solution, especially considering that AWS Lambda does not support calling PHP scripts out of the box.

Customize your environment and AWS
AWS CLI
Let's start by creating an account and installing AWS CLI. AWS console shell is based on Python 2.7+ or 3.4+. Since AWS recommends version 3 of Python, we will not argue.
The examples below are for Ubuntu.
sudo apt-get -y install python3-pip
Then install directly AWS CLI:
pip3 install awscli --upgrade --user
Check the installation:
aws --version
Now you need to connect AWS CLI to your account. You can use your existing username and password, but it would be better if you create a separate user through AWS IAM, defining him only the necessary access rights. Calling the configuration will not cause problems:
aws configure
Next, you'll need AWS Secret and AWS Access Key. They can be obtained in ASW IAM in the tab "Security credentials" (located on the page of the desired user). The “Create access key” button will help to generate access keys. Keep them with you.

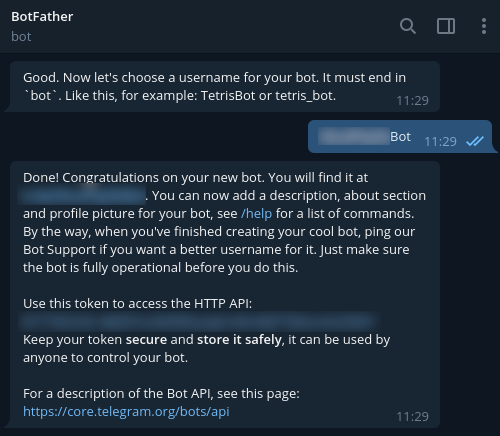
To register a new bot in Telegram, use @BotFather and the / newbot command. As a result, the token necessary for connecting to your bot will be returned to you. Lock it also.
Serverless framework
To install Serverless Framework, you will need an account at https://serverless.com/ .
After completing the registration, we will proceed to the installation at our workstation. Node.js 6th and above will be required.
sudo apt-get -y install nodejs
To ensure the correct launch in our environment, we follow the recommended steps:
mkdir ~/.npm-global export PATH=~/.npm-global/bin:$PATH source ~/.profile npm config set prefix '~/.npm-global'
Also add:
~/.npm-global/bin:$PATH
to the / etc / environment file.
Now put Serverless:
npm install -g serverless
Aws
Well, it's time to switch to the AWS interface and add a domain name. We create an AWS Route 53 zone, a DNS record, and an SSL certificate for it.
In addition, you need the ELB, which we create in the service EC2 -> Load Balancers. By the way, when creating an ELB, you need to go through all the steps of the wizard, indicating the created certificate.
As for the balancer, you can create it through the AWS CLI using the following command:
aws elb create-load-balancer --load-balancer-name my-load-balancer --listeners "Protocol=HTTP,LoadBalancerPort=80,InstanceProtocol=HTTP,InstancePort=80" "Protocol=HTTPS,LoadBalancerPort=443,InstanceProtocol=HTTP,InstancePort=80,SSLCertificateId=arn:aws:iam::123456789012:server-certificate/my-server-cert" --subnets subnet-15aaab61 --security-groups sg-a61988c3
A balancer will be needed after the first deployment. In this case, you need to send requests to our domain to it. To implement this, in the settings of the DNS record (field “Alias target”), begin to enter the name of the created ELB. As a result, you will see a drop-down list, so it remains to select the desired entry and save it.

Now go to the code.
Writing a code
We will use Bref to write the code. As mentioned earlier, this library is installed using composer, so the code will be compatible with any framework. By the way, the developers have already described the process of using Bref with Laravel and Symfony . But it is advisable for us to work on the "bare" PHP - this will help to better understand the essence.
We start with the dependencies:
{ "require": { "php": ">=7.2", "bref/bref": "^0.5.9", "telegram-bot/api": "*" }, "autoload": { "psr-4": { "App\": "src/" } } }
We will write in PHP 7.2 and higher, and for working with Telegram this shell for the API is suitable for us - https://github.com/TelegramBot/Api . As for the code itself, it will be placed in the src directory.
So, the serverless environment is going through a console dialog. An HTTP application is required, and from the point of view of Lambda, this will mean that script calls will be executed in the same way as Nginx does. Interpretation will be performed by PHP-FPM. In general, this is more like a standard console script call. This is an important point, because without taking this feature into account, we will not be able to call scripts via HTTP.
We carry out:
vendor/bin/bref init
In the dialog, select the “HTTP application” item and do not forget to specify the region, since the application should work in the same region in which the balancer works.
After initialization, 2 new files will appear:
index.php - the called file;
serverless.yml - deployment configuration file.
The .serverless folder will need to be immediately added to the .gitignore (it will appear after the 1st attempt to deploy).
Since we have a web application, we will drop index.php into the public folder, immediately switching to serverless.yml. Here's what it might look like in our implementation:
# lambda- service: app # provider: name: aws # ! region: eu-central-1 # runtime: provided # , bref 1024. memoryLimit: 256 # stage: dev # environment: BOT_TOKEN: ${ssm:/app/bot-token} # bref plugins: - ./vendor/bref/bref # Lambda- functions: # php-api-dev # service-function-stage api: handler: public/index.php description: '' # in seconds (API Gateway has a timeout of 29 seconds) timeout: 28 layers: - ${bref:layer.php-73-fpm} # API Gateway events: - http: 'ANY /' - http: 'ANY /{proxy+}' # environment: MY_VARIABLE: ${ssm:/app/my_variable}
Now let's analyze the non-obvious lines. We need more environment variables. We do not want to hardcode database connections, external APIs, etc. If we connect to Telegram, we will have our own token, which is received from BotFather. And it is not recommended to store this token in serverless.yml, so it’s better to send it to AWS ssm storage:
aws ssm put-parameter --region eu-central-1 --name '/app/my_variable' --type String --value '___BOTFATHER'
By the way, we are referring to it in the configuration.
These variables are available as environment variables, and you can access them in PHP using the getenv function. If we talk about our example, then let's keep the bot token in the global scope for simplicity. We can also transfer the token to the scope of a single function, and the call itself will not change from this.
Go ahead. Let's now create a simple BotApp class - it will be responsible for generating a response for the bot and will respond to commands. Telegram developers recommend adding support for the / help and / start commands for all bots. Let's add another command for fun. The class itself is quite simple and makes it possible to implement Front controller in index.php without loading the call file itself. To get more complex logic, the architecture should be developed and complicated.
<?php namespace App; use TelegramBot\Api\Client; use Telegram\Bot\Objects\Update; class BotApp { function run(): void{ $token = getenv('BOT_TOKEN'); $bot = new Client($token); // start $bot->command('start', function ($message) use ($bot) { $answer = ' !'; $bot->sendMessage($message->getChat()->getId(), $answer); }); // $bot->command('help', function ($message) use ($bot) { $answer = ': /help - '; $bot->sendMessage($message->getChat()->getId(), $answer); }); // $bot->command('hello', function ($message) use ($bot) { $answer = '-, - , Serverless '; $bot->sendMessage($message->getChat()->getId(), $answer); }); $bot->run(); } }
And here is the listing of index.php:
<?php require_once('../vendor/autoload.php'); use App\BotApp; try{ $botApp = new BotApp(); $botApp->run(); } catch (Exception $e){ echo $e->getMessage(); print_r($e->getTrace(), 1); }
It may seem strange, but we are all set to go to Production. Let's do this by running the command in the serverless.yml folder:
sls deploy
In normal mode, serverless will pack the files into zip archives, create an S3-bucket where to put them, then create or update AWS Application attached to Lambda and put the code and runtime in a separate layer.
During the 1st launch, the Gateway API will be created (we left it to make it easier to test calls, but then it is advisable to delete it). You will also need to configure the Lambda call via ELB, for which we select “Add trigger” in the function control window and select “Application Load Balancer” in the drop-down list. You will need to specify the ELB created earlier, set the connection via HTTPS, leave the Host empty, and in Path specify the path that Lambda will call (for example, / lambda / mytgbot). As a result, your Lambda will be available at the URL with the specified path.
Now you can register the response part of the bot in Telegram so that the messenger understands where to get messages. To do this, call the following URL in the browser, but do not forget to substitute your own parameters into it:
https://api.telegram.org/bot_/setWebhook?url=https://my-elb-host.com/lambda/mytgbot
As a result, the API will return “OK”, after which the bot will become available.

Testing the bot on locales
Bot can be tested before deployment. The fact is that the Serverless Framework supports launching on locales using Docker containers for this. Call command:
sls invoke local --docker -f myFunction
Do not forget that we used environment variables, so during the call they should also be set in the format:
sls invoke local --docker -f myFunction --env VAR1=val1
Logs
By default, the call output will be logged into CloudWatch - it is available in the Monitoring panel of the corresponding Lambda function. Here you can read the call traces in the event of a dump on the PHP side. In addition, you can connect advanced monitoring services, but they will cost an additional few cents every month.
Total
As a result, we got a fairly quick, flexible, scalable, and also relatively inexpensive solution. Yes, Lambda does not always win compared to standard VMs and containers, but there are situations when the Serverless application helps to “shoot” quickly and efficiently. And the example of the created bot just demonstrates this.
Useful materials on the topic: