
How does Flutter actually work?
What are Widgets, Elements, BuildContext, RenderOject, Bindings? ..
Difficulty: Beginner
Introduction
Last year ( note: in 2018 ), when I started my journey into the fabulous world of Flutter, there was very little information on the Internet compared to what it is today. Now, despite the fact that a lot of materials have already been written, only a small part of them talks about how Flutter actually works.
What are Widgets ( widgets ), Elements ( elements ), BuildContext? Why is Flutter fast? Why sometimes it does not work as expected? What are trees and why are they needed?
In 95% of cases when writing an application, you will only deal with widgets in order to display something or interact with it. But have you really wondered how all this magic works inside? How does the system know when to refresh the screen and which parts should be updated?
Content:
- Introduction
- Part 1: Background
- Part 2. From widgets to pixels
- Part 3: Handling Gestures
- Part 4: Animations
- Full picture
- Buildcontext
- Conclusion
Part 1: Background
The first part of the article presents some key concepts that will be used in the second part of the material and help to better understand Flutter.
A little bit about the device
Let's start from the end and back to the basics.
When you look at your device or, more precisely, at the application running on your device, you only see the screen.
In fact, all you see are pixels, which together make up a 2-dimensional image, and when you touch the screen with your finger, the device only recognizes the position of your finger on the glass.
All the magic of the application (from a visual point of view) in most cases is to update this image based on the following interactions:
- with the screen of the device ( for example, a finger on the glass )
- with the network ( for example, communication with the server )
- over time ( e.g. animation )
- with other external sensors
Visualization of the image on the screen is provided by hardware (display), which regularly (usually 60 times per second) updates the display. This is called the "refresh rate" and is expressed in Hz (Hertz).
The display receives information for display from the GPU (Graphics Processing Unit), which is a specialized electronic circuit optimized and designed to quickly form images from some data (polygons and textures). The number of times per second that the graphics processor can generate an “image” (= frame buffer) to display and send it to the hardware is called the frame rate ( note: frame rate ). This is measured using a block of frames per second ( e.g. 60 frames per second or 60fps ).
You may ask me why I started this article with the concepts of a 2-dimensional image displayed by a GPU / hardware and a physical glass sensor, and what is the connection with regular Flutter widgets?
I think it will be easier to understand how Flutter actually works if we look at it from this point of view, since one of the main goals of the Flutter application is to create this 2-dimensional image and allow it to interact with it. Also, because in Flutter, believe it or not, almost everything is due to the need to update the screen quickly and at the right time!
Interface between code and device
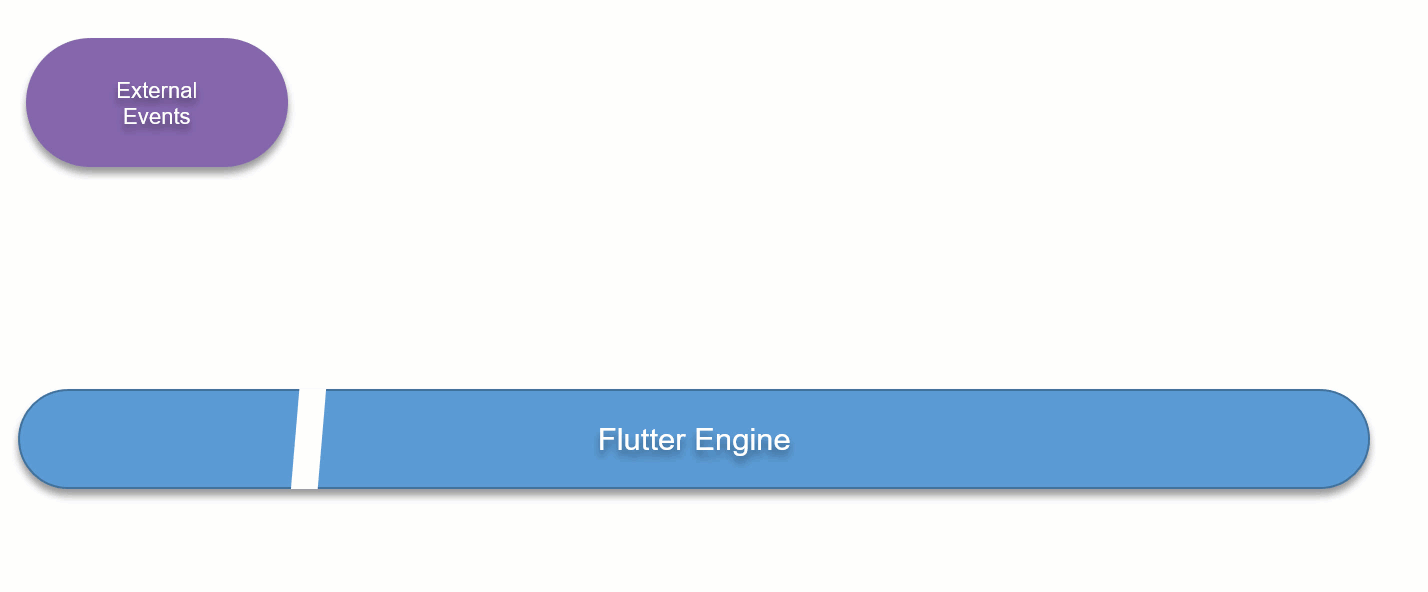
Anyway, everyone interested in Flutter has already seen the following picture, which describes the high-level architecture of Flutter.

When we write a Flutter application using Dart, we remain at the Flutter Framework level (highlighted in green).
The Flutter Framework interacts with the Flutter Engine (in blue) through an abstraction layer called Window . This level of abstraction provides a number of APIs for indirect interaction with the device.
Also, through this level of abstraction, the Flutter Engine notifies the Flutter Framework when:
- an event of interest occurs at the device level (change of orientation, change of settings, memory problem, operating state of the application ...)
- some event occurs at the glass level (= gesture)
- platform channel sends some data
- but also mainly when the Flutter Engine is ready to render a new frame
Manage Flutter Framework Flutter Engine rendering
It's hard to believe, but it's true. Except in some cases ( see below ), no Flutter Framework code is executed without starting the Flutter Engine rendering.
Exceptions:
- Gesture / Gesture (= event on glass)
- Platform messages (= messages generated by a device, such as GPS)
- Device messages (= messages that relate to a change in the state of the device, for example, orientation, application sent in the background, memory alerts, device settings ...)
- Future or http responses
(Between us, you can actually apply a visual change without calling from the Flutter Engine, but this is not recommended )
You ask me: "If some kind of code related to the gesture is executed and causes a visual change, or if I use a timer to set the frequency of the task that leads to visual changes (for example, animation), then how does it work?"
If you want a visual change to occur or some code to be executed based on a timer, then you need to tell the Flutter Engine that something needs to be drawn.
Usually, the next time the Flutter Engine updates, it calls on the Flutter Framework to execute some code and ultimately provides a new scene for rendering.
Therefore, an important question is how the Flutter engine organizes all application behavior based on rendering.
To get an idea of the internal mechanisms, look at the following animation:
A brief explanation (more details will come later):
- Some external events (gesture, http-answers, etc.) or even futures can trigger tasks that make it necessary to update the display. Corresponding message is sent to Flutter Engine (= Schedule Frame )
- When the Flutter Engine is ready to start updating the rendering, it creates a Begin Frame request
- This Begin Frame request is intercepted by the Flutter Framework , which performs tasks primarily related to Tickers (for example, animation)
- These tasks can re-create the request for later rendering (example: the animation has not completed its execution, and to complete it, it will need to get another Begin Frame at a later stage)
- Next, the Flutter Engine sends a Draw Frame , which is intercepted by the Flutter Framework , which will look for any tasks related to updating the layout in terms of structure and size
- After all these tasks are completed, he proceeds to the tasks associated with updating the layout in terms of rendering
- If there is something on the screen that needs to be drawn, then a new scene ( Scene ) for visualization is sent to the Flutter Engine , which will update the screen
- The Flutter Framework then performs all the tasks that will be performed after rendering (= PostFrame callbacks), and any other subsequent tasks that are not related to rendering
- ... and this process begins all over again
RenderView and RenderObject
Before diving into the details of the workflow, it's time to introduce the concept of the Rendering Tree .
As mentioned earlier, everything will eventually be converted to pixels that will be displayed on the screen, and the Flutter Framework will convert the Widgets that we use to develop the application into visual blocks that will be displayed on the screen.
These visual parts correspond to objects called RenderObject , which are used to:
- defining a certain area of the screen in terms of dimensions, position, geometry, as well as in terms of "rendered content"
- identifying areas of the screen that can be affected by gestures (= finger touch)
A set of all RenderObjects forms a tree called a Render Tree . At the top of this tree (= root ) we find a RenderView .
RenderView provides a common surface for Render Tree objects and is a special version of RenderObject .
Visually, we could represent all this as follows:
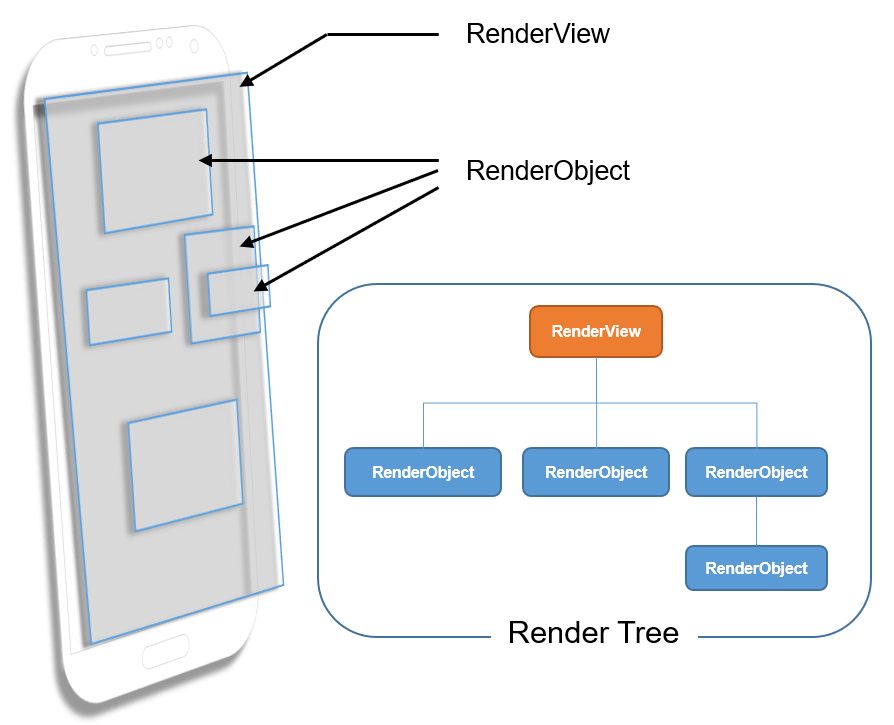
The relationship between Widget and RenderObject will be discussed later. In the meantime, it's time to go a little deeper ...
Initialization bindings
When the Flutter application starts, the main()
function is called first, which ultimately calls the runApp(Widget app)
method.
When the runApp()
method is runApp()
Flutter Framework initializes the interfaces between itself and the Flutter Engine . These interfaces are called bindings ( note: bindings ).
Introduction to Bindings
Bindings are designed to be the link between the framework and the Flutter engine. Only through bindings can data be exchanged between the Flutter Framework and the Flutter Engine .
(There is only one exception to this rule - RenderView , but we will discuss this later).
Each binding is responsible for processing a set of specific tasks, actions, events, grouped by area of activity.
At the time of this writing, the Flutter Framework has 8 bindings.
Below are 4 of them that will be considered in this article:
- SchedulerBinding
- Gesture binding
- Renderer binding
- Widgets binding
For completeness, I will mention the remaining 4:
- ServicesBinding : responsible for processing messages sent by the platform channel
- PaintingBinding : responsible for processing the image cache
- SemanticsBinding : reserved for the subsequent implementation of everything related to semantics
- TestWidgetsFlutterBinding : used by the widget test library
You can also mention WidgetsFlutterBinding , but this is not really a binding, but rather a kind of "binding initializer . "
The following diagram shows the interaction between the bindings, which I am going to consider next, and the Flutter Engine .
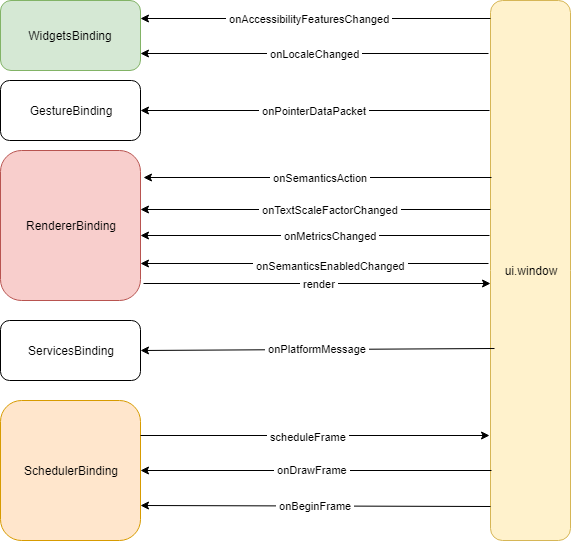
Let's look at each of these “core” bindings.
SchedulerBinding
This binding has two main responsibilities:
- Say Flutter Engine : “Hey! Next time you’re not busy, wake me up so I can work a bit and tell you what to render, or if I need you to call me later ...”
- Listen and respond to such “disturbing awakenings” (see below)
When does SchedulerBinding request a wake-up call ?
When a Ticker Must Work Out a New Tick
For example, you have an animation, you start it. The animation is cropped using the Ticker , which is called at regular intervals (= tick ) to perform a callback . To trigger such a callback , we need to tell the Flutter Engine to wake us up with the next update (= Begin Frame ). This will launch the ticker callback to complete its task. If the ticker still needs to continue execution, then at the end of its task, it will call SchedulerBinding to schedule another frame.
When to refresh the display
For example, we need to work out an event that leads to a visual change (example: updating the color of a part of the screen, scrolling, adding / removing something from the screen), for this we need to take the necessary steps to ultimately display the updated image on the screen. In this case, when such a change occurs, the Flutter Framework calls SchedulerBinding to schedule another frame using the Flutter Engine . (Later we will see how this actually works)
Gesture binding
This binding listens to the interaction with the engine in terms of the “finger” (= gesture ).
In particular, he is responsible for receiving finger- related data and for determining which part (s) of the screen the gestures work with. He then notifies accordingly / of these parts.
Renderer binding
This binding is the link between the Flutter Engine and the Render Tree . She is responsible for:
- listening to events generated by the engine to inform about changes applied by the user through the device settings that affect visual effects and / or semantics
- message to the engine about changes that will be applied to the display
To provide the changes that will be displayed on the screen, RendererBinding is responsible for managing PipelineOwner and initializing the RenderView .
PipelineOwner is a kind of orchestra that knows what needs to be done with RenderObject in accordance with the component , and coordinates these actions.
Widgets binding
This binding listens for changes applied by the user through device settings that affect the language (= locale ) and semantics .
Small note
I assume that at a later stage in the development of Flutter, all semantics related events will be transferred to the SemanticsBinding , but at the time of this writing, this is not the case.
In addition, WidgetsBinding is the link between widgets and the Flutter Engine . She is responsible for:
- management of the process of processing changes to the structure of widgets
- render call
Processing changes to the structure of widgets is carried out using BuildOwner .
BuildOwner keeps track of which widgets need to be rebuilt, and handles other tasks that apply to the widget structure as a whole.
Part 2. From widgets to pixels
Now that we’ve become familiar with the basics of Flutter’s internal work, it's time to talk about widgets.
In all Flutter documentation you will read that all are Widgets .
This is almost correct. But in order to be a little more precise, I would rather say:
From the developer's side, everything related to the user interface in terms of layout and interaction is done using widgets.
Why so much accuracy? In addition to the fact that Widget allows the developer to determine part of the screen in terms of size, content, layout and interaction, BUT there is much more to it. So what is Widget really?
Immutable Configuration
If you look at the Flutter source code, you will notice the following definition of the Widget class.
@immutable abstract class Widget extends DiagnosticableTree { const Widget({ this.key }); final Key key; ... }
What does it mean?
The annotation "@immutable" is very important and tells us that any variable in the Widget class must be FINAL , in other words: "defined and assigned ONCE FOR EVERYONE ." Thus, after creating an instance, Widget will no longer be able to change its internal variables.
Since Widget is immutable, it can be considered a static configuration
The hierarchical structure of widgets
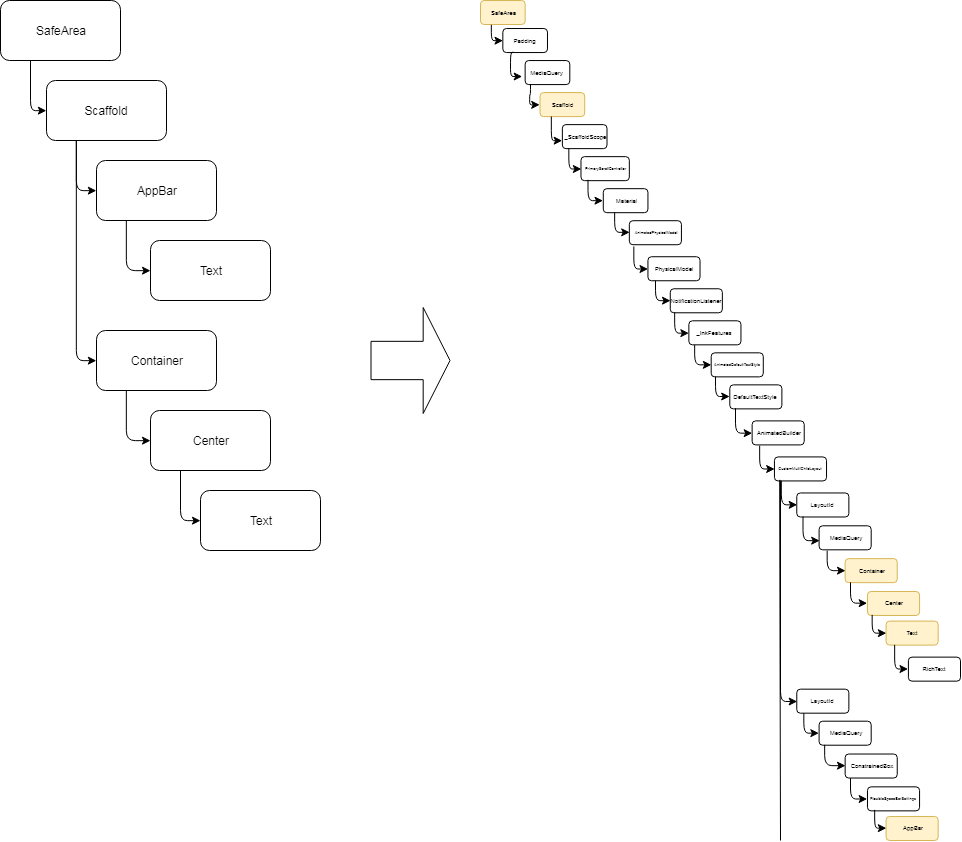
When you design using Flutter, you define the structure of your screen (s) using widgets something like this:
Widget build(BuildContext context){ return SafeArea( child: Scaffold( appBar: AppBar( title: Text('My title'), ), body: Container( child: Center( child: Text('Centered Text'), ), ), ), ); }
This example uses 7 widgets that together form a hierarchical structure. A very simplified scheme based on this code is as follows:

As you can see, the presented diagram looks like a tree, where SafeArea is its root.
Forest behind the trees
As you already know, a widget itself can be an aggregation of other widgets. As an example, you can modify the previous code as follows:
Widget build(BuildContext context){ return MyOwnWidget(); }
This option assumes that the widget "MyOwnWidget" itself will display SafeArea , Scaffold . But the most important thing in this example is that
A widget can represent a leaf, a knot in a tree, even the tree itself or, why not, a forest of trees ...
Understanding Element in a Tree
What does this have to do with it?
As will be shown later, in order to be able to generate pixels that make up the image displayed on the device, Flutter must know in detail all the small parts that make up the screen, and in order to determine all the parts, it needs to know the expansion of all widgets.
To illustrate this point, consider the principle of a nested doll: when closed, you see only 1 doll, but it contains another doll, which in turn contains another one and so on ...

When Flutter expands all widgets (part of the screen) , it will be like getting all the dolls (part of the whole) .
The picture below shows part of the final hierarchical structure of widgets corresponding to the previous code. In yellow, I highlighted the widgets that were mentioned in the code earlier, so that you can define them in the final tree.
Important clarification
The language "Widget tree" exists only to facilitate understanding, as programmers use widgets, but there is NO widget tree in Flutter!
In fact, it would be more correct to say "tree of Elements"
It is time to introduce the concept of an Element .
Each widget has one element. Elements are connected to each other and form a tree. Therefore, the element is a reference to something in the tree.
To begin with, think of an element as a node that has a parent and possibly a child. By linking them together through a parent-child relationship, we get a tree structure.

As you can see, the element points to one widget, and can also point to a RenderObject .
Even better ... Element points to Widget who created this Element!
Let's summarize:
- There is no widget tree, but there is an element tree
- Elements are created by widgets.
- The item refers to the widget that created it.
- Elements are associated with parent relationships
- An item may have a "baby."
- Elements can also point to a RenderObject.
Elements determine how parts of the displayed blocks are related to each other.
In order to better imagine where the concept of an element fits, let's look at the following visual representation:

As you can see, the element tree is the actual relationship between widgets and RenderObjects .
But why does Widget create an Element ?
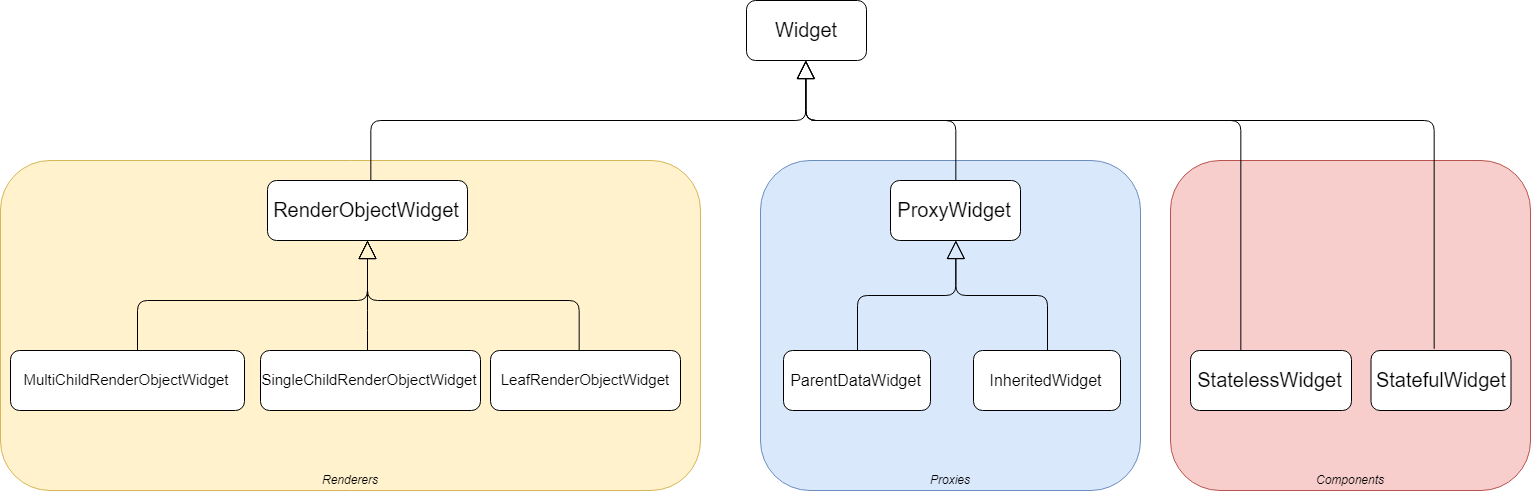
3 categories of widgets
In Flutter, widgets are divided into 3 categories, I personally call them as follows (but this is only my way of classifying them) :
Proxy
The main task of these widgets is to store some information (which should be accessible to widgets), part of the tree structure based on Proxy. An example of such widgets is InheritedWidget or LayoutId .
These widgets do not directly participate in the formation of the user interface, but are used to obtain the information that they can provide.
Renderer
These widgets are directly related to the layout of the screen, because they determine (or are used to determine) the size , position , rendering . Typical examples are: Row , Column , Stack , as well as Padding , Align , Opacity , RawImage ...
Component
These are other widgets that provide directly not the final information related to the sizes, positions, appearance, but rather the data (or hints) that will be used to obtain the same final information. These widgets are commonly called components.
Examples: RaisedButton , Scaffold , Text , GestureDetector , Container ...
This PDF lists most of the widgets grouped by category.
Why is this separation important? Because depending on the category of the widget, the corresponding element type is associated with ...
Item Types
There are several types of elements:

As you can see in the picture above, the elements are divided into 2 main types:
Componententlement
These elements are not directly responsible for rendering any part of the display.
RenderObjectElement
These elements are responsible for parts of the displayed image on the screen.
Fine! So much information, but how is all this related to each other and why is it interesting to talk about it?
How widgets and elements work together
In Flutter, all mechanics are based on invalidating an element or renderObject.
Element invalidation can be done in the following ways:
- using
setState
, which invalidates the entire StatefulElement (note that I intentionally do not say StatefulWidget ) - through notifications processed by proxyElement (for example, InheritedWidget), which invalidates any element that depends on this proxyElement
The result of invalidation is that a link to the corresponding element appears in the list of dirty elements.
The invalidation of renderObject means that the structure of the elements does not change at all, but a change occurs at the level of renderObject , for example:
- changing its size, position, geometry ...
- something needs to be repainted, for example, when you just change the background color, font style ...
The result of such invalidation is a link to the corresponding renderObject in the list of rendering objects (renderObjects) that need to be rebuilt or repainted.
Regardless of the type of invalidation, SchedulerBinding is called (remember this?) To request the Flutter Engine to schedule a new frame.
This is exactly the moment when the Flutter Engine “wakes up” the SchedulerBinding and all the magic happens ...
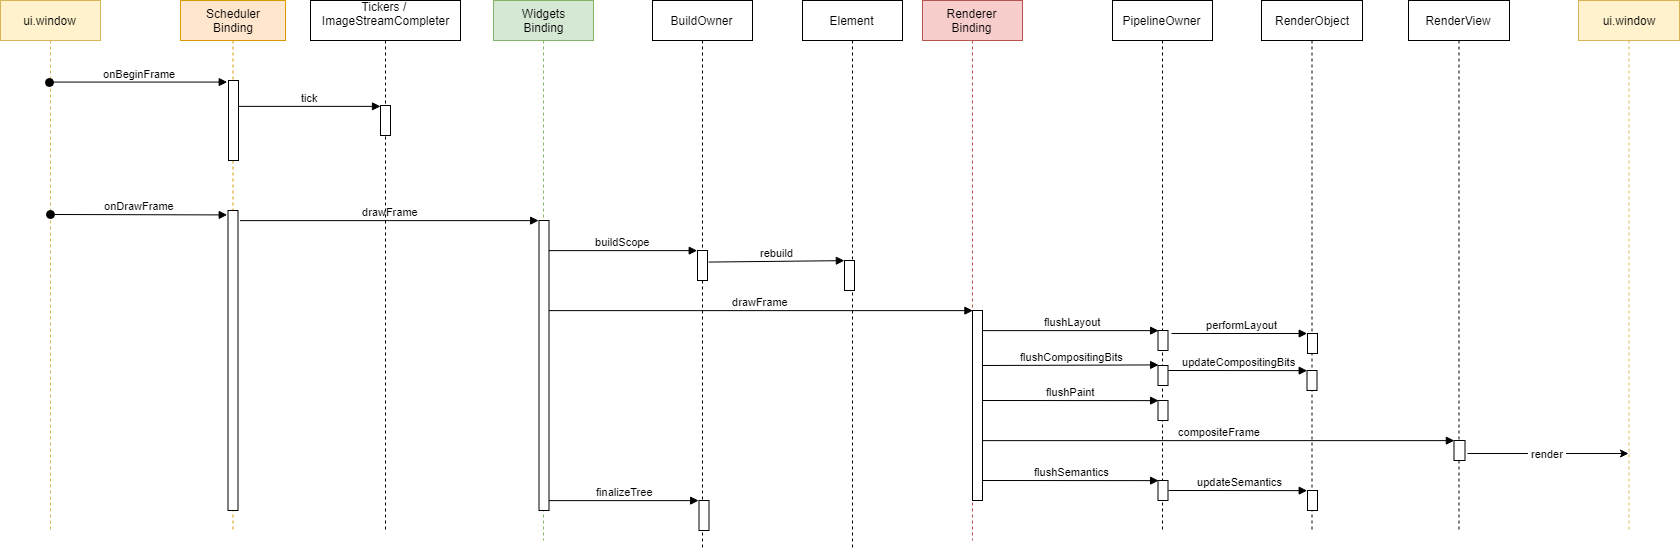
onDrawFrame ()
Earlier in this article, we noted that SchedulerBinding has two main responsibilities, one of which is the willingness to handle requests made by the Flutter Engine related to frame rebuilding. This is the perfect moment to focus on this.
The partial sequence diagram below shows what happens when the SchedulerBinding receives an onDrawFrame () request from the Flutter Engine .
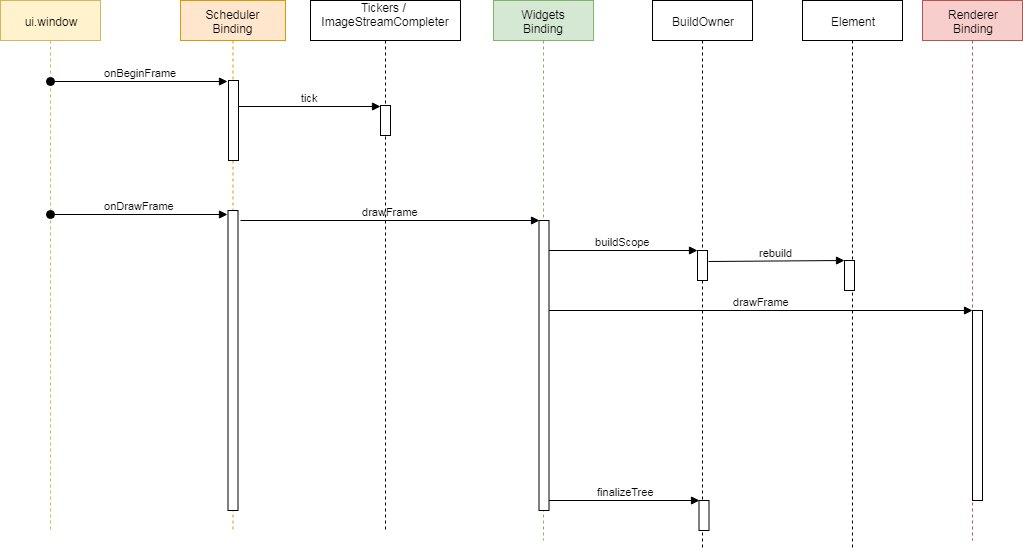
Step 1. Elements
WidgetsBinding is called , and this binding first considers the changes associated with the elements. WidgetsBinding calls the buildScope method of the buildOwner object, since BuildOwner is responsible for processing the item tree. This method goes through the list of dirty elements and requests their rebuild .
The main principles of this rebuild()
method ( rebuild()
) are:
- There is a request to rebuild the element (this will take most of the time) by calling the
build()
method of the widget that this element refers to (=Widget build (BuildContext context) {...}
method). Thisbuild()
method will return a new widget - If the element does not have “children,” then an element is created for the new widget (see below) ( note: inflateWidget ), otherwise
- the new widget is compared to the one referred to by the child of the element
- If they are interchangeable (= the same widget type and key ), then the update occurs and the child is saved.
- If they are not interchangeable, then the child is discarded ( ~ discarded ) and an element is created for the new widget
- This new item is mounted as a child of the item. ( mounted) = inserted into the element tree)
The following animation will try to make this explanation a little clearer.

Note on widgets and elements
For a new widget, an element of a specific type is created that corresponds to the category of the widget, namely:
- InheritedWidget -> InheritedElement
- StatefulWidget -> StatefulElement
- StatelessWidget -> StatelessElement
- InheritedModel -> InheritedModelElement
- InheritedNotifier -> InheritedNotifierElement
- LeafRenderObjectWidget -> LeafRenderObjectElement
- SingleChildRenderObjectWidget -> SingleChildRenderObjectElement
- MultiChildRenderObjectWidget -> MultiChildRenderObjectElement
- ParentDataWidget -> ParentDataElement
Each of these types of elements has its own behavior. For example:
- StatefulElement will call the
widget.createState()
method on initialization, which will create a State and bind it to the element - When an element of type RenderObjectElement is mounted, it creates a RenderObject . This renderObject will be added to the Render Tree and associated with the element.
Step 2. renderObjects
Now after completing all the actions related to dirty elements, the Element Tree is stable. So it's time to consider the visualization process.
Since RendererBinding is responsible for rendering the Render Tree , WidgetsBinding calls the drawFrame
RendererBinding method.
The partial diagram below shows the sequence of actions performed during the drawFrame () request.
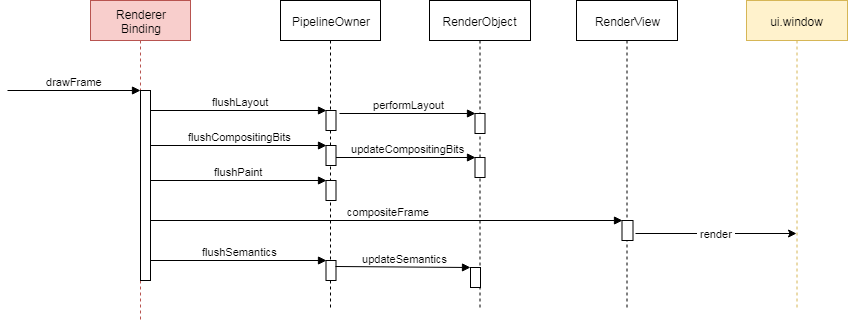
At this step, the following actions are performed:
- Each renderObject marked as dirty is requested to compose it (i.e., calculate its size and geometry)
- Each renderObject marked as "needing redrawing" is redrawn using its own layer method
- The resulting scene is formed and sent to the Flutter Engine , so that the latter transfers it to the device screen
- Finally, semantics are also updated and sent to the Flutter Engine
At the end of this workflow, the device screen refreshes.
Part 3: Handling Gestures
Gestures (= events related to finger actions on the glass ) are processed using GestureBinding .
When the Flutter Engine sends information about a gesture-related event via the window.onPointerDataPacket API, the GestureBinding intercepts it, performs some buffering, and:
- converts the coordinates given by the Flutter Engine to match the device pixel ratio , and then
- requests a renderView list of all RenderObjects that are in the part of the screen related to the coordinates of the event
- then iterates through the resulting renderObjects list and sends a related event to each of them
- if renderObject "listens" for events of this type, then it processes it
Hopefully now I understand how important renderObjects is .
Part 4: Animations
This part of the article focuses on the concept of animation and a deep understanding of Ticker .
When you work with animations, you usually use an AnimationController or any widget for animations ( note: AnimatedCrossFade ).
In Flutter, everything related to animations refers to Ticker . Ticker , when it is active, has only one task: "it asks SchedulerBinding to register a callback and tell the Flutter Engine to wake it up when a new callback appears." When the Flutter Engine is ready, it calls SchedulerBinding through a request: " onBeginFrame ". SchedulerBinding accesses the ticker callback list and executes each one.
Each tick is intercepted by an "interested" controller to process it. If the animation is complete, then the ticker is “disabled”, otherwise the ticker requests a SchedulerBinding to schedule a new callback. And so on...
Full picture
Now we have learned how Flutter works:
Buildcontext
Finally, back to the diagram that shows the different types of elements, and consider the signature of the root Element :
abstract class Element extends DiagnosticableTree implements BuildContext { ... }
We see the very famous BuildContext ! But what is it?
BuildContext is an interface that defines a number of getters and methods that can be implemented by an element. Mostly BuildContext is used in the build()
method of StatelessWidget or State for StatefulWidget .
BuildContext is nothing but the Element itself, which matches
- widget being updated (inside the
build
orbuilder
methods)- StatefulWidget associated with State in which you reference the context variable.
This means that most developers constantly work with elements without even knowing about it.
How useful can a BuildContext be?
BuildContext , , , BuildContext , :
- RenderObject , (, Renderer , -)
- RenderObject
- . ,
of
(,MediaQuery.of(context)
,Theme.of(context)
…)
, , BuildContext – , . StatelessWidget , StatefulWidget , setState()
, BuildContext .
, !
– , StatelessWidget .
, , StatefulWidget .
void main(){ runApp(MaterialApp(home: TestPage(),)); } class TestPage extends StatelessWidget { // final because a Widget is immutable (remember?) final bag = {"first": true}; @override Widget build(BuildContext context){ return Scaffold( appBar: AppBar(title: Text('Stateless ??')), body: Container( child: Center( child: GestureDetector( child: Container( width: 50.0, height: 50.0, color: bag["first"] ? Colors.red : Colors.blue, ), onTap: (){ bag["first"] = !bag["first"]; // // This is the trick // (context as Element).markNeedsBuild(); } ), ), ), ); } }
, setState()
, : _element.markNeedsBuild()
.
Conclusion
: " ". , , Flutter , , , , . , , Widget , Element , BuildContext , RenderObject , . , .
. .
PS , () .
PSS Flutter internals Didier Boelens, )