This summer, at the WWDC 2019 conference, Apple introduced its own Sign in with Apple authorization system and made it mandatory for all applications in the App Store that use social media login. The exception is educational, corporate, government and business applications that use their own authorization. For Sign in with Apple, Apple made high-quality documentation , and in this article we will use the example of CIAN to describe how to implement it in our service.

Configure Apple Developer Account
Integration work begins with setting up a developer account. First you need to enable the Sign In with Apple option for your App ID. To do this, go to the list of identifiers in the Apple Developer Account , select the necessary App ID and enable the Sign In with Apple option for it.
Now we configure Service ID - a unique identifier for the web application that you will need to access the Sign in with Apple API. You can create up to 5 Service IDs for a single App ID. To do this, click the button for creating identifiers, select Service ID, fill in the required fields and click Edit in the Sign In With Apple field. A form will open where we select the correct Primary App ID, specify the web domain and list the URLs for the redirect after a successful login. Keep in mind that you can enter only 10 Return URLs:
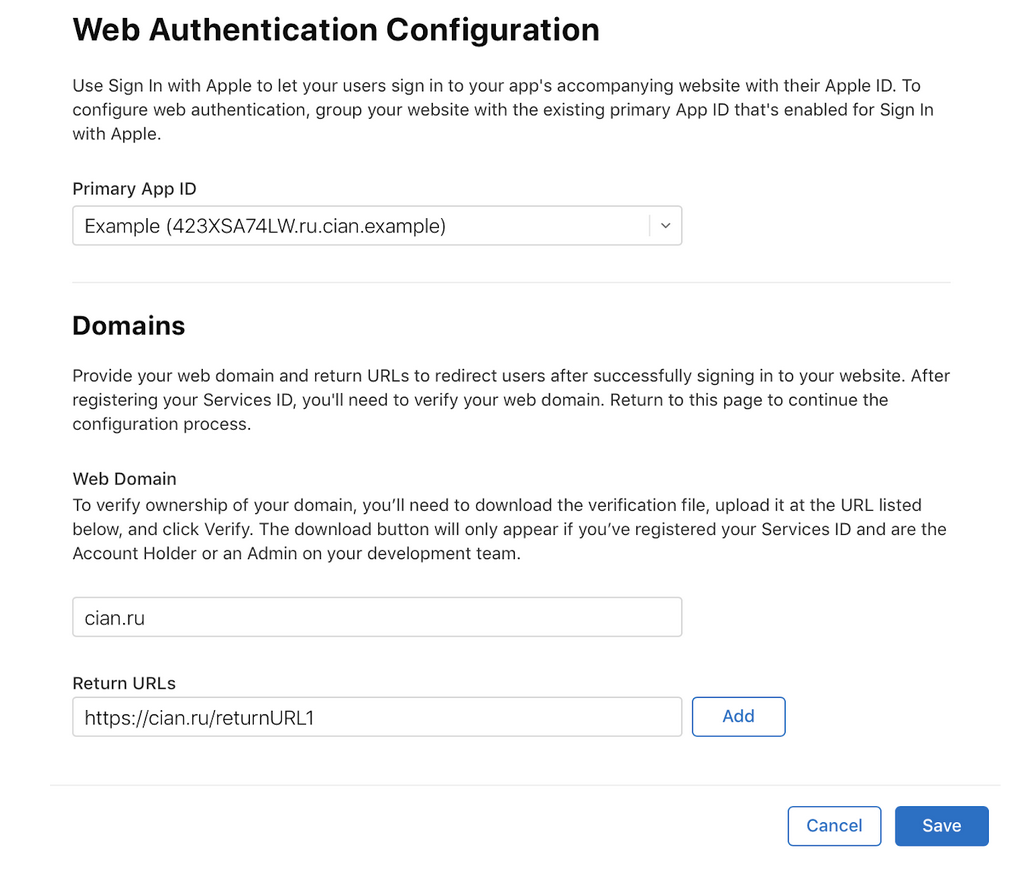
To save, click Save, Continue and Register. Yes, for any configuration changes, you must click all three buttons, otherwise the changes will not take effect.
Now, in the Service ID list, select the created identifier and again click Edit in the Sign In With Apple field. In the window that opens, near the field with the web address, we see two new buttons:

This file is required for Apple to verify your resource. Download it and place it on your resource. Immediately, this feint didn’t work for us: when our admins added the file, then a redirect (302) to the file lying in another place worked on the specified url, and Apple did not verify it. Then I had to place the file for direct access by URL (200). After Apple successfully checks the file, a green checkmark next to the domain lights up:

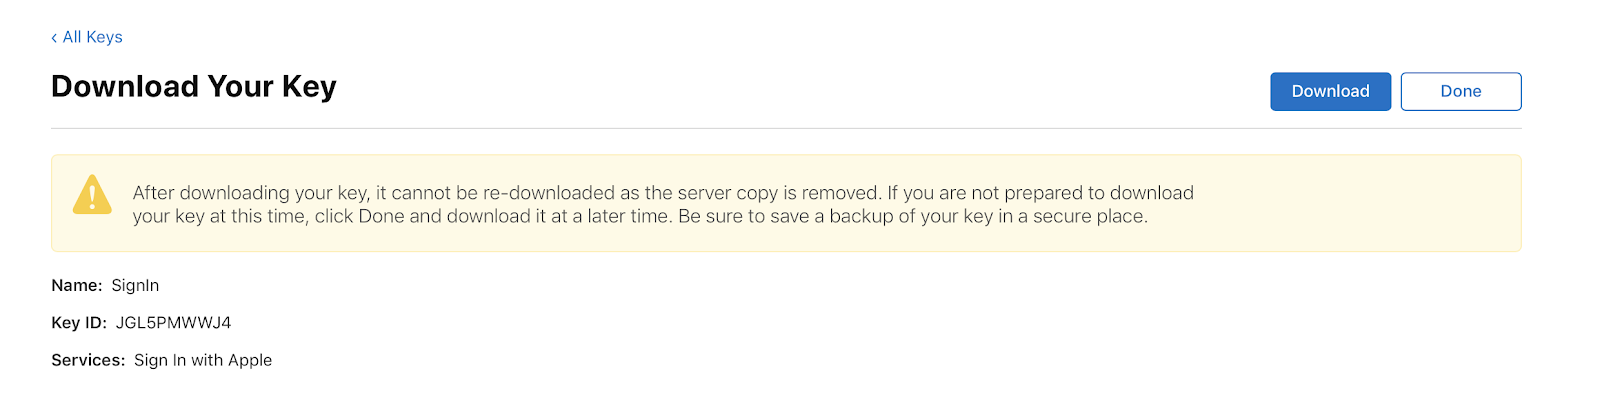
From the identifiers section, go to the Keys section and create a new key. To do this, check the Sign In with Apple checkbox and click Configure first to check the App ID, then Continue:

On the next screen, be sure to download the file with the key and save it in a safe place, since after leaving this screen the key will not be available for download. On the same page you can see the Key ID, which we still need:
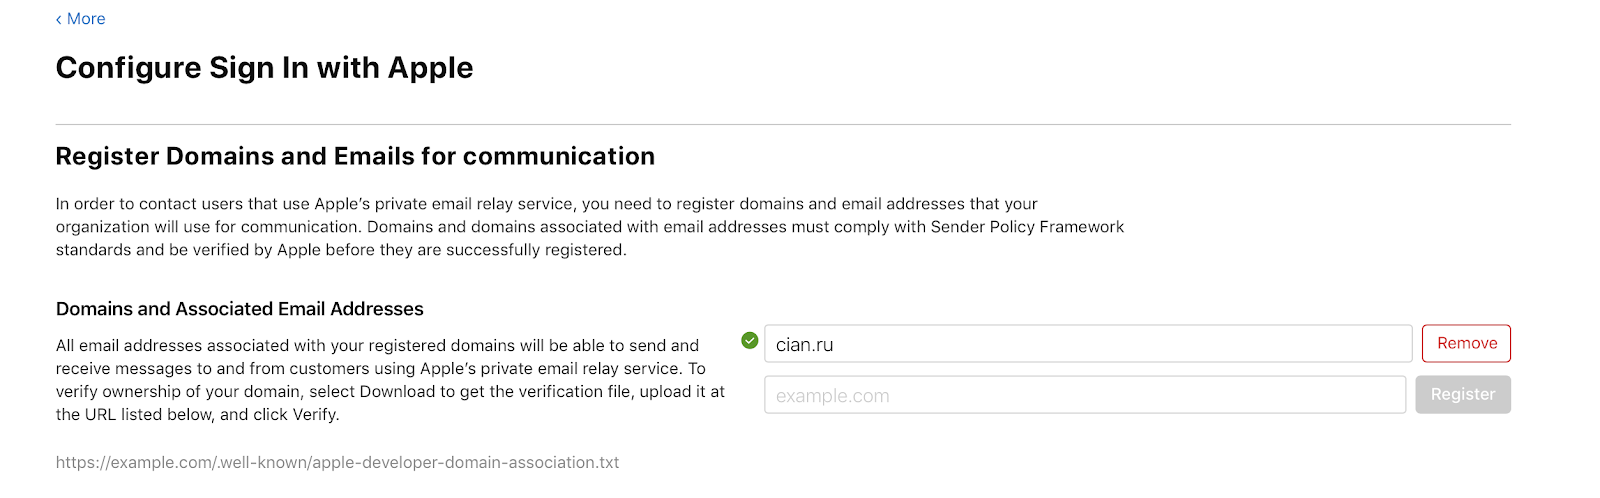
Sign In with Apple has a bonus for users: it allows you to provide a fake e-mail, to which you can write only from trusted addresses. In this case, additional configuration is needed. Open the More section, click Configure in the Sign In with Apple section and enter your URL:
Add the Sign In with Apple button to the iOS app.
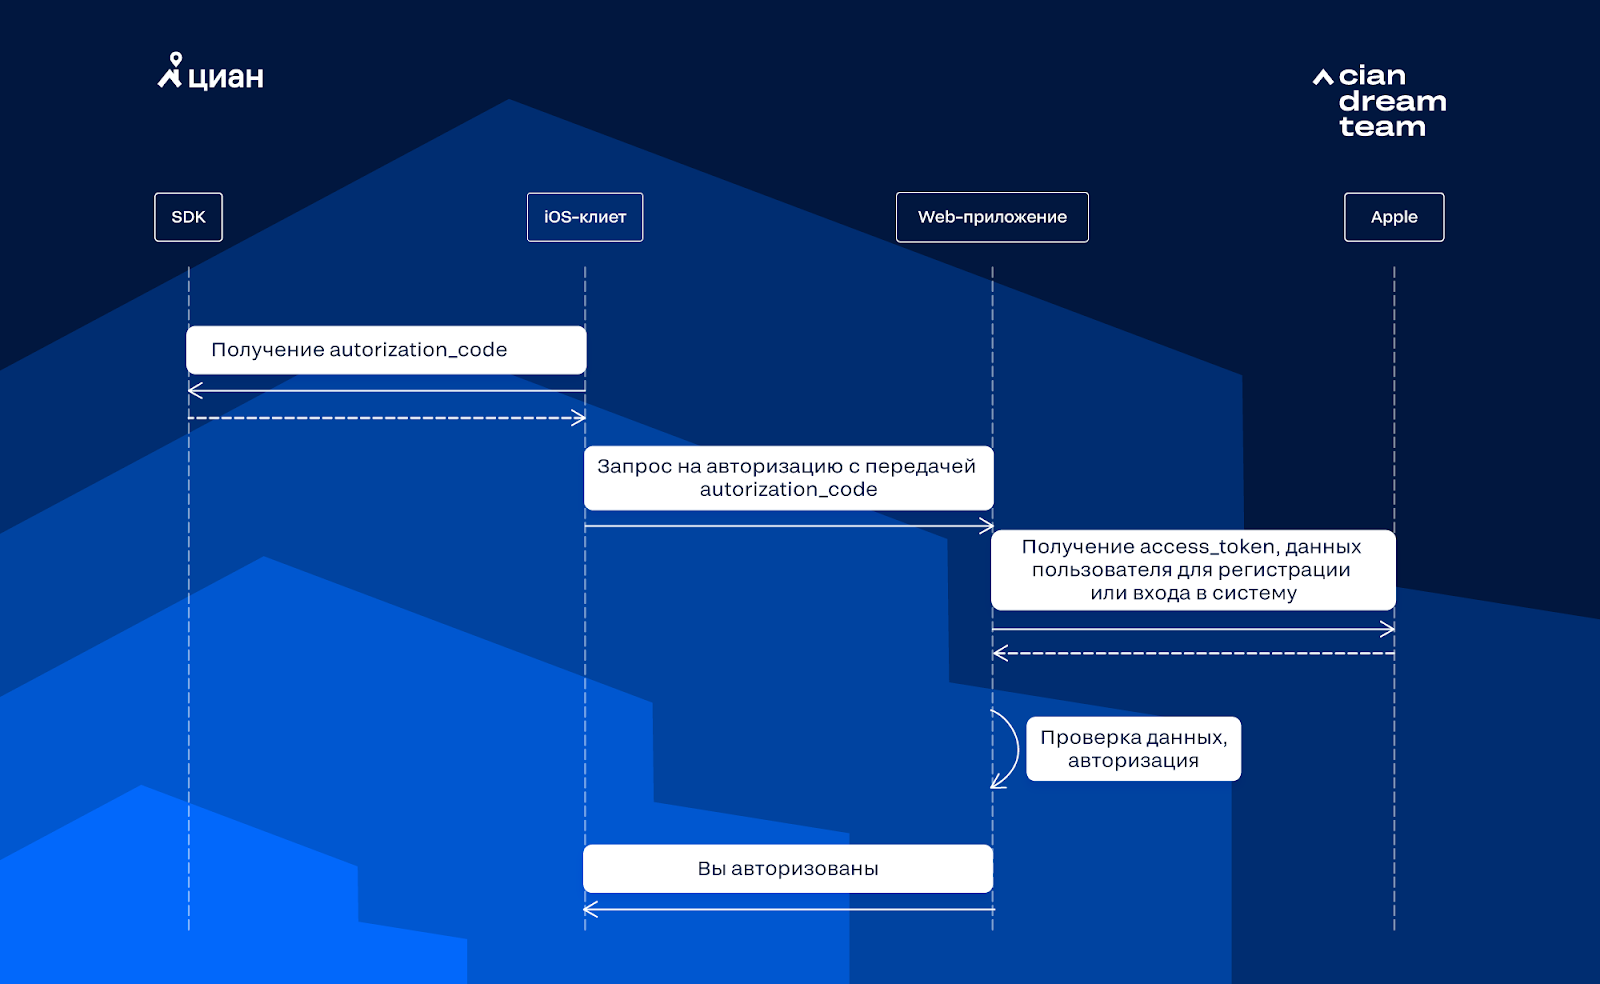
CIAN works on three platforms: iOS, Android, Web. There is a native SDK for iOS, so authorization will look like this:
To add Sign in with Apple to the iOS application, add the ASAuthorizationAppleIDButton button and hang the click handler on it:
let appleIDProvider = ASAuthorizationAppleIDProvider() let request = appleIDProvider.createRequest() request.requestedScopes = [.fullName, .email] let authorizationController = ASAuthorizationController(authorizationRequests: [request]) authorizationController.delegate = self authorizationController.presentationContextProvider = self authorizationController.performRequests()
In addition to ASAuthorizationAppleIDProvider, pay attention to ASAuthorizationPasswordProvider, which allows you to get a bunch of "login-password" from Keychain.
Now we implement ASAuthorizationControllerPresentationContextProviding:
func presentationAnchor(for controller: ASAuthorizationController) -> ASPresentationAnchor { return self.view.window! }
Create an ASAuthorizationControllerDelegate delegate that reports success or error:
public func authorizationController( controller: ASAuthorizationController, didCompleteWithAuthorization authorization: ASAuthorization ) { guard let appleIDCredential = authorization.credential as? ASAuthorizationAppleIDCredential, let code = appleIDCredential.authorizationCode, let codeStr = String(data: code, encoding: .utf8) else { // - // return } let email = appleIDCredential.email let firstName = appleIDCredential.fullName?.givenName let lastName = appleIDCredential.fullName?.familyName // codeStr } public func authorizationController( controller: ASAuthorizationController, didCompleteWithError error: Error ) { // }
We send the received authorizationCode to the server and wait for a response from the backend about the success of authorization in our system.
We implement Sign in with Apple for web and Android
Suddenly, for Android and Web, Apple does not provide an SDK, so in both cases you need to open the Apple authorization page and the process will be different:

The URL for the login page is as follows:
https://appleid.apple.com/auth/authorize?\ state=abvgd&\ response_type=code&\ client_id=ServiceID&\ scope=email+name&\ response_mode=form_post&\ redirect_uri=https%3A%2F%2Fcian.ru%2Fauth%2Fsome-callback%2F%3Ftype%3Dappleid
Consider its parameters:
- client_id - Service ID that was registered above.
- redirect_uri - The URI where the user is redirected after successful authentication through the AppleID. We specified this URI above when setting up Apple Developer.
- state is the session ID of the user that Apple will return when redirect_uri is called, so that we can verify the sender. You can invent a rule for generating this parameter yourself, for example, a random string.
- scope - this parameter indicates what information is needed from the user. For example, name, email, or both, as in the example above.
- response_type - this parameter indicates in what form the answer is needed. It can be code or id_token. If you select id_token, then you need to specify it with the response_mode parameter, in which you can specify query, fragment and form_post.
After successful two-factor authentication via appleID, Apple will call the specified redirect_uri and pass the state and code parameters:
curl -X POST \ 'https://www.cian.ru/some-callback/?type=appleid' \ -H 'Content-Type: application/x-www-form-urlencoded' \ --data ' \ state=abvgd&\ code=12345&\ user={"name":{"firstName":"Tanya","lastName":"Sviridova"},"email":"someemail@gmail.com"}'
In the code parameter, a one-time user authentication code is passed, which is valid for 5 minutes. In the state parameter, the session identifier sent when the authorization form was created, and in the user parameter, user data.
Data retrieval
On all clients, to save user data, you need to get access_token from Apple. To do this, first request authorization_code:
curl -X POST https://appleid.apple.com/auth/token -d '\ client_id=some_client_id&\ code=12345&\ client_secret=jwt_part1.jwt_part2.jwt_part3&\ grant_type=authorization_code'
In this request:
- the client_id indicates the ServiceID created for the web application and the AppID for the iOS application.
- code - we received higher after the redirect or transferred from the iOS client
- in the grant_type parameter, we pass the purpose of obtaining the token: authorization (authorization_code) or renewal of the token (refresh_token)
- in the client_secret parameter - JSON Web Tokens based on the secret key received during application registration.
You can create JSON Web Tokens in Python:
claims = { 'iss': APPLEID_TEAM_ID, 'aud': 'https://appleid.apple.com', 'sub': client_id, 'iat': current_timestamp, 'exp': current_timestamp + expire_period, } headers = {'kid': 'APPLEID_KEY_ID', 'alg': 'ES256'} client_secret = jwt.encode(payload=claims, key=secret_key, algorithm='ES256', headers=headers).decode('utf-8')
If everything went well, the following parameters will come in the response:
{ "access_token":"ufhzch", "token_type":"Bearer", "expires_in":3600, "refresh_token":"some_refresh_token", "id_token":"some_long_signed_jwt_token" }
Hooray, here is access_token. Along with it comes refresh_token, which can be used to update access_token if necessary.
User information is stored in the id_token field, but it needs to be decoded:
public_key = jwt.algorithms.RSAAlgorithm.from_jwk( json.dumps(apple_public_key) ) data = jwt.decode( id_token, public_key, algorithm="RS256", verify=True, audience=client_id, )
Apple_public_key is a public key that can be obtained from the link.
After decoding we get:
data = { "iss": "https://appleid.apple.com", "aud": client_id, "exp": 1570379521, "iat": 1570378921, "sub": " ", "at_hash": "8ZDF6j786IQf9mA", "email": "someemail@gmail.com", "email_verified": "true", "auth_time": 1570378804 }
Email is transmitted only once when the user first logs in to your service through Sign in with Apple. Next time, Apple will transfer this data only if the user unbinds your application. This authorization from Apple differs from other services where data can be obtained through the API, and we did not find information that they plan to implement something like that.
In this answer, we need the sub parameters, which are transmitted every time, and email, so we save them in our system and inform the client about the successful authorization. PROFIT.
First results
After the release of the new version of CIAN with Sign in with Apple, on the first day of the day it accounted for a third of new registrations on iOS 13, and now it takes the second place for all versions of iOS, second only to VK. There are few registrations on the site using AppleID, but their number is slowly growing. And now we have plans to enable authorization via AppleID on Android applications, and see how many users will register in such a tricky way.