 At some point in your graphic adventure, you might want to output text through OpenGL. Contrary to what you might expect, getting a simple line on the screen is quite difficult with a low-level library such as OpenGL. If you do not need more than 128 different characters to render text, then it will not be difficult. Difficulties arise when the characters do not match the height, width and offset. Depending on where you live, you may need more than 128 characters. But what if you want special characters, mathematical or musical characters? As soon as you understand that drawing text is not the easiest task, you will come to the realization that it most likely should not belong to such a low-level API as OpenGL.
Since OpenGL does not provide any means for rendering text, all the difficulties of this case are on us. Since there is no graphic primitive "Symbol", we will have to invent it ourselves. There are already ready-made examples: draw a symbol through GL_LINES
, create 3D models of symbols, or draw symbols on flat quadrangles in three-dimensional space.
Most often, developers are too lazy to drink coffee and choose the last option. Drawing these textured quadrangles is not as difficult as choosing the right texture. In this tutorial, we will learn a few ways and write our advanced but flexible text renderer using FreeType.
- Debugging
- Text rendering
Classic: Raster Fonts
Once upon a time in the time of dinosaurs, rendering text included selecting a font (or creating it) for application and copying the desired characters onto a large texture called a bitmap font. This texture contains all the necessary characters in certain parts. These characters are called glyphs. Each glyph has a specific texture coordinate region associated with it. Each time you draw a character, you select a specific glyph and draw only the desired part on a flat quad.
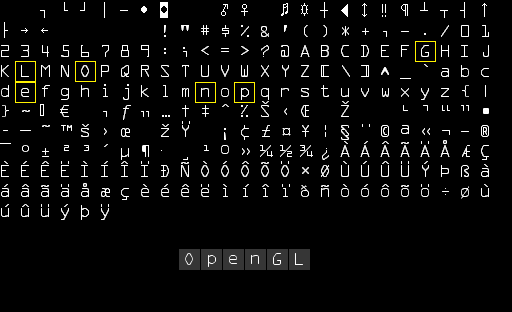
Here you can see how we would render the text "OpenGL". We take a raster font and sample the necessary glyphs from the texture, carefully choosing the texture coordinates, which we will draw over several quadrangles. Turning on blending and keeping the background transparent, we get a string of characters on the screen. This bitmap font was generated using the Codehead bitmap font generator .
This approach has its pros and cons. This approach has a simple implementation, since bitmap fonts are already rasterized. However, this is not always convenient. If you need a different font, you need to generate a new bitmap font. Moreover, increasing the size of characters will quickly show pixelated edges. Moreover, bitmap fonts are often tied to a small set of characters, so Unicode characters will most likely not be displayed.
This technique was popular not so long ago (and still retains its popularity), because it is very fast and works on any platform. But to date, there are other approaches to rendering text. One of them is rendering TrueType fonts using FreeType.
Modernity: FreeType
FreeType is a library that downloads fonts, renders them to bitmaps, and provides support for some font-related operations. This popular library is used on Mac OS X, Java, Qt, PlayStation, Linux, and Android. The ability to load TrueType fonts makes this library attractive enough.
A TrueType font is a collection of glyphs defined not by pixels, but by mathematical formulas. As with vector images, a rasterized font image can be generated based on the preferred font size. Using TrueType fonts, you can easily render glyphs of various sizes without loss of quality.
FreeType can be downloaded from the official site . You can either compile FreeType yourself, or use precompiled versions, if any, on the site. Remember to link your program to freetype.lib
and make sure that the compiler knows where to look for the header files.
Then attach the correct header files:
#include <ft2build.h> #include FT_FREETYPE_H
Since FreeType is designed in a slightly strange way (at the time of writing the original, let me know if something has changed), you can put its header files only in the root of the folders with the header files. Connecting FreeType in some other way (for example,#include <3rdParty/FreeType/ft2build.h>
) can provoke a header file conflict.
What does FreeType do? Loads TrueType fonts and generates a bitmap for each glyph and calculates some glyph metrics. We can get bitmap images for generating textures and positioning each glyph depending on the received metrics.
To download a font, we need to initialize FreeType and load the font as face (as FreeType calls the font). In this example, we load the TrueType font arial.ttf
, copied from the C: / Windows / Fonts folder.
FT_Library ft; if (FT_Init_FreeType(&ft)) std::cout << "ERROR::FREETYPE: Could not init FreeType Library" << std::endl; FT_Face face; if (FT_New_Face(ft, "fonts/arial.ttf", 0, &face)) std::cout << "ERROR::FREETYPE: Failed to load font" << std::endl;
Each of these FreeType functions returns a non-zero value in case of failure.
Once we have loaded the face font face, we need to specify the desired font size, which we will extract:
FT_Set_Pixel_Sizes(face, 0, 48);
This function sets the width and height of the glyph. By setting the width to 0 (zero) we allow FreeType to calculate the width depending on the set height.
Face FreeType contains a collection of glyphs. We can make some glyph active by calling FT_Load_Char
. Here we try to load the glyph X
:
if (FT_Load_Char(face, 'X', FT_LOAD_RENDER)) std::cout << "ERROR::FREETYTPE: Failed to load Glyph" << std::endl;
By setting FT_LOAD_RENDER
as one of the download flags, we tell FreeType to create an 8-bit grayscale bitmap, which we can then get like this:
face->glyph->bitmap;
Glyphs loaded with FreeType are not the same size as was the case with bitmap fonts. A bitmap generated using FreeType is the minimum size for a given font size and is only enough to hold one character. For example, a bitmap image of a glyph .
much smaller than the bitmap of glyph X
For this reason, FreeType also downloads some metrics that show what size and where a single character should be located. Below is an image showing which metrics FreeType calculates for each glyph.

Each glyph is located on the baseline (horizontal line with an arrow). Some are exactly on baseline ( X
), some are below ( g
, p
). These metrics accurately determine the offsets for accurately positioning glyphs on the baseline, adjusting the size of the glyphs and to find out how many pixels you need to leave to draw the next glyph. The following is a list of the metrics we will use:
- width : glyph width in pixels, access by
face->glyph->bitmap.width
- height : glyph height in pixels, access by
face->glyph->bitmap.rows
- bearingX : horizontal offset of the upper left point of the glyph relative to origin, access by
face->glyph->bitmap_left
- bearingY : vertical offset of the upper left point of the glyph relative to origin, access by
face->glyph->bitmap_top
- advance : horizontal offset of the beginning of the next glyph in 1/64 pixels relative to origin, access by
face->glyph->advance.x
We can load a glyph of a symbol, get its metrics and generate a texture every time we want to draw it on the screen, but to create textures for each symbol on each frame is not a good method. Better we will save the generated data somewhere and request them when we need them. We define a convenient structure that we will store in std::map
:
struct Character { GLuint TextureID; // ID glm::ivec2 Size; // glm::ivec2 Bearing; // GLuint Advance; // }; std::map<GLchar, Character> Characters;
In this article, we will simplify our life and will use only the first 128 characters. For each character, we will generate a texture and save the necessary data in a structure of type Character
, which we will add to Characters
type std::map
. Thus, all the data needed to draw a character is saved for future use.
glPixelStorei(GL_UNPACK_ALIGNMENT, 1); // Disable byte-alignment restriction for (GLubyte c = 0; c < 128; c++) { // Load character glyph if (FT_Load_Char(face, c, FT_LOAD_RENDER)) { std::cout << "ERROR::FREETYTPE: Failed to load Glyph" << std::endl; continue; } // Generate texture GLuint texture; glGenTextures(1, &texture); glBindTexture(GL_TEXTURE_2D, texture); glTexImage2D( GL_TEXTURE_2D, 0, GL_RED, face->glyph->bitmap.width, face->glyph->bitmap.rows, 0, GL_RED, GL_UNSIGNED_BYTE, face->glyph->bitmap.buffer ); // Set texture options glTexParameteri(GL_TEXTURE_2D, GL_TEXTURE_WRAP_S, GL_CLAMP_TO_EDGE); glTexParameteri(GL_TEXTURE_2D, GL_TEXTURE_WRAP_T, GL_CLAMP_TO_EDGE); glTexParameteri(GL_TEXTURE_2D, GL_TEXTURE_MIN_FILTER, GL_LINEAR); glTexParameteri(GL_TEXTURE_2D, GL_TEXTURE_MAG_FILTER, GL_LINEAR); // Now store character for later use Character character = { texture, glm::ivec2(face->glyph->bitmap.width, face->glyph->bitmap.rows), glm::ivec2(face->glyph->bitmap_left, face->glyph->bitmap_top), face->glyph->advance.x }; Characters.insert(std::pair<GLchar, Character>(c, character)); // Characters[c] = character; }
Inside the loop, for each of the first 128 characters, we get a glyph, generate a texture, set its settings and save the metrics. It is interesting to note that we use GL_RED
as arguments to internalFormat
and format
textures. A bitmap generated from a glyph is an 8-bit grayscale image, each pixel of which occupies 1 byte. For this reason, we will store the bitmap buffer as the texture color value. This is achieved by creating a texture in which each byte corresponds to the red component of the color. If we use 1 byte to represent texture colors, don't forget about the limitations of OpenGL:
glPixelStorei(GL_UNPACK_ALIGNMENT, 1);
OpenGL requires all textures to have a 4-byte offset, i.e. their size must be a multiple of 4 bytes (e.g. 8 bytes, 4000 bytes, 2048 bytes) or (and) they should use 4 bytes per pixel (such as in RGBA format), but since we use 1 byte per pixel, they can have different width. By setting the unpack alignment offset (is there a better translation?) To 1, we eliminate the offset errors that could cause segfaults.
Also, when we finished working with the font itself, we should clear the FreeType resources:
FT_Done_Face(face); // face FT_Done_FreeType(ft); // FreeType
Shaders
To draw glyphs, use the following vertex shader:
#version 330 core layout (location = 0) in vec4 vertex; // <vec2 pos, vec2 tex_coord> out vec2 TexCoords; uniform mat4 projection; void main() { gl_Position = projection * vec4(vertex.xy, 0.0, 1.0); TexCoords = vertex.zw; }
We combine symbol position and texture coordinates in one vec4
. The vertex shader calculates the product of coordinates with the projection matrix and transfers the texture coordinates to the fragment shader:
#version 330 core in vec2 TexCoords; out vec4 color; uniform sampler2D text; uniform vec3 textColor; void main() { vec4 sampled = vec4(1.0, 1.0, 1.0, texture(text, TexCoords).r); color = vec4(textColor, 1.0) * sampled; }
The fragment shader accepts 2 global variables - a monochrome image of the glyph and the color of the glyph itself. First, we sample the color value of the glyph. Since the texture data is stored in the red texture component, we only sample the r
component as the transparency value. By changing the transparency of the color, the resulting color will be transparent to the background of the glyph and opaque to the true pixels of the glyph. We also multiply RGB colors with the textColor variable to change the color of the text.
But for our mechanism to work, you need to enable mixing:
glEnable(GL_BLEND); glBlendFunc(GL_SRC_ALPHA, GL_ONE_MINUS_SRC_ALPHA);
As a projection matrix, we will have an orthographic projection matrix. For rendering text, in fact, a perspective matrix is not required and the use of orthographic projection also allows us to specify all the vertex coordinates in screen coordinates if we set the matrix like this:
glm::mat4 projection = glm::ortho(0.0f, 800.0f, 0.0f, 600.0f);
We set the bottom of the matrix to 0.0f
, the top to the height of the window. As a result, the y
coordinate takes values from the bottom of the screen ( y = 0
) to the top of the screen ( y = 600
). This means that the point (0, 0)
indicates and the lower left corner of the screen.
In conclusion, create VBO and VAO to draw the quadrangles. Here we reserve enough memory in VBO so that we can then update the data to draw characters.
GLuint VAO, VBO; glGenVertexArrays(1, &VAO); glGenBuffers(1, &VBO); glBindVertexArray(VAO); glBindBuffer(GL_ARRAY_BUFFER, VBO); glBufferData(GL_ARRAY_BUFFER, sizeof(GLfloat) * 6 * 4, NULL, GL_DYNAMIC_DRAW); glEnableVertexAttribArray(0); glVertexAttribPointer(0, 4, GL_FLOAT, GL_FALSE, 4 * sizeof(GLfloat), 0); glBindBuffer(GL_ARRAY_BUFFER, 0); glBindVertexArray(0);
A flat quadrangle requires 6 vertices of 4 floating point numbers, so we reserve 6 * 4 = 24
memory float. Since we are going to change vertex data quite often, we allocate memory using GL_DYNAMIC_DRAW
.
Display a line of text on the screen
To output a line of text, we extract the Character
structure corresponding to the symbol and calculate the dimensions of the quadrangle from the metrics of the symbol. From the calculated dimensions of the quadrangle, on the fly we create a set of 6 vertices and update the vertex data using glBufferSubData
.
For convenience, RenderText
function that will draw a string of characters:
void RenderText(Shader &s, std::string text, GLfloat x, GLfloat y, GLfloat scale, glm::vec3 color) { // Activate corresponding render state s.Use(); glUniform3f(glGetUniformLocation(s.Program, "textColor"), color.x, color.y, color.z); glActiveTexture(GL_TEXTURE0); glBindVertexArray(VAO); // Iterate through all characters std::string::const_iterator c; for (c = text.begin(); c != text.end(); c++) { Character ch = Characters[*c]; GLfloat xpos = x + ch.Bearing.x * scale; GLfloat ypos = y - (ch.Size.y - ch.Bearing.y) * scale; GLfloat w = ch.Size.x * scale; GLfloat h = ch.Size.y * scale; // Update VBO for each character GLfloat vertices[6][4] = { { xpos, ypos + h, 0.0, 0.0 }, { xpos, ypos, 0.0, 1.0 }, { xpos + w, ypos, 1.0, 1.0 }, { xpos, ypos + h, 0.0, 0.0 }, { xpos + w, ypos, 1.0, 1.0 }, { xpos + w, ypos + h, 1.0, 0.0 } }; // Render glyph texture over quad glBindTexture(GL_TEXTURE_2D, ch.textureID); // Update content of VBO memory glBindBuffer(GL_ARRAY_BUFFER, VBO); glBufferSubData(GL_ARRAY_BUFFER, 0, sizeof(vertices), vertices); glBindBuffer(GL_ARRAY_BUFFER, 0); // Render quad glDrawArrays(GL_TRIANGLES, 0, 6); // Now advance cursors for next glyph (note that advance is number of 1/64 pixels) x += (ch.Advance >> 6) * scale; // Bitshift by 6 to get value in pixels (2^6 = 64) } glBindVertexArray(0); glBindTexture(GL_TEXTURE_2D, 0); }
The contents of the function are relatively clear: the calculation of origin, sizes and vertices of the quadrangle. Notice that we multiplied each metric by scale
. After that, update VBO and draw a quad.
This line of code requires some attention:
GLfloat ypos = y - (ch.Size.y - ch.Bearing.y);
Some characters, such as p
and g
, are drawn noticeably below the baseline, which means that the quad should be noticeably lower than the y
parameter of the RenderText
function. The exact offset y_offset
can be expressed from glyph metrics:

To calculate the offset, we need straight arms to find out the distance at which the symbol is located below the baseline. This distance is shown by the red arrow. Obviously, y_offset = bearingY - height
and ypos = y + y_offset
.
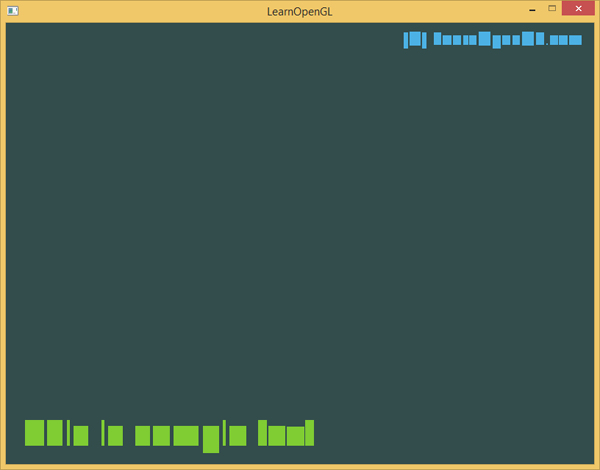
If everything is done correctly, you can display the text on the screen like this:
RenderText(shader, "This is sample text", 25.0f, 25.0f, 1.0f, glm::vec3(0.5, 0.8f, 0.2f)); RenderText(shader, "(C) LearnOpenGL.com", 540.0f, 570.0f, 0.5f, glm::vec3(0.3, 0.7f, 0.9f));
The result should look like this:

An example code is here (link to the original author’s site).
To understand which quadrangles are drawn, turn off blending:
From this figure, it is obvious that most quadrangles are on top of an imaginary baseline, although some characters, such as (
and p
, are shifted down.
What next?
This article showed how to render TrueType fonts with FreeType. This approach is flexible, scalable and efficient on various character encodings. However, this approach may be too heavy for your application, as a texture is created for each character. Productive bitmap fonts are preferred because we have one texture for all glyphs. The best approach is to combine the two approaches and take the best: on-the-fly generate a raster font from glyphs downloaded using FreeType. This will save the renderer from multiple texture switching and, depending on the texture packaging, increase performance.
But FreeType has one more drawback: fixed-size glyphs, which means that as the size of the rendered glyph increases, steps may appear on the screen and when rotated, the glyph may look blurry. Valve solved (link to web archive) this problem several years ago using signed distance fields. They did very well and they showed it on 3D applications.
PS : We have a telegram conf for coordination of transfers. If you have a serious desire to help with the translation, then you are welcome!