Hello, Habr!
At HackQuest, before the ZeroNight 2019 conference, there was one entertaining task. I did not pass the decision on time, but I received my portion of thrills. I think you will be interested to know what the organizers and the r0.Crew team have prepared for the participants.
Task: get the activation code for the secret Micosoft 1998 operating system.
In this article I will tell you how to do it.
Content
0. Task
1. Tools
2. Inspect the image
3. Character devices and the kernel
4. Search register_chrdev
4.1. Preparing a Fresh Minimal Linux Image
4.2. Some more preparations
4.3. Disable KASLR on lunix
4.4. We search and find a signature
5. Search for fops from / dev / activate and the write function
6. We study write
6.1. Hash function
6.2. Key Generation Algorithm
6.3. Keygen
A task
An image launched in QEMU requires mail and an activation key. We already know the mail, let's look for the rest!
1. Tools
- Gdb
- QEMU
- binwalk
- IDA
In
~/.gdbinit
you need to write a useful function:
define xxd dump binary memory dump.bin $arg0 $arg0+$arg1 shell xxd dump.bin end
2. Inspect the image
First rename jD74nd8_task2.iso to lunix.iso.
Using binwalk, we see that there is a script at offset
0x413000
. This script checks mail and key:

We break the check with the hex editor directly in the image and make the script execute our commands. What it looks like now:

Note that you had to trim the
activated
line to
activ
to keep the image size the same. Fortunately, there is no hash check. The image is called lunix_broken_activation.iso.
Run it through QEMU:
sudo qemu-system-x86_64 lunix_broken_activation.iso -enable-kvm
Let's dig inside:
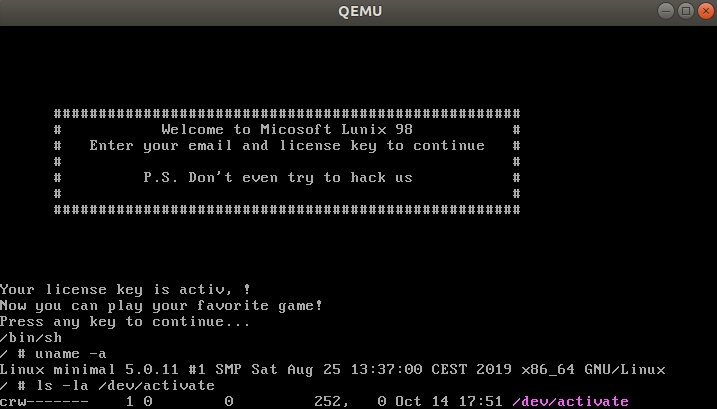
So we have:
- Distribution - Minimal Linux 5.0.11.
- The character device
/dev/activate
is engaged in checking mail, the key, which means that the verification logic needs to be looked for somewhere in the bowels of the kernel. - Mail, key are transmitted in
email|key
format.
The target_broken_activation.iso image is no longer required.
3. Character devices and the kernel
Devices like
/dev/mem
,
/dev/vcs
,
/dev/activate
, etc. register using the
register_chrdev
function:
int register_chrdev (unsigned int major, const char * name, const struct fops);
name
is the name, and the
fops
structure contains pointers to driver functions:
struct file_operations { struct module *owner; loff_t (*llseek) (struct file *, loff_t, int); ssize_t (*read) (struct file *, char *, size_t, loff_t *); ssize_t (*write) (struct file *, const char *, size_t, loff_t *); int (*readdir) (struct file *, void *, filldir_t); unsigned int (*poll) (struct file *, struct poll_table_struct *); int (*ioctl) (struct inode *, struct file *, unsigned int, unsigned long); int (*mmap) (struct file *, struct vm_area_struct *); int (*open) (struct inode *, struct file *); int (*flush) (struct file *); int (*release) (struct inode *, struct file *); int (*fsync) (struct file *, struct dentry *, int datasync); int (*fasync) (int, struct file *, int); int (*lock) (struct file *, int, struct file_lock *); ssize_t (*readv) (struct file *, const struct iovec *, unsigned long, loff_t *); ssize_t (*writev) (struct file *, const struct iovec *, unsigned long, loff_t *); };
We are only interested in this function:
ssize_t (*write) (struct file *, const char *, size_t, loff_t *);
Here, the second argument is the buffer with the data transferred, the next is the size of the buffer.
4. Search register_chrdev
By default, Minimal Linux compiles with disabled debugging information to reduce the size of the image, but minimal. Therefore, you can’t just start the debugger and find the function by name. But it is possible by signature.
And the signature is in the image of Minimal Linux with the included debugging information. In general, you need to build your Minimal.
That is, the scheme is as follows:
Minimal Linux -> register_chrdev -> -> register_chrdev Lunix
4.1. Preparing a Fresh Minimal Linux Image
- Install the necessary tools:
sudo apt install wget make gawk gcc bc bison flex xorriso libelf-dev libssl-dev
- Downloading scripts:
git clone https://github.com/ivandavidov/minimal cd minimal/src
- Correct
02_build_kernel.sh
:
delete it
# Disable debug symbols in kernel => smaller kernel binary. sed -i "s/^CONFIG_DEBUG_KERNEL.*/\\# CONFIG_DEBUG_KERNEL is not set/" .config
add it
echo "CONFIG_GDB_SCRIPTS=y" >> .config
- Compiling
./build_minimal_linux_live.sh
The image is minimal / src / minimal_linux_live.iso.
4.2. Some more preparations
Unzip minimal_linux_live.iso to the minimal / src / iso folder.
The minimal / src / iso / boot file
rootfs.xz
kernel
kernel.xz
and the
rootfs.xz
FS
rootfs.xz
. Rename them to
kernel.minimal.xz
,
rootfs.minimal.xz
.
In addition, you need to pull the core out of the image. The extract-vmlinux script will help with this:
extract-vmlinux kernel.minimal.xz > vmlinux.minimal
Now in the minimal / src / iso / boot folder we have this set:
kernel.minimal.xz
,
rootfs.minimal.xz
,
vmlinux.minimal
.
But from lunix.iso we only need the kernel. Therefore, we
vmlinux.lunix
out all the same operations, we call the
vmlinux.lunix
kernel.xz
, forget about
kernel.xz
,
rootfs.xz
, now I will tell you why.
4.3. Disable KASLR on lunix
I was able to disable KASLR in the case of freshly assembled Minimal Linux in QEMU.
But it did not work out with Lunix. Therefore, you have to edit the image itself.
To do this, open it in a hex editor, find the line
"APPEND vga=normal"
and replace it with
"APPEND nokaslr\x20\x20\x20"
.
And the image is called lunix_nokaslr.iso.
4.4. We search and find a signature
Launch fresh Minimal Linux in one terminal:
sudo qemu-system-x86_64 -kernel kernel.minimal.xz -initrd rootfs.minimal.xz -append nokaslr -s
In another debugger:
sudo gdb vmlinux.minimal (gdb) target remote localhost:1234
Now look for
register_chrdev
in the list of functions:
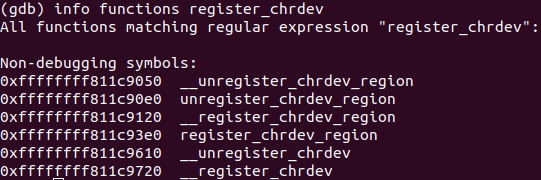
Obviously, our option is
__register_chrdev
.
We are not confused that we searched register_chrdev, but found __register_chrdev
Disassemble:

What signature to take? I tried several options and settled on the following piece:
0xffffffff811c9785 <+101>: shl $0x14,%esi 0xffffffff811c9788 <+104>: or %r12d,%esi

The fact is that in
lunix
there is only one function that contains
0xc1, 0xe6, 0x14, 0x44, 0x09, 0xe6
.
Now I will show, but first we find out in which segment to look for it.
The
__register_chrdev
function
__register_chrdev
address
0xffffffff811c9720
, this is the
.text
segment. There we will look.
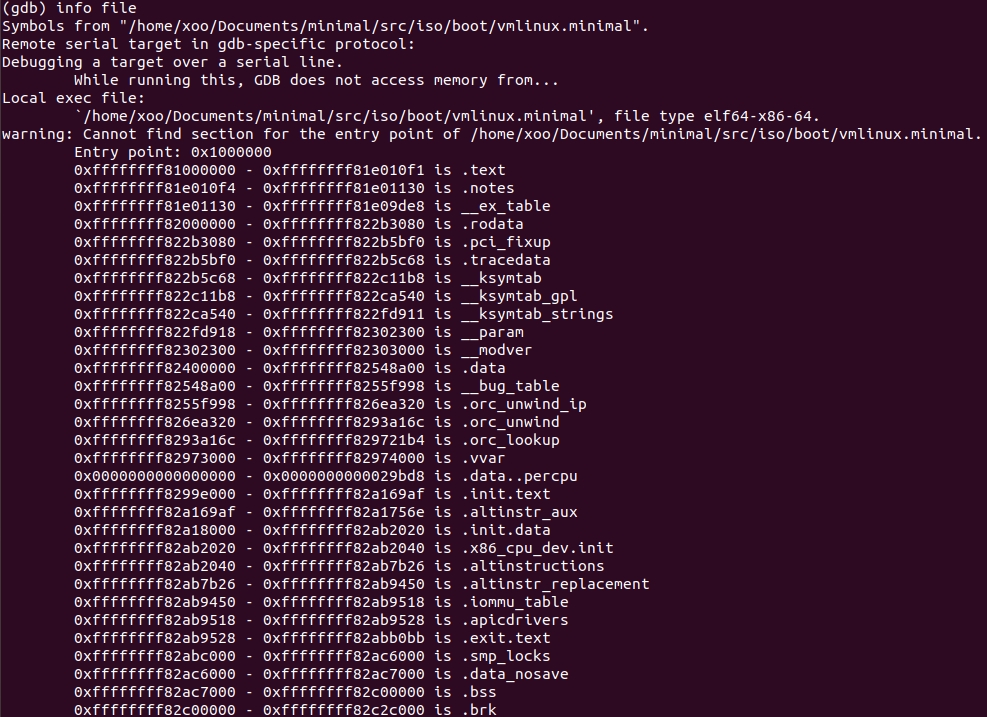
Disconnect from the reference Minimal Linux. Connect to lunix now.
In one terminal:
sudo qemu-system-x86_64 lunix_nokaslr.iso -s -enable-kvm
In another:
sudo gdb vmlinux.lunix (gdb) target remote localhost:1234
We look at the boundaries of the
.text
segment:
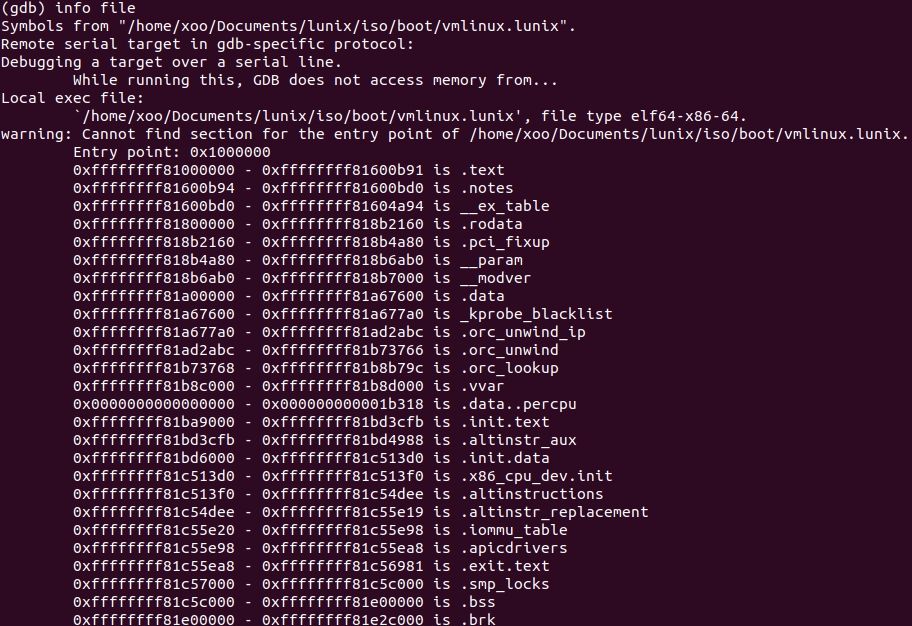
Borders
0xffffffff81000000 - 0xffffffff81600b91
, look for
0xc1, 0xe6, 0x14, 0x44, 0x09, 0xe6
:

We find the piece at the address
0xffffffff810dc643
. But this is only part of the function, let's see what is above:
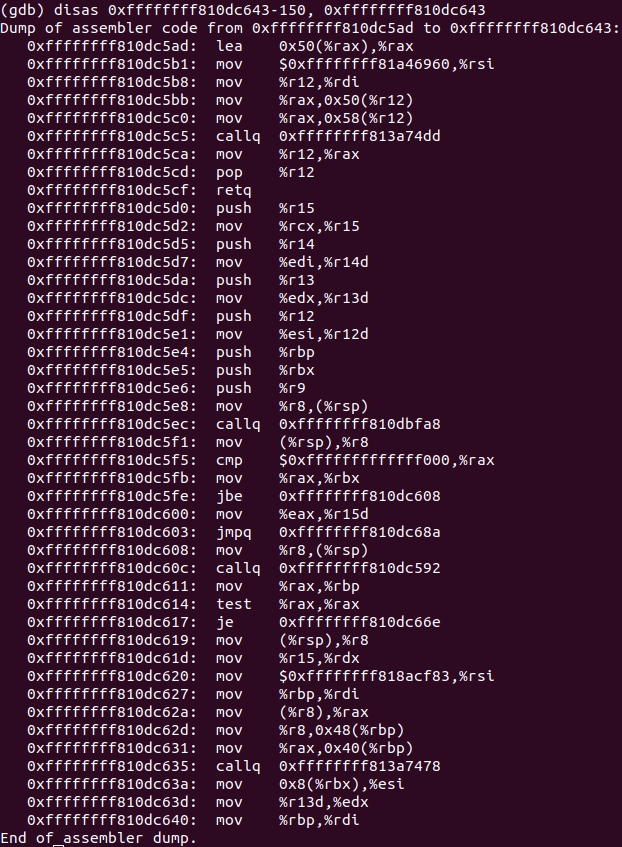
And here is the beginning of the function
0xffffffff810dc5d0
(because
retq
is the exit from the neighboring function).
5. Search fops from / dev / activate
The prototype of the
register_chrdev
function is this:
int register_chrdev (unsigned int major, const char * name, const struct fops);
We need a
fops
structure.
Restarting the debugger and QEMU. We
0xffffffff810dc5d0
break on
0xffffffff810dc5d0
. It will work several times. This wakes up devices
mem, vcs, cpu/msr, cpu/cpuid
, and immediately after them
activate
.
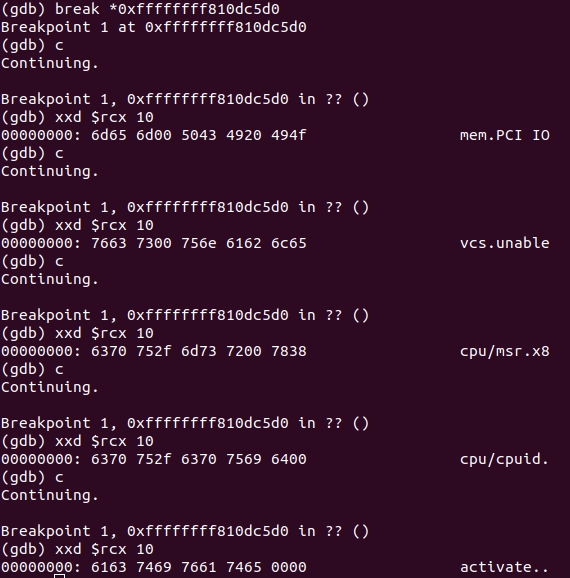
The pointer to the name is stored in the
rcx
. And the pointer to
fops
is in
r8
:
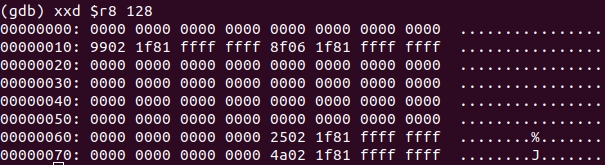
I remind structure fops
struct file_operations { struct module *owner; loff_t (*llseek) (struct file *, loff_t, int); ssize_t (*read) (struct file *, char *, size_t, loff_t *); ssize_t (*write) (struct file *, const char *, size_t, loff_t *); int (*readdir) (struct file *, void *, filldir_t); unsigned int (*poll) (struct file *, struct poll_table_struct *); int (*ioctl) (struct inode *, struct file *, unsigned int, unsigned long); int (*mmap) (struct file *, struct vm_area_struct *); int (*open) (struct inode *, struct file *); int (*flush) (struct file *); int (*release) (struct inode *, struct file *); int (*fsync) (struct file *, struct dentry *, int datasync); int (*fasync) (int, struct file *, int); int (*lock) (struct file *, int, struct file_lock *); ssize_t (*readv) (struct file *, const struct iovec *, unsigned long, loff_t *); ssize_t (*writev) (struct file *, const struct iovec *, unsigned long, loff_t *); };
So, the address of the
write
function is
0xffffffff811f068f
.
6. We study write
The function includes several interesting blocks. It’s not worth describing every breakpoint right there, it's a usual routine. Moreover, the blocks of calculations are visible to the naked eye.
6.1. Hash function
Open the IDA, load the kernel
vmlinux.lunix
and see what the write function has inside.
The first to draw attention to this cycle:
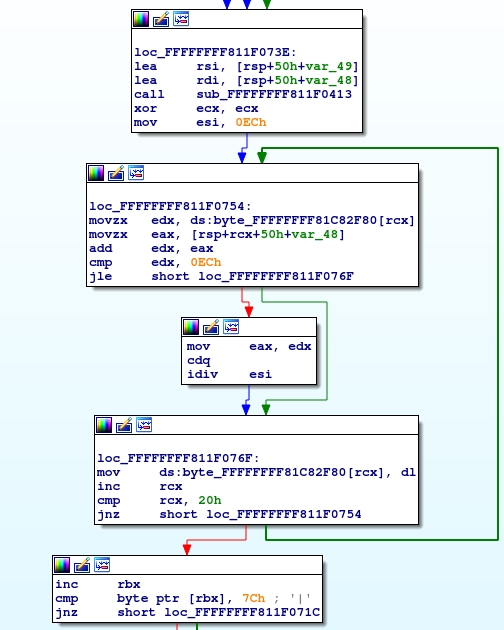
Some
sub_FFFFFFFF811F0413
function is
sub_FFFFFFFF811F0413
, which starts like this:

And at the address
0xffffffff81829ce0
, a table for sha256 is detected:

That is,
sub_FFFFFFFF811F0413
= sha256. The bytes whose hash must be obtained are transmitted via
$sp+0x50+var49
, and the result is stored at
$sp+0x50+var48
. By the way,
var49=-0x49
,
var48=-0x48
, so
$sp+0x50+var49 = $sp+0x7
,
$sp+0x50+var48 = $sp+0x8
.
Check it out.
We start qemu, gdb, set a break on
0xffffffff811f0748 call sub_FFFFFFFF811F0413
and on the instruction
0xffffffff811f074d xor ecx, ecx
, which is immediately behind the function.
test@mail.ru
test@mail.ru
, password
1234-5678-0912-3456
.
The byte of mail is passed to the function, and the result is this:
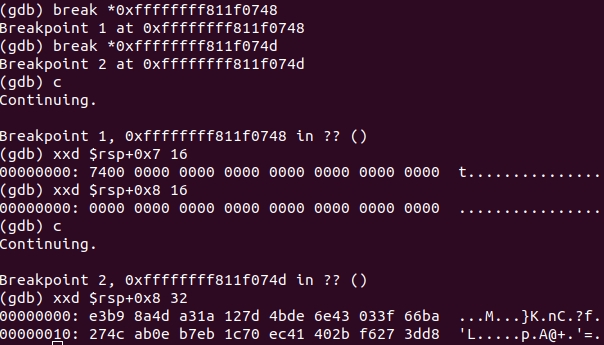
>>> import hashlib >>> hashlib.sha256(b"t").digest().hex() 'e3b98a4da31a127d4bde6e43033f66ba274cab0eb7eb1c70ec41402bf6273dd8' >>>
That is, yes, it really is sha256, only it calculates hashes for all bytes of mail, and not one hash only from mail.
Then the hashes are summed by byte. But if the sum is greater than
0xEC
, then the remainder of the division by
0xEC
:
import hashlib def get_email_hash(email): h = [0]*32 for sym in email: sha256 = hashlib.sha256(sym.encode()).digest() for i in range(32): s = h[i] + sha256[i] if s <= 0xEC: h[i] = s else: h[i] = s % 0xEC return h
The amount is saved at
0xffffffff81c82f80
. Let's see what the hash from
test@mail.ru
.
We
ffffffff811f0786 dec r13d
break on
ffffffff811f0786 dec r13d
(this is the exit from the loop):

And compare with:
>>> get_email_hash('test@mail.ru') 2b902daf5cc483159b0a2f7ed6b593d1d56216a61eab53c8e4b9b9341fb14880
But the hash itself is clearly a bit long for the key.
6.2. Key Generation Algorithm
The key is responsible for this code:
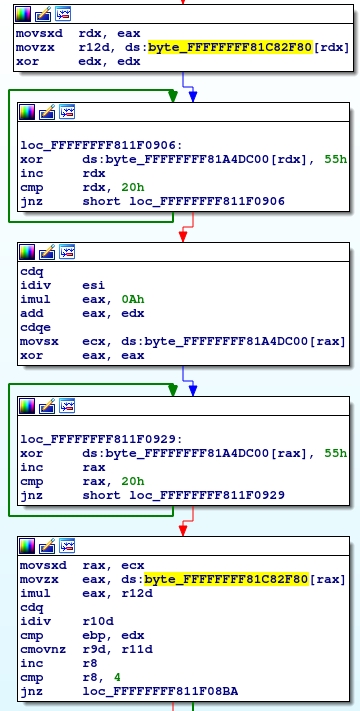
Here is the final calculation of each byte:
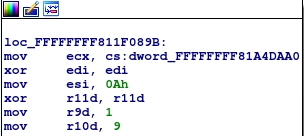
0xFFFFFFFF811F0943 imul eax, r12d 0xFFFFFFFF811F0947 cdq 0xFFFFFFFF811F0948 idiv r10d
In
eax
and
r12d
hash bytes, they are multiplied, and then the remainder of dividing by 9 is taken.
Because
And bytes are taken in unexpected order. I will indicate it in keygen.
6.3. Keygen
def keygen(email): email_hash = get_email_hash(email) pairs = [(0x00, 0x1c), (0x1f, 0x03), (0x01, 0x1d), (0x1e, 0x02), (0x04, 0x18), (0x1b, 0x07), (0x05, 0x19), (0x1a, 0x06), (0x08, 0x14), (0x17, 0x0b), (0x09, 0x15), (0x16, 0x0a), (0x0c, 0x10), (0x13, 0x0f), (0x0d, 0x11), (0x12, 0x0e)] key = [] for pair in pairs: i = pair[0] j = pair[1] key.append((email_hash[i] * email_hash[j])%9) return [''.join(map(str, key[i:i+4])) for i in range(0, 16, 4)]
So, let's generate some key:
>>> import lunix >>> lunix.keygen("m.gayanov@gmail.com") ['0456', '3530', '0401', '2703']
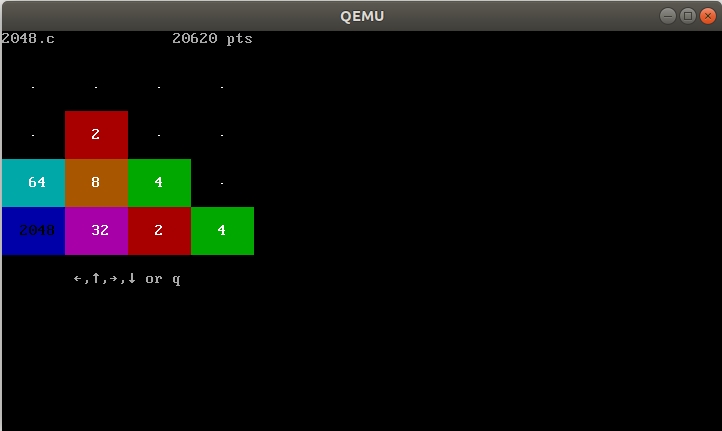
And now you can relax and play the game 2048 :) Thank you for your attention! Code here