Why for the new project I took Robot Framework
Recently I changed the project - I came to a new development, where before me there was no testing, either manual or automatic. The customer did not impose conditions on the toolkit (except that it was Python), so I made my own choice. In this article, I will explain why in such conditions I chose Robot Framework. And in the end there will be some examples specially written for the article that illustrate what we are talking about.

I have been doing test automation for over 10 years, and about three of them interacted with the Robot Framework.
As I noted above, not so long ago I came to a new project, where I started testing automation from scratch. I can’t tell you about the project - NDA. I only note that this is a cool automation tool, which in the future should save a lot of human resources. It is built from microservices. So far, my work concerns four of them, but in the future I will expand my activities to others - it all comes down to the fact that I have only 8 working hours a day. Everything takes time.
The lack of testing in the case of this project was identical to the lack of recommended tools. As part of the Python stack, I had freedom of choice. And I took advantage of it.
I think I can be attributed to fans of the Robot Framework. It seems to me that almost everything can be done on it.
On other projects, the company uses pytest. However, in my opinion, it does not have such capabilities, since it is limited by the capabilities of Python. You just write Python code and note that you expect a certain value in such a variable. For my taste, it's simple but too abstract. A lot of things were handed over to the developer, who would have to add all the useful features by hand. Robot Framework does this on its own. Here are four points worth taking to your project.
The Robot Framework itself is written in Python (i.e., everything that Python can do), and for it there are many libraries created by the community, which greatly expands the range of problems to be solved.
Under the Robot Framework, you can easily write your libraries, integrating it with almost anything, and everything will work right away. No crutches or bicycles are required.
And in addition, the Robot Framework allows you to write parametric tests (templates), which greatly accelerates the work of the automation tool.
One of the fundamental points is that keyword (analogues of conventional methods in the Robot Framework, which historically is called for some reason) can be written in Russian. As a result, the test texts are, of course, far from the literary language, but at first glance it becomes clear what is happening there. This is necessary, first of all, not to end developers, but, for example, to stakeholders. They can independently open the tests and see what exactly happens there: “Select a random element from ...”, etc.
Robot Framework works well with tags. You can not only run tests with a specific tag, but also analyze reports with their help. The log file contains statistics on tags, based on which you can take some action if you think about the arrangement of tags in advance.
Conveniently, in each test you do not need to write all the tags in a long cloth, but you can embed the tests in a tree structure. In my case, it looks like this: the first level is a microservice, the second is the type of test, the third is the tests themselves (it’s convenient to put an init-file containing tags for what is embedded inside).
I created a tag for each microservice, each test approach (smoke tests, CRUD tests, integration, etc.). I can run tests of a specific type or only for a specific service. I also tag the type of function - list or detailed. And if the product responsible for list functions “breaks” in the product, all tests with this tag will turn red, regardless of where they are located and what they relate to.
By tags I bind autotests to Jira. When the bug from the tracker closes, and the test from red turns green, we still have a history of what exactly has changed. Many months later, if the test turns red again, we can see what steps were taken to fix the problem last time, and even assume that led to the replay of the bug.
Another special tag I have added for non-critical bugs. GitLab does not allow us to do anything with the assembly if at least one test crashes. This is logical - until all the bugs are fixed, we can’t release a product or even a weekly sprint. But we have low priority and insignificant bugs. For them, I selected a tag that allows the Robot Framework not to drop the entire assembly, if specifically these tests (tests with this tag) do not pass.
Log analysis is an integral part of testing. Whatever happens at the time the tests are run, the Robot Framework writes absolutely everything. Up to the point that I had to write a special wrapper that hides the login and password from the log for connecting to the database.
Such detailing helps to understand much faster what is the reason for the test crashing - is the system under test working incorrectly or is something not taken into account in the test and needs to be fixed? The answer to this question is not always obvious. Errors of developers and testers are distributed 50/50.
In other tools - in the same pytest - you can generate the same detailed log. But there the task of generating it rests with the developer who writes the tests. He needs to think about what kind of log entries are really needed.
From the moment I started using the Robot Framework, several months have passed. At the moment, the Robot Framework has implemented more than 200 tests and, as mentioned above, there is integration with GitLab, which helps to verify changes made to the developed product (test cases with identifiers that allow you to bind autotests to them are stored in testrail).
To calculate the coverage, I wrote a utility that takes a list of backend APIs from Swagger and compares it with what was tested. Thus, we have a clear understanding of the current coverage. For example, we know that today this microservice is covered in its entirety, and the other is 98% covered. And after adding new functionality that is not yet reflected in testing, coverage drops. Accordingly, you can plan for the next sprint to be implemented by me.
Naturally, the project is developing further. For example, now we are deploying a mock server (about what it is and why it is necessary, my colleague already wrote on Habré ).
The above examples are designed specifically for the article to illustrate the above ideas. If you want to experiment with these examples yourself, they are all posted in our repository .
Let's start with the simplest test on the Robot Framework.
In the example below, a session is first created to a certain obviously accessible resource (in our case, en.wikipedia.org/wiki ). By calling Get root (/), we check the status code 200.
Robot Framework allows you to create test patterns. If we transfer the test from the previous example to the template view, we can easily scale it by adding calls with the necessary arguments. For example, let's check the answer 200 for pages with biographies of scientists.
We continue to improve the simplest test.
Having a template as a single entry point, we can easily add verification of the scientist's year of birth. This way we confirm that the loaded page displays the correct data.
In addition, in the example below, I wrapped the existing keyword in Russian names - for my taste, so the test reads more organically. As a tester, I was always annoyed by methods called “as if in English,” but completely illiterate. It is always better to write in the language you know.
Pay attention to
. You can add tags here, which, as I wrote above, will help to assess problems at the report level. Similarly,
in the __init __. Robot file (see the example in our repository ) allows you to set tags for all tests in the directory, including nested ones. If the tagging is performed correctly, without even reading the names of the tests themselves and without crawling into their logic, we can fairly accurately assume that it does not work in the test project.
Look at the report on the launch of these tests. For clarity, I added a test that will find an error.
Report statistics are its most important part.
In our example, the tests with the
tag did not pass completely (we have 1 out of 1, but in real life there will be, for example, 17 out of 20). It can be assumed that the problem is in this page.
Tags help run tests selectively. To run all tests with a specific tag in the launch line, you must specify:
Even logical operations with tags are supported:
For example, if you want to run only the Smoke test for tests with the numbers tag, you should add:
Let's move on to tricks that greatly simplify the work.
Having tagged the test with tags, you can define one or more of them as “non-critical”. A test with such a tag will still show errors (if any), but in the end, these errors will not be interpreted as "invalid". I use this option when some minor bugs were taken into account, entered into the bug tracker, but have not yet been fixed. Without it, the autotests included in CI, upon detection of such known problems, will not allow you to assemble the project, and this is not always convenient.
Add a new test:
At startup, the added tag is defined as “non-critical” using the key:
The following example will illustrate how to add my library.
Create a new keyword “Generate an array of numbers”. Its purpose is obvious (for this I love Russian names).
We connect the library in the test:
and use it:
Do not forget that if you have a nested structure, you should separate it with dots, as in the example.
Another trick: the numbers passed in
are treated as int, not as strings!
Another nice thing is the built-in arguments, which are passed not at the end of the call, as usual, but directly in his body.
To illustrate, we will write a wrapper for the array generator created above, which allows using the built-in arguments:
Now you can write like this:
The next trick that I really like about the Robot Framework is the substitution of part of the name. Suppose we have two methods: one selects even numbers, the other odd.
The keyword
used above allows you to execute a line of python code “right here”. Please note, if you do not want to replace a piece of the string with the contents of the variable, namely, pass a link to it, then you must specify the variable name immediately after the
sign without curly braces!
And so, you can call both methods, replacing the different part of their name:
Yes, Robot Framework allows you to write a decorator for other keywords!
To illustrate this possibility, we will write a decorator that selects negative numbers in the response of any method that returns a list.
Note:
are all unnamed arguments;
are all named arguments.
Having this bunch, you can redirect them, actually creating a decorator.
Working with the decorator will look like this:
In the examples above, I showed the main features of the Robot Framework, which make life much easier. But his chips are not limited to this list.
If you have any questions, write in the comments. We will single out the main direction of reading interest and answer the questions with a continuation of the text.
The author of the article: Vladimir Vasyaev.
PS We publish our articles on several sites of the Runet. Subscribe to our pages in VK , FB or Telegram-channel to learn about all our publications and other Maxilect news.
I have been doing test automation for over 10 years, and about three of them interacted with the Robot Framework.
As I noted above, not so long ago I came to a new project, where I started testing automation from scratch. I can’t tell you about the project - NDA. I only note that this is a cool automation tool, which in the future should save a lot of human resources. It is built from microservices. So far, my work concerns four of them, but in the future I will expand my activities to others - it all comes down to the fact that I have only 8 working hours a day. Everything takes time.
The lack of testing in the case of this project was identical to the lack of recommended tools. As part of the Python stack, I had freedom of choice. And I took advantage of it.
Why Robot Framework?
I think I can be attributed to fans of the Robot Framework. It seems to me that almost everything can be done on it.
On other projects, the company uses pytest. However, in my opinion, it does not have such capabilities, since it is limited by the capabilities of Python. You just write Python code and note that you expect a certain value in such a variable. For my taste, it's simple but too abstract. A lot of things were handed over to the developer, who would have to add all the useful features by hand. Robot Framework does this on its own. Here are four points worth taking to your project.
Flexibility
The Robot Framework itself is written in Python (i.e., everything that Python can do), and for it there are many libraries created by the community, which greatly expands the range of problems to be solved.
Under the Robot Framework, you can easily write your libraries, integrating it with almost anything, and everything will work right away. No crutches or bicycles are required.
And in addition, the Robot Framework allows you to write parametric tests (templates), which greatly accelerates the work of the automation tool.
Russian language in tests
One of the fundamental points is that keyword (analogues of conventional methods in the Robot Framework, which historically is called for some reason) can be written in Russian. As a result, the test texts are, of course, far from the literary language, but at first glance it becomes clear what is happening there. This is necessary, first of all, not to end developers, but, for example, to stakeholders. They can independently open the tests and see what exactly happens there: “Select a random element from ...”, etc.
Tagging
Robot Framework works well with tags. You can not only run tests with a specific tag, but also analyze reports with their help. The log file contains statistics on tags, based on which you can take some action if you think about the arrangement of tags in advance.
Conveniently, in each test you do not need to write all the tags in a long cloth, but you can embed the tests in a tree structure. In my case, it looks like this: the first level is a microservice, the second is the type of test, the third is the tests themselves (it’s convenient to put an init-file containing tags for what is embedded inside).
I created a tag for each microservice, each test approach (smoke tests, CRUD tests, integration, etc.). I can run tests of a specific type or only for a specific service. I also tag the type of function - list or detailed. And if the product responsible for list functions “breaks” in the product, all tests with this tag will turn red, regardless of where they are located and what they relate to.
By tags I bind autotests to Jira. When the bug from the tracker closes, and the test from red turns green, we still have a history of what exactly has changed. Many months later, if the test turns red again, we can see what steps were taken to fix the problem last time, and even assume that led to the replay of the bug.
Another special tag I have added for non-critical bugs. GitLab does not allow us to do anything with the assembly if at least one test crashes. This is logical - until all the bugs are fixed, we can’t release a product or even a weekly sprint. But we have low priority and insignificant bugs. For them, I selected a tag that allows the Robot Framework not to drop the entire assembly, if specifically these tests (tests with this tag) do not pass.
Great log
Log analysis is an integral part of testing. Whatever happens at the time the tests are run, the Robot Framework writes absolutely everything. Up to the point that I had to write a special wrapper that hides the login and password from the log for connecting to the database.
Such detailing helps to understand much faster what is the reason for the test crashing - is the system under test working incorrectly or is something not taken into account in the test and needs to be fixed? The answer to this question is not always obvious. Errors of developers and testers are distributed 50/50.
In other tools - in the same pytest - you can generate the same detailed log. But there the task of generating it rests with the developer who writes the tests. He needs to think about what kind of log entries are really needed.
What is on the project right now
From the moment I started using the Robot Framework, several months have passed. At the moment, the Robot Framework has implemented more than 200 tests and, as mentioned above, there is integration with GitLab, which helps to verify changes made to the developed product (test cases with identifiers that allow you to bind autotests to them are stored in testrail).
To calculate the coverage, I wrote a utility that takes a list of backend APIs from Swagger and compares it with what was tested. Thus, we have a clear understanding of the current coverage. For example, we know that today this microservice is covered in its entirety, and the other is 98% covered. And after adding new functionality that is not yet reflected in testing, coverage drops. Accordingly, you can plan for the next sprint to be implemented by me.
Naturally, the project is developing further. For example, now we are deploying a mock server (about what it is and why it is necessary, my colleague already wrote on Habré ).
Now to practice
The above examples are designed specifically for the article to illustrate the above ideas. If you want to experiment with these examples yourself, they are all posted in our repository .
The simplest test example
Let's start with the simplest test on the Robot Framework.
In the example below, a session is first created to a certain obviously accessible resource (in our case, en.wikipedia.org/wiki ). By calling Get root (/), we check the status code 200.
*** Settings *** Documentation smoke-. Library RequestsLibrary *** Variables *** ${base_url} https://en.wikipedia.org/wiki ${url} / *** Test Cases *** Wiki Create session conn ${base_url} disable_warnings=1 ${response} Get request conn ${url} Delete all sessions Should be equal ${response.status_code} ${200}
Template (parametric) tests
Robot Framework allows you to create test patterns. If we transfer the test from the previous example to the template view, we can easily scale it by adding calls with the necessary arguments. For example, let's check the answer 200 for pages with biographies of scientists.
*** Settings *** Documentation smoke-. . ... . Library RequestsLibrary Test Setup Test Teardown Test Template Smoke- *** Variables *** ${base_url} https://en.wikipedia.org/wiki *** Test Cases *** /Isaac_Newton /Albert_Einstein /Stephen_Hawking *** Keywords *** Create session conn ${base_url} disable_warnings=1 Delete all sessions Smoke- [Arguments] ${url} ${response} Get request conn ${url} Should be equal ${response.status_code} ${200}
Tagging and reading logs
We continue to improve the simplest test.
Having a template as a single entry point, we can easily add verification of the scientist's year of birth. This way we confirm that the loaded page displays the correct data.
In addition, in the example below, I wrapped the existing keyword in Russian names - for my taste, so the test reads more organically. As a tester, I was always annoyed by methods called “as if in English,” but completely illiterate. It is always better to write in the language you know.
*** Settings *** Documentation smoke-. . ... . ... . ... . Library RequestsLibrary Test Setup Test Teardown Test Template Smoke- *** Variables *** ${base_url} https://en.wikipedia.org/wiki *** Test Cases *** [Tags] Newton /Isaac_Newton 1642 [Tags] Einstein /Albert_Einstein 1879 [Tags] Hawking /Stephen_Hawking 1942 ( ) [Tags] Numbers /123456789 1899 *** Keywords *** Create session conn ${base_url} disable_warnings=1 Delete all sessions Smoke- [Arguments] ${url} ${expected_word} ${response} Get request conn ${url} Should be equal ${response.status_code} ${200} ... msg= GET ${url} , 200 . ${response.text} ${expected_word} [Arguments] ${text} ${expected_word} Should contain ${text} ${expected_word} msg= ${expected_word}!
Pay attention to
[Tags]
. You can add tags here, which, as I wrote above, will help to assess problems at the report level. Similarly,
Force Tags
in the __init __. Robot file (see the example in our repository ) allows you to set tags for all tests in the directory, including nested ones. If the tagging is performed correctly, without even reading the names of the tests themselves and without crawling into their logic, we can fairly accurately assume that it does not work in the test project.
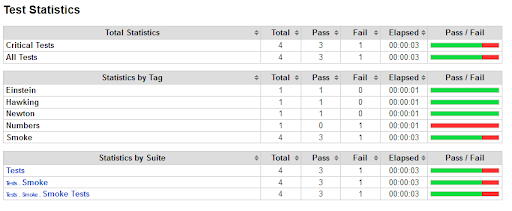
Look at the report on the launch of these tests. For clarity, I added a test that will find an error.
Report statistics are its most important part.
In our example, the tests with the
numbers
tag did not pass completely (we have 1 out of 1, but in real life there will be, for example, 17 out of 20). It can be assumed that the problem is in this page.
Tags help run tests selectively. To run all tests with a specific tag in the launch line, you must specify:
--include <tag>
Even logical operations with tags are supported:
-- include <tag>AND<tag>
For example, if you want to run only the Smoke test for tests with the numbers tag, you should add:
--include smokeANDnumbers
Non-critical tests
Let's move on to tricks that greatly simplify the work.
Having tagged the test with tags, you can define one or more of them as “non-critical”. A test with such a tag will still show errors (if any), but in the end, these errors will not be interpreted as "invalid". I use this option when some minor bugs were taken into account, entered into the bug tracker, but have not yet been fixed. Without it, the autotests included in CI, upon detection of such known problems, will not allow you to assemble the project, and this is not always convenient.
Add a new test:
( ) [Tags] Letters Known /abcdefghi 1799
At startup, the added tag is defined as “non-critical” using the key:
--noncritical Known
Keyword in python
The following example will illustrate how to add my library.
Create a new keyword “Generate an array of numbers”. Its purpose is obvious (for this I love Russian names).
from random import randint from typing import List from robot.api.deco import keyword class ArrayGeneratorLibrary: ROBOT_LIBRARY_SCOPE = 'GLOBAL' @keyword(" ") def generate_array(self, length: int, minimal: int, maximal: int) -> List[int]: result = [] for i in range(int(length)): result.append(randint(int(minimal), int(maximal))) return result
We connect the library in the test:
Library libraries.ArrayGeneratorLibrary
and use it:
, python. ${array} ${5} ${2} ${8} Log to console ${array}
Do not forget that if you have a nested structure, you should separate it with dots, as in the example.
Another trick: the numbers passed in
${}
are treated as int, not as strings!
Inline arguments
Another nice thing is the built-in arguments, which are passed not at the end of the call, as usual, but directly in his body.
To illustrate, we will write a wrapper for the array generator created above, which allows using the built-in arguments:
${n} , ${from} ${to} ${result} ${n} ${from} ${to} [Return] ${result}
Now you can write like this:
. ${array} 5 , 2 8 Log to console ${array}
Substitution of part of the method name, python insert and loops
The next trick that I really like about the Robot Framework is the substitution of part of the name. Suppose we have two methods: one selects even numbers, the other odd.
[Arguments] ${list} ${evens} Evaluate [i for i in $list if i % 2 == 0] [Return] ${evens} [Arguments] ${list} ${odds} Evaluate [i for i in $list if i % 2 != 0] [Return] ${odds}
The keyword
Evaluate
used above allows you to execute a line of python code “right here”. Please note, if you do not want to replace a piece of the string with the contents of the variable, namely, pass a link to it, then you must specify the variable name immediately after the
$
sign without curly braces!
And so, you can call both methods, replacing the different part of their name:
, . . ${types} Create list ${array} 5 , 12 28 FOR ${type} IN @{types} ${numbers} Run keyword ${type} ${array} log to console ${numbers} END
Method Decorators
Yes, Robot Framework allows you to write a decorator for other keywords!
To illustrate this possibility, we will write a decorator that selects negative numbers in the response of any method that returns a list.
, [Arguments] ${keyword} @{args} &{kwargs} ${list} Run keyword ${keyword} @{args} &{kwargs} ${negs} Evaluate [i for i in $list if i < 0] [Return] ${negs}
Note:
@{args}
are all unnamed arguments;
&{kwargs}
are all named arguments.
Having this bunch, you can redirect them, actually creating a decorator.
Working with the decorator will look like this:
${negs} , 10 -5 5 log to console ${negs}
Instead of a conclusion
In the examples above, I showed the main features of the Robot Framework, which make life much easier. But his chips are not limited to this list.
If you have any questions, write in the comments. We will single out the main direction of reading interest and answer the questions with a continuation of the text.
The author of the article: Vladimir Vasyaev.
PS We publish our articles on several sites of the Runet. Subscribe to our pages in VK , FB or Telegram-channel to learn about all our publications and other Maxilect news.
All Articles