Run unit tests locally in STM32CubeIDE under Windows
Introduction
 Everyone knows the benefits of unit testing. First of all, writing tests at the same time as the code allows you to detect errors earlier and not to waste time subsequently on time-consuming complex debugging. In the case of embedded development, unit testing has features related, firstly, to the fact that the code runs somewhere deep in the bowels of the device and it is quite difficult to interact with it, and secondly, the code is heavily tied to the target hardware .
If there are fragments in the project that are independent of equipment and at the same time implement quite complex logic, for them the use of unit tests will give the greatest benefit. For example, this may be the implementation of some kind of data transfer protocol, various calculations, or a controlling state machine.
There are three ways to run unit tests for embedded platforms:
- Launch directly on the target platform. In this case, you can work with the equipment of the device, and the code will work exactly the same as in combat conditions. However, testing will require physical access to the device. In addition, the testing cycle will be quite long because of the need to constantly download code to the device.
- Running on an emulator. This method is good mainly because it allows you to work even when the target platform is unavailable (for example, because it has not yet been done). Disadvantages are the limited accuracy in reproducing the behavior of iron (and the surrounding world), as well as the difficulty of creating such an emulator.
- Running on the host machine (locally). It will not work with the equipment (you can use test stubs instead), but the tests will quickly start and work out, and you do not need access to the target device. A good example for using this method is testing the implementation of a computational algorithm on the microcontroller, which itself does not depend on the hardware, but uses the device’s sensor data. Testing an algorithm with a real data source will be very inconvenient, it is much better to record these measurements once and run tests on the stored data. This script will run tests locally and will be discussed later.
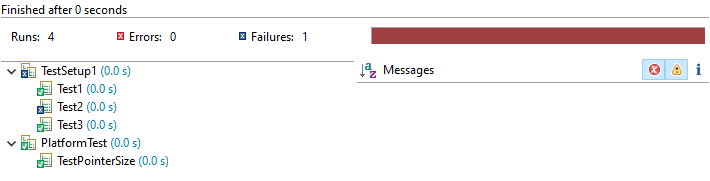
This publication provides a way to configure unit tests in the STM32CubeIDE environment, based on Eclipse and intended for development for controllers of the STM32 family. The development language is C, but the tests themselves are written in C ++. Tests will be run on a Windows host machine using Cygwin. As a test framework, Google Test is used. The results will be displayed in a special plug-in window for unit testing, and they can be launched with one button from the project for STM32:
The described method is suitable for other development environments based on Eclipse, unless of course the good manufacturers have cut them too much for the sake of developers' convenience. This method will also work with CubeIDE under Linux, without the need to bother with Cygwin.
You will need
- Cygwin 3.0.7 x86 (since the tests are for a 32-bit microcontroller, we will use a 32-bit environment on a 64-bit platform as well)
- STM32CubeIDE 1.0.2 for Windows.
- Google Test Framework 1.8.1
Install Cygwin and STM32CubeIDE
Cygwin
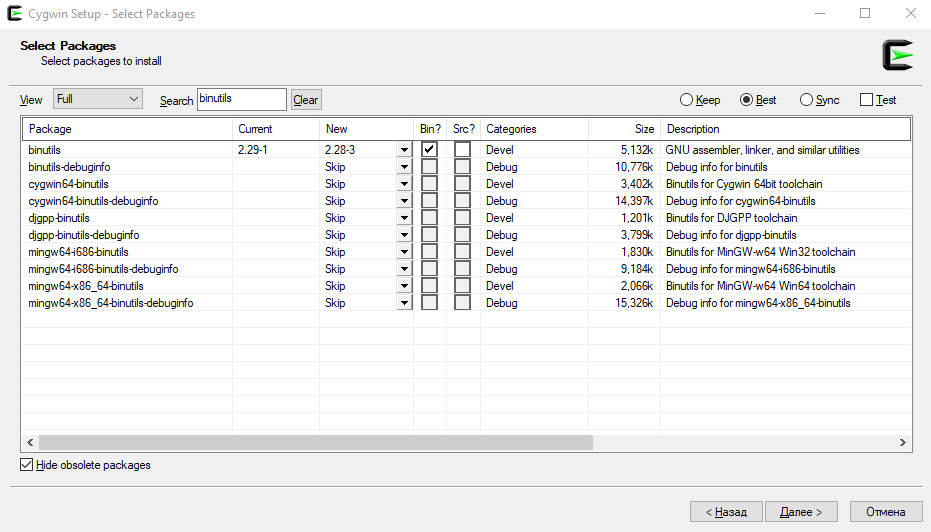
Install Cygwin, version x86. In the installer, select additional packages: gcc-core, g ++, binutils, automake, autoconf, cmake, libtool, gdb, make. You can install the latest stable versions of packages.
You also need to register environment variables:
PATH: ...; C: \ <path_to_Cygwin> \ Cygwin \ bin; C: \ <path_to_Cygwin> \ Cygwin \ lib
classpath: C: \ <path_to_Cygwin> \ Cygwin \ lib
STM32CubeIDE
The environment is installed as usual. It is advisable to install CubeIDE after Cygwin, because in this case Cube will pick up the existing Cygwin toolchain.
First, create a C ++ project for the x86 Cygwin platform. We will need it in order, firstly, to check the functionality of the toolchain, and secondly, we will use it as a “donor" of the assembly configuration for the main project.
Choose File> New> C / C ++ Project. Select C ++ Managed Build. We create a project of type hello world for the Cygwin GCC toolchain:
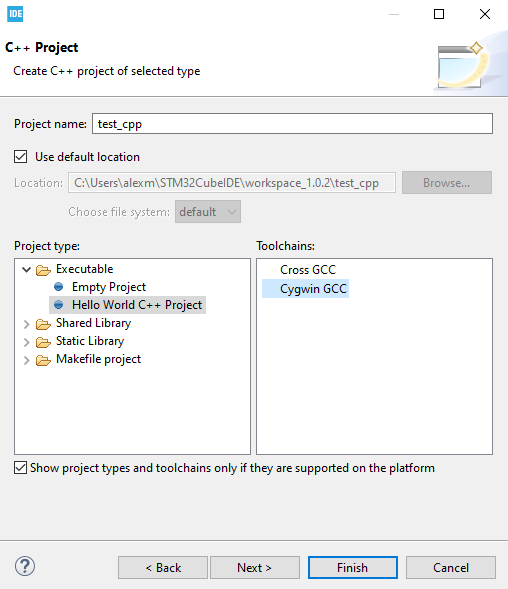
Next, you will need to choose which assembly configurations to create. Just Debug is enough.
Now you can verify that the project is going by selecting Project> Build All. It is also advisable to check debugging under Cygwin by running Run> Debug As> Local C / C ++ Application. The application will output “Hello world” to the console inside CubeIDE.
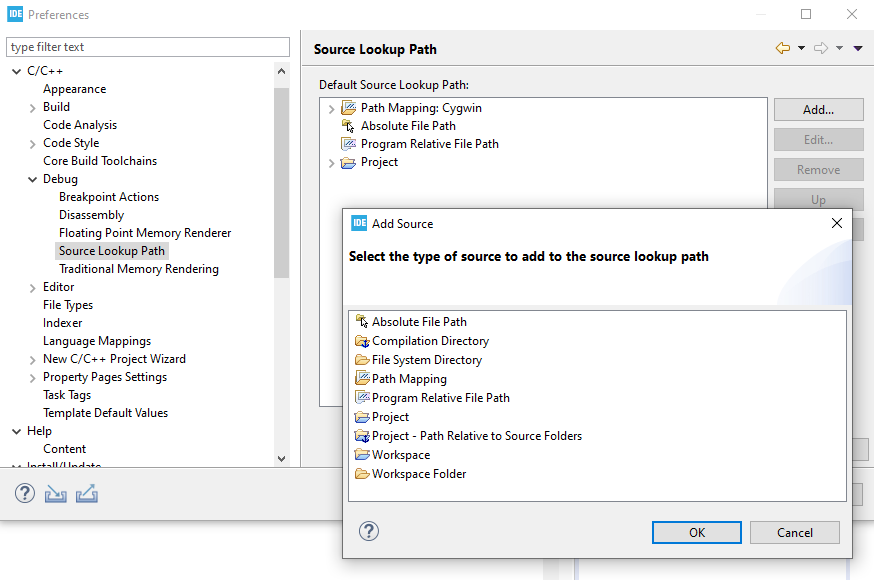
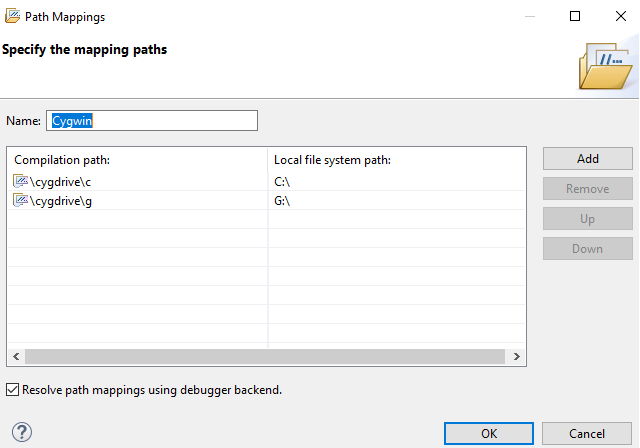
In order for the debugger to show executable lines in source code files, you need to configure the display of paths. In the Window> Preferences window, in the C / C ++> Debug tab, select Source Lookup Path and add a new display: Add> Path Mapping. In the window, you need to name something like a new display and add lines for the disks that are in the system:
- \ cygdrive \ c - C: \
- \ cygdrive \ g - G: \
For a beautiful test run, we also need a plug-in for Eclipse with support for unit tests for C ++. It is installed directly from STM32CubeIDE: menu Help> Install New Software, then select the Eclipse Repository and install the C / C ++ Unit Testing Support plugin.

Build the Google Test Library
The source code of the library can be taken at: https://github.com/google/googletest/tree/release-1.8.1
Unpack the sources, go to the googletest-release-1.8.1 directory using the Cygwin terminal, and run:
cmake . make
After successful assembly, the static library file will be in ./googlemock/lib/libgtest.a, and the header files will be in the ./googletest/include/gtest/ directory. They will need to be copied to our project (or to specify the path to these files in the project settings).
Creating a project for STM32
Design for STM32L476G-DISCO debug board. The example will not be too sophisticated - there are two LEDs on the board, let them show a binary counter from 00 to 11. We will implement a separate module for the counter, described in a pair of .h and .c files, and write a test for it.
The project can be created as usual, using the Cube configurator, the main thing is to make sure that the PB2 and PE8 pins are configured as digital outputs. When creating a project, it would be better to specify the type - C ++, this will be needed to compile the tests (the main code will still be compiled by the C compiler). Converting a project from C will be possible later, by clicking on the name of the RMB project and selecting “Convert to C ++”.
For compilation under MK and for tests we need two different assembly configurations. In these configurations, different sets of files will be collected - the main ones will get the modules for working with hardware and the tested modules, and the test one will get the same tested modules and test files. Therefore, we will create different directories at the root of the project - Application with the application code for MK (you can simply rename the Src directory that Cube created), Common for modules that are not dependent on iron (which we will test) and Tests for tests. Directories can be excluded from the assembly by clicking RMB on their name, menu Resource Configuration> Exclude from build.
Add our counter module to the Common directory:
(led_counter.h):
#ifndef LED_COUNTER_H_ #define LED_COUNTER_H_ #include <stdint.h> void Led_Counter_Init(); uint8_t Led_Counter_Get_Next(); #endif /* LED_COUNTER_H_ */
led_counter.cpp:
#include "led_counter.h" static uint8_t led_cnt_state = 0; void Led_Counter_Init() { led_cnt_state = 0; } uint8_t Led_Counter_Get_Next() { if(++led_cnt_state > 3) led_cnt_state = 0; return led_cnt_state; }
The Common and Tests directories need to be added to the search path for include files: project properties (Properties)> C / C ++ General> Paths and Symbols> Includes.
Add LED work to main
main.c:
… /* USER CODE BEGIN Includes */ #include "led_counter.h" /* USER CODE END Includes */ … int main(void) { … /* USER CODE BEGIN WHILE */ Led_Counter_Init(); uint8_t led_state = 0; while (1) { /* USER CODE END WHILE */ /* USER CODE BEGIN 3 */ led_state = Led_Counter_Get_Next(); HAL_GPIO_WritePin(GPIOB, GPIO_PIN_2, led_state & (1<<0)); HAL_GPIO_WritePin(GPIOE, GPIO_PIN_8, led_state & (1<<1)); HAL_Delay(500); } /* USER CODE END 3 */ … }
The project should compile and run, and the LEDs should blink.
Writing tests
Now that for which everything was started.
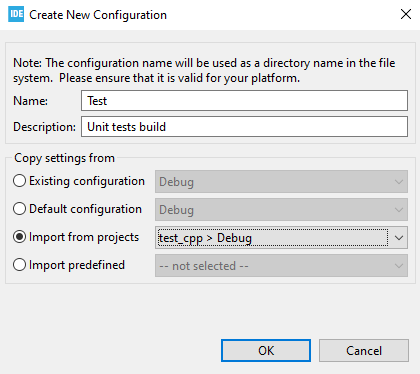
Create a new build configuration through the project properties - Properties> C / C ++ Build> Settings> Manage Configurations. CubeIDE just won't let you create a configuration for assembly under Cygwin, so copy it from the project we created earlier:
Now you need to switch to this configuration and configure the paths to the source files and header files. In the properties of the project in the tab Paths and Symbols we prescribe (when adding an entry it is better to put a daw in the "add to all languages" field):
- Includes - Tests / Inc, Common / Inc
- Libraries - gtest
- Library Paths - Tests / Lib
- Source Location - / <prj_name> / Common and / <prj_name> / Tests (replace <prj_name> with the project name)
Next, copy the gtest library - the .a file to the Tests / Lib directory into the project, and the header files in the gtest folder - to the Tests / Inc folder. In the Tests folder, create a new main.cpp file in which tests will be run. Its contents are standard:
main.cpp:
/* * Unit tests main file */ #include "gtest/gtest.h" int main(int argc, char *argv[]) { ::testing::InitGoogleTest(&argc, argv); return RUN_ALL_TESTS(); }
Also, to test the setup, we will create one test that will verify that the size of the pointer is 32 bits in our environment (we want to make sure that it is the same as on the microcontroller, for this we set 32-bit Cygwin).
Create the following test_platform.cpp test file:
#include "gtest/gtest.h" TEST(PlatformTest, TestPointerSize) { //Check pointer size is 32 bit ASSERT_EQ(sizeof(void*)*8, 32U); }
Now, if the project is started as usual C ++ Application, the debug output will contain a message from Google Test stating that all tests have passed.
The project structure should look something like this:

Now we will write tests for our LED counter module. The test files can be located in the Tests folder:
#include "gtest/gtest.h" extern "C" { #include "led_counter.h" } // Test fixture class LedCounterTest: public ::testing::Test { protected: void SetUp() { Led_Counter_Init(); } }; // Check initial value TEST_F(LedCounterTest, TestInitialValue) { Led_Counter_Init(); ASSERT_EQ(Led_Counter_Get_Next(), 1); } // Check how value is incremented TEST_F(LedCounterTest, TestIncrementValue) { Led_Counter_Init(); unsigned int val = Led_Counter_Get_Next(); for(int i=0;i<1;i++) { ASSERT_EQ(Led_Counter_Get_Next(), ++val); } } // Check how value return to 0 after 3 TEST_F(LedCounterTest, TestZeroCrossing) { Led_Counter_Init(); for(int i=0;i<3;i++) { Led_Counter_Get_Next(); } ASSERT_EQ(Led_Counter_Get_Next(), 0); }
In order for the test results to be displayed in a beautiful window, you need to create a new launch configuration in the Run> Debug Configurations menu. The installed plugin allows you to create configurations of type C / C ++ Unit. Create it, call Run Tests, select the used configuration of the “Test” assembly and uncheck the “stop on startup at” checkbox on the Debugger tab. After that, the configuration can be started.
For a window with the results to appear, select it in Window> Show View> Other> C / C ++> C / C ++ Unit.
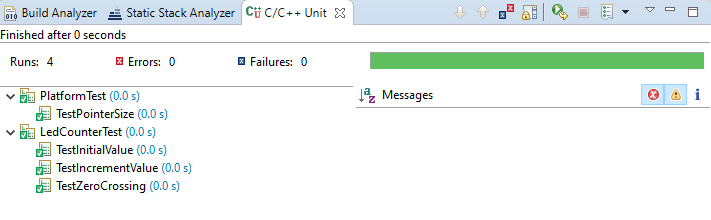
Done! Now the project can be compiled and run under the target MK as usual. When you need to run local tests, when you run the Run Tests configuration, the project will be automatically rebuilt for x86, the environment will run the tests and show the result.
Literature
- J. Grenning. Test-Driven Development for Embedded C. - fundamental work on unit testing of embedded systems and on the application of the TDD methodology.
- https://uncannier.com/unit-testing-of-embedded-firmware-part-1-software-confucius/ - Unit-testing x86 microcontroller code in Texas Instruments Code Composer Studio, CppUTest framework
- http://blog.atollic.com/why-running-your-embedded-arm-cortex-code-on-a-host-pc-is-a-good-thing - an article on why it might be useful to run code for a microcontroller on a desktop platform
All Articles