Discovery.js Guide: Quick Start
This and the following guides will guide you through the process of creating a solution based on the Discovery.js project. Our goal is to create an NPM dependency inspector, that is, an interface for examining the structure of node_modules
.
Note: Discovery.js is at an early stage of development, so over time, something will simplify and become more useful. If you have ideas on how to improve something, write to us .
annotation
Below you will find an overview of the key concepts of Discovery.js. You can learn all the code in the manual in the repository on GitHub , or you can try how it works online .
Initial conditions
First of all, we need to choose a project for analysis. This can be a freshly created project or an existing one, the main thing is that it contains node_modules
(the object of our analysis).
First, install the discoveryjs
core package and its console tools:
npm install @discoveryjs/discovery @discoveryjs/cli
Next, launch the Discovery.js server:
> npx discovery No config is used Models are not defined (model free mode is enabled) Init common routes ... OK Server listen on http://localhost:8123
If you open http://localhost:8123
in your browser, you can see the following:

This is a mode without a model, that is, a mode when nothing is configured. But now, using the "Load data" button, you can select any JSON file, or simply drag it onto the page and start the analysis.
However, we need something specific. In particular, we need to get a view of the node_modules
structure. To do this, add the configuration.
Add configuration
As you may have noticed, the message No config is used
displayed when the server started. Let's create a .discoveryrc.js
configuration file with the following contents:
module.exports = { name: 'Node modules structure', data() { return { hello: 'world' }; } };
Note: if you create a file in the current working directory (that is, in the root of the project), then nothing else is required. Otherwise, you need to pass the path to the configuration file using the --config
option, or set the path in package.json
:
{ ... "discovery": "path/to/discovery/config.js", ... }
Restart the server so that the configuration is applied:
> npx discovery Load config from .discoveryrc.js Init single model default Define default routes ... OK Cache: DISABLED Init common routes ... OK Server listen on http://localhost:8123
As you can see, now the file we created is used. And the default model described by us is applied (Discovery can work in the mode of many models, we will talk about this feature in the following manuals). Let's see what has changed in the browser:
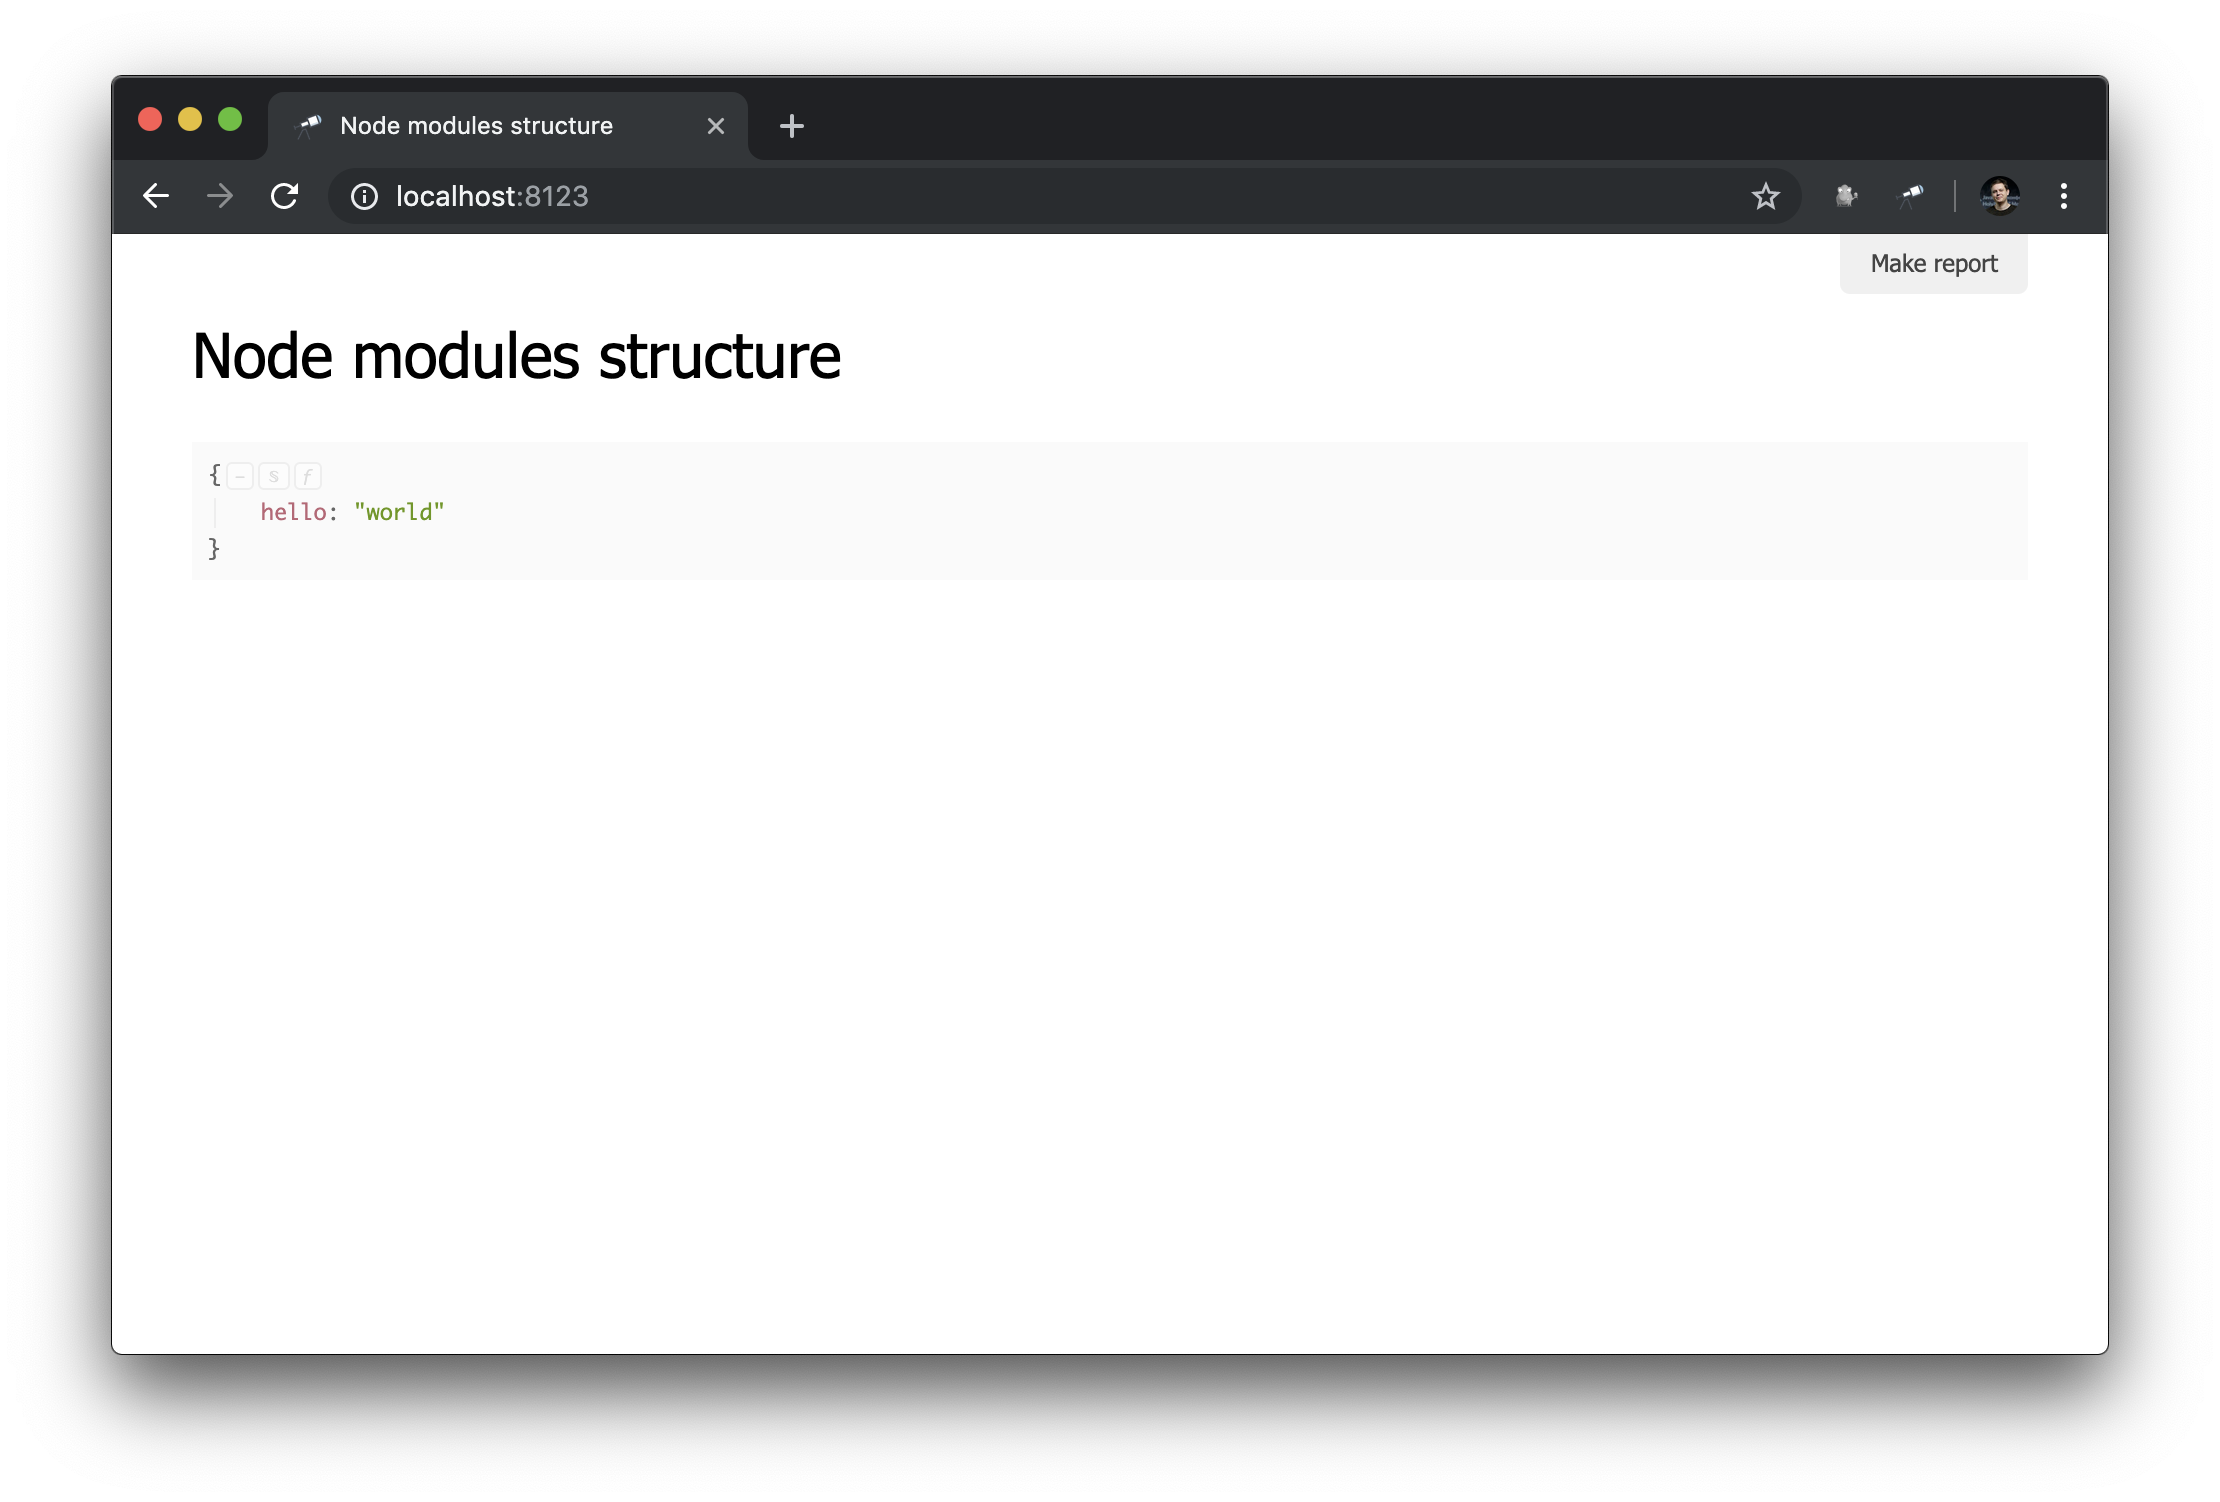
What can be seen here:
-
name
used as the page title; - the result of calling the
data
method is displayed as the main content of the page.
Note: thedata
method must return data or Promise, which resolves to data.
Basic settings are made, you can move on.
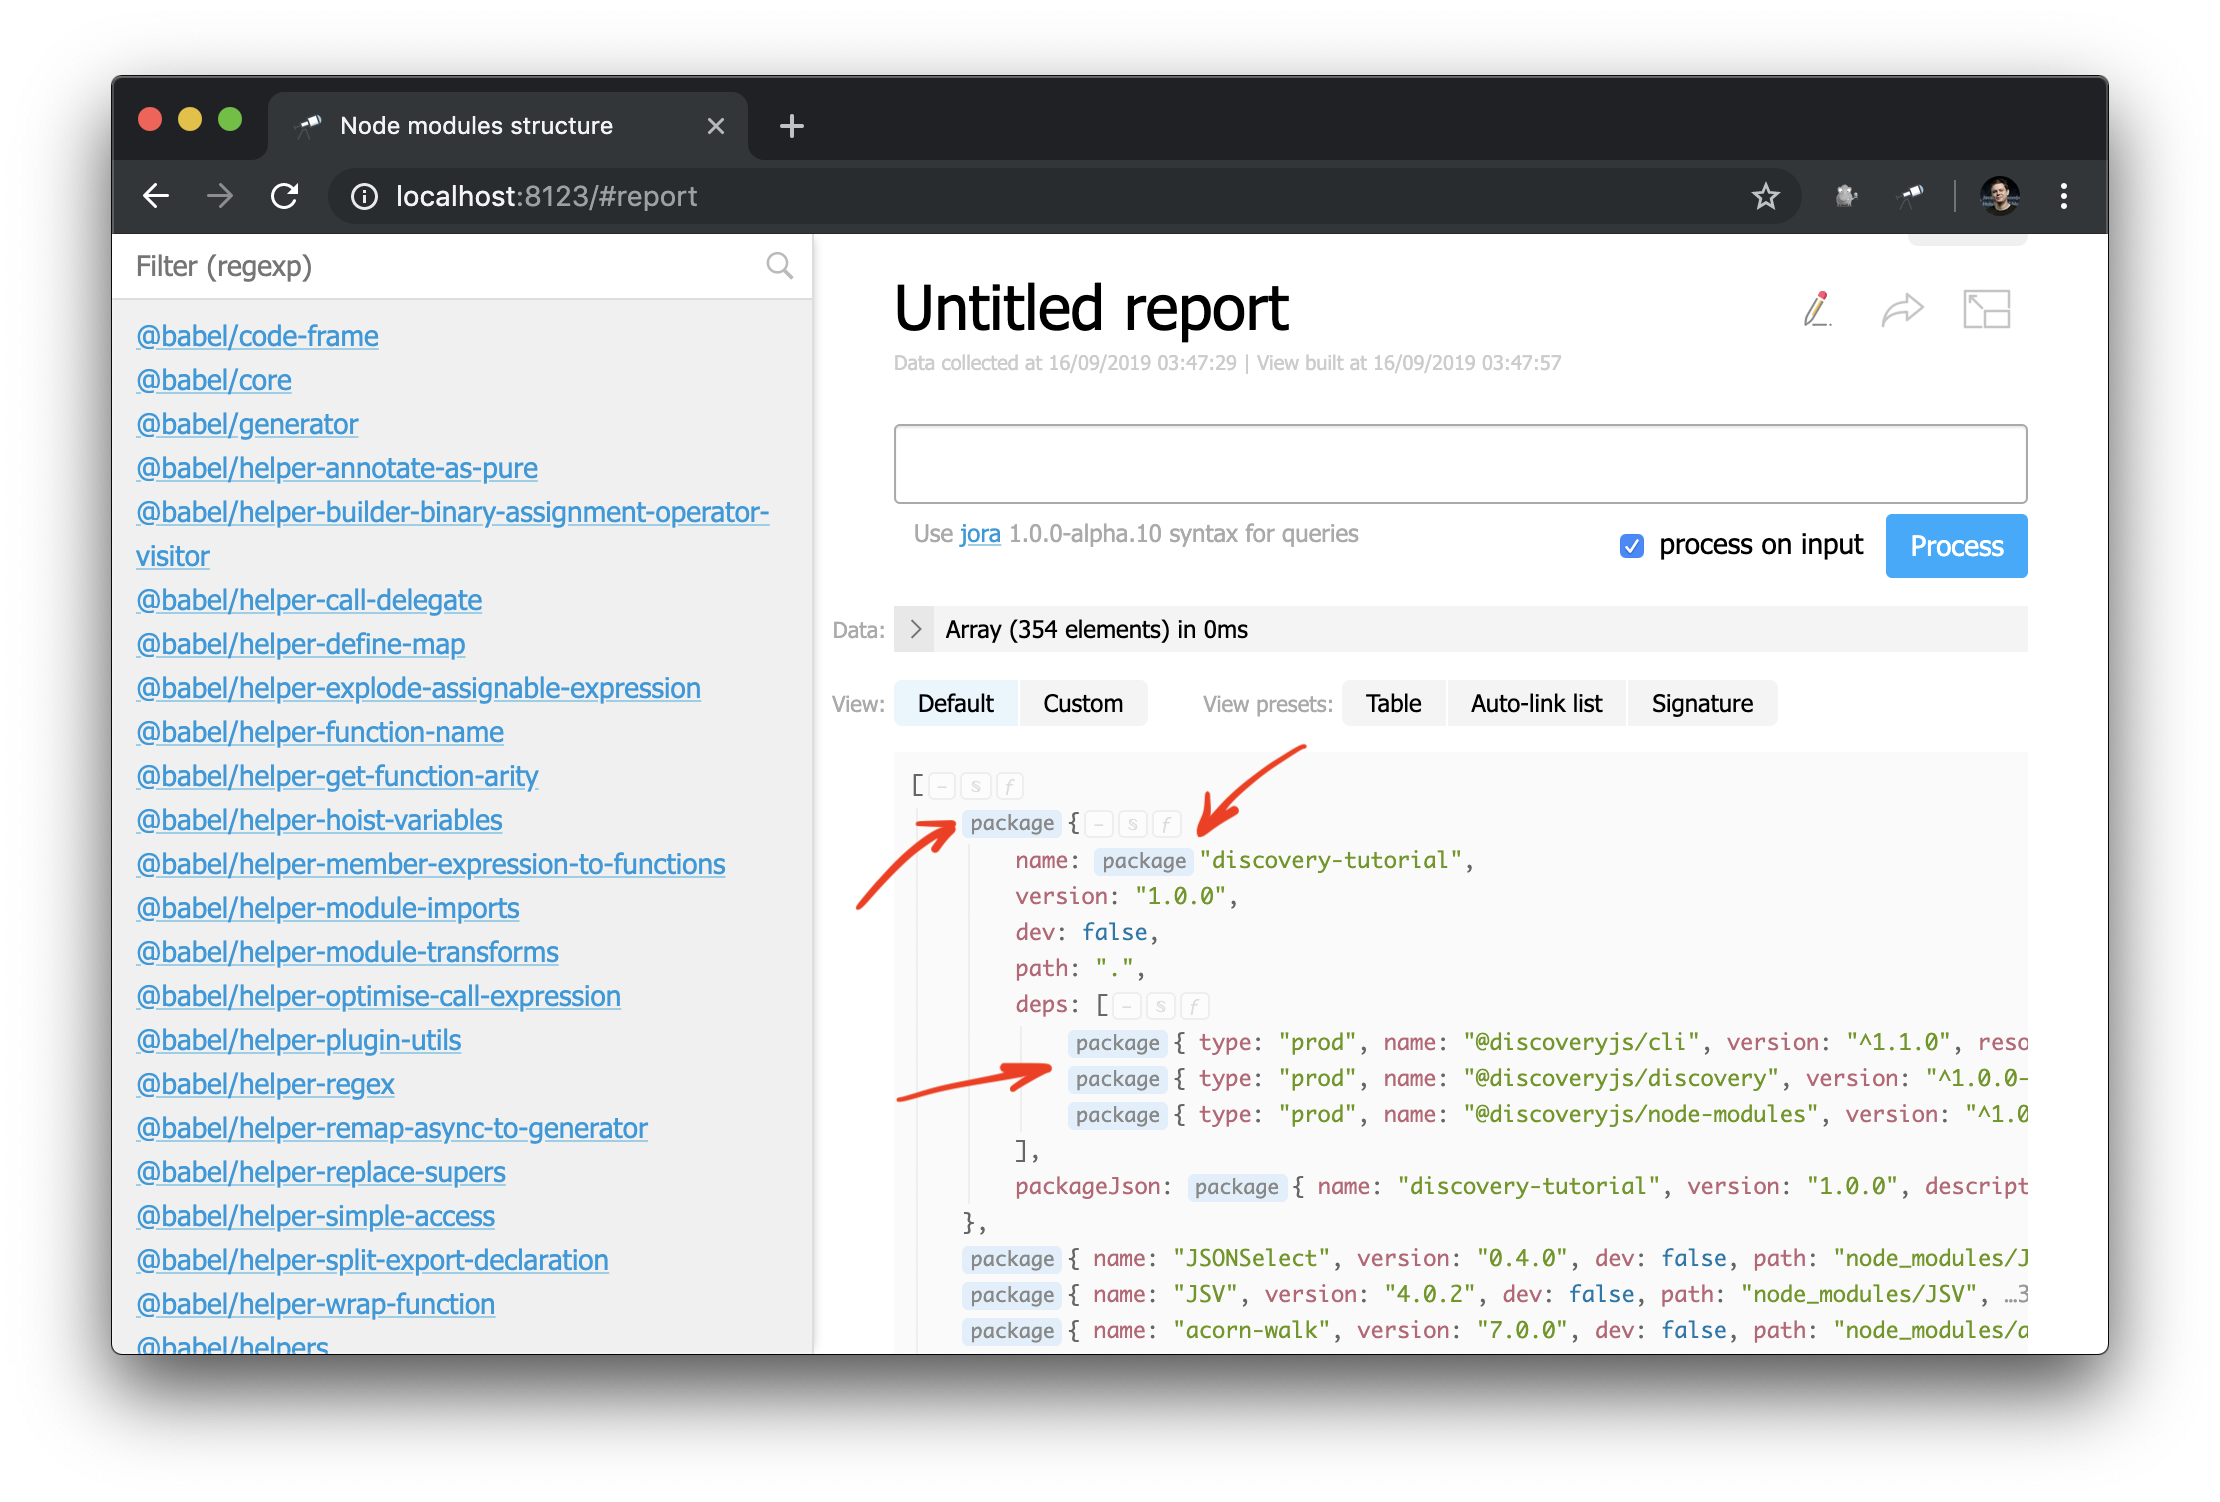
Context
Let's look at a custom report page (click Make report
):
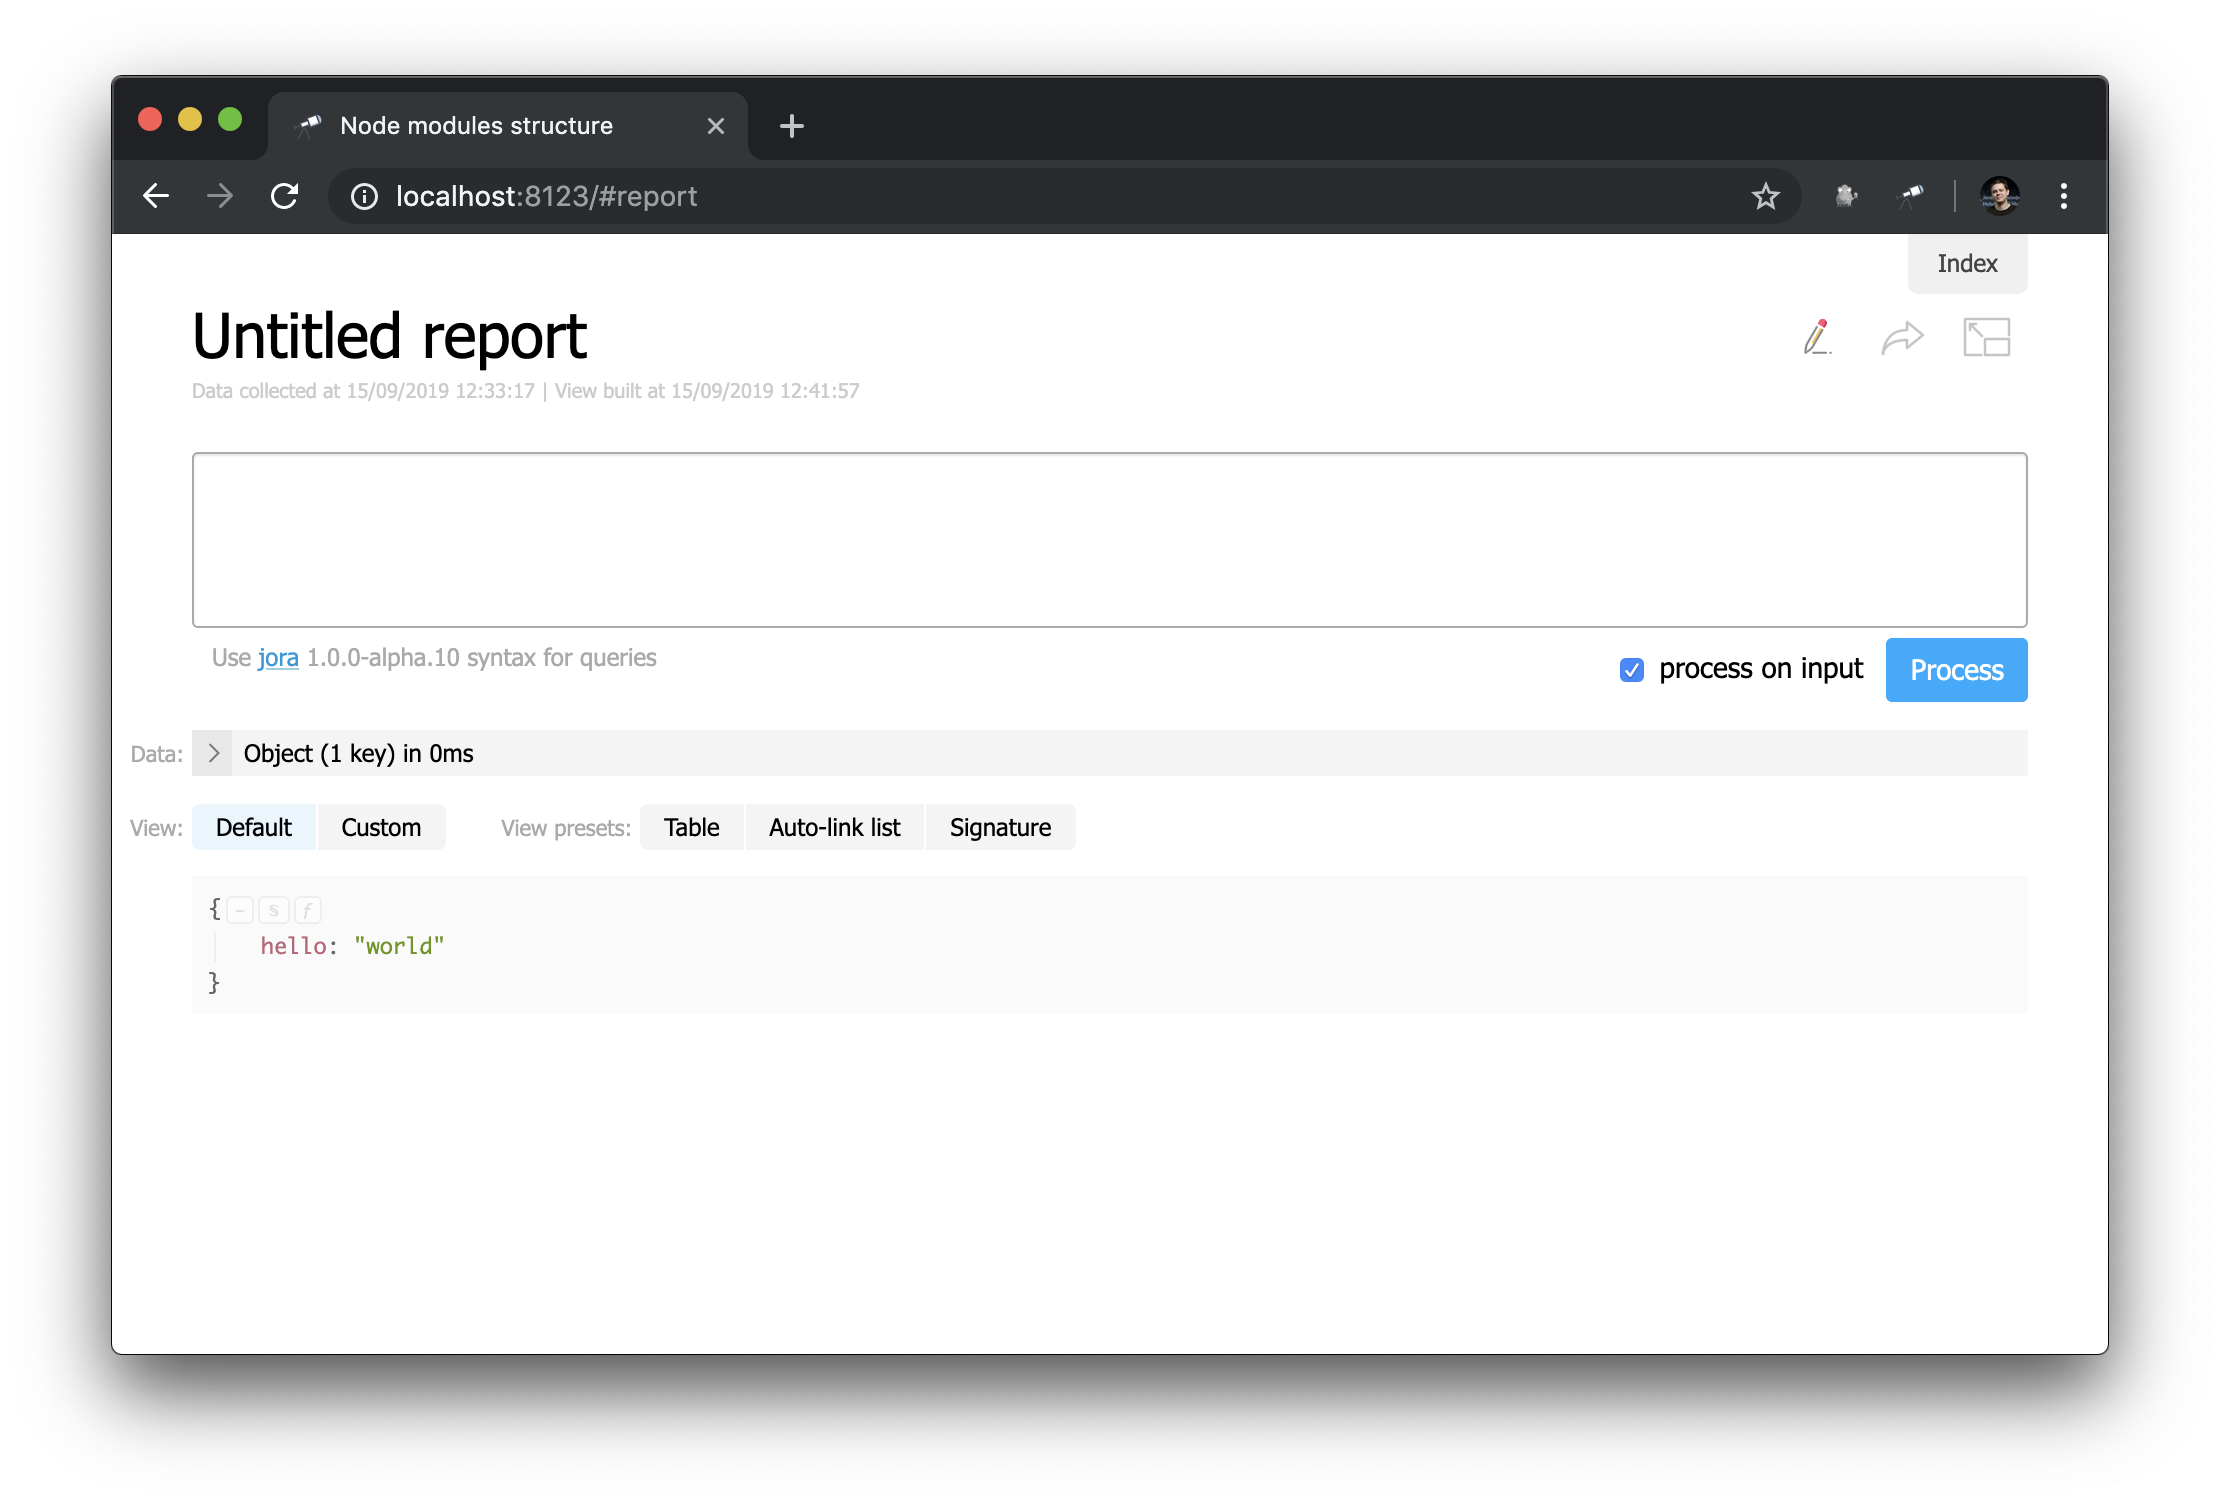
At first glance, this is not very different from the start page ... But here you can change everything! For example, we can easily recreate the appearance of the start page:
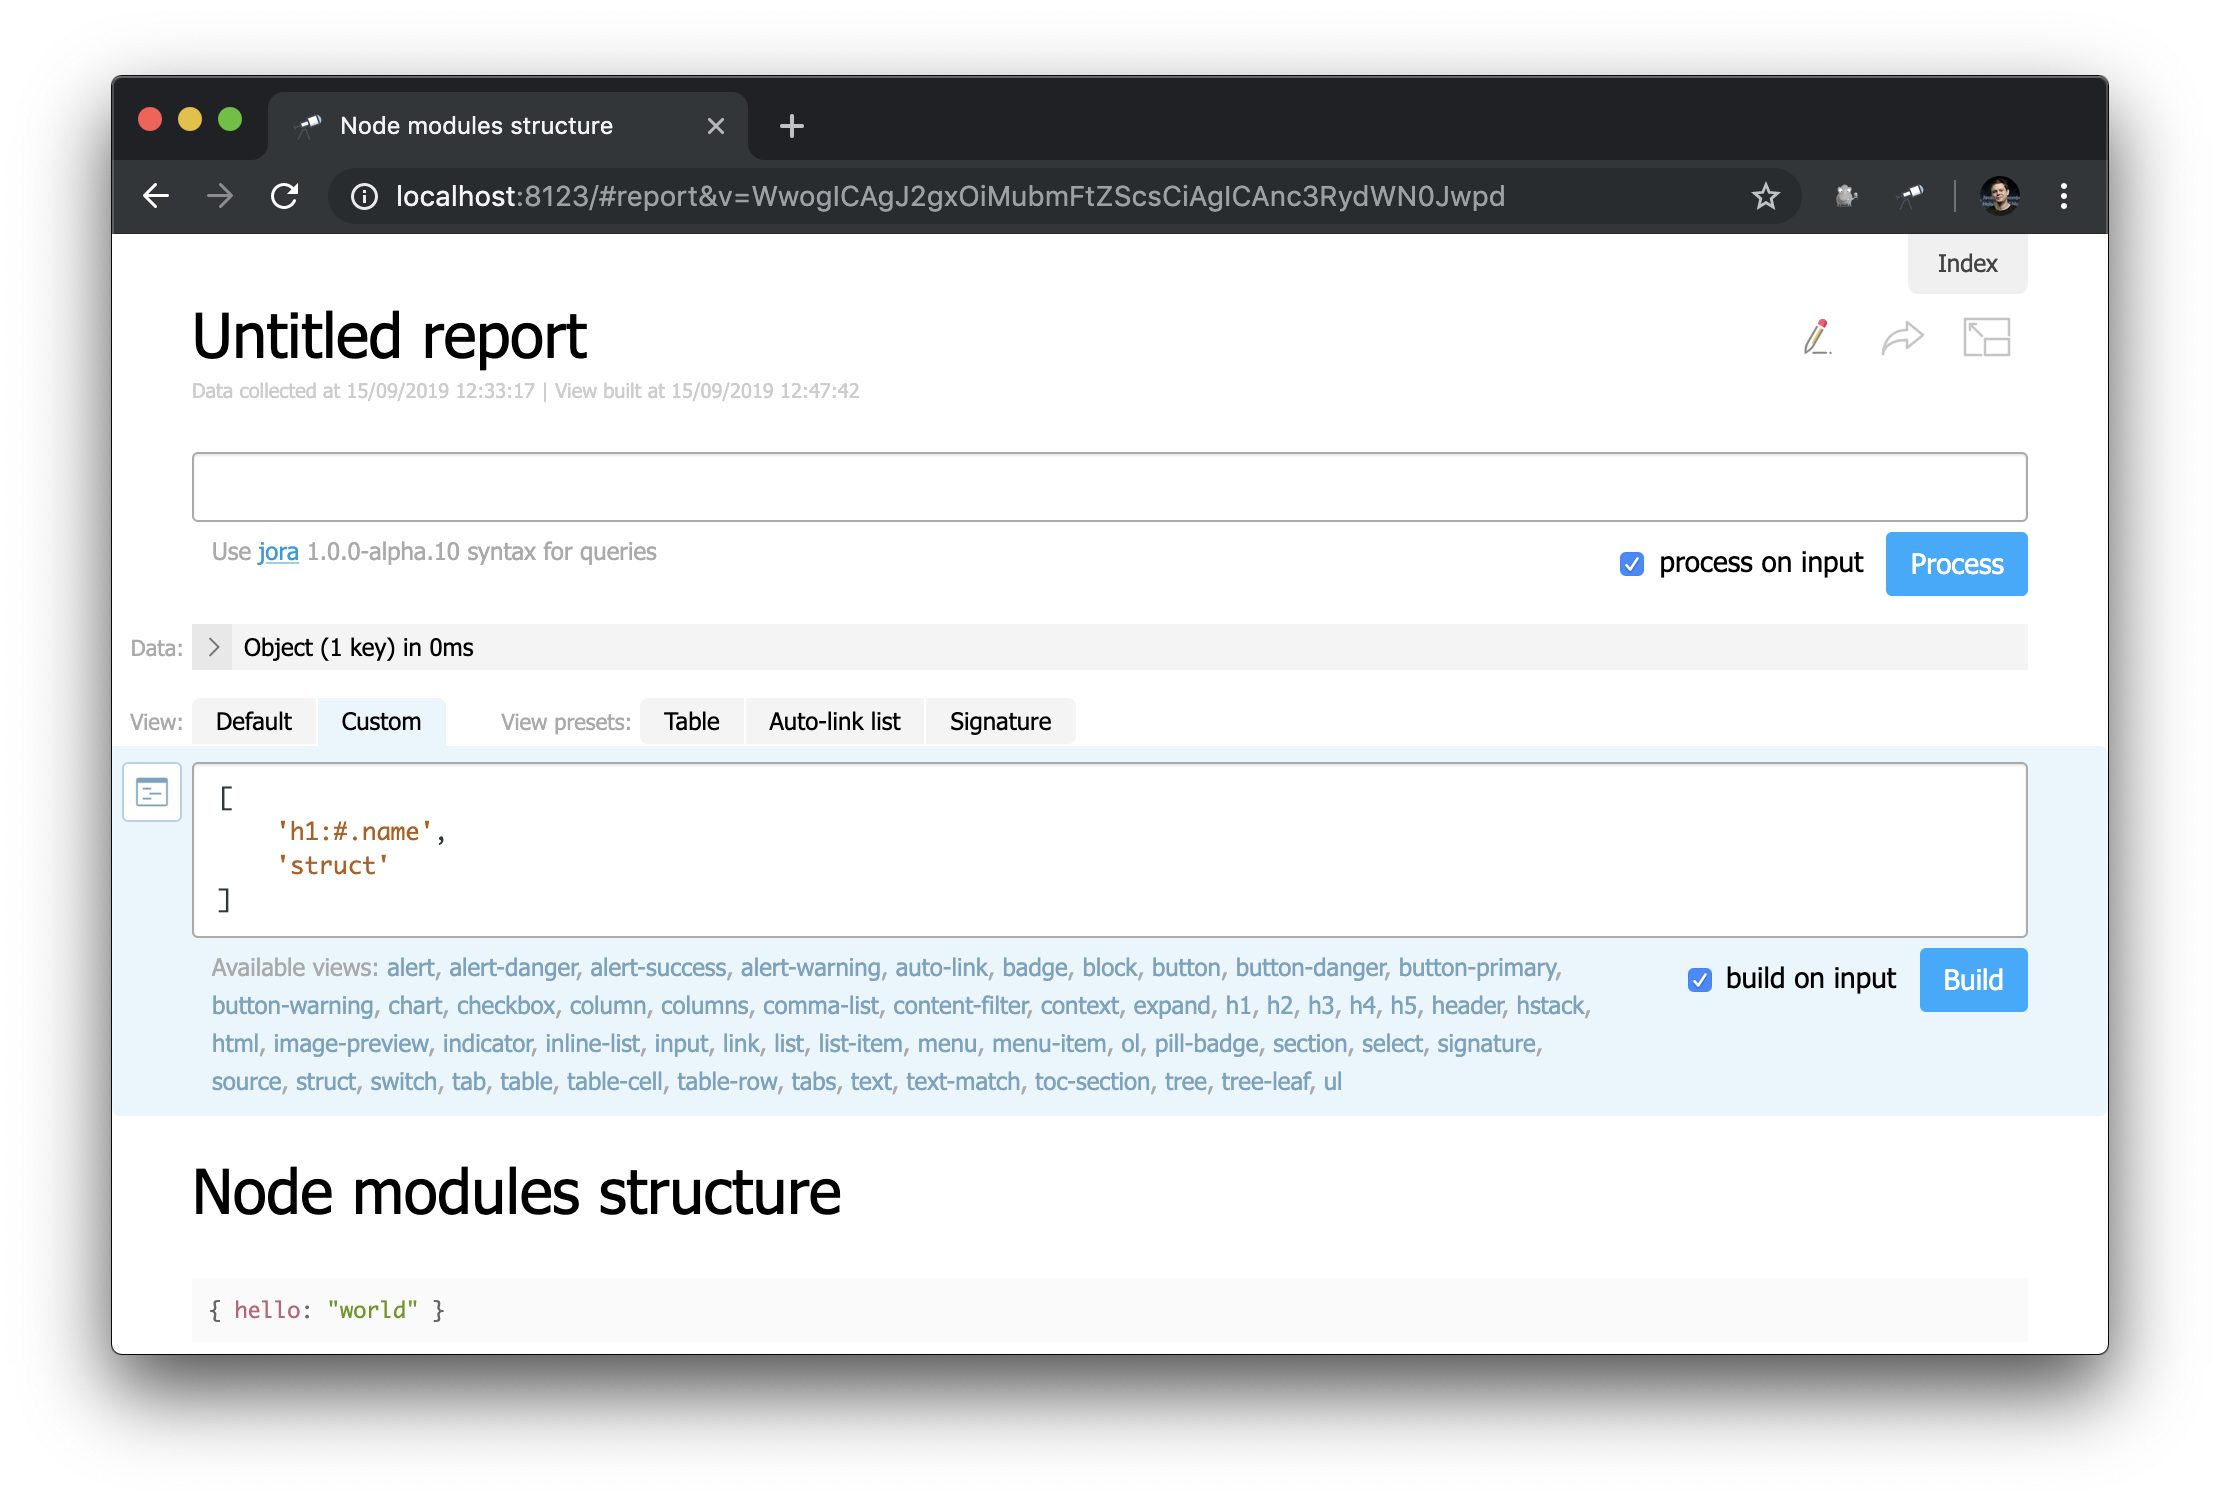
Notice how the header is defined: "h1:#.name"
. This is the first level header with the contents of #.name
, which is a Jora request. #
refers to the request context. To view its contents, simply enter #
in the query editor and use the default display:
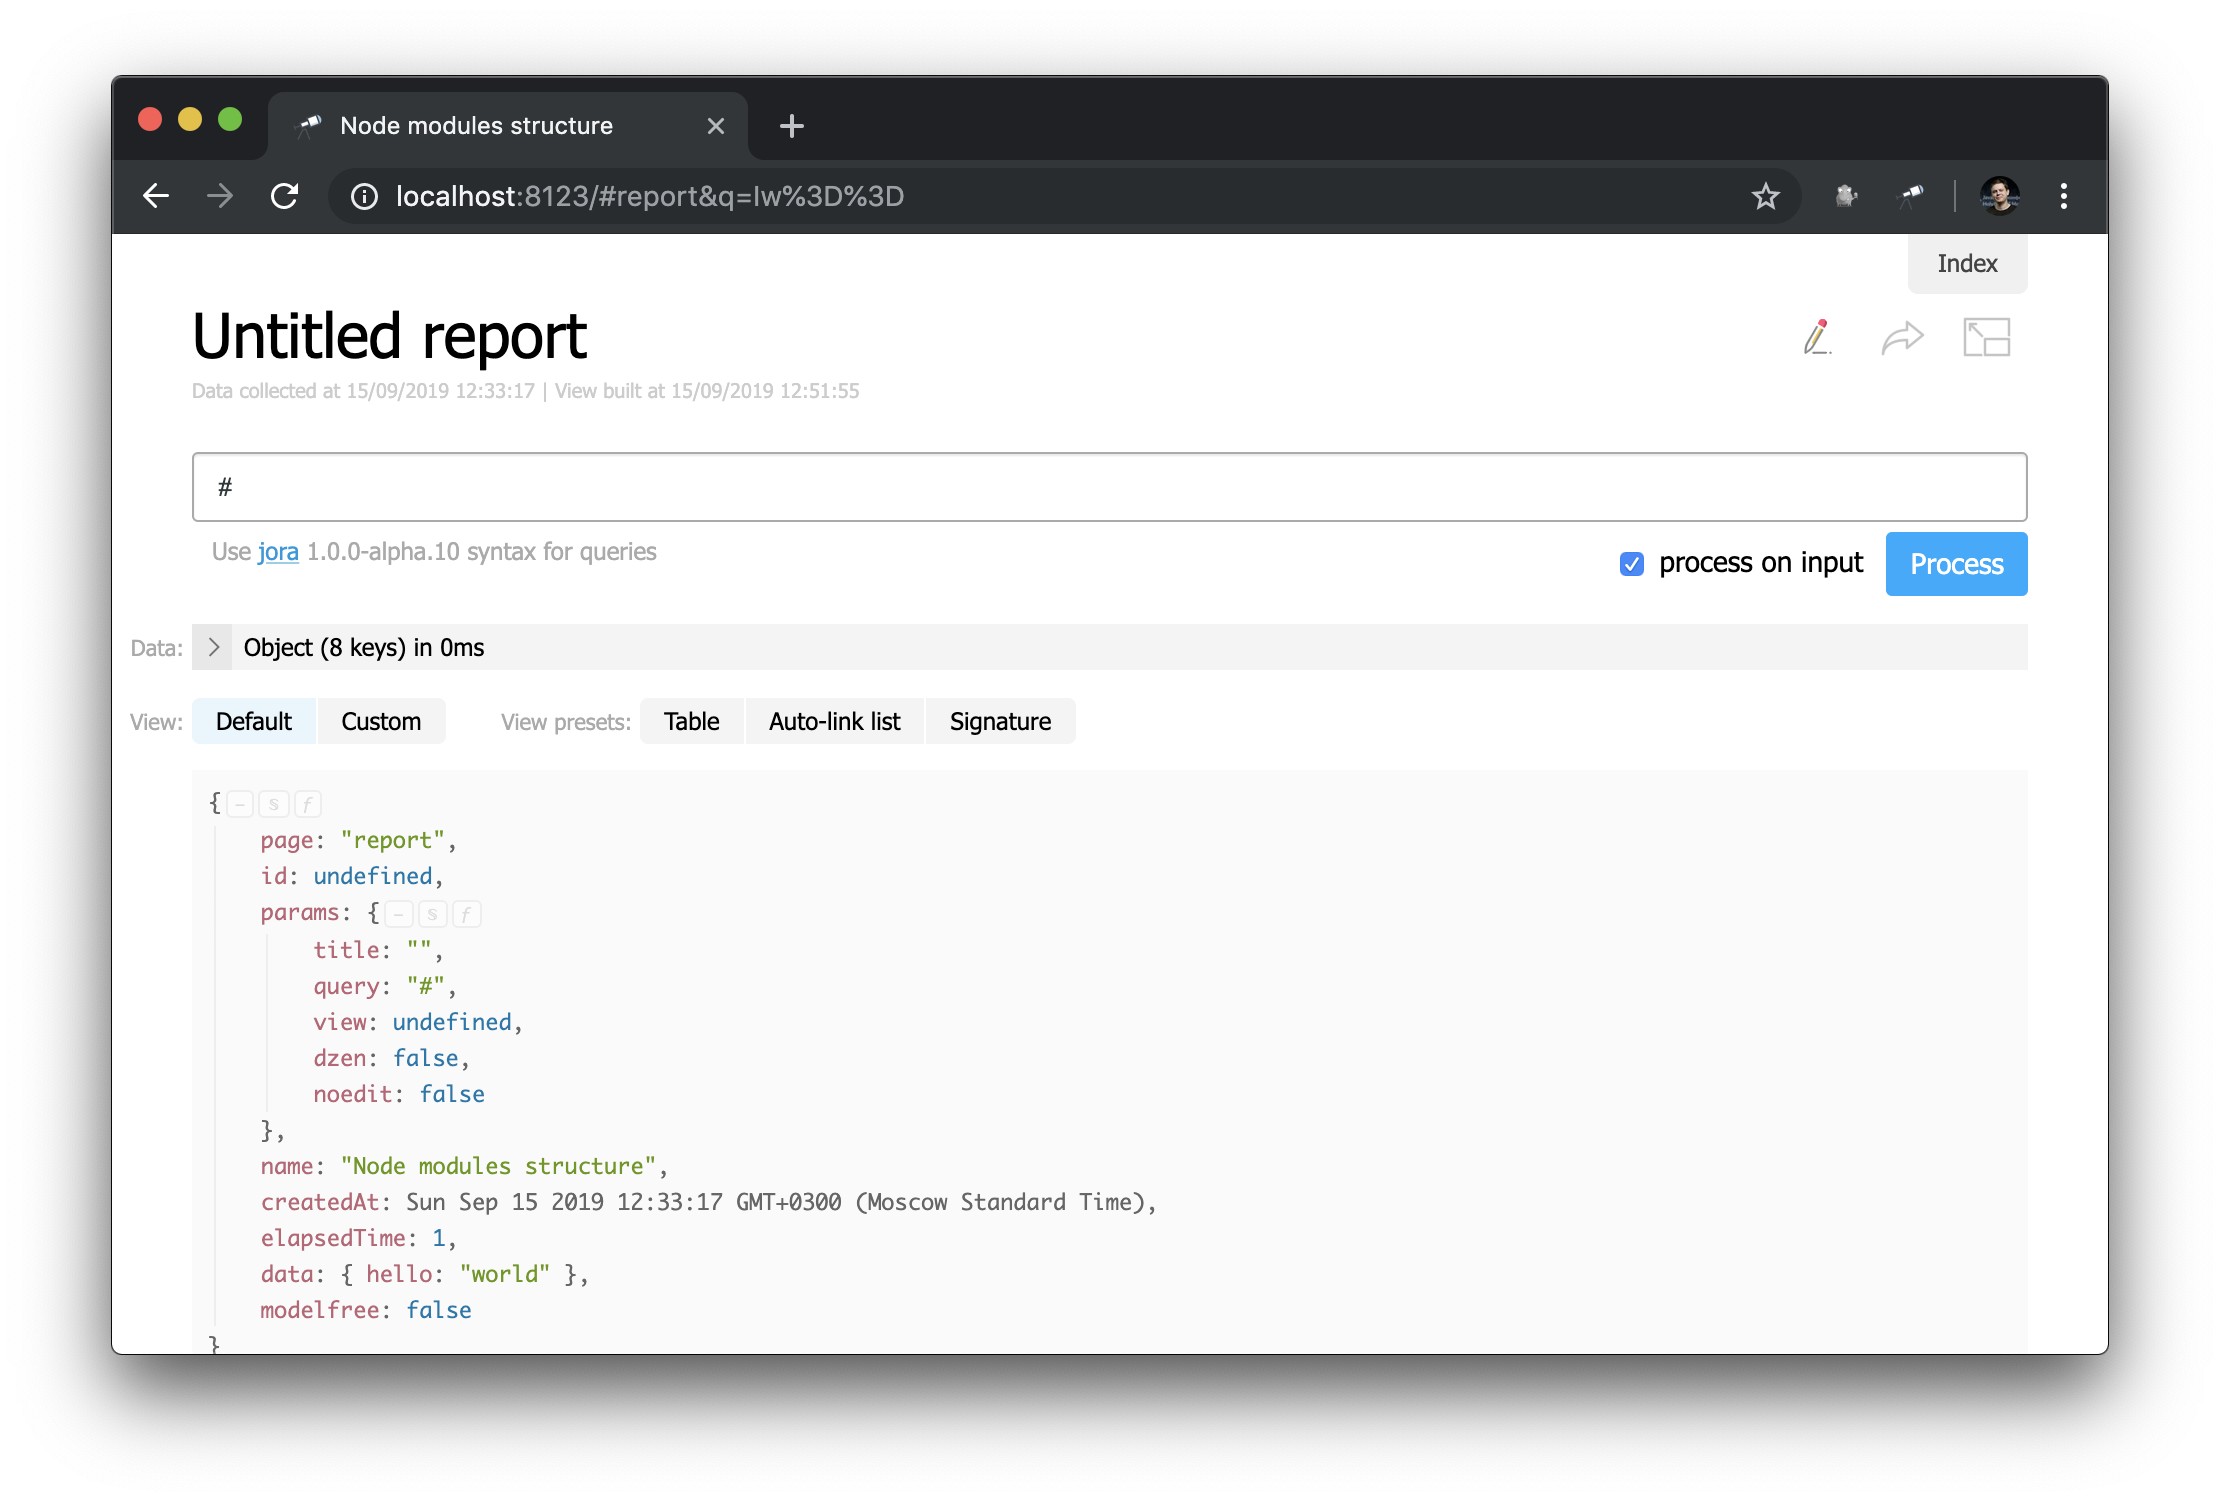
Now you know how you can get the ID of the current page, its parameters and other useful values.
Data collection
Now we use a stub in the project instead of real data, but we need real data. To do this, create a module and change the data
value in the configuration (by the way, after these changes it is not necessary to restart the server):
module.exports = { name: 'Node modules structure', data: require('./collect-node-modules-data') };
The contents of collect-node-modules-data.js
:
const path = require('path'); const scanFs = require('@discoveryjs/scan-fs'); module.exports = function() { const packages = []; return scanFs({ include: ['node_modules'], rules: [{ test: /\/package.json$/, extract: (file, content) => { const pkg = JSON.parse(content); if (pkg.name && pkg.version) { packages.push({ name: pkg.name, version: pkg.version, path: path.dirname(file.filename), dependencies: pkg.dependencies }); } } }] }).then(() => packages); };
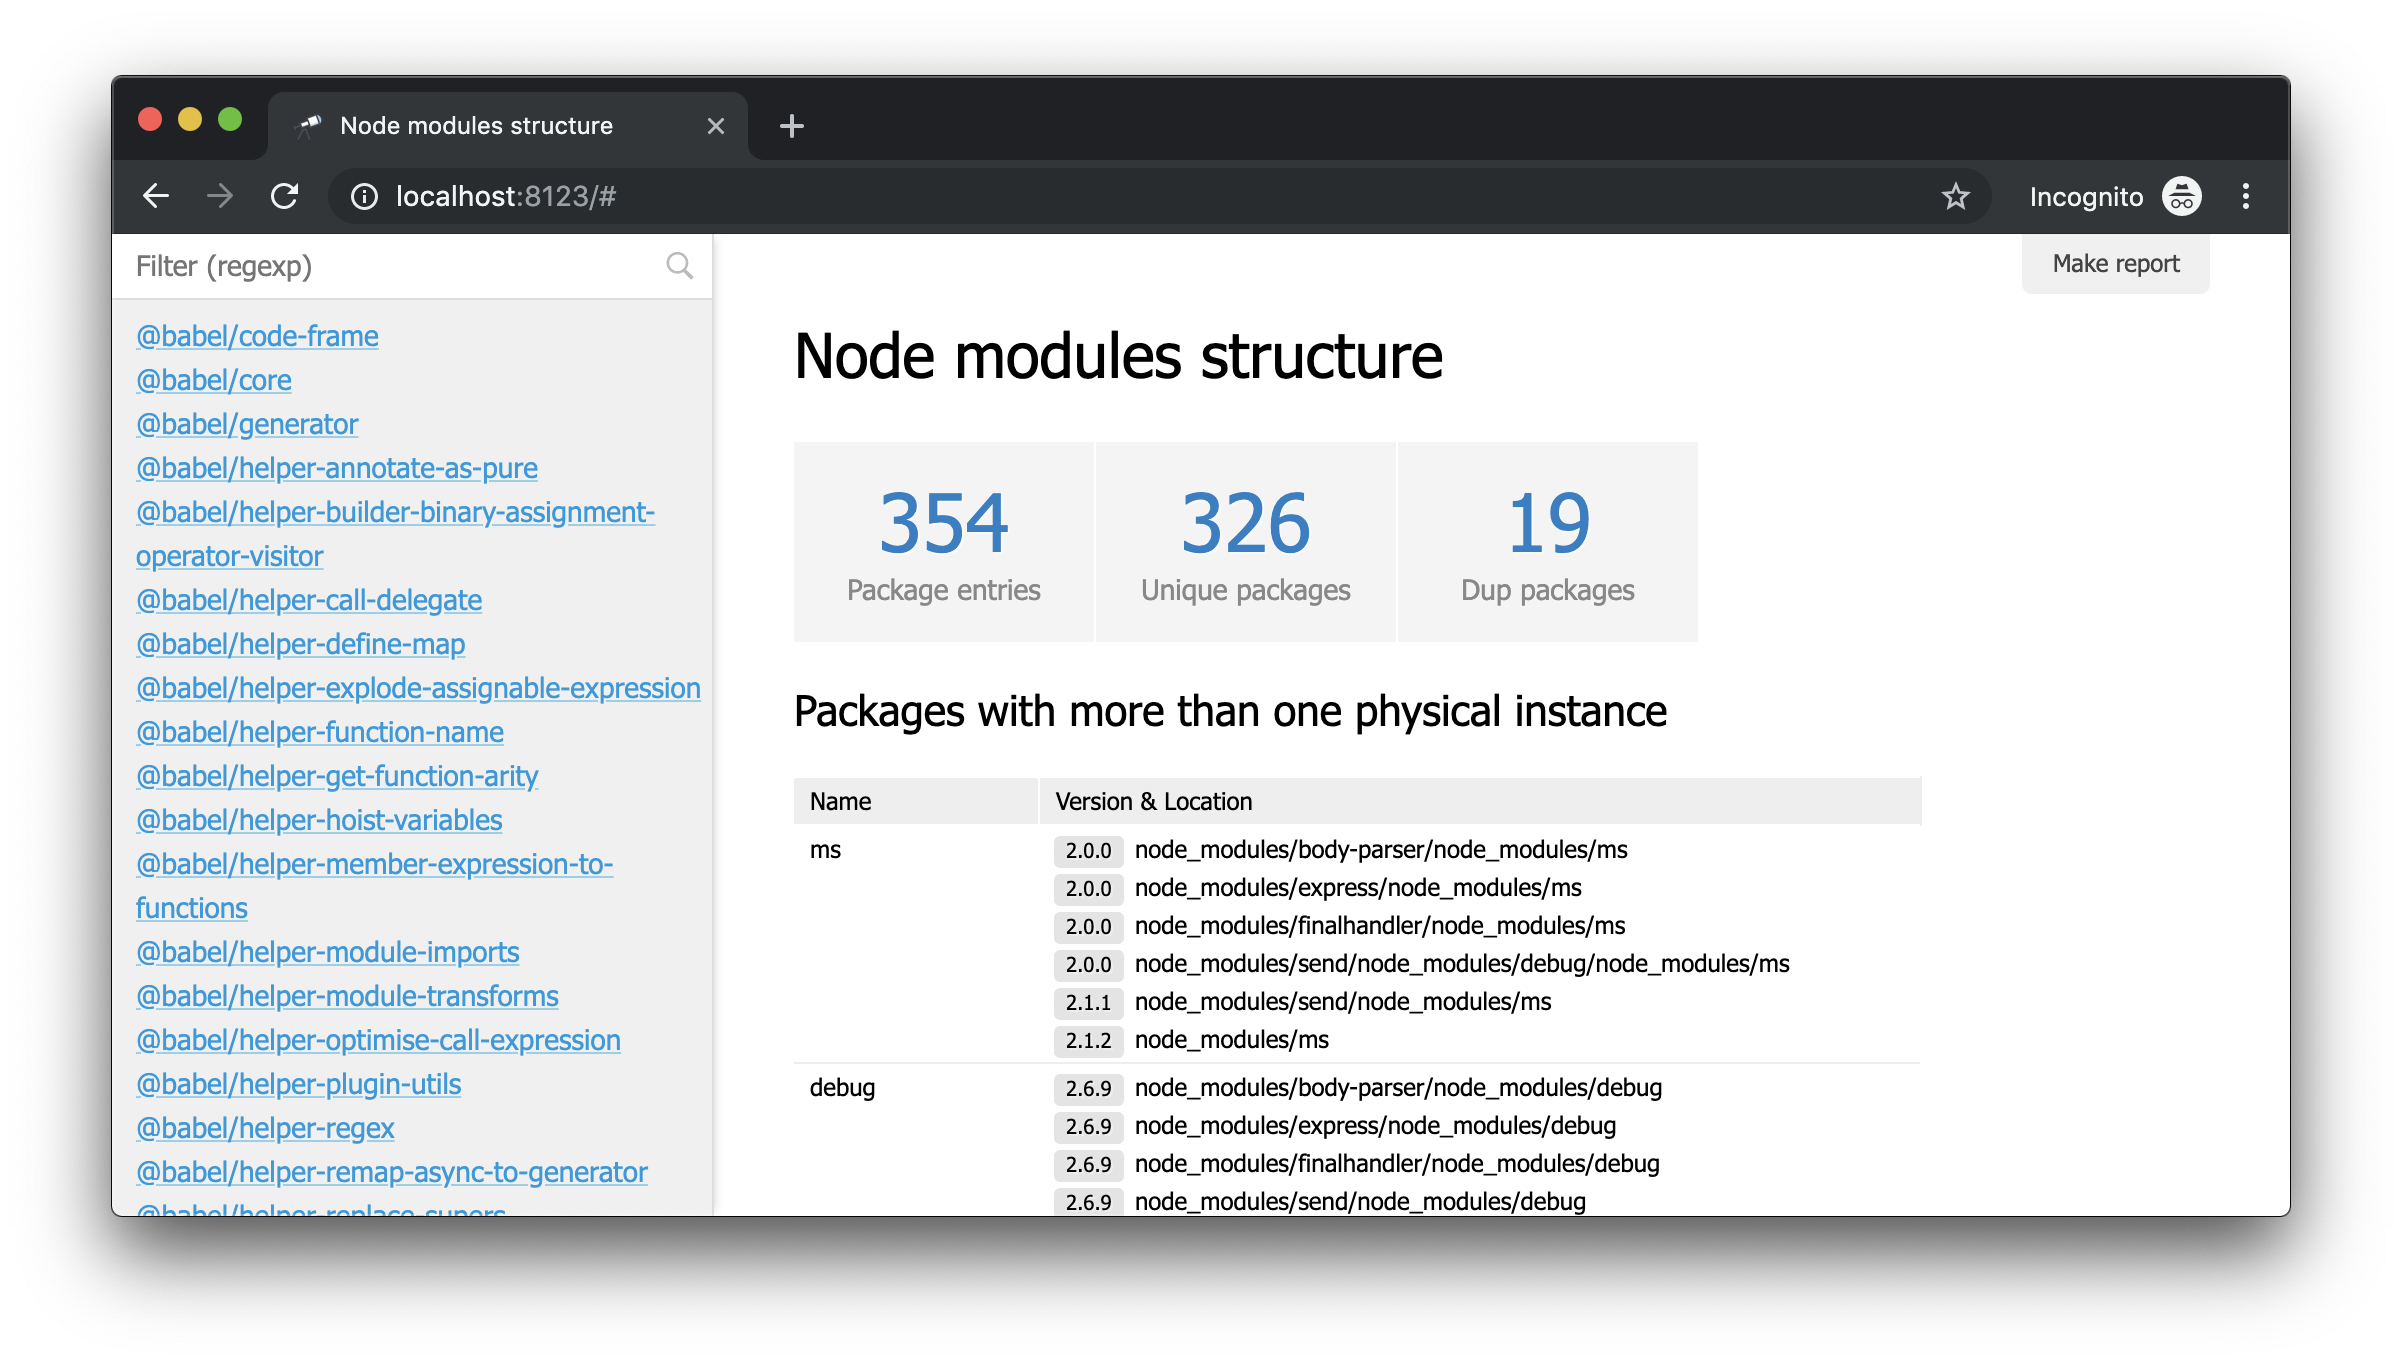
I used the @discoveryjs/scan-fs
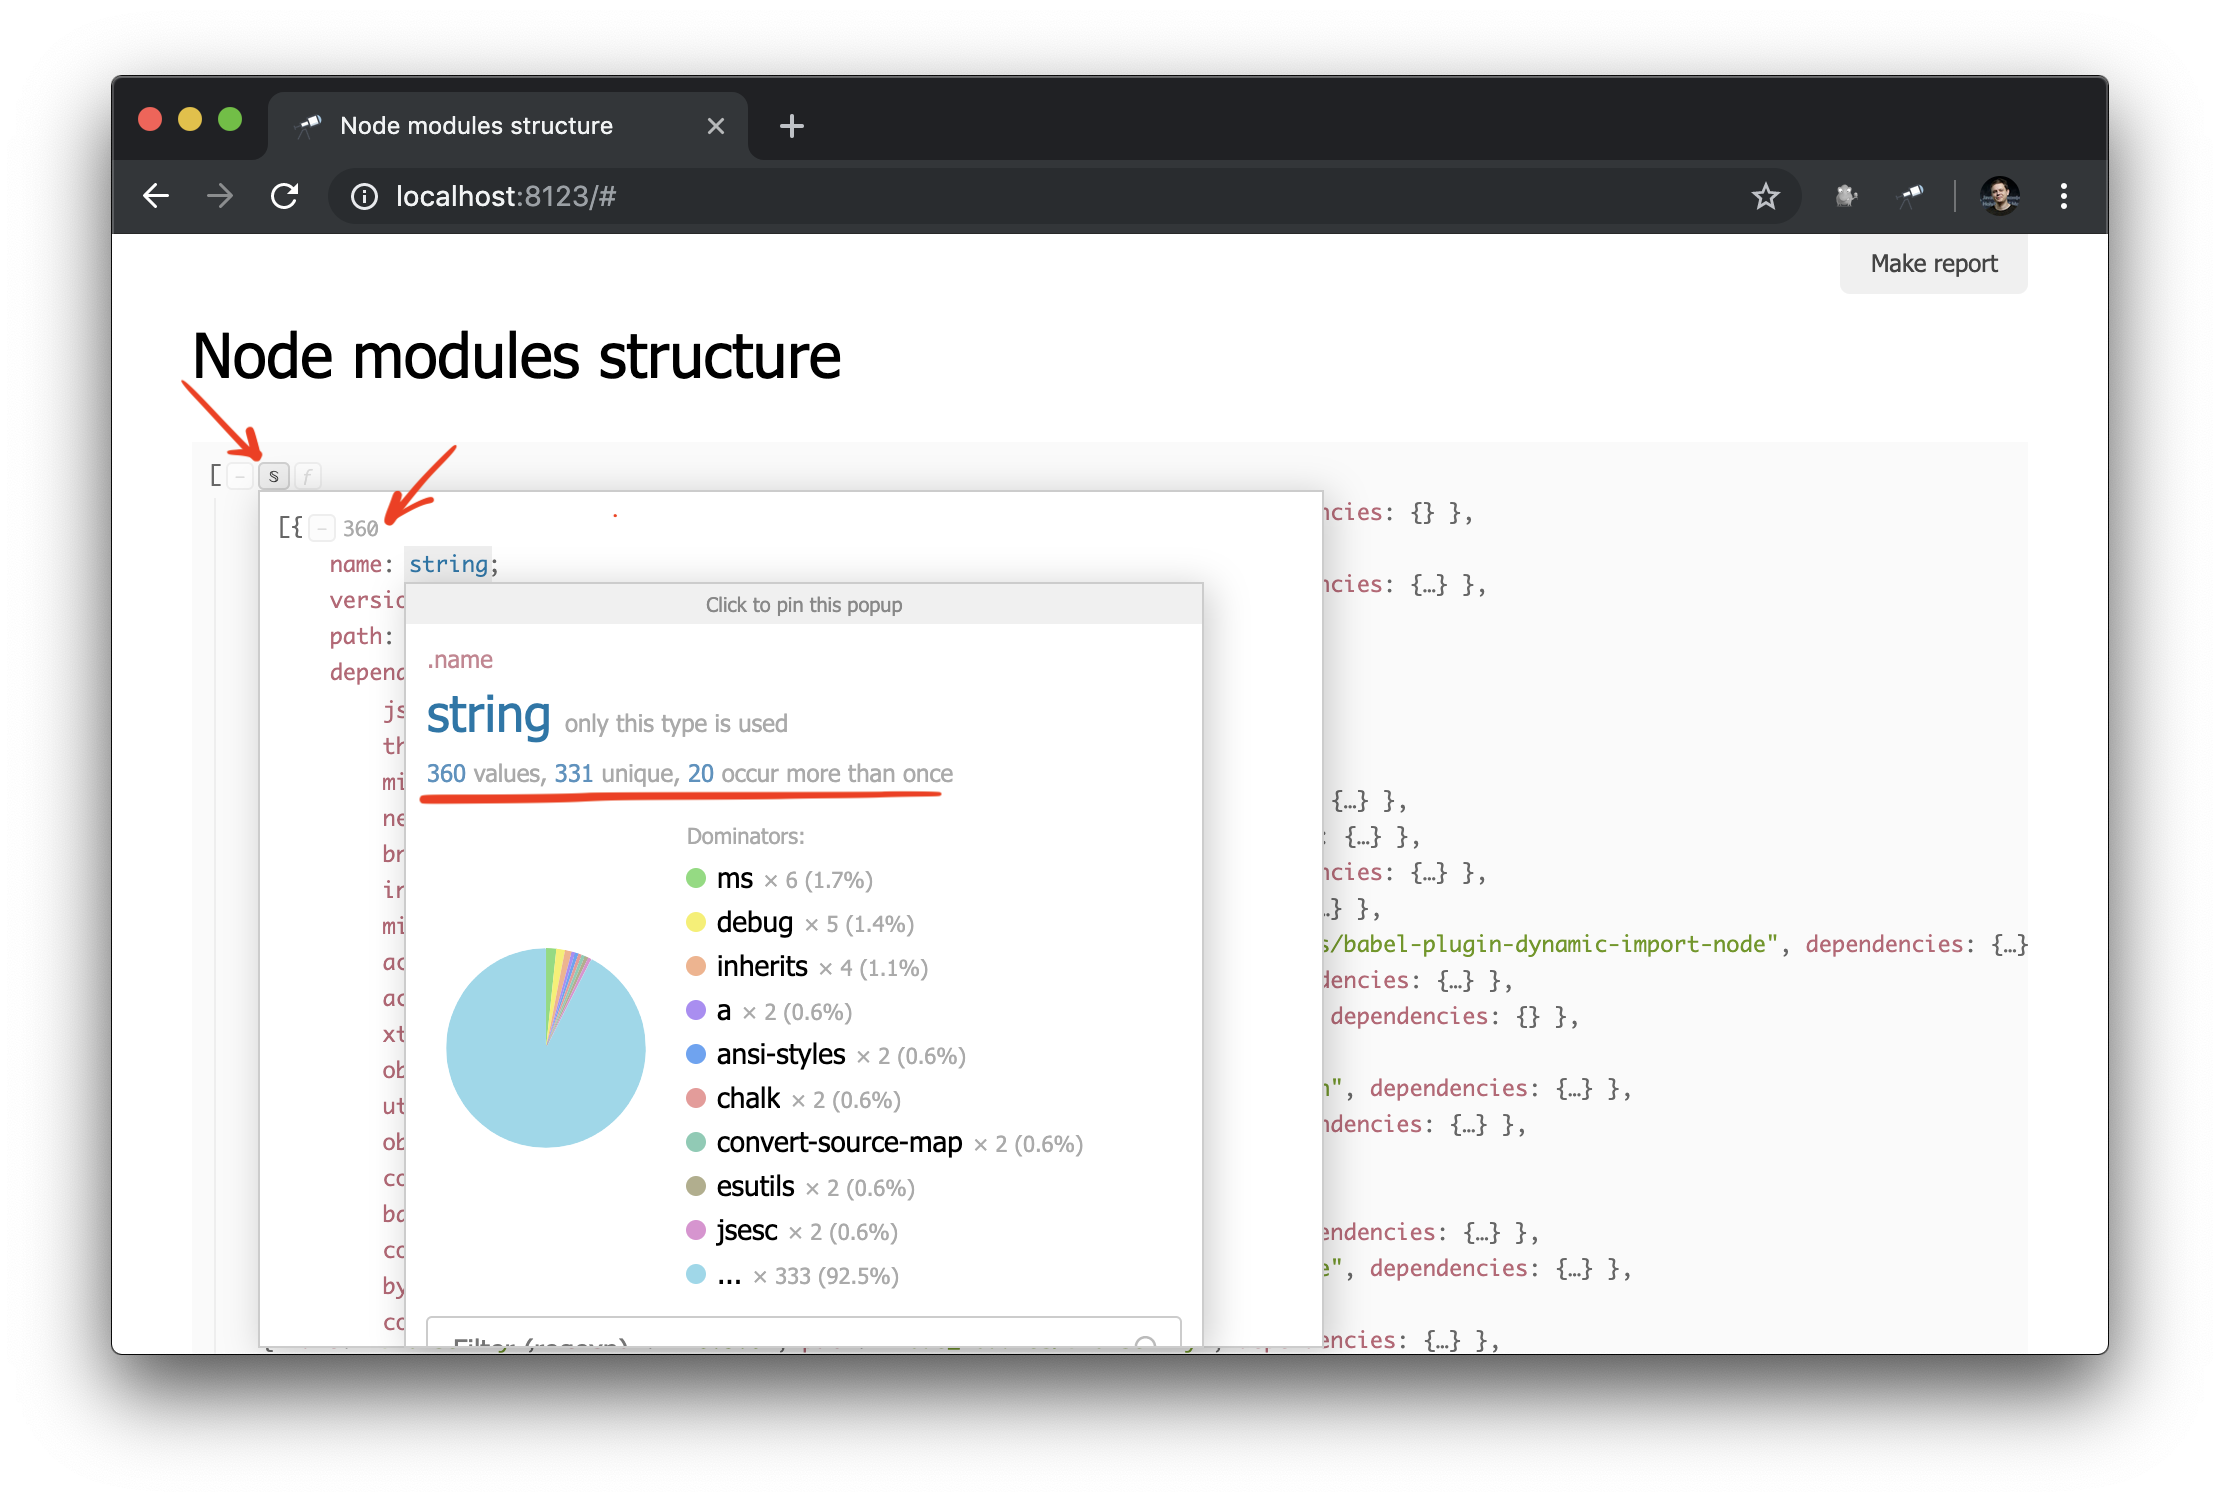
package, which simplifies file system scanning. An example of using the package is described in its readme, I took this example as a basis and finalized as needed. Now we have some information about the contents of node_modules
:

What you need! And despite the fact that this is ordinary JSON, we can already analyze it and draw some conclusions. For example, using the popup of the data structure, you can find out the number of packets and find out how many of them have more than one physical instance (due to the difference in versions or problems with their deduplication).
Despite the fact that we already have some data, we need more details. For example, it would be nice to know which physical instance resolves each of the declared dependencies of a particular module. However, work on improving data extraction is beyond the scope of this guide. Therefore, we will replace it with the @discoveryjs/node-modules
package (which is also based on @discoveryjs/scan-fs
) to retrieve the data and get the necessary details about the packages. As a result, collect-node-modules-data.js
greatly simplified:
const fetchNodeModules = require('@discoveryjs/node-modules'); module.exports = function() { return fetchNodeModules(); };
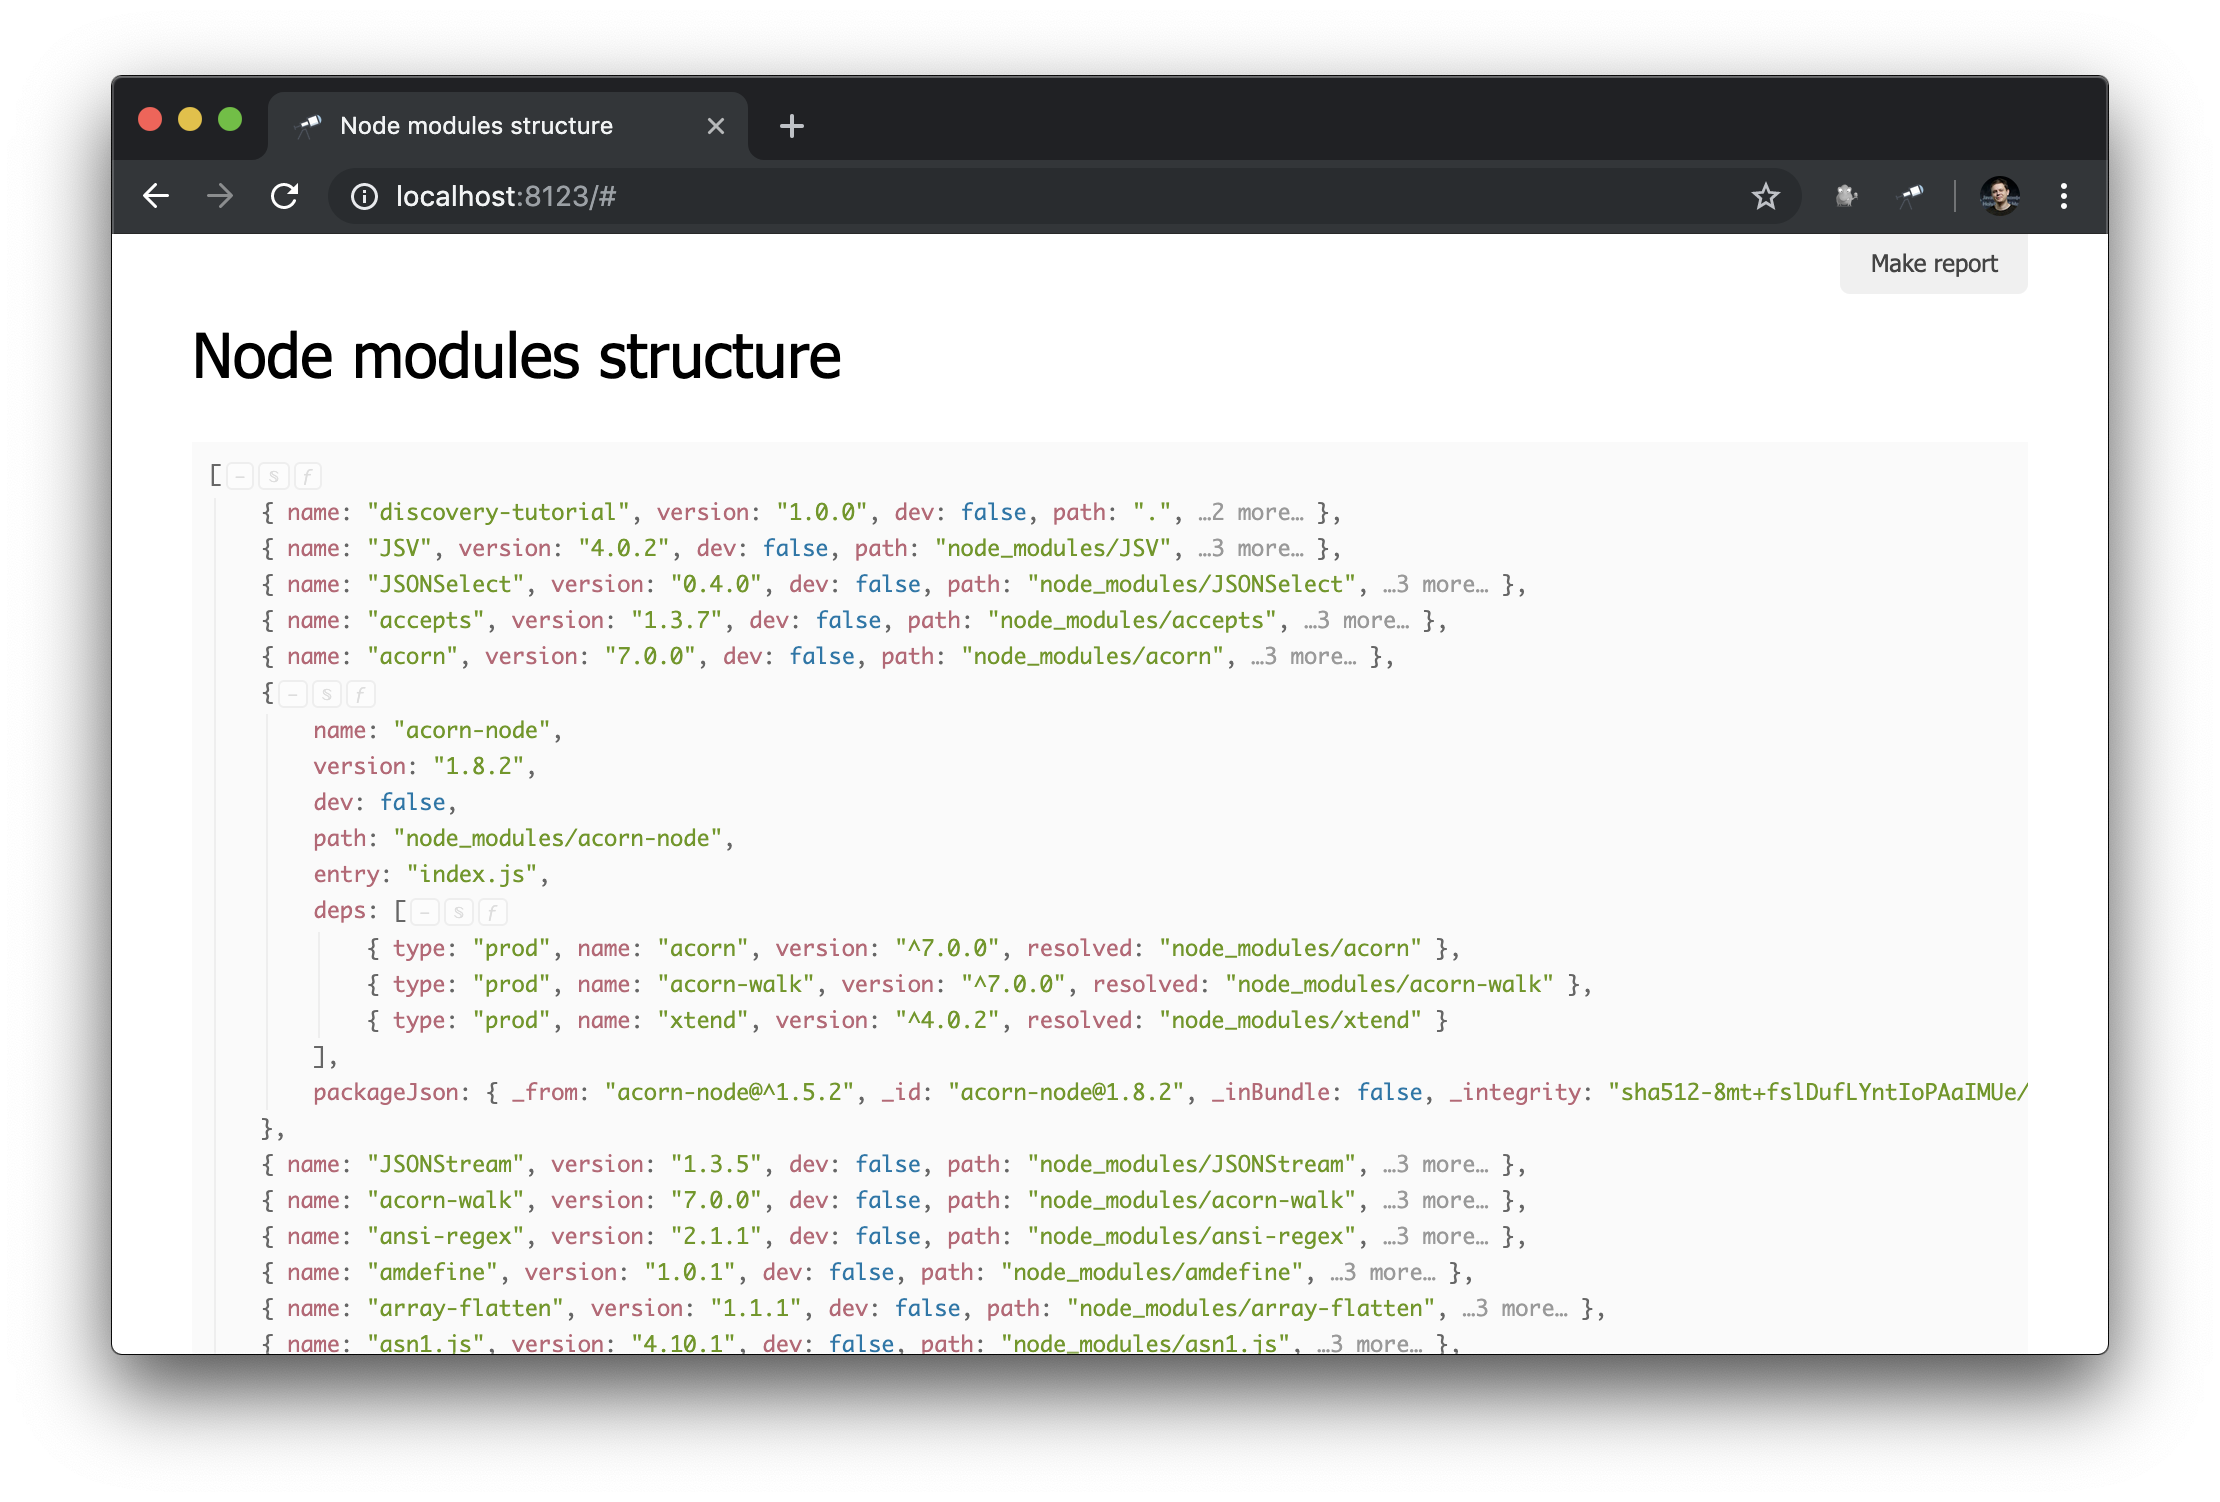
Now the information about node_modules
looks like this:
Preparation script
As you may have noticed, some objects describing packages contain deps
- a list of dependencies. Each dependency has a resolved
field, the value of which is a reference to a physical instance of the package. Such a link is the path
value of one of the packages, it is unique. To resolve the link to the package, you need to use additional code (for example, #.data.pick(<path=resolved>)
). And of course, it would be much more convenient if such links were already resolved into object references.
Unfortunately, at the stage of data collection, we cannot resolve the links, as this will lead to circular connections, which will create the problem of transferring such data in the form of JSON. However, there is a solution: this is a special prepare
script. It is defined in the configuration and called each time a new data is assigned to the Discovery instance. Let's start with the configuration:
module.exports = { ... prepare: __dirname + '/prepare.js', // : , ... };
Define prepare.js
:
discovery.setPrepare(function(data) { // - data / discovery });
In this module, we defined the prepare
function for the Discovery instance. This function is called each time before applying data to the Discovery instance. This is a good place to allow values in object references:
discovery.setPrepare(function(data) { const packageIndex = data.reduce((map, pkg) => map.set(pkg.path, pkg), new Map()); data.forEach(pkg => pkg.deps.forEach(dep => dep.resolved = packageIndex.get(dep.resolved) ) ); });
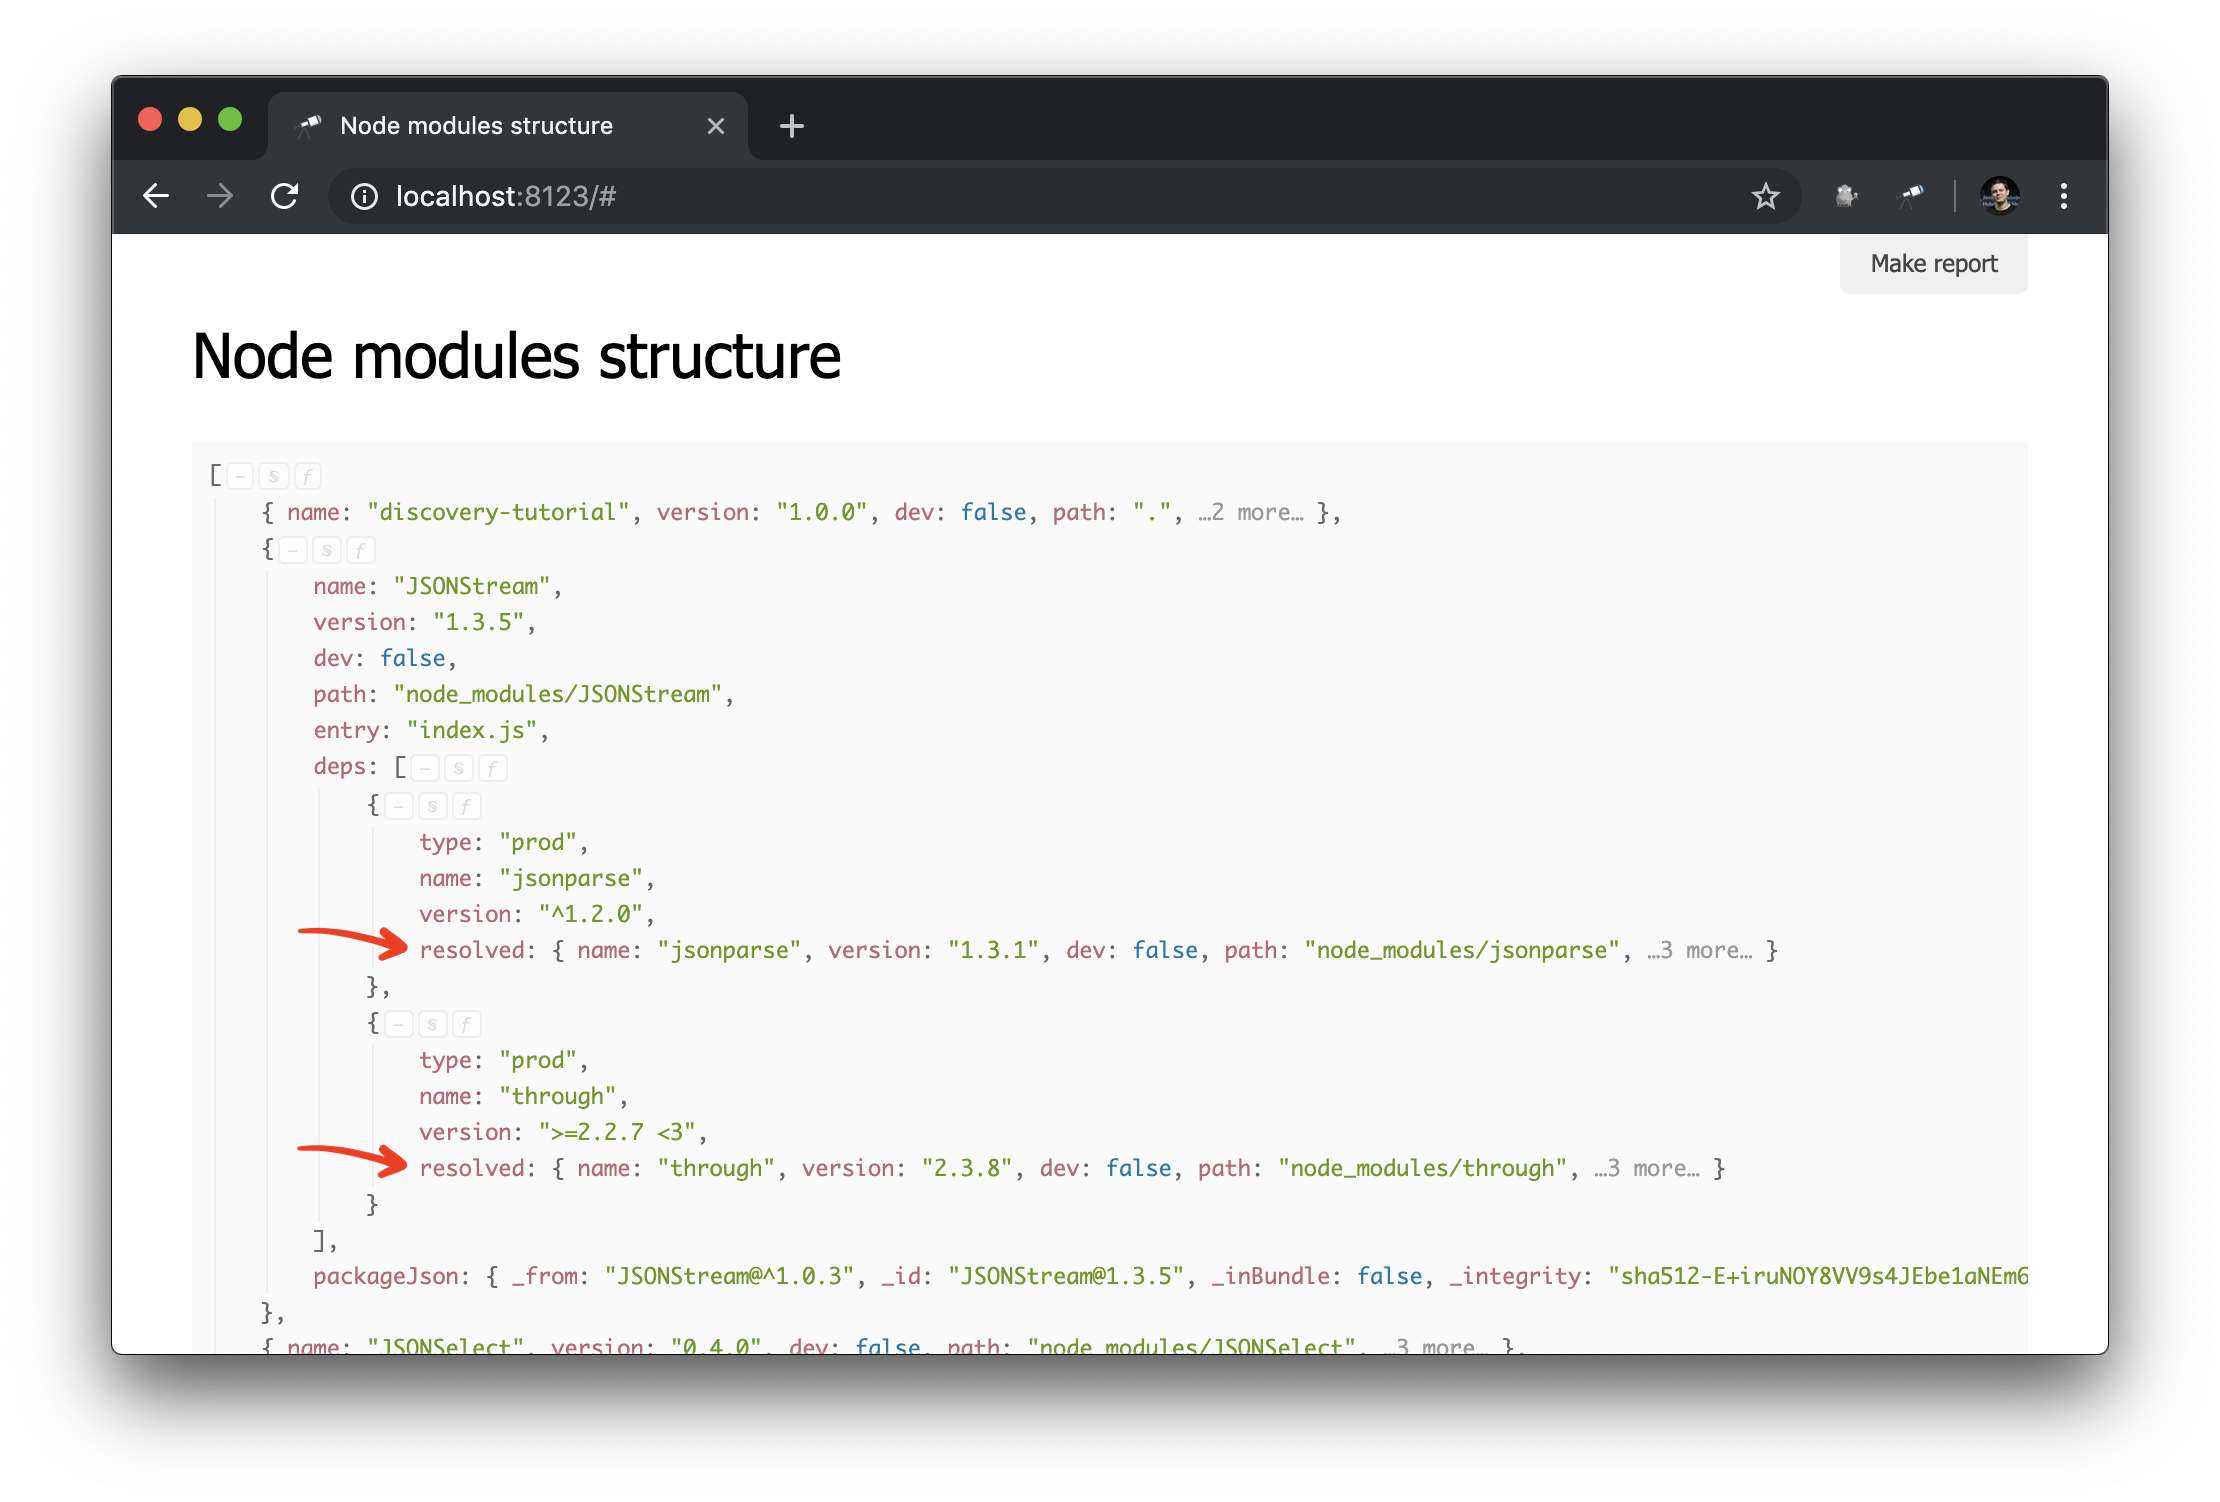
Here we have created a package index in which the key is the package path
value (unique). Then we go through all the packages and their dependencies, and in the dependencies we replace the resolved
value with a reference to the package object. Result:
Now it is much easier to make dependency graph queries. This is how you can get a cluster of dependencies (i.e. dependencies, dependency dependencies, etc.) for a specific package:
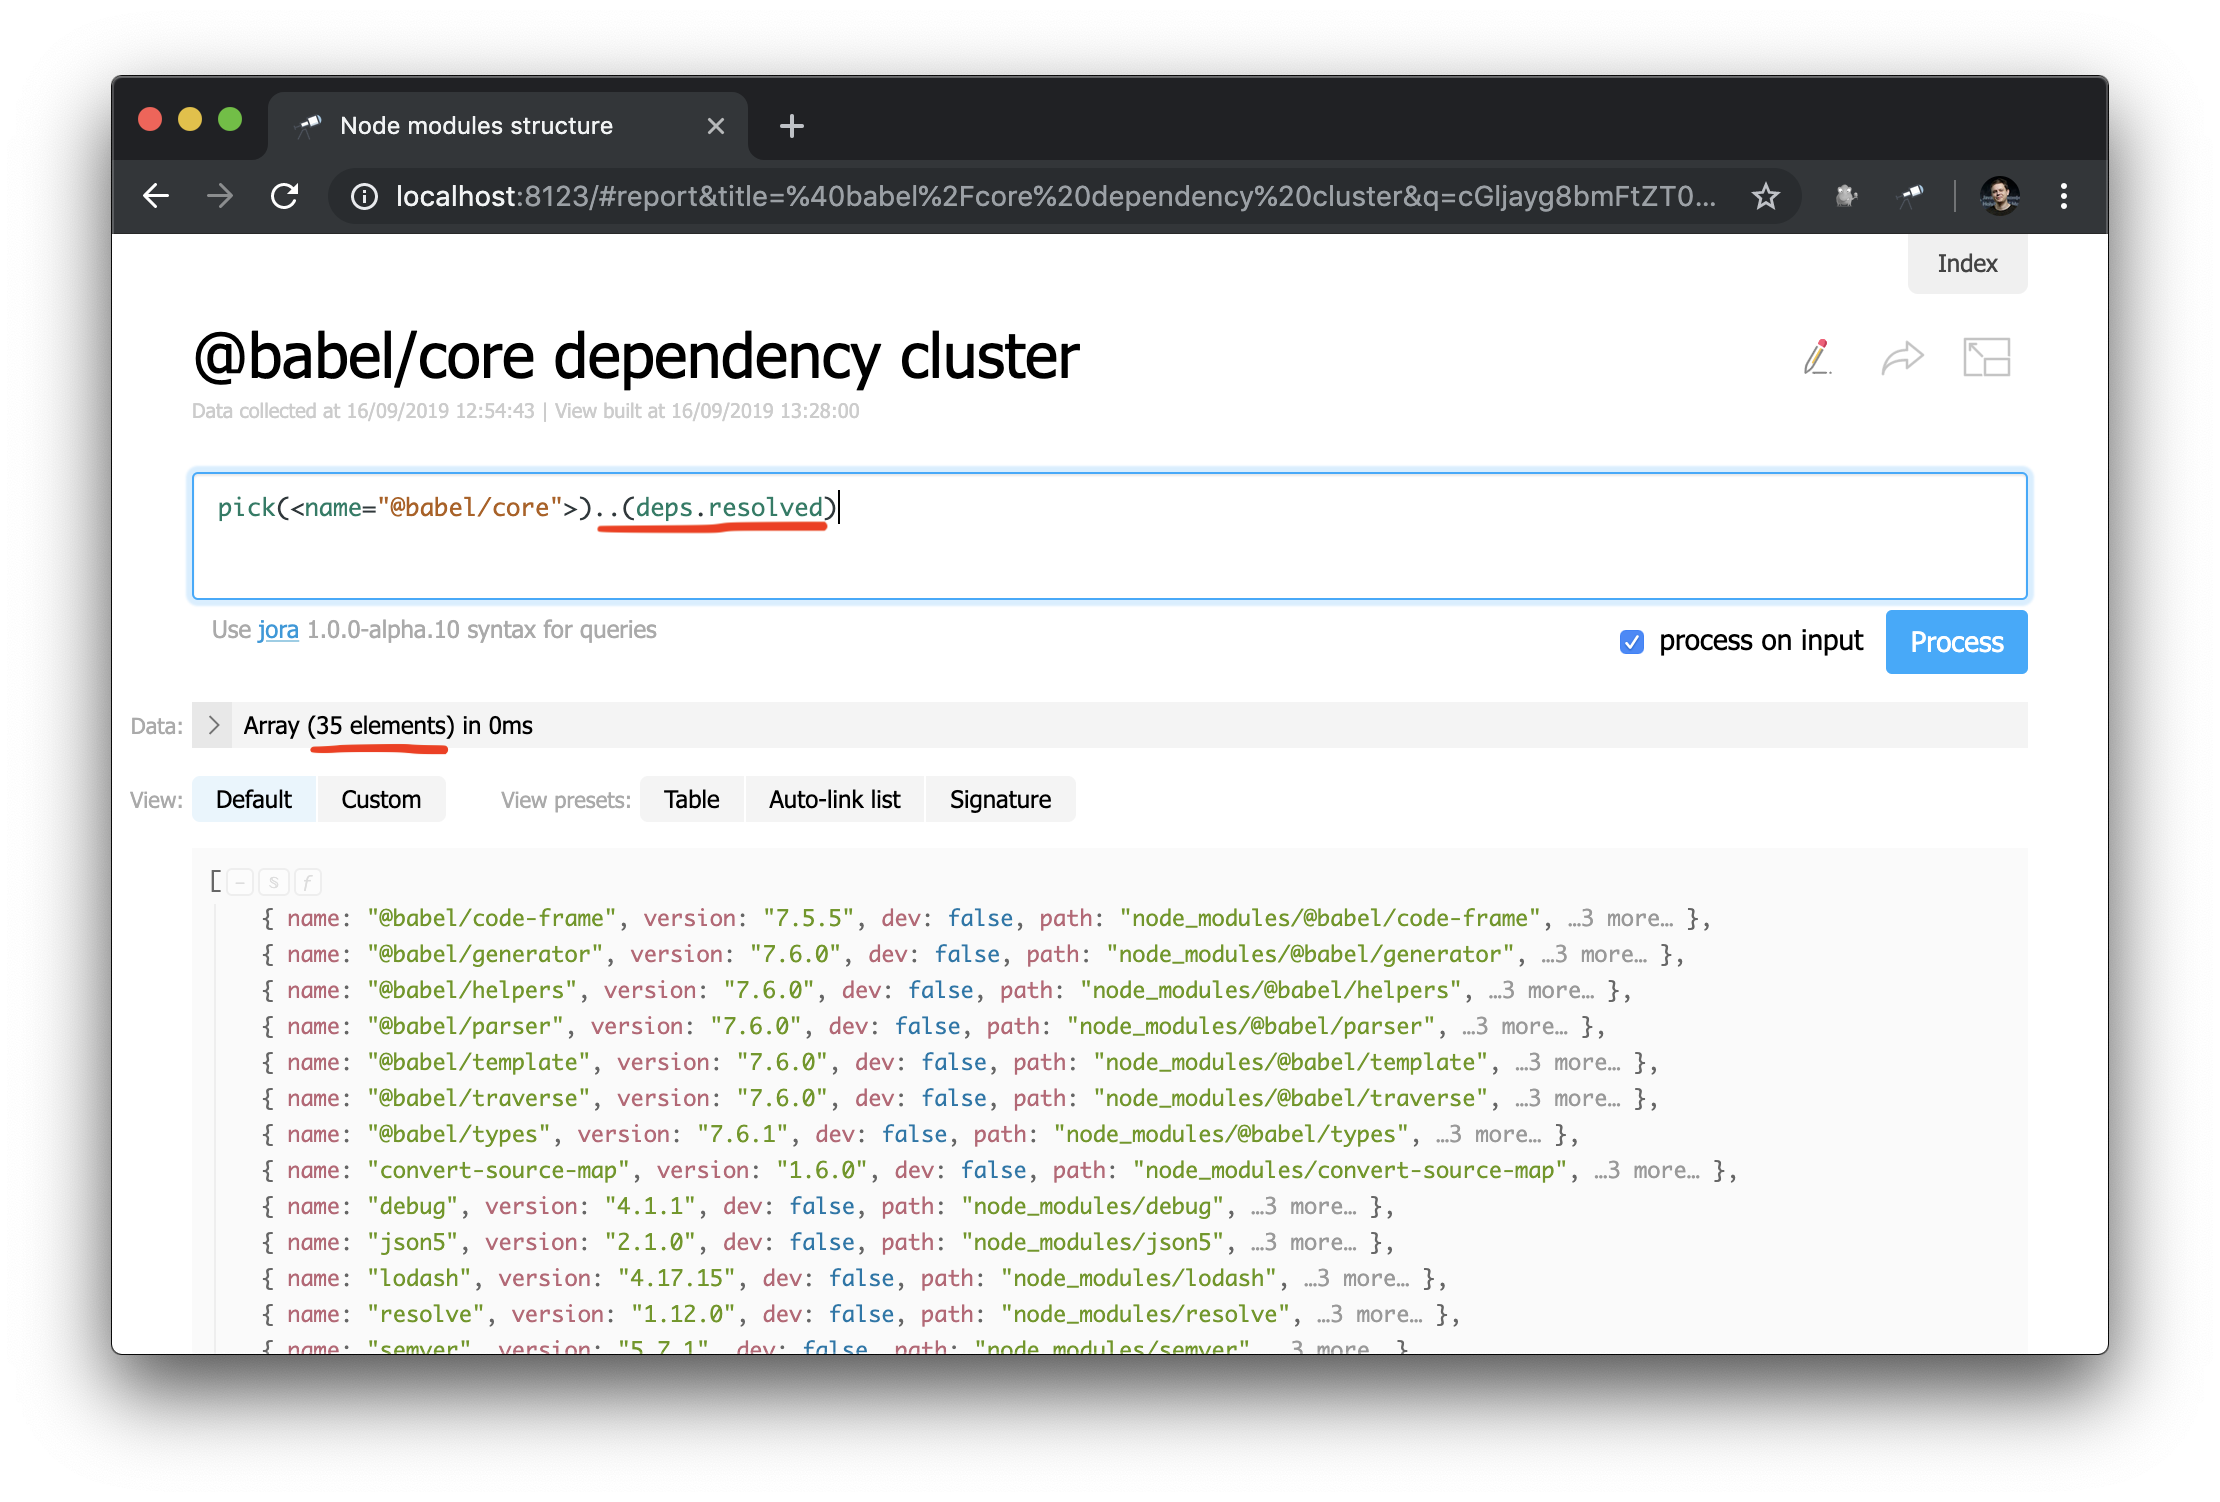
An unexpected success story: while studying the data during the writing of the manual, I found a problem in@discoveryjs/cli
(using the query.[deps.[not resolved]]
), which had a typo in peerDependencies. The problem was fixed immediately. The case is a good example of how such tools help.
Perhaps the time has come to show on the start page several numbers and packages with takes.
Customize Start Page
First we need to create a page module, for example, pages/default.js
. We use default
, because this is the identifier for the start page, which we can override (in Discovery.js, you can override a lot). Let's start with something simple, for example:
discovery.page.define('default', [ 'h1:#.name', 'text:"Hello world!"' ]);
Now in the configuration you need to connect the page module:
module.exports = { name: 'Node modules structure', data: require('./collect-node-modules-data'), view: { assets: [ 'pages/default.js' // ] } };
Check in the browser:
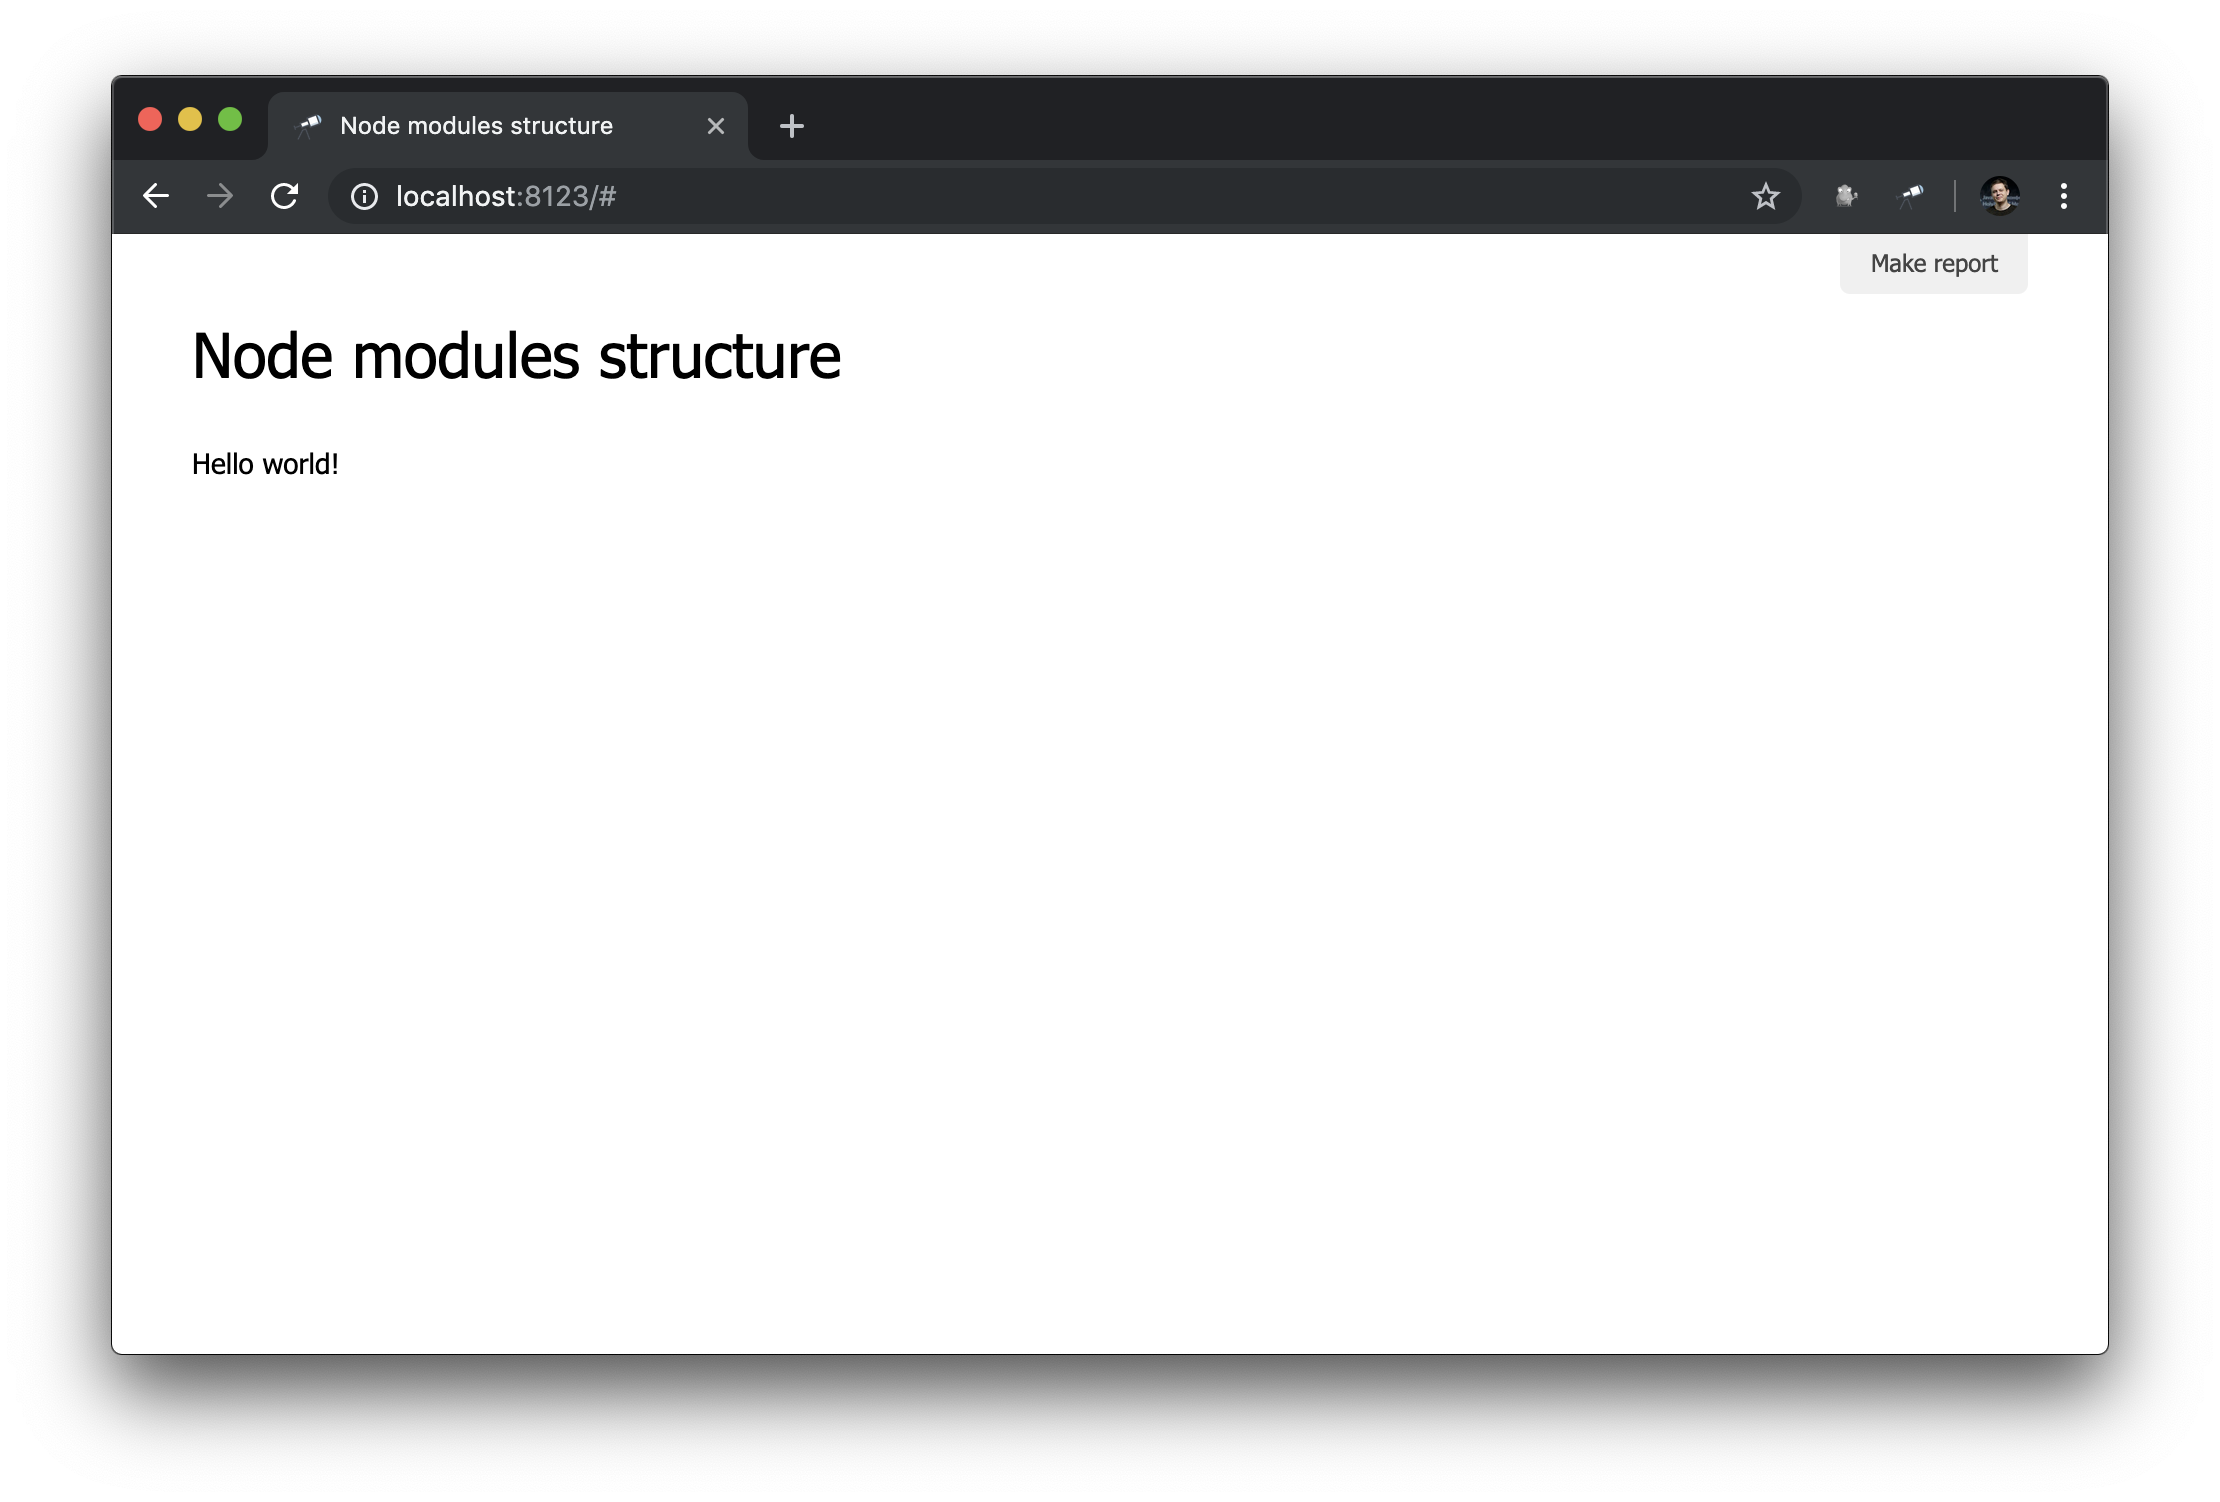
Works!
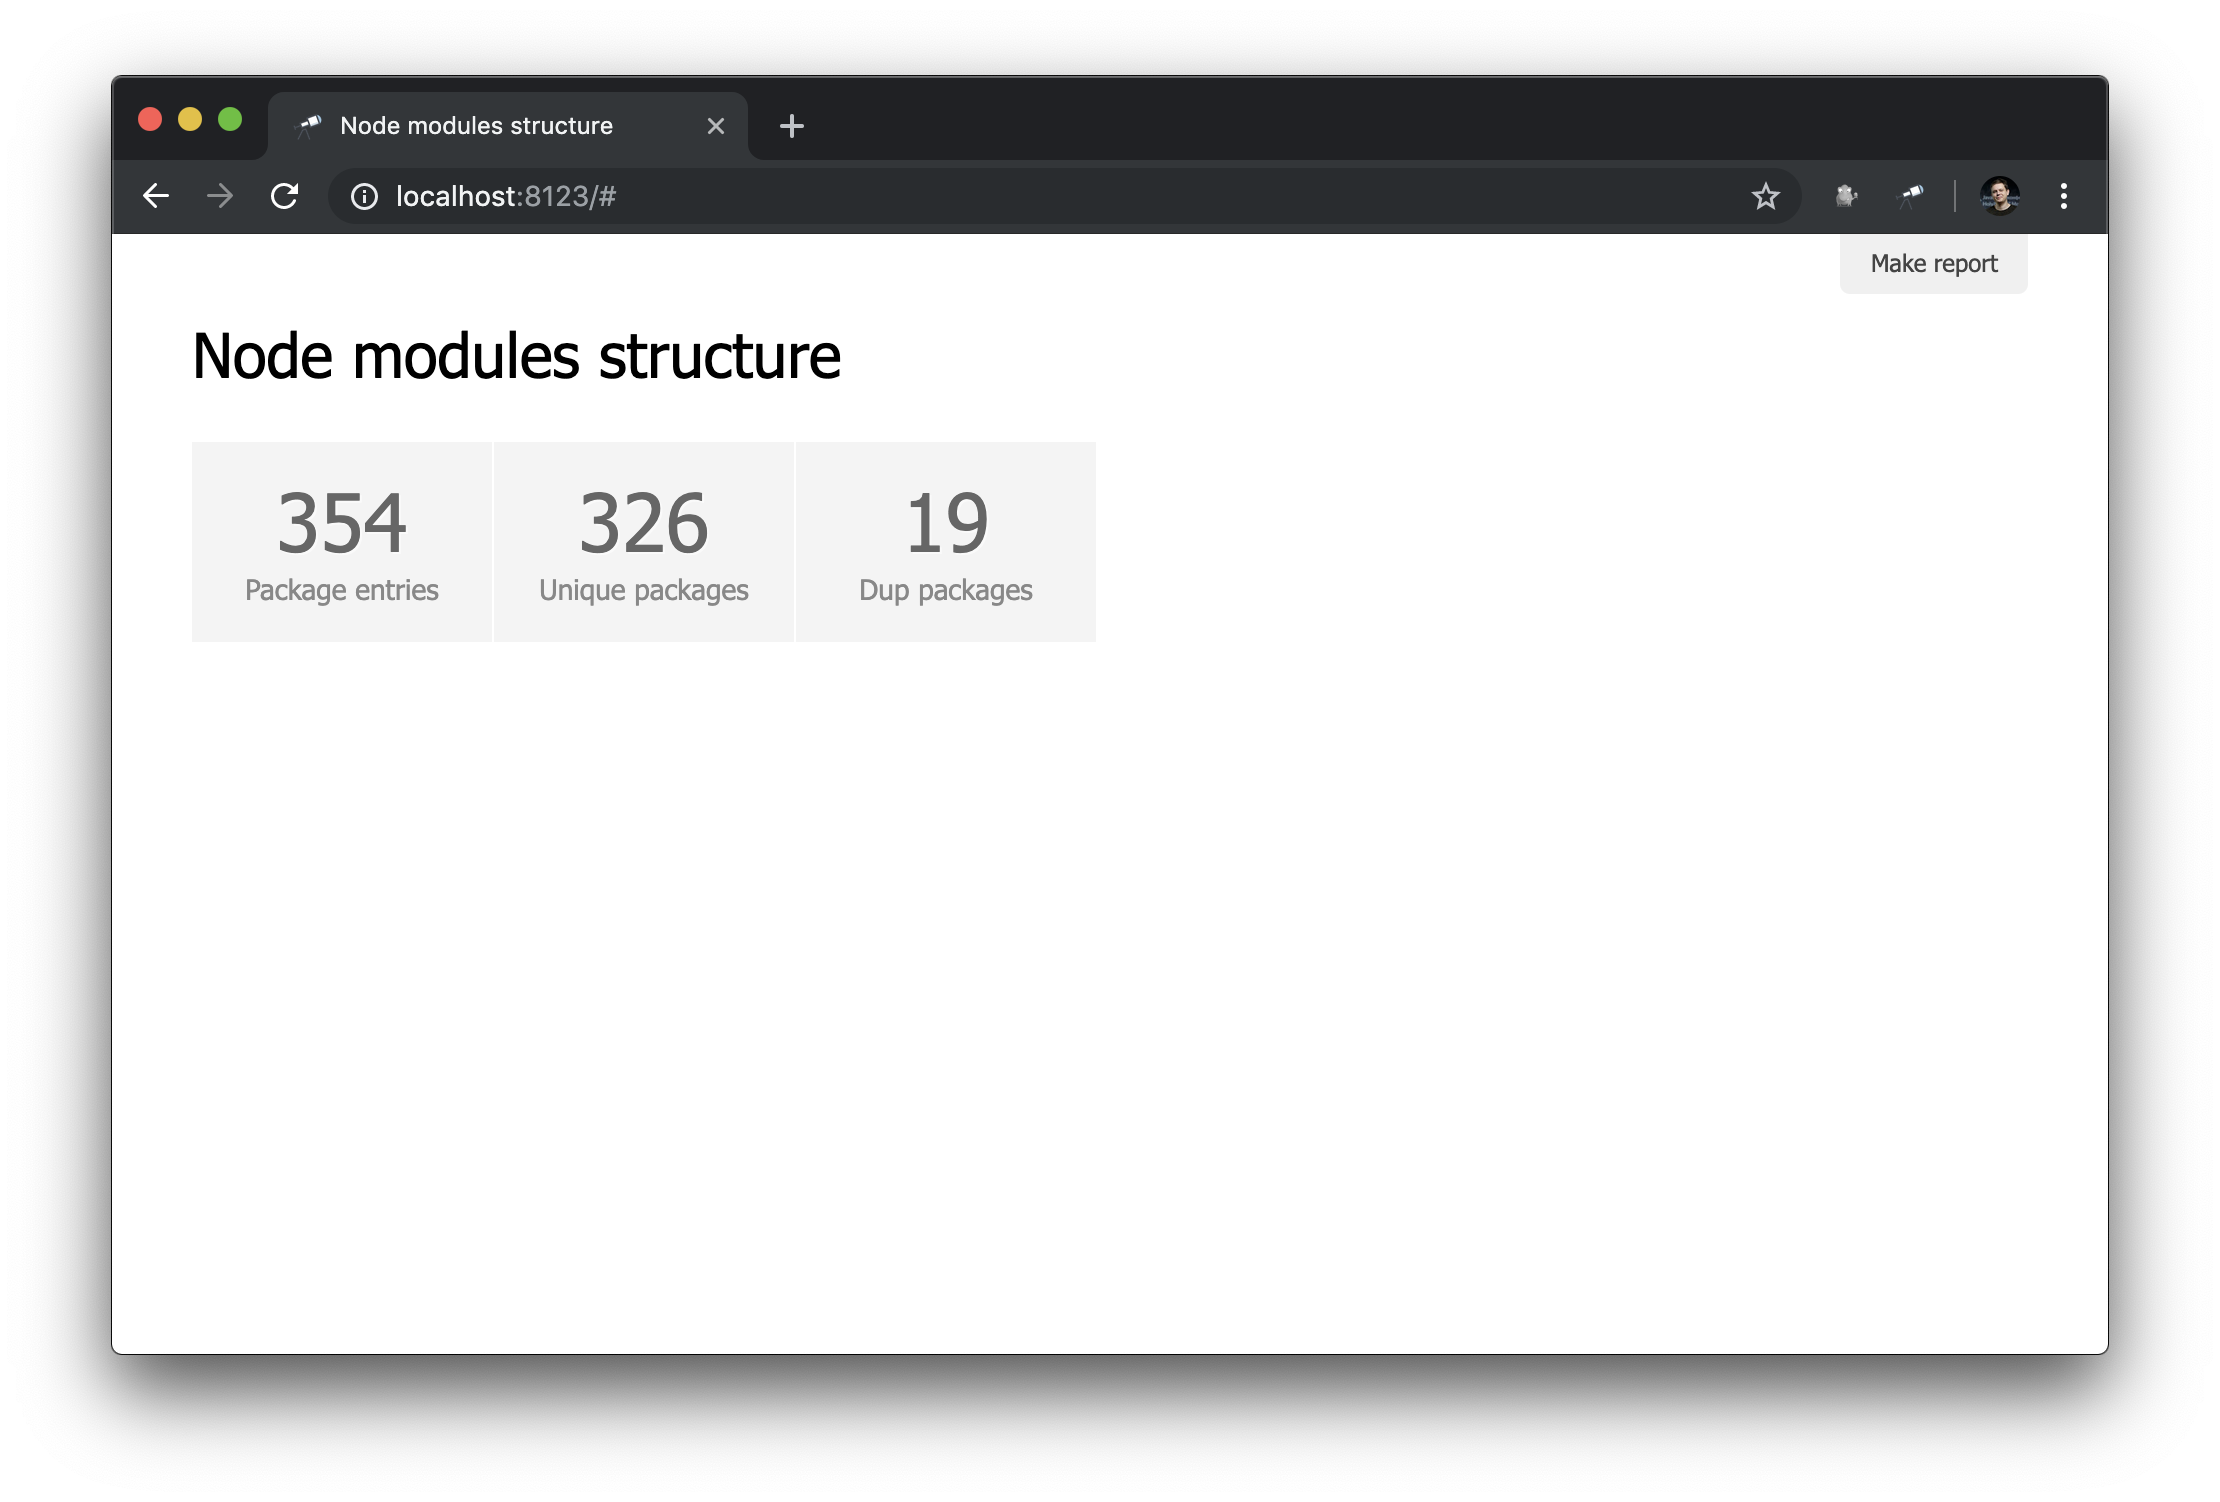
Now let's get some counters. To do this, make changes to pages/default.js
:
discovery.page.define('default', [ 'h1:#.name', { view: 'inline-list', item: 'indicator', data: `[ { label: 'Package entries', value: size() }, { label: 'Unique packages', value: name.size() }, { label: 'Dup packages', value: group(<name>).[value.size() > 1].size() } ]` } ]);
Here we define an inline list of indicators. The data
value is a Jora query that creates an array of records. The list of packages (data root) is used as the basis for queries, so we get the list length ( size()
), the number of unique package names ( name.size()
) and the number of package names that have duplicates ( group(<name>).[value.size() > 1].size()
).
Not bad. Nevertheless, it would be better to have, in addition to numbers, links to the corresponding samples:
discovery.page.define('default', [ 'h1:#.name', { view: 'inline-list', data: [ { label: 'Package entries', value: '' }, { label: 'Unique packages', value: 'name' }, { label: 'Dup packages', value: 'group(<name>).[value.size() > 1]' } ], item: `indicator:{ label, value: value.query(#.data, #).size(), href: pageLink('report', { query: value, title: label }) }` } ]);
First of all, we changed the value of data
, now it is a regular array with some objects. Also, the size()
method has been removed from value requests.
In addition, a subquery has been added to the indicator
view. These types of queries create a new object for each element in which value
and href
are calculated. For value
, a query is executed using the query()
method, into which data is transferred from the context, and then the size()
method is applied to the query result. For href
, the pageLink()
method is used, which generates a link to the report page with a specific request and header. After all these changes, the indicators became clickable (note that their values have turned blue) and more functional.
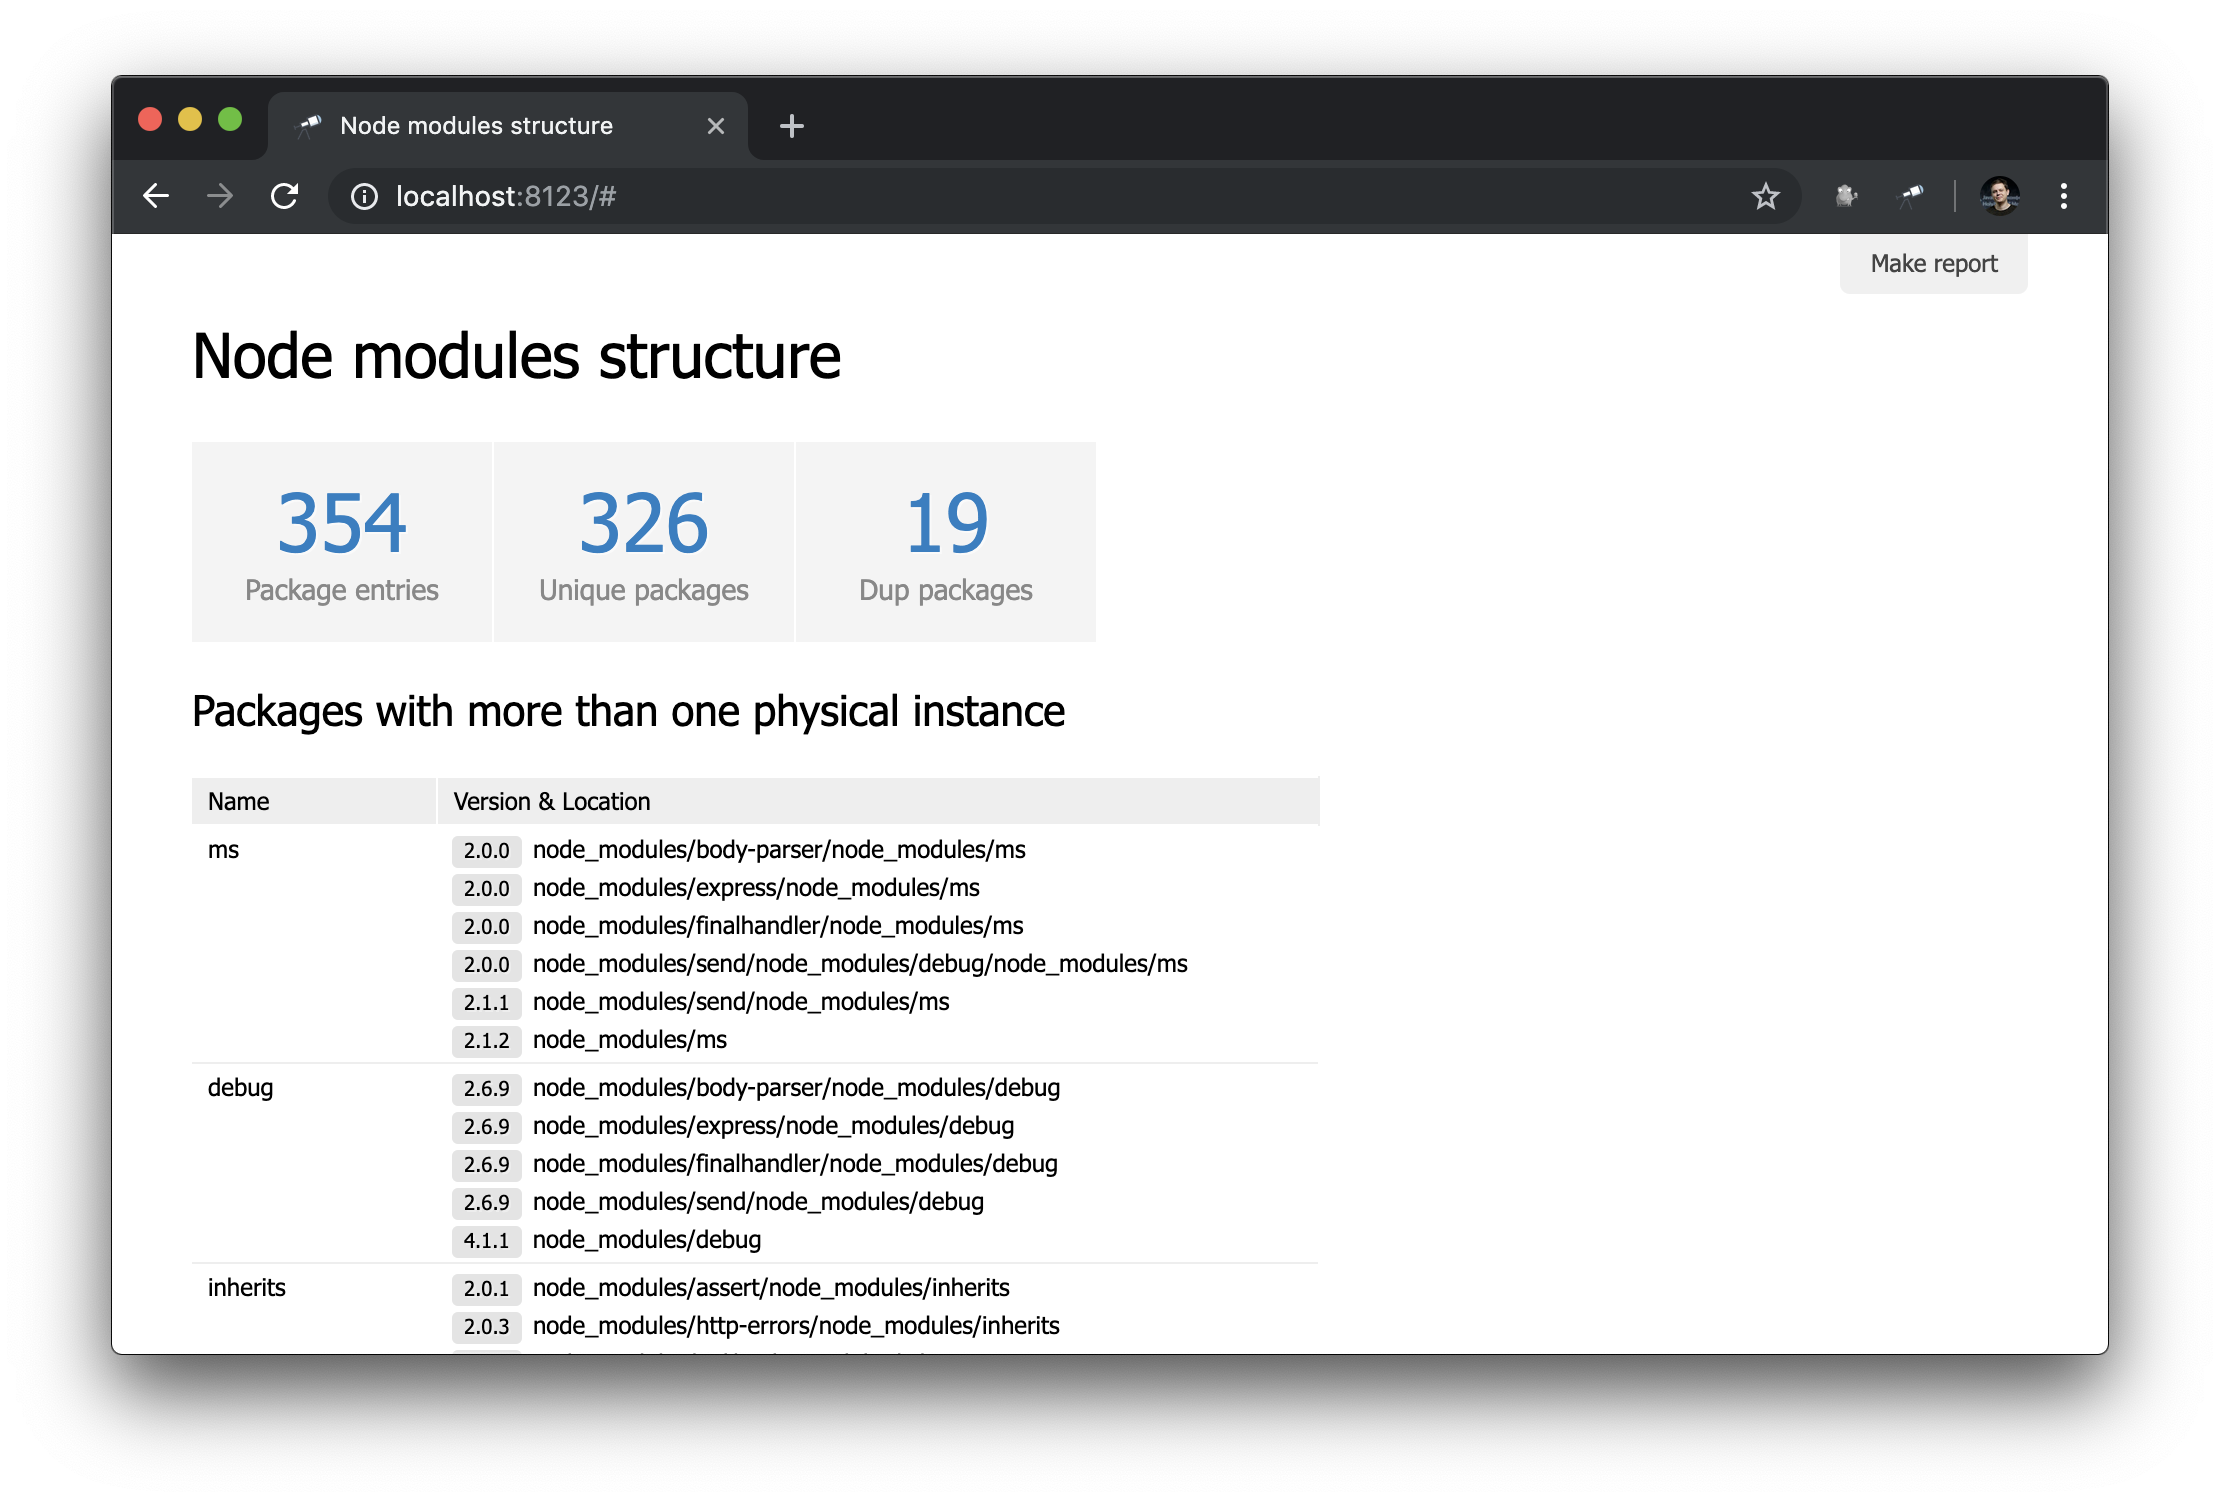
To make the start page more useful, add a table with packages that have duplicates.
discovery.page.define('default', [ // ... 'h2:"Packages with more than one physical instance"', { view: 'table', data: ` group(<name>) .[value.size() > 1] .sort(<value.size()>) .reverse() `, cols: [ { header: 'Name', content: 'text:key' }, { header: 'Version & Location', content: { view: 'list', data: 'value.sort(<version>)', item: [ 'badge:version', 'text:path' ] } } ] } ]);
The table uses the same data as the Dup packages
indicator. The list of packages was sorted by group size in reverse order. The rest of the setup is related to the columns (by the way, usually they do not need to be tuned). For the Version & Location
column, we defined a nested list (sorted by version), in which each element is a pair of the version number and the path to the instance.
Package Page
Now we have only a general overview of packages. But it would be useful to have a page with details about a particular package. To do this, create a new module pages/package.js
and define a new page:
discovery.page.define('package', { view: 'context', data: `{ name: #.id, instances: .[name = #.id] }`, content: [ 'h1:name', 'table:instances' ] });
In this module, we defined the page with the identifier package
. The context
component was used as the initial representation. This is a non-visual component that helps you define data for nested mappings. Note that we used #.id
to get the name of the package, which is retrieved from a URL like this http://localhost:8123/#package:{id}
.
Do not forget to include the new module in the configuration:
module.exports = { ... view: { assets: [ 'pages/default.js', 'pages/package.js' // ] } };
Result in the browser:
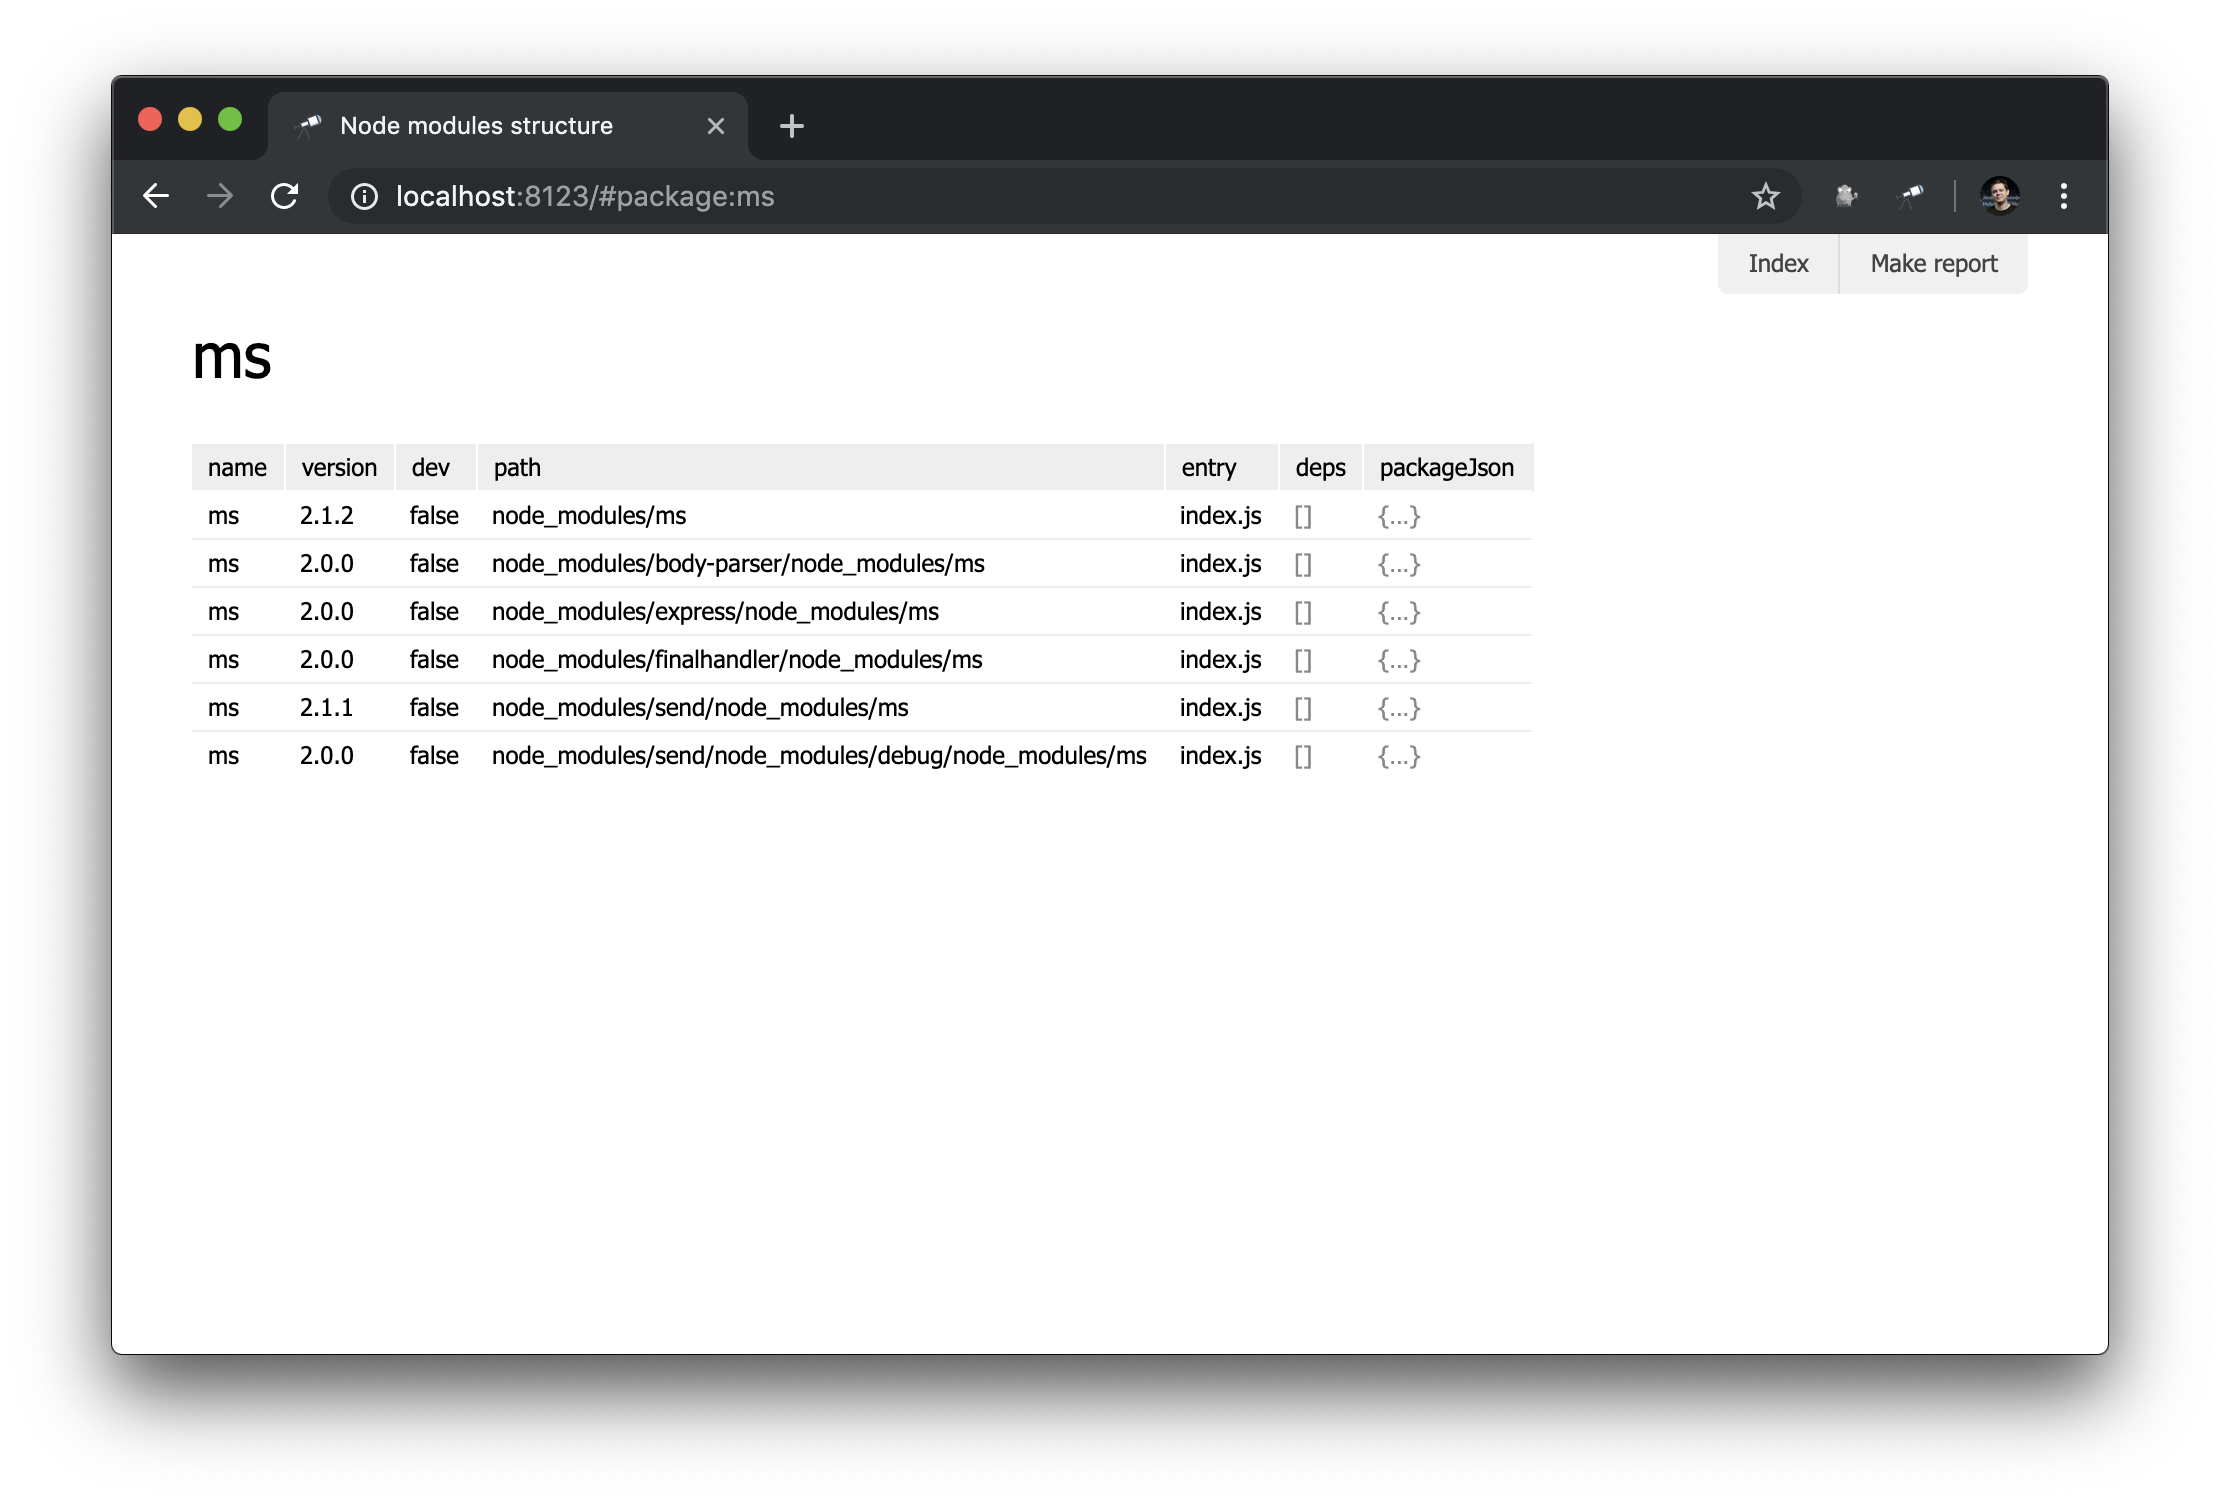
Not too impressive, but for now. We will create more complex mappings in subsequent manuals.
Side panel
Since we already have a package page, it would be nice to have a list of all packages. To do this, you can define a special view - sidebar
, which is displayed if defined (not defined by default). Create a new module views/sidebar.js
:
discovery.view.define('sidebar', { view: 'list', data: 'name.sort()', item: 'link:{ text: $, href: pageLink("package") }' });
Now we have a list of all the packages:
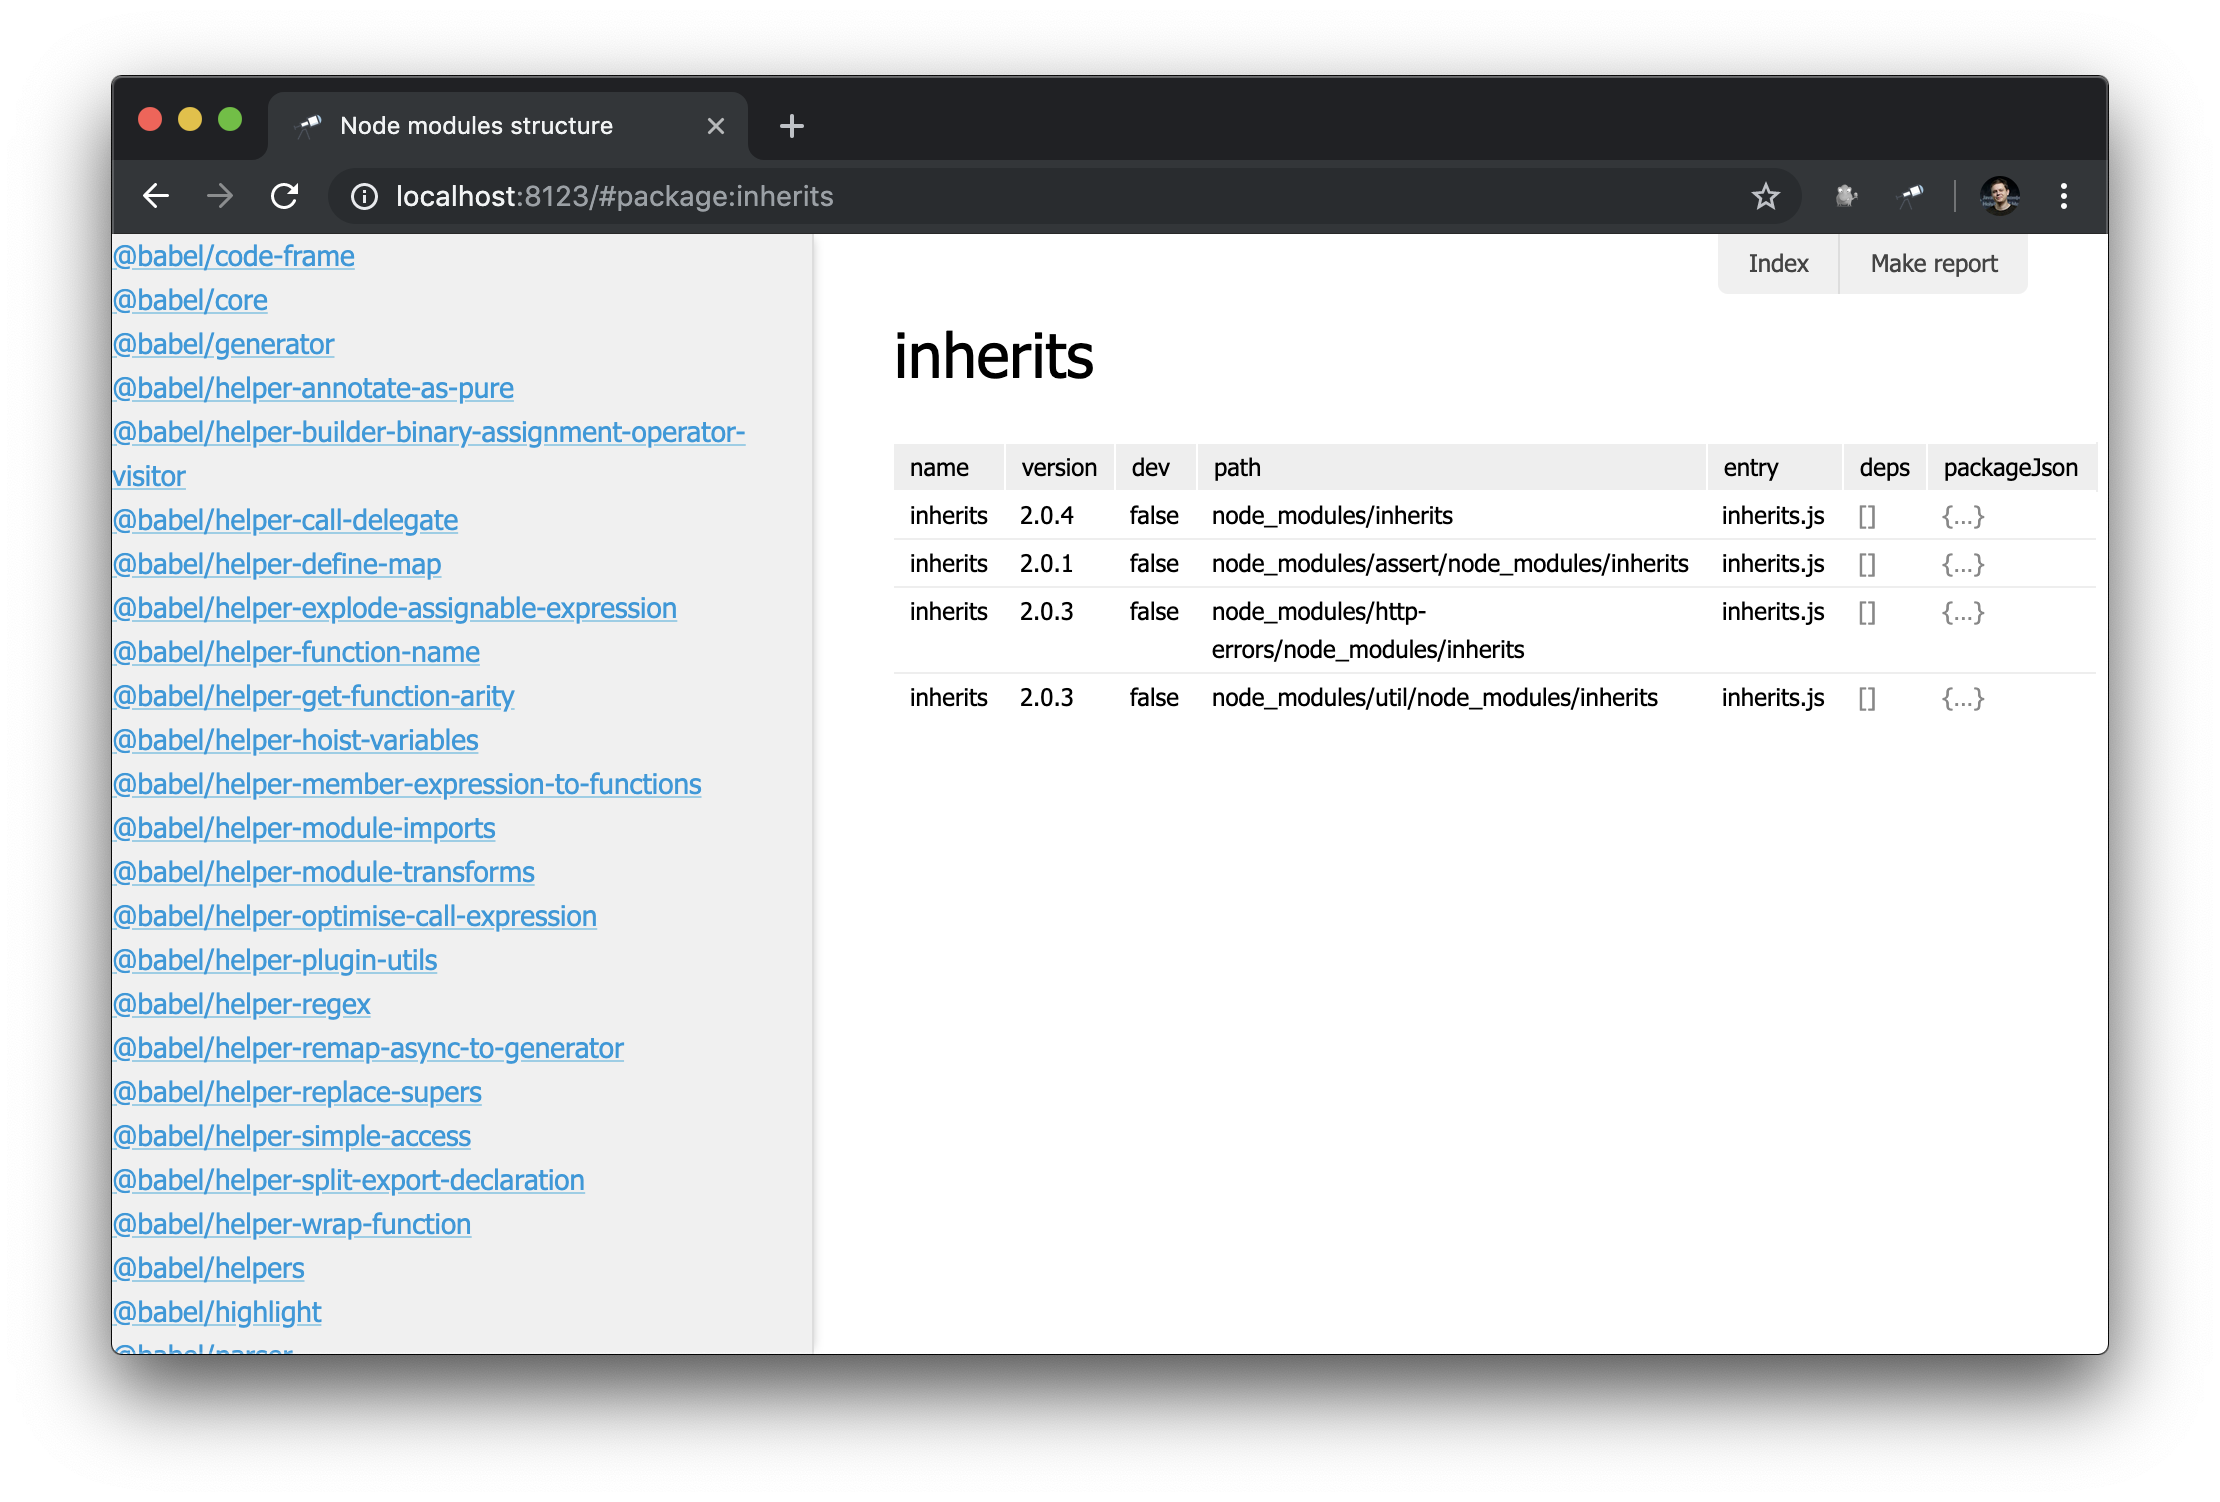
Looks good. But with a filter it would be even better. We expand the definition of sidebar
:
discovery.view.define('sidebar', { view: 'content-filter', content: { view: 'list', data: 'name.[no #.filter or $~=#.filter].sort()', item: { view: 'link', data: '{ text: $, href: pageLink("package"), match: #.filter }', content: 'text-match' } } });
Here we wrapped the list in a content-filter
component that converts the input value in the input field to regular expressions (or null
if the field is empty) and saves it as a filter
value in the context (the name can be changed with the name
option). We also used #.filter
to filter the data for the list. Finally, we used link mapping to highlight matching parts using text-match
. Result:

In case you do not like the default design, you can customize the styles as you wish. Let's say you want to change the width of the sidebar, for this you need to create a style file (say, views/sidebar.css
):
.discovery-sidebar { width: 300px; }
And add a link to this file in the configuration, as well as to JavaScript modules:
module.exports = { ... view: { assets: [ ... 'views/sidebar.css', // assets *.css 'views/sidebar.js' ] } };
AutoLinks
The final chapter of this guide is devoted to links. Earlier, using the pageLink()
method, we made a link to the package page. But in addition to the link, you must also set the link text. But how would we make it easier?
To simplify the work of links, we need to define a rule for generating links. This is best done in the prepare
script:
discovery.setPrepare(function(data) { ... const packageIndex = data.reduce( (map, item) => map .set(item, item) // key is item itself .set(item.name, item), // and `name` value new Map() ); discovery.addEntityResolver(value => { value = packageIndex.get(value) || packageIndex.get(value.name); if (value) { return { type: 'package', id: value.name, name: value.name }; } }); });
We added a new map (index) of packages and used it for entity resolver. The entity resolver tries, if possible, to convert the value passed to it into the entity descriptor. The descriptor contains:
-
type
- entity type -
id
- a unique reference to an entity instance used in links as an ID -
name
- used as link text
Finally, you need to assign this type to a specific page (the link should lead somewhere, right?).
discovery.page.define('package', { ... }, { resolveLink: 'package' // `package` });
The first consequence of these changes is that some values in the struct
view are now marked with a link to the package page:
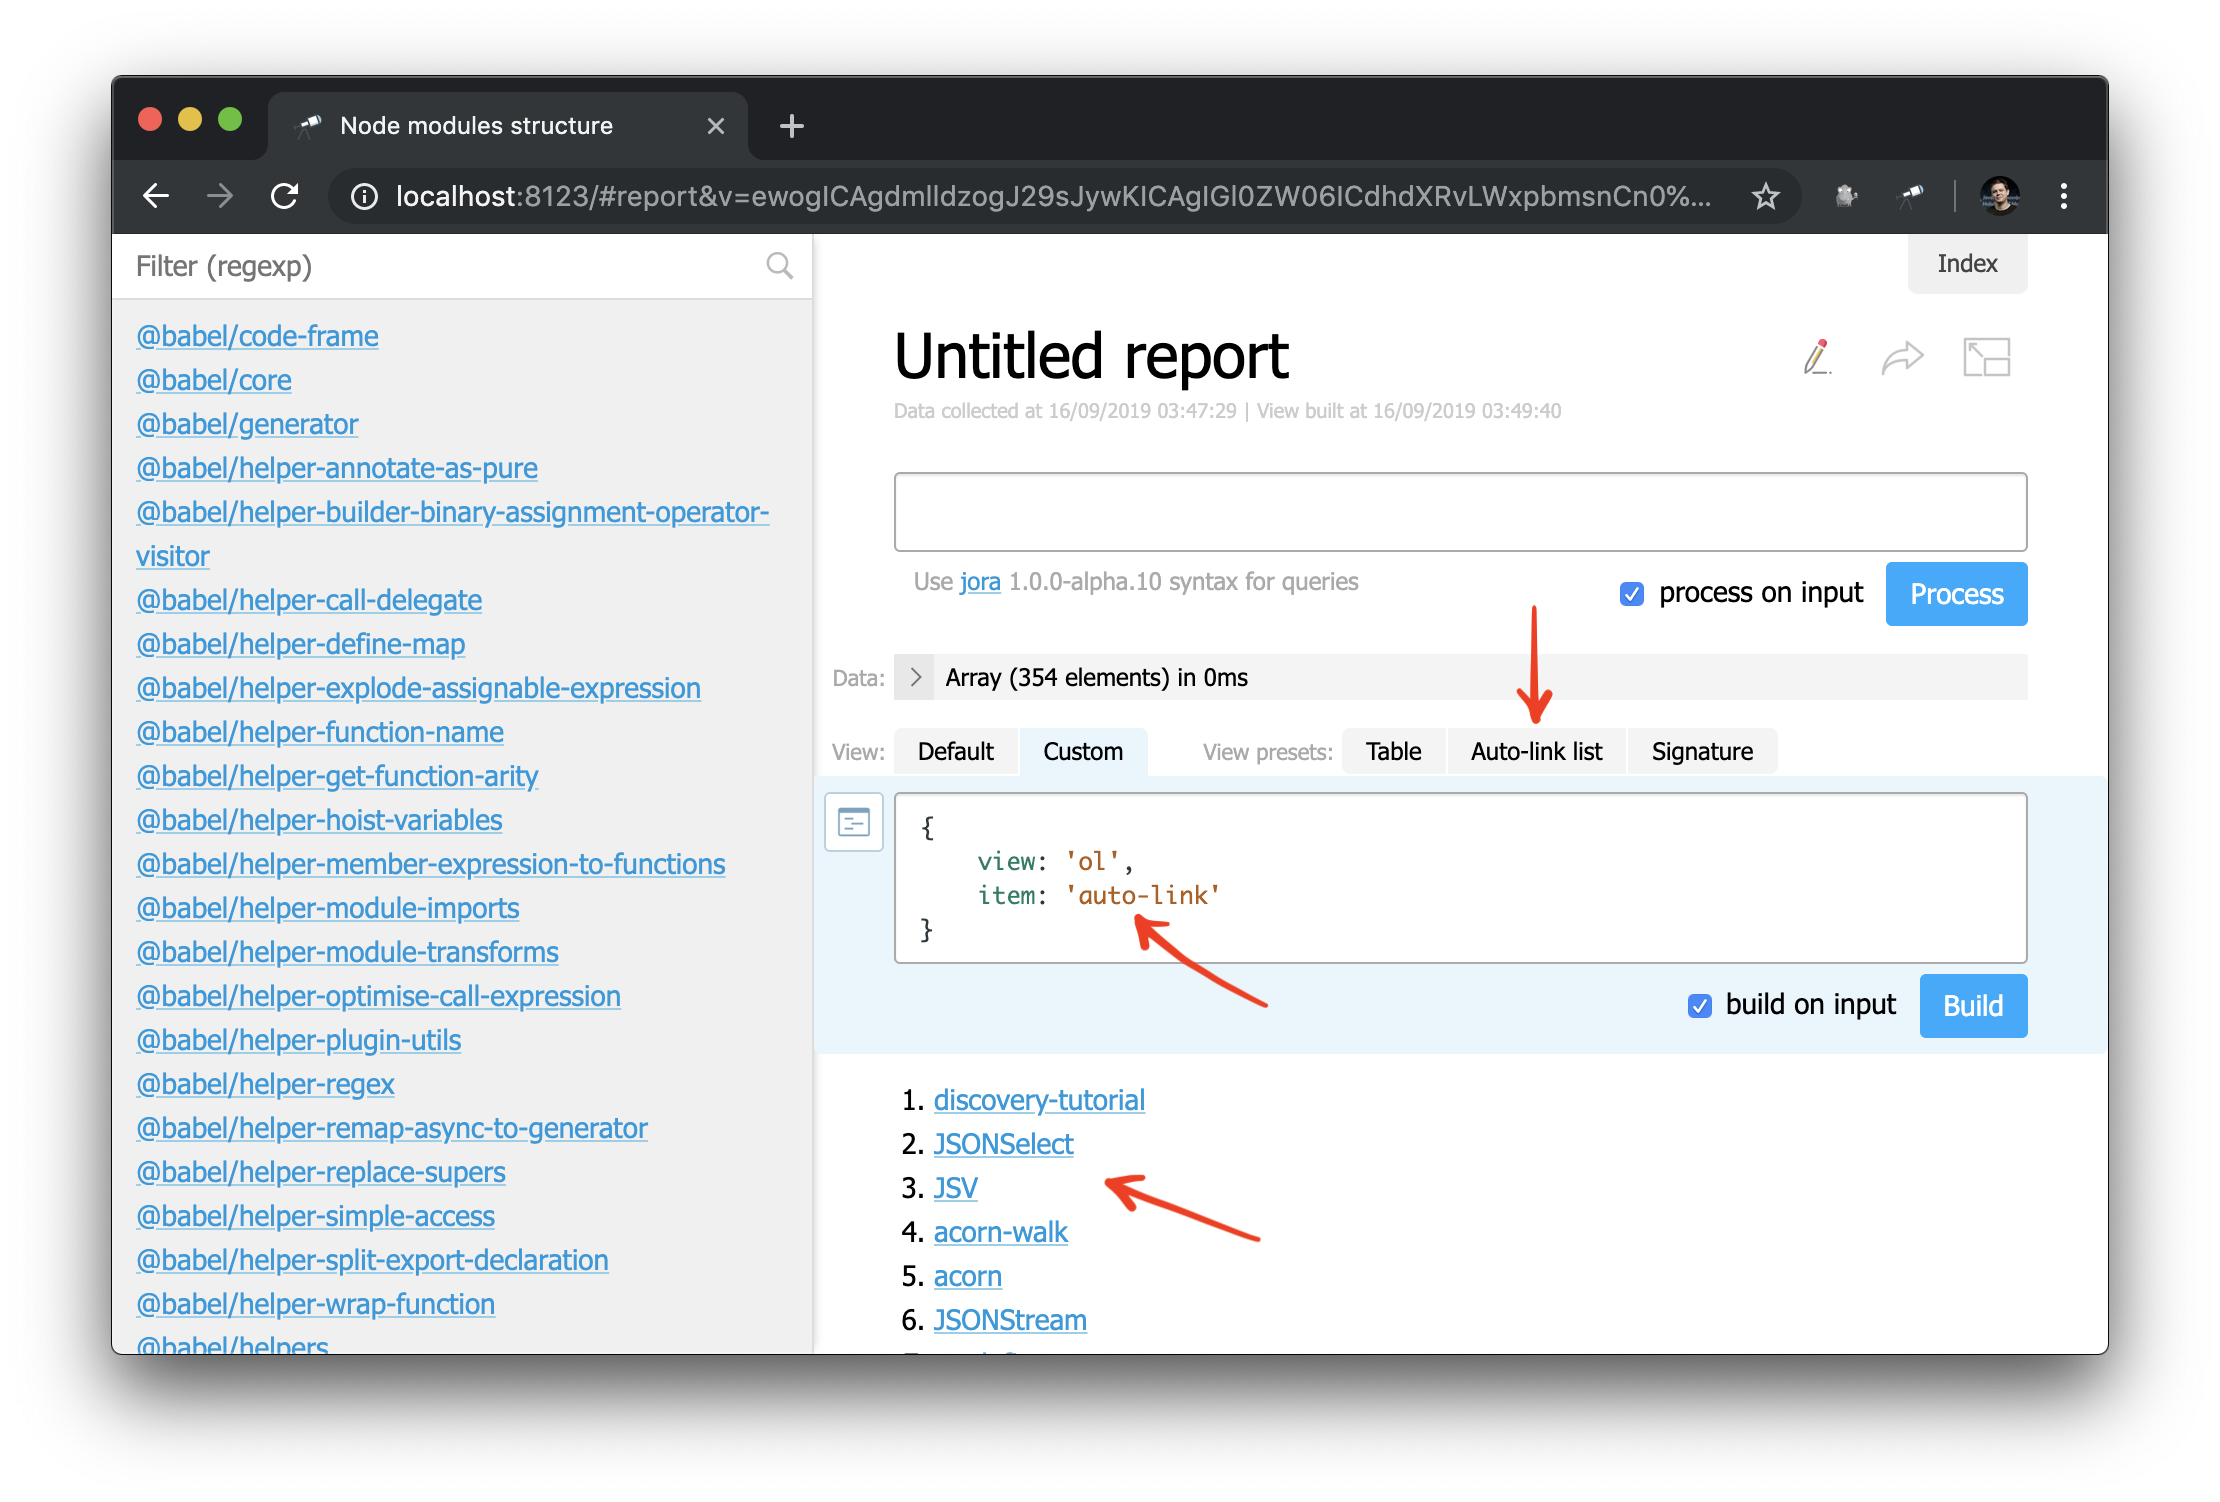
And now you can also apply the auto-link
component to an object or package name:
And, as an example, you can slightly rework the sidebar:
// item: { view: 'link', data: '{ text: $, href: pageLink("package"), match: #.filter }', content: 'text-match' }, // `auto-link` item: { view: 'auto-link', content: 'text-match:{ text, match: #.filter }' }
Conclusion
You now have a basic understanding of the key concepts of Discovery.js . In the following guides we will take a closer look at the topics covered.
You can view the entire source code of the manual in the repository on GitHub or try how it works online .
Follow @js_discovery on Twitter to keep up with the latest news!
All Articles